


一. 类的两个特征
1.静态特征:静态特征也叫做属性,举个例子:电脑的品牌,型号,显卡,cpu等属性的信息就叫做静态特征
2.动态特征:动态特征叫做方法/函数 举个例子:电脑能做些什么就叫做动态特征,比如电脑可以看电视,玩游戏,开机关机等一些动作就是动态特征。
二. 类的创建与使用
创建类使用class关键字,类名首字母要大写
constructor:构造函数
//  class 类的关键词
// Person 类名首字母默认大写,不符合规范
class Person{
    // 构造函数
    constructor(name:string,sex:string,age:number){
        this.name=name
        this.sex=sex
        this.age=age
    }
    name:string
    sex:string
    age:number
    // 方法
    chi() {
        console.log('吃饭');
    }
    he(){
        console.log('喝水');
    }
}
三. 对象
对象也是类的实例,
创建对象的语法: let 对象名:类名=new 类名(构造函数的参数)
修改对象与查看对象属性: 通过对象名.属性名就可以访问 重新赋值就修改了该对象属性的值
调用方法语法:对象名.方法名()
class Person{
    // 构造函数
    constructor(name:string,sex:string,age:number){
        this.name=name
        this.sex=sex
        this.age=age
    }
    name:string
    sex:string
    age:number
    // 方法
    chi() {
        console.log('吃饭');
    }
    he(){
        console.log('喝水');
    }
}

// 对象 类的实例
// 创建对象 实例化对象
let ls:Person=new Person('李四','男',18)
// 通过对象名.属性 进行访问
ls.name='潇潇'
console.log(ls.name);

console.log(ls);
ls.chi()
ls.he()
运行结果:

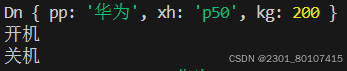
简单练习 声明一个电脑类 属性: 品牌 型号 重量 方法:开机 关机
class Dn{
    constructor(pp:string,xh:string,kg:number){
        this.pp=pp
        this.xh=xh
        this.kg=kg
    }
    pp:string
    xh:string
    kg:number

    kj(){
        console.log('开机');

    }
    gj(){
        console.log('关机');

    }
}

let Dn1:Dn=new Dn('华为','p50',200)
console.log(Dn1);
Dn1.kj()
Dn1.gj()
运行结果:
四. 实例------------表单的验证
4.1效果图展示
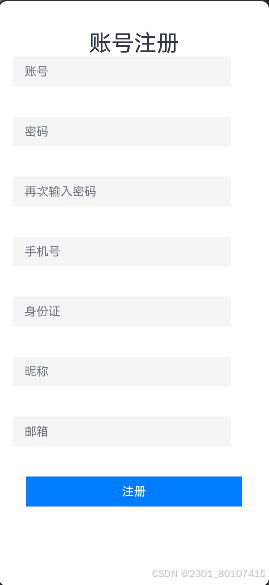
4.2创建类并将实例对象放入数组中
代码含义:
val:输入框默认值
isFlag:默认第一次进入 1:验证成功 2:验证失败
Msg:提示词
msgErr:错误提示词
pat:正则规则
notNull:不能为空
class Reg{
  val:string
  isFlag:number
  Msg:string
  msgErr:string
  pat:string
  notNull:string

  constructor( val:string,isFlag:number,Msg:string,msgErr:string,pat:string,notNull:string) {
    this.val=val
    this.isFlag=isFlag
    this.Msg=Msg
    this.msgErr=msgErr
    this.pat=pat
    this.notNull=notNull
  }
}
声明reg对象数组 把实例化对象放入数组中
aboutToAppear() 启动页面自动执行函数中的内容
 @State reg:Reg[]=[]
  //aboutToAppear()启动页面自动执行函数中的内容
  aboutToAppear(): void {
    let r1:Reg=new Reg('',0,'','账号为6-12位单词字符','^\\w{6,12}$','账号不能为空')
    let r2:Reg=new Reg('',0,'','密码为6-12位单词字符','^\\w{6,12}$','密码不能为空')
    let r3:Reg=new Reg('',0,'','密码不一致','^\\w{6,12}$','确认密码不能为空')
    let r4:Reg=new Reg('',0,'','手机号不正确','^\\d{10}$','手机号不能为空')
    let r5:Reg=new Reg('',0,'','身份证输入不正确','^\\d{17}[0-9Xx]$','身份证不能为空')
    let r6:Reg=new Reg('',0,'','昵称违规','^.+$','昵称不能为空')
    let r7:Reg=new Reg('',0,'','邮箱必须包含@.','^\\w+@\\w+\\.\\w+$','邮箱不能为空')
    this.reg.push(r1)
    this.reg.push(r2)
    this.reg.push(r3)
    this.reg.push(r4)
    this.reg.push(r5)
    this.reg.push(r6)
    this.reg.push(r7)
  }
4.3输入框
创建一个文本输入框设置onChange事件将输入的值赋值给reg对象数组中第一个val变量
如果第一个数组对象中的数据isFlag等于1则验证正确,否则等于2 输入的值验证错误,接下来一样的操作,把数组对象中的下标改为相对应的下标即可
  //   账号
      Column({space:10}){
        Row(){
          TextInput({placeholder:'账号'}).width('90%').borderRadius('0')
            .onChange(val=>this.reg[0].val=val)
          if(this.reg[0].isFlag==1){
            Text('√').fontColor('#fff').fontSize(20).fontWeight(900)
              .width(30).height(30)
              .backgroundColor('blue').borderRadius(30)
              .textAlign(TextAlign.Center)
          }else if(this.reg[0].isFlag==2){
            Text('×').fontColor('#fff').fontSize(25).fontWeight(900)
              .width(30).height(30)
              .backgroundColor('red').borderRadius(30)
              .textAlign(TextAlign.Center)
          }
        }.width('100%')
        Text(this.reg[0].Msg).fontColor('red').width('100%')
      }
      .width('90%')
      .height(80)
密码框:
 //   密码
      Column({space:10}){
        Row(){
          TextInput({placeholder:'密码'}).width('90%').borderRadius('0').type(InputType.Password)
            .onChange(val=>this.reg[1].val=val)
          if(this.reg[1].isFlag==1){
            Text('√').fontColor('#fff').fontSize(20).fontWeight(900)
              .width(30).height(30)
              .backgroundColor('blue').borderRadius(30)
              .textAlign(TextAlign.Center)
          }else if(this.reg[1].isFlag==2){
            Text('×').fontColor('#fff').fontSize(25).fontWeight(900)
              .width(30).height(30)
              .backgroundColor('red').borderRadius(30)
              .textAlign(TextAlign.Center)
          }
        }.width('100%')
        Text(this.reg[1].Msg).fontColor('red').width('100%')
      }
      .width('90%')
      .height(80)
确认密码:
 //   确认密码
      Column({space:10}){
        Row(){
          TextInput({placeholder:'再次输入密码'}).width('90%').borderRadius('0').type(InputType.Password)
            .onChange(val=>this.reg[2].val=val)
          if(this.reg[2].isFlag==1){
            Text('√').fontColor('#fff').fontSize(20).fontWeight(900)
              .width(30).height(30)
              .backgroundColor('blue').borderRadius(30)
              .textAlign(TextAlign.Center)
          }else if(this.reg[2].isFlag==2){
            Text('×').fontColor('#fff').fontSize(25).fontWeight(900)
              .width(30).height(30)
              .backgroundColor('red').borderRadius(30)
              .textAlign(TextAlign.Center)
          }
        }.width('100%')
        Text(this.reg[2].Msg).fontColor('red').width('100%')
      }
      .width('90%')
      .height(80)
手机号:
//   手机号
      Column({space:10}){
        Row(){
          TextInput({placeholder:'手机号'}).width('90%').borderRadius('0')
            .onChange(val=>this.reg[3].val=val)
          if(this.reg[3].isFlag==1){
            Text('√').fontColor('#fff').fontSize(20).fontWeight(900)
              .width(30).height(30)
              .backgroundColor('blue').borderRadius(30)
              .textAlign(TextAlign.Center)
          }else if(this.reg[3].isFlag==2){
            Text('×').fontColor('#fff').fontSize(25).fontWeight(900)
              .width(30).height(30)
              .backgroundColor('red').borderRadius(30)
              .textAlign(TextAlign.Center)
          }
        }.width('100%')
        Text(this.reg[3].Msg).fontColor('red').width('100%')
      }
      .width('90%')
      .height(80)
身份证
  //   身份证
      Column({space:10}){
        Row(){
          TextInput({placeholder:'身份证'}).width('90%').borderRadius('0')
            .onChange(val=>this.reg[4].val=val)
          if(this.reg[4].isFlag==1){
            Text('√').fontColor('#fff').fontSize(20).fontWeight(900)
              .width(30).height(30)
              .backgroundColor('blue').borderRadius(30)
              .textAlign(TextAlign.Center)
          }else if(this.reg[4].isFlag==2){
            Text('×').fontColor('#fff').fontSize(25).fontWeight(900)
              .width(30).height(30)
              .backgroundColor('red').borderRadius(30)
              .textAlign(TextAlign.Center)
          }
        }.width('100%')
        Text(this.reg[4].Msg).fontColor('red').width('100%')
      }
      .width('90%')
      .height(80)
昵称
 //   昵称
      Column({space:10}){
        Row(){
          TextInput({placeholder:'昵称'}).width('90%').borderRadius('0')
            .onChange(val=>this.reg[5].val=val)
          if(this.reg[5].isFlag==1){
            Text('√').fontColor('#fff').fontSize(20).fontWeight(900)
              .width(30).height(30)
              .backgroundColor('blue').borderRadius(30)
              .textAlign(TextAlign.Center)
          }else if(this.reg[5].isFlag==2){
            Text('×').fontColor('#fff').fontSize(25).fontWeight(900)
              .width(30).height(30)
              .backgroundColor('red').borderRadius(30)
              .textAlign(TextAlign.Center)
          }
        }.width('100%')
        Text(this.reg[5].Msg).fontColor('red').width('100%')
      }
      .width('90%')
      .height(80)
邮箱:
//   邮箱
      Column({space:10}){
        Row(){
          TextInput({placeholder:'邮箱'}).width('90%').borderRadius('0')
            .onChange(val=>this.reg[6].val=val)
          if(this.reg[6].isFlag==1){
            Text('√').fontColor('#fff').fontSize(20).fontWeight(900)
              .width(30).height(30)
              .backgroundColor('blue').borderRadius(30)
              .textAlign(TextAlign.Center)
          }else if(this.reg[6].isFlag==2){
            Text('×').fontColor('#fff').fontSize(25).fontWeight(900)
              .width(30).height(30)
              .backgroundColor('red').borderRadius(30)
              .textAlign(TextAlign.Center)
          }
        }.width('100%')
        Text(this.reg[6].Msg).fontColor('red').width('100%')
      }
      .width('90%')
      .height(80)
五. 验证模块
创建验证函数用于复用,简便代码冗余
函数名为patt 参数设置index(下标) 返回值为布尔类型
如果index当前数组对象中的值符合正则规则当前isFlag赋值给1(验证通过),当前提示词为空
否则isFlag赋值给2(验证失败),当前的Msg赋值当前数组中错误的提示词
patt(index:number):boolean{
if(this.reg[index].val.match(this.reg[index].pat)){ //符合规则
this.reg[index].isFlag=1
this.reg[index].Msg=''
return true
}else{
this.reg[index].isFlag=2
this.reg[index].Msg=this.reg[index].msgErr
return false
}
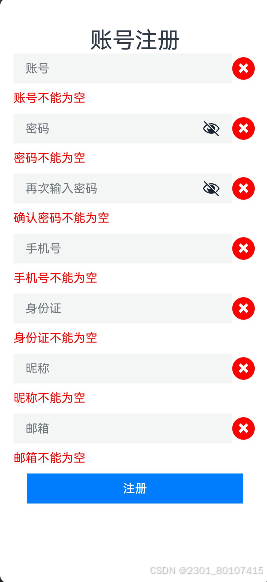
}六.注册按钮
创建一个注册按钮,设置onClick点击事件,遍历对象数组如果当前的val默认值大于0,证明有内容则进行下面判断如果i的值等于2,就是说确认密码框那条数据如果确认密码等于第一次输入的密码则正确,否则就错误,continue跳出本次循环,调用一下刚才创建的验证函数patt,否则就是空值,将当前的isFlag赋值2(验证失败)提示当前数组的错误提示词
如果按照之前的写法写到这里就结束了,但是由于@state只能声明修改一些简单的数据类型,数组,对象,但是一些复杂数据类型无法进行修改,我们就需要删除原来的数据并添加新的数组
 Button('注册').type(ButtonType.Normal).width('80%')
        .onClick(()=>{
          for(let i=0;i<this.reg.length;i++){

            if(this.reg[i].val.length>0){
              if(i==2){//再次输入密码
                if(this.reg[1].val==this.reg[2].val){
                  this.reg[2].isFlag=1
                  this.reg[2].Msg=''
                }else{
                  this.reg[2].isFlag=2
                  this.reg[2].Msg='两次密码不一致'
                }
                continue
              }
              let flag:boolean=this.patt(i)
            }else{
              this.reg[i].isFlag=2
              this.reg[i].Msg=this.reg[i].notNull
            }
            //   获取原来数据
            let r:Reg=this.reg[i]
            //   删除并添加
            this.reg.splice(i,1,r)
          }
        })
七.类的创建位置
我们创建类并不再原页面上声明创建,我们在ets创建一个model文件夹,在model文件夹中创建一个ts文件,我们就把类放到我们创建的这个文件夹中,但是我们如何去使用呢?
我们需要在class前加个 export关键字 这样类就可以在其他文件中被引用。
// export 加上关键词后,类可以在其他文件中被引用
//学生类
export class Student{
  id:string
  name:string
  sex:string
  age:number

  constructor(id:string,name:string,sex:string,age:number) {
    this.id=id
    this.name=name
    this.sex=sex
    this.age=age
  }
}
当前我们这页面中引用我们的类的时候,会自动生成导包文件
//导包 导入对应的文件
import { Student } from '../model/Student';


 748
748

 被折叠的 条评论
为什么被折叠?
被折叠的 条评论
为什么被折叠?
 到【灌水乐园】发言


