


目录
1. 介绍
具有血缘关系的进程进行进程间通信,是匿名管道,如果毫不相关的进程进行通信呢?命名管道 mkfifo
eg. echo 和 cat 的实现,就是一种命名
🎢mkfifo() 函数
mkfifo() 函数用于创建一个FIFO(First In First Out)或者称为命名管道,它允许进程之间进行通信。下面是关于 mkfifo() 函数的详细介绍:man mkfifo
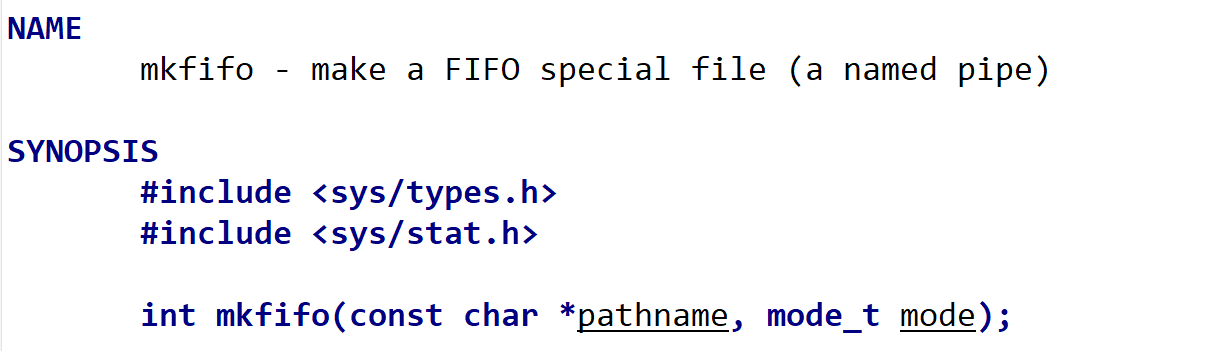
函数原型
#include <sys/types.h>
#include <sys/stat.h>

int mkfifo(const char *pathname, mode_t mode);pathname:要创建的命名管道的路径名。mode:创建命名管道时设置的权限模式,通常以 8 进制表示,比如 0666。
返回值
- 若成功,返回值为 0;若失败,返回值为 -1,并设置errno来指示错误类型。
功能
mkfifo() 函数的作用是在文件系统中创建一个特殊类型的文件,该文件在外观上类似于普通文件,但实际上是一个FIFO,用于进程之间的通信。这种通信方式是单向的,即数据写入FIFO的一端,可以从另一端读取出来,按照先进先出的顺序。
🎢创建命名管道
std::string fifoPath = "/tmp/my_named_pipe";  // 命名管道的路径名
mkfifo(fifoPath.c_str(), 0666); // 创建权限为0666的命名管道🏷️注意事项
- 路径名:确保要创建的命名管道路径名合法且没有重复。
- 权限模式:根据实际需求设置合适的权限模式,确保可被需要访问该管道的进程所访问。
- 错误处理:对
mkfifo()函数的返回值进行适当的错误处理,根据具体的错误原因进行相应的处理和日志记录。
创建命名管道并处理错误的示例
#include <iostream>
#include <sys/types.h>
#include <sys/stat.h>
#include <fcntl.h>
#include <cerrno>
int main() {
    std::string fifoPath = "/tmp/my_named_pipe";  // 命名管道的路径名
    // 尝试创建命名管道
    if (mkfifo(fifoPath.c_str(), 0666) == -1) {
        // 检查错误类型
        if (errno == EEXIST) {
            std::cerr << "Named pipe already exists" << std::endl;
        } else {
            // 输出错误信息
            perror("Error creating named pipe");
        }
    } else {
        std::cout << "Named pipe created successfully" << std::endl;
    }
    return 0;
}
使用命名管道进行读写操作
在open后,可以通过 read() 或 write() 函数对其进行读写操作。
关闭命名管道
关闭命名管道是确保在进程使用完毕后释放相关资源的重要步骤。
#include <iostream>
#include <fcntl.h>
#include <unistd.h>
#include <cerrno>
int main() {
    int fd = open("/tmp/my_named_pipe", O_RDONLY);  // 以只读方式打开命名管道
    // 进行读取操作...
    // 关闭命名管道
    if (close(fd) == -1) {
        perror("Error closing named pipe");
    } else {
        std::cout << "Named pipe closed successfully" << std::endl;
    }
    return 0;
}
注意事项
- 关闭顺序:如果有多个文件描述符指向同一个命名管道,需要依次关闭这些文件描述符,直到所有相关资源都得到释放。
通信方式
- 单向通信:命名管道提供单向通信方式,一个进程写入,另一个进程读取。
- 持久性:命名管道以文件形式存在于文件系统中,即使创建进程终止,管道仍然存在。
- 阻塞和非阻塞:可以选择阻塞或非阻塞模式进行通信。
用法示例
进程 A 写入数据到命名管道
int fd = open("/tmp/my_named_pipe", O_WRONLY);  // 以只写方式打开命名管道
write(fd, "Hello, named pipe!", 18);  // 向管道中写入数据
close(fd);  // 关闭命名管道
进程 B 从命名管道读取数据
int fd = open("/tmp/my_named_pipe", O_RDONLY);  // 以只读方式打开命名管道
char buffer[50];
read(fd, buffer, 50);  // 从管道中读取数据
close(fd);  // 关闭命名管道
2. 理解
对创建的文件,进行只读/只写的 open
- 如果两个不同的进程,打开同一个文件的时候,在内核中,操作系统会维持几份呢?一份
还是这样的:
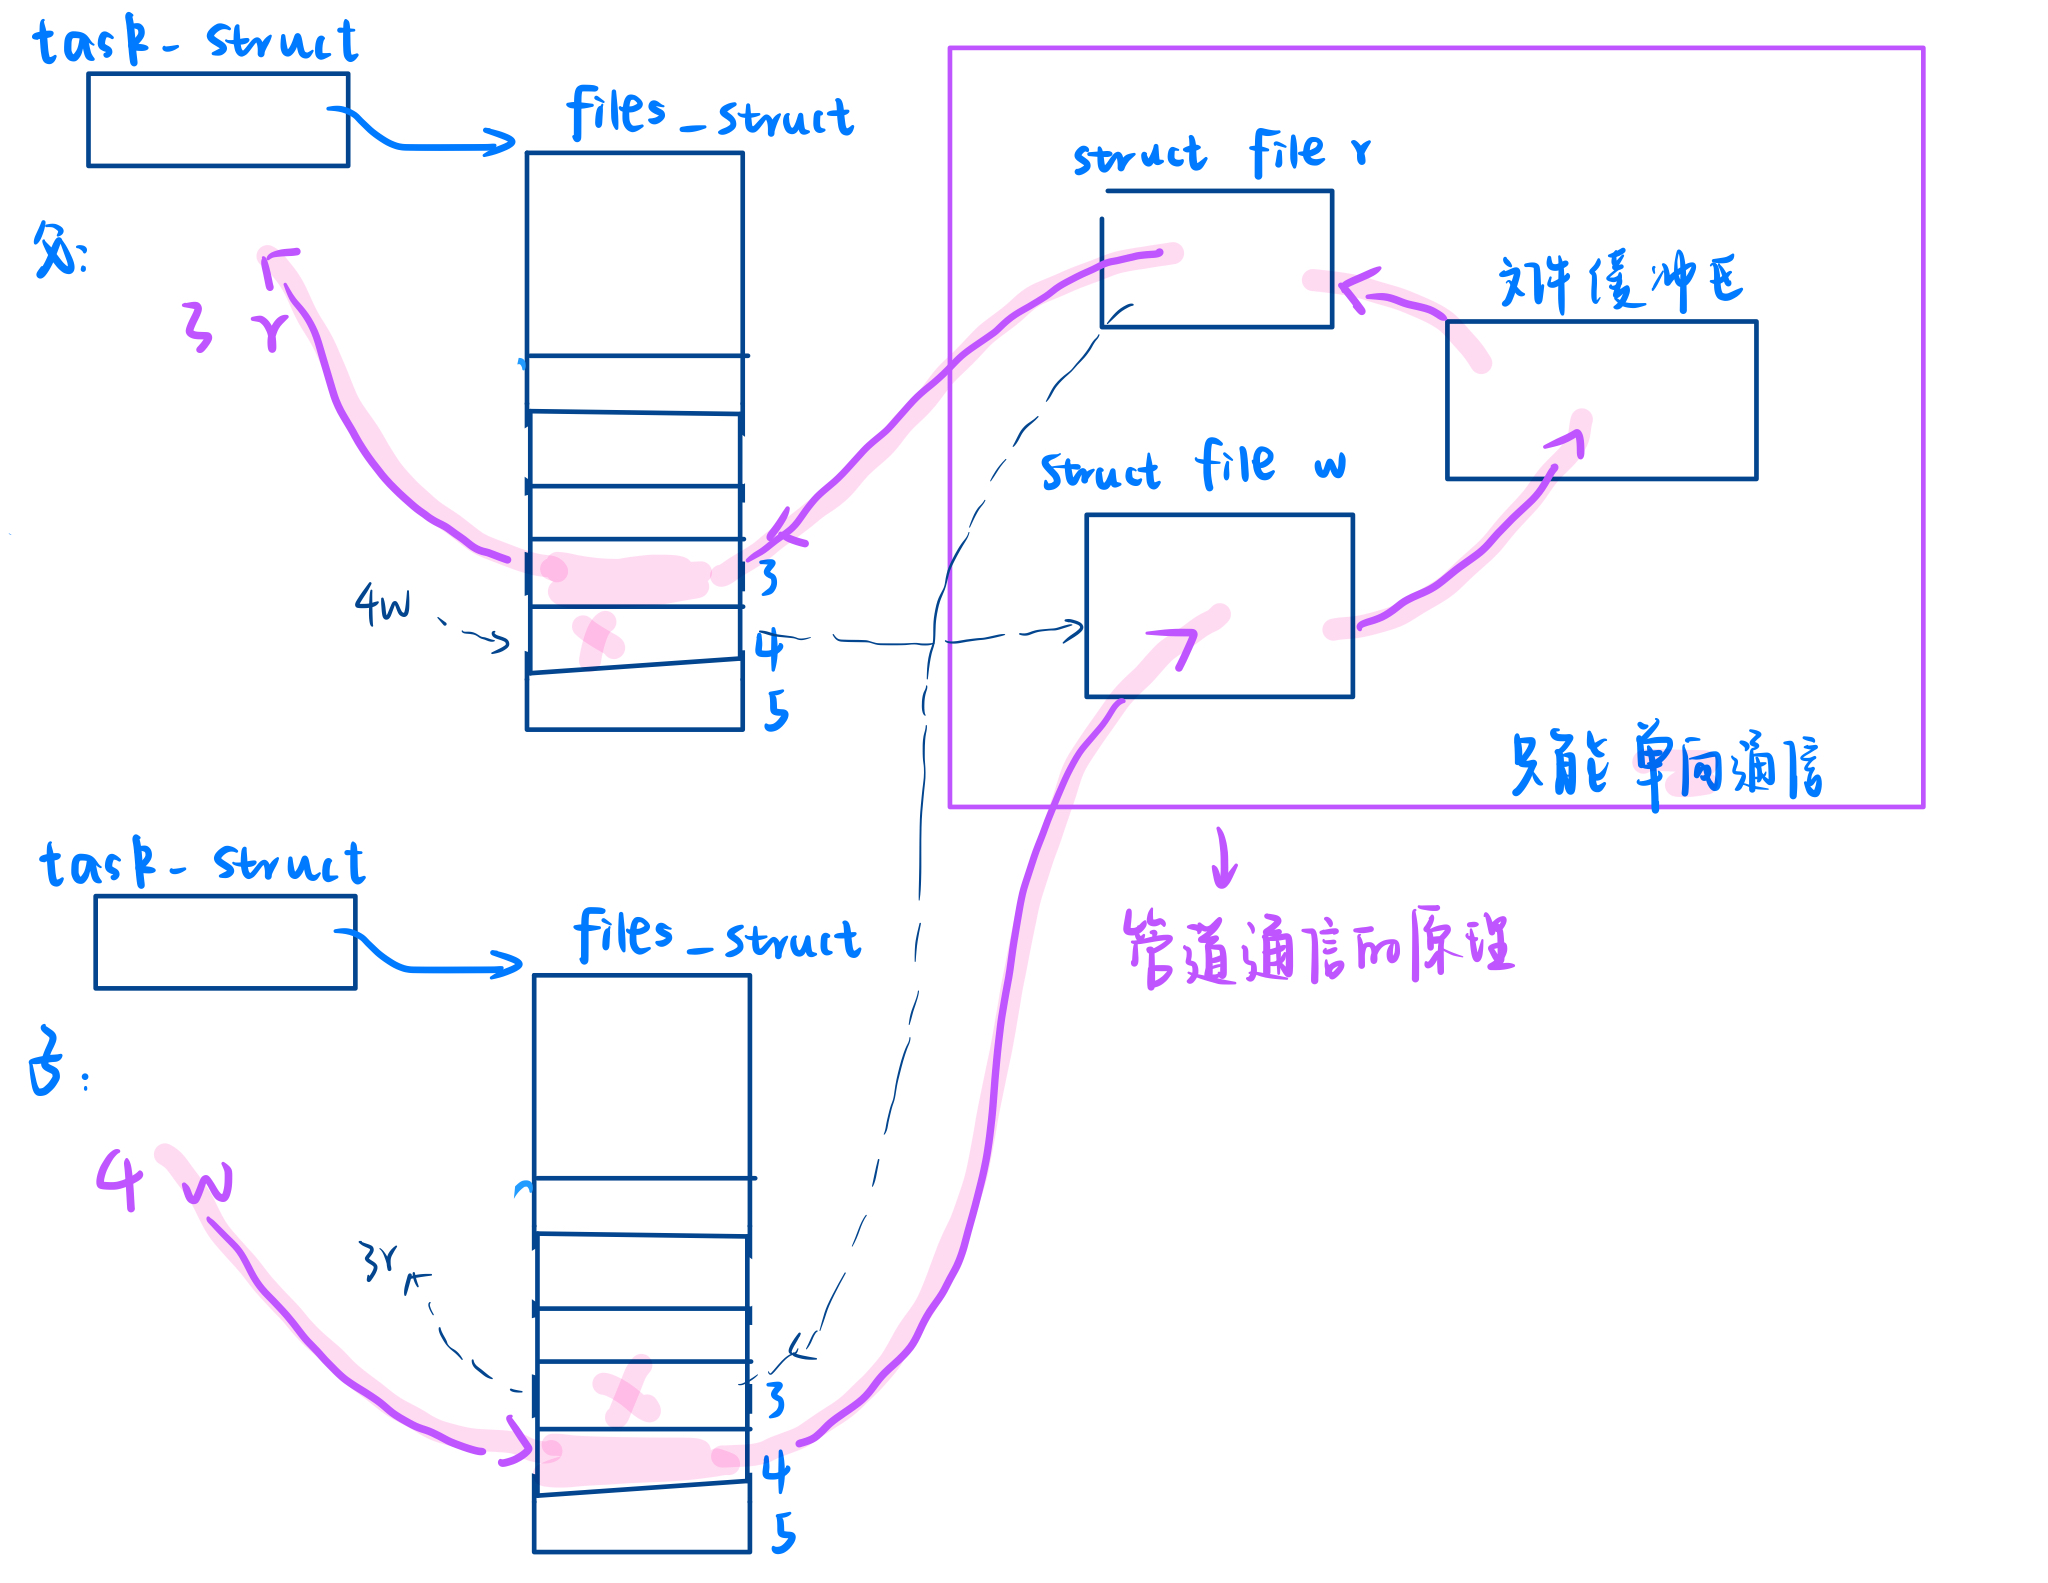
管道是文件缓冲区,不要进行刷盘!所以就有了内存级文件的存在
- 怎么打开同一个文件?为什么要打开同一个文件?
同路径下同一个文件名=路径+文件名 因为唯一性,就可以保证看到同一份资源了
3.运用
3.1 简易通信
makefile
.PHONY:all
all:server client

server:server.cc
	g++ -o $@ $^ -g -std=c++11
client:client.cc
	g++ -o $@ $^ -g -std=c++11

.PHONY:clean
clean:
rm -f server client.PHONY:all:这行声明all是一个伪目标。即使文件系统中存在一个名为all的文件,make all命令也会执行与all相关的规则,而不是认为目标已经是最新的。all:server client:这行定义了all伪目标的依赖,即server和client。当运行make all时,Makefile 会首先尝试构建server和client目标。
comm.hpp
#ifndef COMM_HPP
#define COMM_HPP

#include <iostream>
#include <fcntl.h>
#include <sys/types.h>
#include <sys/stat.h>
#include <unistd.h>
#include <errno.h>
#include <string.h>
#include <cstdlib>
#include <cstdio>

#define FIFO_FILE "/tmp/my_fifo"
#define FIFO_OPEN_ERR 1

#endif // COMM_HPP
server.cc (服务端,读取显示)
#include <iostream>
#include "comm.hpp"

using namespace std;

int main()
{
    // 创建命名管道文件
    if (mkfifo(FIFO_FILE, 0666) == -1)
    {
        if (errno != EEXIST)
        {
            perror("mkfifo");
            exit(FIFO_OPEN_ERR);
        }
    }

    // 打开管道
    int fd = open(FIFO_FILE, O_RDONLY);
    if (fd < 0)
    {
        perror("open");
        exit(FIFO_OPEN_ERR);
    }

    cout << "Server open file done" << endl;

    // 开始通信
    while (true)
    {
        char buffer[1024] = {0};
        int x = read(fd, buffer, sizeof(buffer) - 1);
        if (x > 0)
        {
            buffer[x] = 0;
            cout << "Client says: " << buffer << endl;
        }
        else if (x == 0)
        {
            cout << "Client quit, server will also quit." << endl;
            break;
        }
        else
        {
            perror("read");
            break;
        }
    }

    close(fd);
    return 0;
}
批注:
- 要等待写入方打开之后,自己才会打开文件,向后执行
client.cc (客户端,写入)
#include <iostream>
#include "comm.hpp"

using namespace std;

int main()
{
    // 打开管道
    int fd = open(FIFO_FILE, O_WRONLY);
    if (fd < 0)
    {
        perror("open");
        exit(FIFO_OPEN_ERR);
    }

    cout << "Client open file done" << endl;

    string line;
    while (true)
    {
        cout << "Please Enter: ";
        getline(cin, line);

        if (!line.empty())
        {
            write(fd, line.c_str(), line.size());
        }
    }
    close(fd);
    return 0;
}
write(fd, line.c_str(), line.size()); //将其字符流化打开两个窗口,运行测试如下,成功~

接下来我们将来学习将错误日志化
3.2 日志
- 日志时间
- 日志等级
- Info:常规消息
- Warning:报错信息
- Error:必要严重了,可能需要立即处理
- Fatal:致命的
- Debug:调试
3.日志内容
4.文件的名称和行号
实现一个简单的日志函数,在自己的代码中慢慢的引入日志
log.hpp
为了实现上述日志系统,我们可以按照以下步骤进行:
- 定义日志级别:定义常见的日志级别,如
Info、Warning、Error、Fatal、Debug。 - 实现日志函数:使用可变参数实现一个通用的日志函数,该函数能够记录不同级别的日志信息,并且包含时间戳、文件名和行号等信息。
- 日志输出管理:实现日志的输出方式,如输出到控制台或文件,支持按日志级别分类输出。
- 封装日志接口:提供一个简洁的接口,方便在代码中随时记录日志。
以下是代码实现示例:
1. 定义日志级别
在 log.hpp 中定义日志级别的枚举类型,并实现日志级别到字符串的映射。
// log.hpp
#pragma once

#include <string>
#include <ctime>
#include <iostream>
#include <fstream>
#include <cstdarg>
#include <cstdio>
#include <unistd.h>
#include <sys/types.h>

enum LogLevel {
    Info,
    Warning,
    Error,
    Fatal,
    Debug
};

inline std::string levelToString(LogLevel level) {
    switch (level) {
        case Info: return "INFO";
        case Warning: return "WARNING";
        case Error: return "ERROR";
        case Fatal: return "FATAL";
        case Debug: return "DEBUG";
        default: return "UNKNOWN";
    }
}
2. 实现日志函数
使用可变参数实现一个通用的日志函数 logMessage,能够记录日志级别、时间戳、文件名、行号,以及用户自定义的日志内容。
// log.hpp
#define SIZE 1024

void logMessage(LogLevel level, const char *filename, int line, const char *format, ...) {
    time_t t = time(nullptr);
    struct tm *ctime = localtime(&t);
    char leftbuffer[SIZE];
    snprintf(leftbuffer, sizeof(leftbuffer), "[%s][%d-%02d-%02d %02d:%02d:%02d][%s:%d]",
             levelToString(level).c_str(),
             ctime->tm_year + 1900, ctime->tm_mon + 1, ctime->tm_mday,
             ctime->tm_hour, ctime->tm_min, ctime->tm_sec,
             filename, line);

    char rightbuffer[SIZE];
    va_list args;
    va_start(args, format);
    vsnprintf(rightbuffer, sizeof(rightbuffer), format, args);
    va_end(args);

    char logtxt[SIZE * 2];
    snprintf(logtxt, sizeof(logtxt), "%s %s\n", leftbuffer, rightbuffer);

    printLog(level, logtxt);
}
可变参数
int sum(int n,...)  //之后会从右向左入栈
{
    va_list s;//char *
    va_start(s,n);//s=&n+1
}sum函数是一个示例,它是一个可变参数函数,可以接受任意数量的整数参数,并返回它们的和。va_list类型用于遍历这些参数。
在sum函数中:
int sum(int n,...):声明了一个可变参数函数,它接受一个整数n和任意数量的整数参数。va_list s;:声明了一个va_list类型的变量s,用于遍历可变参数列表。va_start(s, n);:初始化va_list变量s,将可变参数列表的起始地址指向n之后的第一个参数。va_end(s);:清理va_list变量s,准备释放它占用的内存。
可变参数函数是C语言中非常强大的特性,它可以使代码更加通用和灵活。
// sum 函数的实例化
int sum(int n, ...) {
    va_list s;
    va_start(s, n);

    int result = 0;
    for (int i = 0; i <= n; i++) {
        result += va_arg(s, int);
    }

    va_end(s);
    return result;
}

// 示例使用 sum 函数
int main() {
    int sumResult = sum(3, 1, 2, 3);
    printf("The sum of the numbers is: %d\n", sumResult);
    return 0;
}在这个例子中,定义了一个sum函数,它接受一个整数n和任意数量的整数参数。调用sum(3, 1, 2, 3)来实例化这个函数,它将计算1 + 2 + 3的和,并打印结果。
注意:sum函数的参数n是可选的,如果省略,则默认值为0,意味着它将接受任意数量的整数参数。在这个例子中,n的值为第一个数 3。
3. 日志输出管理
如何实现对多个日志分门别类的管理?
用'std::string _logname = path + logname' 都放到 log 中,实现管理
实现日志输出到控制台或文件的功能,支持按日志级别分类输出。
// log.hpp
enum PrintMethod {
    Screen,
    Onefile,
    Classfile
};

PrintMethod printMethod = Screen;
std::string path = "./";
std::string LogFile = "log.txt";

void printLog(LogLevel level, const std::string &logtxt) {
    switch (printMethod) {
        case Screen:
            std::cout << logtxt;
            break;
        case Onefile:
            printOneFile(LogFile, logtxt);
            break;
        case Classfile:
            printClassFile(level, logtxt);
            break;
        default:
            break;
    }
}

void printOneFile(const std::string &logname, const std::string &logtxt) {
    std::string _logname = path + logname;
    int fd = open(_logname.c_str(), O_WRONLY | O_CREAT | O_APPEND, 0666);
    if (fd < 0) return;
    write(fd, logtxt.c_str(), logtxt.size());
    close(fd);
}

void printClassFile(LogLevel level, const std::string &logtxt) {
    std::string filename = LogFile;
    filename += ".";
    filename += levelToString(level); // "log.txt.Debug/Warning/Fatal"
    printOneFile(filename, logtxt);
}
4. 封装日志接口
定义一个简洁的宏 LOG,方便在代码中使用日志功能。
// log.hpp
#define LOG(level, format, ...) logMessage(level, __FILE__, __LINE__, format, ##__VA_ARGS__)
5. 使用日志系统
在代码中可以使用 LOG 宏来记录日志信息,示例如下:
// main.cpp
#include "log.hpp"

int main() {
    LOG(Info, "Server started successfully.");
    LOG(Warning, "This is a warning message.");
    LOG(Error, "An error occurred: %s", "file not found");
    LOG(Fatal, "Fatal error, shutting down...");
    LOG(Debug, "Debugging info: variable x = %d", 42);

    // 更改日志输出方式为按级别分类
    printMethod = Classfile;
    LOG(Info, "Server started successfully with classified logs.");

    return 0;
}
6. 管理多级别日志
通过在 printClassFile 中使用 log.txt.Debug, log.txt.Warning, log.txt.Fatal 等文件名,可以自动将不同级别的日志写入不同的文件中,方便后续查找和调试。
🎢 日志管理总结
通过这种方式实现的日志系统能够灵活地处理不同级别的日志,并支持输出到控制台或文件中。通过使用 LOG 宏,日志功能可以很方便地集成到代码中,提供有效的调试和运行时信息支持。
后续还可以不断扩展和完善,例如添加日志轮转、异步日志、网络日志等高级功能,以适应更复杂的应用场景。对于错误不用再 printf,可以直接查日志啦
3.3 进程池 2.0
命名管道,能不能也设计成我们上一篇文章讲的进程池的样子呢?
使用命名管道(FIFO)实现一个进程池可以通过以下步骤完成:
- 创建命名管道:使用
mkfifo创建两个命名管道,一个用于父进程向子进程发送任务,另一个用于子进程向父进程发送结果。 - 初始化进程池:创建子进程并为每个子进程分配命名管道。
- 父进程控制逻辑:父进程从标准输入获取任务,并通过命名管道将任务发送给子进程,然后读取子进程的结果。
- 子进程工作逻辑:子进程从命名管道读取任务,执行任务后将结果写回命名管道。
以下是使用命名管道实现进程池的代码:
channel.hpp
#pragma once

#include <string>
#include <vector>
#include <iostream>
#include <unistd.h>
#include <sys/wait.h>
#include <cassert>

class channel {
public:
    channel(const std::string &cmdfifo, const std::string &outfifo, int slaverid, const std::string &processname)
        : _cmdfifo(cmdfifo), _outfifo(outfifo), _slaverid(slaverid), _processname(processname) {}

public:
    std::string _cmdfifo;     // 发送任务的命名管道
    std::string _outfifo;     // 接收结果的命名管道
    pid_t _slaverid;          // 子进程的PID
    std::string _processname; // 子进程的名字 -- 方便我们打印日志
};
tasks.hpp
#pragma once

#include <iostream>
#include <vector>

typedef void (*task_t)();

void task1() {
    std::cout << "lol 刷新日志" << std::endl;
}

void task2() {
    std::cout << "lol 更新野区,刷新出来野怪" << std::endl;
}

void task3() {
    std::cout << "lol 检测软件是否更新,如果需要,就提示用户" << std::endl;
}

void task4() {
    std::cout << "lol 用户释放技能,更新用的血量和蓝量" << std::endl;
}

void LoadTask(std::vector<task_t> *tasks) {
    tasks->push_back(task1);
    tasks->push_back(task2);
    tasks->push_back(task3);
    tasks->push_back(task4);
}
main.cc
#include <iostream>
#include <vector>
#include <string>
#include <unistd.h>
#include <sys/wait.h>
#include <fcntl.h>
#include <cstdlib>
#include <ctime>
#include <sstream>
#include "channel.hpp"
#include "tasks.hpp"

void slaver(const std::vector<task_t> &tasks, const std::string &cmdfifo, const std::string &outfifo) {
    int cmdfd = open(cmdfifo.c_str(), O_RDONLY);
    int outfd = open(outfifo.c_str(), O_WRONLY);

    while (true) {
        int cmdcode = 0;
        int n = read(cmdfd, &cmdcode, sizeof(int)); // 从命令管道读取命令码
        if (n == sizeof(int)) {
            // 使用 stringstream 重定向 std::cout 到一个字符串
            std::ostringstream oss;
            std::streambuf *oldCoutStreamBuf = std::cout.rdbuf();
            std::cout.rdbuf(oss.rdbuf());

            if (cmdcode >= 0 && cmdcode < tasks.size()) {
                tasks[cmdcode]();
            }

            std::cout.rdbuf(oldCoutStreamBuf); // 恢复 std::cout 的重定向

            std::string output = oss.str();
            write(outfd, output.c_str(), output.size()); // 写到输出管道中
        }
        if (n == 0) break; // 父进程关闭写端,子进程退出
    }

    close(cmdfd);
    close(outfd);
}

void InitProcessPool(std::vector<channel> *channels, const std::vector<task_t> &tasks, int processnum) {
    for (int i = 0; i < processnum; i++) {
        std::string cmdfifo = "/tmp/cmdfifo_" + std::to_string(i);
        std::string outfifo = "/tmp/outfifo_" + std::to_string(i);
        mkfifo(cmdfifo.c_str(), 0666);
        mkfifo(outfifo.c_str(), 0666);

        pid_t id = fork();
        if (id == 0) { // child process
            slaver(tasks, cmdfifo, outfifo);
            exit(0);
        } else { // parent process
            std::string name = "process-" + std::to_string(i);
            channels->push_back(channel(cmdfifo, outfifo, id, name));
            sleep(1);
        }
    }
}

void Menu() {
    std::cout << "################################################" << std::endl;
    std::cout << "# 1. 刷新日志             2. 刷新出来野怪        #" << std::endl;
    std::cout << "# 3. 检测软件是否更新      4. 更新用的血量和蓝量  #" << std::endl;
    std::cout << "#                         0. 退出               #" << std::endl;
    std::cout << "#################################################" << std::endl;
}

void ctrlSlaver(const std::vector<channel> &channels, const std::vector<task_t> &tasks) {
    int which = 0;
    while (true) {
        int select = 0;
        Menu();
        std::cout << "Please Enter@ ";
        std::cin >> select;

        if (select <= 0 || select >= 5) break;

        int cmdcode = select - 1;

        int cmdfd = open(channels[which]._cmdfifo.c_str(), O_WRONLY);
        write(cmdfd, &cmdcode, sizeof(cmdcode));
        close(cmdfd);

        int outfd = open(channels[which]._outfifo.c_str(), O_RDONLY);
        char buffer[256];
        int n = read(outfd, buffer, sizeof(buffer) - 1);
        if (n > 0) {
            buffer[n] = '\0';
            std::cout << buffer;
        }
        close(outfd);

        which++;
        which %= channels.size();
    }
}

void QuitProcess(const std::vector<channel> &channels) {
    for (const auto &c : channels) {
        unlink(c._cmdfifo.c_str());
        unlink(c._outfifo.c_str());
        waitpid(c._slaverid, NULL, 0);
    }
}

int main() {
    srand(time(nullptr) ^ getpid() ^ 1023);

    std::vector<task_t> tasks;
    LoadTask(&tasks);

    int processnum = 4;
    std::vector<channel> channels;
    InitProcessPool(&channels, tasks, processnum);

    ctrlSlaver(channels, tasks);

    QuitProcess(channels);

    return 0;
}
🏷️ 解释
- channel 类:
channel类保存了命令和输出的命名管道文件路径_cmdfifo和_outfifo,以及子进程的 PID 和名字。
- slaver 函数:
- 子进程在
slaver函数中运行,从命令管道读取任务码,执行任务并将结果写入输出管道。
- InitProcessPool 函数:
- 创建子进程并为每个子进程分配命令和输出的命名管道。
- 使用
mkfifo创建命名管道,并使用fork创建子进程。
- ctrlSlaver 函数:
- 父进程从标准输入获取任务码,并通过命令管道发送给子进程。
- 通过输出管道读取子进程的结果并打印出来。
- QuitProcess 函数:
- 删除所有命名管道,并等待所有子进程退出。
通过这些步骤,父进程就可以通过命名管道与子进程通信,并实现一个简单的进程池啦


 803
803

 被折叠的 条评论
为什么被折叠?
被折叠的 条评论
为什么被折叠?
 到【灌水乐园】发言


