


实验一
用stm32F103核心板的GPIOA端一管脚接一个LED,GPIOB端口一引脚接一个开关(用杜邦线模拟代替)。采用中断模式编程,当开关接高电平时,LED亮灯;接低电平时,LED灭灯。如果完成后,尝试在main函数while循环中加入一个串口每隔1s 发送一次字符的代码片段,观察按键中断对串口发送是否会带来干扰或延迟。
main代码如下
#include "stm32f10x.h"    // Device header
#include "Delay.h"
#include "Serial.h"

void CountSensor_Init(void){//配置中断

/*开启APB2的时钟*/

RCC_APB2PeriphClockCmd(RCC_APB2Periph_GPIOB, ENABLE);//开启APB2的外设,GPIOB是APB2的外设
RCC_APB2PeriphClockCmd(RCC_APB2Periph_AFIO, ENABLE);//开启AFIO的外设,AFIO是APB2的外设

//GPIOB
GPIO_InitTypeDef GIPO_InitStruct;//结构体配置GPIO
GIPO_InitStruct.GPIO_Mode = GPIO_Mode_IPU;//上拉输入模式input、out
GIPO_InitStruct.GPIO_Pin = GPIO_Pin_14;//开启14号引脚
GIPO_InitStruct.GPIO_Speed = GPIO_Speed_50MHz;
GPIO_Init(GPIOB, &GIPO_InitStruct);

//AFIO外外部引脚选择
EXTI_InitTypeDef EXTI_Int_Struct;//结构体Exti
GPIO_EXTILineConfig(GPIO_PortSourceGPIOB, GPIO_PinSource14);//PB14连接
EXTI_Int_Struct.EXTI_Line = EXTI_Line14;
EXTI_Int_Struct.EXTI_LineCmd = ENABLE;//开启
EXTI_Int_Struct.EXTI_Mode = EXTI_Mode_Interrupt;//中断模式
EXTI_Int_Struct.EXTI_Trigger = EXTI_Trigger_Falling;//下降沿触发
EXTI_Init(&EXTI_Int_Struct);

NVIC_InitTypeDef NVIC_IniyStruct;
NVIC_PriorityGroupConfig(NVIC_PriorityGroup_2);//响应等级
NVIC_IniyStruct.NVIC_IRQChannel = EXTI15_10_IRQn;
NVIC_IniyStruct.NVIC_IRQChannelCmd = ENABLE;
NVIC_IniyStruct.NVIC_IRQChannelPreemptionPriority = 1;
NVIC_IniyStruct.NVIC_IRQChannelSubPriority = 1;


NVIC_Init(&NVIC_IniyStruct);
}

//GPIOA初始化
void GPIOA_INIT(void){
    GPIO_InitTypeDef GPIO_InitStructure;//定义变量GPIOA结构体
	GPIO_InitStructure.GPIO_Mode =  GPIO_Mode_Out_PP;
	GPIO_InitStructure.GPIO_Pin  =  GPIO_Pin_0;
	GPIO_InitStructure.GPIO_Speed = GPIO_Speed_50MHz;
	GPIO_Init(GPIOA, &GPIO_InitStructure);//
	GPIO_SetBits(GPIOA, GPIO_Pin_0);
}


int count = 0;

void LED1_Turn(void){

	if (GPIO_ReadOutputDataBit(GPIOA, GPIO_Pin_0) == 0)
	{
		GPIO_SetBits(GPIOA, GPIO_Pin_0);
	}
	else
	{
		GPIO_ResetBits(GPIOA, GPIO_Pin_0);
	}
}

int a=1;
void EXTI15_10_IRQHandler(void){

     if(EXTI_GetITStatus(EXTI_Line14) == SET){

			  EXTI_ClearITPendingBit(EXTI_Line14);

			if(a==1)
			 {
			 a=0;
			 }
		 }
}


int main(void){

	CountSensor_Init();//初始化中断
	RCC_APB2PeriphClockCmd(RCC_APB2Periph_GPIOA, ENABLE);//开启PA端口时钟
	GPIOA_INIT();//初始化GPIOA代码
	Serial_Init();
	Serial_SendString("Init success!\t");
	while(1){
		Serial_SendString("a\t");
		if(a==0)
			 {LED1_Turn();
				 a=1;
			 }
		Delay_ms(1000);
	}

}
serail代码如下
#include "stm32f10x.h"                  // Device header
#include <stdio.h>
#include <stdarg.h>

void Serial_Init(void)
{
	RCC_APB2PeriphClockCmd(RCC_APB2Periph_USART1, ENABLE);
	RCC_APB2PeriphClockCmd(RCC_APB2Periph_GPIOA, ENABLE);

	GPIO_InitTypeDef GPIO_InitStructure;
	GPIO_InitStructure.GPIO_Mode = GPIO_Mode_AF_PP;
	GPIO_InitStructure.GPIO_Pin = GPIO_Pin_9;
	GPIO_InitStructure.GPIO_Speed = GPIO_Speed_50MHz;
	GPIO_Init(GPIOA, &GPIO_InitStructure);//单片机输出口初始化

	GPIO_InitStructure.GPIO_Mode = GPIO_Mode_IPU;
	GPIO_InitStructure.GPIO_Pin = GPIO_Pin_10;
	GPIO_InitStructure.GPIO_Speed = GPIO_Speed_50MHz;
	GPIO_Init(GPIOA, &GPIO_InitStructure);//单片机输入口初始化

	USART_InitTypeDef USART_InitStructure;
	USART_InitStructure.USART_BaudRate = 9600;
	USART_InitStructure.USART_HardwareFlowControl = USART_HardwareFlowControl_None;
	USART_InitStructure.USART_Mode = USART_Mode_Tx | USART_Mode_Rx;
	USART_InitStructure.USART_Parity = USART_Parity_No;
	USART_InitStructure.USART_StopBits = USART_StopBits_1;
	USART_InitStructure.USART_WordLength = USART_WordLength_8b;
	USART_Init(USART1, &USART_InitStructure);

	USART_Cmd(USART1, ENABLE);
}

void Serial_SendByte(uint8_t Byte)
{
	USART_SendData(USART1, Byte);
	while (USART_GetFlagStatus(USART1, USART_FLAG_TXE) == RESET);
}

void Serial_SendArray(uint8_t *Array, uint16_t Length)
{
	uint16_t i;
	for (i = 0; i < Length; i ++)
	{
		Serial_SendByte(Array[i]);
	}
}

void Serial_SendString(char *String)
{
	uint8_t i;
	for (i = 0; String[i] != '\0'; i ++)
	{
		Serial_SendByte(String[i]);
	}
}
实验二
(1)当stm32接收到1个字符“s”时,停止持续发送“hello windows!”; 当接收到1个字符“t”时,持续发送“hello windows!”(提示:采用一个全局标量做信号灯);
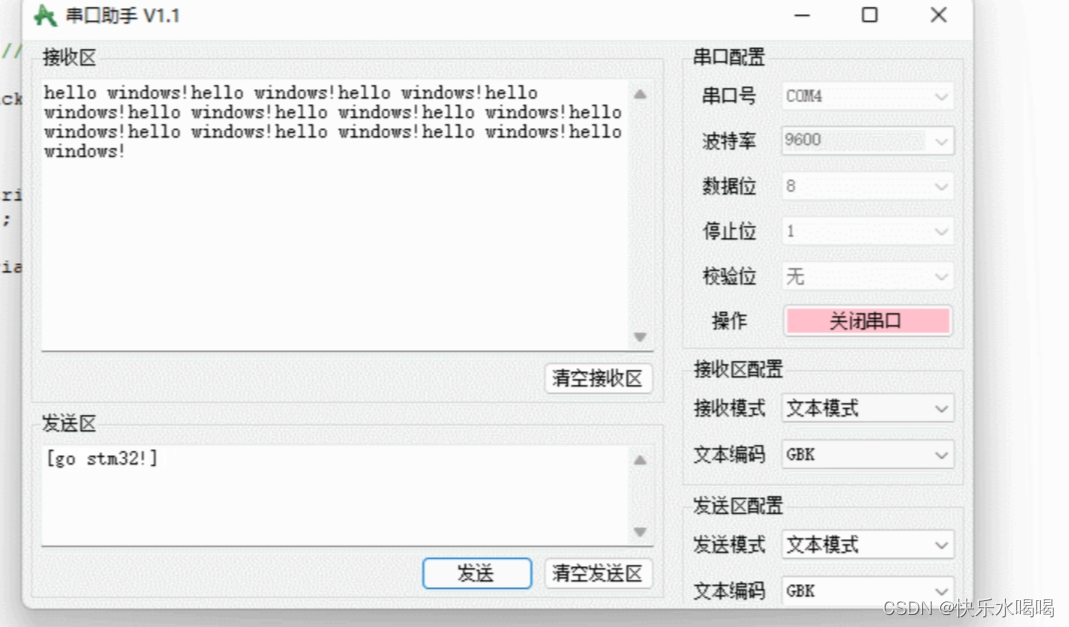
(2)当stm32接收到字符“stop stm32!”时,停止持续发送“hello windows!”; 当接收到字符“go stm32!”时,持续发送“hello windows!”(提示:要将接收到的连续字符保存到一个字符数组里,进行判别匹配。写一个接收字符串的函数
(1)
代码
#include "stm32f10x.h"
#include <stdio.h>

volatile uint8_t continueSending = 1; // 全局变量作为信号灯,控制是否持续发送

void USART_Config(void) {
    // 初始化串口通信,设置波特率等参数
    USART_InitTypeDef USART_InitStructure;
    GPIO_InitTypeDef GPIO_InitStructure;

    RCC_APB2PeriphClockCmd(RCC_APB2Periph_GPIOA | RCC_APB2Periph_USART1, ENABLE);

    // 配置USART1的TX引脚
    GPIO_InitStructure.GPIO_Pin = GPIO_Pin_9;
    GPIO_InitStructure.GPIO_Mode = GPIO_Mode_AF_PP;
    GPIO_InitStructure.GPIO_Speed = GPIO_Speed_50MHz;
    GPIO_Init(GPIOA, &GPIO_InitStructure);

    // 配置USART1的RX引脚
    GPIO_InitStructure.GPIO_Pin = GPIO_Pin_10;
    GPIO_InitStructure.GPIO_Mode = GPIO_Mode_IN_FLOATING;
    GPIO_Init(GPIOA, &GPIO_InitStructure);

    USART_InitStructure.USART_BaudRate = 9600;
    USART_InitStructure.USART_WordLength = USART_WordLength_8b;
    USART_InitStructure.USART_StopBits = USART_StopBits_1;
    USART_InitStructure.USART_Parity = USART_Parity_No;
    USART_InitStructure.USART_Mode = USART_Mode_Rx | USART_Mode_Tx;
    USART_InitStructure.USART_HardwareFlowControl = USART_HardwareFlowControl_None;
    USART_Init(USART1, &USART_InitStructure);

    USART_ITConfig(USART1, USART_IT_RXNE, ENABLE); // 使能串口接收中断
    NVIC_EnableIRQ(USART1_IRQn); // 使能串口中断
    USART_Cmd(USART1, ENABLE);
}

void USART1_IRQHandler(void) {
    if (USART_GetITStatus(USART1, USART_IT_RXNE) != RESET) {
        char receivedChar = USART_ReceiveData(USART1);

        if (receivedChar == 's') {
            continueSending = 0; // 收到字符's',停止发送
        } else if (receivedChar == 't') {
            continueSending = 1; // 收到字符't',持续发送
        }

        USART_ClearITPendingBit(USART1, USART_IT_RXNE);
    }
}

void sendHelloWindows(void) {
    char helloMsg[] = "hello windows!\r\n";
    uint8_t i = 0;

    while (helloMsg[i] != '\0') {
        USART_SendData(USART1, helloMsg[i]);
        while (USART_GetFlagStatus(USART1, USART_FLAG_TXE) == RESET);
        i++;
    }
}

int main(void) {
    USART_Config();

    while (1) {
        if (continueSending) {
            sendHelloWindows();
        }
    }
}
如图

(2)
代码如下
#include "stm32f10x.h"
#include <stdio.h>
#include <string.h>

#define MAX_RX_BUFFER_SIZE 50

volatile uint8_t continueSending = 1; // 全局变量作为信号灯,控制是否持续发送
char rxBuffer[MAX_RX_BUFFER_SIZE];
uint8_t rxIndex = 0;

void USART_Config(void) {
    // 初始化串口通信,设置波特率等参数
    USART_InitTypeDef USART_InitStructure;
    GPIO_InitTypeDef GPIO_InitStructure;

    RCC_APB2PeriphClockCmd(RCC_APB2Periph_GPIOA | RCC_APB2Periph_USART1, ENABLE);

    // 配置USART1的TX引脚
    GPIO_InitStructure.GPIO_Pin = GPIO_Pin_9;
    GPIO_InitStructure.GPIO_Mode = GPIO_Mode_AF_PP;
    GPIO_InitStructure.GPIO_Speed = GPIO_Speed_50MHz;
    GPIO_Init(GPIOA, &GPIO_InitStructure);

    // 配置USART1的RX引脚
    GPIO_InitStructure.GPIO_Pin = GPIO_Pin_10;
    GPIO_InitStructure.GPIO_Mode = GPIO_Mode_IN_FLOATING;
    GPIO_Init(GPIOA, &GPIO_InitStructure);

    USART_InitStructure.USART_BaudRate = 9600;
    USART_InitStructure.USART_WordLength = USART_WordLength_8b;
    USART_InitStructure.USART_StopBits = USART_StopBits_1;
    USART_InitStructure.USART_Parity = USART_Parity_No;
    USART_InitStructure.USART_Mode = USART_Mode_Rx | USART_Mode_Tx;
    USART_InitStructure.USART_HardwareFlowControl = USART_HardwareFlowControl_None;
    USART_Init(USART1, &USART_InitStructure);

    USART_ITConfig(USART1, USART_IT_RXNE, ENABLE); // 使能串口接收中断
    NVIC_EnableIRQ(USART1_IRQn); // 使能串口中断
    USART_Cmd(USART1, ENABLE);
}

void USART1_IRQHandler(void) {
    if (USART_GetITStatus(USART1, USART_IT_RXNE) != RESET) {
        char receivedChar = USART_ReceiveData(USART1);

        rxBuffer[rxIndex++] = receivedChar; // 将接收到的字符保存到缓冲区

        if (rxIndex >= strlen("stop stm32!")) {
            if (memcmp(rxBuffer, "stop stm32!", strlen("stop stm32!")) == 0) {
                continueSending = 0; // 收到"stop stm32!",停止发送
            } else if (memcmp(rxBuffer, "go stm32!", strlen("go stm32!")) == 0) {
                continueSending = 1; // 收到"go stm32!",持续发送
            }

            rxIndex = 0; // 重置缓冲区索引
        }

        USART_ClearITPendingBit(USART1, USART_IT_RXNE);
    }
}

void sendHelloWindows(void) {
    char helloMsg[] = "hello windows!\r\n";
    uint8_t i = 0;

    while (helloMsg[i] != '\0') {
        USART_SendData(USART1, helloMsg[i]);
        while (USART_GetFlagStatus(USART1, USART_FLAG_TXE) == RESET);
        i++;
    }
}

int main(void) {
    USART_Config();

    while (1) {
        if (continueSending) {
            sendHelloWindows();
        }
    }
}
如图
总结
在这次的实验帮助我们更好地理解和学习stm32,如有不足请多多指点


 5941
5941

 被折叠的 条评论
为什么被折叠?
被折叠的 条评论
为什么被折叠?
 到【灌水乐园】发言


