


前言
在本栏(https://blog.csdn.net/2301_80653026/category_12660552.html)的上一节文章中我们介绍了什么是线程、线程和进程的区别。在本节中我们将介绍如何创建线程、Thread类和和常见的方法。
一、创建线程
1.1 通过继承 Thread 类创建线程
创建过程:
- 继承 Thread 来创建一个线程类。
- 创建 MyThread类的实例
- 调用 start 方法启动线程
具体实例代码:
/**
 * @author Zhang
 * @date 2024/4/2915:16
 * @Description:
 */


//创建一个类,继承自Thread
class  MyThread extends  Thread{

    //这个方法就是线程的入口方法
    @Override
    public void run() {
       // System.out.println("hello Thread");

        while(true){
            System.out.println("hello threat");
            try {
                Thread.sleep(1000);  //休眠1000毫秒
                /**
                 * 此处必须try catch,不能throws
                 * 在这个代码中重写的是父类的run,父类的run没有throws,因此,子类方法也就不能有throws
                 */
            } catch (InterruptedException e) {
                throw new RuntimeException(e);
            }
        }

    }
}

//创建线程
public class Demo1 {
    public static void main(String[] args) throws InterruptedException {
        Thread t = new MyThread();
        //start 和run都是Threat的成员
        //run只是描述了线程的入口(线程要做生么任务)
        //start 则是真正调用了系统API,在系统中创建线程,让线程再调用run
        t.start();

         while(true){
         System.out.println("hello main");
         Thread.sleep(1000);  //休眠1000毫秒
         }

    }
}
1.2 实现 Runnable 接口创建线程
创建过程:
- 实现 Runnable 接口。
- 创建 Thread 类实例, 调用 Thread 的构造方法时将 Runnable 对象作为 target 参数。
- 调用 start 方法
线程实例创建代码
/**
 * @author Zhang
 * @date 2024/4/2916:27
 * @Description:
 */


/**
 * 使用Runnable的写法和直接继承Thread之间的区别主要是:解耦合
 */
class  MyRunnable implements Runnable{

    @Override
    public void run() {
        while(true){
            System.out.println("hello thread");
            try {
                Thread.sleep(1000);
            } catch (InterruptedException e) {
                throw new RuntimeException(e);
            }
        }
    }
}

public class Demo2 {
    public static void main(String[] args) {
        Runnable runnable = new MyRunnable();
        Thread t = new Thread(runnable);
        t.start();
        while(true){
            System.out.println("hello main");
            try {
                Thread.sleep(1000);
            } catch (InterruptedException e) {
                throw new RuntimeException(e);
            }
        }
    }
}
上面两种方法:
- 继承 Thread 类, 直接使用 this 就表示当前线程对象的引用. 实现 Runnable 接口, this 表示的是
- MyRunnable 的引用. 需要使用 Thread.currentThread()
1.3 通过匿名内部类创建 Thread 子类对象
创建线程实例代码:
/**
 * @author Zhang
 * @date 2024/4/2916:58
 * @Description:
 */
public class Demo3 {
    public static void main(String[] args) {
        //匿名内部类
        Thread t = new Thread(){
            @Override
            public void run() {
                while (true){
                    System.out.println("hello thread");
                    try {
                        Thread.sleep(1000);
                    } catch (InterruptedException e) {
                        throw new RuntimeException(e);
                    }
                }
            }
        };

        t.start();
        while (true){
            System.out.println("hello main");
            try {
                Thread.sleep(100);
            } catch (InterruptedException e) {
                throw new RuntimeException(e);
            }
        }

    }
}
1.4 通过匿名内部类创建 Runnable 子类对象
创建线程实例:
/**
 * @author Zhang
 * @date 2024/4/2917:03
 * @Description:
 */
public class Demo4 {
    public static void main(String[] args) {
        //匿名内部类
         Runnable runnable = new Runnable() {
             @Override
             public void run() {
                 while(true){
                     System.out.println("hello thread");
                     try {
                         Thread.sleep(1000);
                     } catch (InterruptedException e) {
                         throw new RuntimeException(e);
                     }
                 }
             }
         };

         Thread t = new Thread(runnable);
         t.start();
         while (true){
             System.out.println("hello main");
             try {
                 Thread.sleep(1000);
             } catch (InterruptedException e) {
                 throw new RuntimeException(e);
             }
         }

    }
}
1.5 通过lambda 表达式创建 Runnable 子类对象
创建线程实例代码:
/**
 * @author Zhang
 * @date 2024/4/2917:44
 * @Description:
 */
public class Demo5 {
    public static void main(String[] args) {

        //lambda 表达式创建 Runnable 子类对象
        Thread t = new Thread(()->{
            while(true){
                System.out.println("hello thread");
                try {
                    Thread.sleep(1000);
                } catch (InterruptedException e) {
                    throw new RuntimeException(e);
                }
            }

        });
        t.start();
        while (true){
            System.out.println("hello main");
            try {
                Thread.sleep(1000);
            } catch (InterruptedException e) {
                throw new RuntimeException(e);
            }

        }
    }
}
二、Thread 类及常见方法
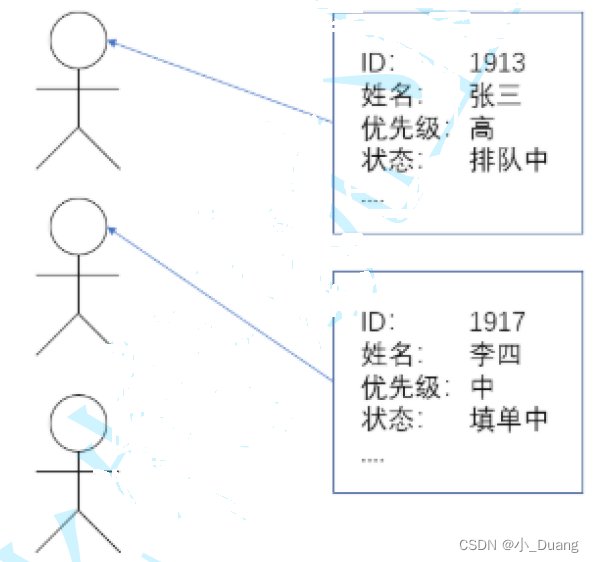
Thread 类是 JVM 用来管理线程的一个类,换句话说,每个线程都有一个唯一的 Thread 对象与之关联。
从实例来看,每个执行流,也需要有一个对象来描述,类似下图所示,而 Thread 类的对象就是用来描述一个线程执行流的,JVM 会将这些 Thread 对象组织起来,用于线程调度,线程管理。
2.1 Thread的常见构造方法
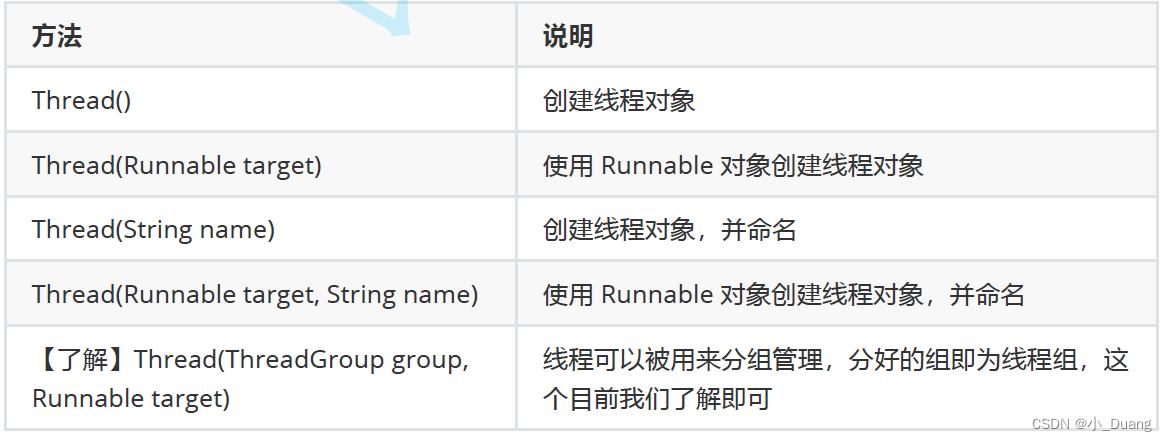
相关实例代码:
Thread t1 = new Thread();
Thread t2 = new Thread(new MyRunnable());
Thread t3 = new Thread("这是我的名字");
Thread t4 = new Thread(new MyRunnable(), "这是我的名字");
2.2 Thread 的几个常见属性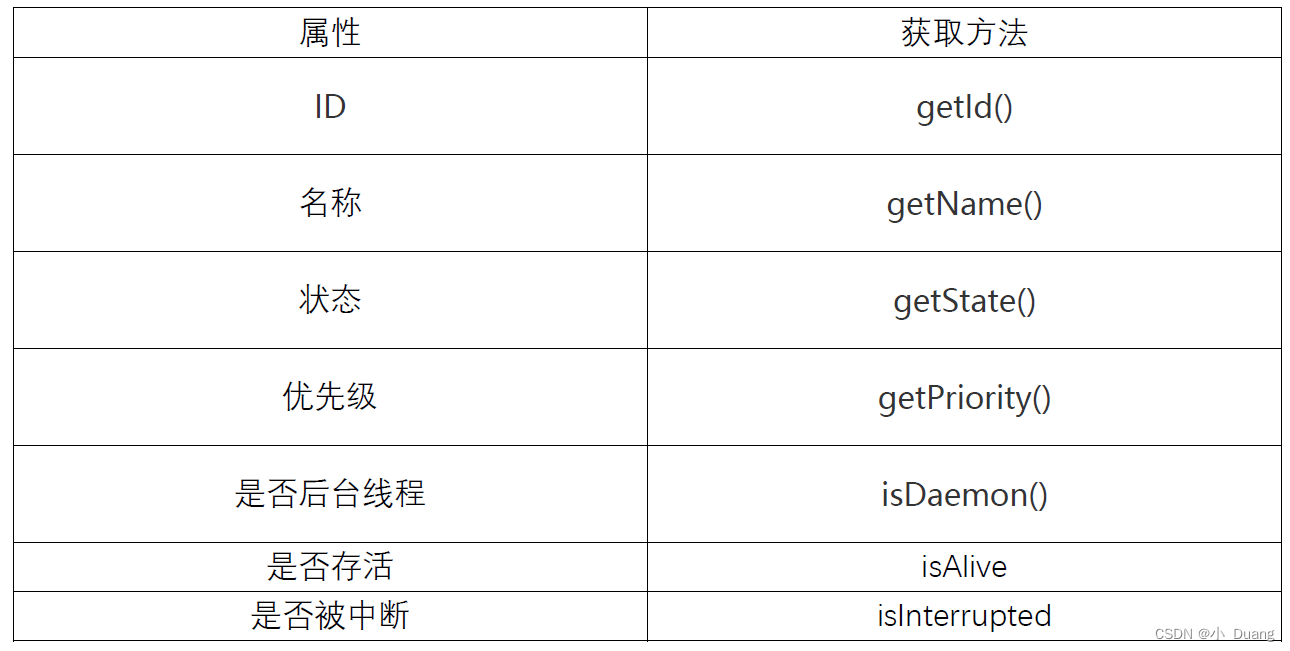
注意事项:
- ID 是线程的唯一标识,不同线程不会重复;
- 名称是各种调试工具用到;
- 状态表示线程当前所处的一个情况,下面我们会进一步说明;
- 优先级高的线程理论上来说更容易被调度到;
- 关于后台线程,需要记住一点:JVM会在一个进程的所有非后台线程结束后,才会结束运行;
- 是否存活,即简单的理解,为 run 方法是否运行结束了。
总结
好啦!以上就是本节所讲的内容,包括五种不同的创建线程的方式,
- 通过继承 Thread 类创建线程
- 实现 Runnable 接口创建线程
- 通过匿名内部类创建 Thread 子类对象
- 通过匿名内部类创建 Runnable 子类对象
- 通过lambda 表达式创建 Runnable 子类对象
此外,我们还介绍了Tread类的常见构造方法和常见属性,
在本栏(https://blog.csdn.net/2301_80653026/category_12660552.html)的下一节中我们将会继续介绍Tread类。


 2万+
2万+


 被折叠的 条评论
为什么被折叠?
被折叠的 条评论
为什么被折叠?
 到【灌水乐园】发言


