


建议
当我们出去找工作,或者准备找工作的时候,我们一定要想,我面试的目标是什么,我自己的技术栈有哪些,近期能掌握的有哪些,我的哪些短板 ,列出来,有计划的去完成,别看前两天掘金一些大佬在驳来驳去 ,他们的观点是他们的,不要因为他们的观点,膨胀了自己,影响自己的学习节奏。基础很大程度决定你自己技术层次的厚度,你再熟练框架也好,也会比你便宜的,性价比高的替代,很现实的问题但也要有危机意识,当我们年级大了,有哪些亮点,与比我们经历更旺盛的年轻小工程师,竞争。
-
无论你现在水平怎么样一定要 持续学习 没有鸡汤,别人看起来的毫不费力,其实费了很大力,这四个字就是我的建议!!!!!!!!!
-
准备想说怎么样写简历,想象算了,我觉得,技术就是你最好的简历
-
我希望每一个努力生活的it工程师,都会得到自己想要的,因为我们很辛苦,我们应得的。
-
有什么问题想交流,欢迎给我私信,欢迎评论
【附】相关架构及资料


内含往期Android高级架构资料、源码、笔记、视频。高级UI、性能优化、架构师课程、NDK、混合式开发(ReactNative+Weex)微信小程序、Flutter全方面的Android进阶实践技术
网上学习资料一大堆,但如果学到的知识不成体系,遇到问题时只是浅尝辄止,不再深入研究,那么很难做到真正的技术提升。
一个人可以走的很快,但一群人才能走的更远!不论你是正从事IT行业的老鸟或是对IT行业感兴趣的新人,都欢迎加入我们的的圈子(技术交流、学习资源、职场吐槽、大厂内推、面试辅导),让我们一起学习成长!
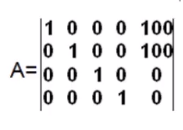
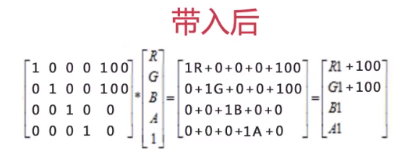
下面我们看一下这个矩阵,它在原来矩阵的基础上把两个地方的0变为了100,导致的后果就是原来的R G的值变为了它们加上100的值,也就是每个像素点的R G值都增加了100:
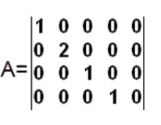
同样的,我们可以看一下这样的一个矩阵,它在原来的初始化矩阵的基础上,把矩阵G上的一个1变为了2,带入后可发现,G变为了原来的两倍,效果就是将整个图像的Green增加了两倍

我们可以发现,颜色矩阵的四行分别控制着像素点的R G B A四个属性,而颜色矩阵的第五列,我们称它为颜色偏移量,它不会直接改变某个颜色的系数,而是在原来的基础上调整整个颜色。
我们要改变一个颜色,不仅仅可以改变偏移量,还可以改变颜色的系数。
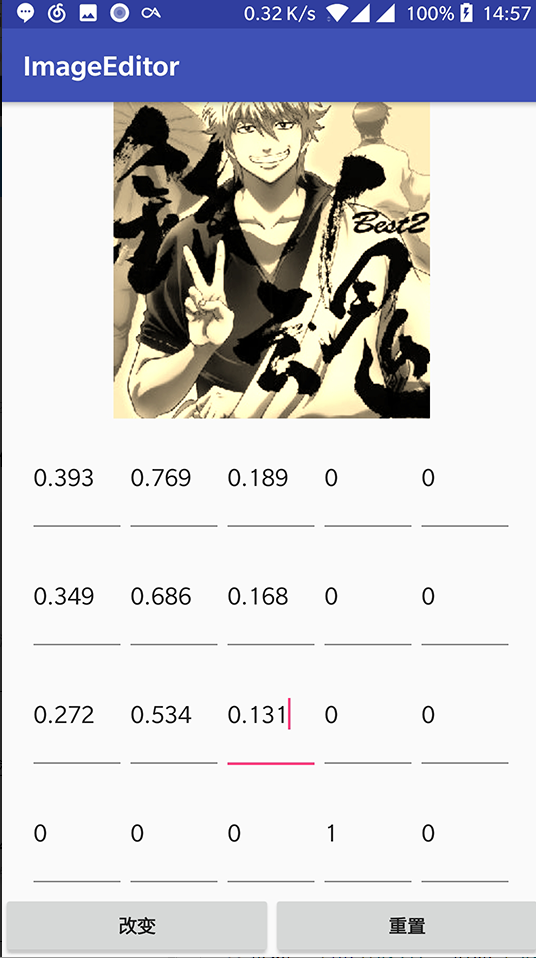
用矩阵变换来调整图像效果
我们基于原来的工程,增加一个Activity,并让MainActivity的第二个按钮跳转到此Activity。
首先是布局,我们制作如下的布局,准备在GridLayout中添加20个EditText来代表矩阵,用按钮来应用矩阵。
<LinearLayout xmlns:android=“http://schemas.android.com/apk/res/android”
android:orientation=“vertical”
android:layout_width=“match_parent”
android:layout_height=“match_parent”>
<ImageView
android:id=“@+id/image_view”
android:layout_width=“match_parent”
android:layout_height=“0dp”
android:layout_weight=“2”/>
<GridLayout
android:id=“@+id/group”
android:layout_width=“match_parent”
android:layout_height=“0dp”
android:layout_weight=“3”
android:rowCount=“4”
android:columnCount=“5”
<LinearLayout
android:layout_width=“match_parent”
android:layout_height=“wrap_content”
android:orientation=“horizontal”>
<Button
android:id=“@+id/btn_change”
android:layout_width=“0dp”
android:layout_height=“wrap_content”
android:layout_weight=“1”
android:text=“改变”/>
<Button
android:id=“@+id/btn_reset”
android:layout_width=“0dp”
android:layout_height=“wrap_content”
android:layout_weight=“1”
android:text=“重置”/>
<
然后,我们修改Activity的代码,动态将EditText添加到GridText,来映射我们的ColorMatrix。通过改变EditText来改变我们的ColorMatrix,使图片效果变化。
public class ColorMatrixActivity extends AppCompatActivity {
private ImageView mImageView;
private GridLayout mGroup;
private Bitmap bitmap;
private int mEtWidth,mEtHeight;
private EditText[] mEditTexts = new EditText[20];
private float[] mColorMatrix = new float[20]; //对应矩阵
private Button changeButton;
private Button resetButton;
@Override
protected void onCreate(Bundle savedInstanceState) {
super.onCreate(savedInstanceState);
setContentView(R.layout.activity_color_matrix);
bitmap = BitmapFactory.decodeResource(getResources(),R.drawable.test1);
mImageView = (ImageView) findViewById(R.id.image_view);
mImageView.setImageBitmap(bitmap);
mGroup = (GridLayout) findViewById(R.id.group);
//动态创建EditText,填充GridLayout
//由于在onCreate中,mGroup还没有创建完成,无法获取宽高
//所以通过post方法,在控件绘制完毕后,执行Runnable的具体方法
mGroup.post(new Runnable() {
@Override
public void run() {
mEtWidth = mGroup.getWidth()/5;
mEtHeight = mGroup.getHeight()/4;
addEditText();
initMatrix();
}
});
changeButton = (Button)findViewById(R.id.btn_change);
changeButton.setOnClickListener(new View.OnClickListener() {
@Override
public void onClick(View view) {
changeButtonEvent();
}
});
resetButton = (Button)findViewById(R.id.btn_reset);
resetButton.setOnClickListener(new View.OnClickListener() {
@Override
public void onClick(View view) {
resetButtonEvent();
}
});
}
private void addEditText(){
for (int i=0;i<20;i++){
EditText editText = new EditText(ColorMatrixActivity.this);
mEditTexts[i] = editText;
mGroup.addView(editText,mEtWidth,mEtHeight);
}
}
private void initMatrix(){
for (int i=0;i<20;i++){
if (i%6 == 0){
//i为第0、6、12、18位时
mColorMatrix[i]=1;
mEditTexts[i].setText(String.valueOf(1));
}else{
mColorMatrix[i]=0;
mEditTexts[i].setText(String.valueOf(0));
}
}
}
private void getMatrix(){
for (int i=0;i<20;i++){
mColorMatrix[i] = Float.valueOf(mEditTexts[i].getText().toString());
}
}
private void setImageMatrix(){
Bitmap currentBitmap = Bitmap.createBitmap(bitmap.getWidth(),bitmap.getHeight(), Bitmap.Config.ARGB_8888);
ColorMatrix colorMatrix = new ColorMatrix();
colorMatrix.set(mColorMatrix);
Canvas canvas = new Canvas(currentBitmap);
Paint paint = new Paint(Paint.ANTI_ALIAS_FLAG);
paint.setColorFilter(new ColorMatrixColorFilter(colorMatrix));
canvas.drawBitmap(bitmap,0,0,paint);
mImageView.setImageBitmap(currentBitmap);
}
public void changeButtonEvent(){
getMatrix();
setImageMatrix();
}
public void resetButtonEvent(){
initMatrix();
setImageMatrix();
}
}
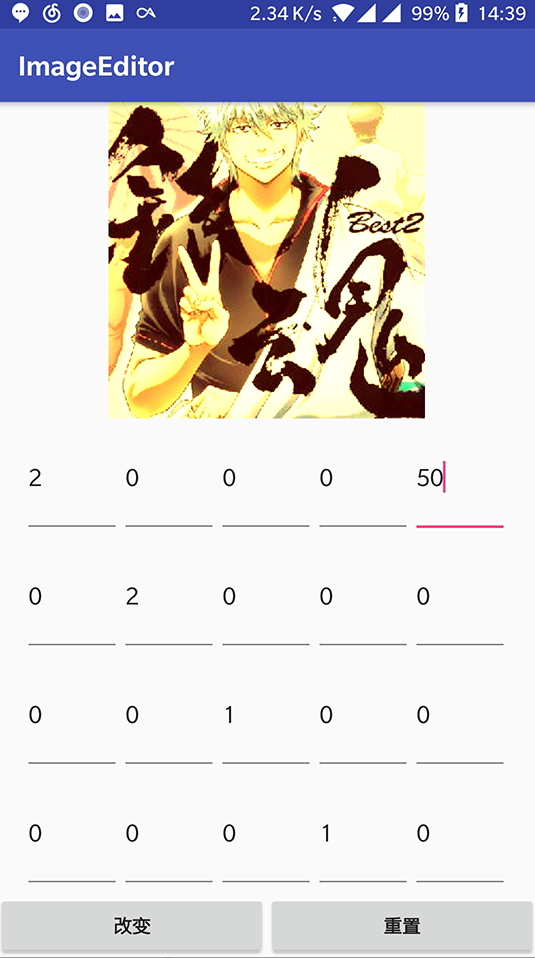
可以看到,成功改变了图片效果,效果如图
学到这里,我们便可以解答之前为什么要用这样的参数来改变色相、饱和度和亮度了。以亮度为例,我们来看看setScale方法的源码。可以发现,ColorMatrix在内部也是使用这样一个颜色数组,同时将6的倍数位设置为相应的值,以此来改变亮度,说明我们如果在颜色矩阵中想要改变亮度,只需要将每个颜色的值同时提高即可。
/**
- Set this colormatrix to scale by the specified values.
*/
public void setScale(float rScale, float gScale, float bScale,float aScale) {
final float[] a = mArray;
for (int i = 19; i > 0; --i) {
a[i] = 0;
}
a[0] = rScale;
a[6] = gScale;
a[12] = bScale;
a[18] = aScale;
}
通过这些研究,我们可以这样总结:
图像处理,实际上就是研究不同颜色矩阵对图像的处理效果
比如我们在一些图像处理app中常见的怀旧效果,通过下图的设置方法即可得到
通过像素点进行图像处理
图像经过放大后,会呈现一个个点阵,每一个点实际上就是一个像素点。通过RGB的颜色配比,就可以显示出不同的颜色。
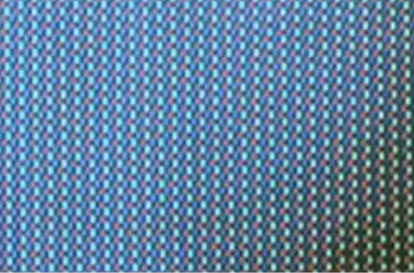
下面是一些对像素点处理形成图像特效的例子:
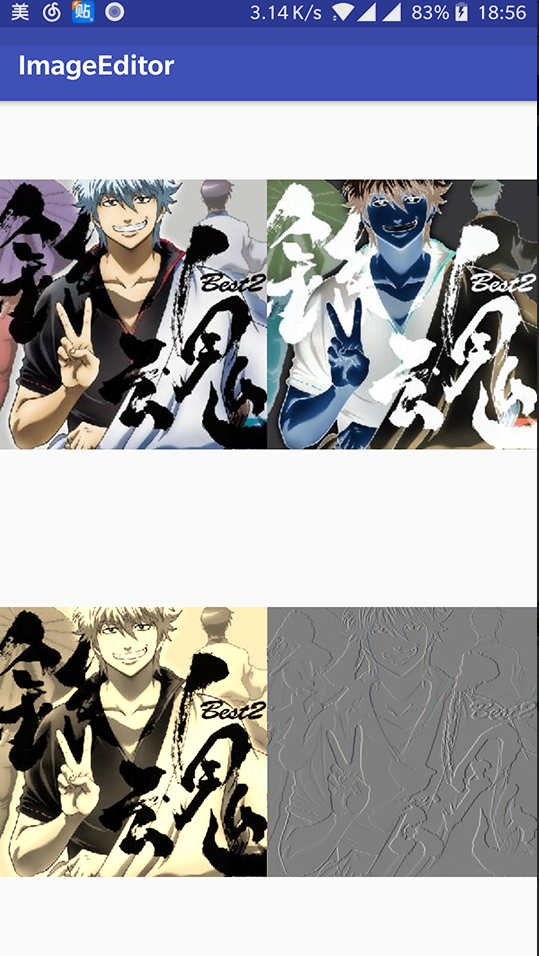
底片效果

对于ABC三个像素点,求B点的底片效果的算法如下。实际上就是对每个坐标点计算它的反色,即可得到
B.r = 255 - B.r;
B.g = 255 - B.g;
B.b = 255 - B.b;
老照片效果

求老照片效果对像素点的算法如下,其中pixR就是当前像素点的R值,以此类推。
newR = (int)(0.393 * pixR + 0.769 * pixG + 0.189 * pixB);
newG = (int)(0.349 * pixR + 0.686 * pixG + 0.168 * pixB);
newB = (int)(0.272 * pixR + 0.534 * pixG + 0.131 * pixB);
浮雕效果

对于ABC三个点,求B点的浮雕效果的算法如下。
B.r = C.r - B.r + 127;
B.g = C.g - B.g + 127;
B.b = C.b - B.b + 127;
下面,我们就通过对像素点的修改来改变图像的显示效果。
先新建一个新的Activity,并在MainActivity的第三个按钮中加上跳转到它的方法。
<?xml version="1.0" encoding="utf-8"?><LinearLayout xmlns:android=“http://schemas.android.com/apk/res/android”
android:orientation=“vertical”
android:layout_width=“match_parent”
android:layout_height=“match_parent”>
<LinearLayout
android:layout_width=“match_parent”
android:layout_height=“0dp”
android:layout_weight=“1”>
<ImageView
android:id=“@+id/image_view1”
android:layout_width=“0dp”
android:layout_height=“match_parent”
android:layout_weight=“1”/>
<ImageView
android:id=“@+id/image_view2”
android:layout_width=“0dp”
android:layout_height=“match_parent”
android:layout_weight=“1”/>
<LinearLayout
android:layout_width=“match_parent”
android:layout_height=“0dp”
android:layout_weight=“1”>
<ImageView
android:id=“@+id/image_view3”
android:layout_width=“0dp”
android:layout_height=“match_parent”
android:layout_weight=“1”/>
<ImageView
android:id=“@+id/image_view4”
android:layout_width=“0dp”
android:layout_height=“match_parent”
android:layout_weight=“1”/>
加入相应特效方法
我们在ImageUtils中加入几个新方法,分别做不同的处理
反色效果
代码如下,我们在里面新建了一个对应图片的像素的数组,然后通过getPixels方法获取所有像素。
getPixels的第二个参数是代表起点的偏移量,第三个参数是控制读取数组时的行距,一般使用width,后面两个参数代表第一次读取像素点的坐标,倒数第二个参数代表我们从bitmap中读取的宽度,最后一个是读取的高度。
然后我们分别对每个像素点通过Color类的red green blue alpha方法来获取r g b a四个值,并通过算法改变它的rgb值,并通过Color的argb方法转换为新的像素数组。需要注意的是,改变它的rgb值时,需要判断一下有没有超过0-255的限制,有的话则赋值为255或0。
Bitmap currentBitmap = Bitmap.createBitmap(width,height,
Bitmap.Config.ARGB_8888);
int[] oldPx = new int[width*height]; //存储像素点数组
int[] newPx = new int[width*height];
bitmap.getPixels(oldPx,0,width,0,0,width,height);
for (int i=0;i<width*height;i++){
color = oldPx[i];
r = Color.red(color);
g = Color.green(color);
b = Color.blue(color);
a = Color.alpha(color);
//通过算法计算新的rgb值
r = 255 - r;
g = 255 - g;
b = 255 - b;
if (r > 255) r=255;
else if (r < 0) r=0;
if (g > 255) g=255;
else if (g < 0) g=0;
if (b > 255) b=255;
else if (b < 0) b=0;
newPx[i] = Color.argb(a,r,g,b);
}
currentBitmap.setPixels(newPx,0,width,0,0,width,height);
return currentBitmap;
}
老照片效果
其他代码基本与之前的一样,只是算法稍作变动,并且不能在原来的rgb基础上改动:
public static Bitmap handleImageOldpicture(Bitmap bitmap){
int width = bitmap.getWidth();
int height = bitmap.getHeight();
int color;
int r,g,b,a;
Bitmap currentBitmap = Bitmap.createBitmap(width,height,
Bitmap.Config.ARGB_8888);
int[] oldPx = new int[width*height]; //存储像素点数组
int[] newPx = new int[width*height];
bitmap.getPixels(oldPx,0,width,0,0,width,height);
for (int i=0;i<width*height;i++){
color = oldPx[i];
r = Color.red(color);
g = Color.green(color);
b = Color.blue(color);
a = Color.alpha(color);
int r1,g1,b1;
r1 = (int)(0.393 * r + 0.769 * g + 0.189 * b);
g1 = (int)(0.349 * r + 0.686 * g + 0.168 * b);
b1 = (int)(0.272 * r + 0.534 * g + 0.131 * b);
if (r1 > 255) r1=255;
else if (r1 < 0) r1=0;
if (g1 > 255) g1=255;
else if (g1 < 0) g1=0;
if (b1 > 255) b1=255;
else if (b1 < 0) b1=0;
newPx[i] = Color.argb(a,r1,g1,b1);
}
currentBitmap.setPixels(newPx,0,width,0,0,width,height);
return currentBitmap;
}
浮雕效果
与之前的差不多,唯一需要注意的是,我们需要用到前一个像素点的颜色,所以需要从1开始循环,然后通过相应算法,获取图片
public static Bitmap handleImagePixelsRelief(Bitmap bitmap){
int width = bitmap.getWidth();
int height = bitmap.getHeight();
int color,colorBefore;
int r,g,b,a;
int r1,g1,b1;
Bitmap currentBitmap = Bitmap.createBitmap(width,height,
Bitmap.Config.ARGB_8888);
int[] oldPx = new int[width*height]; //存储像素点数组
int[] newPx = new int[width*height];
bitmap.getPixels(oldPx,0,width,0,0,width,height);
for (int i=1;i<width*height;i++){
//取出前一个点的颜色
colorBefore = oldPx[i-1];
r = Color.red(colorBefore);
g = Color.green(colorBefore);
b = Color.blue(colorBefore);
a = Color.alpha(colorBefore);
color = oldPx[i];
r1 = Color.red(color);
g1 = Color.green(color);
b1 = Color.blue(color);
r = (r - r1 + 127);
g = (g - g1 + 127);
b = (b - b1 + 127);
if (r1 > 255) r1=255;
if (g1 > 255) g1=255;
if (b1 > 255) b1=255;
newPx[i] = Color.argb(a,r,g,b);
}
currentBitmap.setPixels(newPx,0,width,0,0,width,height);
return currentBitmap;
}
查看效果
我们在Activity中调用相应方法,查看效果。
public class PixelEffectActivity extends AppCompatActivity {
private ImageView imageView1,imageView2,imageView3,imageView4;
@Override
protected void onCreate(Bundle savedInstanceState) {
super.onCreate(savedInstanceState);
setContentView(R.layout.activity_pixel_effect);
Bitmap bitmap = BitmapFactory.decodeResource(getResources(), R.drawable.test1);
imageView1 = (ImageView) findViewById(R.id.image_view1);
imageView2 = (ImageView) findViewById(R.id.image_view2);
imageView3 = (ImageView) findViewById(R.id.image_view3);
imageView4 = (ImageView) findViewById(R.id.image_view4);
imageView1.setImageBitmap(bitmap);
imageView2.setImageBitmap(ImageUtils.handleImageNegative(bitmap));
imageView3.setImageBitmap(ImageUtils.handleImageOldpicture(bitmap));
imageView4.setImageBitmap(ImageUtils.handleImagePixelsRelief(bitmap));
}
}
效果如图
最后
在这里我和身边一些朋友特意整理了一份快速进阶为Android高级工程师的系统且全面的学习资料。涵盖了Android初级——Android高级架构师进阶必备的一些学习技能。
附上:我们之前因为秋招收集的二十套一二线互联网公司Android面试真题(含BAT、小米、华为、美团、滴滴)和我自己整理Android复习笔记(包含Android基础知识点、Android扩展知识点、Android源码解析、设计模式汇总、Gradle知识点、常见算法题汇总。)

网上学习资料一大堆,但如果学到的知识不成体系,遇到问题时只是浅尝辄止,不再深入研究,那么很难做到真正的技术提升。
一个人可以走的很快,但一群人才能走的更远!不论你是正从事IT行业的老鸟或是对IT行业感兴趣的新人,都欢迎加入我们的的圈子(技术交流、学习资源、职场吐槽、大厂内推、面试辅导),让我们一起学习成长!
View) findViewById(R.id.image_view4);
imageView1.setImageBitmap(bitmap);
imageView2.setImageBitmap(ImageUtils.handleImageNegative(bitmap));
imageView3.setImageBitmap(ImageUtils.handleImageOldpicture(bitmap));
imageView4.setImageBitmap(ImageUtils.handleImagePixelsRelief(bitmap));
}
}
效果如图
最后
在这里我和身边一些朋友特意整理了一份快速进阶为Android高级工程师的系统且全面的学习资料。涵盖了Android初级——Android高级架构师进阶必备的一些学习技能。
附上:我们之前因为秋招收集的二十套一二线互联网公司Android面试真题(含BAT、小米、华为、美团、滴滴)和我自己整理Android复习笔记(包含Android基础知识点、Android扩展知识点、Android源码解析、设计模式汇总、Gradle知识点、常见算法题汇总。)
[外链图片转存中…(img-ZsiVFU1z-1715605318295)]
网上学习资料一大堆,但如果学到的知识不成体系,遇到问题时只是浅尝辄止,不再深入研究,那么很难做到真正的技术提升。
一个人可以走的很快,但一群人才能走的更远!不论你是正从事IT行业的老鸟或是对IT行业感兴趣的新人,都欢迎加入我们的的圈子(技术交流、学习资源、职场吐槽、大厂内推、面试辅导),让我们一起学习成长!


 3007
3007


 被折叠的 条评论
为什么被折叠?
被折叠的 条评论
为什么被折叠?
 到【灌水乐园】发言


