python-车辆识别
车辆识别
导入所需的库和模块
import torch.nn as nn
import tkinter as tk
from tkinter import filedialog, messagebox
from PIL import Image, ImageTk
import torch
from torchvision import transforms, models
from efficientnet_pytorch import EfficientNet
import numpy as np
import cv2
import subprocess
import os
定义EfficientNet模型
class EfficientNetModel(nn.Module):
    def __init__(self, num_classes=10, pretrained=True):
        super(EfficientNetModel, self).__init__()
        # 加载预训练的EfficientNet模型
        self.efficientnet = EfficientNet.from_name('efficientnet-b3')
        #
        # if pretrained:
        #     # 加载预训练权重
        #     self.efficientnet.load_state_dict(
        #         torch.load(r'D:\python\pytorch\Vehicle identification\save pth\efficientnet-b3-5fb5a3c3.pth'))

        # 获取EfficientNet模型的最后一层全连接层的输入特征数量
        num_ftrs = self.efficientnet._fc.in_features
        # 将EfficientNet模型的最后一层全连接层替换为一个新的全连接层,输出特征数量设置为num_classes
        self.efficientnet._fc = nn.Linear(num_ftrs, num_classes)

    # forward方法定义了前向传播过程
    def forward(self, x):
        return self.efficientnet(x)
创建一个EfficientNetModel实例,并加载训练好的模型参数
# Example usage
model = EfficientNetModel(num_classes=12)
# # 定义并加载 ResNet-50 模型
# num_classes = 10  # 根据实际类别数修改
# model = models.resnet50(weights=None)
# model.fc = nn.Linear(model.fc.in_features, num_classes)

# 加载训练好的模型参数
model_path = 'best_EfficientNet_b3_updata1.pth'
model.load_state_dict(torch.load(model_path, map_location=torch.device('cpu')))
model.eval()
图像转换
transform = transforms.Compose([
    transforms.Resize((224, 224)),  # ResNet-50 的输入图像大小
    transforms.ToTensor(),
    transforms.Normalize(mean=[0.485, 0.456, 0.406], std=[0.229, 0.224, 0.225]),  # ResNet-50 的标准化
])
定义类别标签classes。
classes = ['皮卡', '敞篷车', '跑车', '掀背两箱车', '小型面包车', 'SUV', '轿车', '厢式货车', '旅行车', '公共汽车', '消防车', '出租车']
初始化全局变量
# 初始化全局变量
selected_image_path = None
label_text = None
right_canvas_image = None
定义上传图像
def upload_image():
    global selected_image_path, label_text
    file_path = filedialog.askopenfilename()
    if file_path:
        selected_image_path = file_path
        image = Image.open(file_path)
        original_width, original_height = image.size

        # 计算宽高比
        aspect_ratio = original_width / original_height

        # 根据画布尺寸和宽高比计算新尺寸
        canvas_width = 500
        canvas_height = 300
        new_width = canvas_width
        new_height = int(new_width / aspect_ratio)
        if new_height > canvas_height:
            new_height = canvas_height
            new_width = int(new_height * aspect_ratio)

        # 调整图片大小
        image = image.resize((new_width, new_height), Image.Resampling.LANCZOS)

        # 居中图片
        photo = ImageTk.PhotoImage(image)
        canvas_left.create_image((canvas_width - new_width) / 2, (canvas_height - new_height) / 2, anchor='nw', image=photo)
        canvas_left.image = photo  # Keep a reference!

        # 创建图片的标签
        if label_text is None:
            label_text = tk.Label(window, text="", font=("Arial", 16))
            label_text.grid(row=3, column=0, columnspan=2, padx=10, pady=10)
定义开始检测
def start_detection():
    global right_canvas_image
    if selected_image_path is not None:
        image = Image.open(selected_image_path)
        input_image = transform(image).unsqueeze(0)
        with torch.no_grad():
            outputs = model(input_image)
            _, predicted = torch.max(outputs, 1)
            label = classes[predicted.item()]
            probabilities = torch.nn.functional.softmax(outputs, dim=1)
            max_probability = probabilities[0][predicted].item()
            label_text.config(text=f"{label} - {max_probability:.2f}")

        # 显示图片在右侧画布
        image = Image.open(selected_image_path)  # 重新打开图片以避免被转换影响
        original_width, original_height = image.size
        aspect_ratio = original_width / original_height
        canvas_width = 500
        canvas_height = 300
        new_width = canvas_width
        new_height = int(new_width / aspect_ratio)
        if new_height > canvas_height:
            new_height = canvas_height
            new_width = int(new_height * aspect_ratio)
        image = image.resize((new_width, new_height), Image.Resampling.LANCZOS)
        photo = ImageTk.PhotoImage(image)

        # 检查是否已经创建了右侧画布的图片
        if right_canvas_image is None:
            right_canvas_image = canvas_right.create_image((canvas_width - new_width) / 2, (canvas_height - new_height) / 2, anchor='nw', image=photo)
        else:
            canvas_right.itemconfig(right_canvas_image, image=photo)
        canvas_right.image = photo  # Keep a reference!
    else:
        messagebox.showwarning("警告", "请先选择一张图像")


    # 将标签放置在图片上
    label_text.grid(row=1, column=1, padx=10, pady=10, sticky='n')
图像增强
def replaceZeroes(data):
    min_nonzero = min(data[np.nonzero(data)])
    data[data == 0] = min_nonzero
    return data


def MSR(img, scales):
    weight = 1 / 3.0
    scales_size = len(scales)
    h, w = img.shape[:2]
    log_R = np.zeros((h, w), dtype=np.float32)

    for i in range(scales_size):
        img = replaceZeroes(img)
        L_blur = cv2.GaussianBlur(img, (scales[i], scales[i]), 0)
        L_blur = replaceZeroes(L_blur)
        dst_Img = cv2.log(img / 255.0)
        dst_Lblur = cv2.log(L_blur / 255.0)
        dst_Ixl = cv2.multiply(dst_Img, dst_Lblur)
        log_R += weight * cv2.subtract(dst_Img, dst_Ixl)

    dst_R = cv2.normalize(log_R, None, 0, 255, cv2.NORM_MINMAX)
    log_uint8 = cv2.convertScaleAbs(dst_R)
    return log_uint8
    def img_inten():
    global selected_image_path, right_canvas_image
    if selected_image_path is not None:
        # 读取图像
        image = Image.open(selected_image_path)
        # 转换为OpenCV格式
        image = cv2.cvtColor(np.array(image), cv2.COLOR_RGB2BGR)

        # 应用MSR算法
        scales = [15, 101, 301]  # 可根据需要调整
        b_gray, g_gray, r_gray = cv2.split(image)
        b_gray = MSR(b_gray, scales)
        g_gray = MSR(g_gray, scales)
        r_gray = MSR(r_gray, scales)
        enhanced_image = cv2.merge([b_gray, g_gray, r_gray])

        # 转换回PIL图像格式
        enhanced_image = Image.fromarray(cv2.cvtColor(enhanced_image, cv2.COLOR_BGR2RGB))

        # 调整图像大小以适应模型输入
        enhanced_image = enhanced_image.resize((224, 224), Image.Resampling.LANCZOS)

        # 转换图像为模型可以接受的格式
        input_image = transform(enhanced_image).unsqueeze(0)

        # 使用模型进行检测
        with torch.no_grad():
            outputs = model(input_image)
            _, predicted = torch.max(outputs, 1)
            label = classes[predicted.item()]
            probabilities = torch.nn.functional.softmax(outputs, dim=1)
            max_probability = probabilities[0][predicted].item()

        # 显示增强后的图像和检测结果在右侧画布
        enhanced_image = enhanced_image.resize((500, 300), Image.Resampling.LANCZOS)
        photo = ImageTk.PhotoImage(enhanced_image)
        if right_canvas_image is None:
            right_canvas_image = canvas_right.create_image((500 - 500) / 2, (300 - 300) / 2, anchor='nw', image=photo)
        else:
            canvas_right.itemconfig(right_canvas_image, image=photo)
        canvas_right.image = photo  # Keep a reference!

        # 更新标签文本
        label_text.config(text=f"{label} - {max_probability:.2f}")
    else:
        messagebox.showwarning("警告", "请先选择一张图像")
主窗口
# 创建主窗口
window = tk.Tk()
window.title("图像目标检测系统")
window.geometry('1000x650')  # 设置窗口大小

# 创建背景画布并使用grid布局管理器
canvas_background = tk.Canvas(window, width=1000, height=650, bg="#e6f2ff")
canvas_background.grid(row=0, column=0, columnspan=2, rowspan=4, sticky='nsew')  # 使用grid管理器

# 加载背景图像
background_image = Image.open(r"E:\汽车识别项目\图标\5.jpg")  # 替换为您的背景图像路径
background_image = background_image.resize((1000, 650), Image.Resampling.LANCZOS)  # 调整图像大小以适应窗口
background_photo = ImageTk.PhotoImage(background_image)

# 在背景画布上绘制背景图像
canvas_background.create_image(0, 0, anchor='nw', image=background_photo)
canvas_background.image = background_photo  # 保持对图像的引用

# 加载按钮图片
upload_img = Image.open(r"E:\汽车识别项目\图标\3.jpg")  # 替换为您的上传按钮图片路径
upload_img = upload_img.resize((100, 50), Image.Resampling.LANCZOS)  # 调整图片大小
upload_img = ImageTk.PhotoImage(upload_img)

start_detection_img = Image.open(r"E:\汽车识别项目\图标\2.jpg")  # 替换为您的开始检测按钮图片路径
start_detection_img = start_detection_img.resize((100, 50), Image.Resampling.LANCZOS)  # 调整图片大小
start_detection_img = ImageTk.PhotoImage(start_detection_img)

img_intensification_img = Image.open(r"E:\汽车识别项目\图标\1.jpg")  # 替换为您的图像增强按钮图片路径
img_intensification_img = img_intensification_img.resize((100, 50), Image.Resampling.LANCZOS)  # 调整图片大小
img_intensification_img = ImageTk.PhotoImage(img_intensification_img)

# 创建两个画布区域
canvas_left = tk.Canvas(window, width=224, height=224, bg="#e6f2ff")
canvas_right = tk.Canvas(window, width=224, height=224, bg="#e6f2ff")
# 加载图片
waiting_image = Image.open(r"E:\汽车识别项目\图标\8.jpg")  # 替换为您的图片路径
detected_image = Image.open(r"E:\汽车识别项目\图标\7.jpg")  # 替换为您的图片路径
waiting_image = waiting_image.resize((200, 50), Image.Resampling.LANCZOS)
detected_image = detected_image.resize((200, 50), Image.Resampling.LANCZOS)
waiting_photo = ImageTk.PhotoImage(waiting_image)
detected_photo = ImageTk.PhotoImage(detected_image)
# 将两个画布区域放置在主窗口中
canvas_left.grid(row=1, column=0, padx=10, pady=10, sticky='nsew')
canvas_right.grid(row=1, column=1, padx=10, pady=10, sticky='nsew')

# 创建标签
label_waiting_image = tk.Label(window, image=waiting_photo, font=("Arial", 16), bg="#e6f2ff")
label_detected_image = tk.Label(window, image=detected_photo, font=("Arial", 16), bg="#e6f2ff")

# 定位标签
label_waiting_image.grid(row=0, column=0, padx=10, pady=10, sticky='nsew')
label_detected_image.grid(row=0, column=1, padx=10, pady=10, sticky='nsew')

# 设置标签的图片
label_waiting_image.config(image=waiting_photo)
label_detected_image.config(image=detected_photo)


# 创建按钮并放置在主窗口上
button_upload = tk.Button(window, image=upload_img, command=upload_image, relief="flat", borderwidth=0, background='#e6f2ff', activebackground='#e6f2ff')
button_start_detection = tk.Button(window, image=start_detection_img, command=start_detection, relief="flat", borderwidth=0, background='#e6f2ff', activebackground='#e6f2ff')
img_intensification = tk.Button(window, image=img_intensification_img, command=img_inten, relief="flat", borderwidth=0, background='#e6f2ff', activebackground='#e6f2ff')

# 将按钮放置在主窗口上
button_upload.place(x=155,y=495)
button_start_detection.place(x=755,y=495)
img_intensification.place(x=455,y=495)


# 运行主窗口
window.mainloop()
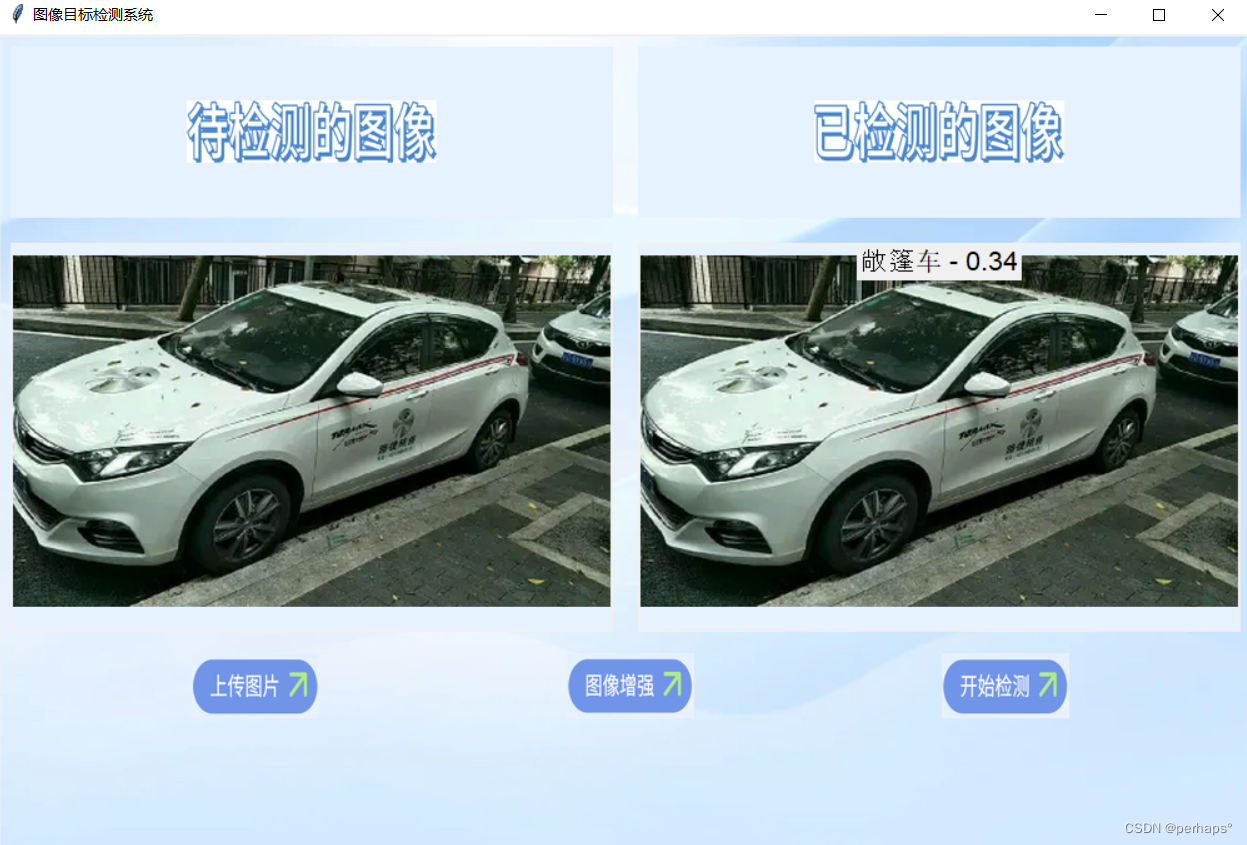
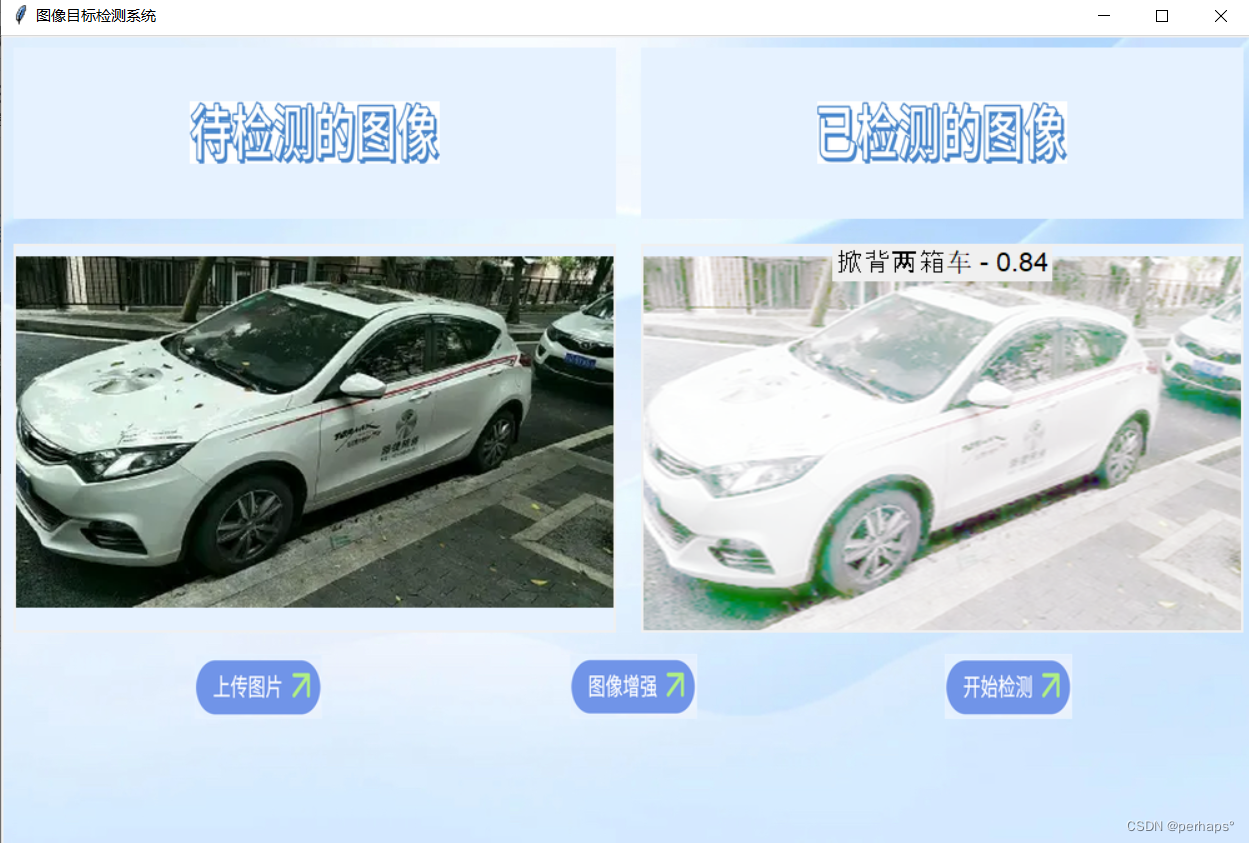
效果


 623
623

 被折叠的 条评论
为什么被折叠?


