


一、前言
二维码作为一种便捷的信息载体,广泛应用于各种场景。本文将详细介绍如何使用Java生成二维码,并通过Vue.js前端框架展示这些二维码。我们将使用ZXing库生成二维码,并通过Spring Boot提供API接口,前端使用axios获取数据并渲染。
二、技术栈选择
后端:Spring Boot + ZXing(二维码生成库)
前端:Vue.js 3 + Element Plus(UI组件库)+ axios(HTTP请求库)
三、后端实现(Java部分)
3.1. 创建Spring Boot项目
3.2. pom.xml中添加ZXing依赖
<dependency>
    <groupId>com.google.zxing</groupId>
    <artifactId>javase</artifactId>
    <version>3.3.3</version>
</dependency>

<dependency>
    <groupId>commons-codec</groupId>
    <artifactId>commons-codec</artifactId>
    <version>1.14</version>
</dependency>
3.3. 创建二维码生成实现类
public class QRCodeServiceImpl {

    //生成二维码
    public Result generateQRCode(){
        //二维码信息生成
        String qrCode = getQRCode();
        return Result.ok(new QRCodeVO(qrCode));
    }

    private String getQRCode(String code) {
        //可放入信息,只放入url扫码后会调转页面,放入数据扫码后可以拿到数据。
        //Map<String, Object> dataMap = new HashMap<>();
        //String flushTime = LocalDateTime.now().toString();
        //UUID uuid = UUID.randomUUID();
        //String uuidString = uuid.toString();
        //dataMap.put("sessionIds", sessionIds);
        //dataMap.put("flushTime", flushTime);
        //dataMap.put("uuid", uuidString);
        //String jsonString = JSON.toJSONString(dataMap);
        String url = "https://www.baidu.com";
        try {
            HashMap<EncodeHintType, Object> map = new HashMap<>();
            map.put(EncodeHintType.ERROR_CORRECTION, ErrorCorrectionLevel.Q);
            map.put(EncodeHintType.CHARACTER_SET, "utf-8");
            map.put(EncodeHintType.MARGIN, 1);

            //此处即放入了url参数,扫码后会跳转到https://www.baidu.com,当然你改为jsonString即放入数据。
            BitMatrix bitMatrix = new MultiFormatWriter().encode(url, BarcodeFormat.QR_CODE, 2000, 2000, map);
            int width = bitMatrix.getWidth();
            int height = bitMatrix.getHeight();
            BufferedImage bufferedImage = new BufferedImage(width, height, BufferedImage.TYPE_INT_RGB);

            for (int x = 0; x < width; x++) {
                for (int y = 0; y < height; y++) {
                    bufferedImage.setRGB(x, y, bitMatrix.get(x, y) ? 0xFF000000 : 0xFFFFFFFF);
                }
            }

            ByteArrayOutputStream os = new ByteArrayOutputStream();
            ImageIO.write(bufferedImage, "png", os);
            return Base64.encodeBase64String(os.toByteArray());
        } catch (Exception e) {
            return null;
        }
    }
}
3.4. 创建Controller提供API接口
@RestController
@RequestMapping("/qrcode")
public class QRCodeController {

    private final QRCodeServiceImpl qRCodeServiceImpl;

    /**
     * 生成二维码
     */
    @GetMapping("/getQrCode")
    public Result generateQRCode() {
        return qRCodeServiceImpl.generateQRCode();
    }

}
3.5. 启动Spring Boot应用
确保主应用类上有@SpringBootApplication注解,然后启动应用。
四、前端实现(Vue部分)
4.1. 准备条件
创建Vue3项目、npm导入Element-Plus、Axiso等基础依赖。
4.2. 实现二维码展示页面
在views目录下实现QRCode.vue
<template>
  <div class="qr-simple">
    <!-- 生成按钮 -->
    <el-button
      type="primary"
      @click="generateQR"
      :loading="generating"  <!-- 这里使用generating -->
    >
      生成二维码
    </el-button>
    <!-- 下载按钮(仅在生成后显示) -->
    <el-button
      v-if="qrCode"
      @click="downloadQRCode"
      class="download-btn"
    >
      下载二维码
    </el-button>
    <!-- 二维码展示 -->
    <div v-if="qrCode" class="qr-image-container">
      <img :src="qrCode" alt="二维码" />
    </div>
  </div>
</template>

<script setup>
import { ref } from 'vue'
import axios from 'axios'  // 需要导入axios

const qrCode = ref(null)
const generating = ref(false)  // 变量名应该是generating而非loading

const generateQR = async () => {
  generating.value = true  // 使用generating而非loading
  qrCode.value = null

  try {
    // 发送GET请求到指定端点
    const response = await axios.get('http://localhost:8080/qrcode/getcode', {
      headers: {
        'Content-Type': 'application/json'
      }
    })

    // 假设返回的是base64编码的图片数据
    if (response.data) {
      qrCode.value = `data:image/png;base64,${response.data}`
    }
  } catch (error) {
    console.error('二维码生成失败:', error)
    alert('二维码生成失败,请检查服务是否可用')
  } finally {
    generating.value = false  // 使用generating而非loading
  }
}

// 下载二维码
const downloadQRCode = () => {
  if (!qrCode.value) return
  try {
    const base64Data = qrCode.value.split('base64,')[1]
    const byteArray = new Uint8Array(
      atob(base64Data)
        .split('')
        .map(char => char.charCodeAt(0))
    )
    const blob = new Blob([byteArray], { type: 'image/png' })
    const url = URL.createObjectURL(blob)
    const link = document.createElement('a')
    link.href = url
    link.download = 'qrcode.png'
    document.body.appendChild(link)  // 添加这行确保兼容所有浏览器
    link.click()
    document.body.removeChild(link)  // 添加这行清理DOM
    URL.revokeObjectURL(url)
  } catch (error) {
    console.error('下载失败:', error)
    alert('二维码下载失败')  // 添加用户提示
  }
}
</script>

<style scoped>
.qr-simple {
  display: flex;
  flex-direction: column;
  gap: 15px;
  align-items: center;
  padding: 20px;  /* 添加内边距 */
}
.qr-image-container {
  margin-top: 20px;

  img {
    width: 200px;
    height: 200px;
    border: 1px solid #eee;
    border-radius: 4px;  /* 添加圆角 */
  }
}
.download-btn {
  margin-left: 10px;
}
</style>
五、前后端联调
5.1. 解决跨域问题
在Spring Boot创建一个CORS配置类:
@Configuration
public class WebConfig implements WebMvcConfigurer {

    @Override
    public void addCorsMappings(CorsRegistry registry) {
        registry.addMapping("/**")
                .allowedOrigins("http://localhost:8081") // 允许的前端地址
                .allowedMethods("GET", "POST", "PUT", "DELETE", "OPTIONS")
                .allowedHeaders("*")
                .allowCredentials(true)
                .maxAge(3600);
    }
}
5.2. 启动前后端项目
启动Spring Boot应用(默认端口8080)与Vue开发服务器。
前端默认访问地址:http://localhost:8081
六、功能测试
访问前端页面
点击"生成二维码"按钮
观察生成的二维码图片,手机扫码后是否跳到百度页面

网页页面点击"下载二维码"按钮下载生成的二维码图片
七、关于二维码中传递对象数据的问题
7.1. 二维码中的数据限制
二维码本质是一个图片,通常通过URL、文本或Base64编码存储数据。直接将Java对象(如Map、POJO)序列化为字符串后放入二维码是可行的,但存在以下限制:
URL长度限制:如果数据放在URL参数中(如?data=xxx),浏览器和服务器对URL长度有限制(通常2KB~8KB)。
数据安全性:直接暴露数据(如敏感信息)不安全。
数据格式:需确保数据能被前端解析(如JSON字符串需转义特殊字符)。
7.2. 解决方案
如果需要将对象数据(如Map)传递到扫码后的静态页面,有以下几种方法:
方案1:通过URL参数传递(适合少量数据)
步骤:
将Map转为JSON字符串(如{"key1":"value1","key2":"value2"})。
对JSON字符串进行URL编码(避免特殊字符冲突)。
将编码后的数据作为URL参数拼接(如http://<ip地址>:8080/page?data=xxx)。
前端扫码后解析URL参数并反序列化。
方案2:通过后端API接口获取数据(推荐)
适用场景:数据量大或敏感时。
步骤:
二维码中仅存储一个唯一标识(如token或id)。
扫码后,前端通过标识访问后端API获取完整数据。
后端根据标识查询数据库或缓存,返回JSON数据。
示例流程:
生成二维码URL:
http://localhost:8080/static-page.html?token=abc123
前端扫码后请求API:
const token = getQueryParam("token");
    if (token) {
        axios.get(`http://localhost:8080/api/data?token=${token}`).then(response => {
        console.log(response.data); // 完整数据
    });
}
后端接口API实现:
@GetMapping("/api/data")
public ResponseEntity<Map<String, Object>> getData(@RequestParam String token) {
    // 根据token查询数据库或缓存
    Map<String, Object> data = dataService.getDataByToken(token);
    return ResponseEntity.ok(data);
}
方案3:使用Session/Cookie存储数据(仅限同源)
适用场景:扫码前后端为同一域名。
步骤:
生成二维码时,后端将数据存入Session或Cookie。
二维码URL中携带Session ID或标识。
扫码后,前端通过标识从Session/Cookie中读取数据。
方案4:使用临时存储服务(如Redis)
适用场景:需要跨服务或短时间数据共享。
步骤:
生成二维码时,将数据存入Redis,设置过期时间(如5分钟)。
二维码URL中携带Redis键(如key=temp:data:abc123)。
扫码后,前端通过键从Redis获取数据。
方案对比
| 方案 | 优点 | 缺点 | 适用场景 |
|---|---|---|---|
| URL参数传递 | 简单直接 | 数据量小、安全性低 | 少量非敏感数据 |
| 后端API接口 | 数据量大、安全、灵活 | 需额外请求 | 敏感数据或复杂数据 |
| Session/Cookie | 无需额外请求 | 仅限同源,服务器负担 | 同一域名下的扫码访问 |
| 临时存储服务 | 跨服务、数据量大 | 需维护存储服务 | 分布式系统或短时间数据共享 |
推荐方案
简单场景:使用URL参数传递(方案1)。
生产环境:使用后端API接口(方案2)或临时存储服务(方案4)。
八、静态页面实现流程
示例功能背景:
新增设备时需要生成二维码,当扫描这个二维码时需要展示这个设备的所有信息(这里没有实现设备方面的API接口,不过应该也可以看懂,自行实现自己需要的即可)。
springboot项目
qrcode-service/

├── pom.xml

├── src/main/java/com/example/qrcode/

│ ├── QrcodeApplication.java

│ └── controller/

│ │ └── QrcodeController.java

│ └── serviceImpl/

│ │ └── QrcodeServiceImpl.java

└── src/main/resources/

│ └── static/

│ └── info.html

└── application.yml
QRCodeController
@RestController
@RequestMapping("/qrcode")
public class QRCodeController {

    private final QRCodeServiceImpl qRCodeServiceImpl;

    /**
     * 生成二维码
     */
    @GetMapping("/getQrCode/{code}")
    public Result generateQRCode(@PathVariable String code) {
        return qRCodeServiceImpl.generateQRCode(code);
    }

}
QRCodeServiceImpl
public class QRCodeServiceImpl {

    //生成二维码
    public Result generateQRCode(String code){
        //二维码信息生成
        String qrCode = getQRCode(code);
        return Result.ok(new QRCodeVO(qrCode));
    }

    private String getQRCode(String code) {
        //静态页面访问路径,code作为路由参数传给页面让页面发请求向后端调用
        String url = "http://《你的ip地址》:8080/info.html?code=" + code;
        try {
            HashMap<EncodeHintType, Object> map = new HashMap<>();
            map.put(EncodeHintType.ERROR_CORRECTION, ErrorCorrectionLevel.Q);
            map.put(EncodeHintType.CHARACTER_SET, "utf-8");
            map.put(EncodeHintType.MARGIN, 1);

            BitMatrix bitMatrix = new MultiFormatWriter().encode(url, BarcodeFormat.QR_CODE, 2000, 2000, map);
            int width = bitMatrix.getWidth();
            int height = bitMatrix.getHeight();
            BufferedImage bufferedImage = new BufferedImage(width, height, BufferedImage.TYPE_INT_RGB);

            for (int x = 0; x < width; x++) {
                for (int y = 0; y < height; y++) {
                    bufferedImage.setRGB(x, y, bitMatrix.get(x, y) ? 0xFF000000 : 0xFFFFFFFF);
                }
            }

            ByteArrayOutputStream os = new ByteArrayOutputStream();
            ImageIO.write(bufferedImage, "png", os);
            return Base64.encodeBase64String(os.toByteArray());
        } catch (Exception e) {
            return null;
        }
    }
}
info.html
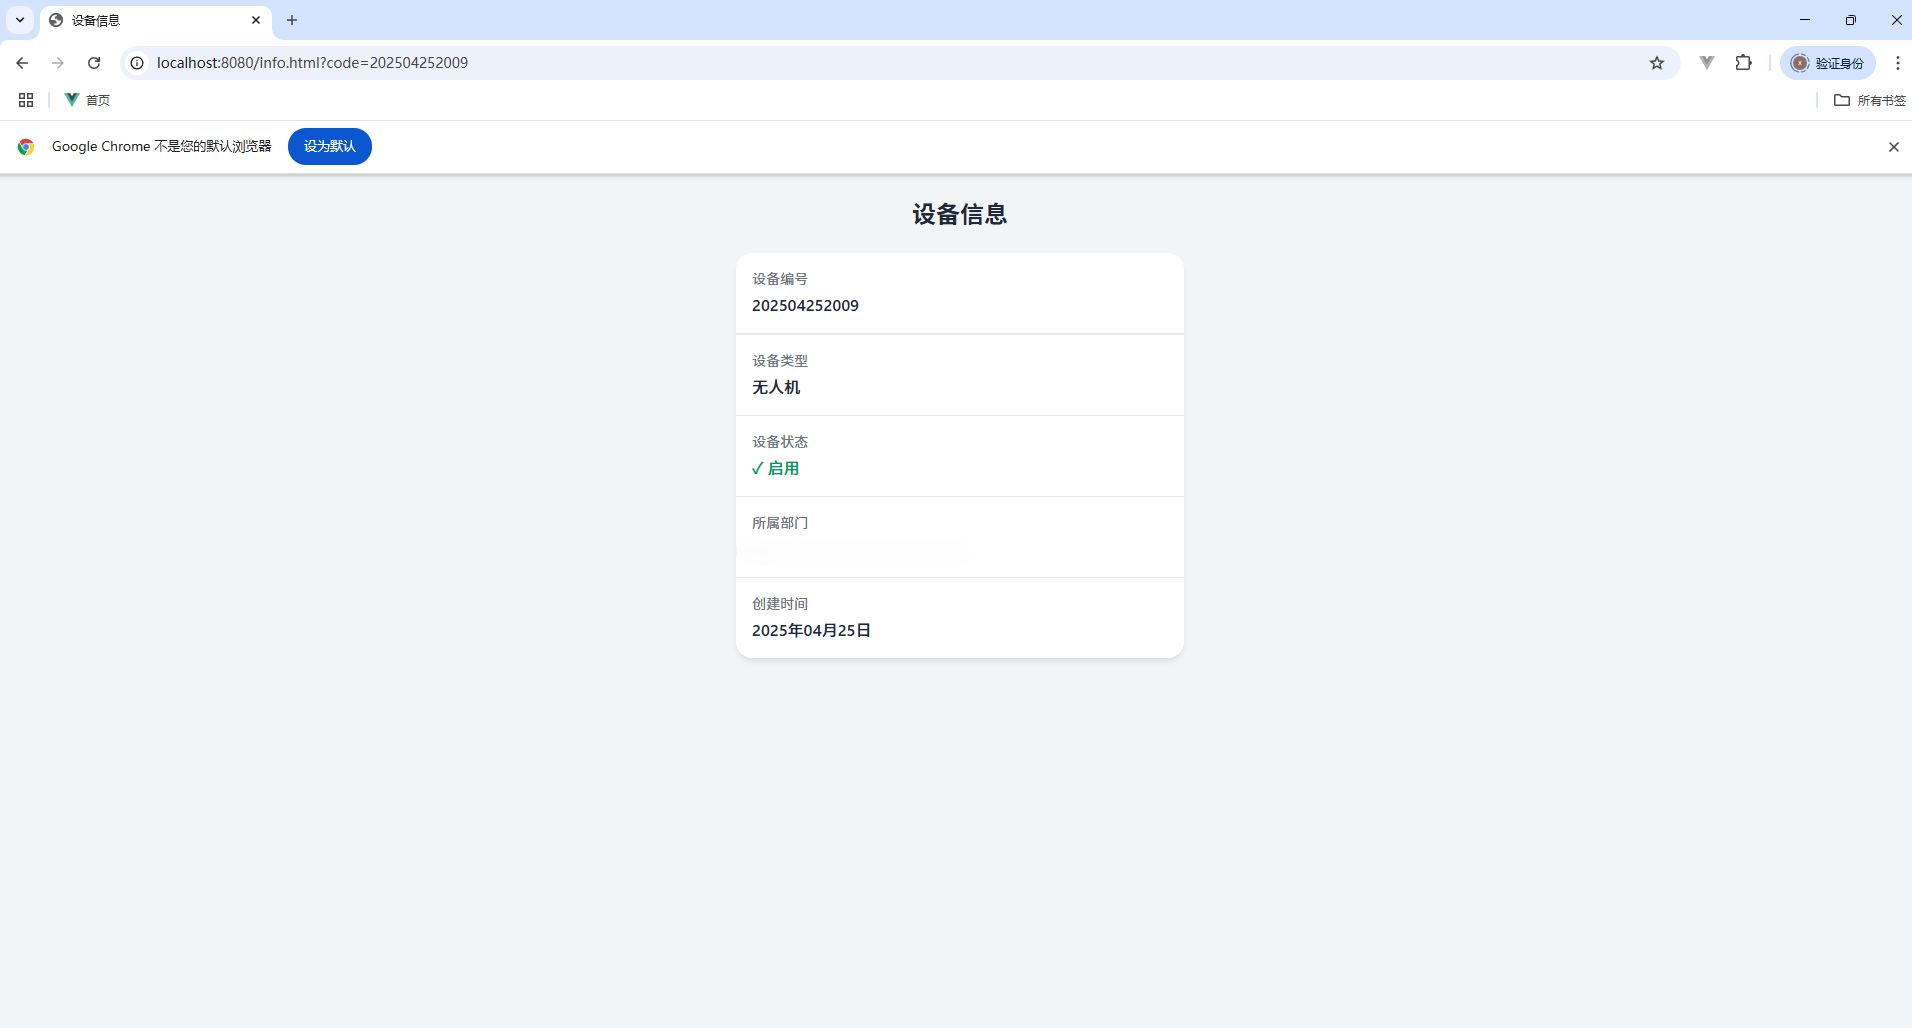
<!DOCTYPE html>
<html lang="zh-CN">
<head>
    <meta charset="UTF-8">
    <meta name="viewport" content="width=device-width, initial-scale=1.0">
    <title>设备信息</title>
    <!-- 使用更可靠的CDN源 -->
    <link rel="stylesheet" href="https://cdn.bootcdn.net/ajax/libs/normalize/8.0.1/normalize.min.css">
    <link href="https://cdn.bootcdn.net/ajax/libs/tailwindcss/2.2.19/tailwind.min.css" rel="stylesheet">
    <!-- 本地fallback样式 -->
    <style>
        /* 核心样式保障 */
        body {
            font-family: -apple-system, BlinkMacSystemFont, "Segoe UI", Roboto, sans-serif;
            background-color: #f3f4f6;
            color: #1f2937;
            line-height: 1.5;
        }
        .container {
            max-width: 480px;
            margin-left: auto;
            margin-right: auto;
            padding-left: 1rem;
            padding-right: 1rem;
        }
        .card {
            background-color: white;
            border-radius: 1rem;
            box-shadow: 0 4px 6px -1px rgba(0, 0, 0, 0.1);
            overflow: hidden;
        }
        .info-item {
            padding: 1rem;
            border-bottom: 1px solid #e5e7eb;
            min-height: 44px;
            display: flex;
            flex-direction: column;
            justify-content: center;
        }
        .loading-spinner {
            animation: spin 1s linear infinite;
        }
        @keyframes spin {
            0% { transform: rotate(0deg); }
            100% { transform: rotate(360deg); }
        }
    </style>
</head>
<body>
<div class="container py-6">
    <header class="text-center mb-6">
        <h1 class="text-2xl font-bold">设备信息</h1>
    </header>

    <section class="card">
        <div id="device-info" class="divide-y divide-gray-200">
            <div id="loading" class="p-6 flex justify-center items-center">
                <svg class="loading-spinner h-8 w-8 text-blue-500" xmlns="http://www.w3.org/2000/svg" fill="none" viewBox="0 0 24 24">
                    <circle class="opacity-25" cx="12" cy="12" r="10" stroke="currentColor" stroke-width="4"></circle>
                    <path class="opacity-75" fill="currentColor" d="M4 12a8 8 0 018-8V0C5.373 0 0 5.373 0 12h4zm2 5.291A7.962 7.962 0 014 12H0c0 3.042 1.135 5.824 3 7.938l3-2.647z"></path>
                </svg>
                <span class="ml-3">加载中...</span>
            </div>
        </div>
    </section>
</div>

<script>
    // 浏览器兼容性检测
    (function() {
        const isModernBrowser = (
            window.Promise &&
            window.fetch &&
            window.URLSearchParams &&
            'content' in document.createElement('template')
        );

        if (!isModernBrowser) {
            document.getElementById('loading').innerHTML = `
                <div class="p-4 bg-yellow-100 text-yellow-800 rounded-lg">
                    <p class="font-medium">⚠️ 浏览器兼容提示</p>
                    <p class="text-sm mt-1">推荐使用Chrome/Edge/Firefox等现代浏览器</p>
                </div>
            `;
            return;
        }
    })();

    // 日期格式化
    function formatDate(dateString) {
        try {
            const date = new Date(dateString);
            if (isNaN(date.getTime())) return '未知日期';

            const year = date.getFullYear();
            const month = (date.getMonth() + 1).toString().padStart(2, '0');
            const day = date.getDate().toString().padStart(2, '0');

            return `${year}年${month}月${day}日`;
        } catch {
            return '未知日期';
        }
    }

    // 设备类型转换
    const deviceTypes = {
        1: '无人车',
        2: '无人机'
    };

    function getDeviceType(type) {
        return deviceTypes[type] || `未知类型(${type})`;
    }

    // 状态转换
    const statusMap = {
        1: '<span class="text-green-600 font-medium">✓ 启用</span>',
        2: '<span class="text-red-600 font-medium">✗ 禁用</span>'
    };

    function getStatus(status) {
        return statusMap[status] || `未知状态(${status})`;
    }

    // 获取设备数据
    async function fetchDeviceData() {
        try {
            const searchParams = new URLSearchParams(window.location.search);
            const code = searchParams.get('code');

            if (!code) {
                throw new Error('缺少设备编号参数');
            }

            const response = await fetch(`http://《你的ip地址》:8080/equipment/getInfo/${code}`, {
                headers: {
                    'Accept': 'application/json'
                },
                cache: 'no-store'
            });

            if (!response.ok) {
                throw new Error(`请求失败: ${response.status}`);
            }

            const result = await response.json();

            if (!result?.isSuccess) {
                throw new Error(result?.message || '获取设备信息失败');
            }

            renderDeviceInfo(result.data || {});

        } catch (error) {
            showError(error.message);
            console.error('获取设备信息失败:', error);
        }
    }

    // 渲染设备信息
    function renderDeviceInfo(device) {
        const infoContainer = document.getElementById('device-info');
        infoContainer.innerHTML = '';

        const createInfoItem = (label, value) => {
            const div = document.createElement('div');
            div.className = 'info-item';
            div.innerHTML = `
                <p class="text-sm text-gray-500 mb-1">${label}</p>
                <p class="text-base font-medium text-gray-800 break-all">${value || '--'}</p>
            `;
            return div;
        };

        // 按顺序添加信息项(已移除设备名称和最后更新时间)
        const infoItems = [
            ['设备编号', device.code],
            ['设备类型', getDeviceType(device.type)],
            ['设备状态', getStatus(device.status)],
            ['所属部门', device.deptIds],
            ['创建时间', formatDate(device.createTime)]
        ];

        infoItems.forEach(([label, value]) => {
            infoContainer.appendChild(createInfoItem(label, value));
        });
    }

    // 显示错误信息
    function showError(message) {
        const infoContainer = document.getElementById('device-info');
        infoContainer.innerHTML = `
            <div class="p-6 text-center">
                <div class="text-red-500 p-4 bg-red-50 rounded-lg inline-block max-w-xs">
                    <svg xmlns="http://www.w3.org/2000/svg" class="h-6 w-6 mx-auto mb-2" fill="none" viewBox="0 0 24 24" stroke="currentColor">
                        <path stroke-linecap="round" stroke-linejoin="round" stroke-width="2" d="M12 9v2m0 4h.01m-6.938 4h13.856c1.54 0 2.502-1.667 1.732-3L13.732 4c-.77-1.333-2.694-1.333-3.464 0L3.34 16c-.77 1.333.192 3 1.732 3z" />
                    </svg>
                    <p class="font-medium">${message}</p>
                    <p class="text-sm mt-2">请检查URL参数或稍后重试</p>
                </div>
            </div>
        `;
    }

    // 页面加载
    document.addEventListener('DOMContentLoaded', () => {
        setTimeout(fetchDeviceData, 500);
    });
</script>
</body>
</html>
前端设备管理页面(这里的请求后端API方法经过了request封装)
<template>
  <div class="equipment-container">
    <el-card class="equipment-card">
      <template #header>
        <div class="card-header">
          <span>设备管理</span>
          <el-button icon="Plus" @click="handleCreate">新增设备</el-button>
        </div>
      </template>

      <!-- 二维码生成弹窗 -->
      <el-dialog v-model="dialogVisible" width="600px">
        <template #header>
          <span style="font-weight: bold">生成设备二维码</span>
        </template>

        <el-form :model="form" ref="formRef" label-width="100px">
          <el-form-item label="设备编号" prop="code">
            <el-input v-model="form.code" placeholder="请输入设备编号" />
          </el-form-item>

          <div v-if="qrCode" class="qr-code-container">
            <img :src="qrCode" alt="设备二维码" class="qr-code-image" />
            <div class="qr-code-text">编号:{{ currentCode }}</div>
            <el-button @click="downloadQRCode" type="primary">下载二维码</el-button>
          </div>
        </el-form>

        <template #footer>
          <el-button @click="dialogVisible = false">取消</el-button>
          <el-button @click="generateQR" type="primary" v-if="!qrCode">生成二维码</el-button>
        </template>
      </el-dialog>
    </el-card>
  </div>
</template>

<script setup>
import { ref } from 'vue'
import { ElMessage } from 'element-plus'
import { generateQRCode } from '@/api/system'

// 二维码相关数据
const dialogVisible = ref(false)
const qrCode = ref(null)
const currentCode = ref('')
const form = ref({
  code: ''
})

// 打开弹窗
const handleCreate = () => {
  dialogVisible.value = true
  qrCode.value = null
  form.value.code = ''
}

// 生成二维码
const generateQR = async () => {
  if (!form.value.code) {
    ElMessage.warning('请输入设备编号')
    return
  }

  try {
    const { data } = await generateQRCode(form.value.code)
    qrCode.value = `data:image/png;base64,${data.qrCode}`
    currentCode.value = form.value.code
    ElMessage.success('二维码生成成功')
  } catch (error) {
    console.error('生成二维码失败:', error)
    ElMessage.error('生成二维码失败')
  }
}

// 下载二维码
const downloadQRCode = () => {
  if (!qrCode.value) {
    ElMessage.warning('请先生成二维码')
    return
  }

  try {
    const base64Data = qrCode.value.split('base64,')[1]
    const byteCharacters = atob(base64Data)
    const byteNumbers = new Array(byteCharacters.length)

    for (let i = 0; i < byteCharacters.length; i++) {
      byteNumbers[i] = byteCharacters.charCodeAt(i)
    }

    const byteArray = new Uint8Array(byteNumbers)
    const blob = new Blob([byteArray], { type: 'image/png' })
    const url = URL.createObjectURL(blob)

    const link = document.createElement('a')
    link.href = url
    link.download = `device_${currentCode.value || 'qrcode'}.png`
    document.body.appendChild(link)
    link.click()

    setTimeout(() => {
      document.body.removeChild(link)
      URL.revokeObjectURL(url)
    }, 100)
  } catch (error) {
    console.error('下载失败:', error)
    ElMessage.error('下载二维码失败')
  }
}
</script>

<style lang="scss" scoped>
.equipment-container {
  padding: 20px;

  .equipment-card {
    .card-header {
      display: flex;
      justify-content: space-between;
      align-items: center;
    }

    .qr-code-container {
      margin-top: 20px;
      text-align: center;

      .qr-code-image {
        width: 200px;
        height: 200px;
        border: 1px solid #ddd;
        margin-bottom: 10px;
      }

      .qr-code-text {
        margin-bottom: 15px;
        font-size: 16px;
      }
    }
  }
}
</style>
注意 http://《你的ip地址》:8080/v1/equipment/getInfo/${code}的跨域问题,需将此接口放出
@Configuration
public class WebConfig implements WebMvcConfigurer {

    @Override
    public void addCorsMappings(CorsRegistry registry) {
        // 通用配置 - 对所有路径生效,但有更严格的安全限制
        registry.addMapping("/**")
                .allowedOrigins("http://《你的ip地址》:8081") // 仅允许本地8000端口
                .allowedMethods("GET", "POST", "PUT", "DELETE", "OPTIONS")
                .allowedHeaders("*")
                .allowCredentials(true)
                .maxAge(3600);

        // 特定路径配置 - 对/v1/equipment/路径下的接口生效,有更宽松的规则
        registry.addMapping("/v1/equipment/**")
                .allowedOrigins("*") // 允许所有域名访问
                .allowedMethods("GET", "POST", "PUT", "DELETE", "OPTIONS")
                .allowedHeaders("*")
                .allowCredentials(false)
                .maxAge(3600);
    }
}
这样启动只后,浏览器访问或者在同一局域网下的手机扫描都可访问页面。
浏览器访问:http://<你的ip地址>:8080/info.html?code=202504252009
手机扫描访问:生成二维码后扫描访问到该设备信息。

通过本文档的学习,你将能够:
独立实现:从零开始搭建一个基于二维码的Spring Boot静态页面访问系统。
灵活应对:根据业务需求选择最优的数据传递方案。
解决实际问题:处理开发中遇到的URL长度、数据安全、跨域等常见问题。
无论是个人项目、企业级应用还是微信扫码场景,你都能游刃有余地实现二维码与Spring Boot静态页面的结合!如果有什么问题欢迎留言区讨论。


 被折叠的 条评论
为什么被折叠?
被折叠的 条评论
为什么被折叠?
 到【灌水乐园】发言


