


目录
(2)使用vue-router来实现登录页面与主页面展示效果:
引言:上篇文章实现了用户的注册以及登录的接口及页面的开发,我们本篇博客讲述设计文章分类的相关接口及页面 =>
一.所用技术栈:
- Vue3
- pinia
- axios
- element-plus
- router(路由)
- SpringBoot
- JWT
二.后端开发:
我们整个布局是下面的样子:

需要我们开发四个接口:
- 文章分类列表渲染
- 新增文章分类
- 编辑文章分类
- 删除文章分类
因为这四个接口是基本的增删改查操作,所以这里不过多强调代码如何写,这里介绍一下参数校验的注解:
①在pojo类内属性上加的注解:
- @NotNull:值不能为空
- @NotEmpty:值不能为空并且不能为空串
- @Email:格式是email邮箱格式
- @Patten(regexp="正则表达式"):判断格式
上面这四个需要在Controller层内参数前加上@Validated注解才能使用。
- @JsonIgnore:返回响应数据会忽略该属性(eg:可以在密码上加来加密)
- @JsonFormat(patten="yyyy-MM-dd HH:mm:ss"):时间格式
上面这两个注解使用时可不用加@Validated注解 。
②在Controller层内参数前加的注解:
- @URL:参数需要是地址格式
而基于上面还是有些不够便捷,我们提出了分组校验的概念,在@NotNull@NotEmpty这两个注解前可加上(groups="接口的字节码")来限定哪些方法会使用,随后我们就再Controller层的参数前注解@Validated(接口的字节码),这样就可以实现分组校验。
如果我们同一个校验项属于多个分组,这样会很麻烦,这个时候我们就可以借助默认分组来处理 =>
若某个校验项没有指定分组,默认属于Default分组,分组之间可以继承,A extends B,那么A中可以拥有B中所有的校验项,所以在@Validated()括号内写继承Default的接口字节码就可以使用默认的校验项。
@Data
public class Category {
//    @NotEmpty(groups = {Add.class,Update.class})
    @NotEmpty
    private String categoryName;//分类名称
//    @NotEmpty(groups = {Add.class,Update.class})
    @NotEmpty
    private String categoryAlias;//分类别名

    //若某个校验项没有指定分组,默认属于Default分组
    //分组之间可以继承,A extends B,那么A中可以拥有B中所有的校验项

    public interface Add extends Default {}
    public interface Update extends Default {}
}
基于上面的注解功能,我们在pojo包下的Category类属性前加上完整注解代码:
@Data
public class Category {
    @NotNull(groups = Update.class)
    private Integer id;//主键ID

//    @NotEmpty(groups = {Add.class,Update.class})
    @NotEmpty
    private String categoryName;//分类名称
//    @NotEmpty(groups = {Add.class,Update.class})
    @NotEmpty
    private String categoryAlias;//分类别名

    private Integer createUser;//创建人ID

    @JsonFormat(pattern = "yyyy-MM-dd HH:mm:ss")
    private LocalDateTime createTime;//创建时间
    @JsonFormat(pattern = "yyyy-MM-dd HH:mm:ss")
    private LocalDateTime updateTime;//更新时间

    //若某个校验项没有指定分组,默认属于Default分组
    //分组之间可以继承,A extends B,那么A中可以拥有B中所有的校验项

    public interface Add extends Default {}
    public interface Update extends Default {}
}
介绍完这个注解开发,我们就可以开发后端接口。
1.文章分类列表渲染:
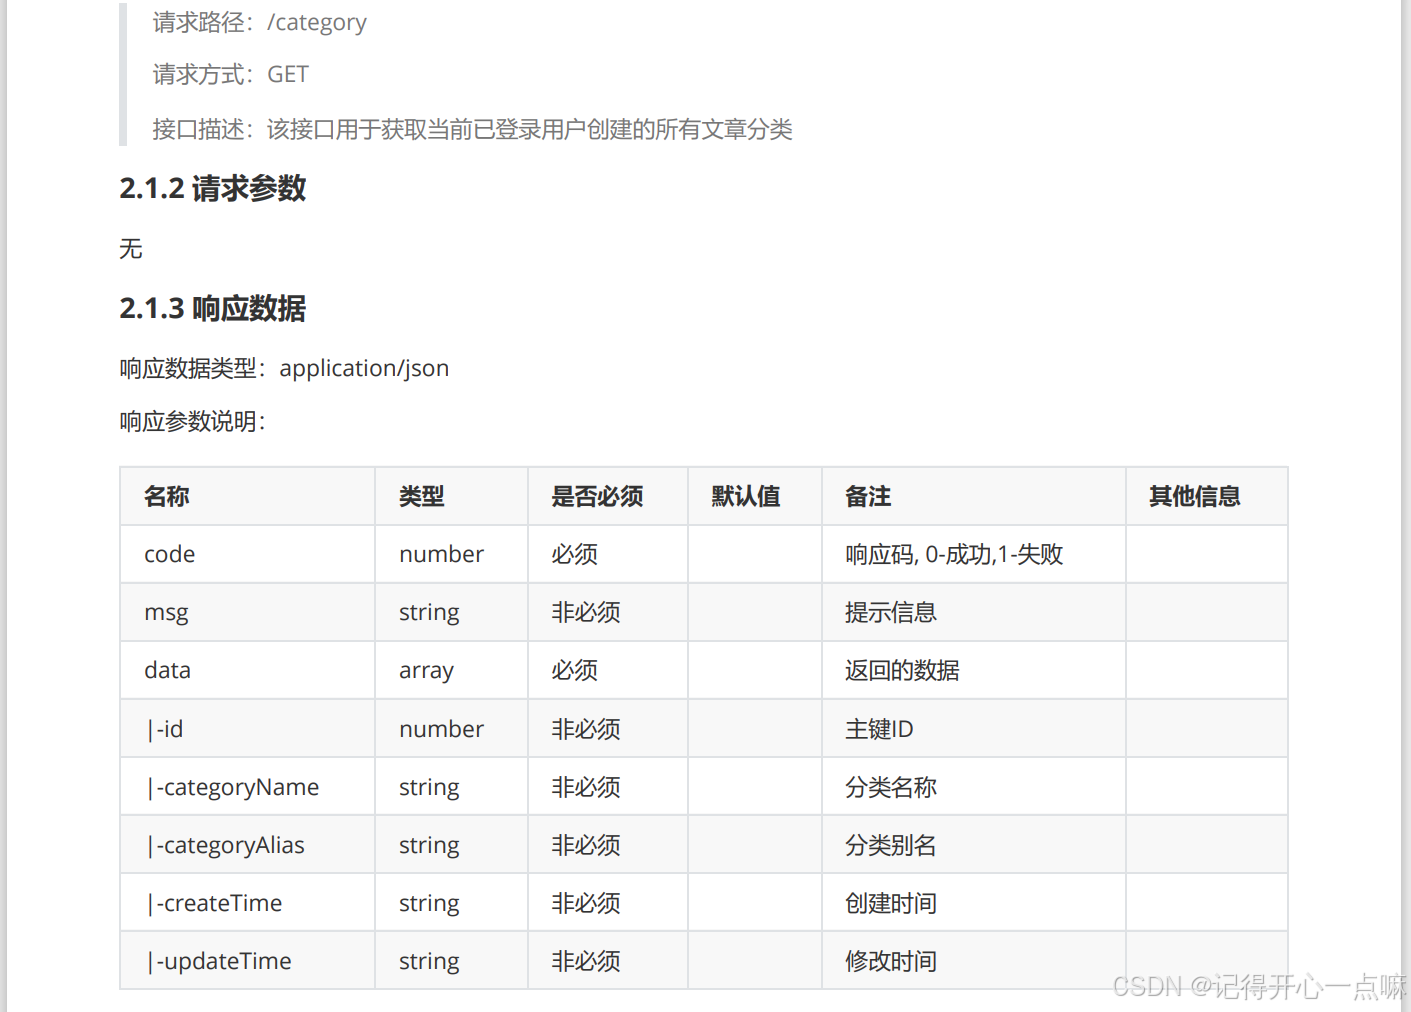
根据文档要求,我们需要返回一个列表,每个元素是一个Category类封装的数据。
2.新增文章分类:
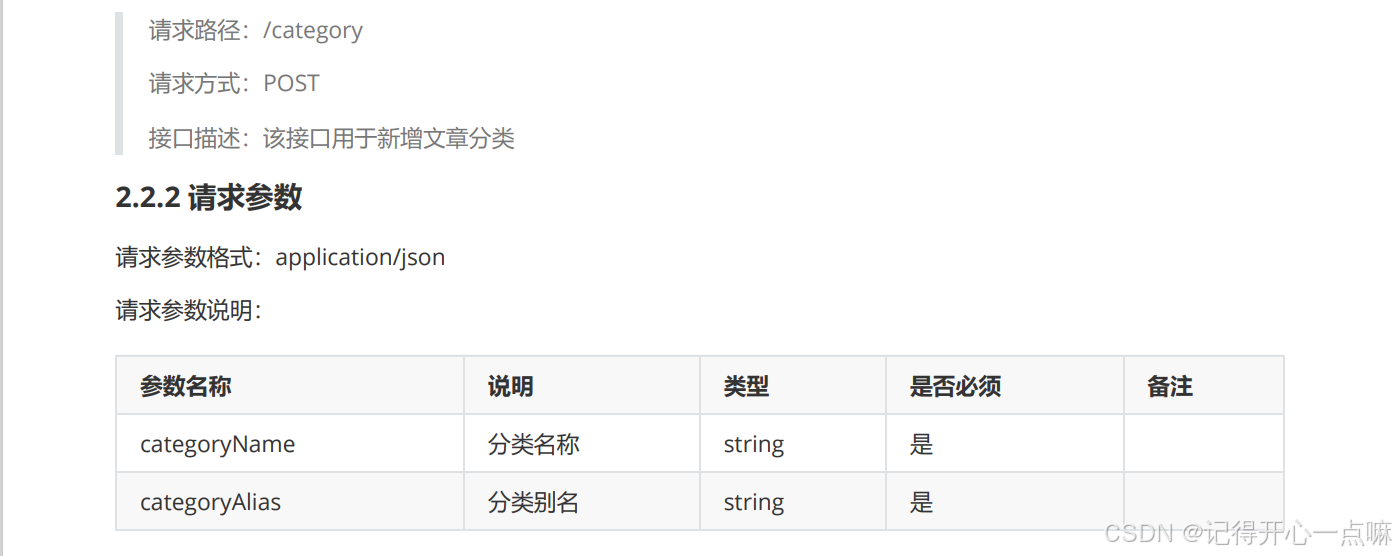
这里新增数据就可以使用@Validated注解来判断数据
根据文档要求,我们只需根据用户 id 保存两个数据值,为了在我们JWT令牌中拿到用户id,我们就会使用ThreadLocal来开辟线程空间存储JWT令牌,如果想使用就可以在线程空间获取JWT令牌中的用户id。
如果不了解ThreadLocal请查看下面博客:使用ThreadLocal来存取单线程内的数据-CSDN博客
Map<String,Object> map = ThreadLocalUtil.get();
Integer userId = (Integer) map.get("id");
category.setCreateUser(userId);
3.编辑文章分类:
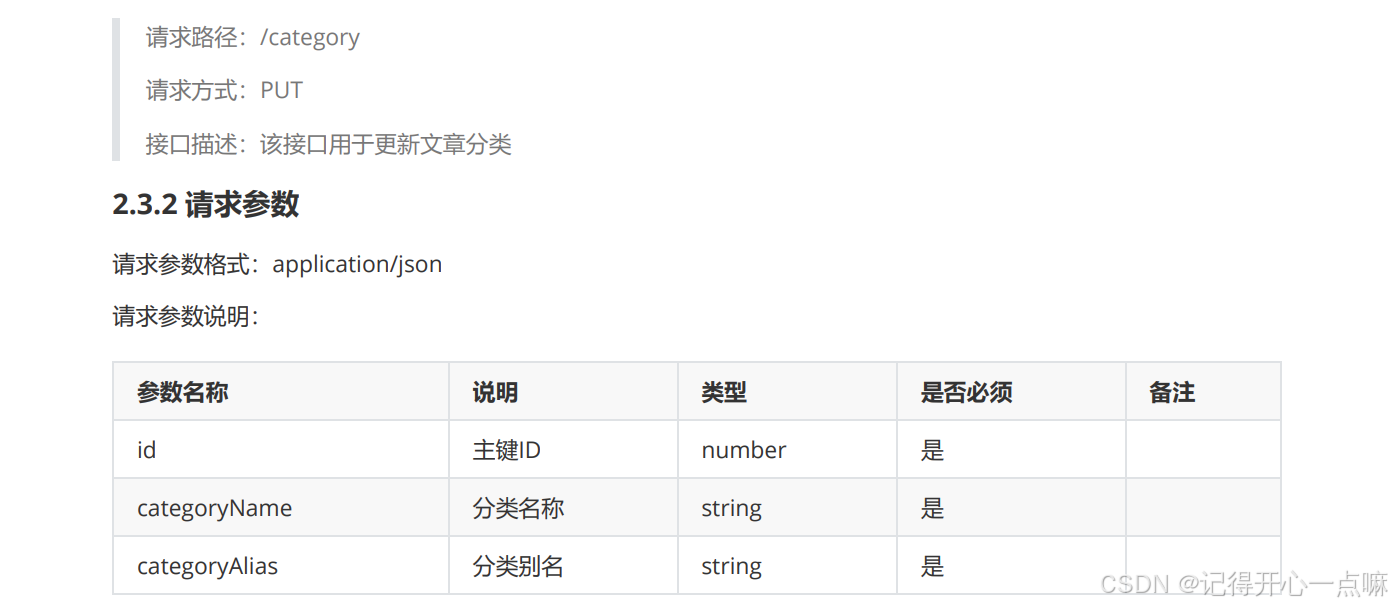
这里更新数据就可以使用@Validated注解来判断数据。
4.删除文章分类 :
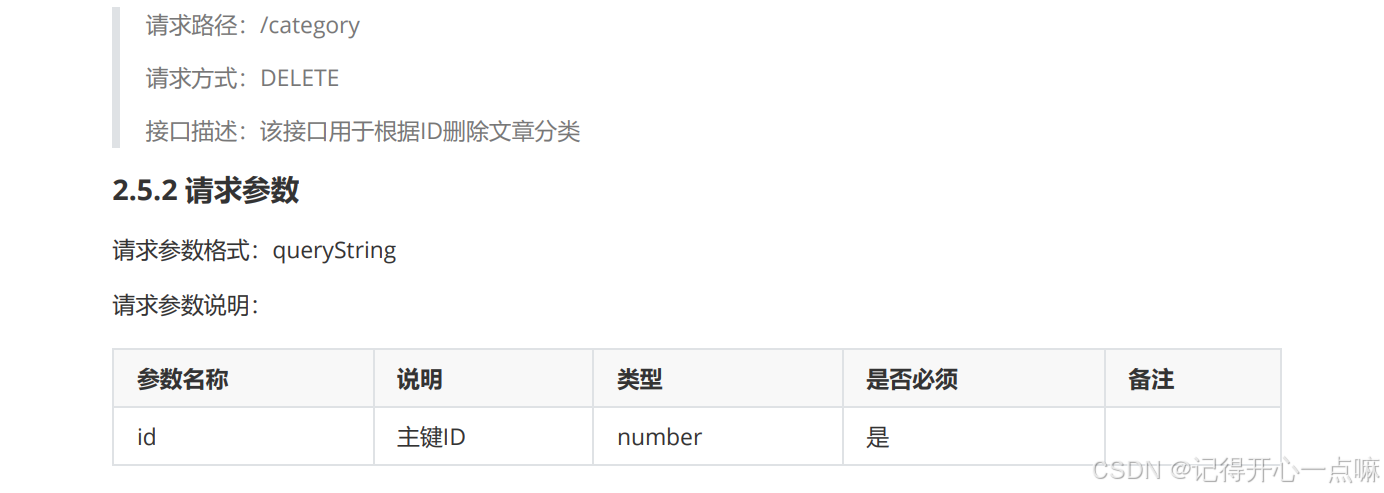
删除就没什么好说的了,这里就不过多强调。
5.完整三层架构后端代码:
(1)Controller层:
@RestController
@RequestMapping("/category")
public class CateController {

    @Autowired
    private CategoryService categoryService;

    @PostMapping
    public Result add(@RequestBody @Validated(Category.Add.class) Category category){
        categoryService.add(category);
        return Result.success();
    }

    @GetMapping
    public Result<List<Category>> list(){
        List<Category> list = categoryService.list();
        return Result.success(list);
    }

    @PutMapping
    public Result update(@RequestBody @Validated(Category.Update.class) Category category){
        categoryService.update(category);
        return Result.success();
    }

    @DeleteMapping
    public Result delete(Integer id){
        categoryService.deleteById(id);
        return Result.success();
    }
}
(2)Service层:
@Service
public class CategoryServiceImpl implements CategoryService {

    @Autowired
    private CategoryMapper categoryMapper;

    @Override
    public void add(Category category) {
        category.setCreateTime(LocalDateTime.now());
        category.setUpdateTime(LocalDateTime.now());

        Map<String,Object> map = ThreadLocalUtil.get();
        Integer userId = (Integer) map.get("id");
        category.setCreateUser(userId);
        categoryMapper.add(category);
    }

    @Override
    public List<Category> list() {
        Map<String,Object> map = ThreadLocalUtil.get();
        Integer userId = (Integer) map.get("id");
        return categoryMapper.list(userId);

    }

    @Override
    public Category findById(Integer id) {
        return categoryMapper.findById(id);
    }

    @Override
    public void update(Category category) {
        category.setUpdateTime(LocalDateTime.now());
        categoryMapper.update(category);
    }

    @Override
    public void deleteById(Integer id) {
        categoryMapper.deleteById(id);
    }
}
(3)Mapper层:
@Mapper
public interface CategoryMapper {

    @Insert("insert into category(category_name,category_alias,create_user,create_time,update_time)" +
            " values (#{categoryName},#{categoryAlias},#{createUser},#{createTime},#{updateTime})")
    void add(Category category);

    @Select("select * from category where create_user = #{userId}")
    List<Category> list(Integer userId);

    @Select("select * from category where id = #{id}")
    Category findById(Integer id);

    @Update("update category set category_name = #{categoryName} , category_alias = #{categoryAlias} , update_time = #{updateTime} where id = #{id}")
    void update(Category category);

    @Delete("delete from category where id = #{id}")
    void deleteById(Integer id);
}
三.前端开发:
1.路由的使用:
路由指的是根据不同的访问路径,展示不同组件的内容。
Vue Router 是 Vue.js 的官方路由。
(1)Vue Router的使用:
- 安装vue-router: cnpm install vue-router@4
- 在src/router/index.js中创建路由器,并导出
- 在vue应用实例中使用vue-router
- 声明router-view标签,展示组件内容
(2)使用vue-router来实现登录页面与主页面展示效果:
①创建 index.js :
//导入vue-router
import { createRouter , createWebHistory } from "vue-router";

//导入vue组件
import LoginVue from '@/views/Login.vue';
import LayoutVue from "@/views/Layout.vue";

//定义路由关系
const routes = [
    {path:'/login',component: LoginVue},
    {
        path:'/',  //设置访问路径
        component: LayoutVue,  //设置访问路径对应的访问组件
    }
]

//创建路由器
const router = createRouter({
    history: createWebHistory(), //路由模式
    routes: routes  //路由关系
})

//导出路由器
export default router;
②在 main.js 导入创建的路由器:
import './assets/main.scss'

import { createApp } from 'vue'
import ElementPlus from 'element-plus'
import 'element-plus/dist/index.css'
import App from './App.vue'
//导入创建的路由器
//index.js可以省略不写,会默认导入该文件
import router from '@/router'

const app = createApp(App);
//将router传递至App.vue
app.use(router)
app.use(ElementPlus);
app.mount('#app')
③在App.vue声明标签:
<script setup>

</script>

<template>
  <router-view></router-view>
</template>

<style>

</style>这样就可以实现在同一页面显示不同组件。但是这样如果我们登录成功后,不会直接跳转主页面,那么这个时候我们需要通过路由来完成跳转主页面。
//导入路由器
import { useRouter } from 'vue-router';
const router = useRouter();
//通过路由跳转首页
router.push('跳转路径');
所以在login.vue文件内进行操作:
//导入路由器
import { useRouter } from 'vue-router';
const router = useRouter();
//表单数据校验
const login = async()=>{
    let result = await userLoginService(registerData.value);
    ElMessage.success(result.msg ? result.msg : '登录成功');
    //通过路由跳转首页
    router.push('/');
}
(3)子路由的使用:
为了在我们主页面下展示区点击按钮展示不同的子组件,我们就引入了子路由的知识:
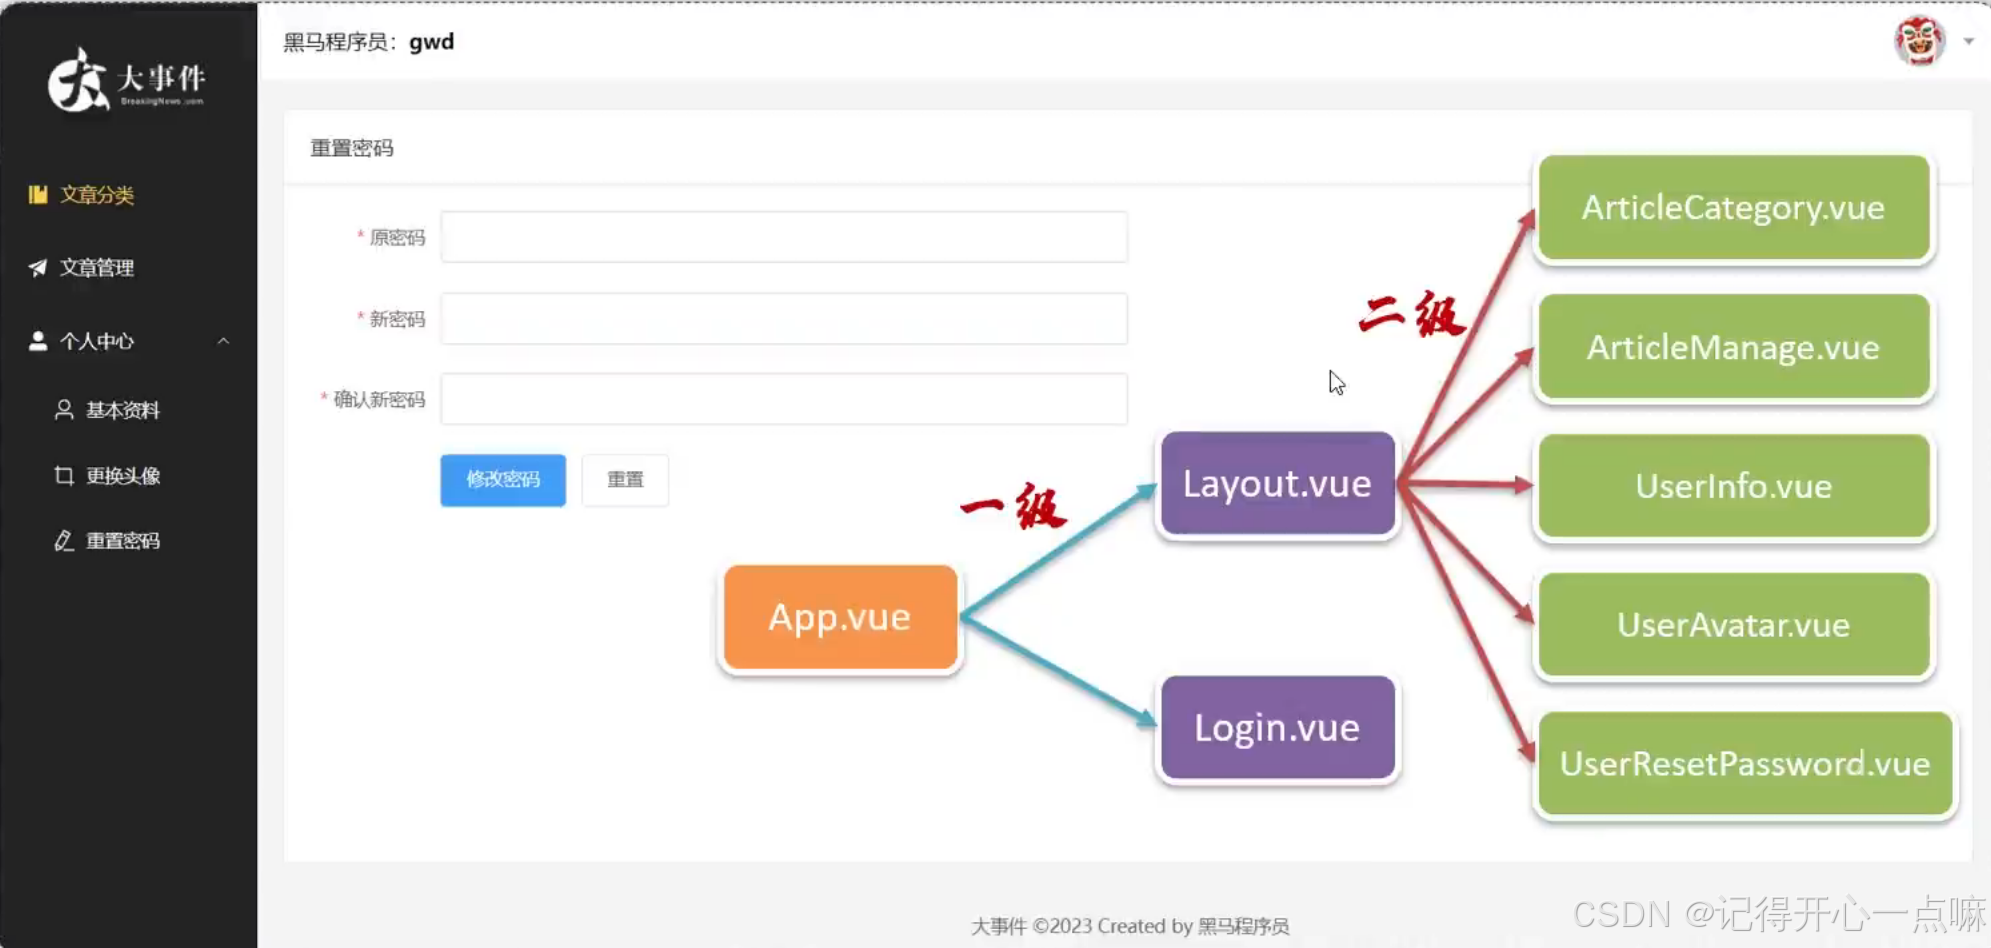
上图是我们的每一级路由关系,我们想将五个vue文件在主页面Layout.vue中的展示区展示,就需要配置子路由 =>
①添加五个组件
②配置子路由:
在内部先定义路由关系,然后创建路由器,最后导出(暴露)路由器。
在路由关系内主页面内部设置 children 属性来声明五个子路由,并且为了不让主页面'/'为空,我们使用 redirect 来将 '/' 地址重定向为 '/article/manage' =>
//导入vue-router
import { createRouter , createWebHistory } from "vue-router";

//导入vue组件
import LoginVue from '@/views/Login.vue';
import LayoutVue from "@/views/Layout.vue";
import ArticleCategoryVue from '@/views/article/ArticleCategory.vue'
import ArticleManageVue from '@/views/article/ArticleManage.vue'
import UserAvatarVue from '@/views/user/UserAvatar.vue'
import UserInfoVue from '@/views/user/UserInfo.vue'
import UserResetPasswordVue from '@/views/user/UserResetPassword.vue'

//定义路由关系
const routes = [
    {path:'/login',component: LoginVue},
    {
        path:'/',
        component: LayoutVue,
        redirect: '/article/manage',  //重定向
        //子路由
        children:[
            {path:'/article/category',component: ArticleCategoryVue},
            {path:'/article/manage',component: ArticleManageVue},
            {path:'/user/avatar',component: UserAvatarVue},
            {path:'/user/info',component: UserInfoVue},
            {path:'/user/resetPassword',component: UserResetPasswordVue},
        ]
    }
]

//创建路由器
const router = createRouter({
    history: createWebHistory(), //路由模式
    routes: routes  //路由关系
})

//导出路由器
export default router;
③在主页面的展示区声明router-view标签:
            <!-- 中间区域 -->
            <el-main>
                <!-- <div style="width: 1290px; height: 570px;border: 1px solid red;">
                    内容展示区
                </div> -->
                <!-- 路由 -->
                <router-view></router-view>
            </el-main>
④给菜单项设置index属性,设置点击后的路由地址:
这样设置后,当我们点击文字时候就可以自动在我们设置的标签router-view展示区来展示index='地址'中的地址。
<!-- 左侧菜单 -->
<el-aside width="200px">
    <div class="el-aside__logo"></div>
    <el-menu active-text-color="#ffd04b" background-color="#232323"  text-color="#fff"
        router>
        <el-menu-item index="/article/category">
            <el-icon>
                <Management />
            </el-icon>
            <span>文章分类</span>
        </el-menu-item>
        <el-menu-item index="/article/manage">
            <el-icon>
                <Promotion />
            </el-icon>
            <span>文章管理</span>
        </el-menu-item>
        <el-sub-menu >
            <template #title>
                <el-icon>
                    <UserFilled />
                </el-icon>
                <span>个人中心</span>
            </template>
            <el-menu-item index="/user/info">
                <el-icon>
                    <User />
                </el-icon>
                <span>基本资料</span>
            </el-menu-item>
            <el-menu-item index="/user/avatar">
                <el-icon>
                    <Crop />
                </el-icon>
                <span>更换头像</span>
            </el-menu-item>
            <el-menu-item index="/user/resetPassword">
                <el-icon>
                    <EditPen />
                </el-icon>
                <span>重置密码</span>
            </el-menu-item>
        </el-sub-menu>
    </el-menu>
</el-aside>
所以这样我们就分别对五个vue组件开发就可以了。
2.对于文章分类的前端开发:
(1)导入ArticleCategory.vue文件:
<script setup>
import {
    Edit,
    Delete
} from '@element-plus/icons-vue'
import { ref } from 'vue'
const categorys = ref([
    {
        "id": 3,
        "categoryName": "美食",
        "categoryAlias": "my",
        "createTime": "2023-09-02 12:06:59",
        "updateTime": "2023-09-02 12:06:59"
    },
    {
        "id": 4,
        "categoryName": "娱乐",
        "categoryAlias": "yl",
        "createTime": "2023-09-02 12:08:16",
        "updateTime": "2023-09-02 12:08:16"
    },
    {
        "id": 5,
        "categoryName": "军事",
        "categoryAlias": "js",
        "createTime": "2023-09-02 12:08:33",
        "updateTime": "2023-09-02 12:08:33"
    }
])
</script>
<template>
    <el-card class="page-container">
        <template #header>
            <div class="header">
                <span>文章分类</span>
                <div class="extra">
                    <el-button type="primary">添加分类</el-button>
                </div>
            </div>
        </template>
        <el-table :data="categorys" style="width: 100%">
            <el-table-column label="序号" width="100" type="index"> </el-table-column>
            <el-table-column label="分类名称" prop="categoryName"></el-table-column>
            <el-table-column label="分类别名" prop="categoryAlias"></el-table-column>
            <el-table-column label="操作" width="100">
                <template #default="{ row }">
                    <el-button :icon="Edit" circle plain type="primary" ></el-button>
                    <el-button :icon="Delete" circle plain type="danger"></el-button>
                </template>
            </el-table-column>
            <template #empty>
                <el-empty description="没有数据" />
            </template>
        </el-table>
    </el-card>
</template>

<style lang="scss" scoped>
.page-container {
    min-height: 100%;
    box-sizing: border-box;

    .header {
        display: flex;
        align-items: center;
        justify-content: space-between;
    }
}
</style>
我们通过定义响应式数据categorys来动态响应文章分类数据。
设置 :data="categorys" 将categorys数据绑定 table 表格,并 prop 属性来分别把属性绑定到 column 上。
(2)文章分类的前端相关请求开发:
- 文章分类列表渲染
- 新增文章分类
- 编辑文章分类
- 删除文章分类
我们根据上面的四个内容开发 =>
一般我们都会再 js 文件内定义函数然后再vue组件进行使用请求函数。
①Pinia状态管理库:
在article.js文件定义请求函数:
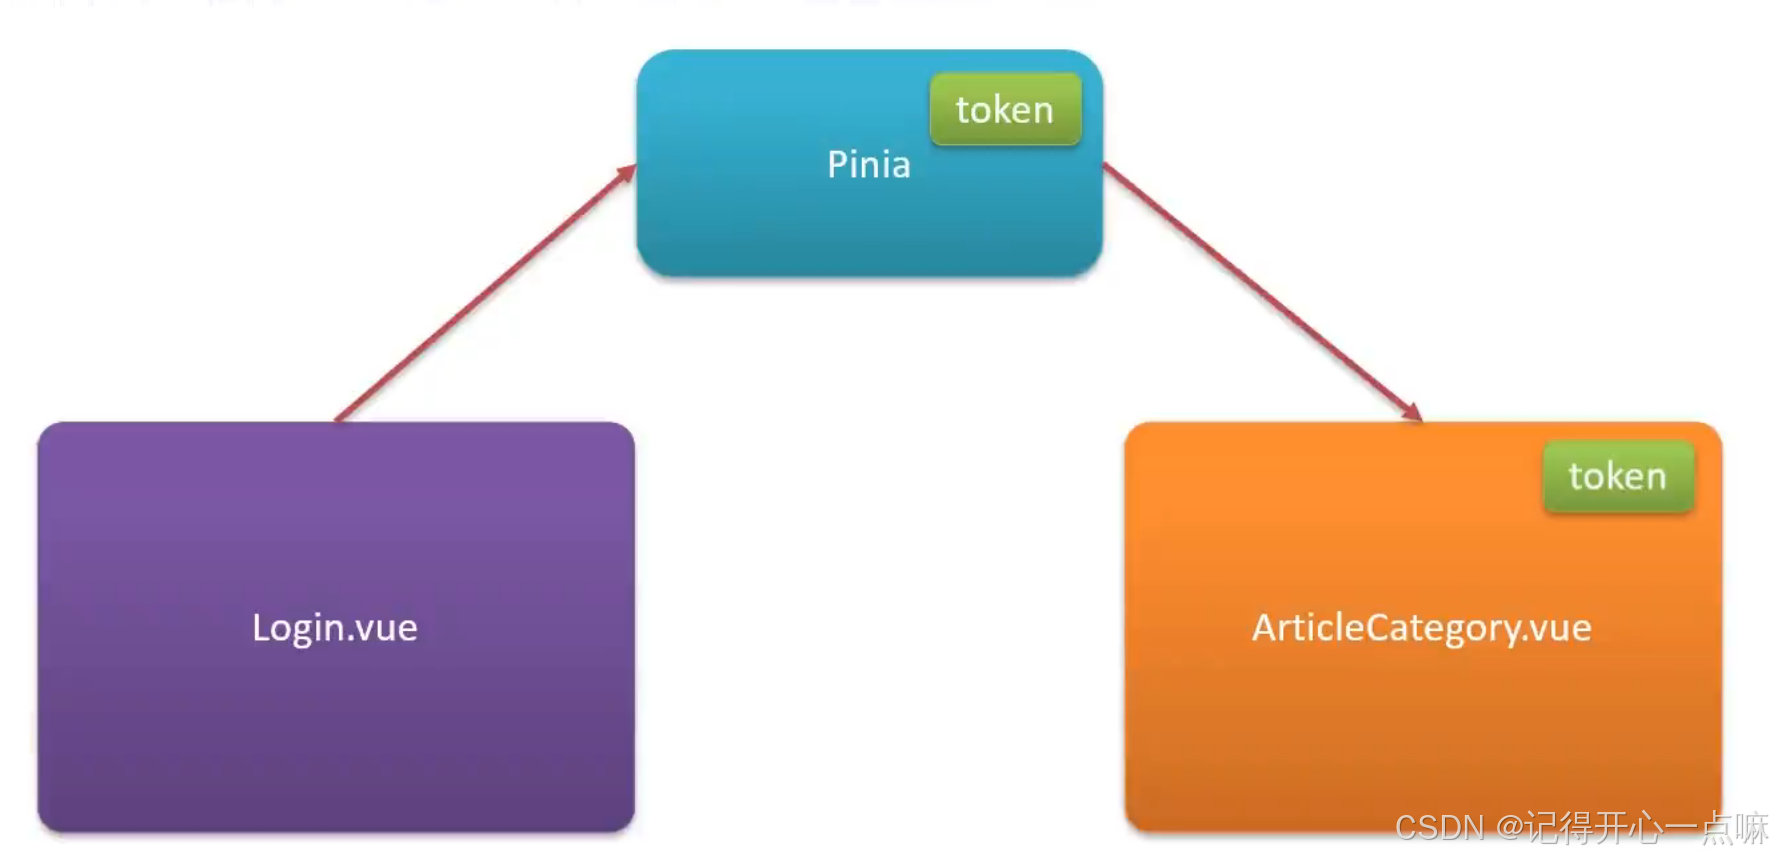
为了传递JWT令牌,我们就会利用Pinia状态管理库,它允许跨组件或页面共享状态。
使用Pinia步骤:
- 安装pinia:cnpm install pinia
- 在vue应用实例中使用pinia
- 在src/stores/token.js中定义store
- 在组件中使用store
1.在main.js文件导入pinia:
这里因为Pinia是默认内存存储,刷新浏览器会丢失数据,我们使用pinia内的Persist插件就可以将Pinia中的数据持久化存储。
为了使用persist,我们需要安装persist:cnpm install pinia-persistedstate-plugin,然后再pinia中使用persist,并且需要再main.js导入一下。
import './assets/main.scss'

import { createApp } from 'vue'
import ElementPlus from 'element-plus'
import 'element-plus/dist/index.css'
import App from './App.vue'
import router from '@/router'
import { createPinia } from 'pinia'
import { createPersistedState } from 'pinia-persistedstate-plugin'

const app = createApp(App);
//创建createPinia()函数实例
const pinia = createPinia();
const persist = createPersistedState();
pinia.use(persist)
app.use(pinia)
app.use(router)
app.use(ElementPlus);
app.mount('#app')
2.定义store状态:
其实无外乎就是使用defineStore()方法,在方法内部分为两个参数来写 :
第一个参数:名字,确保唯一性。
第二个参数:函数,其内部可以定义状态的所有内容,其内部先创建一个响应式数据,然后设置获取数据以及删除数据的方法,最后返回数据以及方法。加上Persist插件就可以将Pinia中的数据持久化存储。
//定义store
import { defineStore } from "pinia";
import {ref} from 'vue'
/*
  第一个参数:名字,确保唯一性
  第二个参数:函数,其内部可以定义状态的所有内容
  返回值:函数
*/
export const useTokenStore = defineStore('token',()=>{
    //定义状态内容

    //1.定义响应式变量
    const token = ref('');

    //2.定义函数来修改token值
    const setToken = (newToken)=>{
        token.value = newToken;
    }

    //3.定义函数来移除token值
    const removeToken = ()=>{
        token.value = '';
    }

    return {
        token,setToken,removeToken
    }
},{
    persist: true  //因为Pinia是默认内存存储,刷新浏览器会丢失数据,使用Persist插件就可以将Pinia中的数据持久化存储
}
);
这样我们就可以调用定义的useTokenStore来使用pinia了。
②文章分类列表渲染:
我们首先再Login.vue文件中把得到的token存储到pinia中:
//导入store状态
import { useTokenStore } from '@/stores/token.js';
//导入路由器
import { useRouter } from 'vue-router';
const tokenstore = useTokenStore();
const router = useRouter();
//表单数据校验
const login = async()=>{
    let result = await userLoginService(registerData.value);
    // alert(result.msg ? result.msg : '登录成功');
    ElMessage.success(result.msg ? result.msg : '登录成功');
    //将得到的token存储到pinia中
    tokenstore.setToken(result.data);
    //通过路由跳转首页
    router.push('/');
}
然后再article.js中定义请求函数:
import request from '@/utils/request.js'
import { useTokenStore } from '@/stores/token.js';

export const ArticleCategoryListService = ()=>{
    const tokenStore = useTokenStore();
    //在pinia中定义的响应式数据不需要加.value才能使用数据
    return request.get('/category',{headers:{'Authorization':tokenStore.token}});
}
但是这样我们需要将剩下的请求函数都要传递JWT令牌,代码会很繁琐,这个时候我们就可以添加请求拦截器来使用回调函数来发送。
③添加请求拦截器:
在request.js文件中添加请求拦截器:
import { useTokenStore } from '@/stores/token.js';
//添加请求拦截器
instance.interceptors.request.use(
    (config)=>{
        //请求前的回调
        const tokenStore = useTokenStore();
        if(tokenStore.token){
            //通过config调用headers获取请求头,在调用Authorization将JWT令牌存放到内部以此来添加统一的请求头
            config.headers.Authorization = tokenStore.token;
        }
        return config;
    },
    (err)=>{
        //请求错误的回调
        Promise.reject(err);//异步的状态转化成失败的状态
    }
)
export default instance;
修改article.js文件的请求函数:
import request from '@/utils/request.js'

export const ArticleCategoryListService = ()=>{
    return request.get('/category');
}
④使用拦截器来对未登录统一处理:
为了将没有登录的用户直接打开主界面,随后浏览器直接能跳转到登录页面,我们就可以添加响应拦截器来对未登录统一处理:
在request.js文件中必须通过下面的方式才能导入router进行使用 =>
import router from '@/router';
// import { useRouter } from 'vue-router';
// const router = useRouter();
//在request.js文件中必须通过下面的方式才能导入router进行使用
import router from '@/router'
//添加响应拦截器
instance.interceptors.response.use(
    result=>{
        //判断业务状态码
        if(result.data.code === 0){
            return result.data;
        }
        //操作失败
        // alert(result.data.message ? result.data.message : '服务异常')
        ElMessage.error(result.data.message ? result.data.message : '服务异常')
        //异步操作的状态转换为失败
        return Promise.reject(result.data);
    },
    err=>{
        //判断响应状态码401
        if(err.response.status === 401){
            ElMessage.error('请先登录');
            //使用路由跳转登录页面
            router.push('/login');
        }else{
            ElMessage.error('服务异常');
        }
        return Promise.reject(err);//异步的状态转化成失败的状态
    }
)
export default instance;
(3)新增文章分类:
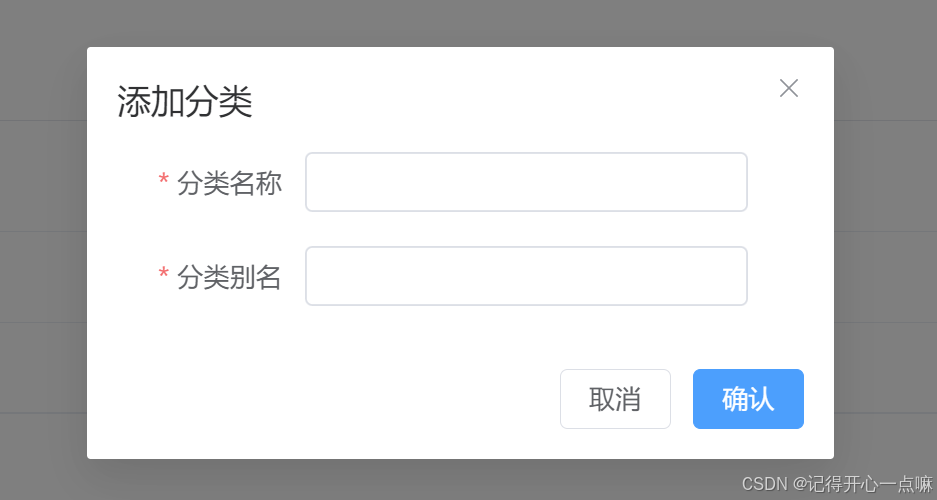
我们为了实现上面操作,在Article.vue添加组件:
<!-- 添加分类弹窗 -->
<el-dialog v-model="dialogVisible" title="添加弹层" width="30%">
    <el-form :model="categoryModel" :rules="rules" label-width="100px" style="padding-right: 30px">
        <el-form-item label="分类名称" prop="categoryName">
            <el-input v-model="categoryModel.categoryName" minlength="1" maxlength="10"></el-input>
        </el-form-item>
        <el-form-item label="分类别名" prop="categoryAlias">
            <el-input v-model="categoryModel.categoryAlias" minlength="1" maxlength="15"></el-input>
        </el-form-item>
    </el-form>
    <template #footer>
        <span class="dialog-footer">
            <el-button @click="dialogVisible = false">取消</el-button>
            <el-button type="primary"> 确认 </el-button>
        </span>
    </template>
</el-dialog>
随后我们通过设置响应式数据来控制添加分类弹窗 =>
//控制添加分类弹窗
const dialogVisible = ref(false)
随后调用点击方法:
//添加分类数据模型
const categoryModel = ref({
    categoryName: '',
    categoryAlias: ''
})
//添加分类表单校验
const rules = {
    categoryName: [
        { required: true, message: '请输入分类名称', trigger: 'blur' },
    ],
    categoryAlias: [
        { required: true, message: '请输入分类别名', trigger: 'blur' },
    ]
}
//添加表单
import { ElMessage } from 'element-plus';
const addCategory = async ()=>{
    //调用接口
    let result = await ArticleCategoryAddService(categoryModel.value);
    ElMessage.success(result.message ? result.message : '添加成功');

    //获取文章分类的函数
    articleCategoryList();
    //让添加分类弹窗消失
    dialogVisible = false;
    //添加后值消失
    categoryModel = ref({
        categoryName: '',
        categoryAlias: ''
    })
}
在article.js中:
import request from '@/utils/request.js'

export const ArticleCategoryAddService = (categoryData)=>{
    return request.post('/category',categoryData);
}
(4)编辑文章分类与删除:
在组件内:
我们复用添加的弹框给编辑弹框,在下面点击事件使用三目运算符进行处理。
<script setup>
import {
    Edit,
    Delete
} from '@element-plus/icons-vue'
import { ref } from 'vue'
const categorys = ref([]);
//声明异步函数
import { ArticleCategoryListService,ArticleCategoryAddService,ArticleCategoryUpdateService,ArticleCategoryDeleteService } from '@/api/article.js';
const articleCategoryList = async ()=>{
    let result = await ArticleCategoryListService();
    categorys.value = result.data;
}
articleCategoryList();
//控制添加分类弹窗
const dialogVisible = ref(false)

//添加分类数据模型
const categoryModel = ref({
    categoryName: '',
    categoryAlias: ''
})
//添加分类表单校验
const rules = {
    categoryName: [
        { required: true, message: '请输入分类名称', trigger: 'blur' },
    ],
    categoryAlias: [
        { required: true, message: '请输入分类别名', trigger: 'blur' },
    ]
}
//添加表单
import { ElMessage } from 'element-plus';
const addCategory = async ()=>{
    //调用接口
    let result = await ArticleCategoryAddService(categoryModel.value);
    ElMessage.success(result.message ? result.message : '添加成功');

    //获取文章分类的函数
    articleCategoryList();
    //让添加分类弹窗消失
    dialogVisible = false;
    //添加后值消失
    categoryModel = ref({
        categoryName: '',
        categoryAlias: ''
    })
}
//定义变量来控制标题
const title = ref('');
//展示编辑弹窗
const showDialog = (row)=>{
    dialogVisible.value = true;
    title.value ='编辑分类';
    //数据拷贝
    categoryModel.value.categoryName = row.categoryName;
    categoryModel.value.categoryAlias = row.categoryAlias;
    //扩展id属性,将来需要传递给后台完成分类的修改
    categoryModel.value.id = row.id;
}
//编辑分类
const updateCategory = ()=>{
    let result  = ArticleCategoryUpdateService(categoryModel.value);
    ElMessage.success(result.message ? result.message : '修改成功');
    articleCategoryList();
    dialogVisible.value = false;
}
//清空
const clearData = ()=>{
    categoryModel.value.categoryName = '';
    categoryModel.value.categoryAlias = '';
}
//删除分类
import { ElMessageBox } from 'element-plus'
const deleteCategory = (row)=>{
    //提示用户
    ElMessageBox.confirm(
    '确认要删除该分类信息吗?',
    '温馨提示',
    {
      confirmButtonText: '确认',
      cancelButtonText: '取消',
      type: 'warning',
      center: true,
    }
  )
    .then(async () => {
      let result = await ArticleCategoryDeleteService(row.id);
      ElMessage({
        type: 'success',
        message: '删除成功',
      })
      articleCategoryList();
    })
    .catch(() => {
      ElMessage({
        type: 'info',
        message: '取消删除',
      })
    })
}
</script>
<template>
    <el-card class="page-container">
        <template #header>
            <div class="header">
                <span>文章分类</span>
                <div class="extra">
                    <el-button type="primary" @click="dialogVisible = true;title = '添加分类';clearData()">添加分类</el-button>
                </div>
            </div>
        </template>
        <el-table :data="categorys" style="width: 100%">
            <el-table-column label="序号" width="100" type="index"> </el-table-column>
            <el-table-column label="分类名称" prop="categoryName"></el-table-column>
            <el-table-column label="分类别名" prop="categoryAlias"></el-table-column>
            <el-table-column label="操作" width="100">
                <template #default="{ row }">
                    <el-button :icon="Edit" circle plain type="primary" @click="showDialog(row)" ></el-button>
                    <el-button :icon="Delete" circle plain type="danger" @click="deleteCategory(row)"></el-button>
                </template>
            </el-table-column>
            <template #empty>
                <el-empty description="没有数据" />
            </template>
        </el-table>
        <!-- 添加分类弹窗 -->
        <el-dialog v-model="dialogVisible" :title="title" width="30%">
            <el-form :model="categoryModel" :rules="rules" label-width="100px" style="padding-right: 30px">
                <el-form-item label="分类名称" prop="categoryName">
                    <el-input v-model="categoryModel.categoryName" minlength="1" maxlength="10"></el-input>
                </el-form-item>
                <el-form-item label="分类别名" prop="categoryAlias">
                    <el-input v-model="categoryModel.categoryAlias" minlength="1" maxlength="15"></el-input>
                </el-form-item>
            </el-form>
            <template #footer>
                <span class="dialog-footer">
                    <el-button @click="dialogVisible = false">取消</el-button>
                    <el-button type="primary" @click="title ==='添加分类' ? addCategory() : updateCategory()"> 确认 </el-button>
                </span>
            </template>
        </el-dialog>
    </el-card>
</template>

<style lang="scss" scoped>
.page-container {
    min-height: 100%;
    box-sizing: border-box;

    .header {
        display: flex;
        align-items: center;
        justify-content: space-between;
    }
}
</style>
在article.js完整代码:
import request from '@/utils/request.js'
// import { useTokenStore } from '@/stores/token.js';

export const ArticleCategoryListService = ()=>{
    //在请求拦截器添加了JWT令牌到请求头中
    return request.get('/category');
}

export const ArticleCategoryAddService = (categoryData)=>{
    return request.post('/category',categoryData);
}

//文章分类编辑
export const ArticleCategoryUpdateService = (categoryData)=>{
    return request.put('/category',categoryData);
}

//文章分类删除
export const ArticleCategoryDeleteService = (id)=>{
    return request.delete('/category?id='+id)
}
好了,今天的内容就到这里了,下期继续更新大事件项目前后端开发,感谢收看!!!


 19万+
19万+

 被折叠的 条评论
为什么被折叠?
被折叠的 条评论
为什么被折叠?
 到【灌水乐园】发言


