


步骤一:OpenGauss 的安装
环境
OS:openEuler 20.03 64bit with ARM
架构:arm64
部署:单机
安装过程
1、环境配置
安装依赖包:
yum install libaio-devel flex bison ncurses-devel glibc-devel patch readline-devel
2、创建 xml 配置文件
创建 cluster_config.xml 配置文件并进行配置
<?xml version="1.0" encoding="UTF-8"?>
<ROOT>
    <!-- openGauss整体信息 -->
    <CLUSTER>
    <!-- 数据库名称 -->
        <PARAM name="clusterName" value="GaussDB" />
    <!-- 数据库节点名称(hostname) -->
        <PARAM name="nodeNames" value="node1" />
    <!-- 节点IP,与nodeNames一一对应 -->
        <PARAM name="backIp1s" value="***.***.***.***87"/>
    <!-- 数据库安装目录-->
        <PARAM name="gaussdbAppPath" value="/opt/huawei/install/app" />
    <!-- 日志目录-->
        <PARAM name="gaussdbLogPath" value="/var/log/omm" />
    <!-- 临时文件目录-->
        <PARAM name="tmpMppdbPath" value="/opt/huawei/tmp"/>
    <!--数据库工具目录-->
        <PARAM name="gaussdbToolPath" value="/opt/huawei/install/om" />
    <!--数据库core文件目录-->
        <PARAM name="corePath" value="/opt/huawei/corefile"/>
    <!-- openGauss类型,此处示例为单机类型,“single-inst”表示单机一主多备部署形态-->
        <PARAM name="clusterType" value="single-inst"/>
    </CLUSTER>
    <!-- 每台服务器上的节点部署信息 -->
    <DEVICELIST>
        <!-- node1上的节点部署信息 -->
        <DEVICE sn="1000001">
        <!-- node1的hostname -->
            <PARAM name="name" value="ecs-kc1-large-2-linux-20210605213652"/>
        <!-- node1所在的AZ及AZ优先级 -->
            <PARAM name="azName" value="AZ1"/>
            <PARAM name="azPriority" value="1"/>
        <!-- 如果服务器只有一个网卡可用,将backIP1和sshIP1配置成同一个IP -->
            <PARAM name="backIp1" value="***.***.***.***87"/>
            <PARAM name="sshIp1" value="***.***.***.***87"/>

	    <!--dbnode-->
	    	<PARAM name="dataNum" value="1"/>
	    <!--DBnode端口号-->
	    	<PARAM name="dataPortBase" value="26000"/>
	    <!--DBnode主节点上数据目录,及备机数据目录-->
	    	<PARAM name="dataNode1" value="node1"/>
	    <!--DBnode节点上设定同步模式的节点数-->
	    	<PARAM name="dataNode1_syncNum" value="0"/>
        </DEVICE>
    </DEVICELIST>
</ROOT>
注意节点 hostname 应与/etc/hostname 中保持一致
3、初始化安装环境
1.以 root 用户登录待安装 openGauss 的任意主机,并按规划创建存放安装包的目录。
mkdir -p /opt/software/openGauss
chmod 755 -R /opt/software
2.下载安装包并将配置文件“cluster_config.xml”都上传至上一步所创建的目录中。
wget https://opengauss.obs.cn-south-1.myhuaweicloud.com/2.0.1/arm/openGauss-2.0.1-openEuler-64bit-all.tar.gz
3.解压安装包。
tar -zxvf openGauss-2.0.1-openEuler-64bit-all.tar.gz
tar jxvf openGauss-2.0.1-openEuler-64bit.tar.bz2
tar -zxvf openGauss-2.0.1-openEuler-64bit-om.tar.gz
tar -zxvf upgrade_sql.tar.gz
4.进入到工具脚本存放目录下。
cd /opt/software/openGauss/script
5.如果是 openEuler 的操作系统为确保适配 python 版本,执行如下命令打开 gspylib/common/CheckPythonVersion.py 文件,将 if not pythonVersion = = (3, 6):修改为 if not pythonVersion > = (3, 6):,键入“ESC”键进入指令模式,执行**:wq**保存并退出修改。(我在实际操作中进入后发现无需修改)
vi gspylib/common/CheckPythonVersion.py
6.如果是 openEuler 的操作系统,执行如下命令打开 performance.sh 文件,用#注释 sysctl -w vm.min_free_kbytes=112640 &> /dev/null,键入“ESC”键进入指令模式,执行**:wq**保存并退出修改。
vi /etc/profile.d/performance.sh
7.为确保 openssl 版本正确,执行预安装前请加载安装包中 lib 库。执行命令如下,其中*{packagePath}*为用户安装包放置的路径,本示例中为/opt/software/openGauss。
export LD_LIBRARY_PATH=/opt/software/openGauss/script/gspylib/clib:$LD_LIBRARY_PATH
8.为确保成功安装,检查 hostname 与 /etc/hostname 是否一致。预安装过程中,会对 hostname 进行检查。
9.使用 gs_preinstall 准备好安装环境。若为共用环境需加入--sep-env-file=ENVFILE 参数分离环境变量,避免与其他用户相互影响,ENVFILE 为用户自行指定的环境变量分离文件的路径。
-
采用交互模式执行前置,并在执行过程中自动创建操作系统 root 用户互信和 omm 用户互信:
./gs_preinstall -U omm -G dbgrp -X /opt/software/openGauss/cluster_config.xml在执行中会要求输入 omm 用户的密码。
运行结果应类似:
plat1:/opt/software/openGauss/script # ./gs_preinstall -U omm -G dbgrp -X /opt/software/openGauss/cluster_config.xml
Parsing the configuration file.
Successfully parsed the configuration file.
Installing the tools on the local node.
Successfully installed the tools on the local node.
Are you sure you want to create trust for root (yes/no)? yes
Please enter password for root.
Password:
Creating SSH trust for the root permission user.
Checking network information.
All nodes in the network are Normal.
Successfully checked network information.
Creating SSH trust.
Creating the local key file.
Successfully created the local key files.
Appending local ID to authorized_keys.
Successfully appended local ID to authorized_keys.
Updating the known_hosts file.
Successfully updated the known_hosts file.
Appending authorized_key on the remote node.
Successfully appended authorized_key on all remote node.
Checking common authentication file content.
Successfully checked common authentication content.
Distributing SSH trust file to all node.
Successfully distributed SSH trust file to all node.
Verifying SSH trust on all hosts.
Successfully verified SSH trust on all hosts.
Successfully created SSH trust.
Successfully created SSH trust for the root permission user.
Setting pssh path
Successfully set core path.
Distributing package.
Begin to distribute package to tool path.
Successfully distribute package to tool path.
Begin to distribute package to package path.
Successfully distribute package to package path.
Successfully distributed package.
Are you sure you want to create the user[omm] and create trust for it (yes/no)? yes
Please enter password for cluster user.
Password:
Please enter password for cluster user again.
Password:
Successfully created [omm] user on all nodes.
Preparing SSH service.
Successfully prepared SSH service.
Installing the tools in the cluster.
Successfully installed the tools in the cluster.
Checking hostname mapping.
Successfully checked hostname mapping.
Creating SSH trust for [omm] user.
Checking network information.
All nodes in the network are Normal.
Successfully checked network information.
Creating SSH trust.
Creating the local key file.
Successfully created the local key files.
Appending local ID to authorized_keys.
Successfully appended local ID to authorized_keys.
Updating the known_hosts file.
Successfully updated the known_hosts file.
Appending authorized_key on the remote node.
Successfully appended authorized_key on all remote node.
Checking common authentication file content.
Successfully checked common authentication content.
Distributing SSH trust file to all node.
Successfully distributed SSH trust file to all node.
Verifying SSH trust on all hosts.
Successfully verified SSH trust on all hosts.
Successfully created SSH trust.
Successfully created SSH trust for [omm] user.
Checking OS software.
Successfully check os software.
Checking OS version.
Successfully checked OS version.
Creating cluster's path.
Successfully created cluster's path.
Setting SCTP service.
Successfully set SCTP service.
Set and check OS parameter.
Setting OS parameters.
Successfully set OS parameters.
Preparing CRON service.
Successfully prepared CRON service.
Setting user environmental variables.
Successfully set user environmental variables.
Setting the dynamic link library.
Successfully set the dynamic link library.
Setting Core file
Successfully set core path.
Setting pssh path
Successfully set pssh path.
Set ARM Optimization.
No need to set ARM Optimization.
Fixing server package owner.
Setting finish flag.
Successfully set finish flag.
Preinstallation succeeded.
4、执行安装
内存小于安装要求的 32G 应该做一些配置修改:
# vim /etc/sysctl.conf
kernel.shmall = 1125899906842624
kernel.shmmax = 1351079888211149

# vim /opt/huawei/install/data/db1/postgresql.conf
cstore_buffers=16MB
bulk_write_ring_size=128MB
shared_buffers=128MB
max_process_memory=2GB
max_connections=10
切换到 omm 用户下执行安装:
su - omm
gs_install -X /opt/software/openGauss/cluster_config.xml
步骤二 数据库的简单链接与使用
1、创建新用户,新数据库并赋予权限
使用 gsql 用 omm 管理账号登陆,创建新用户 jack,创建新数据库 testjack,赋予权限,执行
CREATE USER jack PASSWORD 'Gaussdba@Mpp';
CREATE DATABASE testjack OWNER jack;
GRANT SELECT ON pg_catalog.pg_roles to jack;
GRANT SELECT ON pg_catalog.pg_user_status to jack;
GRANT ALL PRIVILEGES on TABLESPACE pg_default,pg_global TO jack;
然后退出,使用 jack 用户登录 gsql
gsql -U jack -d testjack -p "Gaussdba@Mpp"
创建 SCHEMA
CREATE SCHEMA jack AUTHORIZATION jack;
退出 gsql,赋予 jack 权限,这里 client_address 是客户端的地址
gs_guc set -N all -I all -h "host all jack client_address/32 sha256
或者也可以修改 pg_hba.conf,添加
host all jack client_address/32 sha256
2、允许客户端访问数据库
执行,这里的 client_address 是要客户端的地址, listen_addresses 是参数名。
gs_guc set -I all -c "listen_addresses='client_address'"
或在使用 omm 账号在 gsql 中
ALTER SYSTEM SET listen_addresses TO "client_address";
之后重启数据库
3、关闭防火墙,打开端口
4、使用 Data Studio 访问数据库
可在 opengauss 官网下载 DATA STUDIO 应用
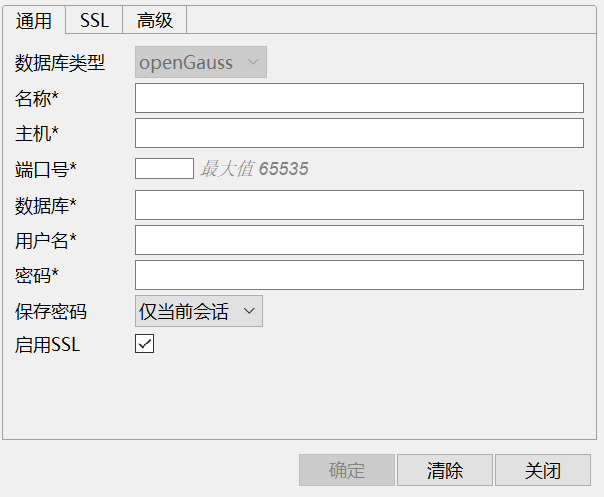
填入对应参数,注意这里应去掉启用 SSL 的选项,因为 SSL 还需要配置证书或密钥。
连接后的界面

5、使用 JDBC 访问数据库
我这里使用 windows 系统作为客户端连接数据库。
在 opengauss 网站下载对应的 JDBC 包,并解压。
创建 Gauss.java 文件
import java.sql.Connection;
import java.sql.DriverManager;
import java.sql.PreparedStatement;
import java.sql.ResultSet;
import java.sql.ResultSetMetaData;
import java.sql.SQLException;
import java.sql.Statement;
import java.sql.CallableStatement;
import java.sql.Types;
import java.util.Collections;
import java.util.Properties;

public class Gauss {

    public static void main(String[] args) {
        Connection connection;
        ResultSet resultSet;
        String url = "jdbc:postgresql://address:port/testjack"; //address 地址 port 端口 testjack 数据库名
        String user = "××××"; // 数据库用户名
        String password = "××××"; // 对应密码
        String sql;
        if(args.length > 0)
        {
            sql = args[0];
        }
        else
        {
            System.out.println("输入一条sql语句");
            return;
        }

        if ((connection = getConnect(user, password, url)) != null) {
            System.out.println(connection.toString());
        }

        if ((resultSet = execSql(connection, sql)) != null)
        {


        }
    }

    // 以下代码将获取数据库连接操作封装为一个接口,可通过给定用户名和密码来连接数据库。
    public static Connection getConnect(String username, String passwd, String url) {
        // 驱动类。
        String driver = "org.postgresql.Driver";
        // 数据库连接描述符。
        String sourceURL = url;
        Connection conn = null;

        try {
            // 加载驱动。
            Class.forName(driver);
        } catch (Exception e) {
            e.printStackTrace();
            return null;
        }

        try {
            // 创建连接。
            conn = DriverManager.getConnection(sourceURL, username, passwd);
            System.out.println("Connection succeed!");
        } catch (Exception e) {
            e.printStackTrace();
            return null;
        }

        return conn;
    };

    // 以下代码将使用Properties对象作为参数建立连接
    public static Connection getConnectUseProp(String username, String passwd, String url) {
        // 驱动类。
        String driver = "org.postgresql.Driver";
        // 数据库连接描述符。
        String sourceURL = url + "?";
        Connection conn = null;
        Properties info = new Properties();

        try {
            // 加载驱动。
            Class.forName(driver);
        } catch (Exception e) {
            e.printStackTrace();
            return null;
        }

        try {
            info.setProperty("user", username);
            info.setProperty("password", passwd);
            // 创建连接。
            conn = DriverManager.getConnection(sourceURL, info);
            System.out.println("Connection succeed!");
        } catch (Exception e) {
            e.printStackTrace();
            return null;
        }

        return conn;
    };

    public static ResultSet execSql(Connection conn, String sql) {
        Statement stmt = null;
        ResultSet rs = null;
        SQLWarning sqlw = null;
        try {
            stmt = conn.createStatement();
            // 执行普通SQL语句。
            stmt.execute(sql);
            if((sqlw = stmt.getWarnings()) != null)
                System.out.println(sqlw.toString());
            if((rs = stmt.getResultSet()) != null)
                printResultSet(rs);

            stmt.close();
        } catch (SQLException e) {
            if (stmt != null) {
                try {
                    stmt.close();
                } catch (SQLException e1) {
                    e1.printStackTrace();
                }
            }
            e.printStackTrace();
        }
        return rs;
    }


    private static void printResultSet(ResultSet rs)
    {
        String line = "";
        try {
            ResultSetMetaData rsmd = rs.getMetaData();
            for(int i = 1; i <= rsmd.getColumnCount(); i ++)
            {
                String label = rsmd.getColumnLabel(i).toString();
                System.out.print(label + "\t");
                line += String.join("", Collections.nCopies(label.length(), "-")) + "\t";
            }
            System.out.println("\n" + line);

            while(rs.next())
            {
                for(int i = 1; i <= rsmd.getColumnCount(); i ++)
                {
                    System.out.print(rs.getObject(i).toString() + "\t");
                }
                System.out.println("");

            }
        } catch (Exception e) {
            e.printStackTrace();
        }
    }

}
编译
javac .\Gauss.java -encoding "utf-8"
运行,我这里将 postgresql.jar 放在同一目录下,创建一个表 nt 作为测试
java -cp ".;postgresql.jar" Gauss "CREATE TABLE nt(id INTEGER, name VARCHAR(20))"
java -cp ".;postgresql.jar" Gauss "INSERT into nt(id, name) VALUES (1,'n1'),(2,'n2'),(3,'n3');"
java -cp ".;postgresql.jar" Gauss "SELECT * FROM nt;"
最后一句输出结果为,可以看到成功进行了连接和操作。
九月 13, 2021 11:58:25 上午 org.postgresql.core.v3.ConnectionFactoryImpl openConnectionImpl
信息: [75000bb7-1475-4579-94cb-f53a01bec9eb] Try to connect. IP: ***.***.***.***:****
九月 13, 2021 11:58:26 上午 org.postgresql.core.v3.ConnectionFactoryImpl openConnectionImpl
信息: [***.***.***.***:****/***.***.***.***:****] Connection is established. ID: 75000bb7-1475-4579-94cb-f53a01bec9eb
九月 13, 2021 11:58:26 上午 org.postgresql.core.v3.ConnectionFactoryImpl openConnectionImpl
信息: Connect complete. ID: 75000bb7-1475-4579-94cb-f53a01bec9eb
Connection succeed!
id      name
--      ----
1       n1
2       n2
3       n3


 2556
2556


 被折叠的 条评论
为什么被折叠?
被折叠的 条评论
为什么被折叠?
 到【灌水乐园】发言


