


实战:基于Java实现REST API
本节,将基于市面上最为流行的3款Java框架——Jersey、ApacheCXF、Spring Web MVC——来分别演示如何实现REST API。
基于Jersey来构建REST服务
下面,我们将演示如何基于Jersey来构建REST服务。
1.创建一个新项目
使用Maven的工程创建一个Jersey项目是最方便的,下面我们将演示用这种方法来看一下它是怎么实现的。我们将创建一个新的Jersey项目,并运行在Grizzly容器里。
我们使用Jersey提供的maven archetype来创建一个项目。只需执行下面的命令。
mvn archetype:generate -DarchetypeArtifactId=jersey-quickstart-grizzly2
-DarchetypeGroupId=org.glassfish.jersey.archetypes -DinteractiveMode=false -DgroupId=com.
waylau.jersey -DartifactId=jersey-rest -Dpackage=com.waylau.jersey -DarchetypeVersion=2.30
这样,就完成了自动创建一个jersey-rest项目的过程。
2.探索项目
我们可以用文本编辑器打开项目源代码,或者导入自己熟悉的IDE中来观察整个项目。
从项目结构上来看,jersey-rest项目就是一个普通的Maven项目,拥有pom.xml文件、源代码目录以及测试目录。整体项目结构如下。
jersey-rest
│ pom.xml│
└─ src
├─ main
│ └─ java
│ └─ com
│ └─ waylau
│ └─ jersey
│ Main.java
│ MyResource.java
│
└─ test
└─ java
└─ com
└─ waylau
└─ jersey
MyResourceTest.java
其中,pom.xml定义内容如下。
<project xmlns="http://maven.apache.org/POM/4.0.0"
xmlns:xsi="http://www.w3.org/2001/XMLSchema-instance"
xsi:schemaLocation="http://maven.apache.org/POM/4.0.0
http://maven.apache.org/maven-v4_0_0.xsd">
<modelVersion>4.0.0</modelVersion>
<groupId>com.waylau.jersey</groupId>
<artifactId>jersey-rest</artifactId>
<packaging>jar</packaging>
<version>1.0-SNAPSHOT</version>
<name>jersey-rest</name>
<dependencyManagement>
<dependencies>
<dependency>
<groupId>org.glassfish.jersey</groupId>
<artifactId>jersey-bom</artifactId>
<version>${jersey.version}</version>
<type>pom</type>
<scope>import</scope>
</dependency>
</dependencies>
</dependencyManagement>
<dependencies>
<dependency>
<groupId>org.glassfish.jersey.containers</groupId>
<artifactId>jersey-container-grizzly2-http</artifactId>
</dependency>
<dependency>
<groupId>org.glassfish.jersey.inject</groupId>
<artifactId>jersey-hk2</artifactId>
</dependency>
<!-- uncomment this to get JSON support:
<dependency>
<groupId>org.glassfish.jersey.media</groupId>
<artifactId>jersey-media-json-binding</artifactId>
</dependency>-->
<dependency>
<groupId>junit</groupId>
<artifactId>junit</artifactId>
<version>4.12</version>
<scope>test</scope>
</dependency>
</dependencies>
<build>
<plugins>
<plugin>
<groupId>org.apache.maven.plugins</groupId>
<artifactId>maven-compiler-plugin</artifactId>
<version>2.5.1</version>
<inherited>true</inherited>
<configuration>
<source>1.7</source>
<target>1.7</target>
</configuration>
</plugin>
<plugin>
<groupId>org.codehaus.mojo</groupId>
<artifactId>exec-maven-plugin</artifactId>
<version>1.2.1</version>
<executions>
<execution>
<goals>
<goal>java</goal>
</goals>
</execution>
</executions>
<configuration>
<mainClass>com.waylau.jersey.Main</mainClass>
</configuration>
</plugin>
</plugins>
</build>
<properties>
<jersey.version>2.30</jersey.version>
<project.build.sourceEncoding>UTF-8</project.build.sourceEncoding>
</properties>
</project>
还有一个Main类,主要是负责承接Grizzly容器,同时也为这个容器配置和部署JAX-RS应用。
package com.waylau.jersey;
import org.glassfish.grizzly.http.server.HttpServer;
import org.glassfish.jersey.grizzly2.httpserver.GrizzlyHttpServerFactory;
import org.glassfish.jersey.server.ResourceConfig;
import java.io.IOException;
import java.net.URI;
/*** Main class.
*
*/
public class Main {
// Base URI the Grizzly HTTP server will listen on
public static final String BASE_URI = "http://localhost:8080/myapp/";
/**
* Starts Grizzly HTTP server exposing JAX-RS resources defined in this application.
* @return Grizzly HTTP server.
*/
public static HttpServer startServer() {
// create a resource config that scans for JAX-RS resources and providers
// in com.waylau.jersey package
final ResourceConfig rc = new ResourceConfig().packages("com.waylau.jersey");
// create and start a new instance of grizzly http server
// exposing the Jersey application at BASE_URI
return GrizzlyHttpServerFactory.createHttpServer(URI.create(BASE_URI), rc);
}
/**
* Main method.
* @param args
* @throws IOException
*/
public static void main(String[] args) throws IOException {
final HttpServer server = startServer();
System.out.println(String.format("Jersey app started with WADL available at "
+ "%sapplication.wadl\nHit enter to stop it...", BASE_URI));
System.in.read();
server.stop();
}
}
MyResource是一个资源类,定义了所有REST API服务。
package com.waylau.jersey;
import javax.ws.rs.GET;
import javax.ws.rs.Path;
import javax.ws.rs.Produces;
import javax.ws.rs.core.MediaType;
/**
* Root resource (exposed at "myresource" path)
*/
@Path("myresource")
public class MyResource {
/**
* Method handling HTTP GET requests. The returned object will be sent
* to the client as "text/plain" media type.
*
* @return String that will be returned as a text/plain response.
*/
@GET
@Produces(MediaType.TEXT_PLAIN)
public String getIt() {
return "Got it!";}
}
在我们的例子中,MyResource资源暴露了一个公开的方法,能够处理绑定在“/myresource”URI路径下的HTTP GET请求,并可以产生媒体类型为“text/plain”的响应消息。在这个示例中,资源返回相同的“Gotit!”应对所有客户端的要求。
在src/test/java目录下的MyResourceTest类是对MyResource的单元测试,它们具有相同的包名“com.waylau.jersey”。
package com.waylau.jersey;
import javax.ws.rs.client.Client;
import javax.ws.rs.client.ClientBuilder;
import javax.ws.rs.client.WebTarget;
import org.glassfish.grizzly.http.server.HttpServer;
import org.junit.After;
import org.junit.Before;
import org.junit.Test;
import static org.junit.Assert.assertEquals;
public class MyResourceTest {
private HttpServer server;
private WebTarget target;
@Before
public void setUp() throws Exception {
// start the server
server = Main.startServer();
// create the client
Client c = ClientBuilder.newClient();
// uncomment the following line if you want to enable
// support for JSON in the client (you also have to uncomment
// dependency on jersey-media-json module in pom.xml and Main.startServer())
// --
// c.configuration().enable(new org.glassfish.jersey.media.json.
JsonJaxbFeature());
target = c.target(Main.BASE_URI);
}
@After
public void tearDown() throws Exception {
server.stop();
}
/**
* Test to see that the message "Got it!" is sent in the response.
*/
@Test
public void testGetIt() {
String responseMsg = target.path("myresource").request().get(String.class);
assertEquals("Got it!", responseMsg);
}
}
在这个单元测试中,测试用到了JUnit,静态方法Main.startServer首先将Grizzly容器启动,而后服务器应用部署到测试中的setUp方法。接下来,一个JAX-RS客户端组件在相同的测试方法中创建,先是一个新的JAX-RS客户端实例生成,接着JAX-RS web target部件指向我们部署的应用程序上下文的根“
http://localhost:8080/myapp/”(Main.BASE_URI的常量值)。
在testGetIt方法中,JAX-RS客户端API用来连接并发送HTTP GET请求到MyResource资源类所侦听的/myresource的URI。在测试方法的第2行,响应的内容(从服务器返回的字符串)与测试断言预期短语进行比较。
3.运行项目
有了项目,进入项目的根目录先测试运行。
$ mvn clean test如果一切正常,能在控制台看到以下输出内容。
D:\workspaceGithub\distributed-java\samples\jersey-rest>mvn clean test
[INFO] Scanning for projects...
[INFO]
[INFO] ---------------< com.waylau.jersey:jersey-rest >------------
[INFO] Building jersey-rest 1.0-SNAPSHOT
[INFO] ----------------------------[ jar ]-------------------------
[INFO]
[INFO] --- maven-clean-plugin:2.5:clean (default-clean) @ jersey-rest ---
[INFO] Deleting D:\workspaceGithub\distributed-java\samples\jersey-rest\target
[INFO]
[INFO] --- maven-resources-plugin:2.6:resources (default-resources) @ jersey-rest ---
[INFO] Using 'UTF-8' encoding to copy filtered resources.
[INFO] skip non existing resourceDirectory
...
-------------------------------------------------------
T E S T S
-------------------------------------------------------
Running com.waylau.jersey.MyResourceTest
1月 20, 2020 10:08:26 下午 org.glassfish.grizzly.http.server.NetworkListener start
信息: Started listener bound to [localhost:8080]1月 20, 2020 10:08:26 下午 org.glassfish.grizzly.http.server.HttpServer start
信息: [HttpServer] Started.
1月 20, 2020 10:08:27 下午 org.glassfish.grizzly.http.server.NetworkListener
shutdownNow
信息: Stopped listener bound to [localhost:8080]
Tests run: 1, Failures: 0, Errors: 0, Skipped: 0, Time elapsed: 1.526 sec
Results :
Tests run: 1, Failures: 0, Errors: 0, Skipped: 0
[INFO] ------------------------------------------------------------
[INFO] BUILD SUCCESS
[INFO] ------------------------------------------------------------
[INFO] Total time: 6.726 s
[INFO] Finished at: 2020-01-20T22:08:27+08:00
[INFO] ------------------------------------------------------------
为了节省篇幅,上述代码只保留了输出的核心内容。
测试通过,下面我们用标准模式运行项目。
$ mvn exec:java运行结果如下。
D:\workspaceGithub\distributed-java\samples\jersey-rest>mvn exec:java
[INFO] Scanning for projects...
[INFO]
[INFO] -------------------< com.waylau.jersey:jersey-rest >--------
[INFO] Building jersey-rest 1.0-SNAPSHOT
[INFO] --------------------------------[ jar ]---------------------
[INFO]
[INFO] >>> exec-maven-plugin:1.2.1:java (default-cli) > validate @ jersey-rest >>>
[INFO]
[INFO] <<< exec-maven-plugin:1.2.1:java (default-cli) < validate @ jersey-rest <<<
[INFO]
[INFO]
[INFO] --- exec-maven-plugin:1.2.1:java (default-cli) @ jersey-rest ---
Downloading from nexus-aliyun: http://maven.aliyun.com/nexus/content/groups/public/
org/apache/commons/commons-exec/1.1/commons-exec-1.1.pom
Downloaded from nexus-aliyun: http://maven.aliyun.com/nexus/content/groups/public/
org/apache/commons/commons-exec/1.1/commons-exec-1.1.pom (11 kB at 9.1 kB/s)
Downloading from nexus-aliyun: http://maven.aliyun.com/nexus/content/groups/public/
org/apache/commons/commons-exec/1.1/commons-exec-1.1.jar
Downloaded from nexus-aliyun: http://maven.aliyun.com/nexus/content/groups/public/
org/apache/commons/commons-exec/1.1/commons-exec-1.1.jar (53 kB at 95 kB/s)
1月 20, 2020 10:10:15 下午 org.glassfish.grizzly.http.server.NetworkListener start
信息: Started listener bound to [localhost:8080]
1月 20, 2020 10:10:15 下午 org.glassfish.grizzly.http.server.HttpServer start
信息: [HttpServer] Started.
Jersey app started with WADL available at http://localhost:8080/myapp/application.wadl
Hit enter to stop it...项目已经运行,项目的WADL描述存放于
http://localhost:8080/myapp/application.wadl的URI中,将该URI在控制台以curl命令执行或者在浏览器中运行,就能看到该WADL描述以XML格式展示。
<application xmlns="http://wadl.dev.java.net/2009/02">
<doc xmlns:jersey="http://jersey.java.net/"
jersey:generatedBy="Jersey: 2.30 2020-01-10 07:34:57"/>
<doc xmlns:jersey="http://jersey.java.net/"
jersey:hint="This is simplified WADL with user and core resources only.
To get full WADL with extended resources use the query parameter detail.
Link: http://localhost:8080/myapp/application.wadl?detail=true"/>
<grammars/>
<resources base="http://localhost:8080/myapp/">
<resource path="myresource">
<method id="getIt" name="GET">
<response>
<representation mediaType="text/plain"/>
</response>
</method>
</resource>
</resources>
</application>
接下来,我们可以尝试与部署在/myresource下面的资源进行交互。
将资源的URL输入浏览器,或者在控制台用curl命令执行,可以看到如下内容输出。
$ curl http://localhost:8080/myapp/myresource
Got it!
可以看到,使用Jersey构建REST服务非常简便。它内嵌Grizzly容器,可以使应用自启动,而无须部署到额外的容器中,非常适合构建微服务。
本节示例,可以在jersey-rest项目下找到。
基于Apache CXF来构建REST服务
下面,我们将演示如何基于Apache CXF来构建REST服务。
1.创建一个新项目
使用Maven的工程创建一个Apache CXF项目是最方便的。与创建Jersey项目类似,我们使用Apache CXF提供的maven archetype来创建一个项目。只需执行下面的命令。
mvn archetype:generate -DarchetypeArtifactId=cxf-jaxrs-service -DarchetypeGroupId=
org.apache.cxf.archetype -DgroupId=com.waylau.cxf -DartifactId=cxf-rest -Dpackage=com.
waylau.cxf -DarchetypeVersion=3.3.5
这就完成了自动创建一个cxf-rest项目的过程。
2.探索项目
我们可以用文本编辑器打开项目源代码,或者导入自己熟悉的IDE中来观察整个项目。
从项目结构上来看,cxf-rest项目就是一个普通的Maven项目,拥有pom.xml文件、源代码目录以及测试目录。整体项目结构如下。
cxf-rest
│ pom.xml
│
├─ .settings
└─ src
├─ main
│ ├─ java
│ │ └─ com
│ │ └─ waylau
│ │ └─ cxf
│ │ HelloWorld.java
│ │ JsonBean.java
│ │
│ └─ webapp
│ ├─ META-INF
│ │ context.xml
│ │
│ └─ WEB-INF
│ beans.xml
│ web.xml
│└─ test
└─ java
└─ com
└─ waylau
└─ cxf
HelloWorldIT.java
其中,pom.xml定义内容如下。
<?xml version="1.0" encoding="UTF-8"?>
<project xmlns="http://maven.apache.org/POM/4.0.0"
xmlns:xsi="http://www.w3.org/2001/XMLSchema-instance"
xsi:schemaLocation="http://maven.apache.org/POM/4.0.0
http://maven.apache.org/maven-v4_0_0.xsd">
<modelVersion>4.0.0</modelVersion>
<groupId>com.waylau.cxf</groupId>
<artifactId>cxf-rest</artifactId>
<version>Y</version>
<packaging>war</packaging>
<name>Simple CXF JAX-RS webapp service using spring configuration</name>
<description>Simple CXF JAX-RS webapp service using spring configuration
</description>
<properties>
<jackson.version>1.8.6</jackson.version>
</properties>
<dependencies>
<dependency>
<groupId>org.apache.cxf</groupId>
<artifactId>cxf-rt-frontend-jaxrs</artifactId>
<version>3.3.5</version>
</dependency>
<dependency>
<groupId>org.apache.cxf</groupId>
<artifactId>cxf-rt-rs-client</artifactId>
<version>3.3.5</version>
</dependency>
<dependency>
<groupId>org.codehaus.jackson</groupId>
<artifactId>jackson-core-asl</artifactId>
<version>${jackson.version}</version>
</dependency>
<dependency>
<groupId>org.codehaus.jackson</groupId>
<artifactId>jackson-mapper-asl</artifactId>
<version>${jackson.version}</version>
</dependency>
<dependency>
<groupId>org.codehaus.jackson</groupId>
<artifactId>jackson-jaxrs</artifactId>
<version>${jackson.version}</version>
</dependency>
<dependency>
<groupId>org.springframework</groupId>
<artifactId>spring-web</artifactId><version>5.1.12.RELEASE</version>
</dependency>
<dependency>
<groupId>junit</groupId>
<artifactId>junit</artifactId>
<version>4.12</version>
<scope>test</scope>
</dependency>
</dependencies>
<build>
<pluginManagement>
<plugins>
<plugin>
<groupId>org.apache.tomcat.maven</groupId>
<artifactId>tomcat7-maven-plugin</artifactId>
<version>2.0</version>
<executions>
<execution>
<id>default-cli</id>
<goals>
<goal>run</goal>
</goals>
<configuration>
<port>13000</port>
<path>/jaxrs-service</path>
<useSeparateTomcatClassLoader>true
</useSeparateTomcatClassLoader>
</configuration>
</execution>
</executions>
</plugin>
<plugin>
<groupId>org.apache.maven.plugins</groupId>
<artifactId>maven-compiler-plugin</artifactId>
<configuration>
<source>1.8</source>
<target>1.8</target>
</configuration>
</plugin>
<plugin>
<groupId>org.apache.maven.plugins</groupId>
<artifactId>maven-eclipse-plugin</artifactId>
<configuration>
<projectNameTemplate>[artifactId]-[version]</projectNameTemplate>
<wtpmanifest>true</wtpmanifest>
<wtpapplicationxml>true</wtpapplicationxml>
<wtpversion>2.0</wtpversion>
</configuration>
</plugin>
</plugins>
</pluginManagement>
<plugins>
<plugin>
<groupId>org.codehaus.mojo</groupId>
<artifactId>build-helper-maven-plugin</artifactId>
<version>1.5</version>
<executions><execution>
<id>reserve-network-port</id>
<goals>
<goal>reserve-network-port</goal>
</goals>
<phase>process-test-resources</phase>
<configuration>
<portNames>
<portName>test.server.port</portName>
</portNames>
</configuration>
</execution>
</executions>
</plugin>
<plugin>
<groupId>org.apache.tomcat.maven</groupId>
<artifactId>tomcat7-maven-plugin</artifactId>
<executions>
<execution>
<id>start-tomcat</id>
<goals>
<goal>run-war</goal>
</goals>
<phase>pre-integration-test</phase>
<configuration>
<port>${test.server.port}</port>
<path>/jaxrs-service</path>
<fork>true</fork>
<useSeparateTomcatClassLoader>true
</useSeparateTomcatClassLoader>
</configuration>
</execution>
<execution>
<id>stop-tomcat</id>
<goals>
<goal>shutdown</goal>
</goals>
<phase>post-integration-test</phase>
<configuration>
<path>/jaxrs-service</path>
</configuration>
</execution>
</executions>
</plugin>
<plugin>
<groupId>org.apache.maven.plugins</groupId>
<artifactId>maven-failsafe-plugin</artifactId>
<version>2.22.2</version>
<executions>
<execution>
<id>integration-test</id>
<goals>
<goal>integration-test</goal>
</goals>
<configuration>
<systemPropertyVariables>
<service.url>http://localhost:${test.server.port}/jaxrs-service</service.url>
</systemPropertyVariables>
</configuration>
</execution>
<execution>
<id>verify</id>
<goals>
<goal>verify</goal>
</goals>
</execution>
</executions>
</plugin>
</plugins>
</build>
</project>
从依赖配置可以看出,这个项目相对jersey-rest而言,依赖了比较多的第三方框架,如Spring、Jackson、Tomcat等。
这是一个典型的Java EE项目,所以有一个web.xml文件来配置应用。
<?xml version="1.0" encoding="utf-8"?>
<web-app xmlns="http://java.sun.com/xml/ns/j2ee"
xmlns:xsi="http://www.w3.org/2001/XMLSchema-instance"
xsi:schemaLocation="http://java.sun.com/xml/ns/j2ee
http://java.sun.com/xml/ns/j2ee/web-app_2_4.xsd" version="2.4">
<display-name>JAX-RS Simple Service</display-name>
<description>JAX-RS Simple Service</description>
<context-param>
<param-name>contextConfigLocation</param-name>
<param-value>WEB-INF/beans.xml</param-value>
</context-param>
<listener>
<listener-class>
org.springframework.web.context.ContextLoaderListener
</listener-class>
</listener>
<servlet>
<servlet-name>CXFServlet</servlet-name>
<servlet-class>
org.apache.cxf.transport.servlet.CXFServlet
</servlet-class>
<load-on-startup>1</load-on-startup>
</servlet>
<servlet-mapping>
<servlet-name>CXFServlet</servlet-name>
<url-pattern>/*</url-pattern>
</servlet-mapping>
</web-app>
同时,cxf-rest是依赖于Spring框架来提供bean实例的管理,所以上下文配置在beans.xml中。
<?xml version="1.0" encoding="UTF-8"?>
<beans xmlns="http://www.springframework.org/schema/beans"
xmlns:xsi="http://www.w3.org/2001/XMLSchema-instance"
xmlns:jaxrs="http://cxf.apache.org/jaxrs"
xmlns:context="http://www.springframework.org/schema/context"
xsi:schemaLocation="http://www.springframework.org/schema/beans
http://www.springframework.org/schema/beans/spring-beans.xsd
http://www.springframework.org/schema/context
http://www.springframework.org/schema/context/spring-context.xsd
http://cxf.apache.org/jaxrs http://cxf.apache.org/schemas/jaxrs.xsd">
<import resource="classpath:META-INF/cxf/cxf.xml"/>
<context:property-placeholder/>
<context:annotation-config/>
<bean class="org.springframework.web.context.support.
ServletContextPropertyPlaceholderConfigurer"/>
<bean class="org.springframework.beans.factory.config.
PreferencesPlaceholderConfigurer"/>
<jaxrs:server id="services" address="/">
<jaxrs:serviceBeans>
<bean class="com.waylau.cxf.HelloWorld"/>
</jaxrs:serviceBeans>
<jaxrs:providers>
<bean class="org.codehaus.jackson.jaxrs.JacksonJsonProvider"/>
</jaxrs:providers>
</jaxrs:server>
</beans>
com.waylau.cxf.HelloWorld就是提供REST服务的资源类。
package com.waylau.cxf;
import javax.ws.rs.Consumes;
import javax.ws.rs.GET;
import javax.ws.rs.POST;
import javax.ws.rs.Path;
import javax.ws.rs.PathParam;
import javax.ws.rs.Produces;
import javax.ws.rs.core.Response;
@Path("/hello")
public class HelloWorld {
@GET
@Path("/echo/{input}")
@Produces("text/plain")
public String ping(@PathParam("input") String input) {
return input;
}
@POST
@Produces("application/json")
@Consumes("application/json")@Path("/jsonBean")
public Response modifyJson(JsonBean input) {
input.setVal2(input.getVal1());
return Response.ok().entity(input).build();
}
}
该资源类定义了两个REST API。其中:
·GET/hello/echo/{input}将会返回input变量的内容。
·POST/hello/jsonBean则是返回传入的JsonBean对象。
JsonBean就是一个典型的POJO。
package com.waylau.cxf;
public class JsonBean {
private String val1;
private String val2;
public String getVal1() {
return val1;
}
public void setVal1(String val1) {
this.val1 = val1;
}
public String getVal2() {
return val2;
}
public void setVal2(String val2) {
this.val2 = val2;
}
}
HelloWorldIT是应用的测试类。
package com.waylau.cxf;
import static org.junit.Assert.assertEquals;
import java.io.InputStream;
import java.util.ArrayList;
import java.util.List;
import javax.ws.rs.core.Response;
import org.apache.cxf.helpers.IOUtils;
import org.apache.cxf.jaxrs.client.WebClient;
import org.codehaus.jackson.JsonParser;
import org.codehaus.jackson.map.MappingJsonFactory;
import org.junit.BeforeClass;
import org.junit.Test;
public class HelloWorldIT {
private static String endpointUrl;
@BeforeClass
public static void beforeClass() {endpointUrl = System.getProperty("service.url");
}
@Test
public void testPing() throws Exception {
WebClient client =
WebClient.create(endpointUrl + "/hello/echo/SierraTangoNevada");
Response r = client.accept("text/plain").get();
assertEquals(Response.Status.OK.getStatusCode(), r.getStatus());
String value = IOUtils.toString((InputStream)r.getEntity());
assertEquals("SierraTangoNevada", value);
}
@Test
public void testJsonRoundtrip() throws Exception {
List<Object> providers = new ArrayList<>();
providers.add(new org.codehaus.jackson.jaxrs.JacksonJsonProvider());
JsonBean inputBean = new JsonBean();
inputBean.setVal1("Maple");
WebClient client =
WebClient.create(endpointUrl + "/hello/jsonBean", providers);
Response r = client.accept("application/json")
.type("application/json")
.post(inputBean);
assertEquals(Response.Status.OK.getStatusCode(), r.getStatus());
MappingJsonFactory factory = new MappingJsonFactory();
JsonParser parser = factory.createJsonParser((InputStream)r.getEntity());
JsonBean output = parser.readValueAs(JsonBean.class);
assertEquals("Maple", output.getVal2());
}
}
3.运行项目
进入项目的根目录先测试运行。
$ mvn clean test如果一切正常,能在控制台看到以下输出内容。
D:\workspaceGithub\distributed-java\samples\cxf-rest>mvn clean test
[INFO] Scanning for projects...
[INFO]
[INFO] ------------------< com.waylau.cxf:cxf-rest >---------------
[INFO] Building Simple CXF JAX-RS webapp service using spring configuration Y
[INFO] ----------------------------[ war ]-------------------------
[INFO]
[INFO] --- maven-clean-plugin:2.5:clean (default-clean)
@ cxf-rest ---
[INFO] Deleting D:\workspaceGithub\distributed-java\samples\cxf-rest\target
[INFO]
[INFO] --- maven-resources-plugin:2.6:resources (default-resources) @ cxf-rest ---[WARNING] Using platform encoding (GBK actually) to copy filtered resources, i.e. build
is platform dependent!
[INFO] skip non existing resourceDirectory D:\workspaceGithub\distributed-java\
samples\cxf-rest\src\main\resources
[INFO]
[INFO] --- maven-compiler-plugin:3.1:compile (default-compile) @ cxf-rest ---
[INFO] Changes detected - recompiling the module!
[WARNING] File encoding has not been set, using platform encoding GBK, i.e. build is
platform dependent!
[INFO] Compiling 2 source files to D:\workspaceGithub\distributed-java\samples\
cxf-rest\target\classes
[INFO]
[INFO] --- maven-resources-plugin:2.6:testResources (default-testResources) @ cxf-rest
---
[WARNING] Using platform encoding (GBK actually) to copy filtered resources, i.e. build
is platform dependent!
[INFO] skip non existing resourceDirectory D:\workspaceGithub\distributed-java\samples\
cxf-rest\src\test\resources
[INFO]
...
[INFO] Reserved port 49189 for test.server.port
[INFO]
[INFO] --- maven-compiler-plugin:3.1:testCompile (default-testCompile) @ cxf-rest ---
[INFO] Changes detected - recompiling the module!
[WARNING] File encoding has not been set, using platform encoding GBK, i.e. build is
platform dependent!
[INFO] Compiling 1 source file to D:\workspaceGithub\distributed-java\samples\
cxf-rest\target\test-classes
[INFO]
[INFO] --- maven-surefire-plugin:2.12.4:test (default-test) @ cxf-rest ---
[INFO] ------------------------------------------------------------
[INFO] BUILD SUCCESS
[INFO] ------------------------------------------------------------
[INFO] Total time: 19.335 s
[INFO] Finished at: 2020-01-20T21:59:53+08:00
[INFO] ------------------------------------------------------------
为了节省篇幅,上述代码只保留了输出的核心内容。
由于项目内嵌了Tomcat运行插件,所以,可以直接执行以下命令来启动项目。
$ mvn tomcat7:run运行结果如下。
D:\workspaceGithub\cloud-native-book-demos\samples\ch02\cxf-rest>mvn tomcat7:run
[INFO] Scanning for projects...
[INFO]
[INFO] ------------------------------------------------------------[INFO] Building Simple CXF JAX-RS webapp service using spring configuration 1.0-SNAPSHOT
[INFO] ------------------------------------------------------------
[INFO]
[INFO] >>> tomcat7-maven-plugin:2.0:run (default-cli) > compile @ cxf-rest >>>
[INFO]
[INFO] --- maven-resources-plugin:2.6:resources (default-resources) @ cxf-rest ---
[WARNING] Using platform encoding (GBK actually) to copy filtered resources, i.e. build
is platform dependent!
[INFO] skip non existing resourceDirectory D:\workspaceGithub\cloud-native-book-demos\
samples\ch02\cxf-rest\src\main\resources
[INFO]
[INFO] --- maven-compiler-plugin:3.1:compile (default-compile) @ cxf-rest ---
[INFO] Nothing to compile - all classes are up to date
[INFO]
[INFO] <<< tomcat7-maven-plugin:2.0:run (default-cli) < compile @ cxf-rest <<<
[INFO]
[INFO]
[INFO] --- tomcat7-maven-plugin:2.0:run (default-cli) @ cxf-rest ---
[INFO] Running war on http://localhost:13000/jaxrs-service
[INFO] Using existing Tomcat server configuration at D:\workspaceGithub\cloud-native-
book-demos\samples\ch02\cxf-rest\target\tomcat
[INFO] create webapp with contextPath: /jaxrs-service
六月 07, 2019 12:18:11 上午 org.apache.coyote.AbstractProtocol init
信息: Initializing ProtocolHandler ["http-bio-13000"]
六月 07, 2019 12:18:11 上午 org.apache.catalina.core.StandardService startInternal
信息: Starting service Tomcat
六月 07, 2019 12:18:11 上午 org.apache.catalina.core.StandardEngine startInternal
信息: Starting Servlet Engine: Apache Tomcat/7.0.30
六月 07, 2019 12:18:13 上午 org.apache.catalina.core.ApplicationContext log
信息: No Spring WebApplicationInitializer types detected on classpath
六月 07, 2019 12:18:13 上午 org.apache.catalina.core.ApplicationContext log
信息: Initializing Spring root WebApplicationContext
六月 07, 2019 12:18:13 上午 org.springframework.web.context.ContextLoader
initWebApplicationContext
信息: Root WebApplicationContext: initialization started
六月 07, 2019 12:18:13 上午 org.springframework.context.support.
AbstractApplicationContext prepareRefresh
信息: Refreshing Root WebApplicationContext: startup date [Thu Jun 07 00:18:13 CST 2018];
root of context hierarchy
六月 07, 2019 12:18:13 上午 org.springframework.beans.factory.xml.
XmlBeanDefinitionReader loadBeanDefinitions
信息: Loading XML bean definitions from ServletContext resource [/WEB-INF/beans.xml]
六月 07, 2019 12:18:13 上午 org.springframework.beans.factory.xml.
XmlBeanDefinitionReader loadBeanDefinitions
信息: Loading XML bean definitions from class path resource [META-INF/cxf/cxf.xml]
六月 07, 2019 12:18:14 上午 org.springframework.beans.factory.annotation.
AutowiredAnnotationBeanPostProcessor <init>
信息: JSR-330 'javax.inject.Inject' annotation found and supported for autowiring
六月 07, 2019 12:18:14 上午 org.apache.cxf.endpoint.ServerImpl initDestination
信息: Setting the server's publish address to be /
六月 07, 2019 12:18:14 上午 org.springframework.web.context.ContextLoader
initWebApplicationContext
信息: Root WebApplicationContext: initialization completed in 1083 ms
六月 07, 2019 12:18:14 上午 org.apache.coyote.AbstractProtocol start
信息: Starting ProtocolHandler ["http-bio-13000"]项目启动后,就可以尝试与部署在“/hello”下面的资源进行交互。
将资源的URL输入浏览器,或者在控制台用curl命令执行,可以看到以下内容输出。
$ curl http://localhost:13000/jaxrs-service/hello/echo/waylau
waylau
$ curl -H "Content-type: application/json" -X POST -d '{"val1":"hello","val2":"world"}'
http://localhost:13000/jaxrs-service/hello/jsonBean
{"val1": "hello","val2": "hello"}
官方提供的Maven项目源代码存在bug,执行过程中可能存在错误。读者可以参阅笔者修改后的源代码内容。
本小节示例,可以在cxf-rest项目下找到。
基于Spring Web MVC来构建REST服务
下面将演示如何通过Spring Web MVC来实现REST服务。
1.接口设计
我们将创建一个名为spring-rest的项目,实现简单的REST风格的API。
我们将会在系统中实现两个API。
·GET
http://localhost:8080/hello。
·GET
http://localhost:8080/hello/way。
其中,第一个接口“/hello”将会返回“Hello World!”的字符串;而第二个接口“/hello/way”则会返回一个包含用户信息的JSON字符串。
2.创建一个新项目
新创建的spring-rest项目,pom.xml配置如下。
<project xmlns="http://maven.apache.org/POM/4.0.0"
xmlns:xsi="http://www.w3.org/2001/XMLSchema-instance"
xsi:schemaLocation="http://maven.apache.org/POM/4.0.0
http://maven.apache.org/xsd/maven-4.0.0.xsd">
<modelVersion>4.0.0</modelVersion>
<groupId>com.waylau.spring</groupId>
<artifactId>spring-rest</artifactId>
<version>1.0.0</version>
<name>spring-rest</name>
<packaging>jar</packaging>
<organization>
<name>waylau.com</name>
<url>https://waylau.com</url>
</organization>
<properties>
<project.build.sourceEncoding>UTF-8</project.build.sourceEncoding>
<spring.version>5.0.6.RELEASE</spring.version>
<jetty.version>9.4.10.v20180503</jetty.version>
<jackson.version>2.9.5</jackson.version>
</properties>
<dependencies>
<dependency>
<groupId>org.springframework</groupId>
<artifactId>spring-webmvc</artifactId>
<version>${spring.version}</version>
</dependency>
<dependency>
<groupId>org.eclipse.jetty</groupId>
<artifactId>jetty-servlet</artifactId>
<version>${jetty.version}</version>
<scope>provided</scope>
</dependency>
<dependency>
<groupId>com.fasterxml.jackson.core</groupId>
<artifactId>jackson-core</artifactId>
<version>${jackson.version}</version>
</dependency>
<dependency>
<groupId>com.fasterxml.jackson.core</groupId>
<artifactId>jackson-databind</artifactId>
<version>${jackson.version}</version>
</dependency>
</dependencies>
</project>
其中:
·spring-webmvc是为了使用Spring MVC的功能。
·jetty-servlet是为了提供内嵌的Servlet容器,这样我们就无须依赖外部的容器,可以直接运行我们的应用。
·jackson-core和jackson-databind为我们的应用提供JSON序列化的功能。
创建一个User类,代表用户信息。User是一个POJO类。
public class User {
private String username;
private Integer age;
public User(String username, Integer age) {
this.username = username;
this.age = age;
}
public String getUsername() {
return username;
}
public void setUsername(String username) {
this.username = username;
}
public Integer getAge() {
return age;
}
public void setAge(Integer age) {
this.age = age;
}
}
创建HelloController用于处理用户的请求。
@RestController
public class HelloController {
@RequestMapping("/hello")
public String hello() {
return "Hello World! Welcome to visit waylau.com!";
}
@RequestMapping("/hello/way")
public User helloWay() {
return new User("Way Lau", 30);
}
}
其中,映射到“/hello”的方法将会返回“Hello World!”的字符串;而映射到“/hello/way”的方法则会返回一个包含用户信息的JSON字符串。
3.应用配置
在本项目中,我们采用基于Java注解的配置。
AppConfiguration是我们的主应用配置。
import org.springframework.context.annotation.ComponentScan;
import org.springframework.context.annotation.Configuration;
import org.springframework.context.annotation.Import;
@Configuration
@ComponentScan(basePackages = { "com.waylau.spring" })
@Import({ MvcConfiguration.class })
public class AppConfiguration {
}
AppConfiguration会扫描“com.waylau.spring”包下的文件,并自动将相关的bean进行注册。
AppConfiguration同时又引入了MVC的配置类MvcConfiguration。
@EnableWebMvc
@Configuration
public class MvcConfiguration implements WebMvcConfigurer {
public void extendMessageConverters(List<HttpMessageConverter<?>> converters) {
converters.add(new MappingJackson2HttpMessageConverter());
}
}
MvcConfiguration配置类一方面启用了MVC的功能,另一方面添加了Jackson JSON的转换器。
最后,我们需要引入Jetty服务器JettyServer。
import org.eclipse.jetty.server.Server;
import org.eclipse.jetty.servlet.ServletContextHandler;
import org.eclipse.jetty.servlet.ServletHolder;
import org.springframework.web.context.ContextLoaderListener;
import org.springframework.web.context.WebApplicationContext;
import org.springframework.web.context.support.AnnotationConfigWebApplicationContext;
import org.springframework.web.servlet.DispatcherServlet;
import com.waylau.spring.mvc.configuration.AppConfiguration;
public class JettyServer {
private static final int DEFAULT_PORT = 8080;
private static final String CONTEXT_PATH = "/";
private static final String MAPPING_URL = "/*";
public void run() throws Exception {
Server server = new Server(DEFAULT_PORT);
server.setHandler(servletContextHandler(webApplicationContext()));
server.start();
server.join();
}
private ServletContextHandler servletContextHandler(
WebApplicationContext context) {
ServletContextHandler handler = new ServletContextHandler();handler.setContextPath(CONTEXT_PATH);
handler.addServlet(new ServletHolder(new DispatcherServlet(context)),
MAPPING_URL);
handler.addEventListener(new ContextLoaderListener(context));
return handler;
}
private WebApplicationContext webApplicationContext() {
AnnotationConfigWebApplicationContext context =
new AnnotationConfigWebApplicationContext();
context.register(AppConfiguration.class);
return context;
}
}
JettyServer将在Application类中启动。
public class Application {
public static void main(String[] args) throws Exception {
new JettyServer().run();;
}
}
4.运行项目
在编辑器中,直接运行Application类即可。启动之后,应能看到以下控制台信息。
2018-06-07 22:19:23.572:INFO::main: Logging initialized @305ms to org.eclipse.
jetty.util.log.StdErrLog
2018-06-07 22:19:23.982:INFO:oejs.Server:main: jetty-9.4.10.v20180503; built:
2018-05-03T15:56:21.710Z; git: daa59876e6f384329b122929e70a80934569428c; jvm 1.8.0_162-b12
2018-06-07 22:19:24.096:INFO:oejshC.ROOT:main: Initializing Spring root
WebApplicationContext
六月 07, 2018 10:19:24 下午 org.springframework.web.context.ContextLoader
initWebApplicationContext
信息: Root WebApplicationContext: initialization started
六月 07, 2018 10:19:24 下午 org.springframework.context.support.AbstractApplicationContext
prepareRefresh
信息: Refreshing Root WebApplicationContext: startup date [Thu Jun 07 22:19:24 CST 2018];
root of context hierarchy
六月 07, 2018 10:19:24 下午 org.springframework.web.context.support.
AnnotationConfigWebApplicationContext loadBeanDefinitions
信息: Registering annotated classes: [class com.waylau.spring.mvc.configuration.
AppConfiguration]
六月 07, 2018 10:19:25 下午 org.springframework.web.servlet.handler.
AbstractHandlerMethodMapping$MappingRegistry register
信息: Mapped "{[/hello]}" onto public java.lang.String com.waylau.spring.mvc.
controller.HelloController.hello()
六月 07, 2018 10:19:25 下午 org.springframework.web.servlet.handler.AbstractHandlerMethodMapping$MappingRegistry register
信息: Mapped "{[/hello/way]}" onto public com.waylau.spring.mvc.vo.User com.waylau.
spring.mvc.controller.HelloController.helloWay()
六月 07, 2018 10:19:26 下午 org.springframework.web.servlet.mvc.method.annotation.
RequestMappingHandlerAdapter initControllerAdviceCache
信息: Looking for @ControllerAdvice: Root WebApplicationContext: startup date [Thu Jun
07 22:19:24 CST 2018]; root of context hierarchy
六月 07, 2018 10:19:26 下午 org.springframework.web.context.ContextLoader
initWebApplicationContext
信息: Root WebApplicationContext: initialization completed in 2073 ms
2018-06-07 22:19:26.191:INFO:oejshC.ROOT:main: Initializing Spring FrameworkServlet
'org.springframework.web.servlet.DispatcherServlet-246ae04d'
六月 07, 2018 10:19:26 下午 org.springframework.web.servlet.FrameworkServlet
initServletBean
信息: FrameworkServlet 'org.springframework.web.servlet.DispatcherServlet-246ae04d':
initialization started
六月 07, 2018 10:19:26 下午 org.springframework.web.servlet.FrameworkServlet
initServletBean
信息: FrameworkServlet 'org.springframework.web.servlet.DispatcherServlet-246ae04d':
initialization completed in 31 ms
2018-06-07 22:19:26.226:INFO:oejsh.ContextHandler:main: Started
o.e.j.s.ServletContextHandler@4ae9cfc1{/,null,AVAILABLE}
2018-06-07 22:19:26.610:INFO:oejs.AbstractConnector:main: Started
ServerConnector@5bf0fe62{HTTP/1.1,[http/1.1]}{0.0.0.0:8080}
2018-06-07 22:19:26.611:INFO:oejs.Server:main: Started @3346ms
分别在浏览器中访问“
http://localhost:8080/hello”和“http://localhost:8080/hello/way”地址进行测试,能看到图8-2和图8-3所示的响应效果。

图8-2 “/hello”接口的返回内容
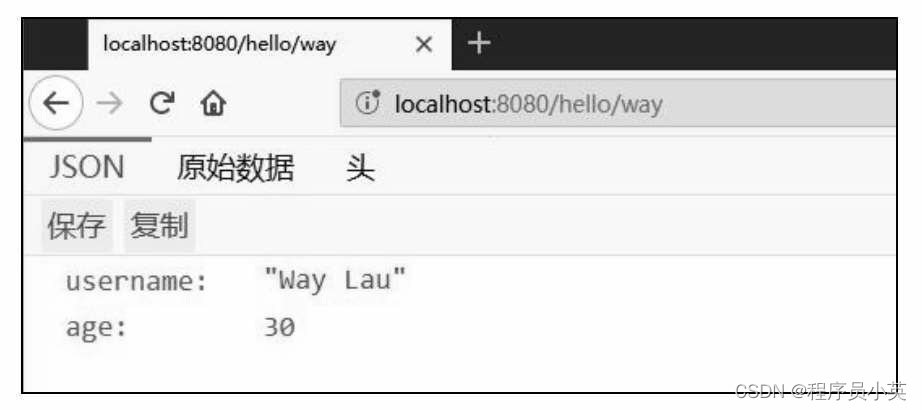
图8-3 “/hello/way”接口的返回内容
本小节示例,可以在spring-rest项目下找到。
本篇小结
本章介绍了REST风格的架构,其中包括REST风格的概念、REST设计原则、REST成熟度模型、REST API管理等方面的内容。同时,针对Java领域,着重讲解了Java实现REST所需要的常用技术,并列举了丰富的案例。


 182
182

 被折叠的 条评论
为什么被折叠?
被折叠的 条评论
为什么被折叠?
 到【灌水乐园】发言


