


1. 关键字驱动框架简介
原理及特点
- 关键字驱动测试是数据驱动测试的一种改进类型,它也被称为表格驱动测试或者基于动作字的测试。
- 主要关键字包括三类:被操作对象(Item)、操作行为(Operation)和操作值(Value),用面向对象形式可将其表现为 Item.Operation(Value)。
- 将测试逻辑按照这些关键字进行分解,形成数据文件。
- 用关键字的形式将测试逻辑封装在数据文件中,测试工具只要能够解释这些关键字即可对其应用自动化。

优势
- 执行人员可以不需要太多的技术:一旦框架建立,手工测试人员和非技术人员都可以很容易的编写自动化测试脚本。
- 简单易懂:它存在 Excel 表格中,没有编码,测试脚本容易阅读和理解。关键字和操作行为这样的手工测试用例,使它变得更容易编写和维护。
- 早期介入:可以在应用未提交测试之前,就可以建立关键字驱动测试用例对象库,从而减少后期工作。使用需求和其它相关文档进行收集信息,关键字数据表可以建立手工测试程序。
- 代码的重用性:用关键字的形式将测试用例及数据进行组装并解释执行,提高代码的可重用性。
2. 框架结构说明
框架结构
整个测试框架分为四层,通过分层的方式,测试代码更容易理解,维护起来较为方便。
第一层是“测试工具层”:
- util 包:用于实现测试过程中调用的工具类方法,例如读取配置文件、页面元素的操作方法、操作 Excel 文件、生成测试报告、发送邮件等。
- conf 包:配置文件及全局变量。
- log 目录:日志输出文件。
- exception_pic 目录:失败用例的截图保存目录。
第二层是“服务层”:相当于对测试对象的一个业务封装。对于接口测试,是对远程方法的一个实现;对于 UI 测试,是对页面元素或操作的一个封装。
- action 包:封装具体的页面动作,如点击、输入文本等。
第三层是“测试用例逻辑层”:该层主要是将服务层封装好的各个业务对象,组织成测试逻辑,进行校验。
- bussiness_process 包:基于关键字的形式,实现单条、多条用例的测试脚本逻辑。
- test_data 目录:Excel 数据文件,包含用例步骤、被操作对象、操作动作、操作值、测试结果等。
第四层是“测试场景层”:将测试用例组织成测试场景,实现各种级别 cases 的管理,如冒烟,回归等测试场景。
- main.py:本框架工程的运行主入口。


框架特点
- 基于关键字测试框架,即使不懂开发技术的测试人员也可以实施自动化测试,便于在整个测试团队中推广和使用自动化测试技术,降低自动化测试实施的技术门槛。
- 使用外部测试数据文件,使用Excel管理测试用例的集合和每个测试用例的所有执行步骤,实现在一个文件中完成测试用例的维护工作。
- 通过定义关键字、操作元素的定位方式和定位表达式和操作值,就可以实现每个测试步骤的执行,可以更加灵活地实现自动化测试的需求。
- 基于关键字的方式,可以进行任意关键字的扩展,以满足更加复杂的自动化测试需求。
- 实现定位表达式和测试代码的分离,实现定位表达式直接在数据文件中进行维护。
- 框架提供日志功能,方便调试和监控自动化测试程序的执行。
3. 框架代码实现
action 包
action 包为框架第二层“服务层”,相当于对测试对象的一个业务封装。对于接口测试,是对远程方法的一个实现;对于 UI 测试,是对页面元素或操作的一个封装。
page_action.py
本模块基于关键字格式,封装了页面操作的常用函数,如打开 APP、点击、输入文本等。
-
1 import traceback -
2 import os -
3 import time -
4 from appium import webdriver -
5 from util.get_desired_caps import get_desired_caps -
6 from util.datetime_util import * -
7 from util.find_element_util import * -
8 from util.global_var import * -
9 from util.log_util import * -
10 -
11 -
12 DRIVER = "" -
13 -
14 -
15 # 打开APP,获取webdriver对象 -
16 def open_app(): -
17 global DRIVER -
18 desired_caps = get_desired_caps() -
19 DRIVER = webdriver.Remote(APPIUM_SERVER, desired_caps) -
20 -
21 -
22 # 设定开始活动页 -
23 def open_start_activity(app_name, start_activity_name): -
24 global DRIVER -
25 DRIVER.start_activity(app_name, start_activity_name) -
26 -
27 -
28 # 退出APP -
29 def quit_app(): -
30 global DRIVER -
31 DRIVER.quit() -
32 -
33 -
34 # 在页面输入框中输入数据 -
35 def input_string(location_type, locator_expression, input_content): -
36 global DRIVER -
37 find_element(DRIVER, location_type, locator_expression).send_keys(input_content) -
38 -
39 -
40 # 清除输入框默认内容 -
41 def clear(location_type, locator_expression): -
42 global DRIVER -
43 find_element(DRIVER, location_type, locator_expression).clear() -
44 -
45 -
46 # 点击页面元素 -
47 def click(location_type, locator_expression): -
48 global DRIVER -
49 find_element(DRIVER, location_type, locator_expression).click() -
50 -
51 -
52 # 断言界面源码是否存在某关键字或关键字符串 -
53 def assert_string_in_pagesource(assert_string): -
54 global DRIVER -
55 try: -
56 assert assert_string in DRIVER.page_source, "%s not found in page source!" % assert_string -
57 info("断言成功【关键字:{}】".format(assert_string)) -
58 except: -
59 error("断言失败【关键字:{}】".format(assert_string)) -
60 raise -
61 -
62 -
63 # 强制等待 -
64 def sleep(sleep_seconds): -
65 time.sleep(int(sleep_seconds)) -
66 -
67 -
68 # 批量断言 -
69 def assert_app_list(location_type, locator_expression, assert_string): -
70 global DRIVER -
71 assert_string_list = assert_string.split(",") -
72 elements = find_element(DRIVER, location_type, locator_expression) -
73 for element in elements[:3]: -
74 assert element.text in assert_string_list -
75 -
76 -
77 # 截图函数 -
78 def take_screenshot(): -
79 global DRIVER -
80 # 创建当前日期目录 -
81 dir = os.path.join(EXCEPION_PIC_PATH, get_chinese_date()) -
82 if not os.path.exists(dir): -
83 os.makedirs(dir) -
84 # 以当前时间为文件名 -
85 file_name = get_chinese_time() -
86 file_path = os.path.join(dir, file_name+".png") -
87 try: -
88 DRIVER.get_screenshot_as_file(file_path) -
89 # 返回截图文件的绝对路径 -
90 return file_path -
91 except: -
92 print("截图发生异常【{}】".format(file_path)) -
93 traceback.print_exc() -
94 return file_path
business_process 包
business_process 包是框架第三层“测试用例逻辑层”,该层主要是将服务层封装好的各个业务对象,组织成测试逻辑,进行校验。
case_process.py
- 测试用例文件的一行数据,拼接其中的操作动作、操作对象、操作值等关键字,形成与 page_action.py 中的函数相对应的字符串,并通过 eval() 转成表达式以执行用例。
- 记录该用例的测试结果,如测试执行结果、测试执行时间等。
- 如需数据驱动的用例集,则获取数据驱动的数据源集合,循环将每组数据传递给用例步骤。
- 如果遇到需要参数化的值 ${变量名},则根据数据驱动的数据源,根据变量名进行参数化。
data_source_process.py
本模块实现了获取数据驱动所需的数据源集合。
- 根据数据源 sheet 名,获取该 sheet 所有行数据,每行数据作为一组测试数据。
- 每行数据作为一个字典,存储在一个列表中。如 [{"登录用户名": "xxx", "登录密码": "xxx", ...}, {...}, ...]
-
1 from util.excel_util import Excel -
2 from util.global_var import * -
3 from util.log_util import * -
4 -
5 -
6 # 数据驱动 -
7 # 每行数据作为一个字典,存储在一个列表中。如[{"登录用户名": "xxx", "登录密码": "xxx", ...}, {...}, ...] -
8 def get_test_data(excel_file_path, sheet_name): -
9 # excel对象初始化 -
10 if isinstance(excel_file_path, Excel): -
11 excel = excel_file_path -
12 else: -
13 excel = Excel(excel_file_path) -
14 # 校验sheet名 -
15 if not excel.get_sheet(sheet_name): -
16 error("sheet【】不存在,停止执行!" % sheet_name) -
17 return -
18 result_list = [] -
19 all_row_data = excel.get_all_row_data() -
20 if len(all_row_data) <= 1: -
21 error("sheet【】数据不大于1行,停止执行!" % sheet_name) -
22 return -
23 # 将参数化的测试数据存入全局字典 -
24 head_line_data = all_row_data[0] -
25 for data in all_row_data[1:]: -
26 if data[-1].lower() == "n": -
27 continue -
28 row_dict = {} -
29 for i in range(len(data[:-1])): -
30 row_dict[head_line_data[i]] = data[i] -
31 result_list.append(row_dict) -
32 return result_list -
33 -
34 -
35 if __name__ == "__main__": -
36 from util.global_var import * -
37 print(get_test_data(TEST_DATA_FILE_PATH, "搜索词")) -
38 # [{'搜索词': 'python', '断言词': 'python'}, {'搜索词': 'mysql', '断言词': 'mysql5.6'}]
main_process.py
本模块基于 case_process.py 和 data_source_process.py,实现关键字驱动+数据驱动的测试用例集的执行。
- suite_process():执行具体的测试用例步骤 sheet(如“登录” sheet、“搜索” sheet 等)
- main_suite_process():执行“测试用例”主 sheet 的用例集。每行用例集对应一个用例步骤 sheet 和数据源 sheet。
-
1 from util.excel_util import * -
2 from util.datetime_util import * -
3 from util.log_util import * -
4 from util.global_var import * -
5 from bussiness_process.case_process import execute_case -
6 from bussiness_process.data_source_process import get_test_data -
7 -
8 -
9 # 执行具体的测试用例步骤sheet -
10 def suite_process(excel_file_path, sheet_name, test_data_source=None): -
11 """ -
12 :param excel_file_path: excel文件绝对路径或excel对象 -
13 :param sheet_name: 测试步骤sheet名 -
14 :param test_data_source: 数据驱动的数据源,默认没有 -
15 :return: -
16 """ -
17 # 记录测试结果统计 -
18 global TOTAL_CASE -
19 global PASS_CASE -
20 global FAIL_CASE -
21 # 整个用例sheet的测试结果,默认为全部通过 -
22 suite_test_result = True -
23 # excel对象初始化 -
24 if isinstance(excel_file_path, Excel): -
25 excel = excel_file_path -
26 else: -
27 excel = Excel(excel_file_path) -
28 if not excel.get_sheet(sheet_name): -
29 error("sheet【】不存在,停止执行!" % sheet_name) -
30 return -
31 # 获取测试用例sheet的全部行数据 -
32 all_row_data = excel.get_all_row_data() -
33 if len(all_row_data) <= 1: -
34 error("sheet【】数据不大于1行,停止执行!" % sheet_name) -
35 return -
36 # 标题行数据 -
37 head_line_data = all_row_data[0] -
38 # 切换到测试结果明细sheet,准备写入测试结果 -
39 if not excel.get_sheet("测试结果明细"): -
40 error("【测试结果明细】sheet不存在,停止执行!") -
41 return -
42 excel.write_row_data(head_line_data, None, True, "green") -
43 # 执行每行的测试用例 -
44 for row_data in all_row_data[1:]: -
45 result_data = execute_case(excel, row_data, test_data_source) -
46 # 无需执行的测试步骤,跳过 -
47 if result_data is None: -
48 continue -
49 TOTAL_CASE += 1 -
50 if result_data[CASESTEP_TEST_RESULT_COL_NO].lower() == "fail": -
51 suite_test_result = False -
52 FAIL_CASE += 1 -
53 else: -
54 PASS_CASE += 1 -
55 excel.write_row_data(result_data) -
56 # 切换到测试结果统计sheet,写入统计数据 -
57 if not excel.get_sheet("测试结果统计"): -
58 error("【测试结果统计】sheet不存在,停止执行!") -
59 return -
60 excel.insert_row_data(1, [TOTAL_CASE, PASS_CASE, FAIL_CASE]) -
61 return excel, suite_test_result -
62 -
63 -
64 # 执行【测试用例】主sheet的用例集 -
65 def main_suite_process(excel_file_path, sheet_name): -
66 # 初始化excel对象 -
67 excel = Excel(excel_file_path) -
68 if not excel: -
69 error("excel数据文件【%s】不存在!" % excel_file_path) -
70 return -
71 if not excel.get_sheet(sheet_name): -
72 error("sheet名称【%s】不存在!" % sheet_name) -
73 return -
74 # 获取所有行数据 -
75 all_row_datas = excel.get_all_row_data() -
76 if len(all_row_datas) <= 1: -
77 error("sheet【%s】数据不大于1行,停止执行!" % sheet_name) -
78 return -
79 # 标题行数据 -
80 head_line_data = all_row_datas[0] -
81 for row_data in all_row_datas[1:]: -
82 # 跳过不需要执行的测试用例集 -
83 if row_data[TESTCASE_IS_EXECUTE_COL_NO].lower() == "n": -
84 info("#" * 50 + " 测试用例集【%s】无需执行!" % row_data[TESTCASE_CASE_NAME_COL_NO] + "#" * 50 + "\n") -
85 continue -
86 # 记录本用例集的测试时间 -
87 row_data[TESTCASE_TEST_TIME_COL_NO] = get_english_datetime() -
88 # 校验用例步骤sheet名是否存在 -
89 if row_data[TESTCASE_CASE_STEP_SHEET_NAME_COL_NO] not in excel.get_all_sheet(): -
90 error("#" * 50 + " 用例步骤集【%s】不存在! " % row_data[TESTCASE_CASE_STEP_SHEET_NAME_COL_NO] + "#" * 50 + "\n") -
91 row_data[TESTCASE_TEST_RESULT_COL_NO] = "Fail" -
92 excel.write_row_data(head_line_data, None, True, "red") -
93 excel.write_row_data(row_data) -
94 continue -
95 # 判断本测试用例集是否进行数据驱动 -
96 if row_data[TESTCASE_DATA_SOURCE_SHEET_NAME_COL_NO]: -
97 # 校验测试数据集sheet名是否存在 -
98 if row_data[TESTCASE_DATA_SOURCE_SHEET_NAME_COL_NO] not in excel.get_all_sheet(): -
99 error("#" * 50 + " 测试数据集【%s】不存在! " % row_data[TESTCASE_DATA_SOURCE_SHEET_NAME_COL_NO] + "#" * 50 + "\n") -
100 row_data[TESTCASE_TEST_RESULT_COL_NO] = "Fail" -
101 excel.write_row_data(head_line_data, None, True, "red") -
102 excel.write_row_data(row_data) -
103 continue -
104 # 获取测试数据集 -
105 test_data_source = get_test_data(excel, row_data[TESTCASE_DATA_SOURCE_SHEET_NAME_COL_NO]) -
106 # 每条数据进行一次本用例集的测试 -
107 for data_source in test_data_source: -
108 info("-" * 50 + " 测试用例集【%s】开始执行!" % row_data[TESTCASE_CASE_NAME_COL_NO] + "-" * 50) -
109 excel, test_result_flag = suite_process(excel, row_data[TESTCASE_CASE_STEP_SHEET_NAME_COL_NO], data_source) -
110 # 记录本用例集的测试结果 -
111 if test_result_flag: -
112 info("#" * 50 + " 测试用例集【%s】执行成功! " % row_data[TESTCASE_CASE_NAME_COL_NO] + "#" * 50 + "\n") -
113 row_data[TESTCASE_TEST_RESULT_COL_NO] = "Pass" -
114 else: -
115 error("#" * 50 + " 测试用例集【%s】执行失败! " % row_data[TESTCASE_CASE_NAME_COL_NO] + "#" * 50 + "\n") -
116 row_data[TESTCASE_TEST_RESULT_COL_NO] = "Fail" -
117 # 全部测试步骤结果写入后,最后写入本用例集的标题行和测试结果行数据 -
118 # 切换到“测试结果明细”sheet,以写入测试执行结果 -
119 excel.get_sheet("测试结果明细") -
120 excel.write_row_data(head_line_data, None, True, "red") -
121 excel.write_row_data(row_data) -
122 # 本用例集无需数据驱动 -
123 else: -
124 info("-" * 50 + " 测试用例集【%s】开始执行!" % row_data[TESTCASE_CASE_NAME_COL_NO] + "-" * 50) -
125 excel, test_result_flag = suite_process(excel, row_data[TESTCASE_CASE_STEP_SHEET_NAME_COL_NO]) -
126 # 记录本用例集的测试结果 -
127 if test_result_flag: -
128 info("#" * 50 + " 测试用例集【%s】执行成功! " % row_data[TESTCASE_CASE_NAME_COL_NO] + "#" * 50 + "\n") -
129 row_data[TESTCASE_TEST_RESULT_COL_NO] = "Pass" -
130 else: -
131 error("#" * 50 + " 测试用例集【%s】执行失败! " % row_data[TESTCASE_CASE_NAME_COL_NO] + "#" * 50 + "\n") -
132 row_data[TESTCASE_TEST_RESULT_COL_NO] = "Fail" -
133 # 全部测试步骤结果写入后,最后写入本用例集的标题行和测试结果行数据 -
134 # 切换到“测试结果明细”sheet,以写入测试执行结果 -
135 excel.get_sheet("测试结果明细") -
136 excel.write_row_data(head_line_data, None, True, "red") -
137 excel.write_row_data(row_data) -
138 return excel -
139 -
140 -
141 if __name__ == "__main__": -
142 from util.report_util import create_excel_report_and_send_email -
143 # excel, _ = suite_process(TEST_DATA_FILE_PATH, "进入主页") -
144 # excel, _ = suite_process(excel, "登录") -
145 excel = main_suite_process(TEST_DATA_FILE_PATH, "测试用例") -
146 create_excel_report_and_send_email(excel, "182230124@qq.com", "app自动化测试", "请查收附件:app自动化测试报告")
util 包
util 包属于第一层的测试工具层:用于实现测试过程中调用的工具类方法,例如读取配置文件、页面元素的操作方法、操作 Excel 文件、生成测试报告、发送邮件等。
global_var.py
本模块用于定义测试过程中所需的全局变量。
-
1 import os -
2 -
3 -
4 PROJECT_DIR = os.path.dirname(os.path.dirname(os.path.abspath(__file__))) -
5 -
6 # APP配置信息路径 -
7 INI_FILE_PATH = os.path.join(PROJECT_DIR, "conf", "desired_caps_config.ini") -
8 -
9 # 异常截图路径 -
10 EXCEPION_PIC_PATH = os.path.join(PROJECT_DIR, "exception_pic") -
11 -
12 # 日志配置文件路径 -
13 LOG_CONF_FILE_PATH = os.path.join(PROJECT_DIR, "conf", "logger.conf") -
14 -
15 # 测试数据文件路径 -
16 TEST_DATA_FILE_PATH = os.path.join(PROJECT_DIR, "test_data", "test_case.xlsx") -
17 -
18 # 测试报告存放路径 -
19 TEST_REPORT_FILE_DIR = os.path.join(PROJECT_DIR, "test_report") -
20 -
21 # Appium server地址 -
22 APPIUM_SERVER = 'http://localhost:4723/wd/hub' -
23 -
24 # 测试数据文件中,测试用例sheet中部分列对应的数字序号 -
25 TESTCASE_CASE_NAME_COL_NO = 0 -
26 TESTCASE_FRAMEWORK_TYPE_COL_NO = 1 -
27 TESTCASE_CASE_STEP_SHEET_NAME_COL_NO = 2 -
28 TESTCASE_DATA_SOURCE_SHEET_NAME_COL_NO = 3 -
29 TESTCASE_IS_EXECUTE_COL_NO = 4 -
30 TESTCASE_TEST_TIME_COL_NO = 5 -
31 TESTCASE_TEST_RESULT_COL_NO = 6 -
32 -
33 # 用例步骤sheet中,部分列对应的数字序号 -
34 CASESTEP_NAME_COL_NO = 0 -
35 CASESTEP_ACTION_COL_NO = 1 -
36 CASESTEP_LOCATE_METHOD_COL_NO = 2 -
37 CASESTEP_LOCATE_EXPRESSION_COL_NO = 3 -
38 CASESTEP_OPERATION_VALUE_COL_NO = 4 -
39 CASESTEP_IS_EXECUTE_COL_NO = 5 -
40 CASESTEP_TEST_TIME_COL_NO = 6 -
41 CASESTEP_TEST_RESULT_COL_NO = 7 -
42 CASESTEP_EXCEPTION_INFO_COL_NO = 8 -
43 CASESTEP_EXCEPTION_PIC_DIR_COL_NO = 9 -
44 -
45 # 数据源sheet中,是否执行列对应的数字编号 -
46 DATASOURCE_DATA = 0 -
47 DATASOURCE_KEYWORD = 1 -
48 DATASOURCE_IS_EXECUTE = 2 -
49 DATASOURCE_TEST_TIME = 3 -
50 DATASOURCE_TEST_RESULT = 4 -
51 -
52 # 测试执行结果统计 -
53 TOTAL_CASE = 0 -
54 PASS_CASE = 0 -
55 FAIL_CASE = 0 -
56 -
57 -
58 if __name__ == "__main__": -
59 print(PROJECT_DIR)
find_element_util.py
本模块封装了基于显式等待的界面元素定位方法。
-
1 from selenium.webdriver.support.ui import WebDriverWait -
2 -
3 -
4 # 显式等待一个元素 -
5 def find_element(driver, locate_method, locate_exp): -
6 # 显式等待对象(最多等10秒,每0.2秒判断一次等待的条件) -
7 return WebDriverWait(driver, 10, 0.2).until(lambda x: x.find_element(locate_method, locate_exp)) -
8 -
9 # 显式等待一组元素 -
10 def find_elements(driver, locate_method, locate_exp): -
11 # 显式等待对象(最多等10秒,每0.2秒判断一次等待的条件) -
12 return WebDriverWait(driver, 10, 0.2).until(lambda x: x.find_elements(locate_method, locate_exp))
excel_util.py
本模块封装了对 excel 的读写操作(openpyxl 版本:3.0.4)。
-
1 import os -
2 from openpyxl import load_workbook -
3 from openpyxl.styles import PatternFill, Font, Side, Border -
4 from util.datetime_util import * -
5 from util.global_var import * -
6 from util.log_util import * -
7 -
8 -
9 # 支持excel读写操作的工具类 -
10 class Excel: -
11 -
12 # 初始化读取excel文件 -
13 def __init__(self, file_path): -
14 if not os.path.exists(file_path): -
15 return -
16 self.wb = load_workbook(file_path) -
17 # 初始化默认sheet -
18 self.ws = self.wb.active -
19 self.data_file_path = file_path -
20 # 初始化颜色字典,供设置样式用 -
21 self.color_dict = {"red": "FFFF3030", "green": "FF008B00"} -
22 -
23 def get_all_sheet(self): -
24 return self.wb.get_sheet_names() -
25 -
26 # 打开指定sheet -
27 def get_sheet(self, sheet_name): -
28 if sheet_name not in self.get_all_sheet(): -
29 print("sheet名称【%s】不存在!" % sheet_name) -
30 return -
31 self.ws = self.wb.get_sheet_by_name(sheet_name) -
32 return True -
33 -
34 # 获取最大行号 -
35 def get_max_row_no(self): -
36 # openpyxl的API的行、列索引默认都从1开始 -
37 return self.ws.max_row -
38 -
39 # 获取最大列号 -
40 def get_max_col_no(self): -
41 return self.ws.max_column -
42 -
43 # 获取所有行数据 -
44 def get_all_row_data(self, head_line=True): -
45 # 是否需要标题行数据的标识,默认需要 -
46 if head_line: -
47 min_row = 1 # 行号从1开始,即1为标题行 -
48 else: -
49 min_row = 2 -
50 result = [] -
51 # min_row=None:默认获取标题行数据 -
52 for row in self.ws.iter_rows(min_row=min_row, max_row=self.get_max_row_no(), max_col=self.get_max_col_no()): -
53 result.append([cell.value for cell in row]) -
54 return result -
55 -
56 # 获取指定行数据 -
57 def get_row_data(self, row_num): -
58 # 0 为标题行 -
59 return [cell.value for cell in self.ws[row_num+1]] -
60 -
61 # 获取指定列数据 -
62 def get_col_data(self, col_num): -
63 # 索引从0开始 -
64 return [cell.value for cell in tuple(self.ws.columns)[col_num]] -
65 -
66 # 追加行数据且可以设置样式 -
67 def write_row_data(self, data, font_color=None, border=True, fill_color=None): -
68 if not isinstance(data, (list, tuple)): -
69 print("写入数据失败:数据不为列表或元组类型!【%s】" % data) -
70 self.ws.append(data) -
71 # 设置字体颜色 -
72 if font_color: -
73 if font_color.lower() in self.color_dict.keys(): -
74 font_color = self.color_dict[font_color] -
75 # 设置单元格填充颜色 -
76 if fill_color: -
77 if fill_color.lower() in self.color_dict.keys(): -
78 fill_color = self.color_dict[fill_color] -
79 # 设置单元格边框 -
80 if border: -
81 bd = Side(style="thin", color="000000") -
82 # 记录数据长度(否则会默认与之前行最长数据行的长度相同,导致样式超过了该行实际长度) -
83 count = 0 -
84 for cell in self.ws[self.get_max_row_no()]: -
85 # 设置完该行的实际数据长度样式后,则退出 -
86 if count > len(data) - 1: -
87 break -
88 if font_color: -
89 cell.font = Font(color=font_color) -
90 # 如果没有设置字体颜色,则默认给执行结果添加字体颜色 -
91 else: -
92 if cell.value is not None and isinstance(cell.value, str): -
93 if cell.value.lower() == "pass" or cell.value == "成功": -
94 cell.font = Font(color=self.color_dict["green"]) -
95 elif cell.value.lower() == "fail" or cell.value == "失败": -
96 cell.font = Font(color=self.color_dict["red"]) -
97 if border: -
98 cell.border = Border(left=bd, right=bd, top=bd, bottom=bd) -
99 if fill_color: -
100 cell.fill = PatternFill(fill_type="solid", fgColor=fill_color) -
101 count += 1 -
102 -
103 # 指定行插入数据(行索引从0开始) -
104 def insert_row_data(self, row_no, data, font_color=None, border=True, fill_color=None): -
105 if not isinstance(data, (list, tuple)): -
106 print("写入数据失败:数据不为列表或元组类型!【%s】" % data) -
107 for idx, cell in enumerate(self.ws[row_no+1]): # 此处行索引从1开始 -
108 cell.value = data[idx] -
109 -
110 # 生成写入了测试结果的excel数据文件 -
111 def save(self, save_file_name, timestamp): -
112 save_dir = os.path.join(TEST_REPORT_FILE_DIR, get_chinese_date()) -
113 if not os.path.exists(save_dir): -
114 os.mkdir(save_dir) -
115 save_file = os.path.join(save_dir, save_file_name + "_" + timestamp + ".xlsx") -
116 self.wb.save(save_file) -
117 info("生成测试结果文件:%s" % save_file) -
118 return save_file -
119 -
120 -
121 if __name__ == "__main__": -
122 from util.global_var import * -
123 from util.datetime_util import * -
124 excel = Excel(TEST_DATA_FILE_PATH) -
125 excel.get_sheet("测试结果统计") -
126 # print(excel.get_all_row_data()) -
127 # excel.write_row_data(["4", None, "嘻哈"], "green", True, "red") -
128 excel.insert_row_data(1, [1,2,3]) -
129 excel.save(get_timestamp())
ini_reader.py
本模块封装了对 ini 配置文件的读取操作。
-
1 import os -
2 import configparser -
3 -
4 -
5 # 读取ini文件的工具类 -
6 class IniParser: -
7 -
8 # 初始化打开ini文件 -
9 def __init__(self, file_path): -
10 if not os.path.exists(file_path): -
11 print("ini文件【%s】不存在!" % file_path) -
12 return -
13 self.cf = configparser.ConfigParser() -
14 self.cf.read(file_path, encoding="utf-8") -
15 -
16 # 获取所有分组 -
17 def get_sections(self): -
18 return self.cf.sections() -
19 -
20 # 获取指定分组的所有键 -
21 def get_options(self, section): -
22 return self.cf.options(section) # 注意,获取的键会自动转小写 -
23 -
24 # 获取指定分组的所有键值对 -
25 def get_items(self, section): -
26 return dict(self.cf.items(section)) # 注意,获取的键会自动转小写 -
27 -
28 # 获取指定分组指定键的值 -
29 def get_value(self, section, option): -
30 return self.cf.get(section, option) -
31 -
32 -
33 if __name__ == "__main__": -
34 from util.global_var import * -
35 p = IniParser(INI_FILE_PATH) -
36 print(p.get_sections()) -
37 print(p.get_options("desired_caps")) -
38 print(p.get_items("desired_caps")) -
39 print(p.get_value("desired_caps", "deviceName"))
email_util.py
本模块封装了邮件发送功能。(示例代码中的用户名/密码已隐藏)
-
1 import yagmail -
2 import traceback -
3 from util.log_util import * -
4 -
5 -
6 def send_mail(attachments_report_name, receiver, subject, content): -
7 try: -
8 # 连接邮箱服务器 -
9 # 注意:若使用QQ邮箱,则password为授权码而非邮箱密码;使用其它邮箱则为邮箱密码 -
10 # encoding设置为GBK,否则中文附件名会乱码 -
11 yag = yagmail.SMTP(user="*****@163.com", password="*****", host="smtp.163.com", encoding='GBK') -
12 -
13 # 收件人、标题、正文、附件(若多个收件人或多个附件,则可使用列表) -
14 yag.send(to=receiver, subject=subject, contents=content, attachments=attachments_report_name) -
15 -
16 # 可简写:yag.send("****@163.com", subject, contents, report) -
17 -
18 info("测试报告邮件发送成功!【邮件标题:%s】【邮件附件:%s】【收件人:%s】" % (subject, attachments_report_name, receiver)) -
19 except: -
20 error("测试报告邮件发送失败!【邮件标题:%s】【邮件附件:%s】【收件人:%s】" % (subject, attachments_report_name, receiver)) -
21 error(traceback.format_exc()) -
22 -
23 -
24 if __name__ == "__main__": -
25 send_mail("e:\\code.txt", "182230124@qq.com", "测试邮件", "正文") -
26
datetime_util.py
本模块实现了获取各种格式的当前日期时间。
-
1 import time -
2 -
3 -
4 # 返回中文格式的日期:xxxx年xx月xx日 -
5 def get_chinese_date(): -
6 year = time.localtime().tm_year -
7 if len(str(year)) == 1: -
8 year = "0" + str(year) -
9 month = time.localtime().tm_mon -
10 if len(str(month)) == 1: -
11 month = "0" + str(month) -
12 day = time.localtime().tm_mday -
13 if len(str(day)) == 1: -
14 day = "0" + str(day) -
15 return "{}年{}月{}日".format(year, month, day) -
16 -
17 -
18 # 返回英文格式的日期:xxxx/xx/xx -
19 def get_english_date(): -
20 year = time.localtime().tm_year -
21 if len(str(year)) == 1: -
22 year = "0" + str(year) -
23 month = time.localtime().tm_mon -
24 if len(str(month)) == 1: -
25 month = "0" + str(month) -
26 day = time.localtime().tm_mday -
27 if len(str(day)) == 1: -
28 day = "0" + str(day) -
29 return "{}/{}/{}".format(year, month, day) -
30 -
31 -
32 # 返回中文格式的时间:xx时xx分xx秒 -
33 def get_chinese_time(): -
34 hour = time.localtime().tm_hour -
35 if len(str(hour)) == 1: -
36 hour = "0" + str(hour) -
37 minute = time.localtime().tm_min -
38 if len(str(minute)) == 1: -
39 minute = "0" + str(minute) -
40 second = time.localtime().tm_sec -
41 if len(str(second)) == 1: -
42 second = "0" + str(second) -
43 return "{}时{}分{}秒".format(hour, minute, second) -
44 -
45 -
46 # 返回英文格式的时间:xx:xx:xx -
47 def get_english_time(): -
48 hour = time.localtime().tm_hour -
49 if len(str(hour)) == 1: -
50 hour = "0" + str(hour) -
51 minute = time.localtime().tm_min -
52 if len(str(minute)) == 1: -
53 minute = "0" + str(minute) -
54 second = time.localtime().tm_sec -
55 if len(str(second)) == 1: -
56 second = "0" + str(second) -
57 return "{}:{}:{}".format(hour, minute, second) -
58 -
59 -
60 # 返回中文格式的日期时间 -
61 def get_chinese_datetime(): -
62 return get_chinese_date() + " " + get_chinese_time() -
63 -
64 -
65 # 返回英文格式的日期时间 -
66 def get_english_datetime(): -
67 return get_english_date() + " " + get_english_time() -
68 -
69 -
70 # 返回时间戳 -
71 def get_timestamp(): -
72 year = time.localtime().tm_year -
73 if len(str(year)) == 1: -
74 year = "0" + str(year) -
75 month = time.localtime().tm_mon -
76 if len(str(month)) == 1: -
77 month = "0" + str(month) -
78 day = time.localtime().tm_mday -
79 if len(str(day)) == 1: -
80 day = "0" + str(day) -
81 hour = time.localtime().tm_hour -
82 if len(str(hour)) == 1: -
83 hour = "0" + str(hour) -
84 minute = time.localtime().tm_min -
85 if len(str(minute)) == 1: -
86 minute = "0" + str(minute) -
87 second = time.localtime().tm_sec -
88 if len(str(second)) == 1: -
89 second = "0" + str(second) -
90 return "{}{}{}_{}{}{}".format(year, month, day, hour, minute, second) -
91 -
92 -
93 if __name__ == "__main__": -
94 print(get_chinese_datetime()) -
95 print(get_english_datetime())
![]()
get_desired_caps.py
本模块实现了获取 ini 配置文件中的 Appium 创建 Session 的配置信息。
-
1 from util.ini_reader import IniParser -
2 from util.global_var import INI_FILE_PATH -
3 -
4 -
5 def get_desired_caps(): -
6 pcf = IniParser(INI_FILE_PATH) -
7 items = pcf.get_items("desired_caps") # 获取的键会自动转成小写 -
8 desired_caps = { -
9 "platformName": items.get("platformname"), -
10 "platformVersion": items.get("platformversion"), -
11 "deviceName": items.get("devicename"), -
12 "appPackage": items.get("apppackage"), -
13 "appActivity": items.get("appactivity"), -
14 "unicodeKeyboard": items.get("unicodekeyboard"), -
15 "autoAcceptAlerts": items.get("autoacceptalerts"), -
16 "resetKeyboard": items.get("resetkeyboard"), -
17 "noReset": items.get("noreset"), -
18 "newCommandTimeout": items.get("newcommandtimeout") -
19 } -
20 return desired_caps -
21 -
22 -
23 if __name__ == "__main__": -
24 from util.global_var import * -
25 print(get_desired_caps())
log_util.py
封装了日志打印输出、级别设定等功能。
-
1 import logging -
2 import logging.config -
3 from util.global_var import * -
4 -
5 -
6 # 日志配置文件:多个logger,每个logger指定不同的handler -
7 # handler:设定了日志输出行的格式 -
8 # 以及设定写日志到文件(是否回滚)?还是到屏幕 -
9 # 还定了打印日志的级别 -
10 logging.config.fileConfig(LOG_CONF_FILE_PATH) -
11 logger = logging.getLogger("example01") -
12 -
13 -
14 def debug(message): -
15 logging.debug(message) -
16 -
17 -
18 def info(message): -
19 logging.info(message) -
20 -
21 -
22 def warning(message): -
23 logging.warning(message) -
24 -
25 -
26 def error(message): -
27 logging.error(message) -
28 -
29 -
30 if __name__ == "__main__": -
31 debug("hi") -
32 info("gloryroad") -
33 warning("hello") -
34 error("这是一个error日志")
report_util.py
生成测试结果文件并发送邮件。
-
1 from util.email_util import send_mail -
2 from util.log_util import * -
3 from util.datetime_util import * -
4 -
5 -
6 # 生成测试报告并发送邮件 -
7 def create_excel_report_and_send_email(excel_obj, receiver, subject, content): -
8 """ -
9 :param excel_obj: excel对象用于保存文件 -
10 :param timestamp: 用于文件命名的时间戳 -
11 :return: 返回excel测试报告文件名 -
12 """ -
13 time_stamp = get_timestamp() -
14 report_path = excel_obj.save(subject, time_stamp) -
15 send_mail(report_path, receiver, subject+"_"+time_stamp, content)
conf 目录
conf 目录属于第一层测试工具层,用于存储各配置文件。
desired_caps_config.ini
本配置文件存储了 Appium 创建 Session 的配置信息。
-
[desired_caps] -
platformName=Android -
platformVersion=6 -
deviceName=3DN6T16B26001805 -
appPackage=com.xsteach.appedu -
appActivity=com.xsteach.appedu.StartActivity -
unicodeKeyboard=True -
autoAcceptAlerts=True -
resetKeyboard=True -
noReset=True -
newCommandTimeout=6000
logger.conf
本配置文件用于日志功能的具体配置。
-
############################################### -
[loggers] -
keys=root,example01,example02 -
[logger_root] -
level=DEBUG -
handlers=hand01,hand02 -
[logger_example01] -
handlers=hand01,hand02 -
qualname=example01 -
propagate=0 -
[logger_example02] -
handlers=hand01,hand03 -
qualname=example02 -
propagate=0 -
############################################### -
[handlers] -
keys=hand01,hand02,hand03 -
[handler_hand01] -
class=StreamHandler -
level=INFO -
formatter=form01 -
args=(sys.stderr,) -
[handler_hand02] -
class=FileHandler -
level=DEBUG -
formatter=form01 -
args=('E:\\pycharm_project_dir\\AppAutoTest\\log\\app_test.log', 'a') -
[handler_hand03] -
class=handlers.RotatingFileHandler -
level=INFO -
formatter=form01 -
args=('E:\\pycharm_project_dir\\AppAutoTest\\log\\app_test.log', 'a', 10*1024*1024, 5) -
############################################### -
[formatters] -
keys=form01,form02 -
[formatter_form01] -
format=%(asctime)s [%(levelname)s] %(message)s -
datefmt=%Y-%m-%d %H:%M:%S -
[formatter_form02] -
format=%(name)-12s: [%(levelname)-8s] %(message)s -
datefmt=%Y-%m-%d %H:%M:%S
test_data 目录
test_data 目录用于存放测试数据文件(Excel),存储了用例步骤、用例执行关键字、数据源等测试数据。


main.py
本模块是本框架的运行主入口,属于第四层“测试场景层”,将测试用例组织成测试场景,实现各种级别 cases 的管理,如冒烟,回归等测试场景。
基于 business_process/main_process.py 中的模块用例 sheet 执行函数或主 sheet 执行函数,组装测试场景。
可直接用代码组装测试场景,也可根据 excel 数据文件的用例集合和用例步骤的维护来设定测试场景。
完成测试执行后生成测试结果文件并发送邮件。
-
1 from bussiness_process.main_process import * -
2 from util.report_util import * -
3 -
4 -
5 # 组装测试场景 -
6 # 冒烟测试 -
7 def smoke_test(report_name): -
8 excel, _ = suite_process(TEST_DATA_FILE_PATH, "进入主页") -
9 excel, _ = suite_process(excel, "登录") -
10 excel, _ = suite_process(excel, "退出") -
11 # 生成测试报告并发送邮件 -
12 create_excel_report_and_send_email(excel, ['itsjuno@163.com', '182230124@qq.com'], report_name, "请查收附件:app自动化测试报告") -
13 -
14 -
15 # 全量测试:执行主sheet的用例集 -
16 def suite_test(report_name): -
17 excel = main_suite_process(TEST_DATA_FILE_PATH, "测试用例集") -
18 create_excel_report_and_send_email(excel, ['itsjuno@163.com', '182230124@qq.com'], report_name, "请查收附件:app自动化测试报告") -
19 -
20 -
21 if __name__ == "__main__": -
22 # smoke_test("APP自动化测试报告_冒烟测试") -
23 suite_test("APP自动化测试报告_全量测试")

test_report 目录
本目录用于存放测试结果文件。


exception_pic 目录
本目录用于存放失败用例的截图。

log 目录
本目录用于存放日志输出文件(日志内容同时也会输出到控制台)。
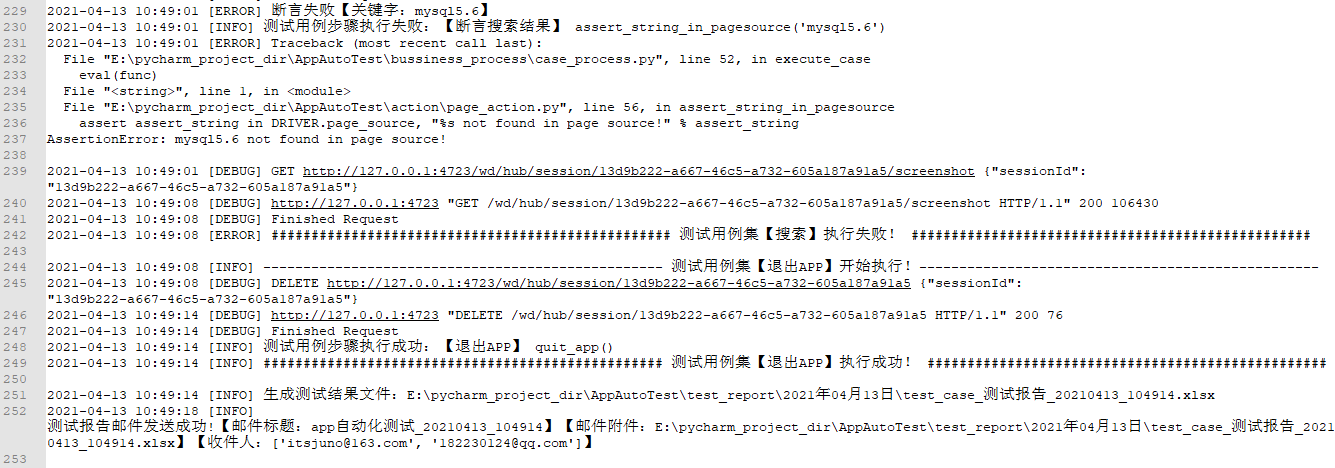
log/app_test.log:
总结:
感谢每一个认真阅读我文章的人!!!
作为一位过来人也是希望大家少走一些弯路,如果你不想再体验一次学习时找不到资料,没人解答问题,坚持几天便放弃的感受的话,在这里我给大家分享一些自动化测试的学习资源,希望能给你前进的路上带来帮助。
-
文档获取方式: -
加入我的软件测试交流群:680748947免费获取~(同行大佬一起学术交流,每晚都有大佬直播分享技术知识点)
这份文档,对于想从事【软件测试】的朋友来说应该是最全面最完整的备战仓库,这个仓库也陪伴我走过了最艰难的路程,希望也能帮助到你!
以上均可以分享,只需要你搜索vx公众号:程序员雨果,即可免费领取


 516
516

 被折叠的 条评论
为什么被折叠?
被折叠的 条评论
为什么被折叠?
 到【灌水乐园】发言


