


2. To set up the yum repository(添加源)
create the file named /etc/yum.repos.d/nginx.repo with the following contents:
[root@ecs-c13b ~]# vim /etc/yum.repos.d/nginx.repo

[nginx-stable]

name=nginx stable repo

baseurl=http://nginx.org/packages/centos/$releasever/$basearch/

gpgcheck=1

enabled=1

gpgkey=https://nginx.org/keys/nginx_signing.key

module_hotfixes=true


[nginx-mainline]

name=nginx mainline repo

baseurl=http://nginx.org/packages/mainline/centos/$releasever/$basearch/

gpgcheck=1

enabled=0

gpgkey=https://nginx.org/keys/nginx_signing.key

module_hotfixes=true
安装nginx
1. 查看nginx源是否添加成功
[root@ecs-c13b ~]# yum search nginx
2. 安装并查看
[root@ecs-c13b ~]# yum install nginx

[root@ecs-c13b ~]# rpm -qa | grep nginx

nginx-1.18.0-1.el7.ngx.x86_64

[root@ecs-c13b ~]#
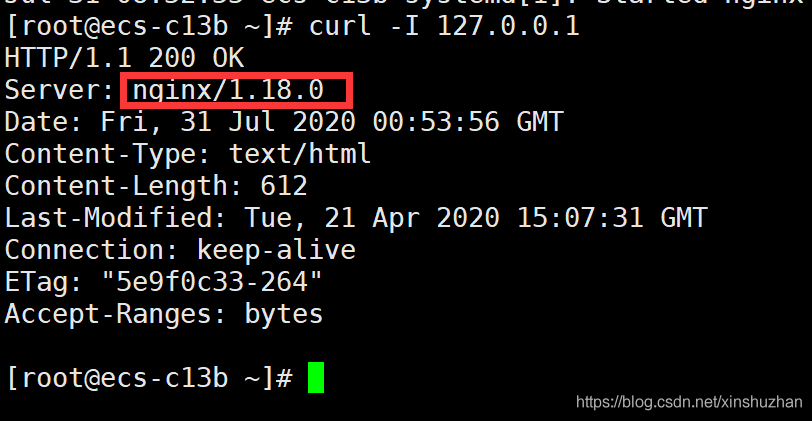
3. 启动nginx
[root@ecs-c13b ~]# systemctl start nginx

[root@ecs-c13b ~]# systemctl enable nginx

Created symlink from /etc/systemd/system/multi-user.target.wants/nginx.service to /usr/lib/systemd/system/nginx.service.

[root@ecs-c13b ~]# systemctl status nginx

● nginx.service - nginx - high performance web server

   Loaded: loaded (/usr/lib/systemd/system/nginx.service; enabled; vendor preset: disabled)

   Active: active (running) since Fri 2020-07-31 08:52:55 CST; 15s ago

     Docs: http://nginx.org/en/docs/

 Main PID: 21326 (nginx)

   CGroup: /system.slice/nginx.service

           ├─21326 nginx: master process /usr/sbin/nginx -c /etc/nginx/nginx.conf

           └─21327 nginx: worker process


Jul 31 08:52:55 ecs-c13b systemd[1]: Starting nginx - high performance web server...

Jul 31 08:52:55 ecs-c13b systemd[1]: Started nginx - high performance web server.

[root@ecs-c13b ~]#
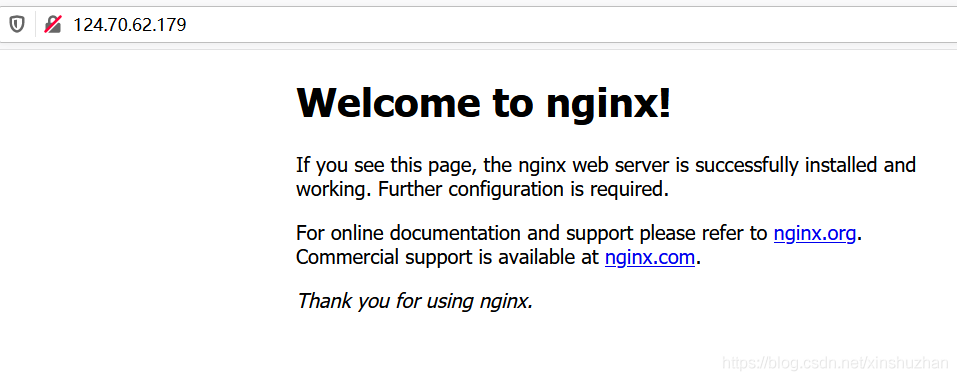
4. 从浏览器端查看
我们在网站根目录传一张图片:
[root@ecs-c13b html]# pwd
/usr/share/nginx/html
[root@ecs-c13b html]# ls
50x.html csdn-0731.png index.html
[root@ecs-c13b html]#
重新查看网页:

总结
nginx的安装相对来说比较简单,使用哪种方式安装都可以,在工作中自由选择。
本文转自 https://zmedu.blog.csdn.net/article/details/107705300,如有侵权,请联系删除。
网上学习资料一大堆,但如果学到的知识不成体系,遇到问题时只是浅尝辄止,不再深入研究,那么很难做到真正的技术提升。
一个人可以走的很快,但一群人才能走的更远!不论你是正从事IT行业的老鸟或是对IT行业感兴趣的新人,都欢迎加入我们的的圈子(技术交流、学习资源、职场吐槽、大厂内推、面试辅导),让我们一起学习成长!


 1141
1141

 被折叠的 条评论
为什么被折叠?
被折叠的 条评论
为什么被折叠?
 到【灌水乐园】发言


