


简介
pytest 是 Python 中一个非常流行的测试框架,主要用于编写、组织和运行单元测试、功能测试和集成测试。它比 Python 自带的 unittest 更简洁、灵活,并且具有丰富的插件生态。Pytest 提供了强大的断言功能,支持丰富的断言表达式,并且在断言失败时会提供详细的错误信息。Pytest 支持大量的插件,这些插件可以扩展 Pytest 的功能,例如支持参数化测试、生成测试报告、与 CI/CD 工具集成等。
安装
pip install pytest
前言
在当前目录和子目录中的所有格式为 test_*.py 或 *_test.py 的文件都被认为是测试文件。pytest要求测试函数的名称以 test 开头,如果函数名称不符合 test_格式,则pytest不会将其视为测试函数。我们不能显式地让pytest将任何不以 _test 开头的函数视为测试函数。
引用
- 运行所有测试:
pytest - 运行特定文件:
pytest test_sample.py - 运行特定测试:
pytest test_sample.py::test_answer - 显示详细信息:
pytest -v - 失败时停止:
pytest -x - 显示打印输出:
pytest -s - 生成报告:
pytest --junitxml=report.xml
插件扩展
pytest-cov(测试覆盖率)pytest-xdist(并行测试)pytest-mock(Mock 对象)pytest-asyncio(异步测试)
开始
1.创建以test_开头或结尾的文件
我的写法不规范,请各位规范写法
def tang(x):
return x + 1
def test_nswera():
assert tang(3) == 4
def test_buchi():
assert tang(8) == 9
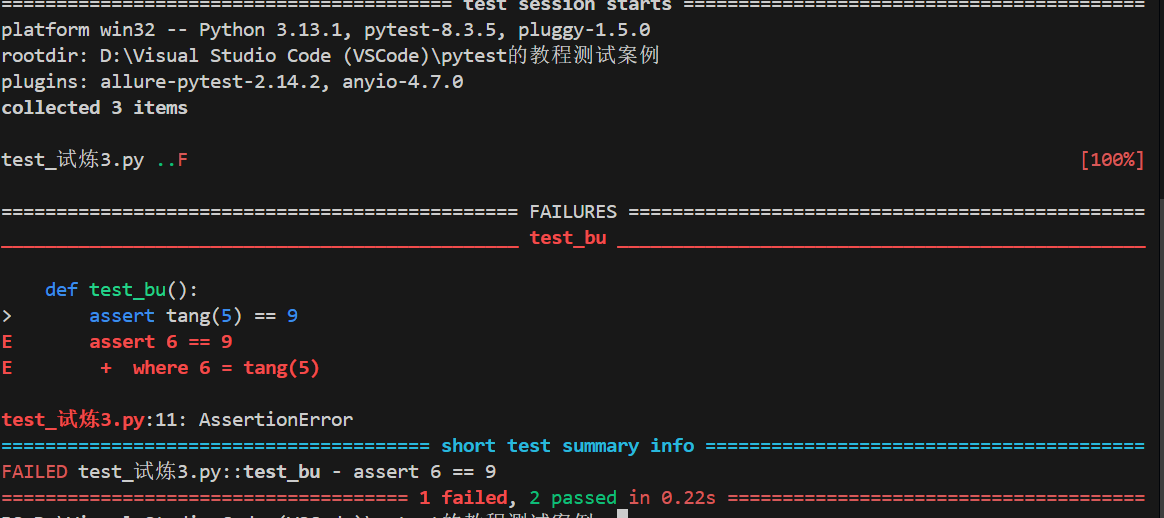
def test_bu():
assert tang(5) == 9我创建的文件是test_试炼3.py。结果中它找到了3个用例,其中一个错误,两个正确。F代表测试失败,点(.)代表测试成功。各位也可以在终端执行 pytest test_试炼3.py -v 在特定的文件执行测试。
![]()
2.再创建一个新的文件
def test_equal():
    num = 100
    assert num == 100  # 测试等于

def test_not_equal():
    num = 100
    assert num != 99   # 测试不等于

def test_range():
    num = 150
    assert 100 < num < 200  # 测试范围区间
我第二个创建的文件是test_试炼1.py 文件, pytestste -v是执行你创建文件夹里所有test文件(特定的文件测试,直接加上你的文件名就行)

Pytest 执行一部分测试套件
在实际情况中,我们会有多个测试文件,每个文件都会有多个测试。测试将涵盖各种模块和功能。假设,我们只想运行一组特定的测试;我们该怎么做呢?Pytest提供了两种选择运行测试套件的方法。
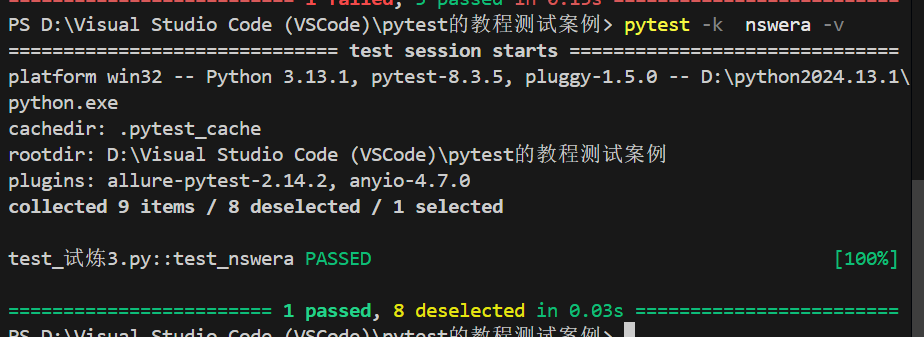
1.Pytest 测试名称的子字符串匹配
(pytest -k <substring> -v)里面的<substring>就是你封装的名 ,也就是test_nswera()中的nswera
Pytest 分组测试
介:Pytest允许我们在测试函数上使用标记。标记用于为测试函数设置各种功能/属性。Pytest提供了许多内置的标记,如xfail、skip和parametrize。除此之外,用户还可以创建自己的标记名称。
要点:要使用标记,我们必须在测试文件中导入pytest模块。 我们可以为测试定义自己的标记名称,并运行具有这些标记名称的测试。( @pytest.mark.<markername> )。要运行标记的测试,我们可以使下语法(pytest -m <markername> -v)
test_试炼2.py
(这是我随便创建的test_开头的文件)
import pytest

@pytest.mark.great
def test_equal():
    num = 100
    assert num == 100

@pytest.mark.great
def test_not_equal():
    num = 100
    assert num != 99

@pytest.mark.others
def test_list_comparison():
    items = [1, 2, 3]
    assert len(items) > 2

@pytest.mark.others
def test_string_comparison():
    text = "pytest"
    assert len(text) <= 6

@pytest.mark.extreme
def test_boundary():
    value = 999
    assert value < 1000
test_试炼4.py
import pytest

@pytest.mark.great
def test_identity_comparison():
    lst1 = [1, 2, 3]
    lst2 = lst1
    assert lst1 is lst2

@pytest.mark.others
def test_collection_contains():
    colors = ["red", "green", "blue"]
    assert "green" in colors

@pytest.mark.extreme
def test_floating_precision():
    result = 1.0 - 0.9
    assert abs(result - 0.1) < 1e-10
现在执行标记为 great 的测试 (pytest -m great -v)以下全部正确

Pytest fixture
介:fixture是在应用于每个测试函数之前运行的函数。fixture用于向测试提供一些数据,比如数据库连接,待测试的URL和一些输入数据。因此,我们可以将固定装置函数附加到测试中,而不是为每个测试运行相同的代码,它将在执行每个测试之前运行并返回数据给测试。
import pytest
@pytest.fixture
def sample_number():
num = 42
return num
def test_even_number(sample_number):
assert sample_number % 2 == 0
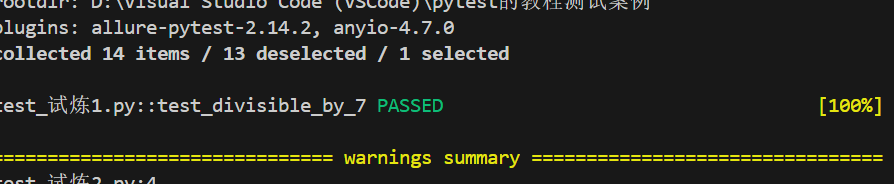
def test_divisible_by_7(sample_number):
assert sample_number % 7 == 0
def test_square_root(sample_number):
assert sample_number ** 0.5 == pytest.approx(6.4807, rel=1e-4)
使用命令执行测试 – pytest -k divisible -v
这种方法也有其局限性。在测试文件中定义的装置函数只在该测试文件内部有效。我们无法在另一个测试文件中使用该装置。要使一个装置可用于多个测试文件,我们必须将装置函数定义在一个名为 conftest.py 的文件中。
Pytest Conftest.py
conftest.py 是 pytest 框架中的一个特殊文件,它主要有以下特点:
- 用于存放 pytest 的 fixture 函数
- 这些 fixture 可以被同一目录及其子目录中的所有测试文件共享使用
- 不需要显式导入,pytest 会自动发现这些 fixture
- 在项目的测试目录中创建一个名为 conftest.py 的文件
- 在这个文件中定义你的 fixture 函数
换句话理解,可以想象它是一个 "共享工具箱",里面放了一些常用的工具(fixture函数)。任何测试文件(比如 test_*.py)都可以直接使用这些工具,不用每次重复写代码。
2. 编辑 conftest.py(工具箱)
import pytest

# 定义一个fixture(工具),名字叫"login_data"
@pytest.fixture
def login_data():
    return {"username": "test_user", "password": "123456"}
编辑 test_demo.py(测试文件)
# 注意:这里不需要导入conftest.py!pytest会自动找到它

def test_login(login_data):  # 👈 直接使用fixture名字"login_data"
    print("测试登录,数据是:", login_data)
    assert login_data["username"] == "test_user"
在终端输入:
pytest test_demo.py -v
Pytest 参数化测试
Pytest 参数化测试是一种高效的测试方法,允许你用不同的输入数据运行同一个测试逻辑。@pytest.mark.parametrize 装饰器。最常用的方式,直接在测试函数上标记多组参数:
import pytest

@pytest.mark.parametrize("input,expected", [
    ("3+5", 8),
    ("2*4", 8),
    ("6/2", 3.0)
])
def test_eval(input, expected):
    assert eval(input) == expected
通过运行命令来执行测试:
Pytest -k eval -v
选择xfail测试或跳过测试
在日常写代码中,有些是自己不想要测试的,某个测试在一段时间内不相关,这些情况下,我们可以选择xfail测试或跳过测试。
xfail
xfail测试,它不会被视为失败或通过的部分测试。即使测试失败,也不会打印这些测试的详细信息。我们可以使用标记来xfail测试
skip
跳过测试意味着该测试不会被执行,我们可以使用skip标记来跳过测试
import pytest

@pytest.mark.xfail
@pytest.mark.math
def test_square():
    num = 5
    assert num**2 == 24  # 预期会失败

@pytest.mark.xfail
@pytest.mark.math
def test_cube():
    num = 3
    assert num**3 == 27  # 预期会通过但标记为xfail

@pytest.mark.skip
@pytest.mark.string
def test_concat():
    s1 = "hello"
    s2 = "world"
    assert s1 + s2 == "helloworld"  # 会被跳过
 skipped - 有1个测试用例被跳过(使用了
@pytest.mark.skip)
xfailed - 有1个测试预期会失败且确实失败了(标记了@pytest.mark.xfail且断言未通过)
xpassed - 有1个测试预期会失败但意外通过了(标记了@pytest.mark.xfail但断言通过了)
warnings - 产生了3条警告信息(可能是弃用警告等)
多或N个测试失败后停止测试套件
在真实的部署场景中,一旦代码的新版本准备就绪,它首先会被部署到预生产或暂存环境中。
随后,会运行一个测试套件对其进行验证。只有当测试套件通过时,代码才被视为准备好部署到生产环境。如果测试中存在一个或多个失败,代码则不能部署到生产环境中。
因此,如果我们希望在出现n个测试失败后立即停止测试套件的执行,可以在pytest中使用 maxfail 选项。
import pytest
import random
import math
def test_cube_success():
num = 3
assert num ** 3 == 27 # 3的立方是27,测试通过
def test_addition_success():
a = 5
b = 10
assert a + b == 15 # 5加10是15,测试通过
def test_division_success():
num = 10
assert num / 2 == 5 # 10除以2是5,测试通过
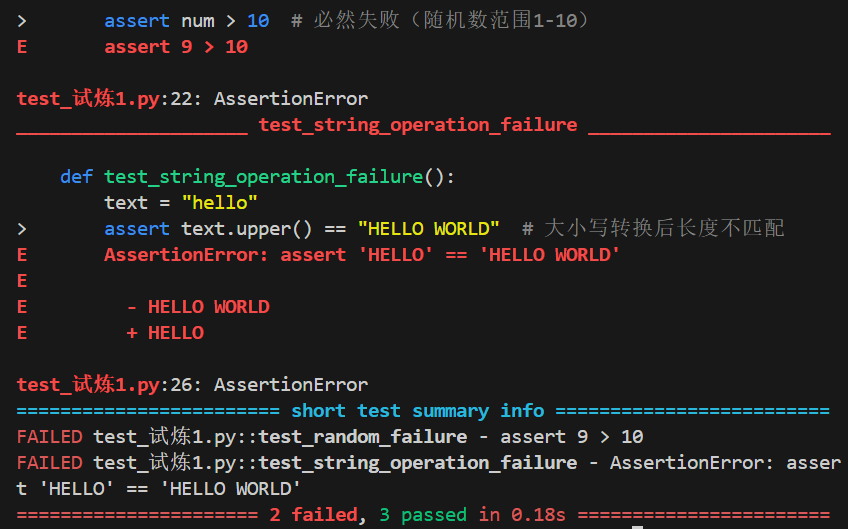
def test_random_failure():
num = random.randint(1, 10)
assert num > 10 # 必然失败(随机数范围1-10)
def test_string_operation_failure():
text = "hello"
assert text.upper() == "HELLO WORLD" # 大小写转换后长度不匹配
默认情况下,pytest按顺序运行测试。在实际场景中,一个测试套件会有多个测试文件,每个文件会有一系列的测试。这样就会导致较长的执行时间。为了解决这个问题,pytest提供了一个选项来并行运行测试。
为了实现这一点,我们首先需要安装pytest-xdist插件。
pip install pytest-xdist -n <num>通过使用多个工作进程来运行测试,这里是3
pytest -n 3还有一个生成结果的,xml,我这里就不多讲了,感兴趣的可以去了解一下。
pytest -v --junitxml = "result.xml"总结
Pytest 是一个功能强大且易于使用的测试框架,适用于各种规模的 Python 项目。通过掌握其基本功能和高级特性,可以显著提高测试效率和代码质量。


 3839
3839

 被折叠的 条评论
为什么被折叠?
被折叠的 条评论
为什么被折叠?
 到【灌水乐园】发言


