


一、防火墙的基础
防火墙分为硬件防火墙和软件防火墙,硬件防火墙有专门的设备:如国产华为、绿盟等,作为网关层做地址转换等安全防护。很多公司基本都会使用硬件防火墙做第一道防御,在核心业务上再添加软件防火墙提高安全性能。iptables防火墙是Linux系统软件类型防火墙的一种,是centOS7之前版本默认的防火墙,由netfilter和iptables组成。
netfilter属于内核态的功能体系,是一个内核模块,有多个数据包过滤表组成,其中包含数据包的过滤处理规则集,并根据规则处理IP数据包(raw、mangle、 nat 和 filter 四个规则表,表中所有规则配置后,立即生效无需重启);iptables是属于用户态的管理工具,如同firewalld、ufw,是一个防火墙应用程序,用来实现防火墙规则集的增删改查。
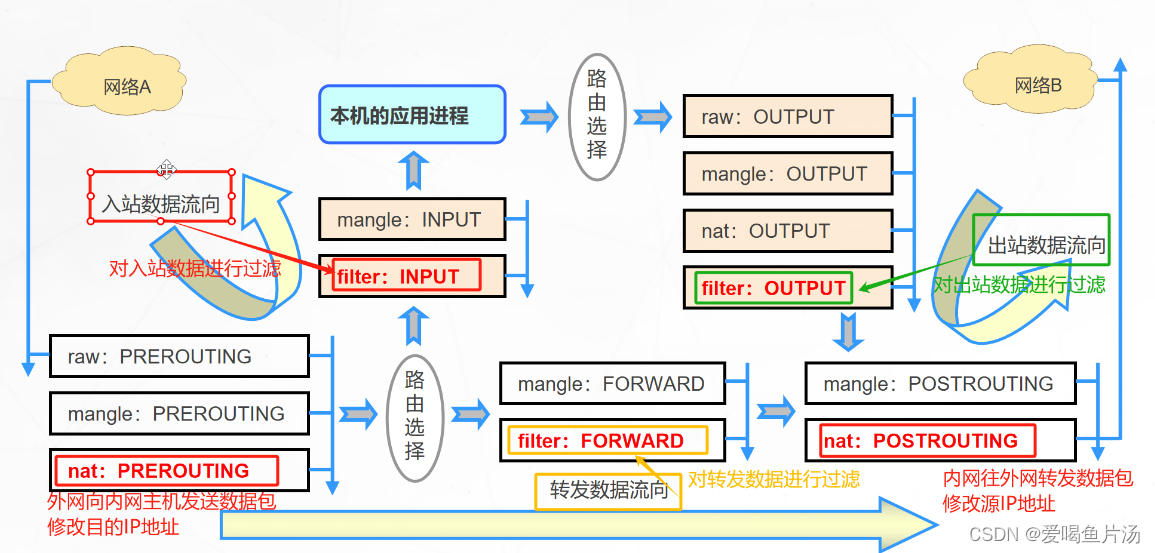
1)四表五链
iptables防火墙的四表五链的关系:表中有链,链中有规则。
四表
raw表:确定是否对该数据包进行状态跟踪。包含两个规则链,OUTPUT、PREROUTING。
mangle表:修改数据包内容,用来做流量整形的,给数据包设置标记。包含五个规则链,INPUT、OUTPUT、FORWARD、PREROUTING、POSTROUTING。
nat表:负责网络地址转换,用来修改数据包中的源、目标IP地址或端口。包含三个规则链,OUTPUT、PREROUTING、POSTROUTING。
filter表:负责过滤数据包,确定是否放行该数据包(过滤)。包含三个规则链,INPUT、FORWARD、OUTPUT。
五链
INPUT:处理入站数据包,匹配目标IP为本机的数据包。
OUTPUT:处理出站数据包,一般不在此链上做配置。
FORWARD:处理转发数据包,匹配流经本机的数据包(可以理解为一个路由器的功能)。
PREROUTING:在进行路由选择前处理数据包,用来修改目的地址,用来做DNAT。相当于把内网服务器的IP和端口映射到路由器的外网IP和端口上。
POSTROUTING:在进行路由选择后处理数据包,用来修改源地址,用来做SNAT。相当于内网通过路由器NAT转换功能实现内网主机通过一个公网IP地址上网。

2)数据包过滤的匹配流程和优先级
规则表之间的顺序:raw ---> mangle ---> nat --->filter
3)链的匹配顺序
入站数据:PREROUTING ---> INPUT --->本机应用程序
出站数据:本机应用程 ---> OUTPUT ---> POSTROUTING
转发数据:PREROUTING ---> FORWARD---> POSTROUTING
4)规则的匹配顺序
按顺序从上往下依次匹配,匹配到即停止(log策略除外);若没有匹配的规则,则按该链的默认策略处理。
过滤入站数据包:filter表中的INPUT链
过滤出站数据包:filter表中的OUTPUT链
过滤转发数据包:filter表中的FORWARD链
修改内网转发到外网数据包的源IP地址:nat表中的POSTROUTING链
修改外网转发到内网数据包的目的IP地址:nat表中的PREROUTING链

二、使用iptables
1)安装iptables和iptables-service服务
centOS7默认使用firewalld防火墙,安装Linux系统时选择桌面安装也会安装iptables,想要使用iptables先要永久关闭firewalld,然后安装iptables和iptables-service,可以使用systemctl管理应用服务。

2)iptables命令行配置格式
iptables [-t 表名] 管理选项 [链名] [匹配条件] [-j 控制类型]
| iptables命令 | -t 指定表名 | 操作选项 | 链名 | 匹配条件 | -j 常用控制类 |
| -t filter 或无,默认指定filter -t nat 指定nat -t mangle 指定mangle -t raw 指定raw | 增 -A -I 改 -R -P 删 -D -F 查 -L -n -v | INPUT OUTPUT FORWARD PREROUTING HOSTROUTING | -p 协议 -s 源IP -d 目的IP -i 入站网卡接口 -o 出站网卡接口 --dport 目的端口 --sport 源端口 | ACCEPT REJECT DROP SNAT DNAT |
3)常用的控制类型
ACCEPT:允许数据包通过;
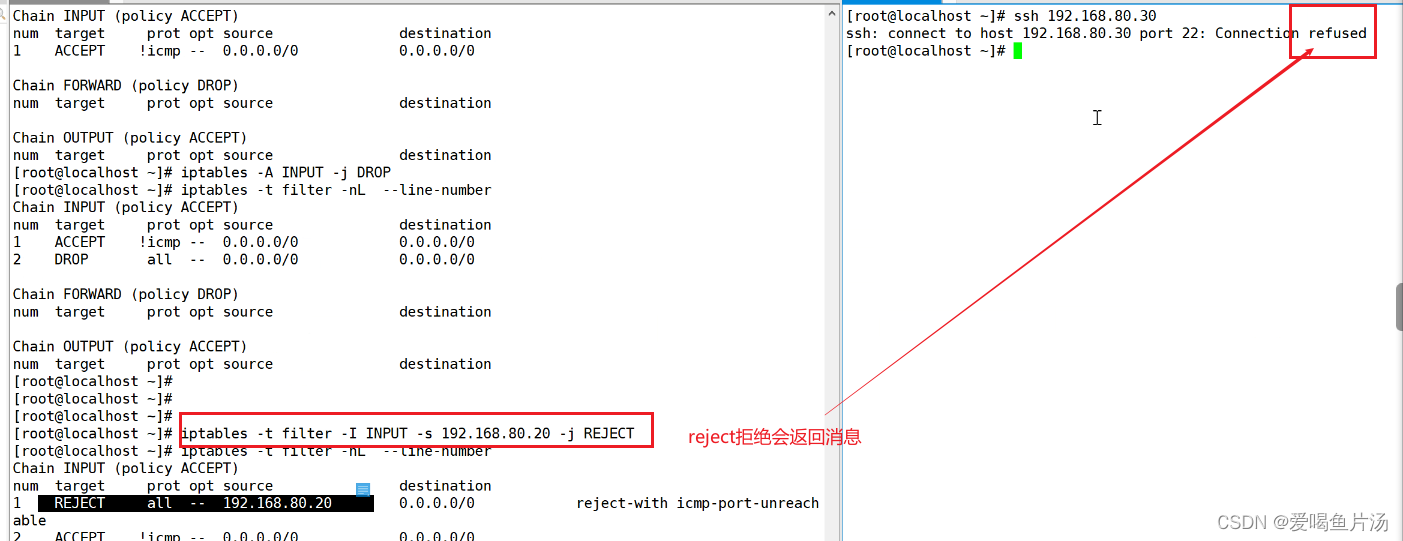
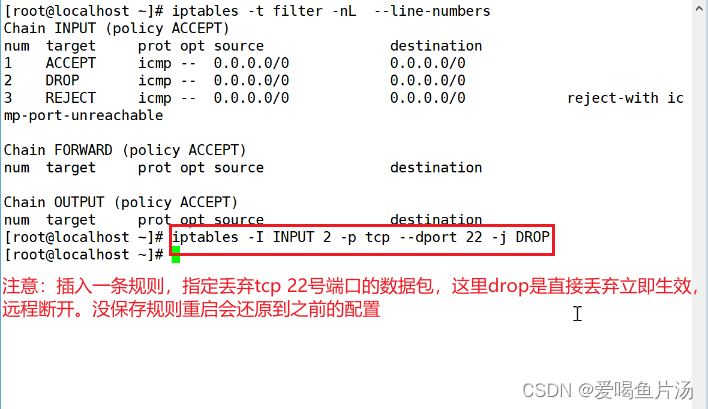
DROP:拒绝通过,直接丢弃数据包,不给出任何回应信息;

REJECT:拒绝数据包通过,会给数据发送端一个响应信息;
SNAT:修改数据包的源地址;
DNAT:修改数据包的目的地址;
REDIRECT:重定向改变目的端口,将接受的包转发至本机的不同端口;
MASQUERADE:伪装成一个非固定公网IP地址;
LOG:在/var/log/messages文件中记录日志信息,然后将数据包传递给下一条规则。LOG只是一种辅助动作,并没有真正处理数据包。
4)常用的操作选项
① 增操作
-A :在指定链的末尾追加(--append)一条新的规则
iptables -t 表名 -A 链名 匹配条件 -j 控制类型
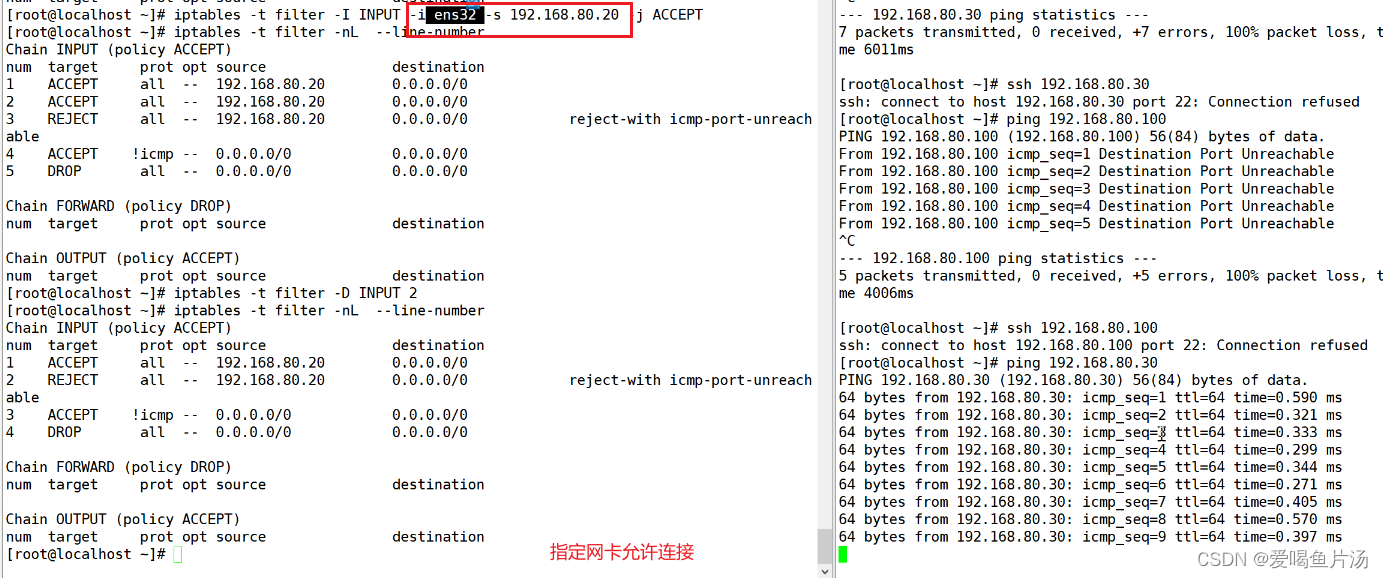
-I :在指定链的开头插入(--insert)一条新的规则,未指定序号时默认作为第一条规则
iptables -t 表名 -A 链名 序号 匹配条件 -j 控制类型
想要重新连接需要到服务器端把那条命令删除或替换成放开
② 修改操作
-R :修改、替换(--replace)指定链中的某一条规则,可指定规则序号或具体内容
iptables -t 表名 -R 链名 序号 序号 新规则内容

-P :设置指定链的默认策略(--policy)
iptables -t 表名 -P 链名 ACCEPT/DROP/REJECT

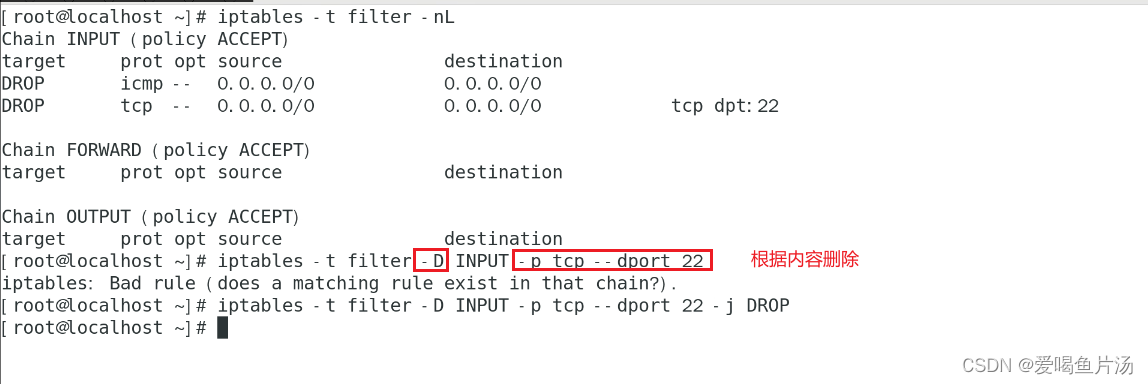
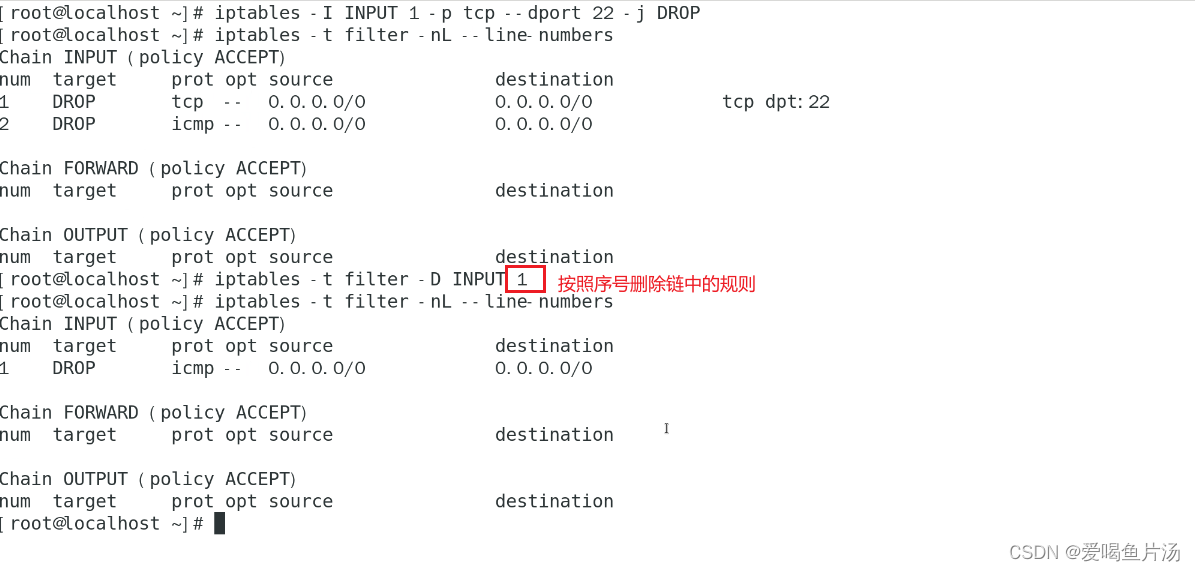
③ 删除操作
-D :删除(--delete)指定链中的某一条规则,可指定规则序号或具体内容
iptables -t 表名 -D 链名 序号/内容
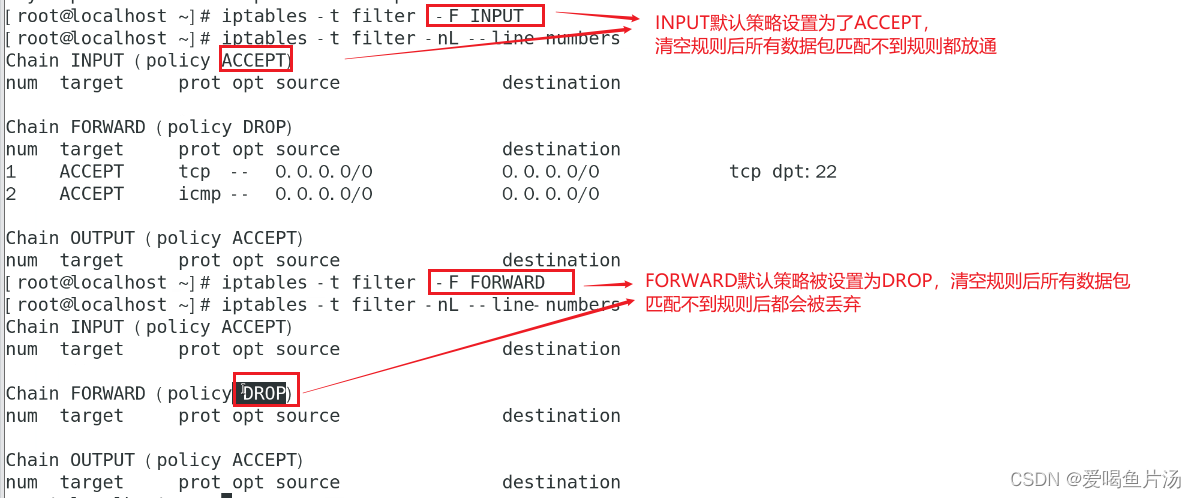
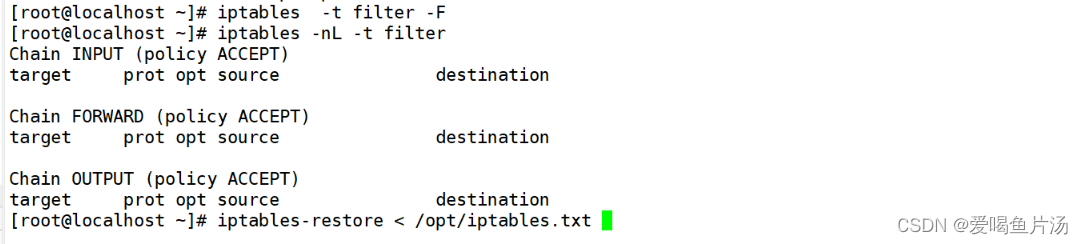
-F :清空(--flush)指定链中的所有规则,若未指定链名,则清空表中的所有链。(慎用)
iptables -t 表名 -F 链名 #如果不指定链名则删除清空所有链的规则
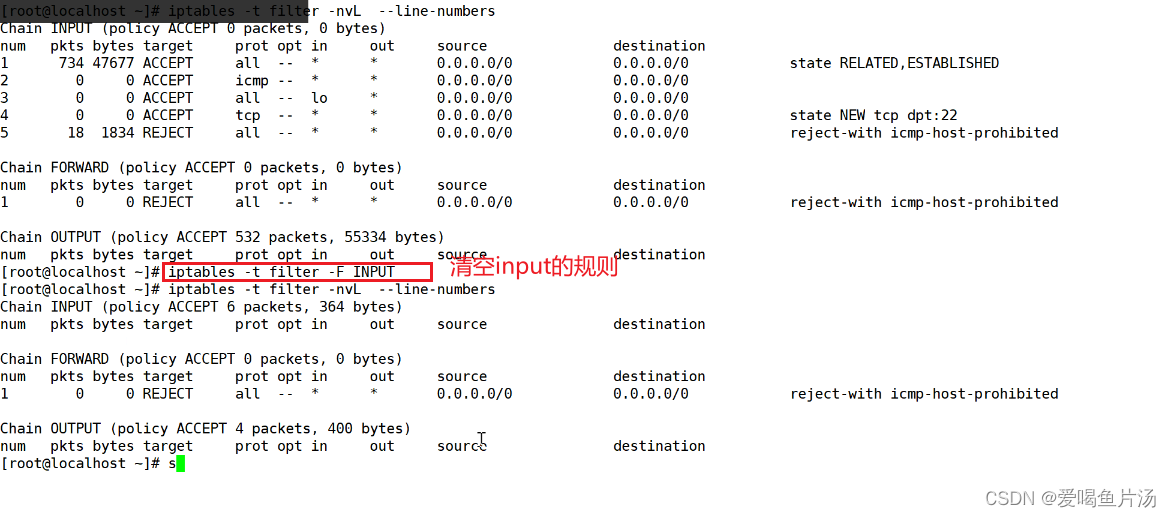
清空规则时需要注意到默认规则有没有指定为drop
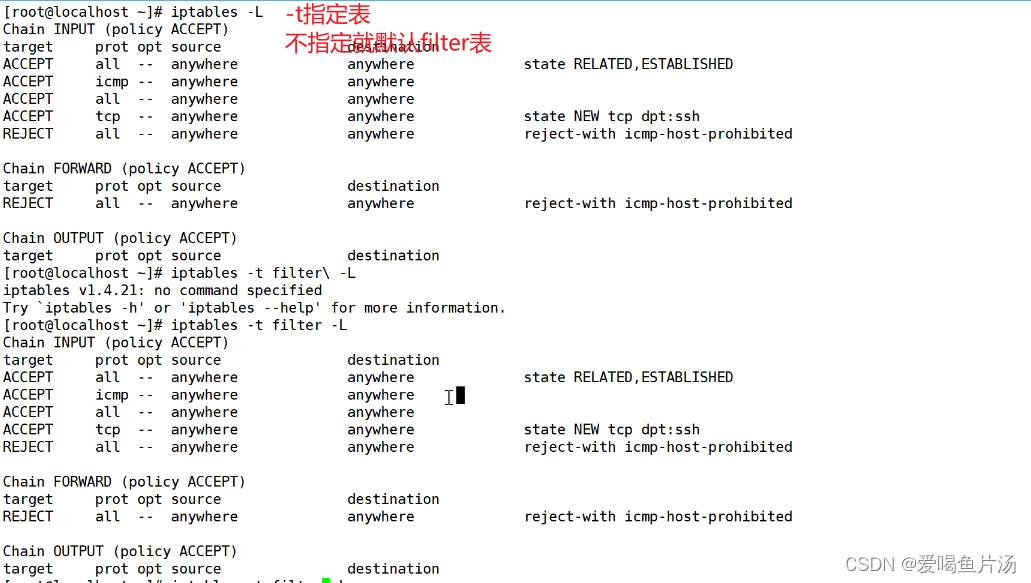
④ 查看操作
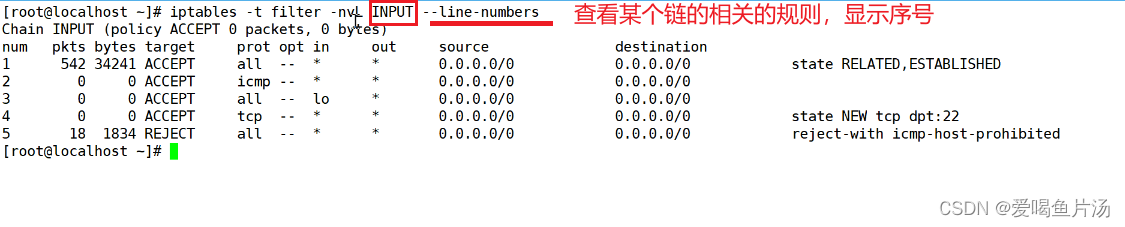
iptables -t 表名 -L -n -v --line-numbers 链名
iptables -t 表名 -nvL --line-numbers 链名
-L :列出(--list)指定链中所有的规则,若未指定链名,则列出表中的所有链
-n :使用数字形式(--numeric)显示输出结果,如显示 IP 地址而不是主机名

-v :显示详细信息,包括每条规则的匹配包数量和匹配字节数
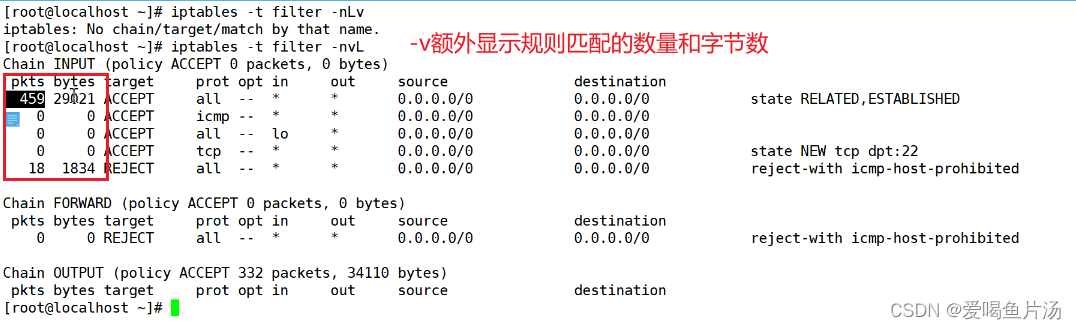
--line-numbers:查看规则时,显示规则的序号


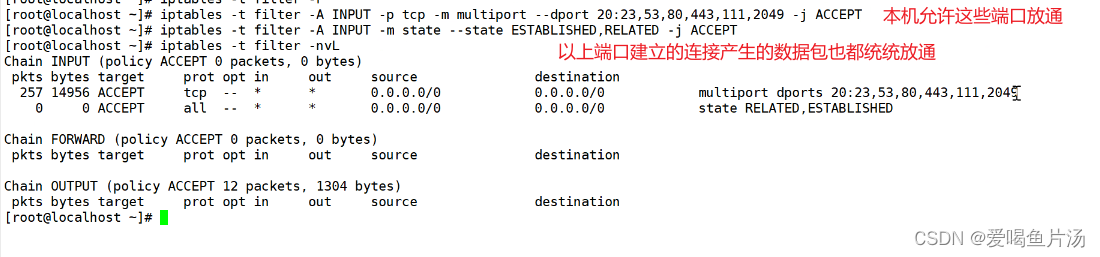
⑤ 设置白名单
√ 生产环境中通常使用白名单设置规则
iptables -t 表名 -A 链名 匹配条件 -j ACCEPT #先配置需要开放的规则1...2...3...
iptables -t 表名 -A 链名 -j DROP #在规则最后设置指定默认为禁止所有
5)规则的匹配条件
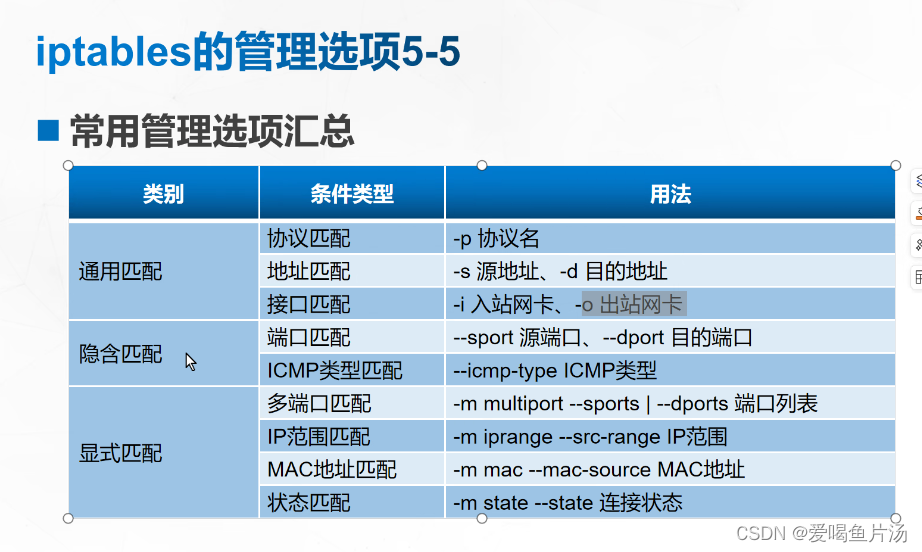
① 通用的匹配
-i 指定入站网卡(可以是IP、网段、域名、空即任何地址)
-o 出站网卡接口(可以是IP、网段、域名、空即任何地址)
-p 协议
-s 源IP
-d 目的IP
----------------------------------------------------------------------------------------------------------------------------
② 隐含匹配
隐含匹配必须指定协议
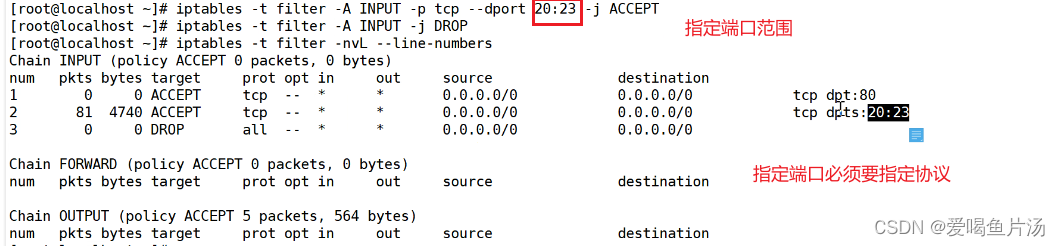
-p tcp/udp --dport 目标端口/扣扣范围
-p tcp/udp --sport 目标端口/扣扣范围
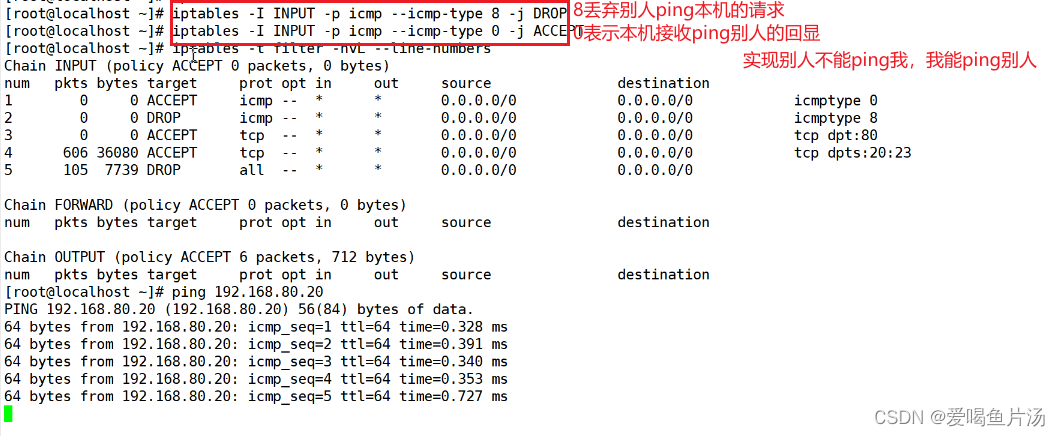
-p icmp --icmp-type 8(请求) / 0 (回显) / 3 (目标不可达)

iptables -A INPUT ! -p icmp -j ACCEPT #取反


--dport 目的端口
--sport 源端口
TCP标志位匹配:--tcp-flags TCP标志位

③ 显示匹配
-m 扩展模块支出类型,包括多端口、mac地址、IP范围、数据包状态等条件
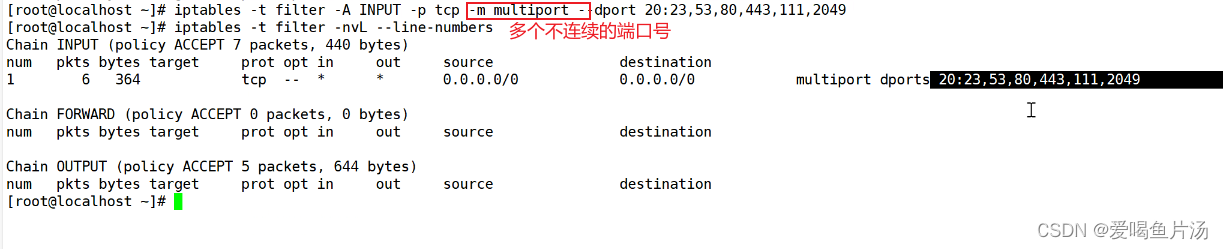
多端口匹配:-m -multiport --dport 端口号,端口号;端口号
ip地址范围匹配:-m iprange --src-range 192.168.170.10-192.168.170.20 -j DROP

-m iprange --dst-range 192.168.170.10-192.168.170.20 -j DROP 根据目标地址禁止访问
-m mac --mac-source 11:22:33:44:55:66 -j DROP 根据mac地址禁止访问
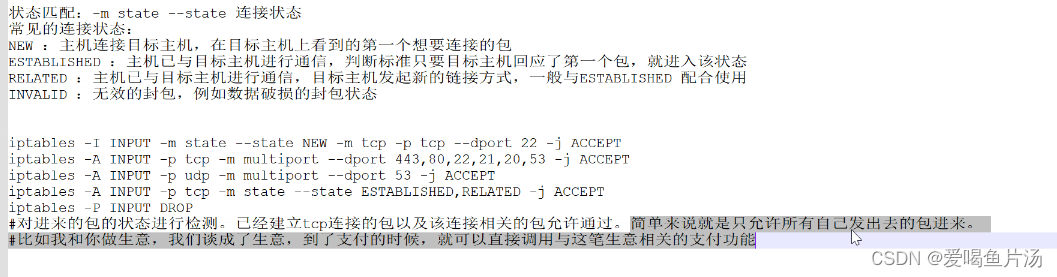

-m state --state RELATED,ESTABLISHED, [,NEW,INVALID]
用于放行本机发出去的数据包返回的应答包进站
6)规则的保存
iptables规则修改后会立即生效,但是重启后会恢复到原始设置。
iptables-save > 文件路径 #保存设置的规则
iptables-save > /etc/sysconfig/iptables #设置成默认规则
![]()
iptables-restore < 文件路径 #导出、或者误删后还原规则
7)注意事项
不指定表名时,默认指filter表
不指定链名时,默认指表内的所有链
除非设置链的默认策略,否则必须指定匹配条件
控制类型和链名使用大写字母,其余均为小写
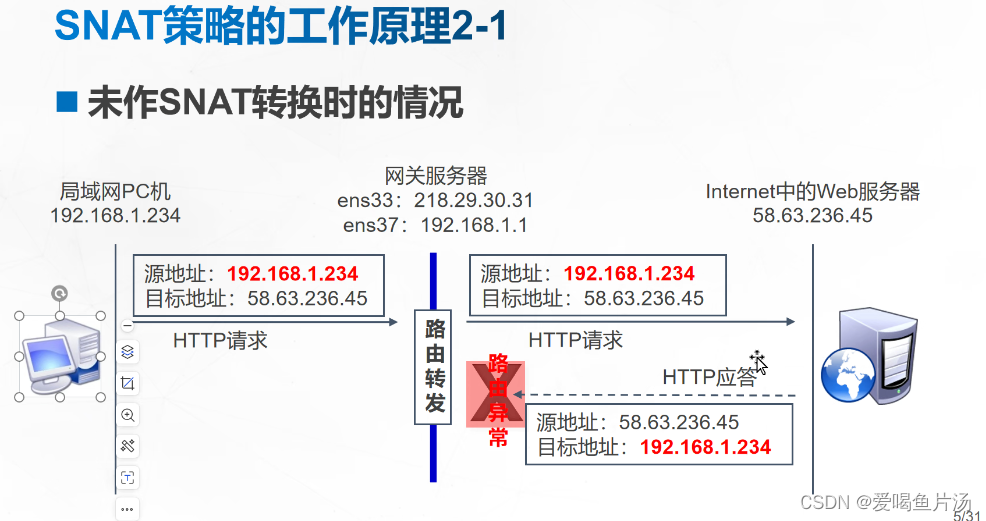
三、SNAT和DNAT策略配置,tcpdump抓包
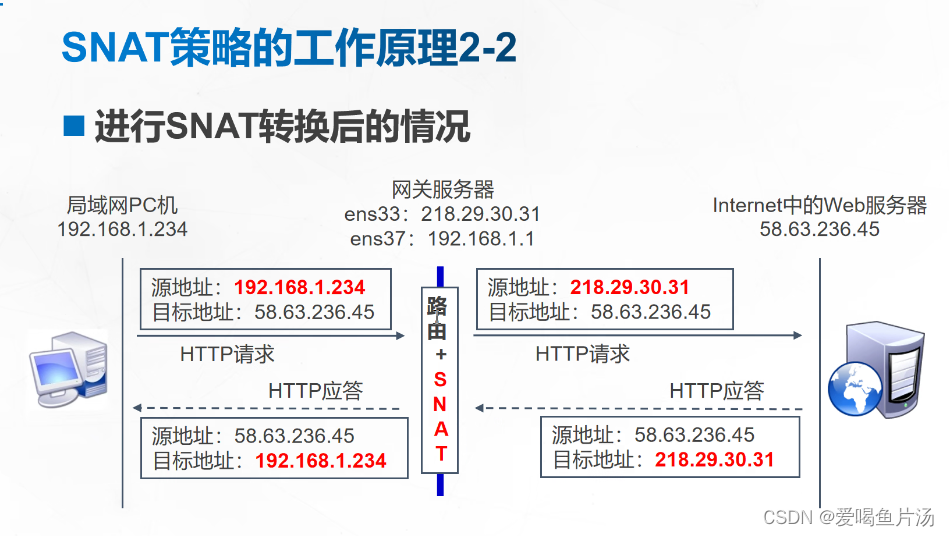
1)SNAT策略配置
把从内网 --> 外网的数据的源内网地址转换成公网源地址
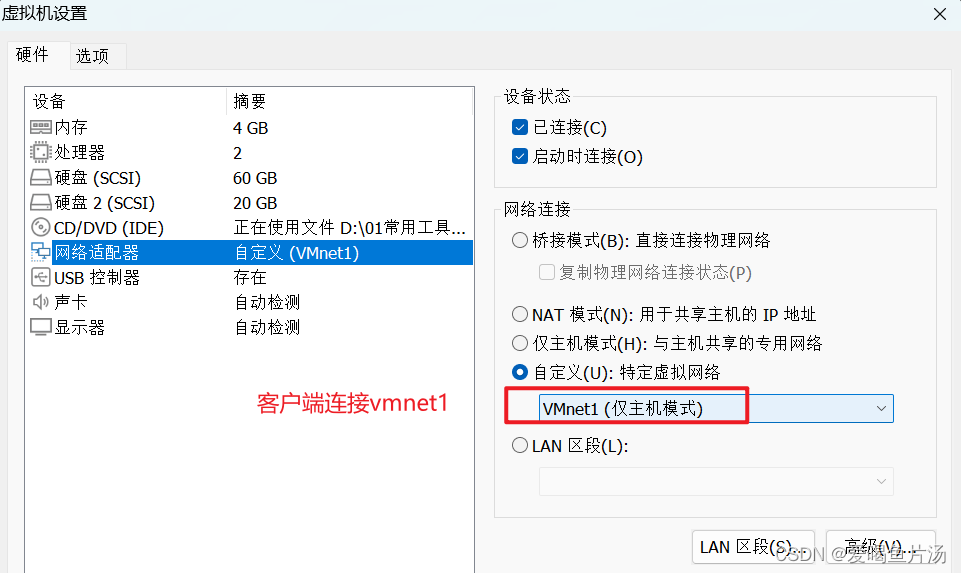
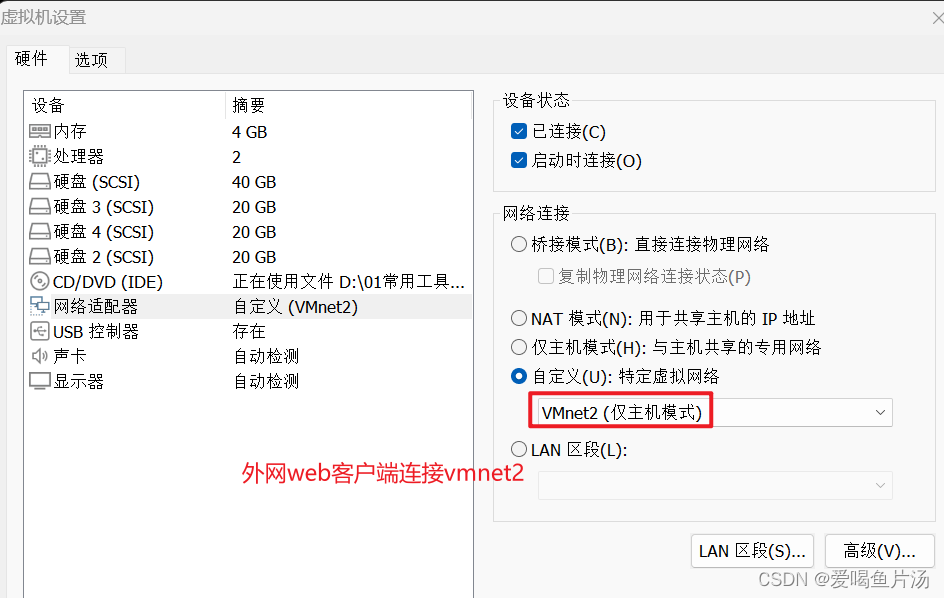
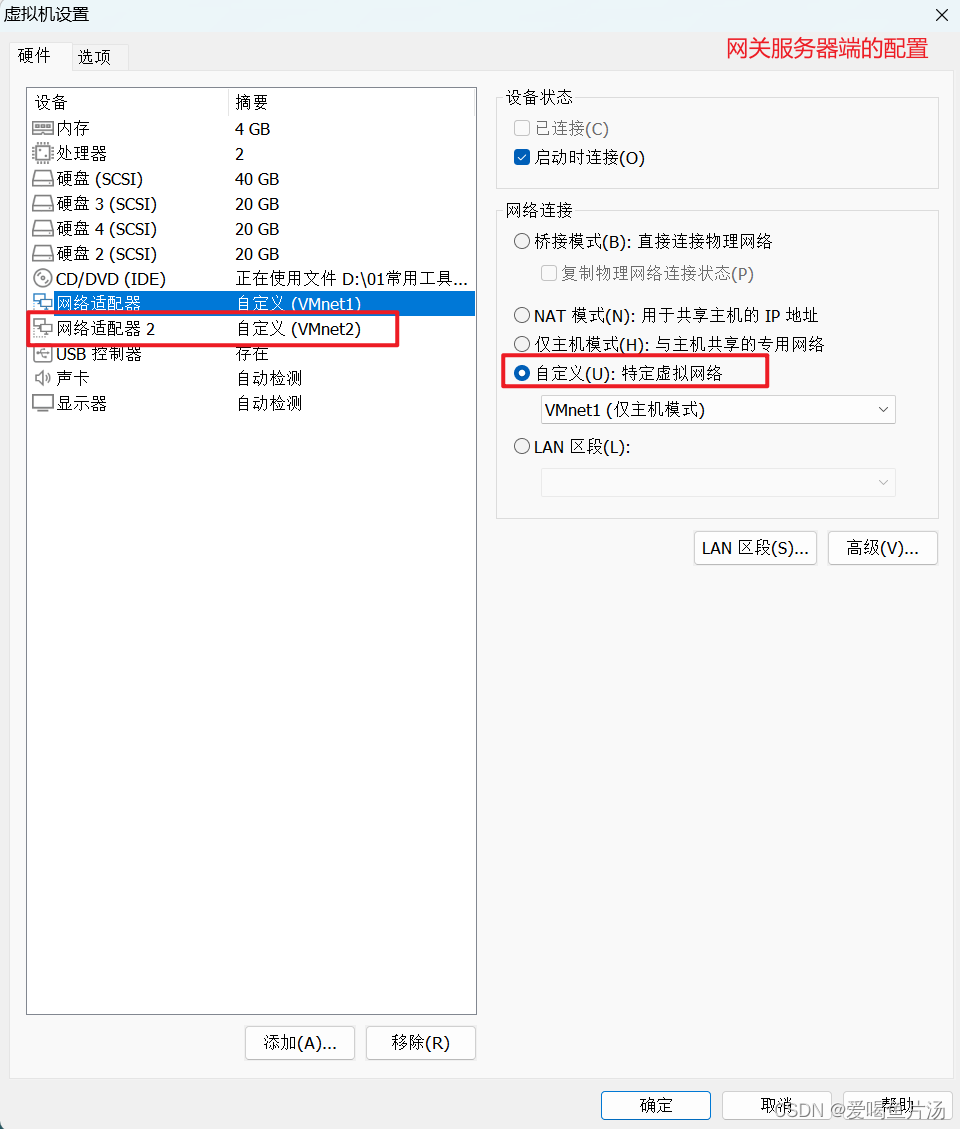
1、实验网络规划,环境部署。准备配置一台内网主机IP地址为192.168.237.100;一台网关服务器,准备2个网卡接口,分别连接内网和外网,接内网IP设置为192.168.237.10,接外网IP设置为20.0.0.10;一台外网主机IP地址为20.0.0.100。实验前请先检查镜像、本地yum仓库配置、光盘挂载、防火墙是否关闭,避免影响整体的过程。
 2、配置内网客户机
systemctl disable --now firewalld
systemctl stop firewalld
setenforce 0
ifconfig
vim /etc/sysconfig/network-scripts/ifcfg-ens33
systemctl restart network
ifconfig
iptables -nl
iptables -F
3、外网web服务器
systemctl disable --now firewalld
systemctl stop firewalld
setenforce 0
ifconfig
vim /etc/sysconfig/network-scripts/ifcfg-ens33
systemctl restart network
ifconfig
yum install -y httpd
systemctl start httpd.service
iptables -nl
iptables -F
4、配置网关服务器
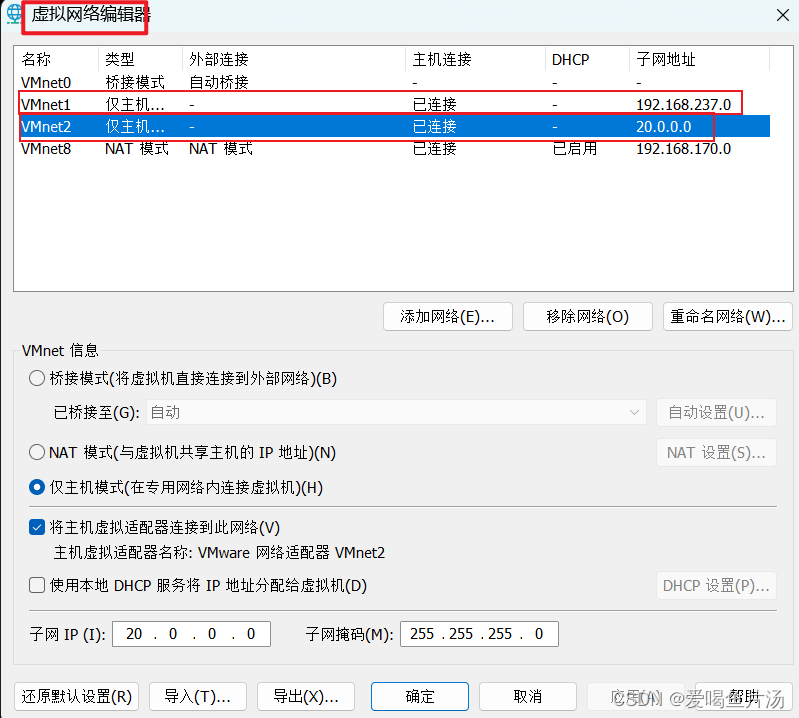
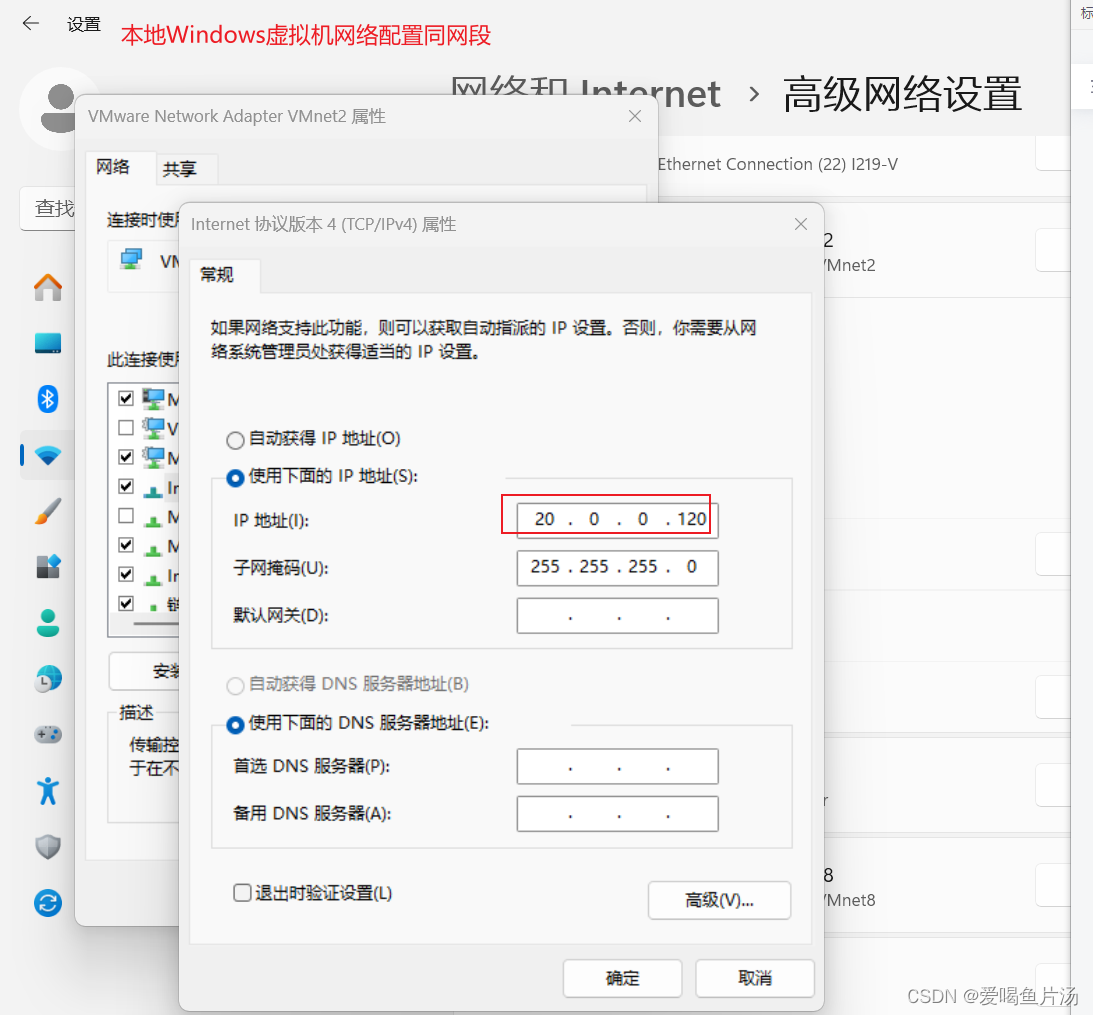
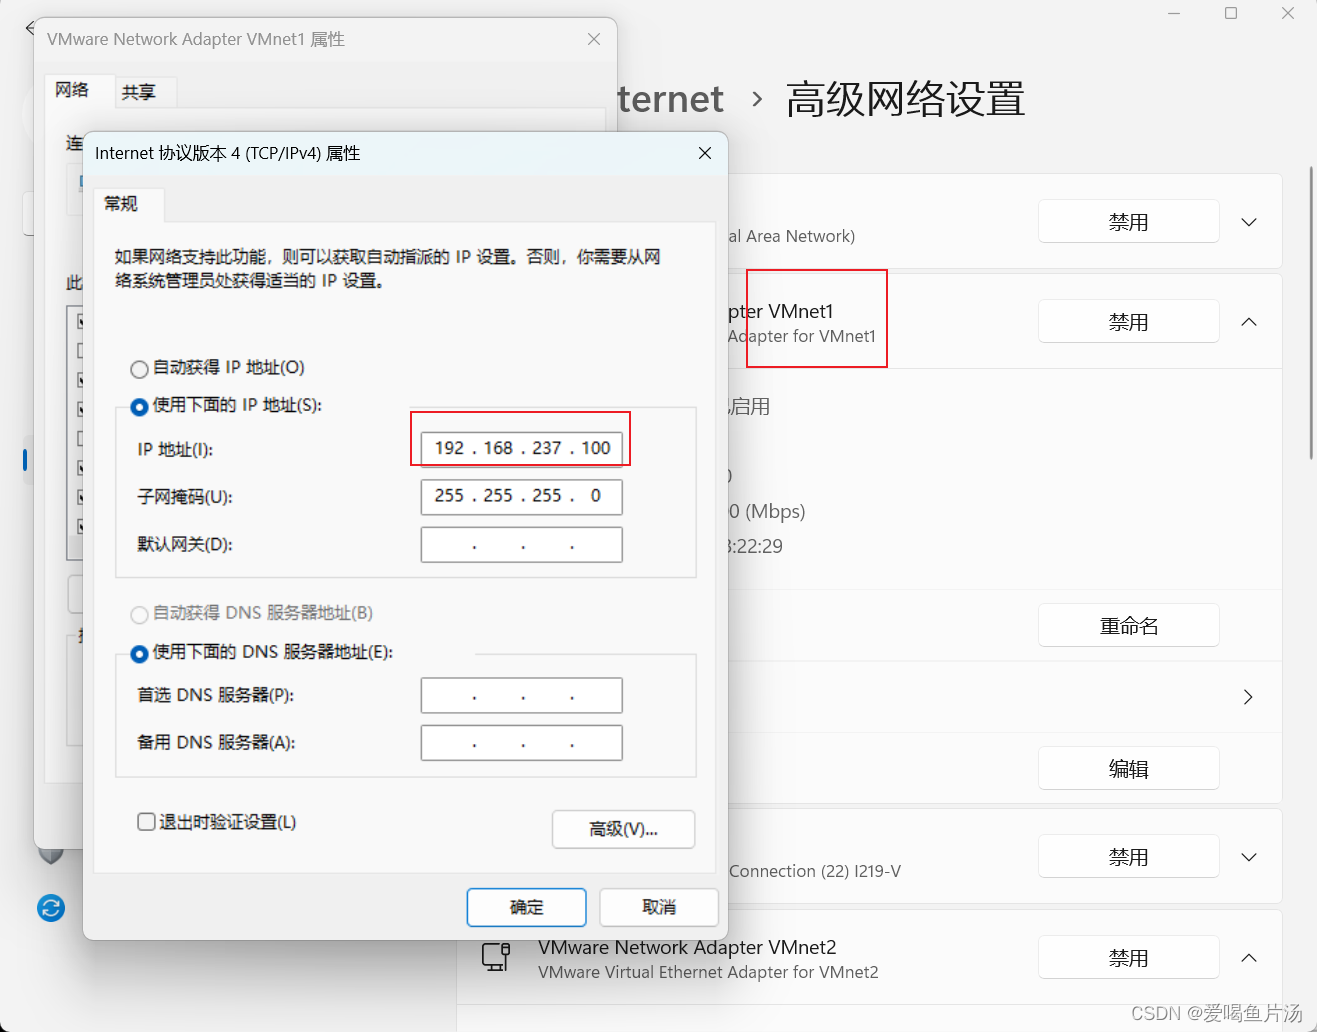
- 先将虚拟机网络模式与内网客户端与外网客户端区分开,虚拟机网络设置,真机网络设置同步。
- 网关服务器首先要确保能够进行路由转发,cat /etc/proc/sys/net/ipv4/ip_forwad,值为0则表示关闭,临时开启修改此文件的值为1,sysctl -p立即生效;或者vim /etc/sysctl.conf文件,添加一行配置:永久生效。
- 添加规则的命令:iptables -t nat -A POSTROUTING -s 内网的源地址/网段 -o 出站网卡 -j SNAT --to 要转换的公网源地址
systemctl disable --now firewalld
systemctl stop firewalld
setenforce 0
ifconfig
vim /etc/sysconfig/network-scripts/ifcfg-ens33
   --->设置内网卡ip为192.168.237.10
cd /etc/sysconfig/network-scripts
cp ifcfg-ens33 ifcfg-ens36
vim ifcfg-ens36
   --->复制ens33配置文件修改时需要注意,网卡设备的uuid都是唯一的,需要注释掉,修改文件里的网卡名
   为ens36,,IP地址修改为20.0.0.10
systemctl restart network
ifconfig
yum install -y iptables-services.x86_64 iptables
systemctl start iptables.service
vim /etc/sysctl.conf
   ---> 添加net.ipv4.ip_forward=1
sysctl -p
iptables -nL
iptables -F
iptables -t nat -A POSTROUTING -s 192.168.237.0/24 -o ens36 -j SNAT --to 20.0.0.100
iptables -t nat -nL --line-numbers
ping 192.168.237.100
ping 20.0.0.100
5、内网ping命令验证能否联通外网即可
6、tcpdump抓包查看验证SNAT策略的整个过程
tcp开启监听icmp协议,从内网192.168.237.100 ping web服务端20.0.0.100,ping10个包,tcpdump抓包看看
#借助远程终端连接外网web端,开启监听抓包
tcpdump -i ens33 -s 0 -w ./test1.cap    #指定监听的网卡,保存抓包的文件为test1.cap

#内网客户端
ping -c 10 20.0.0.100

#外网web端退出监听,保存文件到本地
ctrl c
sz test1.cap 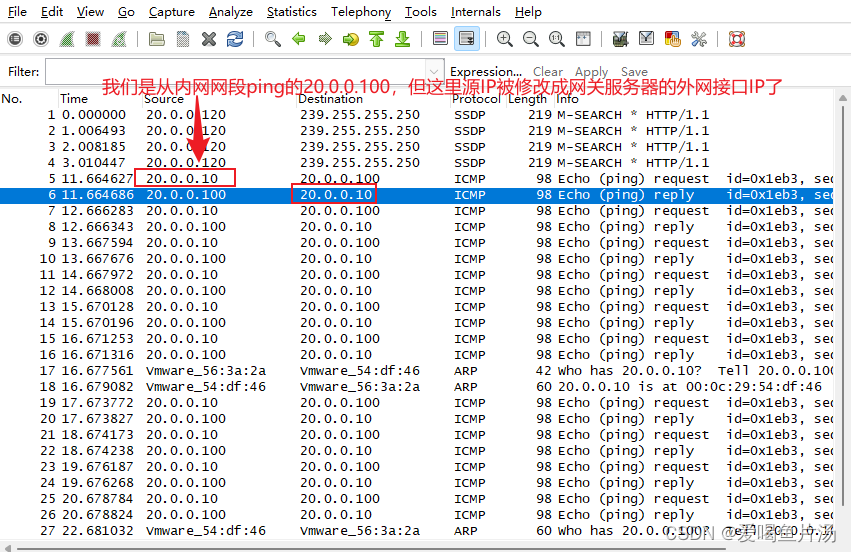
2)DNAT策略
外网访问内网时,将外网 --> 内网的数据包的目的地址由公网IP 转换成内网IP 端口
iptables -t nat -A PREROUTING -i 入站网卡 -d 原公网目的地址 -p 协议 --dport 原目的端口 -j DNAT --to 要转换的内网目的地址:端口
①网络规划
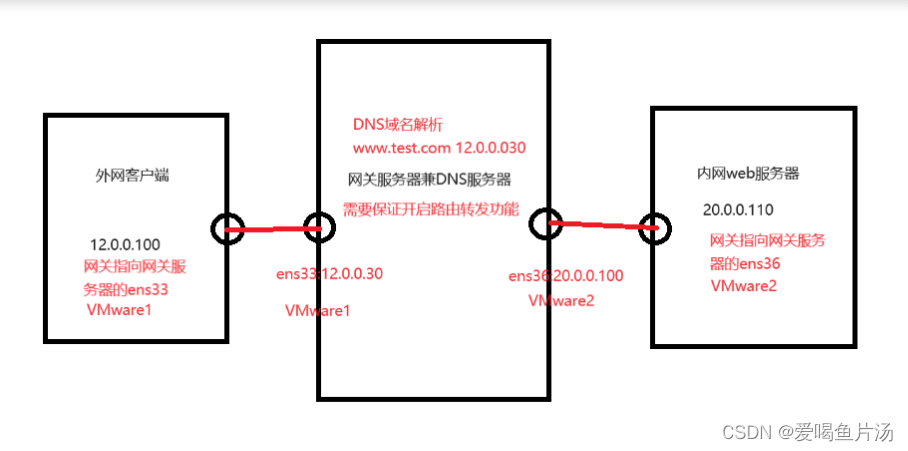
想要实现外网客户端通过域名访问到内网web服务器,需要将外网发往内网的数据包的目外网IP:12.0.0.30改为内网IP:20.0.0.110:80,如果内网端口改过了则需要指定
- 外网客户端:12.0.0.100,网关为指向网关服务器的内网接口12.0.0.30,VMware1;
- 内网web服务器兼DNS服务器:20.0.0.110,网关指向网关服务器的外网接口20.0.0.100,VMware2
- 网关服务器:外网接口ens33为12.0.0.30,虚拟机网络模式为VMware1;内网接口ens36为20.0.0.100,虚拟机网络模式为VMware1;
②外网客户端配置
#检查光盘是否挂载、yum源,关闭防火墙、修改网卡IP、重启网络服务
[root@localhost ~]# df
文件系统                   1K-块    已用     可用 已用% 挂载点
devtmpfs                 1913548       0  1913548    0% /dev
tmpfs                    1930624       0  1930624    0% /dev/shm
tmpfs                    1930624   20948  1909676    2% /run
tmpfs                    1930624       0  1930624    0% /sys/fs/cgroup
/dev/mapper/centos-root 38815216 4594580 34220636   12% /
/dev/mapper/centos-home 18950144   33108 18917036    1% /home
/dev/sda1                1038336  191084   847252   19% /boot
tmpfs                     386128      20   386108    1% /run/user/0
/dev/sr0                 4635056 4635056        0  100% /run/media/root/CentOS 7 x86_64
[root@localhost ~]# cd /etc/yum.repos.d/
[root@localhost yum.repos.d]# ls
1.txt  abc  local.repo  repo.bak
[root@localhost yum.repos.d]# mount /dev/sr0 /mnt
mount: /dev/sr0 写保护,将以只读方式挂载
[root@localhost ~]# setenforce 0
[root@localhost ~]# systemctl stop firewalld.service
[root@localhost ~]# ifconfig
ens33: flags=4163<UP,BROADCAST,RUNNING,MULTICAST>  mtu 1500
        inet 192.168.170.101  netmask 255.255.255.0  broadcast 192.168.170.255
        inet6 fe80::350e:a1d9:ebac:b0c8  prefixlen 64  scopeid 0x20<link>
        ether 00:0c:29:88:0d:40  txqueuelen 1000  (Ethernet)
        RX packets 1338  bytes 1679078 (1.6 MiB)
        RX errors 0  dropped 0  overruns 0  frame 0
        TX packets 547  bytes 44616 (43.5 KiB)
        TX errors 0  dropped 0 overruns 0  carrier 0  collisions 0

lo: flags=73<UP,LOOPBACK,RUNNING>  mtu 65536
        inet 127.0.0.1  netmask 255.0.0.0
        inet6 ::1  prefixlen 128  scopeid 0x10<host>
        loop  txqueuelen 1000  (Local Loopback)
        RX packets 150  bytes 12844 (12.5 KiB)
        RX errors 0  dropped 0  overruns 0  frame 0
        TX packets 150  bytes 12844 (12.5 KiB)
        TX errors 0  dropped 0 overruns 0  carrier 0  collisions 0

virbr0: flags=4099<UP,BROADCAST,MULTICAST>  mtu 1500
        inet 192.168.122.1  netmask 255.255.255.0  broadcast 192.168.122.255
        ether 52:54:00:6b:12:f5  txqueuelen 1000  (Ethernet)
        RX packets 0  bytes 0 (0.0 B)
        RX errors 0  dropped 0  overruns 0  frame 0
        TX packets 0  bytes 0 (0.0 B)
        TX errors 0  dropped 0 overruns 0  carrier 0  collisions 0
[root@localhost ~]# vim /etc/sysconfig/network-scripts/ifcfg-ens33
                         16 IPADDR=12.0.0.100
                         17 NETMASK=255.255.255.0
                         18 GATEWAY=12.0.0.30
[root@localhost ~]# systemctl restart network
[root@localhost ~]# ifconfig
ens33: flags=4163<UP,BROADCAST,RUNNING,MULTICAST>  mtu 1500
        inet 12.0.0.100  netmask 255.255.255.0  broadcast 12.0.0.255
        inet6 fe80::350e:a1d9:ebac:b0c8  prefixlen 64  scopeid 0x20<link>
        ether 00:0c:29:88:0d:40  txqueuelen 1000  (Ethernet)
        RX packets 1340  bytes 1679248 (1.6 MiB)
        RX errors 0  dropped 0  overruns 0  frame 0
        TX packets 576  bytes 48774 (47.6 KiB)
        TX errors 0  dropped 0 overruns 0  carrier 0  collisions 0
lo: flags=73<UP,LOOPBACK,RUNNING>  mtu 65536
        inet 127.0.0.1  netmask 255.0.0.0
        inet6 ::1  prefixlen 128  scopeid 0x10<host>
        loop  txqueuelen 1000  (Local Loopback)
        RX packets 182  bytes 15548 (15.1 KiB)
        RX errors 0  dropped 0  overruns 0  frame 0
        TX packets 182  bytes 15548 (15.1 KiB)
        TX errors 0  dropped 0 overruns 0  carrier 0  collisions 0
virbr0: flags=4099<UP,BROADCAST,MULTICAST>  mtu 1500
        inet 192.168.122.1  netmask 255.255.255.0  broadcast 192.168.122.255
        ether 52:54:00:6b:12:f5  txqueuelen 1000  (Ethernet)
        RX packets 0  bytes 0 (0.0 B)
        RX errors 0  dropped 0  overruns 0  frame 0
        TX packets 0  bytes 0 (0.0 B)
        TX errors 0  dropped 0 overruns 0  carrier 0  collisions 0
③内网web服务器配置
#初始化设置
[root@pyx ~]# vim /etc/selinux/config
[root@pyx ~]# systemctl stop firewalld.service
[root@pyx ~]# systemctl disable firewalld.service
Removed symlink /etc/systemd/system/multi-user.target.wants/firewalld.service.
Removed symlink /etc/systemd/system/dbus-org.fedoraproject.FirewallD1.service.
[root@pyx ~]# setenforce 0
[root@pyx ~]# ls /etc/yum.repos.d/
local.repo   repo.bak
[root@pyx ~]# mount /dev/sr0 /mnt/
mount: /dev/sr0 写保护,将以只读方式挂载
[root@pyx ~]# vim /etc/sysconfig/network-scripts/ifcfg-ens33
                     16 IPADDR=20.0.0.110
                     17 NETMASK=255.255.255.0
                     18 GATEWAY=20.0.0.100
[root@pyx ~]# systemctl restart network
[root@pyx ~]# ifconfig
ens33: flags=4163<UP,BROADCAST,RUNNING,MULTICAST>  mtu 1500
        inet 20.0.0.110  netmask 255.255.255.0  broadcast 20.0.0.255
        inet6 fe80::bfac:aee:9cc8:2cb9  prefixlen 64  scopeid 0x20<link>
        ether 00:0c:29:56:3a:2a  txqueuelen 1000  (Ethernet)
        RX packets 353  bytes 37467 (36.5 KiB)
        RX errors 0  dropped 0  overruns 0  frame 0
        TX packets 467  bytes 39216 (38.2 KiB)
        TX errors 0  dropped 0 overruns 0  carrier 0  collisions 0
-------------------------------------------------------------------------------------------
#安装apache
[root@pyx ~]# yum install -y httpd
[root@pyx ~]# systemctl start httpd
[root@pyx ~]# systemctl enable httpd
Created symlink from /etc/systemd/system/multi-user.target.wants/httpd.service to /usr/lib/systemd/system/httpd.service.
④网关服务器兼DNS服务器配置
#初始化设置
[root@pyx ~]# mount /dev/sr0 /mnt
mount: /dev/sr0 写保护,将以只读方式挂载
[root@pyx ~]# df
文件系统                       1K-块    已用     可用 已用% 挂载点
devtmpfs                     1913628       0  1913628    0% /dev
tmpfs                        1930648       0  1930648    0% /dev/shm
tmpfs                        1930648   12768  1917880    1% /run
tmpfs                        1930648       0  1930648    0% /sys/fs/cgroup
/dev/mapper/centos_pyx-root 36805060 4553768 32251292   13% /
/dev/sda1                    1038336  189024   849312   19% /boot
tmpfs                         386132      28   386104    1% /run/user/0
/dev/sr0                     4600876 4600876        0  100% /mnt
[root@pyx ~]# systemctl stop firewalld.service
[root@pyx ~]# setenforce 0
[root@pyx ~]# cd /etc/sysconfig/network-scripts/
[root@pyx network-scripts]# ls
ifcfg-ens33  ifdown-ippp    ifdown-sit       ifup-bnep  ifup-plip    ifup-Team          network-functions-ipv6
ifcfg-lo     ifdown-ipv6    ifdown-Team      ifup-eth   ifup-plusb   ifup-TeamPort
ifdown       ifdown-isdn    ifdown-TeamPort  ifup-ib    ifup-post    ifup-tunnel
ifdown-bnep  ifdown-post    ifdown-tunnel    ifup-ippp  ifup-ppp     ifup-wireless
ifdown-eth   ifdown-ppp     ifup             ifup-ipv6  ifup-routes  init.ipv6-global
ifdown-ib    ifdown-routes  ifup-aliases     ifup-isdn  ifup-sit     network-functions
[root@pyx network-scripts]# vim ifcfg-ens33
                                 16 IPADDR=12.0.0.30
                                 17 NETMASK=255.255.255.0
                                 18 #GATEWAY=192.168.170.2
                                 19 #DNS1=192.168.170.2
[root@pyx network-scripts]# cp ifcfg-ens33 ifcfg-ens36
[root@pyx network-scripts]# vim ifcfg-ens36
                                 12 NAME=ens36
                                 13 #UUID=7ee63edb-3a12-4599-97b5-e8662b6ca823
                                 14 DEVICE=ens36
                                 16 IPADDR=20.0.0.100
                                 17 NETMASK=255.255.255.0
                                 18 #GATEWAY=192.168.170.2
                                 19 #DNS1=192.168.170.2
[root@pyx network-scripts]# systemctl restart network
[root@pyx network-scripts]# ifconfig
ens33: flags=4163<UP,BROADCAST,RUNNING,MULTICAST>  mtu 1500
        inet 12.0.0.30  netmask 255.255.255.0  broadcast 12.0.0.255
        inet6 fe80::bfac:aee:9cc8:2cb9  prefixlen 64  scopeid 0x20<link>
        ether 00:0c:29:54:df:3c  txqueuelen 1000  (Ethernet)
        RX packets 230  bytes 26692 (26.0 KiB)
        RX errors 0  dropped 0  overruns 0  frame 0
        TX packets 410  bytes 31925 (31.1 KiB)
        TX errors 0  dropped 0 overruns 0  carrier 0  collisions 0
ens36: flags=4163<UP,BROADCAST,RUNNING,MULTICAST>  mtu 1500
        inet 20.0.0.100  netmask 255.255.255.0  broadcast 20.0.0.255
        inet6 fe80::1a31:23db:407e:1523  prefixlen 64  scopeid 0x20<link>
        ether 00:0c:29:54:df:46  txqueuelen 1000  (Ethernet)
        RX packets 131  bytes 10284 (10.0 KiB)
        RX errors 0  dropped 0  overruns 0  frame 0
        TX packets 210  bytes 33446 (32.6 KiB)
        TX errors 0  dropped 0 overruns 0  carrier 0  collisions 0
lo: flags=73<UP,LOOPBACK,RUNNING>  mtu 65536
        inet 127.0.0.1  netmask 255.0.0.0
        inet6 ::1  prefixlen 128  scopeid 0x10<host>
        loop  txqueuelen 1000  (Local Loopback)
        RX packets 380  bytes 36108 (35.2 KiB)
        RX errors 0  dropped 0  overruns 0  frame 0
        TX packets 380  bytes 36108 (35.2 KiB)
        TX errors 0  dropped 0 overruns 0  carrier 0  collisions 0
virbr0: flags=4099<UP,BROADCAST,MULTICAST>  mtu 1500
        inet 192.168.122.1  netmask 255.255.255.0  broadcast 192.168.122.255
        ether 52:54:00:9a:4c:a2  txqueuelen 1000  (Ethernet)
        RX packets 0  bytes 0 (0.0 B)
        RX errors 0  dropped 0  overruns 0  frame 0
        TX packets 0  bytes 0 (0.0 B)
        TX errors 0  dropped 0 overruns 0  carrier 0  collisions 0
[root@pyx network-scripts]# ping 20.0.0.110
PING 20.0.0.110 (20.0.0.110) 56(84) bytes of data.
64 bytes from 20.0.0.110: icmp_seq=1 ttl=64 time=0.739 ms
64 bytes from 20.0.0.110: icmp_seq=2 ttl=64 time=0.207 ms
^C
--- 20.0.0.110 ping statistics ---
2 packets transmitted, 2 received, 0% packet loss, time 999ms
rtt min/avg/max/mdev = 0.207/0.473/0.739/0.266 ms
[root@pyx network-scripts]# ping 12.0.0.100
PING 12.0.0.100 (12.0.0.100) 56(84) bytes of data.
64 bytes from 12.0.0.100: icmp_seq=1 ttl=64 time=0.452 ms
64 bytes from 12.0.0.100: icmp_seq=2 ttl=64 time=0.213 ms
^C
--- 12.0.0.100 ping statistics ---
2 packets transmitted, 2 received, 0% packet loss, time 999ms
rtt min/avg/max/mdev = 0.213/0.332/0.452/0.120 ms
----------------------------------------------------------------------------------------
#开启路由功能
[root@pyx network-scripts]# vim /etc/sysctl.conf
                                添加:net.ipv4.ip_forward = 1
[root@pyx network-scripts]# sysctl -p               #开启路由转发
net.ipv4.ip_forward = 1

----------------------------------------------------------------------------------------
#安装bind程序,配置DNS服务文件
[root@pyx network-scripts]# yum install -y bind
[root@pyx network-scripts]# vim /etc/named.conf
                                13  listen-on port 53 { any; };
                                21  allow-query     { any; };
[root@pyx network-scripts]# vim /etc/named.rfc1912.zones
                                12  zone "test.com" IN {
                                13  type master;
                                14  file "test.com.zone";
                                15  allow-update { none; };
                                16 };
[root@pyx network-scripts]# cd /var/named/
[root@pyx named]# ll
总用量 16
drwxrwx--- 2 named named    6 10月 13 2020 data
drwxrwx--- 2 named named    6 10月 13 2020 dynamic
-rw-r----- 1 root  named 2253 4月   5 2018 named.ca
-rw-r----- 1 root  named  152 12月 15 2009 named.empty
-rw-r----- 1 root  named  152 6月  21 2007 named.localhost
-rw-r----- 1 root  named  168 12月 15 2009 named.loopback
drwxrwx--- 2 named named    6 10月 13 2020 slaves
[root@pyx named]# cp -p named.localhost test.com.zone
[root@pyx named]# vim test.com.zone
                      9         A       12.0.0.30
                     10 www IN  A       12.0.0.30
[root@pyx named]# systemctl restart named
[root@pyx named]# systemctl enable named
Created symlink from /etc/systemd/system/multi-user.target.wants/named.service to /usr/lib/systemd/system/named.service.
----------------------------------------------------------------------------------------
#安装iptables-service,配置iptables规则
[root@pyx named]# yum install -y iptables-services.x86_64
[root@pyx named]# systemctl start iptables.service
[root@pyx named]# systemctl enable iptables.service
Created symlink from /etc/systemd/system/basic.target.wants/iptables.service to /usr/lib/systemd/system/iptables.service.
[root@pyx named]# iptables -nL
Chain INPUT (policy ACCEPT)
target     prot opt source               destination
ACCEPT     all  --  0.0.0.0/0            0.0.0.0/0            state RELATED,ESTABLISHED
ACCEPT     icmp --  0.0.0.0/0            0.0.0.0/0
ACCEPT     all  --  0.0.0.0/0            0.0.0.0/0
ACCEPT     tcp  --  0.0.0.0/0            0.0.0.0/0            state NEW tcp dpt:22
REJECT     all  --  0.0.0.0/0            0.0.0.0/0            reject-with icmp-host-prohibited

Chain FORWARD (policy ACCEPT)
target     prot opt source               destination
REJECT     all  --  0.0.0.0/0            0.0.0.0/0            reject-with icmp-host-prohibited

Chain OUTPUT (policy ACCEPT)
target     prot opt source               destination
[root@pyx named]# iptables -F
[root@pyx named]# iptables -t nat -A PREROUTING -i ens33 -d 12.0.0.30 -p tcp --dport 80 -j DNAT --to 20.0.0.110:80
[root@pyx named]# iptables -nL
Chain INPUT (policy ACCEPT)
target     prot opt source               destination

Chain FORWARD (policy ACCEPT)
target     prot opt source               destination

Chain OUTPUT (policy ACCEPT)
target     prot opt source               destination
[root@pyx named]# iptables -nL -t nat
Chain PREROUTING (policy ACCEPT)
target     prot opt source               destination
DNAT       tcp  --  0.0.0.0/0            12.0.0.30            tcp dpt:80 to:20.0.0.110:80

Chain INPUT (policy ACCEPT)
target     prot opt source               destination

Chain OUTPUT (policy ACCEPT)
target     prot opt source               destination

Chain POSTROUTING (policy ACCEPT)
target     prot opt source               destination
⑤我们想通过外网客户端12.0.0.100进行域名解析访问到内网web服务器20.0.0.110,这里在客户端添加DNS服务器的配置信息,验证能否正常解析
[root@localhost ~]# vim /etc/resolv.conf
                        # Generated by NetworkManager
                        nameserver 12.0.0.30
[root@localhost ~]# nslookup www.test.com
Server:		12.0.0.30
Address:	12.0.0.30#53
Name:	www.test.com
Address: 12.0.0.30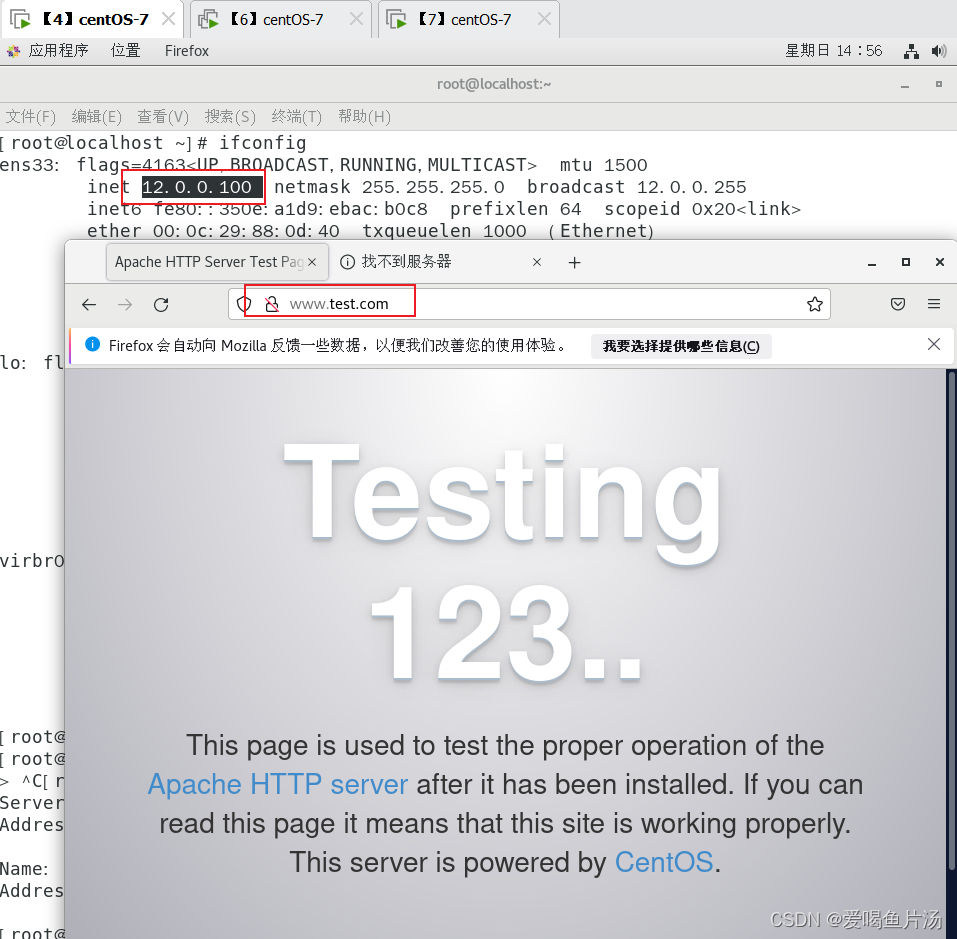
⑥想要实现外网客户机访问网关服务器的外网接口ssh 12.0.0.0.30:2345,访问到内网的web服务器,ssh 20.0.0.110:22
#网关服务器端操作
[root@pyx ~]# iptables -t nat -A PREROUTING -i ens33 -d 12.0.0.30 -p tcp --dport 2345 -j DNAT --to 20.0.0.110:22   #外网客户端只要从12.0.0.30 的2345号端口入站,都会通过被网关服务器转发,地址解析成20.0.0.110的22号端口
[root@pyx ~]# iptables -t nat -nL
Chain PREROUTING (policy ACCEPT)
target     prot opt source               destination
DNAT       tcp  --  0.0.0.0/0            12.0.0.30            tcp dpt:2345 to:20.0.0.110:22
Chain INPUT (policy ACCEPT)
target     prot opt source               destination
Chain OUTPUT (policy ACCEPT)
target     prot opt source               destination
Chain POSTROUTING (policy ACCEPT)
target     prot opt source               destination

------------------------------------------------------------------------------------------
#外网客户端的操作,远程登录
[root@localhost ~]# ssh -p 2345 12.0.0.30
The authenticity of host '[12.0.0.30]:2345 ([12.0.0.30]:2345)' can't be established.
ECDSA key fingerprint is SHA256:oyNrIfYpNhBAdz2hRtpPU0QgNrJ+tnU/4Zq3YzSJi+4.
ECDSA key fingerprint is MD5:aa:f2:97:c7:b7:1c:95:3e:fd:65:14:41:0c:9a:3f:fe.
Are you sure you want to continue connecting (yes/no)? yes
Warning: Permanently added '[12.0.0.30]:2345' (ECDSA) to the list of known hosts.
root@12.0.0.30's password:
Last login: Sun May  5 21:57:14 2024
[root@pyx ~]# ipc
ipcalc  ipcmk   ipcrm   ipcs
[root@pyx ~]# ipconfig
bash: ipconfig: 未找到命令...
[root@pyx ~]# ifconfig
ens33: flags=4163<UP,BROADCAST,RUNNING,MULTICAST>  mtu 1500
        inet 20.0.0.110  netmask 255.255.255.0  broadcast 20.0.0.255
        inet6 fe80::bfac:aee:9cc8:2cb9  prefixlen 64  scopeid 0x20<link>
        ether 00:0c:29:56:3a:2a  txqueuelen 1000  (Ethernet)
        RX packets 701  bytes 76004 (74.2 KiB)
        RX errors 0  dropped 0  overruns 0  frame 0
        TX packets 662  bytes 98636 (96.3 KiB)
        TX errors 0  dropped 0 overruns 0  carrier 0  collisions 0
⑦抓包验证
#借助远程终端连接内网web端(20.0.0.100),开启监听抓包
pyx ~]# tcpdump -i ens33 -s 0 -w ./test1.cap   #指定监听的网卡,保存抓包的文件为test1.cap

#外网客户端ping网关地址
ot@localhost ~]# ping 12.0.0.30
PING 12.0.0.30 (12.0.0.30) 56(84) bytes of data.
64 bytes from 12.0.0.30: icmp_seq=1 ttl=64 time=0.329 ms
64 bytes from 12.0.0.30: icmp_seq=2 ttl=64 time=0.580 ms
64 bytes from 12.0.0.30: icmp_seq=3 ttl=64 time=0.213 ms
^C
--- 12.0.0.30 ping statistics ---
3 packets transmitted, 3 received, 0% packet loss, time 1999ms
rtt min/avg/max/mdev = 0.213/0.374/0.580/0.153 ms

#外网web端退出监听,保存文件到本地
[root@pyx ~]#
^C
[root@pyx ~]# sz test1.cap 
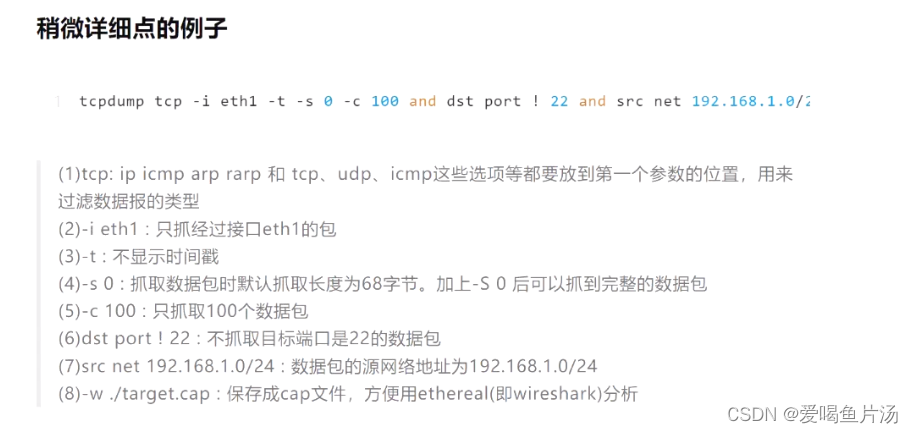
3)补充tcpdump抓包工具用法
监听特定网卡 tcpdump -i ens32
监听特定主机 tcpdump host 192.168.170.10
监听特定主机名来源的数据包 tcpdump src host hostname
监听特定主机名为目标的数据包 tcpdump dst host hostname
监听特定主机名所有的数据包 tcpdump host hostname
监听特定端口 tcpdump port XX
监听指定协议TCP/UDP tcpdump tcp/udp/icmp
监听来源主机XX在端口XX上的TCP/UDP数据包 tcpdump tcp port 22 and src host 12.0.0.10
监听特定主机之间的通信 tcpdump ip host 192.168.117.10 and 210.10.10.10
抓包文件的保存 tcp 协议 port 端口 [src/dst] net 网段 -i 网卡 -s 0 -w XXX.cap; sz test1.cap(这一步只能在远程终端实现)


 615
615


 被折叠的 条评论
为什么被折叠?
被折叠的 条评论
为什么被折叠?
 到【灌水乐园】发言


