


目录
5、Haproxy的3种实现会话保持的方法(实验最后有详细介绍)
8.验证登录haproxy定义的监控页面,查看nginx前端后端的状态统计情况
一、haproxy相关概念
1、常见的Web集群调度器
• 软件类型:通常使用开源的LVS、Haproxy、Nginx
• 硬件类型:一般使用比较多的是 F5 (用的最多的国际品牌)、Array,也有很多人使用国内的一些产品,如梭子鱼、绿盟、浪潮等。
2、Haproxy应用分析(了解)
硬件调度器性能最好、功能最多、成本最高,维护升级每年都需要买维保服务,所以一般中小型企业会采用软件型web集群调度器。LVS在企业应用中抗负载能力很强,因为它是基于内核实现的,性能最好,但存在不足:LVS不支持正则处理,不能实现动静分离;对于大型网站,LVS的实施配置复杂,维护成本相对较高。Haproxy是一款可提供高可用性、负载均衡、及基于TCP和HTTP应用的代理的软件,支持正则处理,且拥有丰富的健康检查方案,适用于负载大的Web站点,运行在硬件上可支持数以万计的并发连接的连接请求。Nginx 的 upstream模块支持群集功能,但是对群集节点健康检查功能不强,高并发性能没有 Haproxy 好。
| 调度器类型 | 优点 | 缺点 |
| Nginx | ●工作在网络的7层之上,可以针对http应用做一些分流的策略,比如针对域名、目录结构。Nginx正则规则比HAProxy更为强大和灵活。 ●Nginx对网络稳定性的依赖非常小,理论上能ping通就就能进行负载功能,LVS对网络稳定性依赖比较大,稳定要求相对更高。 ●Nginx安装和配置、测试比较简单、方便,有清晰的日志用于排查和管理,LVS的配置、测试就要花比较长的时间了。 ●可以承担高负载压力且稳定,一般能支撑几万次的并发量,负载度比LVS相对小些。(一般3万以内的并发量可以选择nginx做负载均衡) ●Nginx可以通过端口检测到服务器内部的故障,比如根据服务器处理网页返回的状态码、超时等等。但需要通过第三方插件实现 ●Nginx不仅仅是一款优秀的负载均衡器/反向代理软件,它同时也是功能强大的Web应用服务器。 ●Nginx作为Web正向加速缓存越来越成熟了,速度比传统的Squid服务器更快,很多场景下都将其作为向代理加速器。 ●Nginx作为静态网页和图片服务器,这方面的性能非常优秀,同时第三方模块也很多。 | ●Nginx仅能支持http、https和Email协议,这样就在适用范围上面小些。 ●对后端服务器的健康检查,只支持通过端口来检测(被动),不支持通过url来检测。如果想主动发送url请求需要通过第三方插件实现 ●不支持Session的直接保持,需要通过ip_hash和cookie的引导来解决。 |
| LVS | ●抗负载能力强、是工作在网络4层之上仅作分发之用,没有流量的产生。因此负载均衡软件里的性能最强的,对内存和cpu资源消耗比较低。(一般5-10万的并发量可以选择LVS做负载均衡) ●LVS工作稳定,因为其本身抗负载能力很强,自身有完整的双机热备方案。 ●无流量,LVS只分发请求,而流量并不从它本身出去,这点保证了均衡器IO的性能不会收到大流量的影响。 ●应用范围较广,因为LVS工作在4层,所以它几乎可对所有应用做负载均衡,包括http、数据库等。 | ●软件本身不支持正则表达式处理,不能做动静分离。相对来说,Nginx/HAProxy+Keepalived则具有明显的优势。 ●如果是网站应用比较庞大的话,LVS/DR+Keepalived实施起来就比较复杂了。相对来说,Nginx/HAProxy+Keepalived就简单多了。 |
| HAProxy | ●HAProxy也是支持虚拟主机的。 (一般3-5万的并发量可以选择HAProxy做负载均衡) |
3、LVS、Nginx、HAProxy的区别?
| 负载均衡转发性能 | 硬件负载均衡 F5 > LVS 最好 >HAProxy 其次 > Nginx 弱于其它两款 |
| 支持的代理类型 | LVS 是基于iinux内核实现的软负载均衡,只支持四层代理转发,且不支持正则表达式处理,不能做动静分离; Nginx、HAProxy都是基于应用层实现的软负载均衡,都支持四层和七层代理转发,且也支持正则表达式处理,能做动静分离。 |
| 配置维护 | LVS实施配置复杂,维护成本相对较高; Nginx、HAProxy 配置简单,维护成本较低。 |
| 健康检查 | LVS可以配合Keepalived实现高可用,以及实现TCP端口或HTTP URL方式的健康检查; Nginx默认只文持被动方式的TCP端口健康检査,主动健康检査需要安装第三方模块nginx_upstream_ check_module后才能支持HAProxy默认就支持主动的TCP端口、HTTP URL、脚本等方式的健康检查. |
4、Haproxy的8种调度算法
| roundrobin | 轮询 |
| static-rr | 加权轮询 |
| leastconn | 最小连接 |
| source | 根据源地址做哈希(但容易导致负载失衡的问题) |
| uri | 根据请求的URI地址做哈希缓存调度 |
| url_param | 根据请求的URL路径里传递的参数做哈希缓存调度 |
| hdr(NAME ) | 根据请求头的字段做哈希缓存调度 |
| rdp-cookie(NAME) | 根据cookie里的字段做哈希缓存调度 |
5、Haproxy的3种实现会话保持的方法(实验最后有详细介绍)
1、源地址hash
2、设置cookie
3、会话粘性表stick-table
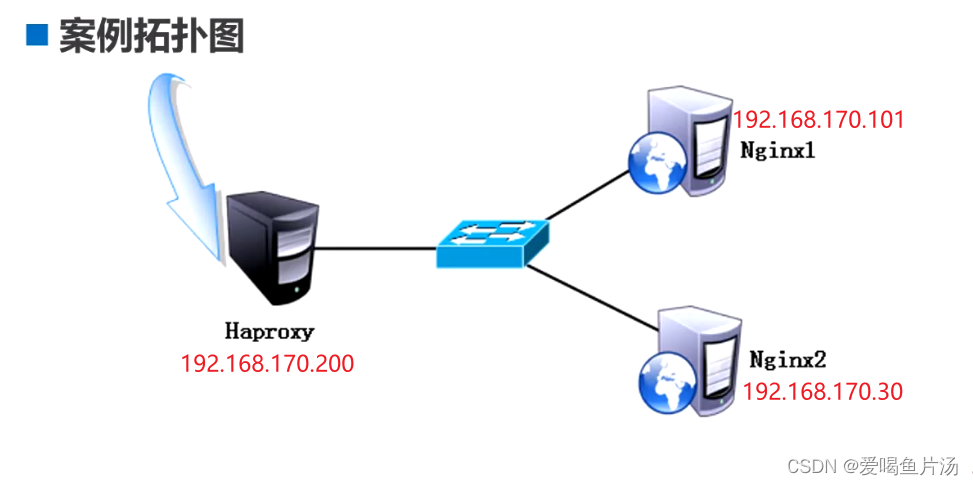
二、HAProxy搭建web群集
Linux系统自带haproxy安装包,但版本较低,这里我安装官网下载的版本haproxy-2.8.9.tar.gz,源码编译安装。HAProxy - The Reliable, High Perf. TCP/HTTP Load BalancerReliable, High Performance TCP/HTTP Load Balancer![]() https://www.haproxy.org/#down
https://www.haproxy.org/#down

1.haproxy服务器初始化操作
[root@haproxy ~]# systemctl stop firewalld
[root@haproxy ~]# setenforce 0
[root@haproxy ~]# vim /etc/selinux/config
2.上传解压haproxy软件包,源码编译安装
#安装依赖包
[root@haproxy ~]# yum install -y gcc gcc-c++ make zlib-devel pcre-devel openssl-devel systemd-devel

#创建程序用户
[root@haproxy ~]# useradd -M -s /sbin/nologin haproxy

#上传软件包并解压,目录中没有.configure文件,不需要编译,但需要安装依赖包
[root@haproxy ~]# cd /opt/
[root@haproxy opt]# rz -e
[root@haproxy opt]# ls
haproxy-2.8.9.tar.gz
[root@haproxy opt]# ls
haproxy-2.8.9.tar.gz
[root@haproxy opt]# tar xf haproxy-2.8.9.tar.gz
[root@haproxy opt]# cd haproxy-2.8.9/
[root@haproxy haproxy-2.8.9]# ls
addons  BRANCHES     CHANGELOG     dev  examples  INSTALL  MAINTAINERS  README     scripts  SUBVERS  VERDATE
admin   BSDmakefile  CONTRIBUTING  doc  include   LICENSE  Makefile     reg-tests  src      tests    VERSION

#查看架构,我的是x86
[root@haproxy haproxy-2.8.9]# hostnamectl
   Static hostname: centOS2
Transient hostname: haproxy
         Icon name: computer-vm
           Chassis: vm
        Machine ID: 40ea032a5a634d6094076ee726a6725a
           Boot ID: 90399e50320b478fb90d0631d72b6c49
    Virtualization: vmware
  Operating System: CentOS Linux 7 (Core)
       CPE OS Name: cpe:/o:centos:centos:7
            Kernel: Linux 3.10.0-1160.el7.x86_64
      Architecture: x86-64

#编译安装(添加了一些模块),指定安装目录
[root@haproxy haproxy-2.8.9]# make ARCH=x86_64 TARGET=linux-glibc USE_PCRE=1 USE_OPENSSL=1 USE_ZLIB=1 USE_SYSTEMD=1
[root@haproxy haproxy-2.8.9]# make install PREFIX=/usr/local/haproxy
#修改haproxy.init启动脚本的内容,并且能看到haproxy启动脚本中定义了配置文件的位置,复制启动脚本到etc目录中
[root@haproxy haproxy-2.8.9]# cd examples/
[root@haproxy examples]# vim haproxy.init
[root@haproxy examples]# cp haproxy.init /etc/init.d/haproxy
[root@haproxy examples]# cd /etc/init.d/
[root@haproxy init.d]# ll
总用量 44
-rw-r--r--. 1 root root 18281 5月  22 2020 functions
-rw-r--r--. 1 root root  2382 6月  13 16:39 haproxy
-rwxr-xr-x. 1 root root  4569 5月  22 2020 netconsole
-rwxr-xr-x. 1 root root  7928 5月  22 2020 network
-rw-r--r--. 1 root root  1160 12月  7 2023 README
[root@haproxy init.d]# chmod +x haproxy

#找到配置文件quick-test.cfg,复制到/etc/haproxy目录
[root@haproxy init.d]# cd /opt/haproxy-2.8.9/examples/
[root@haproxy examples]# ls
basic-config-edge.cfg  errorfiles    lua                    quick-test.cfg  transparent_proxy.cfg
content-sw-sample.cfg  haproxy.init  option-http_proxy.cfg  socks4.cfg      wurfl-example.cfg
[root@haproxy examples]# mkdir /etc/haproxy
[root@haproxy examples]# cp quick-test.cfg /etc/haproxy/haproxy.cfg
[root@haproxy examples]# vim /etc/haproxy/haproxy.cfg
                         23    bind :8000  #默认端口号为8000
#软链接程序文件到/usr/sbin中,让其可执行
[root@haproxy examples]# cd /usr/local/haproxy/sbin/
[root@haproxy sbin]# ls
haproxy
[root@haproxy sbin]# ln -s /usr/local/haproxy/sbin/haproxy /usr/sbin/
#查看版本号
[root@haproxy sbin]# haproxy -v
HAProxy version 2.8.9-1842fd0 2024/04/05 - https://haproxy.org/
Status: long-term supported branch - will stop receiving fixes around Q2 2028.
Known bugs: http://www.haproxy.org/bugs/bugs-2.8.9.html
Running on: Linux 3.10.0-1160.el7.x86_64 #1 SMP Mon Oct 19 16:18:59 UTC 2020 x86_64
[root@haproxy sbin]# cd /etc/init.d/

#查看是否开机自启,开启开机自启
[root@haproxy init.d]# chkconfig --add haproxy
[root@haproxy init.d]# chkconfig --list haproxy
注:该输出结果只显示 SysV 服务,并不包含
原生 systemd 服务。SysV 配置数据
可能被原生 systemd 配置覆盖。
      要列出 systemd 服务,请执行 'systemctl list-unit-files'。
      查看在具体 target 启用的服务请执行
      'systemctl list-dependencies [target]'。
haproxy        	0:关	1:关	2:关	3:关	4:关	5:关	6:关
[root@haproxy init.d]# chkconfig --level 35 haproxy on
[root@haproxy init.d]# chkconfig --list haproxy
注:该输出结果只显示 SysV 服务,并不包含
原生 systemd 服务。SysV 配置数据
可能被原生 systemd 配置覆盖。
      要列出 systemd 服务,请执行 'systemctl list-unit-files'。
      查看在具体 target 启用的服务请执行
      'systemctl list-dependencies [target]'。
haproxy        	0:关	1:关	2:关	3:开	4:关	5:开	6:关

#启动haproxy服务,netstat查看开启状态
[root@haproxy init.d]# service haproxy start
Starting haproxy (via systemctl):                          [  确定  ]
[root@haproxy init.d]# netstat -lntp | grep 8000
tcp        0      0 0.0.0.0:8000            0.0.0.0:*               LISTEN      8755/haproxy
3.haproxy服务器配置优化
HAProxy 的配置文件共有 5 个域
注意:HAProxy 既能通过配置frontend和backend实现前后端配置分离,方便管理建议分离配置;也能通过listen配置将前后端配置结合在一起。
| global | 用于配置全局参数 |
| default | 用于配置所有frontend和backend的默认属性 |
| frontend | 用于配置前端服务(即HAProxy自身提供的服务,比如监听端口号等)实例 |
| backend | 用于配置后端服务(即HAProxy后面接的服务,比如节点服务器ip地址、端口号、健康检查方式等)实例组 |
| listen | frontend + backend的组合配置,可以理解成更简洁的配置方法,frontend域和backend域中所有的配置都可以配置在listen域下 |
配置优化文件 vim /etc/haproxy/haproxy.cfg
global全局配置,主要用于定义全局参数,属于进程级的配置,通常和操作系统配置有关
defaults配置默认参数,这些参数可以被用到listen,frontend,backend组件 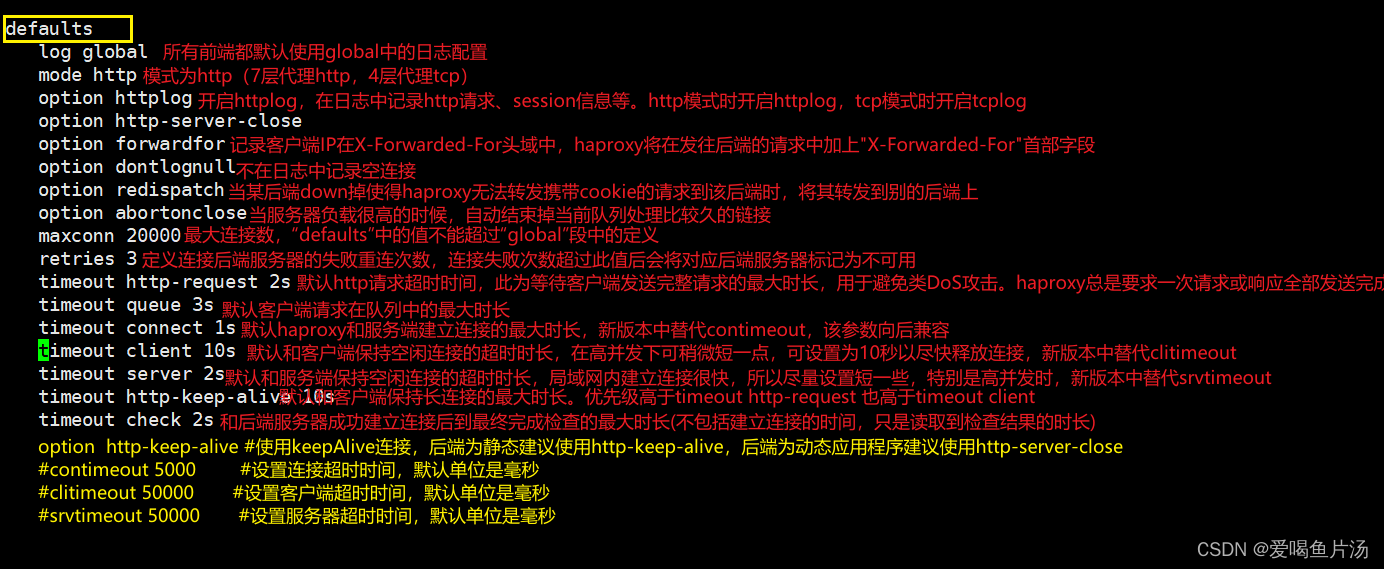
frontend http-in定义前端域

[root@haproxy init.d]# cd /etc/haproxy/
[root@haproxy haproxy]# vim haproxy.cfg
# Basic config mapping a listening IP:port to another host's IP:port with
# support for HTTP/1 and 2.
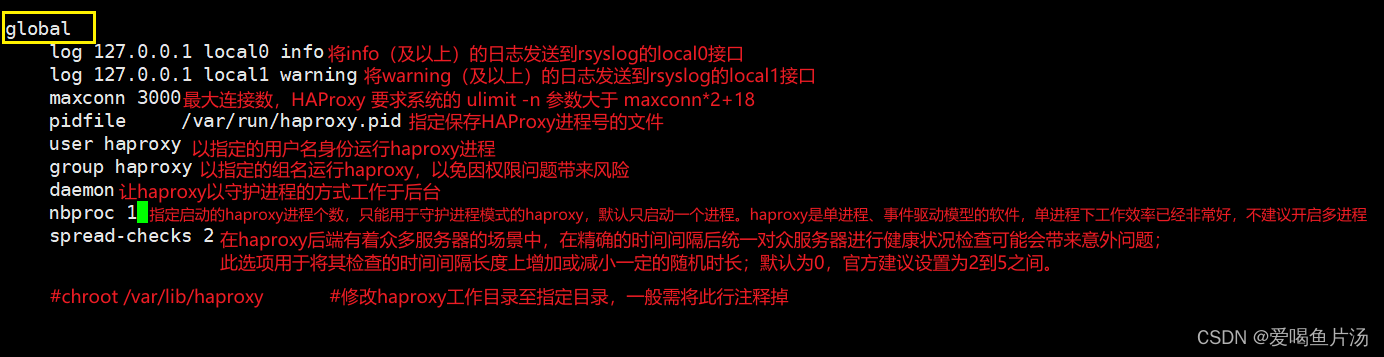
global #全局配置,主要用于定义全局参数,属于进程级的配置,通常和操作系统配置有关
#log指定本机地址定义不同的日志级别进行日志的排查
log 127.0.0.1 local0 info #将info及以上级别的日志发送到rsyslog的local0接口
log 127.0.0.1 local1 warning #将warning及以上级别的日志发送到rsyslog的local1接口
maxconn 30000 #最大连接数,HAProxy 要求系统的 ulimit -n 参数大于 maxconn*2+18
pidfile /var/run/haproxy.pid #指定保存HAProxy进程号的文件
user haproxy #以指定的用户名身份运行haproxy进程
group haproxy #以指定的组名运行haproxy,以免因权限问题带来风险
daemon #让haproxy以守护进程的方式工作于后台
#nbproc 1 #2.5版本之后就不在支持这个配置,线程数会自动调整
spread-checks 2 #用于将其检查的时间间隔长度上增加或减小一定的随机时长;默认为0,官方建议设置为2到5之间。
defaults #配置默认参数,这些参数可以被用到listen,frontend,backend组件
log global #所有前端都默认使用global中的日志配置
mode http #模式为http(7层代理http,4层代理tcp)
option httplog #开启httplog,在日志中记录http请求、session信息等。http模式时开启httplog,tcp模式时开启tcplog
option http-server-close #连接保持设置关闭
option forwardfor #是否记录原始客户端地址
option dontlognull #空连接不做记录
option redispatch #down机后可以转发给别的服务器
option abortonclose #高负载情况下可以断开连接比较久的连接
maxconn 20000 #最大连接数,默认20000
retries 3 #连接失败重试3次
timeout http-request 2s #http请求超时时间
timeout queue 3s #客户端请求在队列的最长时长
timeout connect 1s #默认haproxy和服务器建立连接的最大市场
timeout client 10s #默认和客户端保持空闲连接的超时时长
timeout server 2s #默认和服务端保持空闲连接的超时时长
timeout http-keep-alive 10s #默认和客户端保持长连接的最大市场,优先级高于timeout hettp-request
timeout check 2s #和后端服务器成功建立连接后到最终完成检查的最大时长
#手动配置前端请求http-xy101
frontend http-xy101
bind 192.168.170.200:80 #定义监听自己的ip地址192.168.170.200:80端口,指定为*或0.0.0.0时,将监听当前系统的所有IPv4地址
#maxconn 20000 #定义此端口上的maxconn,这个值如果不设置,默认使用上面的maxconn值
#定义ACL做动静分离
#80端口接收的请求会通过acl正则表达适配判断,如果请求的是以jsp结尾的路径则会转发给tomcat backend后端服务器处理,其他请求全部转发给nginx的backend后端服务器处理。
#acl url_static path_end -i .jpg .jpeg .gif .png .html .htm .txt .css .mp4 .mp3 #这是静态网页url
acl url_jsp path_end -i .jsp #这是动态页面的url
use_backend tomcat_backend if url_jsp #动态url使用tomcat-backend处理
default_backend nginx_backend #除了动态页面的都是静态url,使用静态nginx-backend处理
backend nginx_backend #后端nginx服务器
balance roundrobin #调度算法为轮询
option http-keep-alive #开启了长连接,每次访问完后需要的等一会才能切换到下一个请求
option httpchk GET /test.html #httpchk GET健康检查方式,看nginx服务器中是否有/test.html网页,如果有则探测成功返回2xx 3xx;如果没有则探测失败,返回4xx 5xx
#指定server实例1和2,,IP地址信息和端口号、最大连接数、2000毫秒做一次健康检查,连续检查2次做节点恢复,健康检查3次做隔离。
server nginx.inst1 192.168.170.101:80 maxconn 10000 check inter 2000 rise 2 fall 3
server nginx.inst2 192.168.170.30:80 maxconn 10000 check inter 2000 rise 2 fall 3
#server定义实例配置,注意名称不能重复
backend tomcat_backend
balance roundrobin
#option httpchk GET /test.html
#cookie HA_STICKY_dy insert indirect nocache #自己插入HA_STICKY_dy请求头,这里先关闭cookie能够实现轮询,如果开启会出现会话保持,固定在一台主机上面了。
server tomcat.inst1 192.168.170.101:8080 maxconn 10000 check inter 2000 rise 2 fall 3
server tomcat.inst2 192.168.170.30:8080 maxconn 10000 check inter 2000 rise 2 fall 3
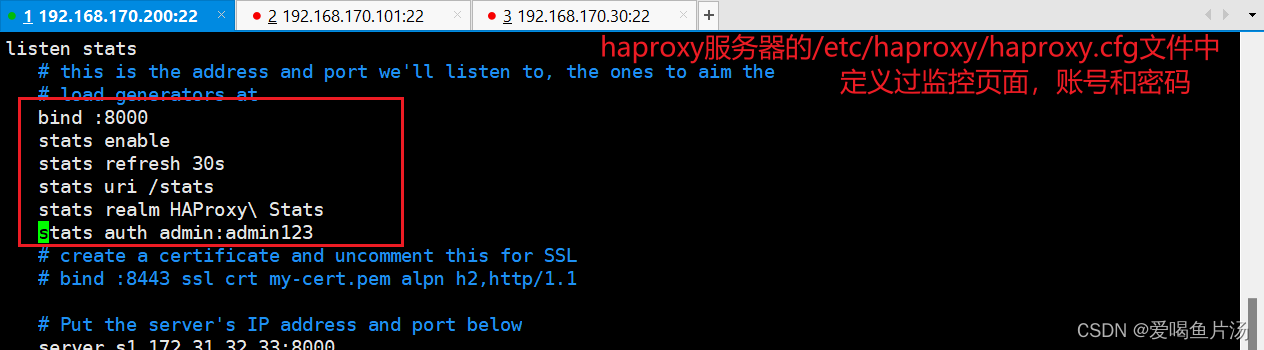
listen stats ##定义监控页面
# this is the address and port we'll listen to, the ones to aim the
# load generators at
bind :8000 #绑定端口
stats enable #启用统计报告监控
stats refresh 30s #每30秒更新监控数据
stats uri /stats #访问监控页面的uri
stats realm HAProxy\ Stats #监控页面的认证提示
stats auth admin:admin123 #监控页面的用户名和密码
# create a certificate and uncomment this for SSL
# bind :8443 ssl crt my-cert.pem alpn h2,http/1.1
# Put the server's IP address and port below
server s1 172.31.32.33:8000
#检查文件配置是否能够生效,重新启动haproxy服务
[root@haproxy haproxy]# haproxy -c -f haproxy.cfg
Configuration file is valid
[root@haproxy haproxy]# service haproxy restart
Restarting haproxy (via systemctl): [ 确定 ]
4.web服务器2台,安装配置nginx和tomcat
①初始化设置,上传软件包
#初始化设置
[root@web1 ~]# setenforce 0
[root@web1 ~]# systemctl stop firewalld
[root@web1 ~]# vim /etc/selinux/config

#上传nginx和tomcat软件包,并解压
[root@web1 ~]# cd /opt/
[root@web1 opt]# ls
rh
[root@web1 opt]# rm -rf rh/
[root@web1 opt]# rz -e
[root@web1 opt]# ls
apache-tomcat-9.0.16.tar.gz  nginx-1.24.0-1.el7.ngx.x86_64.rpm
②安装开启nginx服务并创建静态测试网页
#安装配置nginx,创建测试网页
[root@web1 opt]# rpm -ivh nginx-1.24.0-1.el7.ngx.x86_64.rpm
警告:nginx-1.24.0-1.el7.ngx.x86_64.rpm: 头V4 RSA/SHA256 Signature, 密钥 ID 7bd9bf62: NOKEY
准备中...                          ################################# [100%]
正在升级/安装...
   1:nginx-1:1.24.0-1.el7.ngx         ################################# [100%]
[root@web1 opt]# cd /usr/share/nginx/html/
[root@web1 html]# echo '<h1>this is test web1 page</h1>' > test.html
#重启nginx
[root@web1 html]# systemctl restart nginx
[root@web1 html]# systemctl enable nginx
Created symlink from /etc/systemd/system/multi-user.target.wants/nginx.service to /usr/lib/systemd/system/nginx.service.
验证:能正常访问nginx的测试页面


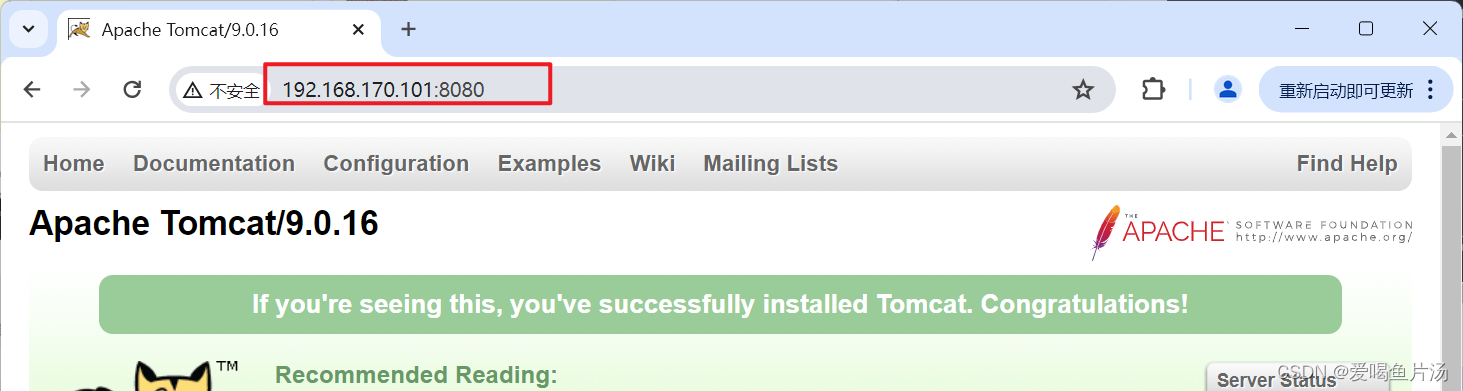
③安装tomcat,创建动态测试网页
#安装tomcat,创建测试页
[root@web1 html]# cd /opt/
[root@web1 opt]# ls
apache-tomcat-9.0.16.tar.gz  nginx-1.24.0-1.el7.ngx.x86_64.rpm
[root@web1 opt]# tar xf apache-tomcat-9.0.16.tar.gz
[root@web1 opt]# mv apache-tomcat-9.0.16 /usr/local/tomcat
[root@web1 opt]# cd /usr/local/
[root@web1 local]# ls
bin  etc  games  include  lib  lib64  libexec  sbin  share  src  tomcat
[root@web1 local]# cd tomcat/
[root@web1 tomcat]# ls
bin           conf             lib      logs    README.md      RUNNING.txt  webapps
BUILDING.txt  CONTRIBUTING.md  LICENSE  NOTICE  RELEASE-NOTES  temp         work
#启动
[root@web1 tomcat]# ./bin/startup.sh
Using CATALINA_BASE:   /usr/local/tomcat
Using CATALINA_HOME:   /usr/local/tomcat
Using CATALINA_TMPDIR: /usr/local/tomcat/temp
Using JRE_HOME:        /usr
Using CLASSPATH:       /usr/local/tomcat/bin/bootstrap.jar:/usr/local/tomcat/bin/tomcat-juli.jar
Tomcat started.
#检查是否安装java,确保能正常启动tomcat
[root@web1 tomcat]# java -version
openjdk version "1.8.0_332"
OpenJDK Runtime Environment (build 1.8.0_332-b09)
OpenJDK 64-Bit Server VM (build 25.332-b09, mixed mode)
[root@web1 tomcat]#
验证:能正常访问tomcat

#创建动态测试页面
[root@web2 tomcat]# cd webapps/ROOT/
[root@web2 ROOT]# ls
asf-logo-wide.svg  bg-middle.png  bg-upper.png  index.jsp          tomcat.css  tomcat.png        tomcat.svg
bg-button.png      bg-nav.png     favicon.ico   RELEASE-NOTES.txt  tomcat.gif  tomcat-power.gif  WEB-INF
[root@web2 ROOT]# vim test.jsp

验证:能够正常访问到tomcat的动态测试网页


5.验证haproxy负载均衡效果


haproxy通过配置七层代理实现动静分离效果
6.如果开启会话保持功能(cookie),静态页面可以正常轮询,但动态页面就不能正常轮询了


7.haproxy的日志输出
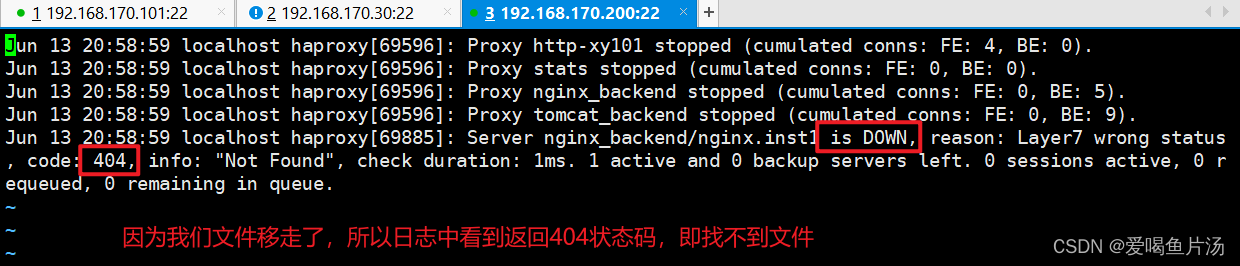
当我们移走web1服务器192.168.170.101的静态测试网页文件,会发现访问不到web1的html页面了,因为健康检查不会将请求转发到web1服务器,且会在日志中有所体现。
#web1服务器移走html文件
[root@web1 ROOT]# cd /usr/share/nginx/
[root@web1 nginx]# ls
html
[root@web1 nginx]# cd html/
[root@web1 html]# ls
50x.html  index.html  test.html
[root@web1 html]# mv test.html /opt/

#为 rsyslog 添加 haproxy 日志的配置
[root@haproxy rsyslog.d]# vim haproxy.conf
           $ModLoad imudp
           $UDPServerRun 514
           $FileCreateMode 0644         #日志文件的权限
           $FileOwner haproxy           #日志文件的owner
           local0.*     /var/log/haproxy/haproxy.log   #local0接口对应的日志输出文件
           local1.*     /var/log/haproxy/haproxy_warn.log   #local1接口对应的日志输出文件
[root@haproxy rsyslog.d]# mkdir /var/log/haproxy
#修改 rsyslog 的启动参数
[root@haproxy rsyslog.d]# vim /etc/sysconfig/rsyslog
                          SYSLOGD_OPTIONS="-c 2 -r -m 0"
#重启 rsyslog 和 HAProxy
[root@haproxy rsyslog.d]# service rsyslog restart
Redirecting to /bin/systemctl restart rsyslog.service
[root@haproxy rsyslog.d]# service haproxy restart
Restarting haproxy (via systemctl):                        [  确定  ]

#查看日志文件
[root@haproxy rsyslog.d]# cd /var/log/haproxy/
[root@haproxy haproxy]# ls
haproxy.log  haproxy_warn.log
[root@haproxy haproxy]# vim haproxy_warn.log
Jun 13 20:58:59 localhost haproxy[69885]: Server nginx_backend/nginx.inst1 is DOWN, reason: Layer7 wrong status, code: 404, info: "Not Found", check duration: 1ms. 1 active and 0 backup servers left. 0 sessions active, 0 requeued, 0 remaining in queue.
#web1服务器移回html文件
[root@web1 html]# mv /opt/test.html ./
[root@web1 html]# ls
50x.html  index.html  test.html

#再在haproxy服务器查看日志,显示web1服务器又up了
[root@haproxy haproxy]# vim haproxy.log
Jun 13 21:02:34 localhost haproxy[69885]: Server nginx_backend/nginx.inst1 is UP, reason: Layer7 check passed, code: 200, check duration: 0ms. 2 active and 0 backup servers online. 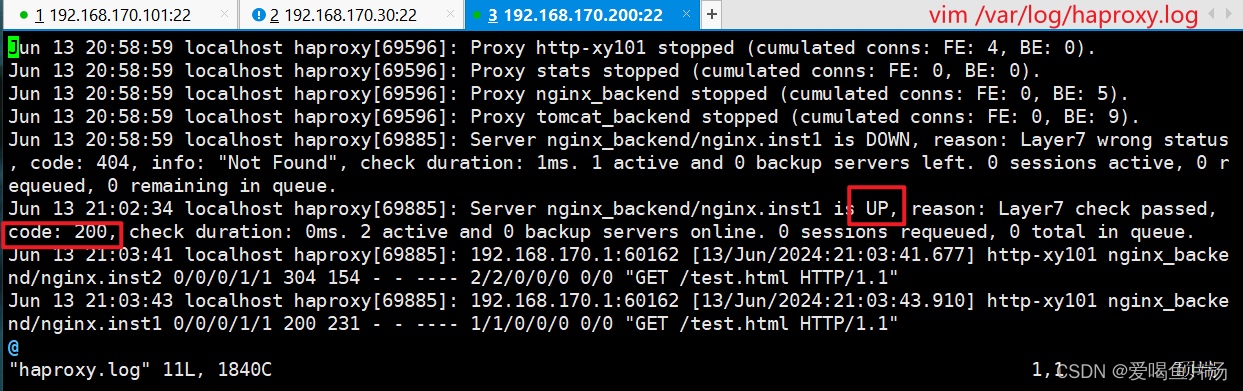

补充另一种导出日志的方法
vim /etc/haproxy/haproxy.cfg
global
	log /dev/log local0 info
	log /dev/log local0 notice
    ......

defaults
    ......
    log global
    ......

#需要修改rsyslog配置,为了便于管理。将haproxy相关的配置独立定义到haproxy.conf,并放到/etc/rsyslog.d/下,rsyslog启动时会自动加载此目录下的所有配置文件。
vim /etc/rsyslog.d/haproxy.conf
if ($programname == 'haproxy' and $syslogseverity-text == 'info')
then -/var/log/haproxy/haproxy-info.log
&~
if ($programname == 'haproxy' and $syslogseverity-text == 'notice')
then -/var/log/haproxy/haproxy-notice.log
&~

#说明:
这部分配置是将haproxy的info日志记录到/var/log/haproxy/haproxy-info.log下,将notice日志记录到/var/log/haproxy/haproxy-notice.log下。“&~”表示当日志写入到日志文件后,rsyslog停止处理这个信息。

service rsyslog restart
service haproxy restart

tail -f /var/log/haproxy/haproxy-info.log		#查看haproxy的访问请求日志信息
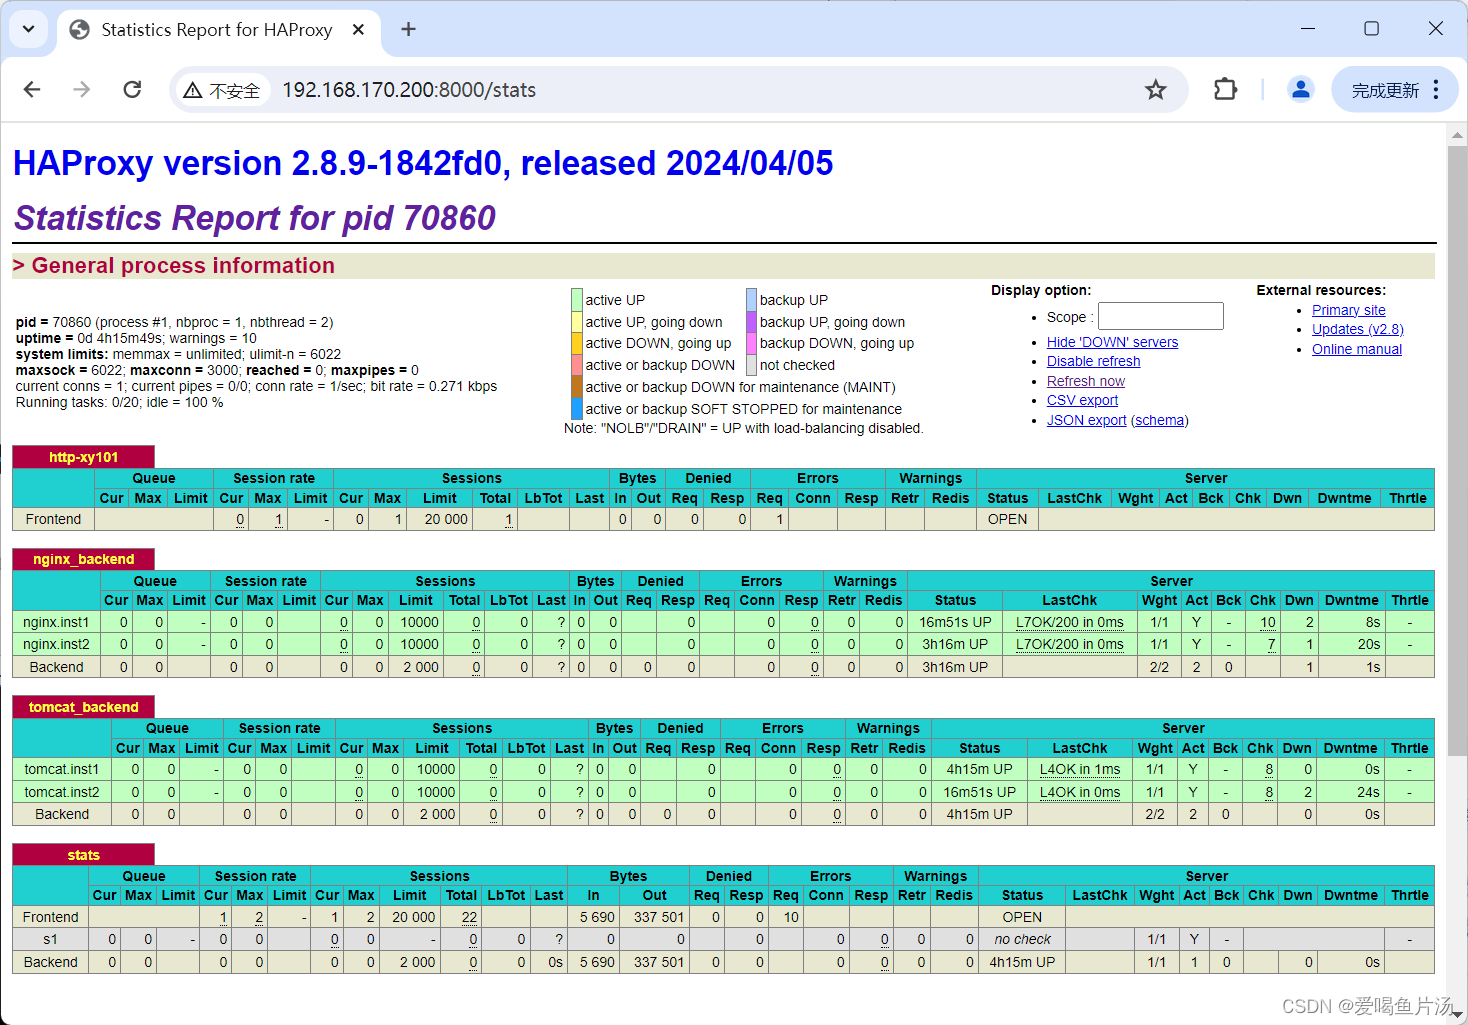
8.验证登录haproxy定义的监控页面,查看nginx前端后端的状态统计情况

9.haproxy自身实现会话保持功能的方式及效果验证
轮询模式下没有开启cookie和stick table时,访问haproxy服务器能看到动态页面在两台nginx服务器上切换,没有会话保持固定访问到一台服务器。


①源地址hash:balance source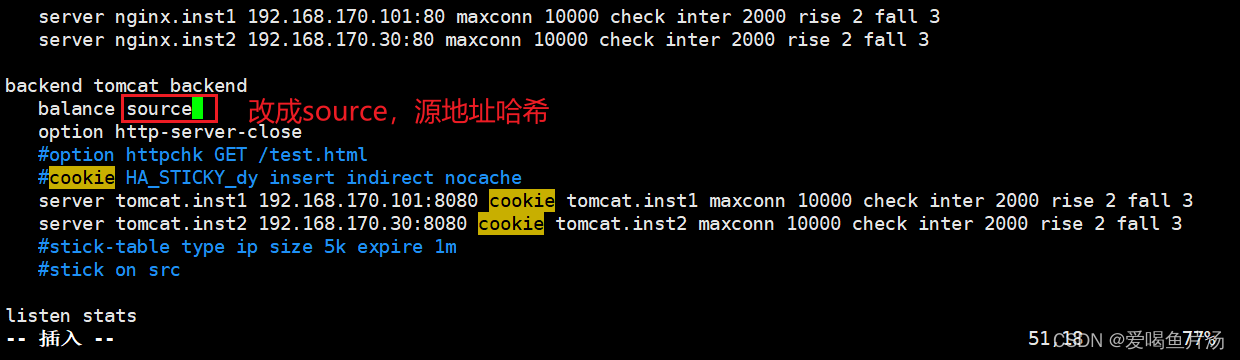
重启服务后,会话保持在30的这台nginx服务器上了,意味着实现了会话保持。但此方法容易导致服务器负载不均衡的问题,解决这个问题可以使用下面的方法去实现会话保持。

②设置cookie:cookie HA_STICKY_dy insert indirect nocache设置cookie并且在server中使用cookie指定字段的值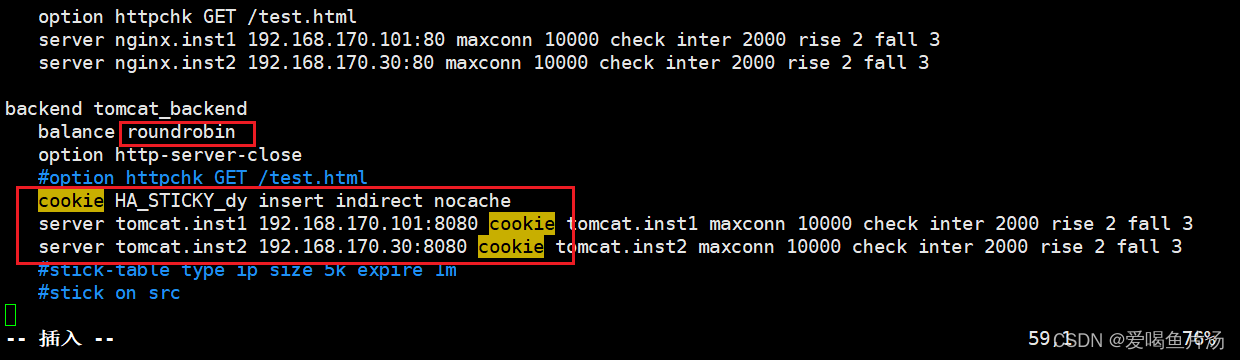

③会话粘性表stick-table
stick-table type ip size 5k expire 1m
stick on src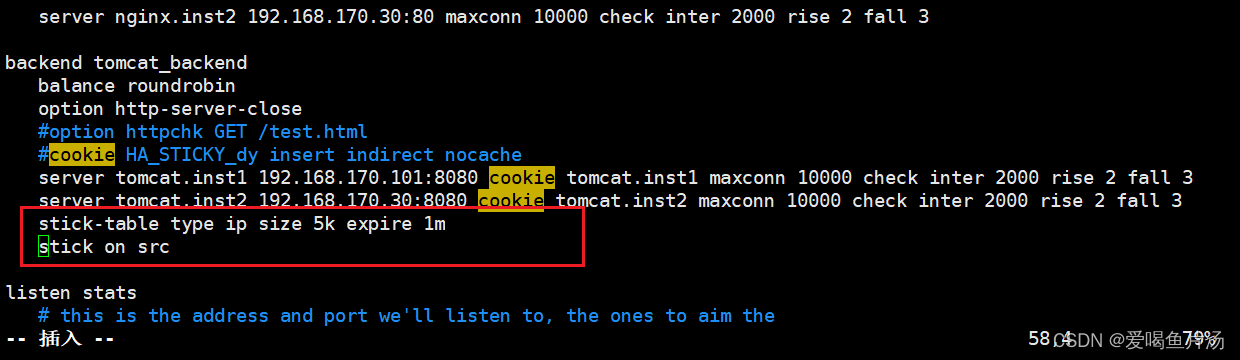

三、课后练习:实现haproxy高可用


 589
589


 被折叠的 条评论
为什么被折叠?
被折叠的 条评论
为什么被折叠?
 到【灌水乐园】发言


