


先自我介绍一下,小编浙江大学毕业,去过华为、字节跳动等大厂,目前在阿里
深知大多数程序员,想要提升技能,往往是自己摸索成长,但自己不成体系的自学效果低效又漫长,而且极易碰到天花板技术停滞不前!
因此收集整理了一份《2024年最新Linux运维全套学习资料》,初衷也很简单,就是希望能够帮助到想自学提升又不知道该从何学起的朋友。


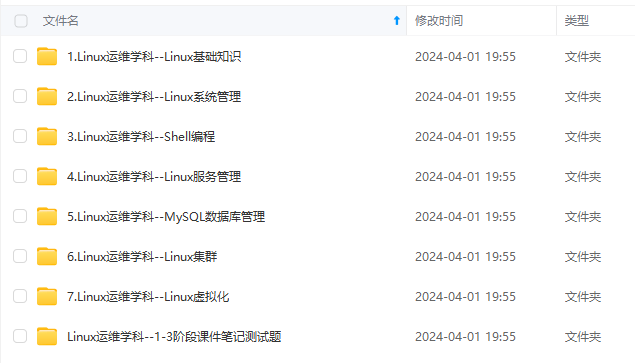
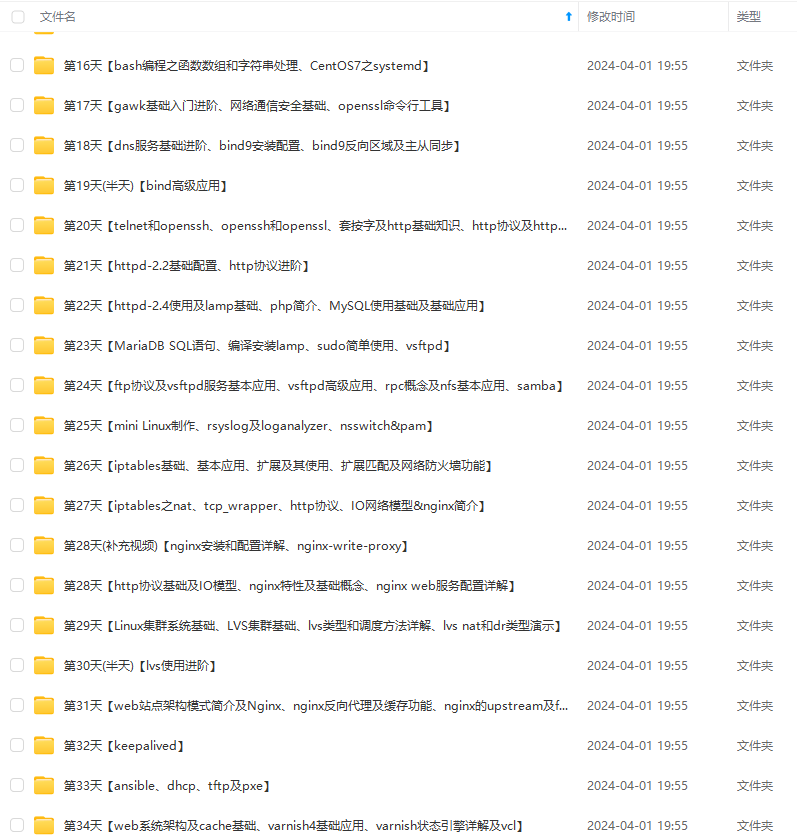
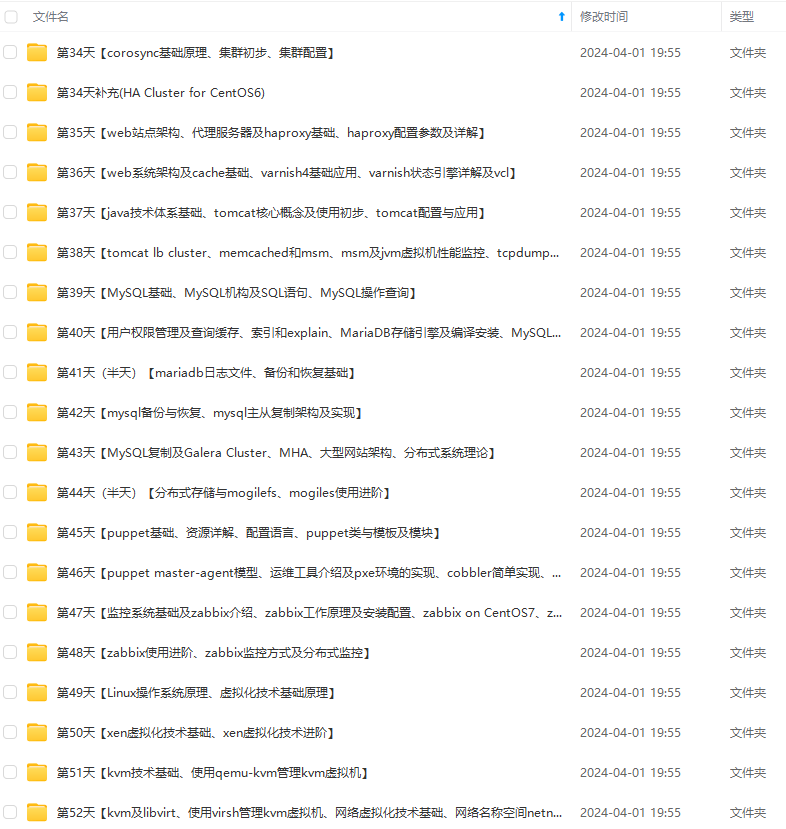
既有适合小白学习的零基础资料,也有适合3年以上经验的小伙伴深入学习提升的进阶课程,涵盖了95%以上运维知识点,真正体系化!
由于文件比较多,这里只是将部分目录截图出来,全套包含大厂面经、学习笔记、源码讲义、实战项目、大纲路线、讲解视频,并且后续会持续更新
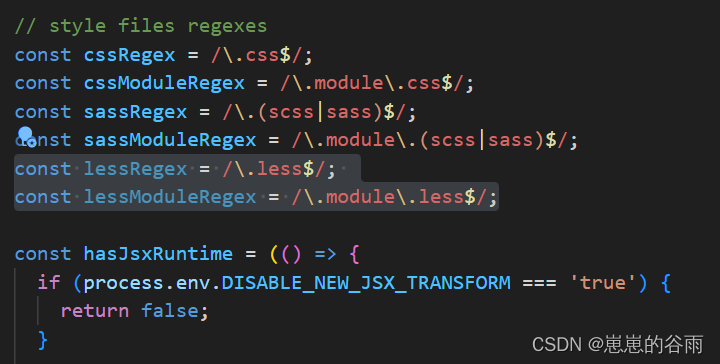
const lessRegex = /.less / ; c o n s t l e s s M o d u l e R e g e x = / m ˙ o d u l e l ˙ e s s /; const lessModuleRegex = /\.module\.less /;constlessModuleRegex=/m˙odulel˙ess/;
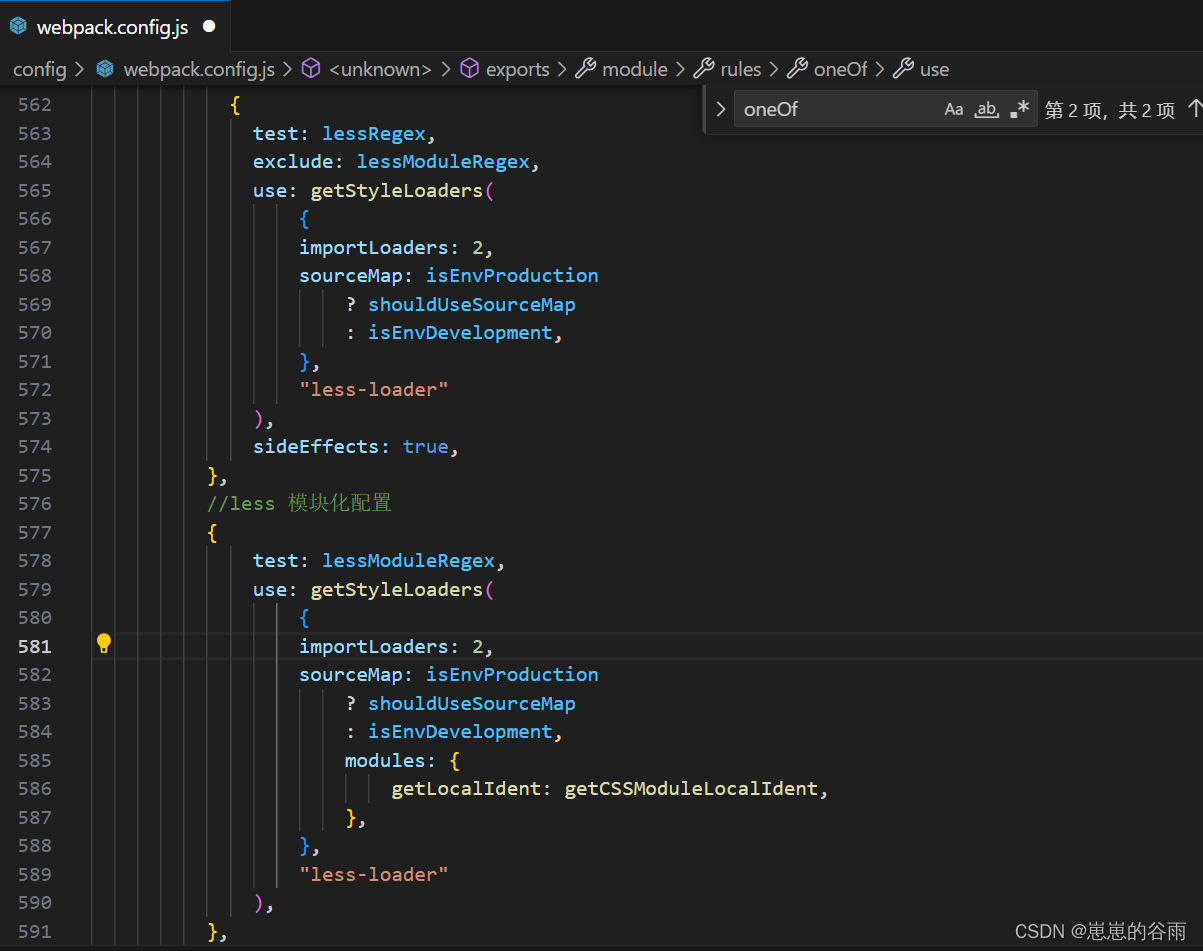
3.搜索oneOf,在oneOf数组中添加以下代码:
//less 配置
{
test: lessRegex,
exclude: lessModuleRegex,
use: getStyleLoaders(
{
importLoaders: 2,
sourceMap: isEnvProduction
? shouldUseSourceMap
: isEnvDevelopment,
},
“less-loader”
),
sideEffects: true,
},
//less 模块化配置
{
test: lessModuleRegex,
use: getStyleLoaders(
{
importLoaders: 2,
sourceMap: isEnvProduction
? shouldUseSourceMap
: isEnvDevelopment,
modules: {
getLocalIdent: getCSSModuleLocalIdent,
},
},
“less-loader”
),
},
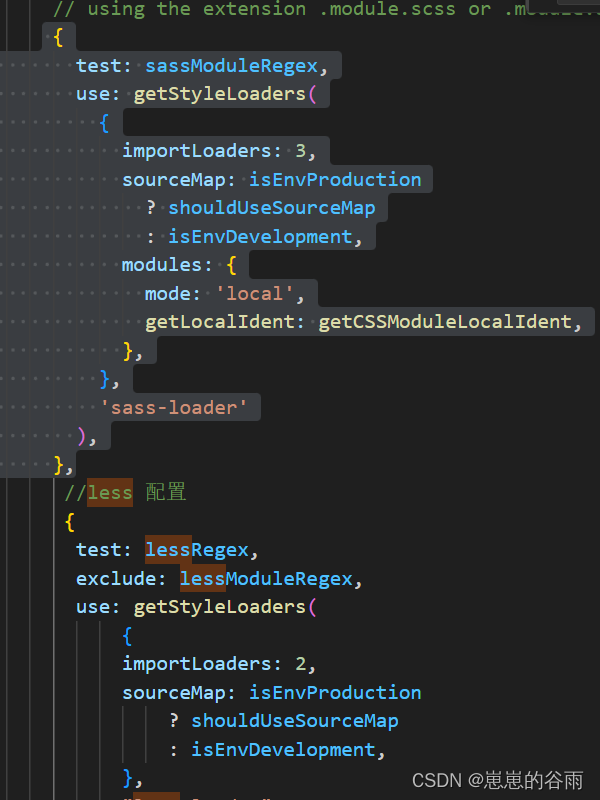
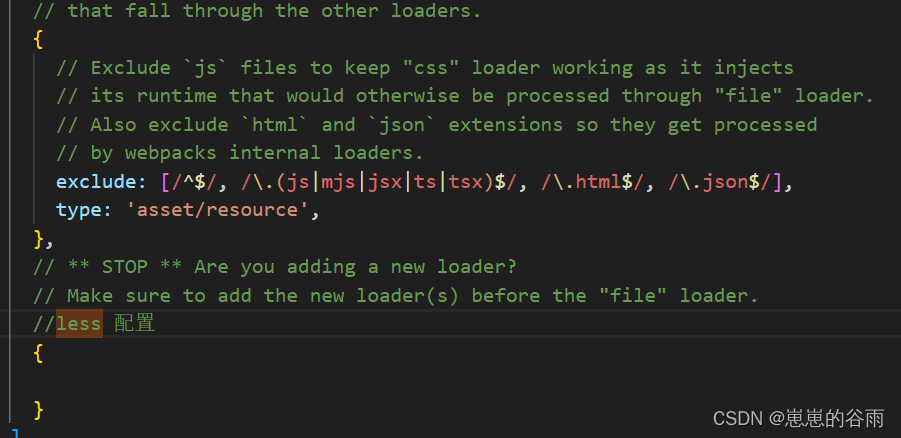
***要放到 sass-loader下面,位置不对可能不生效***
我一开始放到了这里(错误示范)就不生效。
4.重新 npm start(修改 webpack.config.js里的东西 都要重新运行,别忘记保存!!!)
然后 直接 import ‘./App.less’ 或者 模块化引入 import styles from “./index.module.less”(当然 App.less 也要改成 App.module.less)。
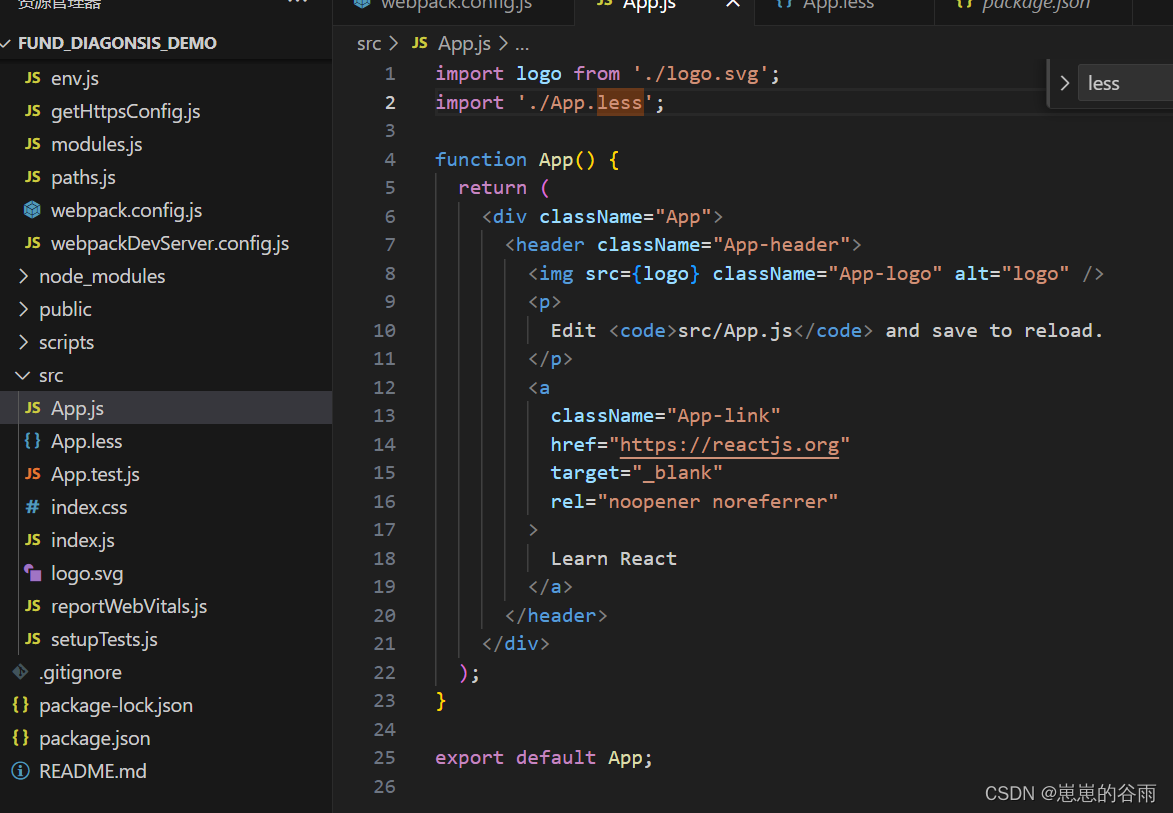
看到 和 App.css运行的效果一样则说明配置成功。
### 配置路由:
1.下载 react-router-dom
npm install react-router-dom
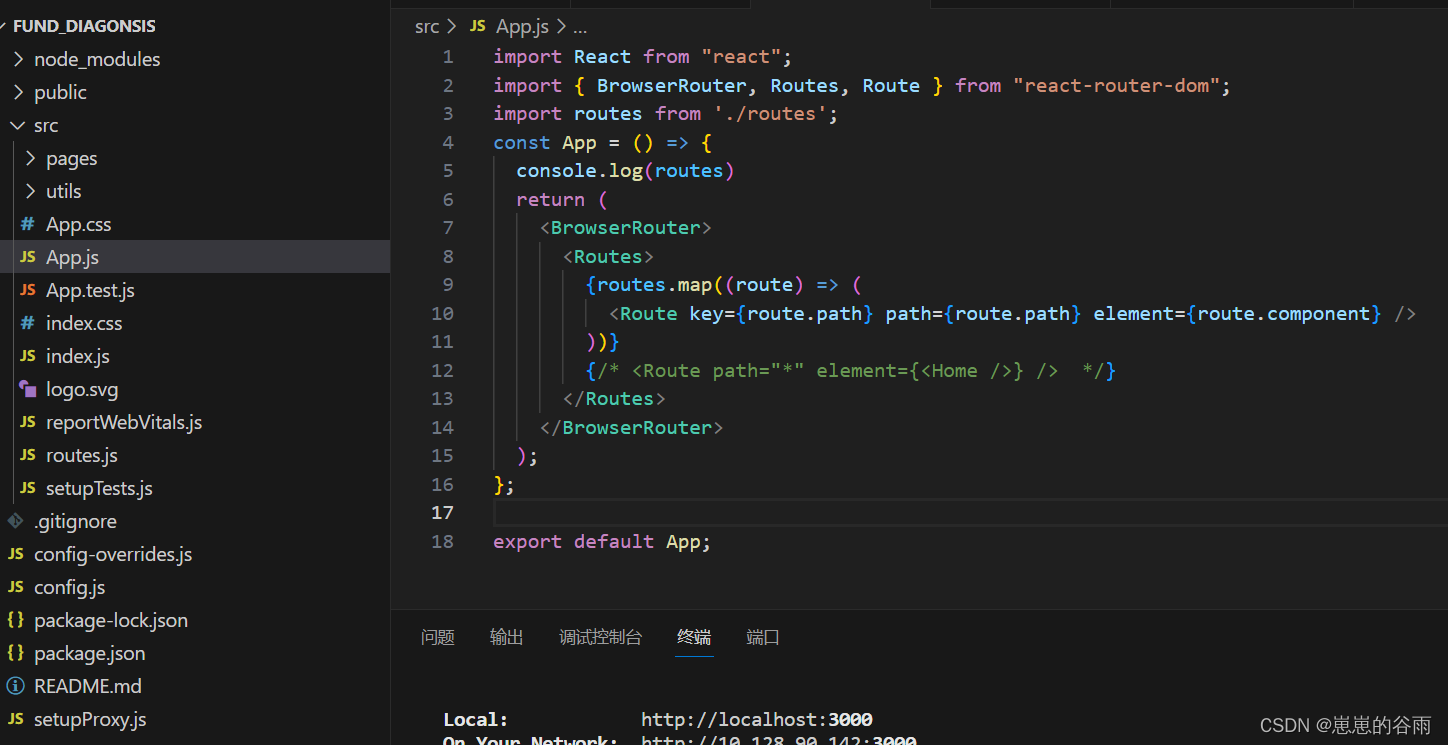
2.App.js 里 写上如下代码:
import React from “react”;
import { BrowserRouter, Routes, Route } from “react-router-dom”;
import routes from ‘./routes’;
const App = () => {
console.log(routes)
return (
{routes.map((route) => (
))}
{/* <Route path=“*” element={} /> */}
);
};
export default App;
遇到 Uncaught TypeError: Cannot read properties of null (reading ‘useRef‘) 报错可以看:
[react create-react-app 配置路由报错(Uncaught TypeError: Cannot read properties of null (reading ‘useRef‘))]( )
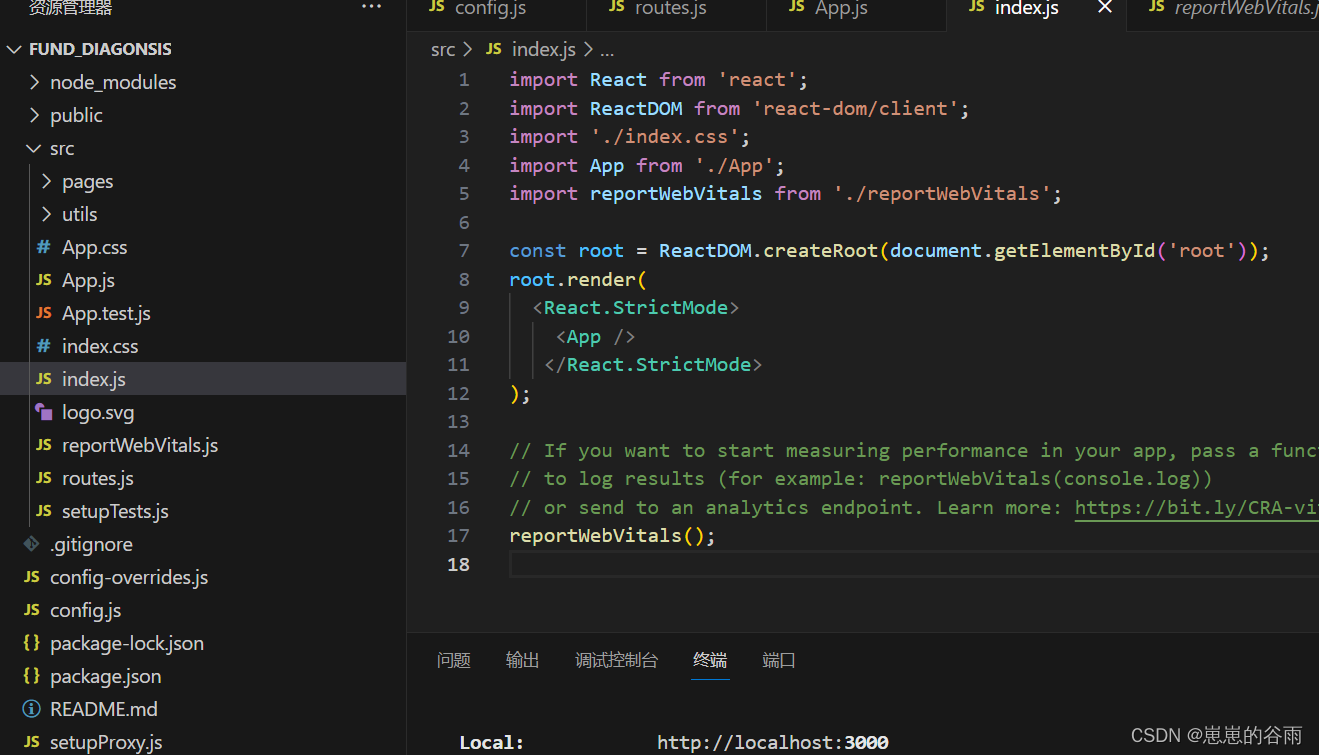
3.index.js里写上:
import React from ‘react’;
import ReactDOM from ‘react-dom/client’;
import ‘./index.css’;
import App from ‘./App’;
import reportWebVitals from ‘./reportWebVitals’;
const root = ReactDOM.createRoot(document.getElementById(‘root’));
root.render(
<React.StrictMode>
</React.StrictMode>
);
// If you want to start measuring performance in your app, pass a function
// to log results (for example: reportWebVitals(console.log))
// or send to an analytics endpoint. Learn more: https://bit.ly/CRA-vitals
reportWebVitals();
4.在src下新建一个 routes.js文件 写上:
// 导入你的页面组件
import Home from ‘./pages’;
//可以用 path:“*” 写个 404页面,我暂时不需要
const routes = [
{ path: “/”, component: }
];
export default routes;
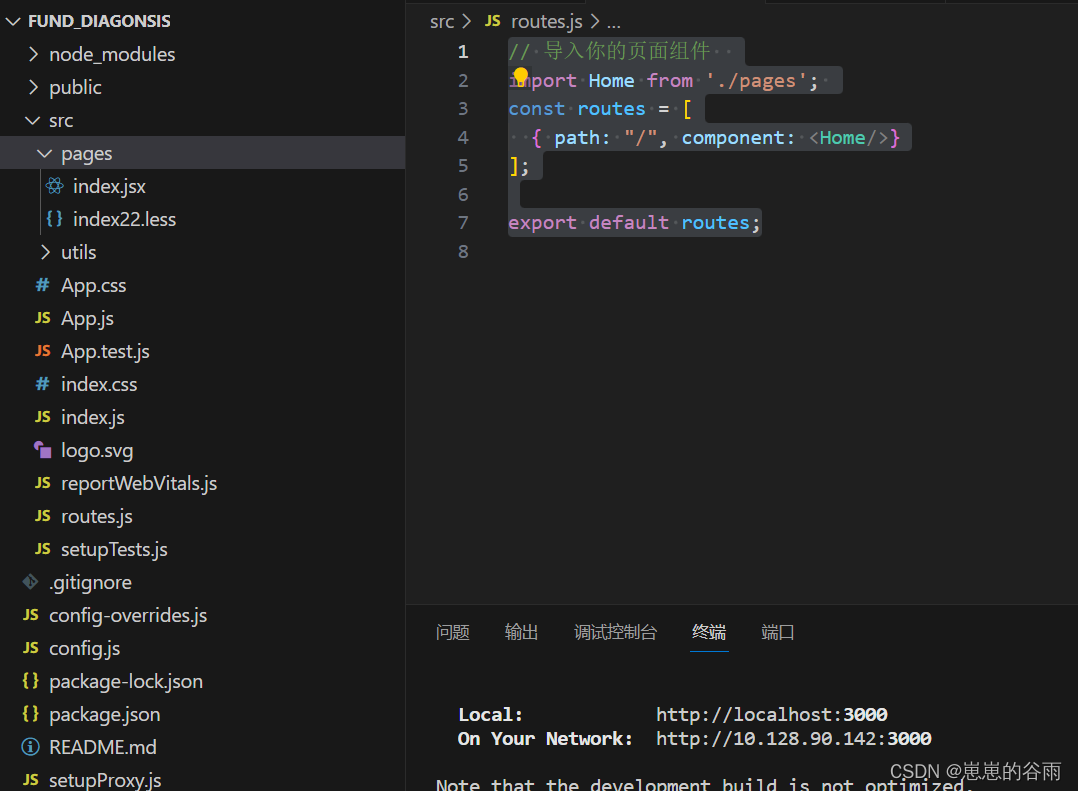
运行看到 Home组件里的东西就说明成功了。之后可以在 scr/router.js里导入其他组件 写上 path和routers就行了。
**注意:react-router-dom v6 和v5 api不太一样,比如 v5 把 Route 上是 component v6是element。具体写法 建议参考 你所用的版本 文档!**
如果遇到了Uncaught TypeError: Cannot read properties of null (reading ‘useRef‘) 报错,可以看[react create-react-app v5 配置路由(报错及注意事项)]( )
### 配置axios:
1.安装 axios
cnpm install axios --save
2.src/utils 新建一个 request.js文件(没有utils就新建一个目录然后再建一个request.js)
 3.request代码如下:
 这个是最简单的配置了,你可以根据自己的需求配置 请求拦截里的东西。
import axios from ‘axios’
// axios的配置文件, 可以在这里去区分开发环境和生产环境等全局一些配置
const devBaseUrl = ‘http://api.k780.com/’
const proBaseUrl = ‘http://xxxxx.com/’
// process.env返回的是一个包含用户的环境信息,它可以去区分是开发环境还是生产环境
export const BASE_URL = process.env.NODE_ENV === ‘development’ ? devBaseUrl : proBaseUrl
export const TIMEOUT = 5000
var request = axios.create({
baseURL:BASE_URL,//基准地址
timeout:TIMEOUT
})
//拦截请求
request.interceptors.request.use((config)=>{
return config
})
//拦截响应
request.interceptors.response.use((response)=>{
return response
},function (error){
//对响应的错误做点什么
return Promise.reject(error);
}
)
export default request;
使用时就是:
import request from “@/utils/request”;
request.get(“/api/fund_home/select_by_fund?fund=1001”).then(res=>{
console.log(res);
})
当然 你也可以不叫 request 你可以叫 $axios 全看自己。
 上面我给的配置说最简单的,一般来说 需要在 请求拦截里加上一些判断比如 错误提示,根据code值提示一下。可以借用 ui库的message组件 message.error(xxx)。还有 如果你需要加上token 还得统一加上token。


比如:我就在响应拦截里做了统一处理,status =200 并且 respnse.data.code=000000时才代表数据成功返回(这个需要根据你自己的接口规范来定)。否则 就需要 提示错误信息。Toast是antd-mobile里的,你可以根据自己需求变。
//拦截响应
request.interceptors.response.use(
(response) => {
console.log(response, “res”);
if (response && response.status == “200”) {
if (response.data && response.data.code == “000000”) {
//接口成功才返回数据
return Promise.resolve(response.data);
} else {
Toast.show({
content: response.data&&response.data.message,
duration:2000,
position: “top”,
});
}
}else{
return Promise.reject(response.message)
}
},
function (error) {
//对响应的错误做点什么
Toast.show({
content: ‘网络异常’,
duration: 0,
position: ‘top’,
})
return Promise.reject(error);
}
);
还需呀注意的时使用 axios的时候一定要用catch捕获一下错误,要不然接口出错一定会导致页面直接有个遮罩层显示错误信息。
比如:
接口超时了,页面直接显示错误信息,但其实应该是显示页面才对,这样太影响用户体验了。
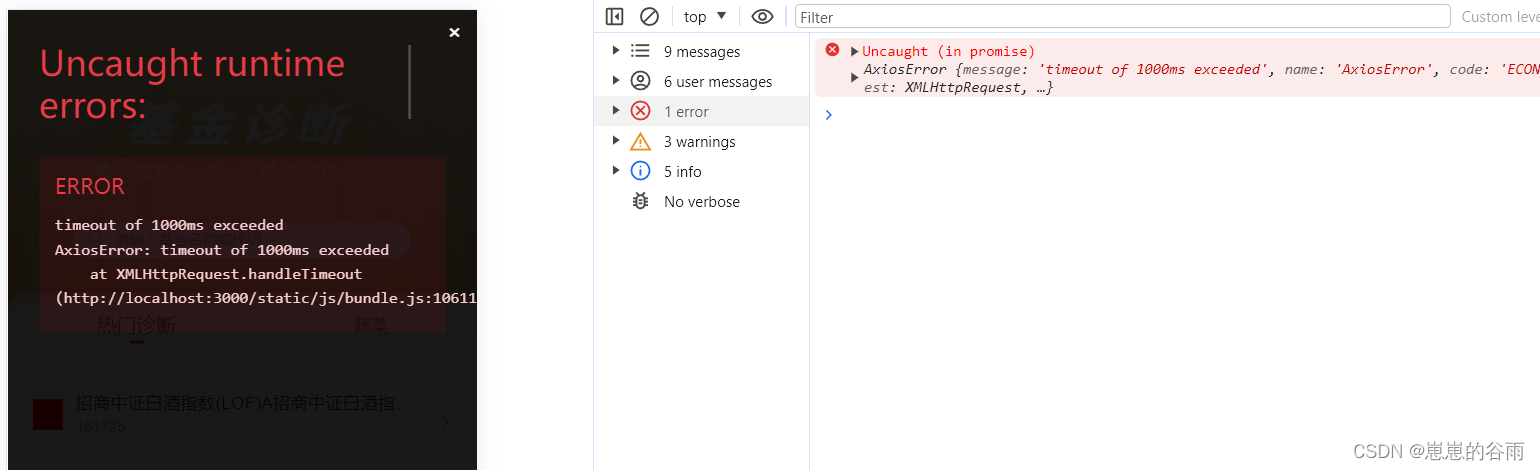
可以用的时候then后面加个catch,就不会直接显示在页面上了。
request
.get(“/api/fund_home/select_by_fund”, {
params: {
fund: “混合”,
},
})
.then((res) => {
console.log(res);
})
// .catch((error) => {
// console.log(error);
// });
**抽出到servers(模块化):**
不过一般 项目里都会抽出来一个server模块(umi、antd-pro都是这样的),这样更加简洁。
1.在 src目录新建一个servers目录。
2.在 src/servers新建一个文件。
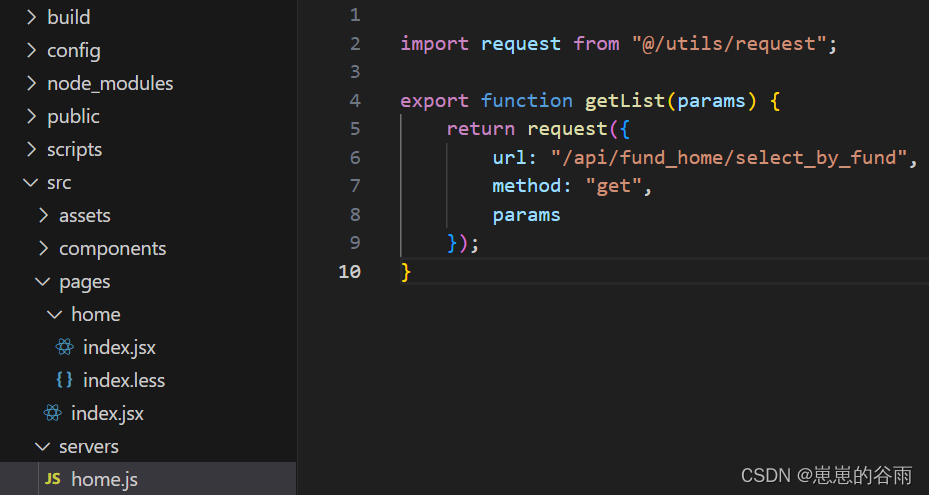
这个文件名 对应的就是模块名,比如:我现在写的是home页,那我就新建 home.js 。 后面写 其他模块就新建对应的js就行。
3.在 home.js里引入 封装好的 request,写上axios请求。
大致如下:你需要根据你自己的实际需求来写(@代表src,这个需要配置一下,如过你没配置就用相对路径引入就行)。
import request from “@/utils/request”;
export function getList(params) {
return request({
url: “/api/fund_home/select_by_fund”,
method: “get”,
params
});
}
然后就可以在 home页里使用了。
import {getList} from “@/servers/home”;
getList({fund:“混合”}).then((res) => {
console.log(res);
})
.catch((error) => {
console.log(error);
});
[react axios配置]( )


### 配置Proxy代理:


使用 http-proxy-middleware
 1.安装http-proxy-middleware
npm install http-proxy-middleware --save
2.在src目录新建一个setupProxy.js
 代码大致如下:
 然后 请求接口时以/api/xx就会自动走代理。
const { createProxyMiddleware } = require(‘http-proxy-middleware’);
module.exports = function(app) {
app.use(
‘/api’,
createProxyMiddleware({
target: ‘http://localhost:8000’,
changeOrigin: true,
// pathRewrite: {
// ‘^/api’: ‘/’,
// },
})
);
};
具体配置可以参考:[React create-react-app 里配置代理(解决跨域)]( )
### 配置 px2rem:
具体请看:[react create-react-app v5配置 px2rem (暴露 eject方式)]( )
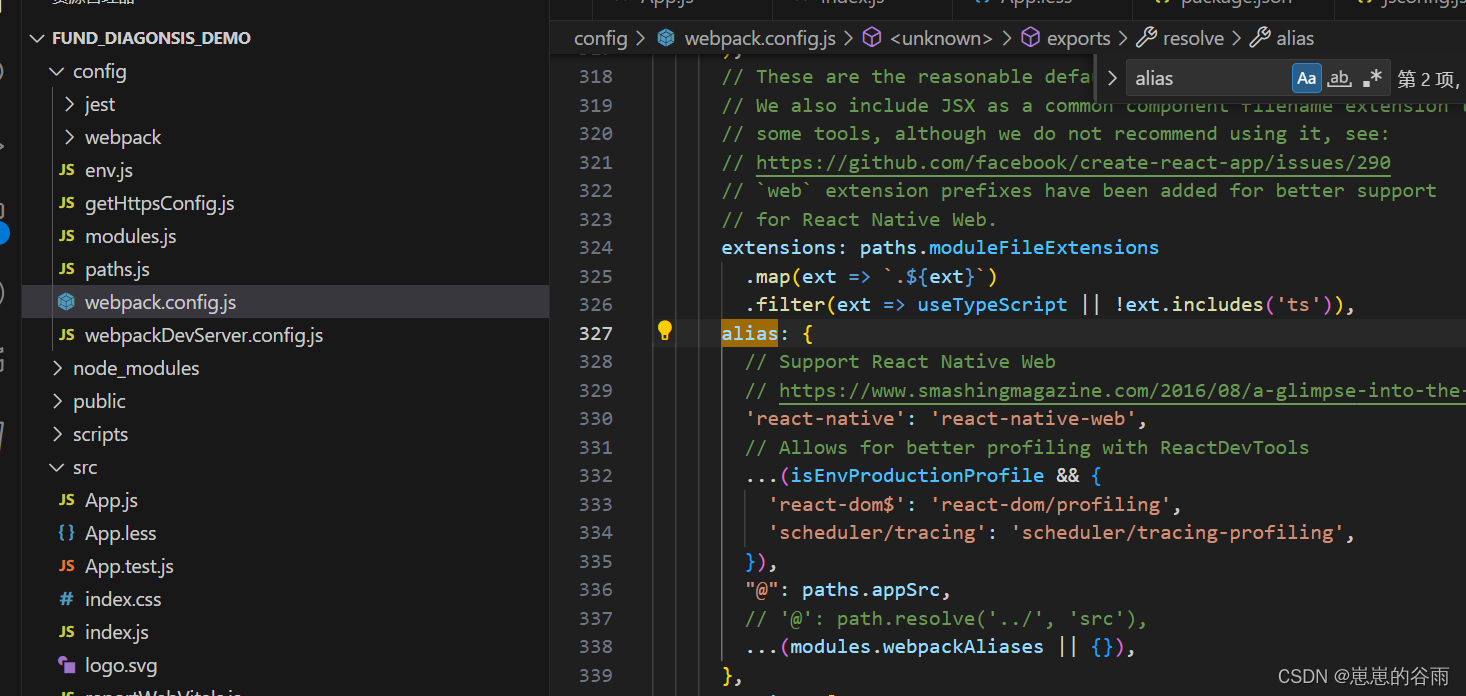
### 配置别名 src可以用 @ :
1.在 config/webpack.config.js里搜索 alias 然后 加上
“@”: paths.appSrc,
2.在 App.js里测试一下,引入 app的样式文件,我是 App.less。
import ‘@/App.less’;
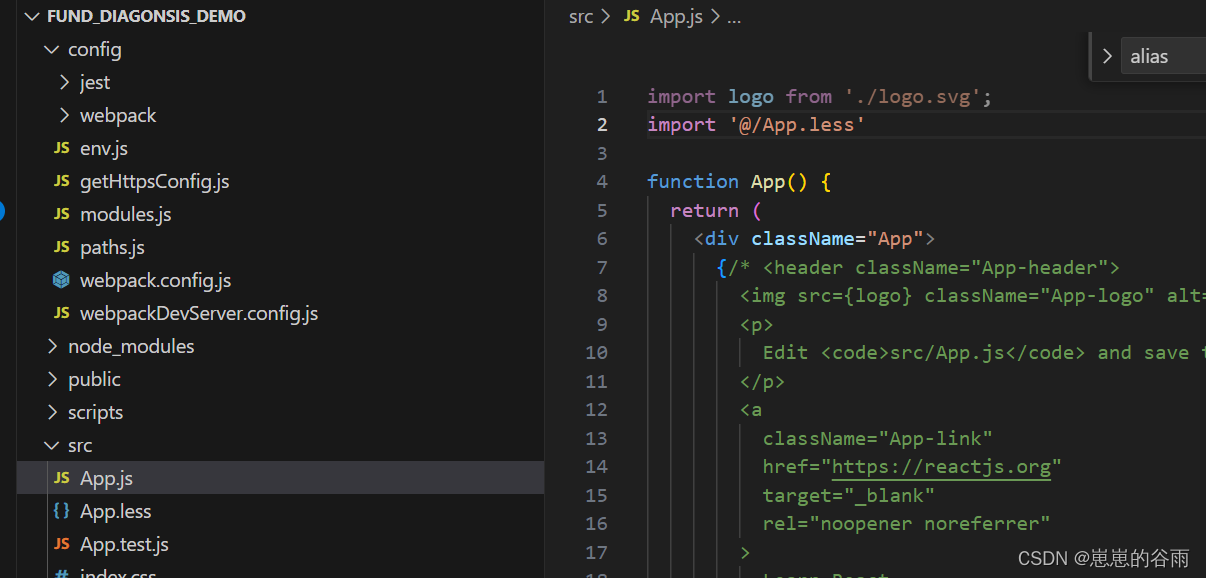
3.重新运行 npm start 如果,样式确实生效了就说明,配置对了。
### 配置按需加载:
***按需加载ui库时因为ui库是less写的样式,所以配置时,需要先配置 less,上文中有步骤,ui库按需加载建议看官网文档,都会有方法和步骤及注意事项,其实现在 很多 ui库都支持 Tree Shaking ,v5也支持所以只要是ui库支持,那么就不用配置按需加载!!!***
Create React App v5 默认支持 Tree Shaking。Tree Shaking 是一项优化技术,用于在打包过程中只包含实际使用的代码,减少最终打包文件的体积。
在 Create React App v5 的构建配置中,通过使用 Babel 和 webpack 的相关插件和配置,可以自动启用 Tree Shaking 功能。
具体来说,Create React App v5 使用了以下插件和配置来支持 Tree Shaking:
Babel 默认配置:Create React App v5 的默认 Babel 配置中使用了 @babel/preset-env,它会根据目标浏览器的兼容性要求,自动转译代码并进行 Tree Shaking。
webpack 配置:Create React App v5 配置了优化选项 sideEffects: false,在 production 环境中默认启用了 Tree Shaking。这使得 webpack 在打包时可以识别出未使用的代码并进行排除。
总结来说,Create React App v5 默认启用了 Tree Shaking,以帮助优化打包文件的体积。你无需额外进行配置即可享受 Tree Shaking 的好处。
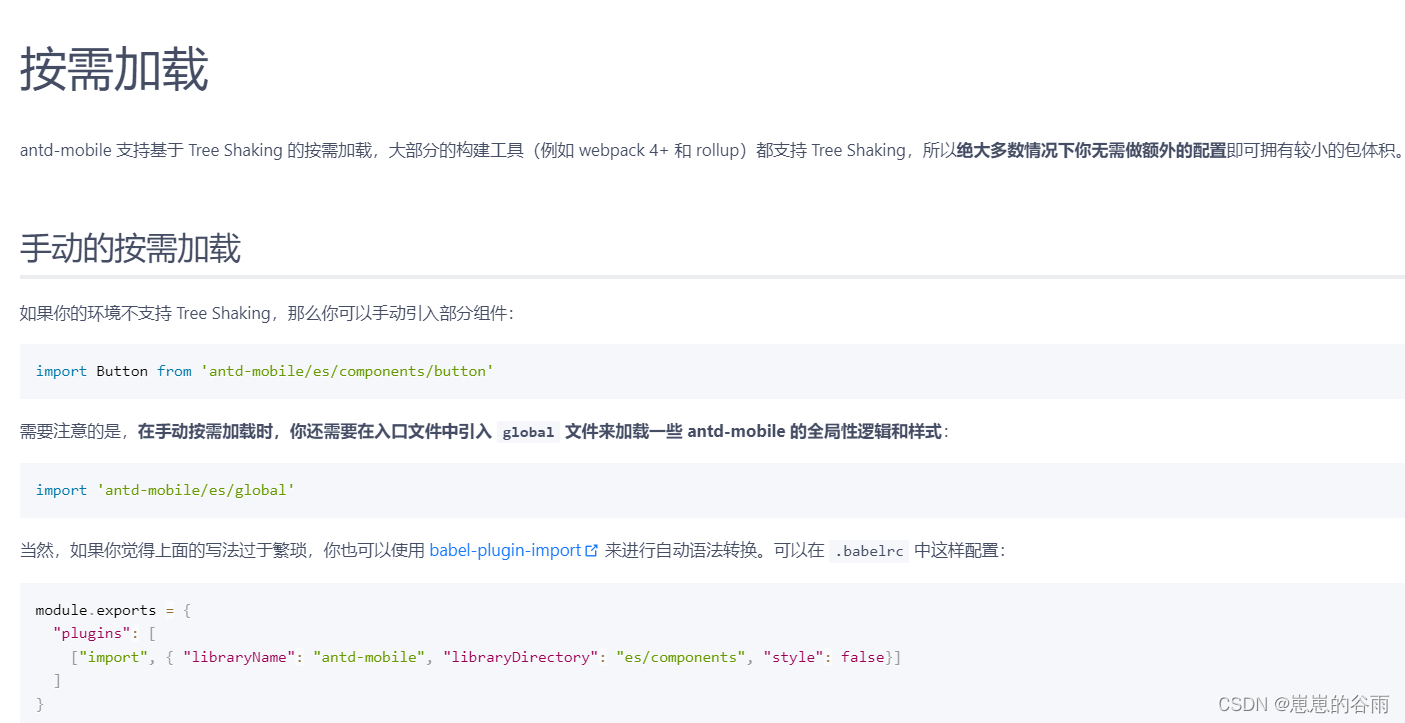
antd-mobile无需配置手动按需加载
[antd-mobile 按需加载]( )
其实 antd 高版本也自带按需加载 可以不用配置(下面的代码只是个 演示,你如果有其他 ui库 或者 插件需要按需加载可以按照下面的步骤来):
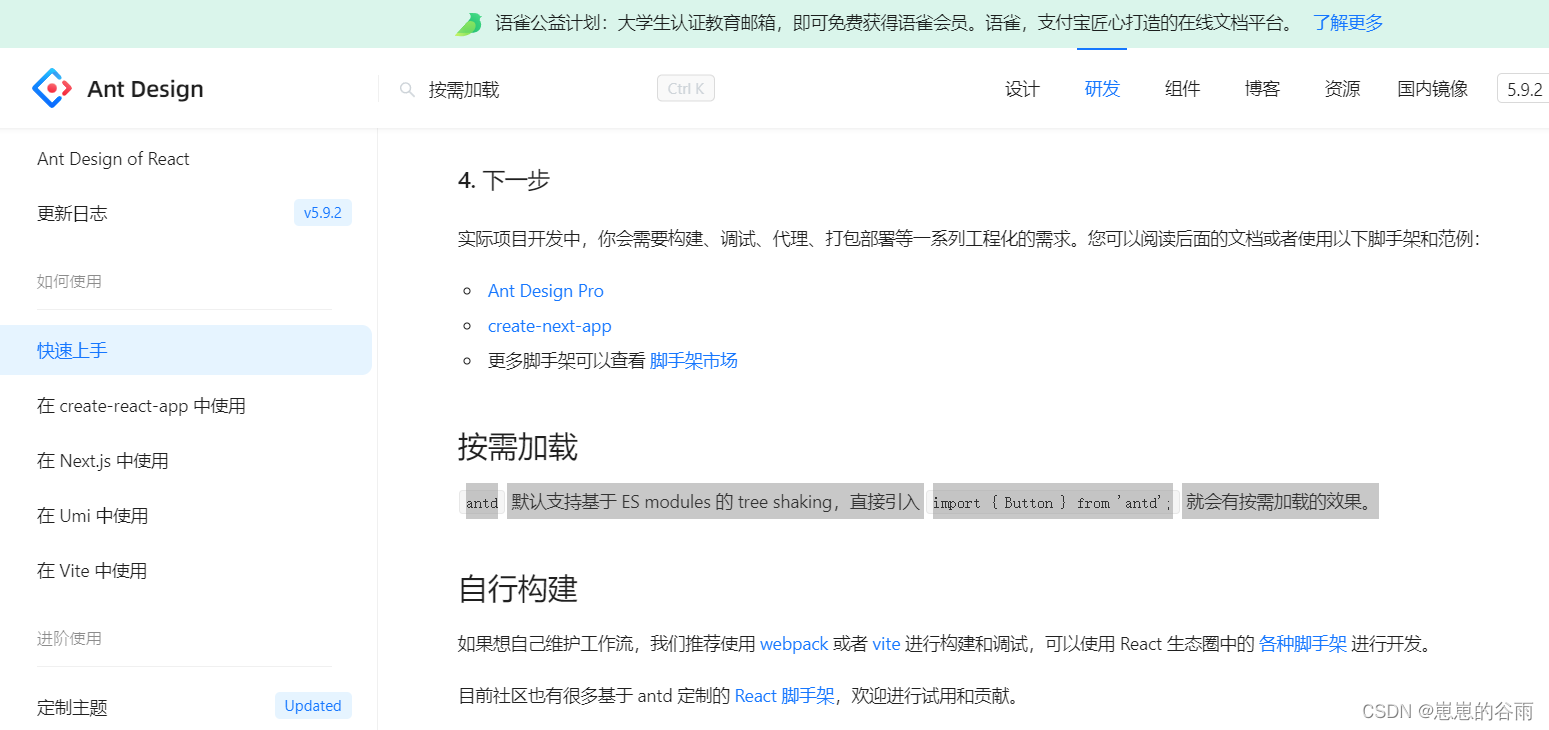
[antd 官方链接 按需加载]( )
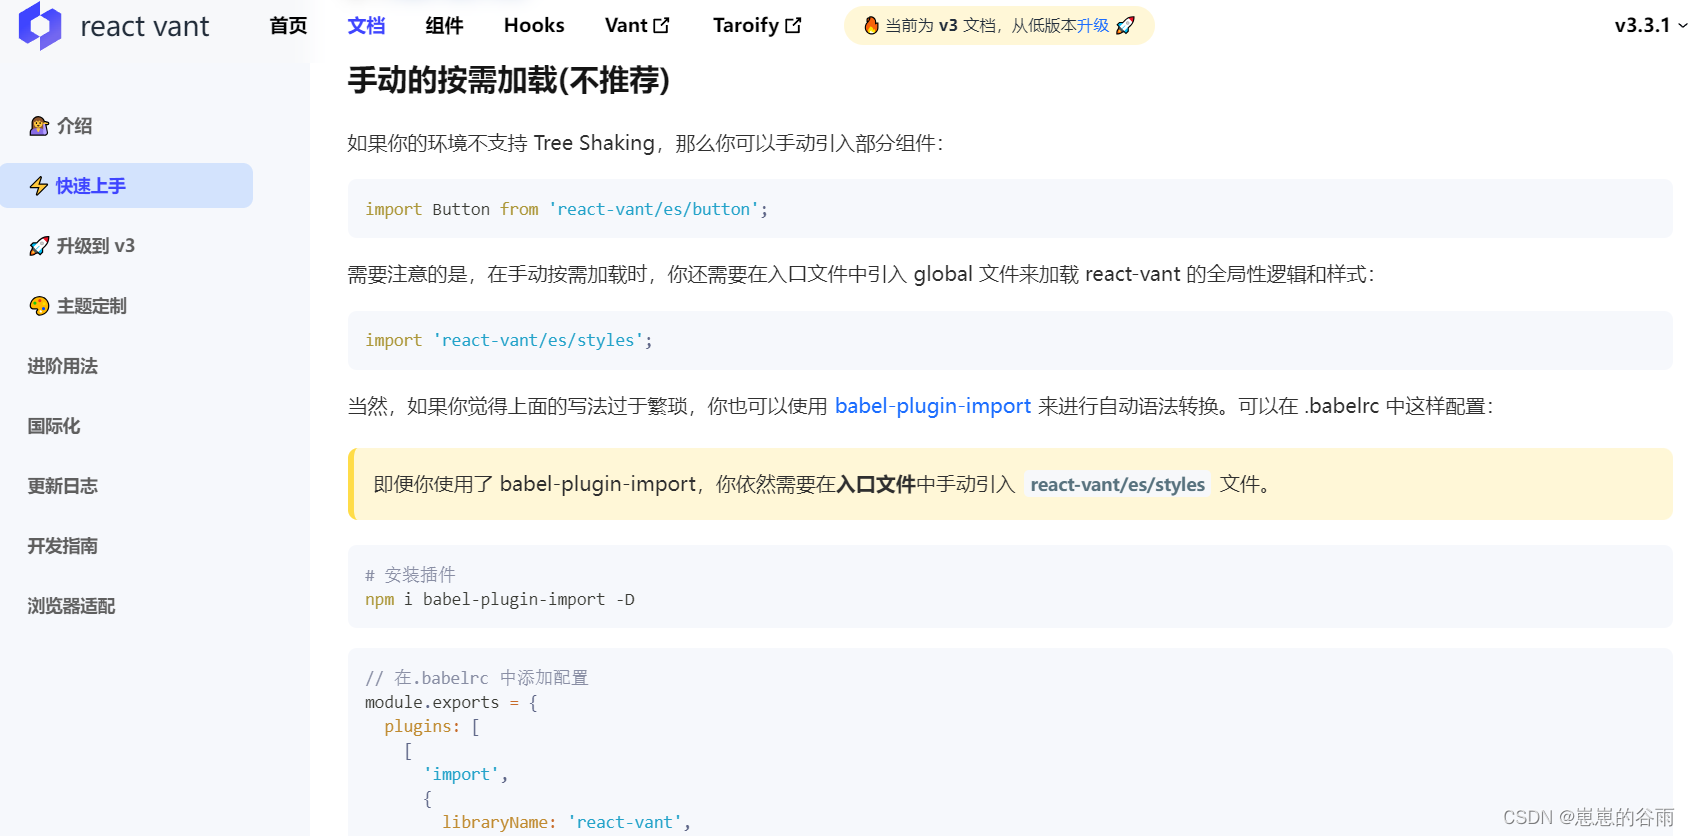
react-vant 也是:
[react-vant官网]( )
如果你有其他插件需要配置可以参考这个步骤来:
这几种方式都需要 babel-plugin-import 支持,所以没有的话需要先安装!!!
#### webpack.config.js配置:
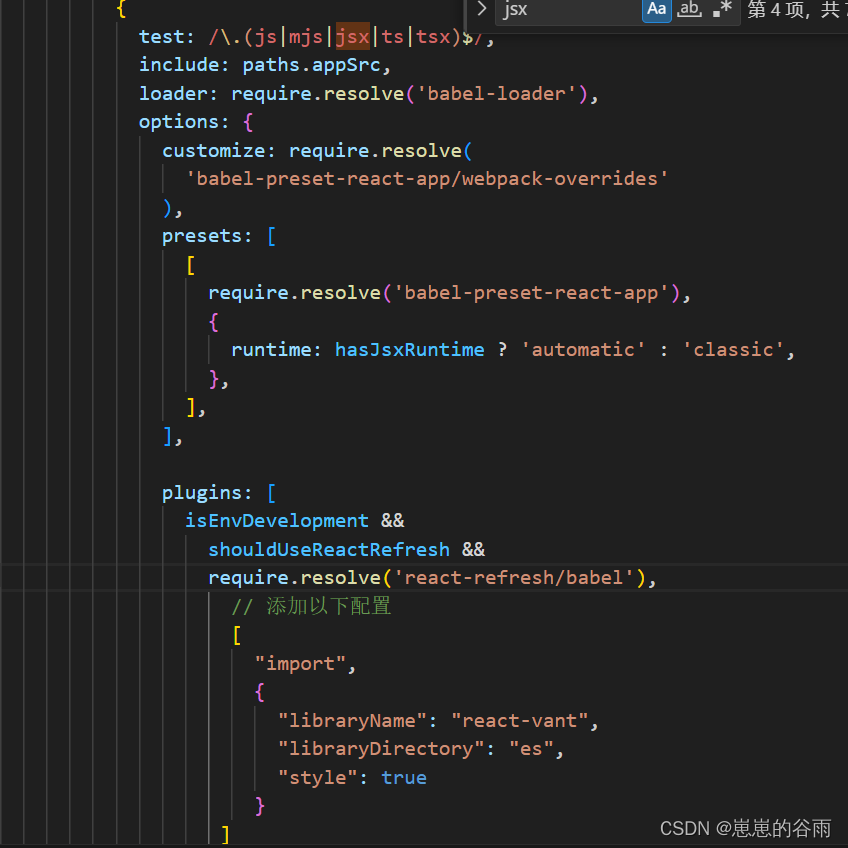
1.找到 config/webpack.config.js 然后 搜索 oneOf 在下面加一个配置,然后找到babel-loader(直接搜索babel-loader也行,然后找到js\jsx的配置),给起plugins加一个配置
plugins: [
// 添加以下配置
[
“import”,
{
“libraryName”: “react-vant”,
“libraryDirectory”: “es”,
“style”: true
}
]
]
完整配置:
{
test: /.(js|mjs|jsx|ts|tsx)$/,
include: paths.appSrc,
loader: require.resolve(‘babel-loader’),
options: {
customize: require.resolve(
‘babel-preset-react-app/webpack-overrides’
),
presets: [
[
require.resolve(‘babel-preset-react-app’),
{
runtime: hasJsxRuntime ? ‘automatic’ : ‘classic’,
},
],
],
            plugins: [
              isEnvDevelopment &&
                shouldUseReactRefresh &&
                require.resolve('react-refresh/babel'),
                  // 添加以下配置
                  [
                    "import",
                    {
                      "libraryName": "react-vant",
                      "libraryDirectory": "es",
                      "style": true
                    }
                 ]
            ].filter(Boolean),
            // This is a feature of `babel-loader` for webpack (not Babel itself).
            // It enables caching results in ./node\_modules/.cache/babel-loader/
            // directory for faster rebuilds.
            cacheDirectory: true,
            // See #6846 for context on why cacheCompression is disabled
            cacheCompression: false,
            compact: isEnvProduction,
          },
        },
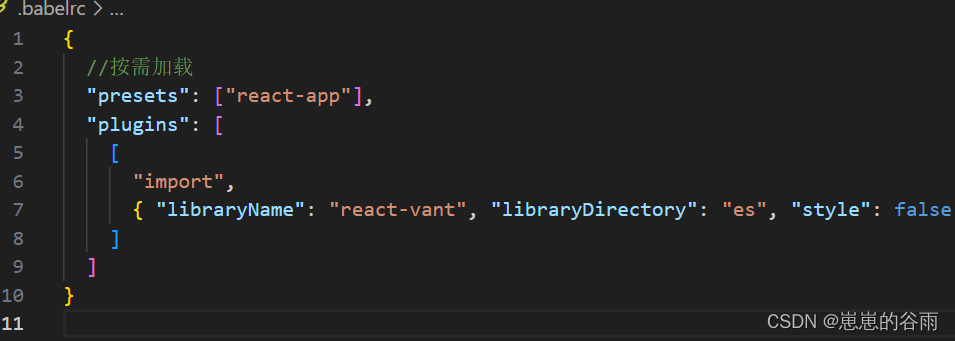
#### .babelrc里配置(推荐)
还可以按照antd-mobile 官网的方式来,就不需要在 webpack里配置了。可以使用 babel-plugin-import 来进行自动语法转换。可以在 .babelrc 中这样配置:
使用 .babelrc 文件进行配置需要确保项目的 Babel 版本在 7.x 及以上。如果你的项目使用的是较旧的 Babel 版本,则无法支持使用 .babelrc 进行配置,需要改用 babel.config.js 文件进行配置。
{
“plugins”: [
[“import”, { “libraryName”: “antd-mobile”, “libraryDirectory”: “es/components”, “style”: false}]
]
}

babel.config.js 这样配置:
module.exports 和export default应该都行。

#### package.json里babel配置(推荐)
1.在 package.json 文件中找到 “babel” 字段,如果没有请自行添加该字段。
2.在 “babel” 字段中添加 “plugins” 字段,并将 “plugins” 字段的值设置为一个数组,用于配置 babel 插件。
3.在 “plugins” 数组中添加 “import” 插件,并将其配置为按需加载。具体配置如下:
只添加 plugins就行,如果默认有其他配置,在后面加上就行。
{
“babel”: {
“plugins”: [
[
“import”,
{
“libraryName”: “react-vant”,
“style”: true
}
]
]
}
}
#### 注意:
.babelrc里配置 和package.json 这两个方式会冲突,会报:
Parsing error: Multiple configuration files found. Please remove one:
package.json
D:\fund\_demo.babelrc

这个错误通常是由于同时存在多个配置文件引起的,包括 package.json 和 .babelrc 等。Create React App 的默认配置中只支持使用一个配置文件来定义 Babel 相关的配置。
解决方案就是只保留一个配置:要不就直接在package.json里配置,要不就 把package.json的babel删掉都放在.babelrc.
### 静态资源图片之类的可以在src下新建assets目录:
在 src新建文件夹assets。然后新建img可以存放图片。 新建 js,css可以存放静态的js和css。
其实放public里也可以:
在create-react-app中,assets目录和public目录都可以用来存放静态资源,但它们之间有一些区别。
assets目录是我们自己创建的,通常放置一些与组件紧密相关的静态资源,如图片、样式文件等。这些资源在Webpack打包时会被处理和压缩,并与代码一起打包到最终的构建文件中。在组件中引用这些资源时,需要使用import关键字进行导入。
public目录是在创建React应用时默认生成的,用于放置一些通用的静态资源,如HTML文件、favicon.ico文件等。这些资源在Webpack打包时不会被处理和压缩,并且会被直接复制到最终的构建文件中。在组件中引用这些资源时,需要使用相对路径进行引用。
总的来说,assets目录和public目录都可以用来存放静态资源,但它们在处理和使用静态资源时有所不同。因此,我们需要根据实际情况选择合适的目录来存放静态资源。
***大白话就是 ,public里的文件打包会直接被复制到 dist里,assets则不会。***
### 打包部署到非根目录:
[create-react-app v5 打包配置(部署到非根目录)]( )
### 使用环境变量
[react 使用环境变量的方法和步骤(dotenv-cli 实现使用环境变量步骤)]( )
### 打包去掉 map文件
[create-react-app 打包去掉 map文件]( )
#### 注意严格模式(StrictMode)会导致开发环境接口请求两次
[React中StrictMode严格模式,导致开发环境,接口会请求两次或多次( useEffect 请求多次)]( )
## 我的 webpack.config.js完整的配置:
你可以参考对比:
‘use strict’;
const fs = require(‘fs’);
const path = require(‘path’);
const webpack = require(‘webpack’);
const resolve = require(‘resolve’);
const HtmlWebpackPlugin = require(‘html-webpack-plugin’);
const CaseSensitivePathsPlugin = require(‘case-sensitive-paths-webpack-plugin’);
const InlineChunkHtmlPlugin = require(‘react-dev-utils/InlineChunkHtmlPlugin’);
const TerserPlugin = require(‘terser-webpack-plugin’);
const MiniCssExtractPlugin = require(‘mini-css-extract-plugin’);
const CssMinimizerPlugin = require(‘css-minimizer-webpack-plugin’);
const { WebpackManifestPlugin } = require(‘webpack-manifest-plugin’);
const InterpolateHtmlPlugin = require(‘react-dev-utils/InterpolateHtmlPlugin’);
const WorkboxWebpackPlugin = require(‘workbox-webpack-plugin’);
const ModuleScopePlugin = require(‘react-dev-utils/ModuleScopePlugin’);
const getCSSModuleLocalIdent = require(‘react-dev-utils/getCSSModuleLocalIdent’);
const ESLintPlugin = require(‘eslint-webpack-plugin’);
const paths = require(‘./paths’);
const modules = require(‘./modules’);
const getClientEnvironment = require(‘./env’);
const ModuleNotFoundPlugin = require(‘react-dev-utils/ModuleNotFoundPlugin’);
const ForkTsCheckerWebpackPlugin =
process.env.TSC_COMPILE_ON_ERROR === ‘true’
? require(‘react-dev-utils/ForkTsCheckerWarningWebpackPlugin’)
: require(‘react-dev-utils/ForkTsCheckerWebpackPlugin’);
const ReactRefreshWebpackPlugin = require(‘@pmmmwh/react-refresh-webpack-plugin’);
const createEnvironmentHash = require(‘./webpack/persistentCache/createEnvironmentHash’);
//px2rem的配置
const px2rem = require(“postcss-plugin-px2rem”);
const px2remOpts = {
rootValue: 37.5, //这个值定义了1rem应该等于多少像素。在这里,1rem等于37.5
exclude: /(node_module)/, //这是一个正则表达式,用于指定哪些文件应该被排除在转换之外。在这里,所有在’node_module’目录下的文件都将被排除。
// mediaQuery: false, //这个选项表示是否应该在媒体查询中转换px单位。在这里,它被设置为false,意味着媒体查询中的px单位将不会被转换
// minPixelValue: 3, //这个选项表示应该转换的最小px值。在这里,只有px值大于或等于3的才会被转换
};
// Source maps are resource heavy and can cause out of memory issue for large source files.
const shouldUseSourceMap = process.env.GENERATE_SOURCEMAP !== ‘false’;
const reactRefreshRuntimeEntry = require.resolve(‘react-refresh/runtime’);
const reactRefreshWebpackPluginRuntimeEntry = require.resolve(
‘@pmmmwh/react-refresh-webpack-plugin’
);
const babelRuntimeEntry = require.resolve(‘babel-preset-react-app’);
const babelRuntimeEntryHelpers = require.resolve(
‘@babel/runtime/helpers/esm/assertThisInitialized’,
{ paths: [babelRuntimeEntry] }
);
const babelRuntimeRegenerator = require.resolve(‘@babel/runtime/regenerator’, {
paths: [babelRuntimeEntry],
});
// Some apps do not need the benefits of saving a web request, so not inlining the chunk
// makes for a smoother build process.
const shouldInlineRuntimeChunk = process.env.INLINE_RUNTIME_CHUNK !== ‘false’;
const emitErrorsAsWarnings = process.env.ESLINT_NO_DEV_ERRORS === ‘true’;
const disableESLintPlugin = process.env.DISABLE_ESLINT_PLUGIN === ‘true’;
const imageInlineSizeLimit = parseInt(
process.env.IMAGE_INLINE_SIZE_LIMIT || ‘10000’
);
// Check if TypeScript is setup
const useTypeScript = fs.existsSync(paths.appTsConfig);
// Check if Tailwind config exists
const useTailwind = fs.existsSync(
path.join(paths.appPath, ‘tailwind.config.js’)
);
// Get the path to the uncompiled service worker (if it exists).
const swSrc = paths.swSrc;
// style files regexes
const cssRegex = /.css
/
;
c
o
n
s
t
c
s
s
M
o
d
u
l
e
R
e
g
e
x
=
/
m
˙
o
d
u
l
e
c
˙
s
s
/; const cssModuleRegex = /\.module\.css
/;constcssModuleRegex=/m˙odulec˙ss/;
const sassRegex = /.(scss|sass)
/
;
c
o
n
s
t
s
a
s
s
M
o
d
u
l
e
R
e
g
e
x
=
/
m
˙
o
d
u
l
e
(
˙
s
c
s
s
∣
s
a
s
s
)
/; const sassModuleRegex = /\.module\.(scss|sass)
/;constsassModuleRegex=/m˙odule(˙scss∣sass)/;
const lessRegex = /.less
/
;
c
o
n
s
t
l
e
s
s
M
o
d
u
l
e
R
e
g
e
x
=
/
m
˙
o
d
u
l
e
l
˙
e
s
s
/; const lessModuleRegex = /\.module\.less
/;constlessModuleRegex=/m˙odulel˙ess/;
const hasJsxRuntime = (() => {
if (process.env.DISABLE_NEW_JSX_TRANSFORM === ‘true’) {
return false;
}
try {
require.resolve(‘react/jsx-runtime’);
return true;
} catch (e) {
return false;
}
})();
// This is the production and development configuration.
// It is focused on developer experience, fast rebuilds, and a minimal bundle.
module.exports = function (webpackEnv) {
const isEnvDevelopment = webpackEnv === ‘development’;
const isEnvProduction = webpackEnv === ‘production’;
// Variable used for enabling profiling in Production
// passed into alias object. Uses a flag if passed into the build command
const isEnvProductionProfile =
isEnvProduction && process.argv.includes(‘–profile’);
// We will provide paths.publicUrlOrPath to our app
// as %PUBLIC_URL% in index.html and process.env.PUBLIC\_URL in JavaScript.
// Omit trailing slash as %PUBLIC_URL%/xyz looks better than %PUBLIC_URL%xyz.
// Get environment variables to inject into our app.
const env = getClientEnvironment(paths.publicUrlOrPath.slice(0, -1));
const shouldUseReactRefresh = env.raw.FAST_REFRESH;
// common function to get style loaders
const getStyleLoaders = (cssOptions, preProcessor) => {
const loaders = [
isEnvDevelopment && require.resolve(‘style-loader’),
isEnvProduction && {
loader: MiniCssExtractPlugin.loader,
// css is located in static/css, use ‘…/…/’ to locate index.html folder
// in production paths.publicUrlOrPath can be a relative path
options: paths.publicUrlOrPath.startsWith(‘.’)
? { publicPath: ‘…/…/’ }
: {},
},
{
loader: require.resolve(‘css-loader’),
options: cssOptions,
},
{
// Options for PostCSS as we reference these options twice
// Adds vendor prefixing based on your specified browser support in
// package.json
loader: require.resolve(‘postcss-loader’),
options: {
postcssOptions: {
// Necessary for external CSS imports to work
// https://github.com/facebook/create-react-app/issues/2677
ident: ‘postcss’,
config: false,
plugins: !useTailwind
? [
‘postcss-flexbugs-fixes’,
[
‘postcss-preset-env’,
{
autoprefixer: {
flexbox: ‘no-2009’,
},
stage: 3,
},
],
[
px2rem(px2remOpts)
],
// Adds PostCSS Normalize as the reset css with default options,
// so that it honors browserslist config in package.json
// which in turn let’s users customize the target behavior as per their needs.
‘postcss-normalize’,
]
: [
‘tailwindcss’,
‘postcss-flexbugs-fixes’,
[
‘postcss-preset-env’,
{
autoprefixer: {
flexbox: ‘no-2009’,
},
stage: 3,
},
],
],
},
sourceMap: isEnvProduction ? shouldUseSourceMap : isEnvDevelopment,
}
}
].filter(Boolean);
if (preProcessor) {
loaders.push(
{
loader: require.resolve(‘resolve-url-loader’),
options: {
sourceMap: isEnvProduction ? shouldUseSourceMap : isEnvDevelopment,
root: paths.appSrc,
},
},
{
loader: require.resolve(preProcessor),
options: {
sourceMap: true,
},
}
);
}
return loaders;
};
return {
target: [‘browserslist’],
// Webpack noise constrained to errors and warnings
stats: ‘errors-warnings’,
mode: isEnvProduction ? ‘production’ : isEnvDevelopment && ‘development’,
// Stop compilation early in production
bail: isEnvProduction,
devtool: isEnvProduction
? shouldUseSourceMap
? ‘source-map’
: false
: isEnvDevelopment && ‘cheap-module-source-map’,
// These are the “entry points” to our application.
// This means they will be the “root” imports that are included in JS bundle.
entry: paths.appIndexJs,
output: {
// The build folder.
path: paths.appBuild,
// Add /* filename */ comments to generated require()s in the output.
pathinfo: isEnvDevelopment,
// There will be one main bundle, and one file per asynchronous chunk.
// In development, it does not produce real files.
filename: isEnvProduction
? ‘static/js/[name].[contenthash:8].js’
: isEnvDevelopment && ‘static/js/bundle.js’,
// There are also additional JS chunk files if you use code splitting.
chunkFilename: isEnvProduction
? ‘static/js/[name].[contenthash:8].chunk.js’
: isEnvDevelopment && ‘static/js/[name].chunk.js’,
assetModuleFilename: ‘static/media/[name].[hash][ext]’,
// webpack uses publicPath to determine where the app is being served from.
// It requires a trailing slash, or the file assets will get an incorrect path.
// We inferred the “public path” (such as / or /my-project) from homepage.
publicPath: paths.publicUrlOrPath,
// Point sourcemap entries to original disk location (format as URL on Windows)
devtoolModuleFilenameTemplate: isEnvProduction
? info =>
path
.relative(paths.appSrc, info.absoluteResourcePath)
.replace(/\/g, ‘/’)
: isEnvDevelopment &&
(info => path.resolve(info.absoluteResourcePath).replace(/\/g, ‘/’)),
},
cache: {
type: ‘filesystem’,
version: createEnvironmentHash(env.raw),
cacheDirectory: paths.appWebpackCache,
store: ‘pack’,
buildDependencies: {
defaultWebpack: [‘webpack/lib/’],
config: [__filename],
tsconfig: [paths.appTsConfig, paths.appJsConfig].filter(f =>
fs.existsSync(f)
),
},
},
infrastructureLogging: {
level: ‘none’,
},
optimization: {
minimize: isEnvProduction,
minimizer: [
// This is only used in production mode
new TerserPlugin({
terserOptions: {
parse: {
// We want terser to parse ecma 8 code. However, we don’t want it
// to apply any minification steps that turns valid ecma 5 code
// into invalid ecma 5 code. This is why the ‘compress’ and ‘output’
// sections only apply transformations that are ecma 5 safe
// https://github.com/facebook/create-react-app/pull/4234
ecma: 8,
},
compress: {
ecma: 5,
warnings: false,
// Disabled because of an issue with Uglify breaking seemingly valid code:
// https://github.com/facebook/create-react-app/issues/2376
// Pending further investigation:
// https://github.com/mishoo/UglifyJS2/issues/2011
comparisons: false,
// Disabled because of an issue with Terser breaking valid code:
// https://github.com/facebook/create-react-app/issues/5250
// Pending further investigation:
// https://github.com/terser-js/terser/issues/120
inline: 2,
},
mangle: {
safari10: true,
},
// Added for profiling in devtools
keep_classnames: isEnvProductionProfile,
keep_fnames: isEnvProductionProfile,
output: {
ecma: 5,
comments: false,
// Turned on because emoji and regex is not minified properly using default
// https://github.com/facebook/create-react-app/issues/2488
ascii_only: true,
},
},
}),
// This is only used in production mode
new CssMinimizerPlugin(),
],
},
resolve: {
// This allows you to set a fallback for where webpack should look for modules.
// We placed these paths second because we want node\_modules to “win”
// if there are any conflicts. This matches Node resolution mechanism.
// https://github.com/facebook/create-react-app/issues/253
modules: [‘node_modules’, paths.appNodeModules].concat(
modules.additionalModulePaths || []
),
// These are the reasonable defaults supported by the Node ecosystem.
// We also include JSX as a common component filename extension to support
// some tools, although we do not recommend using it, see:
// https://github.com/facebook/create-react-app/issues/290
// web extension prefixes have been added for better support
// for React Native Web.
extensions: paths.moduleFileExtensions
.map(ext => .${ext})
.filter(ext => useTypeScript || !ext.includes(‘ts’)),
alias: {
// Support React Native Web
// https://www.smashingmagazine.com/2016/08/a-glimpse-into-the-future-with-react-native-for-web/
‘react-native’: ‘react-native-web’,
// Allows for better profiling with ReactDevTools
…(isEnvProductionProfile && {
‘react-domKaTeX parse error: Expected 'EOF', got '}' at position 97: …ling', }̲), "@":…/,
loader: require.resolve(‘source-map-loader’),
},
{
// “oneOf” will traverse all following loaders until one will
// match the requirements. When no loader matches it will fall
// back to the “file” loader at the end of the loader list.
oneOf: [
// TODO: Merge this config once image/avif is in the mime-db
// https://github.com/jshttp/mime-db
{
test: [/.avifKaTeX parse error: Expected 'EOF', got '}' at position 229: …}, }̲, /…/, /.gif
/
,
/
j
˙
p
e
?
g
/, /\.jpe?g
/,/j˙pe?g/, /.pngKaTeX parse error: Expected 'EOF', got '}' at position 191: …}, }̲, {…/,
use: [
{
loader: require.resolve(’@svgr/webpack’),
options: {
prettier: false,
svgo: false,
svgoConfig: {
plugins: [{ removeViewBox: false }],
},
titleProp: true,
ref: true,
},
},
{
loader: require.resolve(‘file-loader’),
options: {
name: ‘static/media/[name].[hash].[ext]’,
},
},
],
issuer: {
and: [/.(ts|tsx|js|jsx|md|mdx)KaTeX parse error: Expected 'EOF', got '}' at position 19: … }̲, }…/,
include: paths.appSrc,
loader: require.resolve(‘babel-loader’),
options: {
customize: require.resolve(
‘babel-preset-react-app/webpack-overrides’
),
presets: [
[
require.resolve(‘babel-preset-react-app’),
{
runtime: hasJsxRuntime ? ‘automatic’ : ‘classic’,
},
],
],
            plugins: [
              isEnvDevelopment &&
                shouldUseReactRefresh &&
                require.resolve('react-refresh/babel'),
                [
                  "import",
                  {
                    "libraryName": "react-vant",
                    "libraryDirectory": "es",
                    "style": true
                  }
               ]
            ].filter(Boolean),
            // This is a feature of `babel-loader` for webpack (not Babel itself).
            // It enables caching results in ./node\_modules/.cache/babel-loader/
            // directory for faster rebuilds.
            cacheDirectory: true,
            // See #6846 for context on why cacheCompression is disabled
            cacheCompression: false,
            compact: isEnvProduction,
          },
        },
        // Process any JS outside of the app with Babel.
为了做好运维面试路上的助攻手,特整理了上百道 【运维技术栈面试题集锦】 ,让你面试不慌心不跳,高薪offer怀里抱!
这次整理的面试题,小到shell、MySQL,大到K8s等云原生技术栈,不仅适合运维新人入行面试需要,还适用于想提升进阶跳槽加薪的运维朋友。

本份面试集锦涵盖了
- 174 道运维工程师面试题
- 128道k8s面试题
- 108道shell脚本面试题
- 200道Linux面试题
- 51道docker面试题
- 35道Jenkis面试题
- 78道MongoDB面试题
- 17道ansible面试题
- 60道dubbo面试题
- 53道kafka面试
- 18道mysql面试题
- 40道nginx面试题
- 77道redis面试题
- 28道zookeeper
总计 1000+ 道面试题, 内容 又全含金量又高
- 174道运维工程师面试题
1、什么是运维?
2、在工作中,运维人员经常需要跟运营人员打交道,请问运营人员是做什么工作的?
3、现在给你三百台服务器,你怎么对他们进行管理?
4、简述raid0 raid1raid5二种工作模式的工作原理及特点
5、LVS、Nginx、HAproxy有什么区别?工作中你怎么选择?
6、Squid、Varinsh和Nginx有什么区别,工作中你怎么选择?
7、Tomcat和Resin有什么区别,工作中你怎么选择?
8、什么是中间件?什么是jdk?
9、讲述一下Tomcat8005、8009、8080三个端口的含义?
10、什么叫CDN?
11、什么叫网站灰度发布?
12、简述DNS进行域名解析的过程?
13、RabbitMQ是什么东西?
14、讲一下Keepalived的工作原理?
15、讲述一下LVS三种模式的工作过程?
16、mysql的innodb如何定位锁问题,mysql如何减少主从复制延迟?
17、如何重置mysql root密码?
网上学习资料一大堆,但如果学到的知识不成体系,遇到问题时只是浅尝辄止,不再深入研究,那么很难做到真正的技术提升。
一个人可以走的很快,但一群人才能走的更远!不论你是正从事IT行业的老鸟或是对IT行业感兴趣的新人,都欢迎加入我们的的圈子(技术交流、学习资源、职场吐槽、大厂内推、面试辅导),让我们一起学习成长!
转存中…(img-56CYtGx1-1715873411761)]
本份面试集锦涵盖了
- 174 道运维工程师面试题
- 128道k8s面试题
- 108道shell脚本面试题
- 200道Linux面试题
- 51道docker面试题
- 35道Jenkis面试题
- 78道MongoDB面试题
- 17道ansible面试题
- 60道dubbo面试题
- 53道kafka面试
- 18道mysql面试题
- 40道nginx面试题
- 77道redis面试题
- 28道zookeeper
总计 1000+ 道面试题, 内容 又全含金量又高
- 174道运维工程师面试题
1、什么是运维?
2、在工作中,运维人员经常需要跟运营人员打交道,请问运营人员是做什么工作的?
3、现在给你三百台服务器,你怎么对他们进行管理?
4、简述raid0 raid1raid5二种工作模式的工作原理及特点
5、LVS、Nginx、HAproxy有什么区别?工作中你怎么选择?
6、Squid、Varinsh和Nginx有什么区别,工作中你怎么选择?
7、Tomcat和Resin有什么区别,工作中你怎么选择?
8、什么是中间件?什么是jdk?
9、讲述一下Tomcat8005、8009、8080三个端口的含义?
10、什么叫CDN?
11、什么叫网站灰度发布?
12、简述DNS进行域名解析的过程?
13、RabbitMQ是什么东西?
14、讲一下Keepalived的工作原理?
15、讲述一下LVS三种模式的工作过程?
16、mysql的innodb如何定位锁问题,mysql如何减少主从复制延迟?
17、如何重置mysql root密码?
网上学习资料一大堆,但如果学到的知识不成体系,遇到问题时只是浅尝辄止,不再深入研究,那么很难做到真正的技术提升。
一个人可以走的很快,但一群人才能走的更远!不论你是正从事IT行业的老鸟或是对IT行业感兴趣的新人,都欢迎加入我们的的圈子(技术交流、学习资源、职场吐槽、大厂内推、面试辅导),让我们一起学习成长!


 2515
2515


 被折叠的 条评论
为什么被折叠?
被折叠的 条评论
为什么被折叠?
 到【灌水乐园】发言


