


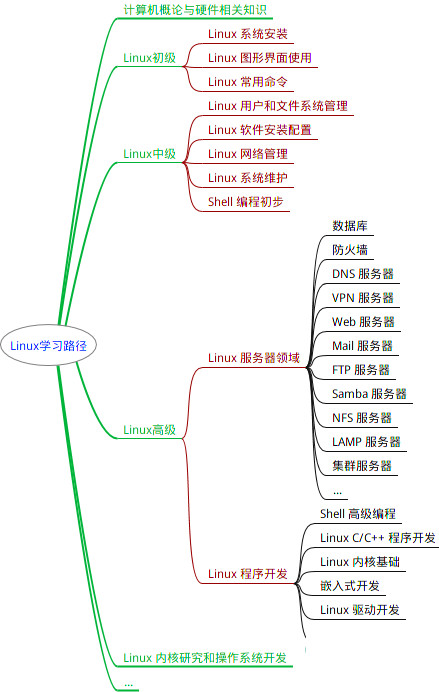
# 代码就不展示了,很简单,就是把75 c7改成75 00即可。
[root@localhost test]# ./a.out 5446 4006a3 # base(0x400000)+offset(0x6a2+1)
看看psss的情况:
value:5446   address:0x7ffd4943cf18  pid:5446
value:5446   address:0x7ffd4943cf18  pid:5446
value:5446   address:0x7ffd4943cf18  pid:5446
break the loop!
成功跳出了死循环!
接下来玩一个简单的进程注入,来调用一个僵尸函数。
请看原始程序代码:
// pokestack.c
#include <stdio.h>
#include <stdlib.h>

void say\_hi()
{
	printf("skinshoe\n");
	exit(0);
}

int main(int argc, char \*\*argv)
{
	int tf = atoi(argv[1]);
	long a = 0x1122334455667788;
	while (tf) {
		printf("value:%lx address:%p pid:%d\n", a, &a, getpid());
		sleep(120); // 在120秒内完成手工操作。用getchar亦可。
	}

	printf("break the loop!\n");
}
请注意,say_hi函数没有任何地方调用它,我们接下来就通过修改其mem文件,让这个程序调用say_hi。
先把它跑起来:
[root@localhost test]# ./pokestack 1
value:1122334455667788   address:0x7fff75a4ba80  pid:5553
按照老样子,这次我们定位其stack中被压栈的sleep返回地址的位置,我们的目标就是改掉它。
如果你不想每次都去查stack的位置,你可以关闭一些ASLR的保护,比如:
sysctl -w kernel.randomize_va_space=0
但是这里为了让事情更加真实,不采用这个伎俩,在真实的环境中,也几乎没有关闭ASLR的。
所以我们依然要查stack的位置,毕竟它被随机化了,每次都不一样:
[root@localhost test]# cat /proc/5553/smaps |grep -E \\[stack\\]
7fff75a2c000-7fff75a4d000 rw-p 00000000 00:00 0                          [stack]
[root@localhost test]# dd if=/proc/5553/mem of=./pokestack.dd skip=140735166988288 bs=1 count=557056
记录了135168+0 的读入
记录了135168+0 的写出
135168字节(135 kB)已复制,0.165683 秒,816 kB/秒
[root@localhost test]# hexdump ./pokestack.dd >./pokestack.hex
我们开始寻找pokestack.hex里面sleep的return address的位置,找到了下面的行:
001fa60 bb70 75a4 7fff 0000 06ff 0040 0000 0000
4006ff就是了。
至于说是如何找到的,不是本文的内容,无非就是按照模式去匹配了:
- 返回main函数肯定是400000附近…
让我们改掉它,改成say_hi的地址:
# 0x7FFF75A4BA68是stack基地址和0x001fa60+0x8的加和。
# 0x000000000040067d是say\_hi的地址。
# 将0x7FFF75A4BA68位置的值改成0x000000000040067d
[root@localhost test]# ./a.out 5553 0x7FFF75A4BA68 0x000000000040067d
等待sleep返回后,看效果:
value:1122334455667788   address:0x7fff75a4ba80  pid:5553

skinshoe
[root@localhost test]#
效果不错。
接下来让我们把一段独立的代码注入到一个已经运行的进程:
// pokestack.c
#include <stdio.h>
#include <stdlib.h>

int main(int argc, char \*\*argv)
{
	\_\_asm("mov $123, %rdi\n"); // 这句是为了导出exit系统调用参数123的指令码。。。
	while (1) {
		printf("pid:%d\n", getpid());
		sleep(120);
	}
}
导出stack的信息:
[root@localhost test]# cat /proc/6033/smaps |grep -E -A2 \\[stack\\]
7ffe66868000-7ffe66889000 rw-p 00000000 00:00 0                          [stack]
Size:                136 kB
Rss:                  16 kB
注意,stack没有可执行权限,所以要在binary的text段进行注入。
如果stack可执行,那么事情就会简单的多,直接将要注入的代码覆盖stack的起始位置就好了(由于stack从高向低伸展,一般伸展不到这么远的地方),让stack变得可执行也不是那么困难,用下面的方式编译即可:
[root@localhost test]# gcc -O0 -z execstack pokestack.c -o pokestack
但是这里为了让事情更加真实,不采用这个伎俩,在真实的环境中,也几乎没有让stack可执行的。
现在我们看一下binary的text段信息:
[root@localhost test]# cat /proc/6033/smaps |grep -A2 r-xp.\*pokestack
00400000-00401000 r-xp 00000000 fd:00 75346995                           /usr/test/pokestack
Size:                  4 kB
Rss:                   4 kB
下面是实施注入的代码:
#include <sys/types.h>
#include <sys/stat.h>
#include <fcntl.h>
#include <stdio.h>
#include <stdlib.h>

int main(int argc, char \*\*argv)
{
	char name[32];
	int fd;
	int pid;
	unsigned long caddr, raddr;
	unsigned long ret_addr;
	// code 仅仅是一个exit(123)的系统调用
	char code[14] = {0x48, 0xc7, 0xc7, 0x7b, 0x00, 0x00, 0x00, 0xb8, 0x3c, 0x00, 0x00, 0x00, 0x0f, 0x05};

	pid = atoi(argv[1]);
	caddr = strtoul(argv[2], NULL, 16);
	raddr = strtoul(argv[3], NULL, 16);

	sprintf(name, "/proc/%d/mem", pid);
	fd = open(name, O_RDWR);

	lseek(fd, caddr, SEEK\_SET);
	write(fd, &code, sizeof(code));

	lseek(fd, raddr, SEEK\_SET);
	write(fd, &caddr, sizeof(caddr));
}
不再解释代码,我们直接看效果:
# 0x7FFE66887998依然是用dd方法导出的stack找到的return address地址位置。
[root@localhost test]# ./a.out 6033 0x00400000 0x7FFE66887998
看看6033号进程的结局:
[root@localhost test]# ./pokestack
pid:6033
[root@localhost test]# echo $?
123
成功以123退出。
下面,我们来个打印怎么样?来打印一堆a。
我们需要注入printf的调用,然而一般都是用相对偏移调用的call,校准的过程并不容易,因此我们采用下面的方法:
push printf@GLIBC
ret
然而printf何在?于是乎,先简单一点,我们直接调用write系统调用。
先看原始代码:
#include <stdio.h>
#include <stdlib.h>

int main(int argc, char \*\*argv)
{
	while (1) {
		printf("pid:%d\n", getpid());
		getchar();
	}
}
跑起来:
[root@localhost test]# ./pokestack
pid:14917

pid:14917
... # 继续敲任意键,依然会getchar,这就是个死循环
一步一步地获取信息:
[root@localhost test]# cat /proc/14917/smaps |grep -E \\[stack\\]
7ffc08ac1000-7ffc08ae2000 rw-p 00000000 00:00 0                          [stack]
[root@localhost test]# dd if=/proc/14917/mem of=./pokestack.dd skip=140720453980160 bs=1 count=557056
[root@localhost test]# hexdump ./pokestack.dd >./pokestack.hex
...
在pokestack.hex里找到了下面的行:
001f4a0 0000 0000 0000 0000 05dc 0040 0000 0000
拼接偏移:
0x7ffc08ac1000 + 0x001f4a0 + 0x08 = 0x7FFDF4F9E818
来制作我们的注入code并且实施注入,下面是代码:
#include <sys/types.h>
#include <sys/stat.h>
#include <fcntl.h>
#include <stdio.h>
#include <stdlib.h>

int main(int argc, char \*\*argv)
{
	char name[32];
	int fd;
	int pid;
	unsigned long caddr, raddr;
	unsigned long ret_addr;
	char code[58] = {/\*0x00\*/ 0x61, 0x61, 0x61, 0x0a,
					 /\*0x04\*/ 0x00, 0x00, 0x00, 0x00,
					 /\*0x08\*/ 0x00, 0x00, 0x00, 0x00,
					 /\*0x0c\*/ 0x00, 0x00, 0x00, 0x00,
					 /\*0x10\*/ 0x48, 0xc7, 0xc7, 0x01, 0x00, 0x00, 0x00, // mov 1, rdi
					 		  0x48, 0xc7, 0xc6, 0x00, 0x00, 0x40, 0x00, // mov 400000, rsi
					 		  0x48, 0xc7, 0xc2, 0x04, 0x00, 0x00, 0x00, // mov 4, rdx
							  0xb8, 0x01, 0x00, 0x00, 0x00,				// mov 1, eax
					 		  0x0f, 0x05,						// write syscall
							  0x48, 0xc7, 0xc7, 0x7b, 0x00, 0x00, 0x00, // mov 123, rdi
							  0xb8, 0x3c, 0x00, 0x00, 0x00, 			// mov 60, eax
							  0x0f, 0x05};						// exit syscall

	pid = atoi(argv[1]);
	caddr = strtoul(argv[2], NULL, 16);
	raddr = strtoul(argv[3], NULL, 16);

	sprintf(name, "/proc/%d/mem", pid);
	fd = open(name, O_RDWR);

	lseek(fd, caddr, SEEK\_SET);
	write(fd, &code[0], sizeof(code));

	caddr += 0x10; // 从mov 1, rdi开始执行
	lseek(fd, raddr, SEEK\_SET);
	write(fd, &caddr, sizeof(caddr));
}
来实施注入:
[root@localhost test]# ./a.out 14917 0x00400000 0x7FFC08AE04A8
看效果:
[root@localhost test]# ./pokestack
pid:14917

pid:14917

aaa
[root@localhost test]# echo $?
123
[root@localhost test]#
不错,跳出了死循环并以123退出。
是不是比ptrace好玩呢?
…
我们还是希望可以直接调用GLIBC的库函数,而不是直接调用系统调用,其实这并不难。
先看下面的代码:
#include <stdio.h>
char abc1[] = "aaaa\n";
int main()
{
	printf("\n\n"); // 为了让该程序加载时解析到printf函数
	\_\_asm("mov $0x000000000060102c, %rdi"); // abc1的地址给rdi寄存器作为参数
	\_\_asm("push $0x40053d"); // main函数\_asm("ret")后面的位置
	\_\_asm("push $0x0000000000400400"); // printf的位置
	\_\_asm("ret");
}
其中的数字都是从objdump里手工找到的。
执行一下试试看,看是不是打印出了aaaa呢。
我们就用此方法来实施注入,还是原来的那个程序,我再贴一遍:
#include <stdio.h>
#include <stdlib.h>

int main(int argc, char \*\*argv)
{
	while (1) {
		printf("pid:%d\n", getpid());
		getchar();
	}
}
跑起来:
[root@localhost test]# ./pokestack
最全的Linux教程,Linux从入门到精通
======================
1. **linux从入门到精通(第2版)**
2. **Linux系统移植**
3. **Linux驱动开发入门与实战**
4. **LINUX 系统移植 第2版**
5. **Linux开源网络全栈详解 从DPDK到OpenFlow**
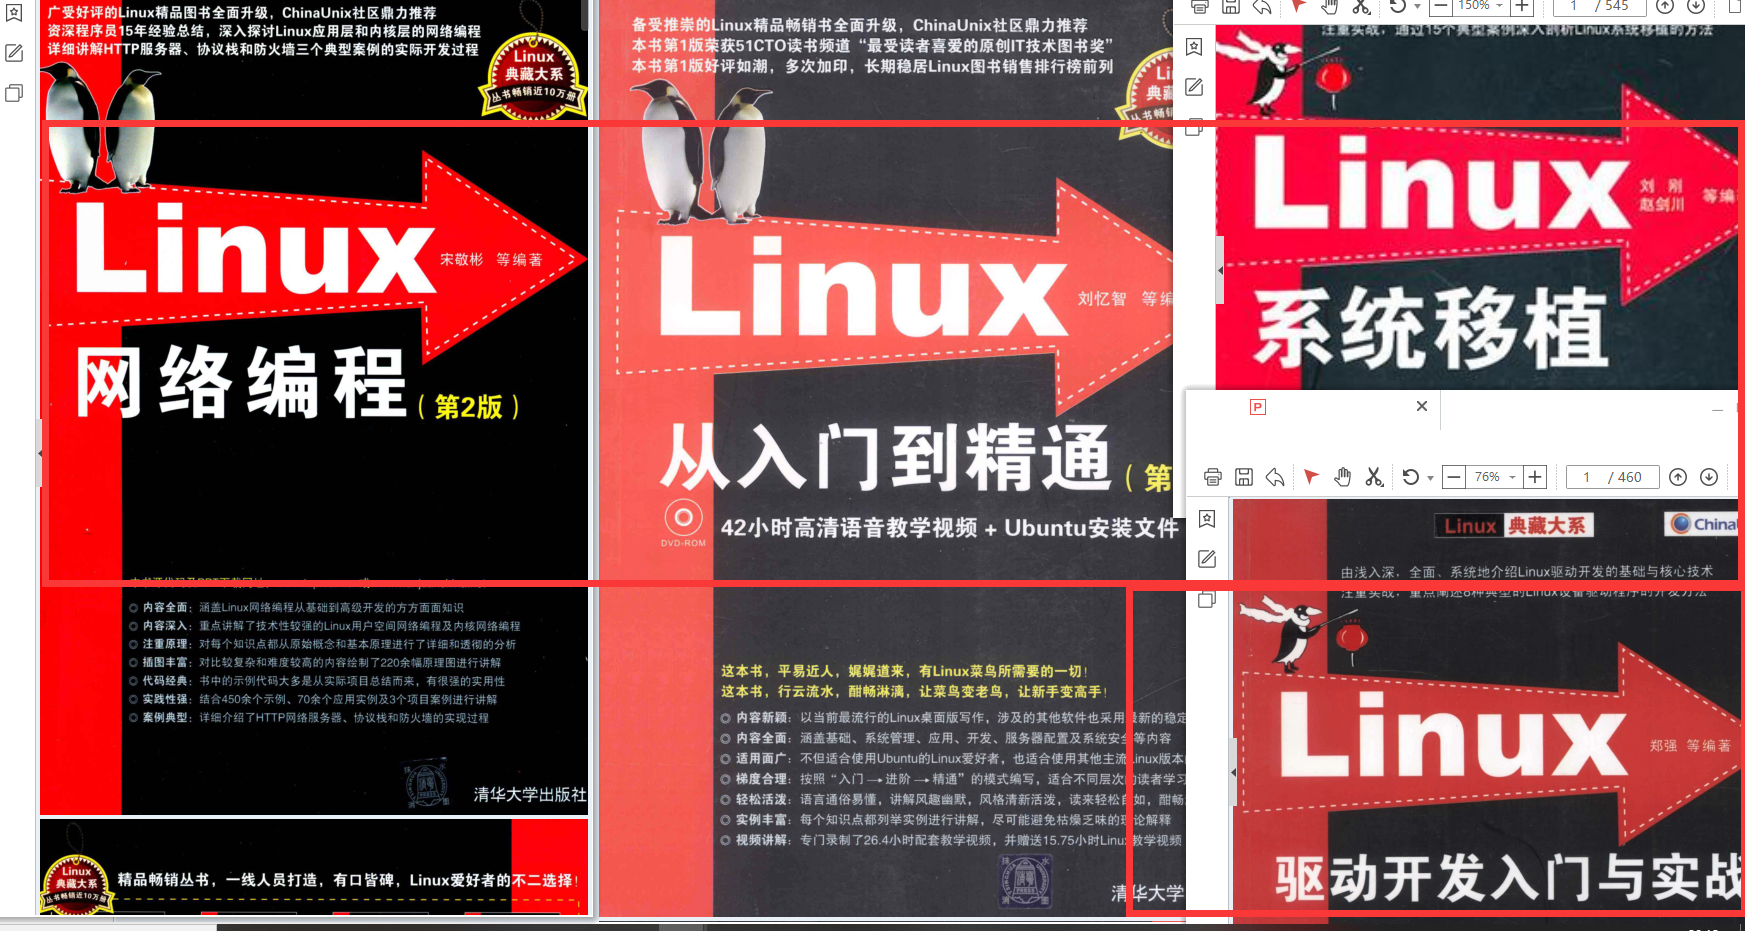
第一份《Linux从入门到精通》466页
====================
内容简介
====
本书是获得了很多读者好评的Linux经典畅销书**《Linux从入门到精通》的第2版**。本书第1版出版后曾经多次印刷,并被51CTO读书频道评为“最受读者喜爱的原创IT技术图书奖”。本书第﹖版以最新的Ubuntu 12.04为版本,循序渐进地向读者介绍了Linux 的基础应用、系统管理、网络应用、娱乐和办公、程序开发、服务器配置、系统安全等。本书附带1张光盘,内容为本书配套多媒体教学视频。另外,本书还为读者提供了大量的Linux学习资料和Ubuntu安装镜像文件,供读者免费下载。

**本书适合广大Linux初中级用户、开源软件爱好者和大专院校的学生阅读,同时也非常适合准备从事Linux平台开发的各类人员。**
> 需要《Linux入门到精通》、《linux系统移植》、《Linux驱动开发入门实战》、《Linux开源网络全栈》电子书籍及教程的工程师朋友们劳烦您转发+评论


 791
791


 被折叠的 条评论
为什么被折叠?
被折叠的 条评论
为什么被折叠?
 到【灌水乐园】发言


