


ret = hi\_nv\_init(ptable->table[HI_FLASH_PARTITON_NORMAL_NV].addr, ptable->table[HI_FLASH_PARTITON_NORMAL_NV].size,
    HI_NV_DEFAULT_BLOCK_SIZE);
if (ret != HI_ERR_SUCCESS) {
    printf("nv init fail\r\n");
}
#ifndef CONFIG_FACTORY_TEST_MODE
hi_upg_init();
#endif
/\* if not use file system, there is no need init it \*/
hi\_fs\_init();

(hi_void)hi\_event\_init(APP_INIT_EVENT_NUM, HI_NULL);
hi\_sal\_init();
/\* 此处设为TRUE后中断中看门狗复位会显示复位时PC值,但有复位不完全风险,量产版本请务必设为FALSE \*/
hi\_syserr\_watchdog\_debug(HI_FALSE);
/\* 默认记录宕机信息到FLASH,根据应用场景,可不记录,避免频繁异常宕机情况损耗FLASH寿命 \*/
hi\_syserr\_record\_crash\_info(HI_TRUE);

hi\_lpc\_init();
hi\_lpc\_register\_hw\_handler(config_before_sleep, config_after_sleep);
#if defined(CONFIG_AT_COMMAND) || defined(CONFIG_FACTORY_TEST_MODE)
ret = hi_at_init();
if (ret == HI_ERR_SUCCESS) {
hi_at_sys_cmd_register();
}
#endif
/\* 如果不需要使用Histudio查看WIFI驱动运行日志等,无需初始化diag \*/
/\* if not use histudio for diagnostic, diag initialization is unnecessary \*/
/\* Shell and Diag use the same uart port, only one of them can be selected \*/
#ifndef CONFIG_FACTORY_TEST_MODE
#ifndef ENABLE_SHELL_DEBUG
#ifdef CONFIG_DIAG_SUPPORT
(hi_void)hi_diag_init();
#endif
#else
(hi_void)hi_shell_init();
#endif
tcpip\_init(NULL, NULL);
#endif
ret = hi\_wifi\_init(APP_INIT_VAP_NUM, APP_INIT_USR_NUM);
if (ret != HISI_OK) {
printf("wifi init failed!\n");
} else {
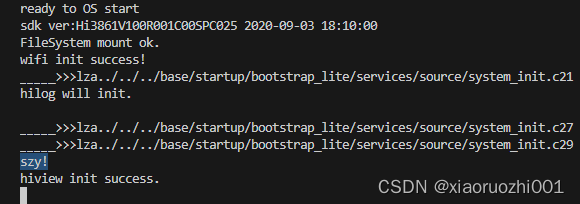
printf("wifi init success!\n");
}
app\_demo\_task\_release\_mem(); /\* 释放系统栈内存所使用任务 \*/
#ifndef CONFIG_FACTORY_TEST_MODE
app_demo_upg_init();
#ifdef CONFIG_HILINK
ret = hilink_main();
if (ret != HISI_OK) {
printf(“hilink init failed!\n”);
} else {
printf(“hilink init success!\n”);
}
#endif
#endif
OHOS_Main();
}
>
> app\_main 一开始打印了 SDK 版本号,中间还会有一些初始化动作,最后一行会调用
>  OHOS\_Main();
>  该函数原型如下:
>
>
>
void OHOS_Main()
{
#if defined(CONFIG_AT_COMMAND) || defined(CONFIG_FACTORY_TEST_MODE)
hi_u32 ret;
ret = hi_at_init();
if (ret == HI_ERR_SUCCESS) {
hi_u32 ret2 = hi_at_register_cmd(G_OHOS_AT_FUNC_TBL, OHOS_AT_FUNC_NUM);
if (ret2 != HI_ERR_SUCCESS) {
printf(“Register ohos failed!\n”);
}
}
#endif
OHOS_SystemInit();
}
>
> 最后,OHOS\_SystemInit 函数进行鸿蒙系统的初始化。我们进去看下初始化做了哪些动
>  作。
>  路径:base\startup\bootstrap\_lite\services\source\system\_init.c
>
>
>
void OHOS_SystemInit(void)
{
MODULE_INIT(bsp);
MODULE_INIT(device);
MODULE_INIT(core);
SYS_INIT(service);
SYS_INIT(feature);
MODULE_INIT(run);
SAMGR_Bootstrap();
}
>
> 我们可以看到主要是初始化了 一些相关模块、系统,包括有 bsp、device(设备)。其
>  中最终的是 MODULE\_INIT(run)
>  它负责调用了,所有 run 段的代码,那么 run 段的代码是哪些呢?
>  事实上就是我们前面 application 中使用 SYS\_RUN() 宏设置的函数名。
>  还记得我们前面写的 hello world 应用程序吗?
>
>
>
#include “ohos_init.h”
#include “ohos_types.h”
void HelloWorld(void)
{
printf(“[DEMO] Hello world.\n”);
}
SYS_RUN(HelloWorld)
>
> 也就是说所有用 SYS\_RUN() 宏设置的函数都会在使用 MODULE\_INIT(run); 为此我们可以在 OHOS\_SystemInit(void)的函数中加一些打印函数:
>
>
>

---
到此为止,我们已经看到了大概的启动流程:
#mermaid-svg-rp9VBZNbpFYcgrPx {font-family:"trebuchet ms",verdana,arial,sans-serif;font-size:16px;fill:#333;}#mermaid-svg-rp9VBZNbpFYcgrPx .error-icon{fill:#552222;}#mermaid-svg-rp9VBZNbpFYcgrPx .error-text{fill:#552222;stroke:#552222;}#mermaid-svg-rp9VBZNbpFYcgrPx .edge-thickness-normal{stroke-width:2px;}#mermaid-svg-rp9VBZNbpFYcgrPx .edge-thickness-thick{stroke-width:3.5px;}#mermaid-svg-rp9VBZNbpFYcgrPx .edge-pattern-solid{stroke-dasharray:0;}#mermaid-svg-rp9VBZNbpFYcgrPx .edge-pattern-dashed{stroke-dasharray:3;}#mermaid-svg-rp9VBZNbpFYcgrPx .edge-pattern-dotted{stroke-dasharray:2;}#mermaid-svg-rp9VBZNbpFYcgrPx .marker{fill:#333333;stroke:#333333;}#mermaid-svg-rp9VBZNbpFYcgrPx .marker.cross{stroke:#333333;}#mermaid-svg-rp9VBZNbpFYcgrPx svg{font-family:"trebuchet ms",verdana,arial,sans-serif;font-size:16px;}#mermaid-svg-rp9VBZNbpFYcgrPx .label{font-family:"trebuchet ms",verdana,arial,sans-serif;color:#333;}#mermaid-svg-rp9VBZNbpFYcgrPx .cluster-label text{fill:#333;}#mermaid-svg-rp9VBZNbpFYcgrPx .cluster-label span{color:#333;}#mermaid-svg-rp9VBZNbpFYcgrPx .label text,#mermaid-svg-rp9VBZNbpFYcgrPx span{fill:#333;color:#333;}#mermaid-svg-rp9VBZNbpFYcgrPx .node rect,#mermaid-svg-rp9VBZNbpFYcgrPx .node circle,#mermaid-svg-rp9VBZNbpFYcgrPx .node ellipse,#mermaid-svg-rp9VBZNbpFYcgrPx .node polygon,#mermaid-svg-rp9VBZNbpFYcgrPx .node path{fill:#ECECFF;stroke:#9370DB;stroke-width:1px;}#mermaid-svg-rp9VBZNbpFYcgrPx .node .label{text-align:center;}#mermaid-svg-rp9VBZNbpFYcgrPx .node.clickable{cursor:pointer;}#mermaid-svg-rp9VBZNbpFYcgrPx .arrowheadPath{fill:#333333;}#mermaid-svg-rp9VBZNbpFYcgrPx .edgePath .path{stroke:#333333;stroke-width:2.0px;}#mermaid-svg-rp9VBZNbpFYcgrPx .flowchart-link{stroke:#333333;fill:none;}#mermaid-svg-rp9VBZNbpFYcgrPx .edgeLabel{background-color:#e8e8e8;text-align:center;}#mermaid-svg-rp9VBZNbpFYcgrPx .edgeLabel rect{opacity:0.5;background-color:#e8e8e8;fill:#e8e8e8;}#mermaid-svg-rp9VBZNbpFYcgrPx .cluster rect{fill:#ffffde;stroke:#aaaa33;stroke-width:1px;}#mermaid-svg-rp9VBZNbpFYcgrPx .cluster text{fill:#333;}#mermaid-svg-rp9VBZNbpFYcgrPx .cluster span{color:#333;}#mermaid-svg-rp9VBZNbpFYcgrPx div.mermaidTooltip{position:absolute;text-align:center;max-width:200px;padding:2px;font-family:"trebuchet ms",verdana,arial,sans-serif;font-size:12px;background:hsl(80, 100%, 96.2745098039%);border:1px solid #aaaa33;border-radius:2px;pointer-events:none;z-index:100;}#mermaid-svg-rp9VBZNbpFYcgrPx :root{--mermaid-font-family:"trebuchet ms",verdana,arial,sans-serif;}
app\_main
OHOS\_Main<>
OHOS\_SystemInit<>
SYS INIT<>
MODULE INIT<>
MODULE\_INIT--run
它负责调用了所有 run 段的代码
## 最后
**自我介绍一下,小编13年上海交大毕业,曾经在小公司待过,也去过华为、OPPO等大厂,18年进入阿里一直到现在。**
**深知大多数Java工程师,想要提升技能,往往是自己摸索成长,自己不成体系的自学效果低效漫长且无助。**
**因此收集整理了一份《2024年嵌入式&物联网开发全套学习资料》,初衷也很简单,就是希望能够帮助到想自学提升又不知道该从何学起的朋友,同时减轻大家的负担。**


**既有适合小白学习的零基础资料,也有适合3年以上经验的小伙伴深入学习提升的进阶课程,基本涵盖了95%以上嵌入式&物联网开发知识点,真正体系化!**
[**如果你觉得这些内容对你有帮助,需要这份全套学习资料的朋友可以戳我获取!!**](https://bbs.csdn.net/topics/618654289)
**由于文件比较大,这里只是将部分目录大纲截图出来,每个节点里面都包含大厂面经、学习笔记、源码讲义、实战项目、讲解视频,并且后续会持续更新**!!
[外链图片转存中...(img-z2v0cNvY-1715759269251)]
[外链图片转存中...(img-p7OEN51p-1715759269252)]
[外链图片转存中...(img-4oEMWRyC-1715759269254)]
[外链图片转存中...(img-9J5YoLly-1715759269254)]
**既有适合小白学习的零基础资料,也有适合3年以上经验的小伙伴深入学习提升的进阶课程,基本涵盖了95%以上嵌入式&物联网开发知识点,真正体系化!**
[**如果你觉得这些内容对你有帮助,需要这份全套学习资料的朋友可以戳我获取!!**](https://bbs.csdn.net/topics/618654289)
**由于文件比较大,这里只是将部分目录大纲截图出来,每个节点里面都包含大厂面经、学习笔记、源码讲义、实战项目、讲解视频,并且后续会持续更新**!!


 89
89


 被折叠的 条评论
为什么被折叠?
被折叠的 条评论
为什么被折叠?
 到【灌水乐园】发言


