


username: root
password: root
jpa:
database: MySQL
show-sql: true
open-in-view: true
#配置Eureka
eureka:
client:
service-url:
defaultZone: http://localhost:9000/eureka/
instance:
prefer-ip-address: true #使用ip地址注册
instance-id: s p r i n g . c l o u d . c l i e n t . i p − a d d r e s s : {spring.cloud.client.ip-address}: spring.cloud.client.ip−address:{server.port} #向组成中心注册服务ID
lease-renewal-interval-in-seconds: 5 #向注册中心中注册服务id
lease-expiration-duration-in-seconds: 10 #续约到期的时间
name: itbluebox
(2)ProductController

@RestController
@RequestMapping(“/product”)
public class ProductController {
@Autowired
private ProductService productService;
@Value(“${server.port}”)
private String port;
@Value(“${spring.cloud.client.ip-address}”)
private String ip;
@Value(value = “${name}”)
private String name;
@RequestMapping(value = “/{id}”, method = RequestMethod.GET)
public Product findById(@PathVariable Long id) {
Product product = productService.findByID(id);
product.setProductName(“访问的服务地址:”+ip+“:”+port);
return product;
}
@RequestMapping(value = “/test”)
public String test(){
return name;
}
}
(3)运行测试

(2)浏览器打开gitee.com,
1)注册用户 ,注册后登陆码云管理控制台

2)创建仓库


创建成功

3)抽取配置文件
文件命名规则:
-
{application}-{profile}.yml -
{application}-{profile}.properties -
application为应用名称 profile指的开发环境(用于区分开发环境,测试环境、生产环境等)

将上述文件移动到电脑桌面并,对文件重新命名修改配置文件product-pro.yml

server:
port: 9002 #端口
spring:
application:
name: service-product #服务名称
datasource:
driver-class-name: com.mysql.jdbc.Driver
url: jdbc:mysql://localhost:3306/springcloud?useUnicode=true&characterEncoding=utf8
username: root
password: root
jpa:
database: MySQL
show-sql: true
open-in-view: true
#配置Eureka
eureka:
client:
service-url:
defaultZone: http://localhost:9000/eureka/
instance:
prefer-ip-address: true #使用ip地址注册
instance-id: s p r i n g . c l o u d . c l i e n t . i p − a d d r e s s : {spring.cloud.client.ip-address}: spring.cloud.client.ip−address:{server.port} #向组成中心注册服务ID
lease-renewal-interval-in-seconds: 5 #向注册中心中注册服务id
lease-expiration-duration-in-seconds: 10 #续约到期的时间
name: itbluebox-pro
将上述文件移动到电脑桌面并,创建新的配置文件product-dev.yml

server:
port: 9001 #端口
spring:
application:
name: service-product #服务名称
datasource:
driver-class-name: com.mysql.jdbc.Driver
url: jdbc:mysql://localhost:3306/springcloud?useUnicode=true&characterEncoding=utf8
username: root
password: root
jpa:
database: MySQL
show-sql: true
open-in-view: true
#配置Eureka
eureka:
client:
service-url:
defaultZone: http://localhost:9000/eureka/
instance:
prefer-ip-address: true #使用ip地址注册
instance-id: s p r i n g . c l o u d . c l i e n t . i p − a d d r e s s : {spring.cloud.client.ip-address}: spring.cloud.client.ip−address:{server.port} #向组成中心注册服务ID
lease-renewal-interval-in-seconds: 5 #向注册中心中注册服务id
lease-expiration-duration-in-seconds: 10 #续约到期的时间
name: itbluebox-dev
4)将上述配置文件上传到gitee


(1)创建工程


(2)引入依赖

org.springframework.cloud
spring-cloud-config-server
org.springframework.cloud
spring-cloud-starter-config
(3)编写启动类


@SpringBootApplication
@EnableConfigServer
public class ConfigServerApplication {
public static void main(String[] args) {
SpringApplication.run(ConfigServerApplication.class,args);
}
}
- @EnableConfigServer : 通过此注解开启注册中心服务端功能
(4)设置配置文件
在这之前复制一下Git请求的服务器的地址


server:
port: 10001 #服务端口
spring:
application:
name: config-server #指定服务名
cloud:
config:
server:
git:
uri: https://gitee.com/itbluebox/config-repostory.git
(5)启动服务进行测试

运行成功

访问测试:http://localhost:10001/product-dev.yml

(1)修改product_service
1)引入依赖

org.springframework.cloud
spring-cloud-starter-config
2)删除application.yml
springboot的应用配置文件,需要通过Config-server获取,这里不再需要。

spring:
cloud:
config:
name: product #应用名称需要对应Git中配置文件的名称的前半部分
profile: dev #开发环境
label: master #git当中的分支
uri: http://localhost:10001 #config-server的请求地址
3)运行测试

访问:http://localhost:9001/product/1

访问:http://localhost:9001/product/test

4)修改配置文件然后在运行测试
将dev修改为pro

spring:
cloud:
config:
name: product #应用名称需要对应Git中配置文件的名称的前半部分
profile: pro #开发环境
label: master #git当中的分支
uri: http://localhost:10001 #config-server的请求地址
重新启动运行

请求的端口改变了

访问:http://localhost:9002/product/1

(1)问题解析
我们已经在客户端取到了配置中心的值,
修改Gitee上的值


修改内容


访问:http://localhost:9002/product/test

但当我们修改Gitee上面的值时,
服务端(Config Server)能实时获取最新的值,但客户端(Config Client)读的是缓存,无法实时获取最新值。
SpringCloud已经为我们解决了这个问题,那就是客户端使用post去触发refresh,获取最新数据,需要依赖spring-boot-starter-actuator
(2)引入依赖

org.springframework.boot
spring-boot-starter-actuator
(3)在ProductController类加上@RefreshScope

@RestController
@RequestMapping(“/product”)
@RefreshScope //代表的是开启动态刷新
public class ProductController {
@Autowired
private ProductService productService;
@Value(“${server.port}”)
private String port;
@Value(“${spring.cloud.client.ip-address}”)
private String ip;
@Value(value = “${name}”)
private String name;
@RequestMapping(value = “/{id}”, method = RequestMethod.GET)
public Product findById(@PathVariable Long id) {
Product product = productService.findByID(id);
product.setProductName(“访问的服务地址:”+ip+“:”+port);
return product;
}
@RequestMapping(value = “/test”)
public String test(){
return name;
}
}
(4)配置文件bootstrap.yml中开发端点

开启动态刷新的请求路径的端点
management:
endpoints:
web:
exposure:
include: refresh
(5)运行测试

访问:http://localhost:9002/product/test

其值itbluebox-product改变因为重新启动了
我们再次修改Gitee对应的配置文件的值

提交并保存
再次访问:http://localhost:9002/product/test

(6)手动刷新发起POST请求,这里使用的工具是Insomnia
访问:http://localhost:9002/actuator/refresh

再次访问:http://localhost:9002/product/test

=====================================================================
在之前的代码中,客户端都是直接调用配置中心的server端来获取配置文件信息。
这样就存在了一个问题,客户端和服务端的耦合性太高,如果server端要做集群,客户端只能通过原始的方式来路由,server端改变IP地址的时候,客户端也需要修改配置,不符合springcloud服务治理的理念。
springcloud提供了这样的解决方案,我们只需要将server端当做一个服务注册到eureka中,client端去eureka中去获取配置中心server端的服务既可。
(1)添加依赖

org.springframework.cloud
spring-cloud-starter-netflix-eureka-client
org.springframework.boot
spring-boot-starter-actuator
org.springframework.cloud
spring-cloud-bus
org.springframework.cloud
spring-cloud-stream-binder-rabbit
(2)配置文件

#配置Eureka
eureka:
client:
service-url:
defaultZone: http://localhost:9000/eureka/
instance:
prefer-ip-address: true #使用ip地址注册
instance-id: s p r i n g . c l o u d . c l i e n t . i p − a d d r e s s : {spring.cloud.client.ip-address}: spring.cloud.client.ip−address:{server.port} #向组成中心注册服务ID
lease-renewal-interval-in-seconds: 5 #向注册中心中注册服务id
lease-expiration-duration-in-seconds: 10 #续约到期的时间
这样server端的改造就完成了。
(3)运行测试
先启动eureka注册中心,在启动server端,
在浏览器中访问:

复制一份ConfigServerApplication


修改一下配置文件的端口号


访问Eurekahttp://localhost:9000/

修改配置文件

spring:
cloud:
config:
name: product #应用名称需要对应Git中配置文件的名称的前半部分
profile: pro #开发环境
label: master #git当中的分支
#uri: http://localhost:10001 #config-server的请求地址
#通过注册中心去获取config-server配置
discovery:
enabled: true #开启服务发现
service-id: config-server
开启动态刷新的请求路径的端点
management:
endpoints:
web:
exposure:
include: refresh
#配置Eureka
eureka:
client:
service-url:
defaultZone: http://localhost:9000/eureka/
instance:
prefer-ip-address: true #使用ip地址注册
instance-id: s p r i n g . c l o u d . c l i e n t . i p − a d d r e s s : {spring.cloud.client.ip-address}: spring.cloud.client.ip−address:{server.port} #向组成中心注册服务ID
重新启动

访问测试:http://localhost:9002/product/1

====================================================================
在微服务架构中,
通常会使用轻量级的消息代理来构建一个共用的消息主题来连接各个微服务实例,
它广播的消息会被所有在注册中心的微服务实例监听和消费,也称消息总线。
SpringCloud中也有对应的解决方案,
SpringCloud Bus 将分布式的节点用轻量的消息代理连接起来,
可以很容易搭建消息总线,
配合SpringCloud config 实现微服务应用配置信息的动态更新。

根据此图我们可以看出利用Spring Cloud Bus做配置更新的步骤:
-
提交代码触发post请求给bus/refresh
-
server端接收到请求并发送给Spring Cloud Bus
-
Spring Cloud bus接到消息并通知给其它客户端
-
其它客户端接收到通知,请求Server端获取最新配置
-
全部客户端均获取到最新的配置
(1)服务端引入依赖
刚刚在上述已经引入了对应消息总线的依赖,在这里是做介绍

(2)服务端添加配置

server:
port: 10001 #服务端口
spring:
application:
name: config-server #指定服务名
cloud:
config:
server:
git:
uri: https://gitee.com/itbluebox/config-repostory.git
rabbitmq:
host: 127.0.0.1
port: 5672
username: guest
password: guest
management:
endpoints:
web:
exposure:
include: bus-refresh
#配置Eureka
eureka:
client:
service-url:
defaultZone: http://localhost:9000/eureka/
instance:
自我介绍一下,小编13年上海交大毕业,曾经在小公司待过,也去过华为、OPPO等大厂,18年进入阿里一直到现在。
深知大多数Java工程师,想要提升技能,往往是自己摸索成长或者是报班学习,但对于培训机构动则几千的学费,着实压力不小。自己不成体系的自学效果低效又漫长,而且极易碰到天花板技术停滞不前!
因此收集整理了一份《2024年Java开发全套学习资料》,初衷也很简单,就是希望能够帮助到想自学提升又不知道该从何学起的朋友,同时减轻大家的负担。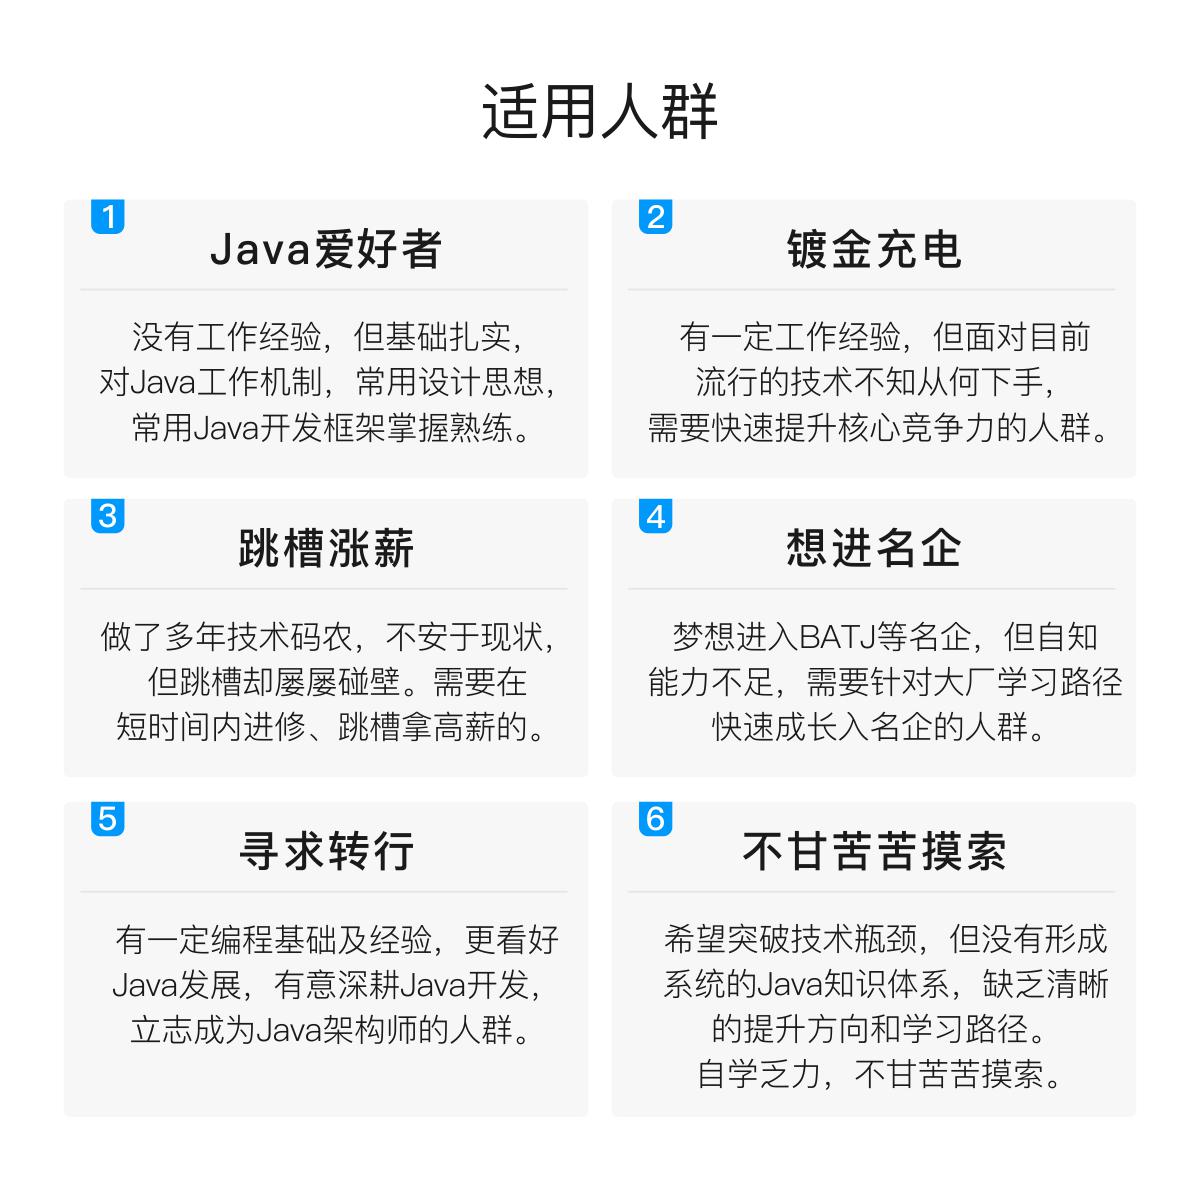

既有适合小白学习的零基础资料,也有适合3年以上经验的小伙伴深入学习提升的进阶课程,基本涵盖了95%以上Java开发知识点,真正体系化!
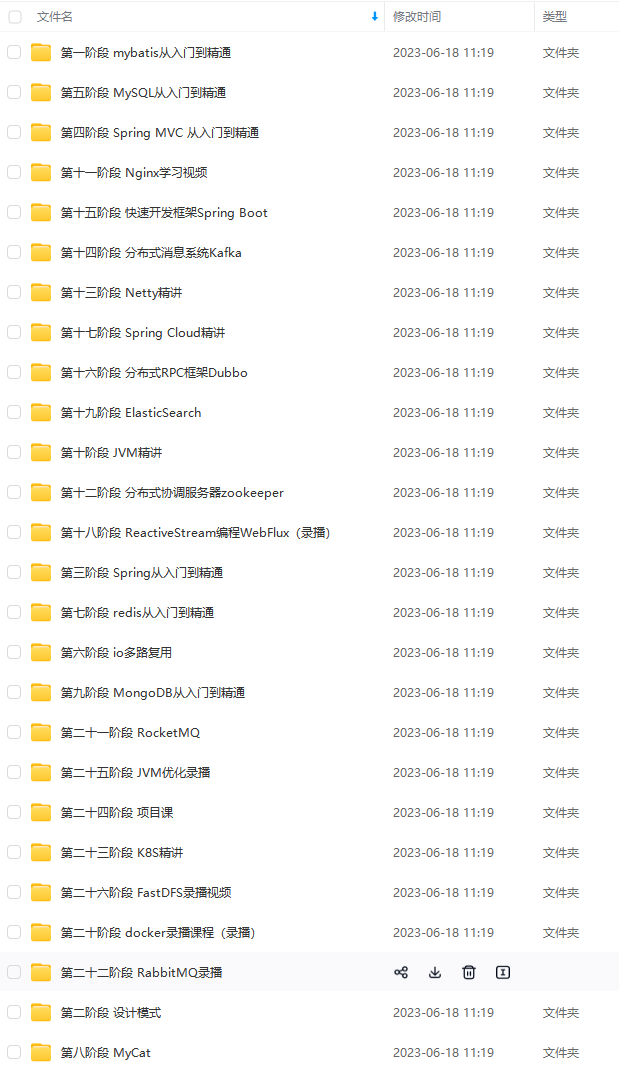
由于文件比较大,这里只是将部分目录截图出来,每个节点里面都包含大厂面经、学习笔记、源码讲义、实战项目、讲解视频,并且会持续更新!
如果你觉得这些内容对你有帮助,可以扫码获取!!(备注Java获取)

最后
做任何事情都要用心,要非常关注细节。看起来不起眼的、繁琐的工作做透了会有意想不到的价值。
当然要想成为一个技术大牛也需要一定的思想格局,思想决定未来你要往哪个方向去走, 建议多看一些人生规划方面的书籍,多学习名人的思想格局,未来你的路会走的更远。
更多的技术点思维导图我已经做了一个整理,涵盖了当下互联网最流行99%的技术点,在这里我将这份导图分享出来,以及为金九银十准备的一整套面试体系,上到集合,下到分布式微服务


《互联网大厂面试真题解析、进阶开发核心学习笔记、全套讲解视频、实战项目源码讲义》点击传送门即可获取!
,也去过华为、OPPO等大厂,18年进入阿里一直到现在。**
深知大多数Java工程师,想要提升技能,往往是自己摸索成长或者是报班学习,但对于培训机构动则几千的学费,着实压力不小。自己不成体系的自学效果低效又漫长,而且极易碰到天花板技术停滞不前!
因此收集整理了一份《2024年Java开发全套学习资料》,初衷也很简单,就是希望能够帮助到想自学提升又不知道该从何学起的朋友,同时减轻大家的负担。[外链图片转存中…(img-boOzaXJA-1713288511786)]
[外链图片转存中…(img-BrW21Z4P-1713288511786)]
[外链图片转存中…(img-CxCCybD3-1713288511786)]
既有适合小白学习的零基础资料,也有适合3年以上经验的小伙伴深入学习提升的进阶课程,基本涵盖了95%以上Java开发知识点,真正体系化!
由于文件比较大,这里只是将部分目录截图出来,每个节点里面都包含大厂面经、学习笔记、源码讲义、实战项目、讲解视频,并且会持续更新!
如果你觉得这些内容对你有帮助,可以扫码获取!!(备注Java获取)
最后
做任何事情都要用心,要非常关注细节。看起来不起眼的、繁琐的工作做透了会有意想不到的价值。
当然要想成为一个技术大牛也需要一定的思想格局,思想决定未来你要往哪个方向去走, 建议多看一些人生规划方面的书籍,多学习名人的思想格局,未来你的路会走的更远。
更多的技术点思维导图我已经做了一个整理,涵盖了当下互联网最流行99%的技术点,在这里我将这份导图分享出来,以及为金九银十准备的一整套面试体系,上到集合,下到分布式微服务
[外链图片转存中…(img-TRAezpaw-1713288511787)]
[外链图片转存中…(img-fcjfJCpX-1713288511787)]
[外链图片转存中…(img-5Z5yD0o7-1713288511787)]
[外链图片转存中…(img-yxr7YcMz-1713288511787)]
《互联网大厂面试真题解析、进阶开发核心学习笔记、全套讲解视频、实战项目源码讲义》点击传送门即可获取!


 被折叠的 条评论
为什么被折叠?
被折叠的 条评论
为什么被折叠?
 到【灌水乐园】发言


