


.body(Util.EMPTY_RESPONSE)
.sentRequestAtMillis(-1L)
.receivedResponseAtMillis(System.currentTimeMillis())
.build();
}
// If we don’t need the network, we’re done.(如果有缓存同时又不使用网络,则直接返回缓存结果)
if (networkRequest == null) {
return cacheResponse.newBuilder()
.cacheResponse(stripBody(cacheResponse))
.build();
}
Response networkResponse = null;
try {
networkResponse = chain.proceed(networkRequest);
} finally {
// If we’re crashing on I/O or otherwise, don’t leak the cache body.
if (networkResponse == null && cacheCandidate != null) {
closeQuietly(cacheCandidate.body());
}
}
// If we have a cache response too, then we’re doing a conditional get.(如果既有缓存,同时又发起了请求,说明此时是一个 Conditional Get 请求)
if (cacheResponse != null) {
if (networkResponse.code() == HTTP_NOT_MODIFIED) {
Response response = cacheResponse.newBuilder()
.headers(combine(cacheResponse.headers(), networkResponse.headers()))
.sentRequestAtMillis(networkResponse.sentRequestAtMillis())
.receivedResponseAtMillis(networkResponse.receivedResponseAtMillis())
.cacheResponse(stripBody(cacheResponse))
.networkResponse(stripBody(networkResponse))
.build();
networkResponse.body().close();
// Update the cache after combining headers but before stripping the
// Content-Encoding header (as performed by initContentStream()).
cache.trackConditionalCacheHit();
cache.update(cacheResponse, response);
return response;
} else {
// 如果响应资源有更新,关掉原有缓存
closeQuietly(cacheResponse.body());
}
}
Response response = networkResponse.newBuilder()
.cacheResponse(stripBody(cacheResponse))
.networkResponse(stripBody(networkResponse))
.build();
if (cache != null) {
if (HttpHeaders.hasBody(response) && CacheStrategy.isCacheable(response, networkRequest)) {
// Offer this request to the cache.(将网络响应写入 cache 中)
CacheRequest cacheRequest = cache.put(response);
return cacheWritingResponse(cacheRequest, response);
}
if (HttpMethod.invalidatesCache(networkRequest.method())) {
try {
cache.remove(networkRequest);
} catch (IOException ignored) {
// The cache cannot be written.
}
}
}
return response;
}
…
}
CacheInterceptor 的职责很明确,就是负责 Cache 的管理
-
当网络请求有符合要求的 Cache 时直接返回 Cache
-
当服务器返回内容有改变时更新当前 cache
-
如果当前 cache 失效,则删除改缓存
ConnectInterceptor
public final class ConnectInterceptor implements Interceptor {
public final OkHttpClient client;
public ConnectInterceptor(OkHttpClient client) {
this.client = client;
}
@Override public Response intercept(Chain chain) throws IOException {
RealInterceptorChain realChain = (RealInterceptorChain) chain;
Request request = realChain.request();
StreamAllocation streamAllocation = realChain.streamAllocation();
// We need the network to satisfy this request. Possibly for validating a conditional GET.
boolean doExtensiveHealthChecks = !request.method().equals(“GET”);
HttpCodec httpCodec = streamAllocation.newStream(client, chain, doExtensiveHealthChecks);
RealConnection connection = streamAllocation.connection();
return realChain.proceed(request, streamAllocation, httpCodec, connection);
}
}
ConnectInterceptor 的 intercept 方法只有一行关键代码:
RealConnection connection = streamAllocation.connection();
即为当前请求找到合适的连接,可能复用已有连接也可能是重新创建的连接,返回的连接由连接池负责决定。
CallServerInterceptor
public final class CallServerInterceptor implements Interceptor {
private final boolean forWebSocket;
public CallServerInterceptor(boolean forWebSocket) {
this.forWebSocket = forWebSocket;
}
@Override public Response intercept(Chain chain) throws IOException {
RealInterceptorChain realChain = (RealInterceptorChain) chain;
HttpCodec httpCodec = realChain.httpStream();
StreamAllocation streamAllocation = realChain.streamAllocation();
RealConnection connection = (RealConnection) realChain.connection();
Request request = realChain.request();
long sentRequestMillis = System.currentTimeMillis();
realChain.eventListener().requestHeadersStart(realChain.call());
httpCodec.writeRequestHeaders(request);
realChain.eventListener().requestHeadersEnd(realChain.call(), request);
Response.Builder responseBuilder = null;
…
httpCodec.finishRequest();
if (responseBuilder == null) {
realChain.eventListener().responseHeadersStart(realChain.call());
responseBuilder = httpCodec.readResponseHeaders(false);
}
Response response = responseBuilder
.request(request)
.handshake(streamAllocation.connection().handshake())
.sentRequestAtMillis(sentRequestMillis)
.receivedResponseAtMillis(System.currentTimeMillis())
.build();
int code = response.code();
if (code == 100) {
// server sent a 100-continue even though we did not request one.
// try again to read the actual response
responseBuilder = httpCodec.readResponseHeaders(false);
response = responseBuilder
.request(request)
.handshake(streamAllocation.connection().handshake())
.sentRequestAtMillis(sentRequestMillis)
.receivedResponseAtMillis(System.currentTimeMillis())
.build();
code = response.code();
}
realChain.eventListener()
.responseHeadersEnd(realChain.call(), response);
if (forWebSocket && code == 101) {
// Connection is upgrading, but we need to ensure interceptors see a non-null response body.
response = response.newBuilder()
.body(Util.EMPTY_RESPONSE)
.build();
} else {
response = response.newBuilder()
.body(httpCodec.openResponseBody(response))
.build();
}
if (“close”.equalsIgnoreCase(response.request().header(“Connection”))
|| “close”.equalsIgnoreCase(response.header(“Connection”))) {
streamAllocation.noNewStreams();
}
if ((code == 204 || code == 205) && response.body().contentLength() > 0) {
throw new ProtocolException(
"HTTP " + code + " had non-zero Content-Length: " + response.body().contentLength());
}
return response;
}
…
}
CallServerInterceptor 负责向服务器发起真正的访问请求,并在接收到服务器返回后读取响应返回。
整体流程
整个网络访问的核心步骤,总结起来如下图所示:

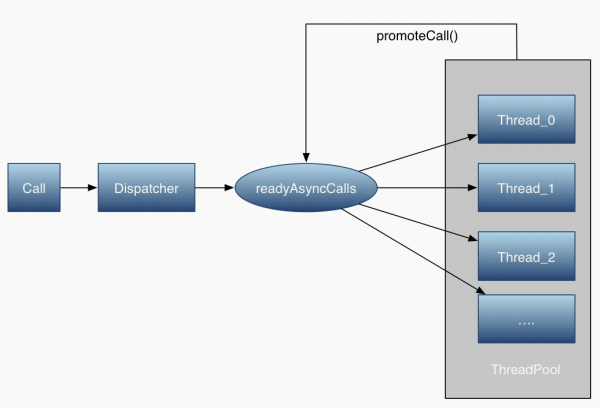
任务队列
OkHttp 的任务队列在内部维护了一个线程池用于执行具体的网络请求。而线程池最大的好处在于通过线程复用减少非核心任务的损耗。
线程池的优点
多线程技术主要解决处理器单元内多个线程执行的问题,它可以显著减少处
理器单元的闲置时间,增加处理器单元的吞吐能力。但如果对多线程应用不
当,会增加对单个任务的处理时间。可以举一个简单的例子:
假设在一台服务器完成一项任务的时间为 T ,
T1 创建线程的时间 ;
T2 在线程中执行任务的时间,包括线程间同步所需时间 ;
T3 线程销毁的时间 ;
显然 T = T1+T2+T3。注意这是一个极度简化的假设。
可以看出 T1、T3 是多线程本身带来的开销(在 Java 中,通过映射 pThead, 并进一步通过SystemCall 实现 native 线程),我们渴望减少 T1、T3 所用的时间,从而减少 T 的时间。但一些线程的使用者并没有注意到这一点,所以在程序中频繁的创建或销毁线程,这导致 T1 和 T3 在 T 中占有相当比例。
线程池技术正是关注如何缩短或调整 T1,T3 时间的技术,从而提高服务器程序性能的。
-
通过对线程进行缓存,减少了创建销毁的时间损失
-
通过控制线程数量阀值,减少了当线程过少时带来的 CPU 闲置(比如说长时间卡在I/O 上了)与线程过多时对 JVM 的内存与线程切换时系统调用的压力。
类似的还有 Socket 连接池、DB 连接池、CommonPool(比如 Jedis)等技术。
OkHttp 的任务队列主要由两部分组成:
-
任务分发器 dispatcher:负责为任务找到合适的执行线程
-
网络请求任务线程池
public final class Dispatcher {
private int maxRequests = 64;
private int maxRequestsPerHost = 5;
private @Nullable Runnable idleCallback;
/** Executes calls. Created lazily. */
private @Nullable ExecutorService executorService;
/** Ready async calls in the order they’ll be run. */
private final Deque readyAsyncCalls = new ArrayDeque<>();
/** Running asynchronous calls. Includes canceled calls that haven’t finished yet. */
private final Deque runningAsyncCalls = new ArrayDeque<>();
/** Running synchronous calls. Includes canceled calls that haven’t finished yet. */
private final Deque runningSyncCalls = new ArrayDeque<>();
public Dispatcher(ExecutorService executorService) {
this.executorService = executorService;
}
public Dispatcher() {
}
public synchronized ExecutorService executorService() {
if (executorService == null) {
executorService = new ThreadPoolExecutor(0, Integer.MAX_VALUE, 60, TimeUnit.SECONDS,
new SynchronousQueue(), Util.threadFactory(“OkHttp Dispatcher”, false));
}
return executorService;
}
…
}
参数说明如下:
-
readyAsyncCalls:待执行异步任务队列
-
runningAsyncCalls:运行中异步任务队列
-
runningSyncCalls:运行中同步任务队列
-
executorService:任务队列线程池:
public ThreadPoolExecutor(int corePoolSize,
int maximumPoolSize,
long keepAliveTime,
TimeUnit unit,
BlockingQueue workQueue,
ThreadFactory threadFactory) {
this(corePoolSize, maximumPoolSize, keepAliveTime, unit, workQueue,
threadFactory, defaultHandler);
}
}
- int corePoolSize: 最小并发线程数,这里并发同时包括空闲与活动的线
程,如果是 0 的话,空闲一段时间后所有线程将全部被销毁
-
int maximumPoolSize: 最大线程数,当任务进来时可以扩充的线程最大值,当大于了这个值就会根据丢弃处理机制来处理
-
long keepAliveTime: 当线程数大于 corePoolSize 时,多余的空闲线程的最大存活时间,类似于 HTTP 中的 Keep-alive
-
TimeUnit unit: 时间单位,一般用秒
-
BlockingQueue workQueue: 工作队列,先进先出
-
ThreadFactory threadFactory: 单个线程的工厂,可以打 Log,设置 Daemon(即当 JVM 退出时,线程自动结束)等
在 OkHttp 中,构建了一个阀值为[0, Integer.MAX_VALUE]的线程池,它不保留任何最小线程数,随时创建更多的线程数,当线程空闲时只能活 60 秒,它使用了一个不存储元素的阻塞工作队列,一个叫做"OkHttp Dispatcher"的线程工厂。
也就是说,在实际运行中,当收到 10 个并发请求时,线程池会创建十个线 程,当工作完成后,线程池会在 60s 后相继关闭所有线程。
Dispatcher 分发器
dispatcher 分发器类似于 Ngnix 中的反向代理,通过 Dispatcher 将任务分发到合适的空闲线程,实现非阻塞,高可用,高并发连接。
同步请求
当我们使用 OkHttp 进行同步请求时,一般构造如下:
OkHttpClient client = new OkHttpClient();
Request request = new Request.Builder() .url(“https://www.wanandroid.com//hotkey/json”)
.build();
Response response = client.newCall(request).execute();
@Override public Response execute() throws IOException {
…
try {
client.dispatcher().executed(this);
Response result = getResponseWithInterceptorChain();
if (result == null) throw new IOException(“Canceled”);
return result;
} catch (IOException e) {
eventListener.callFailed(this, e);
throw e;
} finally {
client.dispatcher().finished(this);
}
}
同步请求的执行逻辑是:
-
将对应任务加入分发器
-
执行任务
-
执行完成后通知 dispatcher 对应任务已完成,对应任务出队
异步请求
OkHttpClient client = new OkHttpClient();
Request request = new Request.Builder() .url(“https://www.wanandroid.com//hotkey/json”)
.build();
client.newCall(request).enqueue(new Callback() {
@Override public void onFailure(Call call,IOException e) {
Log.d(“OkHttp”,“Call Failed:”+e.getMessage());
}
@Override public void onResponse(Call call,Response response) throws IOException {
Log.d(“OkHttp”,“Call succeeded:”+response.message());
}
});
当 OkHttpClient 的请求入队时,根据代码,我们可以发现实际上是Dispatcher 进行了入队操作。
Dispatcher.java:129
synchronized void enqueue(AsyncCall call) {
if (runningAsyncCalls.size() < maxRequests && runningCallsForHost(call) < maxRequestsPerHost) {
//添加正在运行的请求
runningAsyncCalls.add(call);
//线程池执行请求
executorService().execute(call);
} else {
//添加到缓存队列排队等待
readyAsyncCalls.add(call);
}
}
如果满足条件:
-
当前请求数小于最大请求数(64)
-
对单一 host 的请求小于阈值(5)
将该任务插入正在执行任务队列,并执行对应任务。如果不满足则将其放入待执行队列。
接下来看看 AsyncCall的execute方法
@Override protected void execute() {
boolean signalledCallback = false;
try {
//执行I/O耗时任务
Response response = getResponseWithInterceptorChain();
if (retryAndFollowUpInterceptor.isCanceled()) {
signalledCallback = true;
//回调,这里回调是在线程池中
responseCallback.onFailure(RealCall.this, new IOException(“Canceled”));
} else {
signalledCallback = true;
//回调,这里回调是在线程池中
responseCallback.onResponse(RealCall.this, response);
}
} catch (IOException e) {
if (signalledCallback) {
// Do not signal the callback twice!
Platform.get().log(INFO, "Callback failure for " + toLoggableString(), e);
} else {
eventListener.callFailed(RealCall.this, e);
responseCallback.onFailure(RealCall.this, e);
}
} finally {
//通知分发器相关任务 已结束
client.dispatcher().finished(this);
}
}
Dispatcher.java:198
private void finished(Deque calls, T call, boolean promoteCalls) {
int runningCallsCount;
Runnable idleCallback;
synchronized (this) {
if (!calls.remove(call)) throw new AssertionError(“Call wasn’t in-flight!”);
if (promoteCalls) promoteCalls();
runningCallsCount = runningCallsCount();
idleCallback = this.idleCallback;
}
if (runningCallsCount == 0 && idleCallback != null) {
idleCallback.run();
}
}
-
空闲出多余线程,调用 promoteCalls 调用待执行的任务
-
如果当前整个线程池都空闲下来,执行空闲通知回调线程(idleCallback)
private void promoteCalls() {
if (runningAsyncCalls.size() >= maxRequests) return; // Already running max capacity.
if (readyAsyncCalls.isEmpty()) return; // No ready calls to promote.
for (Iterator i = readyAsyncCalls.iterator(); i.hasNext(); ) {
AsyncCall call = i.next();
if (runningCallsForHost(call) < maxRequestsPerHost) {
i.remove();
runningAsyncCalls.add(call);
executorService().execute(call);
}
if (runningAsyncCalls.size() >= maxRequests) return; // Reached max capacity.
}
}
promoteCalls 的逻辑也很简单:扫描待执行任务队列,将任务放入正在执行任务队列,并执行该任务
总结
以上就是整个任务队列的实现细节,总结起来有以下几个特点:
-
OkHttp 采用 Dispatcher 技术,类似于 Nginx,与线程池配合实现了高并发,低阻塞的运行
-
Okhttp 采用 Deque 作为缓存,按照入队的顺序先进先出
-
OkHttp 最出彩的地方就是在 try/finally 中调用了 finished 函数,可以主动控制等待队列的移动,而不是采用锁或者 wait/notify,极大减少了编码复杂性
缓存策略
HTTP 协议中缓存部分的相关域
合理地利用本地缓存可以有效地减少网络开销,减少响应延迟。HTTP 报头也定义了很多与缓存有关的域来控制缓存。
首先来了解下 HTTP 协议中缓存部分的相关域。
Expires
超时时间,一般用在服务器的 response 报头中用于告知客户端对应资源的过期时间。当客户端需要再次请求相同资源时先比较其过期时间,如果尚未超过过期时间则直接返回缓存结果,如果已经超过则重新请求。
Cache-Control
相对值,单位时秒,表示当前资源的有效期。Cache-Control 比 Expires 优先级更高:
Last-Modified-Date
客户端第一次请求时,服务器返回:
Last-Modified: Tue, 12 Jan 2021 09:31:27 GMT
当客户端二次请求时,可以头部加上如下 header:
If-Modified-Since: Tue, 12 Jan 2021 09:31:27 GMT
如果当前资源没有被二次修改,服务器返回 304 告知客户端直接复用本地缓存。
ETag
ETag 是对资源文件的一种摘要,可以通过 ETag 值来判断文件是否有修改。当客户端第一次
请求某资源时,服务器返回:
ETag: “5694c7ef-24dc”
客户端再次请求时,可在头部加上如下域:
If-None-Match: “5694c7ef-24dc”
如果文件并未改变,则服务器返回 304 告知客户端可以复用本地缓存。
no-cache/no-store
不使用缓存
only-if-cached
只使用缓存
Cache 源码分析
OkHttp 的缓存工作都是在 CacheInterceptor 中完成的,Cache 部分有如下几个关键类:
-
Cache:Cache 管理器,其内部包含一个 DiskLruCache 将 cache 写入文件系统,Cache 内部通过 requestCount、networkCount、hitCount 三个统计指标来优化缓存效率
-
CacheStrategy:缓存策略,其内部维护一个 request 和 response,通过指定 request 和 response 来描述是通过网络还是缓存获取response,或二者同时使用
-
CacheStrategy$Factory:缓存策略工厂类根据实际请求返回对应的缓存策略既然实际的缓存工作都是在 CacheInterceptor 中完成的。
通过上面拦截器的分析CacheInterceptor类的代码可以看出,所有的动作都是以 CacheStrategy 缓存策略为依据做出的,那么来看下缓存策略是如何生成的,相关代码实现在 CacheStrategy$Factory.get()方法中:
public CacheStrategy get() {
CacheStrategy candidate = getCandidate();
if (candidate.networkRequest != null && request.cacheControl().onlyIfCached()) {
// We’re forbidden from using the network and the cache is insufficient.
return new CacheStrategy(null, null);
}
return candidate;
}
/** Returns a strategy to use assuming the request can use the network. */
private CacheStrategy getCandidate() {
// No cached response.(若本地没有缓存,发起网络请求)
if (cacheResponse == null) {
return new CacheStrategy(request, null);
}
// Drop the cached response if it’s missing a required handshake.(如果当前请求是 HTTPS,而缓存没有 TLS 握手,重新发起网络请求)
if (request.isHttps() && cacheResponse.handshake() == null) {
return new CacheStrategy(request, null);
}
// If this response shouldn’t have been stored, it should never be used
// as a response source. This check should be redundant as long as the
// persistence store is well-behaved and the rules are constant.
if (!isCacheable(cacheResponse, request)) {
return new CacheStrategy(request, null);
}
//如果当前的缓存策略是不缓存或者是 conditional get,发起网络请求
CacheControl requestCaching = request.cacheControl();
if (requestCaching.noCache() || hasConditions(request)) {
return new CacheStrategy(request, null);
}
CacheControl responseCaching = cacheResponse.cacheControl();
if (responseCaching.immutable()) {
return new CacheStrategy(null, cacheResponse);
}
//缓存 age
long ageMillis = cacheResponseAge();
long freshMillis = computeFreshnessLifetime();
if (requestCaching.maxAgeSeconds() != -1) {
freshMillis = Math.min(freshMillis, SECONDS.toMillis(requestCaching.maxAgeSeconds()));
}
long minFreshMillis = 0;
if (requestCaching.minFreshSeconds() != -1) {
minFreshMillis = SECONDS.toMillis(requestCaching.minFreshSeconds());
}
long maxStaleMillis = 0;
if (!responseCaching.mustRevalidate() && requestCaching.maxStaleSeconds() != -1) {
maxStaleMillis = SECONDS.toMillis(requestCaching.maxStaleSeconds());
}
if (!responseCaching.noCache() && ageMillis + minFreshMillis < freshMillis + maxStaleMillis) {
Response.Builder builder = cacheResponse.newBuilder();
//虽然缓存过期了,但是缓存还可以使用,则在头部添加 110 警告码
if (ageMillis + minFreshMillis >= freshMillis) {
builder.addHeader(“Warning”, “110 HttpURLConnection “Response is stale””);
}
long oneDayMillis = 24 * 60 * 60 * 1000L;
if (ageMillis > oneDayMillis && isFreshnessLifetimeHeuristic()) {
builder.addHeader(“Warning”, “113 HttpURLConnection “Heuristic expiration””);
}
return new CacheStrategy(null, builder.build());
}
// Find a condition to add to the request. If the condition is satisfied, the response body
// will not be transmitted.
String conditionName;
String conditionValue;
if (etag != null) {
conditionName = “If-None-Match”;
conditionValue = etag;
} else if (lastModified != null) {
conditionName = “If-Modified-Since”;
conditionValue = lastModifiedString;
} else if (servedDate != null) {
conditionName = “If-Modified-Since”;
conditionValue = servedDateString;
} else {
return new CacheStrategy(request, null); // No condition! Make a regular request.
}
Headers.Builder conditionalRequestHeaders = request.headers().newBuilder();
Internal.instance.addLenient(conditionalRequestHeaders, conditionName, conditionValue);
Request conditionalRequest = request.newBuilder()
.headers(conditionalRequestHeaders.build())
.build();
return new CacheStrategy(conditionalRequest, cacheResponse);
}
可以看到其核心逻辑在 getCandidate 函数中。基本就是 HTTP 缓存协议的实现。
DiskLruCache
Cache 内部通过 DiskLruCache 管理 cache 在文件系统层面的创建,读取,清理等等工作,
接下来看下 DiskLruCache 的主要逻辑:
journalFile
DiskLruCache 内部日志文件,对 cache 的每一次读写都对应一条日志记录,DiskLruCache
通过分析日志分析和创建 cache。日志文件格式如下:
libcore.io.DiskLruCache
1
100
2
CLEAN 3400330d1dfc7f3f7f4b8d4d803dfcf6 832 21054
DIRTY 335c4c6028171cfddfbaae1a9c313c52
CLEAN 335c4c6028171cfddfbaae1a9c313c52 3934 2342
REMOVE 335c4c6028171cfddfbaae1a9c313c52
DIRTY 1ab96a171faeeee38496d8b330771a7a
CLEAN 1ab96a171faeeee38496d8b330771a7a 1600 234
READ 335c4c6028171cfddfbaae1a9c313c52
READ 3400330d1dfc7f3f7f4b8d4d803dfcf6
前 5 行固定不变,分别为:常量libcore.io.DiskLruCache、diskCache 版本、应用程序版本、valueCount(后文介绍)、空行
接下来每一行对应一个 cache entry 的一次状态记录,其格式为:[状态(DIRTY,CLEAN,READ,REMOVE),key,状态相关 value(可选)]:
- DIRTY:表明一个 cache entry 正在被创建或更新,每一个成功的 DIRTY 记录都应该对应一个 CLEAN 或 REMOVE 操作。如果一个 DIRTY 缺少预期匹配的 CLEAN/REMOVE,则对应 entry 操作失败,需要将其从 lruEntries 中删除
- CLEAN:说明 cache 已经被成功操作,当前可以被正常读取。每一个 CLEAN 行还需要记 录其每一个 value 的长度
- READ: 记录一次 cache 读取操作
- REMOVE:记录一次 cache 清除
日志文件的应用场景主要有四个:
-
DiskCacheLru 初始化时通过读取日志文件创建 cache 容器lruEntries。同时通过日志过滤操作不成功的 cache 项。相关逻辑在 DiskLruCache.readJournalLine, DiskLruCache.processJournal
-
初始化完成后,为避免日志文件不断膨胀,对日志进行重建精简,具体逻辑在 DiskLruCache.rebuildJournal
-
每当有 cache 操作时将其记录入日志文件中以备下次初始化时使用
-
当冗余日志过多时,通过调用 cleanUpRunnable 线程重建日志
DiskLruCache.Entry
每一个 DiskLruCache.Entry 对应一个 cache 记录:
private final class Entry {
final String key;
/** Lengths of this entry’s files. */
final long[] lengths;
final File[] cleanFiles;
final File[] dirtyFiles;
/** True if this entry has ever been published. */
boolean readable;
/** The ongoing edit or null if this entry is not being edited. */
Editor currentEditor;
/** The sequence number of the most recently committed edit to this entry. */
long sequenceNumber;
Entry(String key) {
this.key = key;
lengths = new long[valueCount];
cleanFiles = new File[valueCount];
dirtyFiles = new File[valueCount];
// The names are repetitive so re-use the same builder to avoid allocations.
StringBuilder fileBuilder = new StringBuilder(key).append(‘.’);
int truncateTo = fileBuilder.length();
for (int i = 0; i < valueCount; i++) {
fileBuilder.append(i);
cleanFiles[i] = new File(directory, fileBuilder.toString());
fileBuilder.append(“.tmp”);
dirtyFiles[i] = new File(directory, fileBuilder.toString());
fileBuilder.setLength(truncateTo);
}
}
/** Set lengths using decimal numbers like “10123”. */
void setLengths(String[] strings) throws IOException {
if (strings.length != valueCount) {
throw invalidLengths(strings);
}
try {
for (int i = 0; i < strings.length; i++) {
lengths[i] = Long.parseLong(strings[i]);
}
} catch (NumberFormatException e) {
throw invalidLengths(strings);
}
}
/** Append space-prefixed lengths to {@code writer}. */
void writeLengths(BufferedSink writer) throws IOException {
for (long length : lengths) {
writer.writeByte(’ ').writeDecimalLong(length);
}
}
private IOException invalidLengths(String[] strings) throws IOException {
throw new IOException("unexpected journal line: " + Arrays.toString(strings));
}
/**
-
Returns a snapshot of this entry. This opens all streams eagerly to guarantee that we see a
-
single published snapshot. If we opened streams lazily then the streams could come from
-
different edits.
*/
Snapshot snapshot() {
if (!Thread.holdsLock(DiskLruCache.this)) throw new AssertionError();
Source[] sources = new Source[valueCount];
long[] lengths = this.lengths.clone(); // Defensive copy since these can be zeroed out.
try {
for (int i = 0; i < valueCount; i++) {
sources[i] = fileSystem.source(cleanFiles[i]);
}
return new Snapshot(key, sequenceNumber, sources, lengths);
} catch (FileNotFoundException e) {
// A file must have been deleted manually!
for (int i = 0; i < valueCount; i++) {
if (sources[i] != null) {
Util.closeQuietly(sources[i]);
} else {
break;
}
}
// Since the entry is no longer valid, remove it so the metadata is accurate (i.e. the cache
// size.)
try {
removeEntry(this);
} catch (IOException ignored) {
}
return null;
}
}
}
一个 Entry 主要由以下几部分构成:
-
key:每个 cache 都有一个 key 作为其标识符。当前 cache 的 key 为其对应 URL 的MD5 字符串
-
cleanFiles/dirtyFiles:每一个 Entry 对应多个文件,其对应的文件数由 DiskLruCache.valueCount 指定。当前在 OkHttp 中 valueCount 为 2。即每个 cache 对应 2 个 cleanFiles,2 个 dirtyFiles。其中第一个 cleanFiles/dirtyFiles 记录 cache 的 meta 数据(如 URL,创建时间,SSL 握手记录等等),第二个文件记录 cache 的真正内容。cleanFiles 记录处于稳定状态的 cache 结果,dirtyFiles 记录处于创建或更新状态的 cache
-
currentEditor:entry 编辑器,对 entry 的所有操作都是通过其编辑器完成。编辑器内部添加了同步锁
cleanupRunnable
清理线程,用于重建精简日志:
private final Runnable cleanupRunnable = new Runnable() {
public void run() {
synchronized (DiskLruCache.this) {
if (!initialized | closed) {
return; // Nothing to do
}
try {
trimToSize();
} catch (IOException ignored) {
mostRecentTrimFailed = true;
}
try {
if (journalRebuildRequired()) {
rebuildJournal();
redundantOpCount = 0;
}
} catch (IOException e) {
mostRecentRebuildFailed = true;
journalWriter = Okio.buffer(Okio.blackhole());
}
}
}
};
其触发条件在 journalRebuildRequired()方法中:当冗余日志超过日志文件本身的一般且总条数超过 2000 时执行
boolean journalRebuildRequired() {
final int redundantOpCompactThreshold = 2000;
return redundantOpCount >= redundantOpCompactThreshold
自我介绍一下,小编13年上海交大毕业,曾经在小公司待过,也去过华为、OPPO等大厂,18年进入阿里一直到现在。
深知大多数Android工程师,想要提升技能,往往是自己摸索成长或者是报班学习,但对于培训机构动则几千的学费,着实压力不小。自己不成体系的自学效果低效又漫长,而且极易碰到天花板技术停滞不前!
因此收集整理了一份《2024年Android移动开发全套学习资料》,初衷也很简单,就是希望能够帮助到想自学提升又不知道该从何学起的朋友,同时减轻大家的负担。


既有适合小白学习的零基础资料,也有适合3年以上经验的小伙伴深入学习提升的进阶课程,基本涵盖了95%以上Android开发知识点,真正体系化!
由于文件比较大,这里只是将部分目录大纲截图出来,每个节点里面都包含大厂面经、学习笔记、源码讲义、实战项目、讲解视频,并且后续会持续更新
如果你觉得这些内容对你有帮助,可以添加V获取:vip204888 (备注Android)

最后
希望本文对你有所启发,有任何面试上的建议也欢迎留言分享给大家。
好了,今天的分享就到这里,如果你对在面试中遇到的问题,或者刚毕业及工作几年迷茫不知道该如何准备面试并突破现状提升自己,对于自己的未来还不够了解不知道给如何规划,来看看同行们都是如何突破现状,怎么学习的,来吸收他们的面试以及工作经验完善自己的之后的面试计划及职业规划。

好了~如果你看到了这里,觉得文章写得不错就给个赞呗?如果你觉得那里值得改进的,请给我留言。一定会认真查询,修正不足。谢谢。

为什么某些人会一直比你优秀,是因为他本身就很优秀还一直在持续努力变得更优秀,而你是不是还在满足于现状内心在窃喜!希望读到这的您能点个小赞和关注下我,以后还会更新技术干货,谢谢您的支持!
一个人可以走的很快,但一群人才能走的更远。如果你从事以下工作或对以下感兴趣,欢迎戳这里加入程序员的圈子,让我们一起学习成长!
AI人工智能、Android移动开发、AIGC大模型、C C#、Go语言、Java、Linux运维、云计算、MySQL、PMP、网络安全、Python爬虫、UE5、UI设计、Unity3D、Web前端开发、产品经理、车载开发、大数据、鸿蒙、计算机网络、嵌入式物联网、软件测试、数据结构与算法、音视频开发、Flutter、IOS开发、PHP开发、.NET、安卓逆向、云计算
ctThreshold = 2000;
return redundantOpCount >= redundantOpCompactThreshold
自我介绍一下,小编13年上海交大毕业,曾经在小公司待过,也去过华为、OPPO等大厂,18年进入阿里一直到现在。
深知大多数Android工程师,想要提升技能,往往是自己摸索成长或者是报班学习,但对于培训机构动则几千的学费,着实压力不小。自己不成体系的自学效果低效又漫长,而且极易碰到天花板技术停滞不前!
因此收集整理了一份《2024年Android移动开发全套学习资料》,初衷也很简单,就是希望能够帮助到想自学提升又不知道该从何学起的朋友,同时减轻大家的负担。
[外链图片转存中…(img-0qf8rjYG-1712526177085)]
[外链图片转存中…(img-poKsPtDh-1712526177085)]
[外链图片转存中…(img-eWmhsgsA-1712526177086)]
[外链图片转存中…(img-NDDpTEvS-1712526177086)]
[外链图片转存中…(img-OicpHpXB-1712526177086)]
[外链图片转存中…(img-bZeWtCy8-1712526177087)]
既有适合小白学习的零基础资料,也有适合3年以上经验的小伙伴深入学习提升的进阶课程,基本涵盖了95%以上Android开发知识点,真正体系化!
由于文件比较大,这里只是将部分目录大纲截图出来,每个节点里面都包含大厂面经、学习笔记、源码讲义、实战项目、讲解视频,并且后续会持续更新
如果你觉得这些内容对你有帮助,可以添加V获取:vip204888 (备注Android)
[外链图片转存中…(img-8WxKmvM1-1712526177087)]
最后
希望本文对你有所启发,有任何面试上的建议也欢迎留言分享给大家。
好了,今天的分享就到这里,如果你对在面试中遇到的问题,或者刚毕业及工作几年迷茫不知道该如何准备面试并突破现状提升自己,对于自己的未来还不够了解不知道给如何规划,来看看同行们都是如何突破现状,怎么学习的,来吸收他们的面试以及工作经验完善自己的之后的面试计划及职业规划。
[外链图片转存中…(img-HfCFqK2E-1712526177087)]
好了~如果你看到了这里,觉得文章写得不错就给个赞呗?如果你觉得那里值得改进的,请给我留言。一定会认真查询,修正不足。谢谢。
[外链图片转存中…(img-mslrK2B5-1712526177088)]
为什么某些人会一直比你优秀,是因为他本身就很优秀还一直在持续努力变得更优秀,而你是不是还在满足于现状内心在窃喜!希望读到这的您能点个小赞和关注下我,以后还会更新技术干货,谢谢您的支持!
一个人可以走的很快,但一群人才能走的更远。如果你从事以下工作或对以下感兴趣,欢迎戳这里加入程序员的圈子,让我们一起学习成长!
AI人工智能、Android移动开发、AIGC大模型、C C#、Go语言、Java、Linux运维、云计算、MySQL、PMP、网络安全、Python爬虫、UE5、UI设计、Unity3D、Web前端开发、产品经理、车载开发、大数据、鸿蒙、计算机网络、嵌入式物联网、软件测试、数据结构与算法、音视频开发、Flutter、IOS开发、PHP开发、.NET、安卓逆向、云计算


 270
270


 被折叠的 条评论
为什么被折叠?
被折叠的 条评论
为什么被折叠?
 到【灌水乐园】发言


