


最后我还整理了很多Android中高级的PDF技术文档。以及一些大厂面试真题解析文档。

Android高级架构师之路很漫长,一起共勉吧!
网上学习资料一大堆,但如果学到的知识不成体系,遇到问题时只是浅尝辄止,不再深入研究,那么很难做到真正的技术提升。
一个人可以走的很快,但一群人才能走的更远!不论你是正从事IT行业的老鸟或是对IT行业感兴趣的新人,都欢迎加入我们的的圈子(技术交流、学习资源、职场吐槽、大厂内推、面试辅导),让我们一起学习成长!
if (i == 1 || i == 3)
{
rHeight += cHeight + cParams.topMargin + cParams.bottomMargin;
}
}
width = Math.max(tWidth, bWidth);
height = Math.max(lHeight, rHeight);
/**
-
如果是wrap_content设置为我们计算的值
-
否则:直接设置为父容器计算的值
*/
-
setMeasuredDimension((widthMode == MeasureSpec.EXACTLY) ? sizeWidth
-
width, (heightMode == MeasureSpec.EXACTLY) ? sizeHeight
-
height);
}
10-14行,获取该ViewGroup父容器为其设置的计算模式和尺寸,大多情况下,只要不是wrap_content,父容器都能正确的计算其尺寸。所以我们自己需要计算如果设置为wrap_content时的宽和高,如何计算呢?那就是通过其childView的宽和高来进行计算。
17行,通过ViewGroup的measureChildren方法为其所有的孩子设置宽和高,此行执行完成后,childView的宽和高都已经正确的计算过了
43-71行,根据childView的宽和高,以及margin,计算ViewGroup在wrap_content时的宽和高。
80-82行,如果宽高属性值为wrap_content,则设置为43-71行中计算的值,否则为其父容器传入的宽和高。
3、onLayout对其所有childView进行定位(设置childView的绘制区域)
// abstract method in viewgroup
@Override
protected void onLayout(boolean changed, int l, int t, int r, int b)
{
int cCount = getChildCount();
int cWidth = 0;
int cHeight = 0;
MarginLayoutParams cParams = null;
/**
- 遍历所有childView根据其宽和高,以及margin进行布局
*/
for (int i = 0; i < cCount; i++)
{
View childView = getChildAt(i);
cWidth = childView.getMeasuredWidth();
cHeight = childView.getMeasuredHeight();
cParams = (MarginLayoutParams) childView.getLayoutParams();
int cl = 0, ct = 0, cr = 0, cb = 0;
switch (i)
{
case 0:
cl = cParams.leftMargin;
ct = cParams.topMargin;
break;
case 1:
cl = getWidth() - cWidth - cParams.leftMargin
- cParams.rightMargin;
ct = cParams.topMargin;
break;
case 2:
cl = cParams.leftMargin;
ct = getHeight() - cHeight - cParams.bottomMargin;
break;
case 3:
cl = getWidth() - cWidth - cParams.leftMargin
- cParams.rightMargin;
ct = getHeight() - cHeight - cParams.bottomMargin;
break;
}
cr = cl + cWidth;
cb = cHeight + ct;
childView.layout(cl, ct, cr, cb);
}
}
代码比较容易懂:遍历所有的childView,根据childView的宽和高以及margin,然后分别将0,1,2,3位置的childView依次设置到左上、右上、左下、右下的位置。
如果是第一个View(index=0) :则childView.layout(cl, ct, cr, cb); cl为childView的leftMargin , ct 为topMargin , cr 为cl+ cWidth , cb为 ct + cHeight
如果是第二个View(index=1) :则childView.layout(cl, ct, cr, cb);
cl为getWidth() - cWidth - cParams.leftMargin- cParams.rightMargin;
ct 为topMargin , cr 为cl+ cWidth , cb为 ct + cHeight
剩下两个类似~
这样就完成了,我们的ViewGroup代码的编写,下面我们进行测试,分别设置宽高为固定值,wrap_content,match_parent
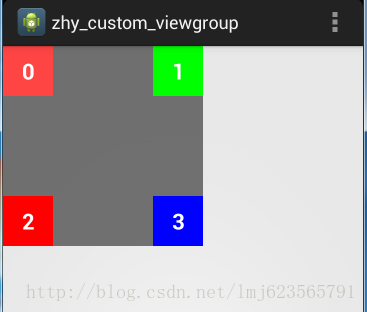
5、测试结果
布局1:
<com.example.zhy_custom_viewgroup.CustomImgContainer xmlns:android=“http://schemas.android.com/apk/res/android”
xmlns:tools=“http://schemas.android.com/tools”
android:layout_width=“200dp”
android:layout_height=“200dp”
android:background=“#AA333333” >
<TextView
android:layout_width=“50dp”
android:layout_height=“50dp”
android:background=“#FF4444”
android:gravity=“center”
android:text=“0”
android:textColor=“#FFFFFF”
android:textSize=“22sp”
android:textStyle=“bold” />
<TextView
android:layout_width=“50dp”
android:layout_height=“50dp”
android:background=“#00ff00”
android:gravity=“center”
android:text=“1”
android:textColor=“#FFFFFF”
android:textSize=“22sp”
android:textStyle=“bold” />
<TextView
android:layout_width=“50dp”
android:layout_height=“50dp”
android:background=“#ff0000”
android:gravity=“center”
android:text=“2”
android:textColor=“#FFFFFF”
android:textSize=“22sp”
android:textStyle=“bold” />
<TextView
android:layout_width=“50dp”
android:layout_height=“50dp”
android:background=“#0000ff”
android:gravity=“center”
android:text=“3”
android:textColor=“#FFFFFF”
android:textSize=“22sp”
android:textStyle=“bold” />
</com.example.zhy_custom_viewgroup.CustomImgContainer>
ViewGroup宽和高设置为固定值
效果图:
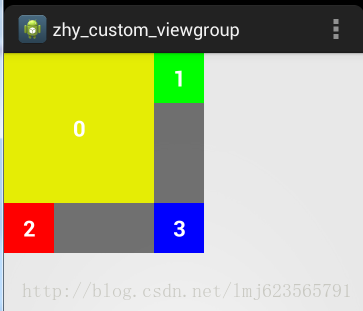
布局2:
<com.example.zhy_custom_viewgroup.CustomImgContainer xmlns:android=“http://schemas.android.com/apk/res/android”
xmlns:tools=“http://schemas.android.com/tools”
android:layout_width=“wrap_content”
android:layout_height=“wrap_content”
android:background=“#AA333333” >
<TextView
android:layout_width=“150dp”
android:layout_height=“150dp”
android:background=“#E5ED05”
android:gravity=“center”
android:text=“0”
android:textColor=“#FFFFFF”
android:textSize=“22sp”
android:textStyle=“bold” />
<TextView
android:layout_width=“50dp”
android:layout_height=“50dp”
android:background=“#00ff00”
android:gravity=“center”
android:text=“1”
android:textColor=“#FFFFFF”
android:textSize=“22sp”
android:textStyle=“bold” />
<TextView
android:layout_width=“50dp”
android:layout_height=“50dp”
android:background=“#ff0000”
android:gravity=“center”
android:text=“2”
android:textColor=“#FFFFFF”
android:textSize=“22sp”
android:textStyle=“bold” />
<TextView
android:layout_width=“50dp”
android:layout_height=“50dp”
android:background=“#0000ff”
android:gravity=“center”
android:text=“3”
android:textColor=“#FFFFFF”
android:textSize=“22sp”
android:textStyle=“bold” />
</com.example.zhy_custom_viewgroup.CustomImgContainer>
ViewGroup的宽和高设置为wrap_content
效果图:
布局3:
<com.example.zhy_custom_viewgroup.CustomImgContainer xmlns:android=“http://schemas.android.com/apk/res/android”
xmlns:tools=“http://schemas.android.com/tools”
android:layout_width=“match_parent”
android:layout_height=“match_parent”
android:background=“#AA333333” >
<TextView
android:layout_width=“150dp”
android:layout_height=“150dp”
android:background=“#E5ED05”
android:gravity=“center”
android:text=“0”
android:textColor=“#FFFFFF”
android:textSize=“22sp”
android:textStyle=“bold” />
<TextView
android:layout_width=“50dp”
android:layout_height=“50dp”
android:background=“#00ff00”
android:gravity=“center”
android:text=“1”
android:textColor=“#FFFFFF”
android:textSize=“22sp”
android:textStyle=“bold” />
<TextView
android:layout_width=“50dp”
android:layout_height=“50dp”
android:background=“#ff0000”
android:gravity=“center”
android:text=“2”
android:textColor=“#FFFFFF”
android:textSize=“22sp”
android:textStyle=“bold” />
<TextView
学习宝典
对我们开发者来说,一定要打好基础,随时准备战斗。不论寒冬是否到来,都要把自己的技术做精做深。虽然目前移动端的招聘量确实变少了,但中高端的职位还是很多的,这说明行业只是变得成熟规范起来了。竞争越激烈,产品质量与留存就变得更加重要,我们进入了技术赋能业务的时代。
不论遇到什么困难,都不应该成为我们放弃的理由!
很多人在刚接触这个行业的时候或者是在遇到瓶颈期的时候,总会遇到一些问题,比如学了一段时间感觉没有方向感,不知道该从那里入手去学习,对此我针对Android程序员,我这边给大家整理了一套学习宝典!包括不限于高级UI、性能优化、移动架构师、NDK、混合式开发(ReactNative+Weex)微信小程序、Flutter等全方面的Android进阶实践技术;希望能帮助到大家,也节省大家在网上搜索资料的时间来学习,也可以分享动态给身边好友一起学习!
【Android核心高级技术PDF文档,BAT大厂面试真题解析】

【算法合集】

【延伸Android必备知识点】

【Android部分高级架构视频学习资源】
网上学习资料一大堆,但如果学到的知识不成体系,遇到问题时只是浅尝辄止,不再深入研究,那么很难做到真正的技术提升。
一个人可以走的很快,但一群人才能走的更远!不论你是正从事IT行业的老鸟或是对IT行业感兴趣的新人,都欢迎加入我们的的圈子(技术交流、学习资源、职场吐槽、大厂内推、面试辅导),让我们一起学习成长!
微信小程序、Flutter等全方面的Android进阶实践技术;希望能帮助到大家,也节省大家在网上搜索资料的时间来学习,也可以分享动态给身边好友一起学习!
【Android核心高级技术PDF文档,BAT大厂面试真题解析】
[外链图片转存中…(img-GsjNbKm1-1715585084131)]
【算法合集】
[外链图片转存中…(img-ImiPc58S-1715585084132)]
【延伸Android必备知识点】
[外链图片转存中…(img-8Vsufp1q-1715585084132)]
【Android部分高级架构视频学习资源】
网上学习资料一大堆,但如果学到的知识不成体系,遇到问题时只是浅尝辄止,不再深入研究,那么很难做到真正的技术提升。
一个人可以走的很快,但一群人才能走的更远!不论你是正从事IT行业的老鸟或是对IT行业感兴趣的新人,都欢迎加入我们的的圈子(技术交流、学习资源、职场吐槽、大厂内推、面试辅导),让我们一起学习成长!


 1138
1138


 被折叠的 条评论
为什么被折叠?
被折叠的 条评论
为什么被折叠?
 到【灌水乐园】发言


