


+ 资源分配与调度
- ApplicationMaster(AM):负责应用程序(Application)的管理;
- 为应用程序申请资源,并分配给内部任务
- 任务调度、监控与容错
- NodeManager(NM):负责 slave 节点的资源管理和使用;
- 单个节点上的资源管理
- 处理来自ResourceManger的命令
- 处理来自ApplicationMaster的命令
- Container(容器):对任务运行环境的一个抽象。
外部博客参考链接:
- https://www.cnblogs.com/gentlescholar/p/15048301.html
- http://kentt.top/2018/09/16/Yarn-Architecture/
spark on k8s
Spark在Kubernetes上是一个令人兴奋的组合,它使您可以利用Apache Spark进行分布式数据处理,并使用Kubernetes进行容器编排。通过在Kubernetes上运行Spark应用程序,您可以利用Kubernetes平台提供的可扩展性、弹性和灵活性。Kubernetes为运行和管理应用程序提供了一个容器化基础设施,而Spark则实现了大规模数据处理和分析。这种组合使您能够轻松扩展Spark应用程序,高效利用资源,并将其与其他Kubernetes原生工具和服务无缝集成。在本文中,我们将带您逐步了解在Kubernetes集群上设置和运行Spark应用程序的过程。我们将涵盖集群配置、应用程序部署、监控、调试和扩展等主题。
首先假设已经有了一个完备的k8s集群,并且配置了对应ServiceAccount和PVC…
官方文档:https://spark.apache.org/docs/latest/running-on-kubernetes.html
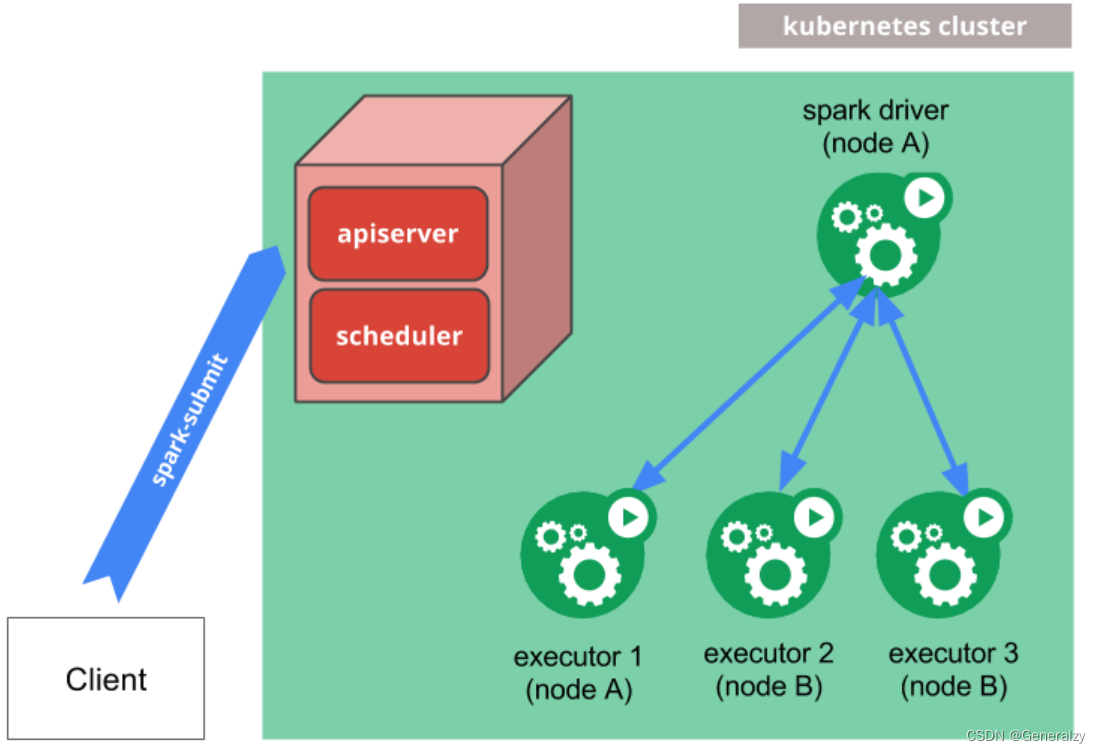
spark-submit可以直接用于向Kubernetes集群提交Spark应用程序。提交机制的工作原理如下:
- Spark 创建一个在Kubernetes pod中运行的 Spark driver。
- driver创建也在 Kubernetes Pod 中运行的 executors 并连接到它们,然后执行应用程序代码。
- 当应用程序完成时,executors Pod 终止并被清理,但driver Pod 会保留日志并在 Kubernetes API 中保持“已完成”状态,直到最终被垃圾收集或手动清理。(在完成状态下,驱动程序 Pod 不使用任何计算或内存资源。)
向 Kubernetes 提交应用程序
Cluster Mode
要在集群模式下启动 Spark Pi,
$ ./bin/spark-submit \
    --master k8s://https://<k8s-apiserver-host>:<k8s-apiserver-port> \
    --deploy-mode cluster \
    --name spark-pi \
    --class org.apache.spark.examples.SparkPi \
    --conf spark.executor.instances=5 \
    --conf spark.kubernetes.container.image=<spark-image> \
    local:///path/to/examples.jar
Spark master(通过将–master命令行参数传递给应用程序的配置spark-submit或通过 spark.master参数在应用程序的配置中进行设置来指定)的格式必须为:k8s://<api_server_host>:<k8s-apiserver-port>。必须始终指定端口,即使它是 HTTPS 端口 443。
在主字符串前添加 k8s:// 将导致 Spark 应用程序在 Kubernetes 集群上启动。如果 URL 中未指定 HTTP 协议,则默认为https. 例如,将 master 设置为k8s://example.com:443相当于将其设置为k8s://https://example.com:443,但要在不同端口上并且不使用 TLS 进行连接,则 master 必须设置为k8s://http://example.com:8080。
Client Mode
Spark executors必须能够通过可路由的主机名和端口连接到Spark driver。
在客户端模式下,Spark正常运行所需的特定网络配置将因设置而异。可以使用无头服务来使driver pod 能够通过稳定的主机名从 executors 路由。
在部署无头服务时,确保服务的标签选择器只匹配 driver pod 而不匹配其他pod。(为 driver pod分配一个足够唯一的标签,并在无头服务的标签选择器中使用该标签)通过spark.driver.host配置指定Spark driver的主机名,通过spark.driver.port配置指定Spark driver 的端口。
Secret资源 Management
Kubernetes Secrets可用于为 Spark 应用程序提供访问安全服务的凭据。
--conf spark.kubernetes.driver.secrets.spark-secret=/etc/secrets
--conf spark.kubernetes.executor.secrets.spark-secret=/etc/secrets
要通过环境变量使用机密,使用以下命令选项spark-submit:
--conf spark.kubernetes.driver.secretKeyRef.ENV_NAME=name:key
--conf spark.kubernetes.executor.secretKeyRef.ENV_NAME=name:key
命名空间
Spark on Kubernetes 可以使用命名空间来启动 Spark 应用程序。可以通过配置spark.kubernetes.namespace来使用它。
RBAC
在启用RBAC的 Kubernetes 集群中,用户可以配置 Kubernetes RBAC 角色和各种 Spark on Kubernetes 组件使用的服务帐户来访问 Kubernetes API 服务器。
Spark 驱动程序 pod 使用 Kubernetes 服务帐户访问 Kubernetes API 服务器来创建和监视执行程序 pod。至少必须向服务帐户授予 Role或ClusterRole权限,以允许驱动程序 Pod 创建 Pod 和服务。
--conf spark.kubernetes.authenticate.driver.serviceAccountName=spark
其他spark on k8s配置
有关 Spark 配置的信息,请参阅配置页面。以下配置特定于 Kubernetes 上的 Spark。
Spark Properties:
| Property Name | Default | Meaning |
|---|---|---|
spark.kubernetes.namespace | default | 指定driver和executor的命名空间 |
spark.kubernetes.container.image | (none) | 用于指定 Spark 应用程序的容器镜像。必填,除非为每种不同的容器类型提供了显式图像。(见下方两个位置) |
spark.kubernetes.driver.container.image | (value of spark.kubernetes.container.image) | driver镜像 |
spark.kubernetes.executor.container.image | (value of spark.kubernetes.container.image) | executor镜像 |
spark.kubernetes.container.image.pullPolicy | IfNotPresent | 在 Kubernetes 中拉取镜像时使用的容器镜像拉取策略。 |
spark.kubernetes.container.image.pullSecrets | 用于从私有映像仓库中提取镜像的 Kubernetes 密钥。 | |
spark.kubernetes.allocation.batch.size | 5 | 每轮执行程序 Pod 分配中一次启动的 Pod 数量。 |
spark.kubernetes.allocation.batch.delay | 1s | 每轮执行程序 Pod 分配之间等待的时间。指定小于 1 秒的值可能会导致 Spark driver的 CPU 使用率过高。 |
spark.kubernetes.authenticate.submission.caCertFile | (none) | Path to the CA cert file for connecting to the Kubernetes API server over TLS when starting the driver. This file must be located on the submitting machine’s disk. Specify this as a path as opposed to a URI (i.e. do not provide a scheme). In client mode, use spark.kubernetes.authenticate.caCertFile instead. |
spark.kubernetes.authenticate.submission.clientKeyFile | (none) | Path to the client key file for authenticating against the Kubernetes API server when starting the driver. This file must be located on the submitting machine’s disk. Specify this as a path as opposed to a URI (i.e. do not provide a scheme). In client mode, use spark.kubernetes.authenticate.clientKeyFile instead. |
spark.kubernetes.authenticate.submission.clientCertFile | (none) | Path to the client cert file for authenticating against the Kubernetes API server when starting the driver. This file must be located on the submitting machine’s disk. Specify this as a path as opposed to a URI (i.e. do not provide a scheme). In client mode, use spark.kubernetes.authenticate.clientCertFile instead. |
spark.kubernetes.authenticate.submission.oauthToken | (none) | OAuth token to use when authenticating against the Kubernetes API server when starting the driver. Note that unlike the other authentication options, this is expected to be the exact string value of the token to use for the authentication. In client mode, use spark.kubernetes.authenticate.oauthToken instead. |
spark.kubernetes.authenticate.submission.oauthTokenFile | (none) | Path to the OAuth token file containing the token to use when authenticating against the Kubernetes API server when starting the driver. This file must be located on the submitting machine’s disk. Specify this as a path as opposed to a URI (i.e. do not provide a scheme). In client mode, use spark.kubernetes.authenticate.oauthTokenFile instead. |
spark.kubernetes.authenticate.driver.caCertFile | (none) | Path to the CA cert file for connecting to the Kubernetes API server over TLS from the driver pod when requesting executors. This file must be located on the submitting machine’s disk, and will be uploaded to the driver pod. Specify this as a path as opposed to a URI (i.e. do not provide a scheme). In client mode, use spark.kubernetes.authenticate.caCertFile instead. |
spark.kubernetes.authenticate.driver.clientKeyFile | (none) | Path to the client key file for authenticating against the Kubernetes API server from the driver pod when requesting executors. This file must be located on the submitting machine’s disk, and will be uploaded to the driver pod as a Kubernetes secret. Specify this as a path as opposed to a URI (i.e. do not provide a scheme). In client mode, use spark.kubernetes.authenticate.clientKeyFile instead. |
spark.kubernetes.authenticate.driver.clientCertFile | (none) | Path to the client cert file for authenticating against the Kubernetes API server from the driver pod when requesting executors. This file must be located on the submitting machine’s disk, and will be uploaded to the driver pod as a Kubernetes secret. Specify this as a path as opposed to a URI (i.e. do not provide a scheme). In client mode, use spark.kubernetes.authenticate.clientCertFile instead. |
spark.kubernetes.authenticate.driver.oauthToken | (none) | OAuth token to use when authenticating against the Kubernetes API server from the driver pod when requesting executors. Note that unlike the other authentication options, this must be the exact string value of the token to use for the authentication. This token value is uploaded to the driver pod as a Kubernetes secret. In client mode, use spark.kubernetes.authenticate.oauthToken instead. |
spark.kubernetes.authenticate.driver.oauthTokenFile | (none) | Path to the OAuth token file containing the token to use when authenticating against the Kubernetes API server from the driver pod when requesting executors. Note that unlike the other authentication options, this file must contain the exact string value of the token to use for the authentication. This token value is uploaded to the driver pod as a secret. In client mode, use spark.kubernetes.authenticate.oauthTokenFile instead. |
spark.kubernetes.authenticate.driver.mounted.caCertFile | (none) | Path to the CA cert file for connecting to the Kubernetes API server over TLS from the driver pod when requesting executors. This path must be accessible from the driver pod. Specify this as a path as opposed to a URI (i.e. do not provide a scheme). In client mode, use spark.kubernetes.authenticate.caCertFile instead. |
spark.kubernetes.authenticate.driver.mounted.clientKeyFile | (none) | Path to the client key file for authenticating against the Kubernetes API server from the driver pod when requesting executors. This path must be accessible from the driver pod. Specify this as a path as opposed to a URI (i.e. do not provide a scheme). In client mode, use spark.kubernetes.authenticate.clientKeyFile instead. |
spark.kubernetes.authenticate.driver.mounted.clientCertFile | (none) | Path to the client cert file for authenticating against the Kubernetes API server from the driver pod when requesting executors. This path must be accessible from the driver pod. Specify this as a path as opposed to a URI (i.e. do not provide a scheme). In client mode, use spark.kubernetes.authenticate.clientCertFile instead. |
spark.kubernetes.authenticate.driver.mounted.oauthTokenFile | (none) | Path to the file containing the OAuth token to use when authenticating against the Kubernetes API server from the driver pod when requesting executors. This path must be accessible from the driver pod. Note that unlike the other authentication options, this file must contain the exact string value of the token to use for the authentication. In client mode, use spark.kubernetes.authenticate.oauthTokenFile instead. |
spark.kubernetes.authenticate.driver.serviceAccountName | default | Service account that is used when running the driver pod. The driver pod uses this service account when requesting executor pods from the API server. Note that this cannot be specified alongside a CA cert file, client key file, client cert file, and/or OAuth token. In client mode, use spark.kubernetes.authenticate.serviceAccountName instead. |
spark.kubernetes.authenticate.caCertFile | (none) | In client mode, path to the CA cert file for connecting to the Kubernetes API server over TLS when requesting executors. Specify this as a path as opposed to a URI (i.e. do not provide a scheme). |
spark.kubernetes.authenticate.clientKeyFile | (none) | In client mode, path to the client key file for authenticating against the Kubernetes API server when requesting executors. Specify this as a path as opposed to a URI (i.e. do not provide a scheme). |
spark.kubernetes.authenticate.clientCertFile | (none) | In client mode, path to the client cert file for authenticating against the Kubernetes API server when requesting executors. Specify this as a path as opposed to a URI (i.e. do not provide a scheme). |
spark.kubernetes.authenticate.oauthToken | (none) | In client mode, the OAuth token to use when authenticating against the Kubernetes API server when requesting executors. Note that unlike the other authentication options, this must be the exact string value of the token to use for the authentication. |
spark.kubernetes.authenticate.oauthTokenFile | (none) | In client mode, path to the file containing the OAuth token to use when authenticating against the Kubernetes API server when requesting executors. |
spark.kubernetes.driver.label.[LabelName] | (none) | Add the label specified by LabelName to the driver pod. For example, spark.kubernetes.driver.label.something=true. Note that Spark also adds its own labels to the driver pod for bookkeeping purposes. |
spark.kubernetes.driver.annotation.[AnnotationName] | (none) | Add the annotation specified by AnnotationName to the driver pod. For example, spark.kubernetes.driver.annotation.something=true. |
spark.kubernetes.executor.label.[LabelName] | (none) | Add the label specified by LabelName to the executor pods. For example, spark.kubernetes.executor.label.something=true. Note that Spark also adds its own labels to the driver pod for bookkeeping purposes. |
spark.kubernetes.executor.annotation.[AnnotationName] | (none) | Add the annotation specified by AnnotationName to the executor pods. For example, spark.kubernetes.executor.annotation.something=true. |
spark.kubernetes.driver.pod.name | (none) | 驱动程序 Pod 的名称。在集群模式下,如果未设置此选项,则驱动程序 pod 名称将设置为“spark.app.name”并添加当前时间戳后缀,以避免名称冲突。在客户端模式下,如果您的应用程序在 pod 内运行,强烈建议将其设置为您的驱动程序运行所在的 pod 的名称。在客户端模式下设置此值允许驱动程序成为其执行程序 pod 的所有者,这反过来又允许集群对执行器 Pod 进行垃圾收集。 |
spark.kubernetes.executor.lostCheck.maxAttempts | 10 | Number of times that the driver will try to ascertain the loss reason for a specific executor. The loss reason is used to ascertain whether the executor failure is due to a framework or an application error which in turn decides whether the executor is removed and replaced, or placed into a failed state for debugging. |
spark.kubernetes.submission.waitAppCompletion | true | 在集群模式下,是否等待应用程序完成后再退出启动器进程。When changed to false, the launcher has a “fire-and-forget” behavior when launching the Spark job. |
spark.kubernetes.report.interval | 1s | Interval between reports of the current Spark job status in cluster mode. |
spark.kubernetes.driver.limit.cores | (none) | 指定driver pod 的CPU限制。 |
spark.kubernetes.executor.request.cores | (none) | 指定每个执行器pod的CPU请求。其值符合Kubernetes的规范。示例值包括0.1、500m、1.5、5等,CPU单位的定义详见CPU单位文档。这与spark.executor.cores不同:它仅在设置了执行器pod的CPU请求时使用,并优先于spark.executor.cores。这不影响任务并行性,例如,执行器可以同时运行的任务数量不受此影响。 |
spark.kubernetes.executor.limit.cores | (none) | 为executor pod 指定CPU限制。 |
spark.kubernetes.node.selector.[labelKey] | (none) | Adds to the node selector of the driver pod and executor pods, with key labelKey and the value as the configuration’s value. For example, setting spark.kubernetes.node.selector.identifier to myIdentifier will result in the driver pod and executors having a node selector with key identifier and value myIdentifier. Multiple node selector keys can be added by setting multiple configurations with this prefix. |
spark.kubernetes.driverEnv.[EnvironmentVariableName] | (none) | Add the environment variable specified by EnvironmentVariableName to the Driver process. The user can specify multiple of these to set multiple environment variables. |
spark.kubernetes.driver.secrets.[SecretName] | (none) | Add the Kubernetes Secret named SecretName to the driver pod on the path specified in the value. For example, spark.kubernetes.driver.secrets.spark-secret=/etc/secrets. |
spark.kubernetes.executor.secrets.[SecretName] | (none) | Add the Kubernetes Secret named SecretName to the executor pod on the path specified in the value. For example, spark.kubernetes.executor.secrets.spark-secret=/etc/secrets. |
spark.kubernetes.driver.secretKeyRef.[EnvName] | (none) | Add as an environment variable to the driver container with name EnvName (case sensitive), the value referenced by key key in the data of the referenced Kubernetes Secret. For example, spark.kubernetes.driver.secretKeyRef.ENV_VAR=spark-secret:key. |
spark.kubernetes.executor.secretKeyRef.[EnvName] | (none) | Add as an environment variable to the executor container with name EnvName (case sensitive), the value referenced by key key in the data of the referenced Kubernetes Secret. For example, spark.kubernetes.executor.secrets.ENV_VAR=spark-secret:key. |
spark.kubernetes.driver.volumes.[VolumeType].[VolumeName].mount.path | (none) | Add the Kubernetes Volume named VolumeName of the VolumeType type to the driver pod on the path specified in the value. For example, spark.kubernetes.driver.volumes.persistentVolumeClaim.checkpointpvc.mount.path=/checkpoint. |
spark.kubernetes.driver.volumes.[VolumeType].[VolumeName].mount.readOnly | (none) | Specify if the mounted volume is read only or not. For example, spark.kubernetes.driver.volumes.persistentVolumeClaim.checkpointpvc.mount.readOnly=false. |
spark.kubernetes.driver.volumes.[VolumeType].[VolumeName].options.[OptionName] | (none) | Configure Kubernetes Volume options passed to the Kubernetes with OptionName as key having specified value, must conform with Kubernetes option format. For example, spark.kubernetes.driver.volumes.persistentVolumeClaim.checkpointpvc.options.claimName=spark-pvc-claim. |
spark.kubernetes.executor.volumes.[VolumeType].[VolumeName].mount.path | (none) | Add the Kubernetes Volume named VolumeName of the VolumeType type to the executor pod on the path specified in the value. For example, spark.kubernetes.executor.volumes.persistentVolumeClaim.checkpointpvc.mount.path=/checkpoint. |
spark.kubernetes.executor.volumes.[VolumeType].[VolumeName].mount.readOnly | false | Specify if the mounted volume is read only or not. For example, spark.kubernetes.executor.volumes.persistentVolumeClaim.checkpointpvc.mount.readOnly=false. |
spark.kubernetes.executor.volumes.[VolumeType].[VolumeName].options.[OptionName] | (none) | Configure Kubernetes Volume options passed to the Kubernetes with OptionName as key having specified value. For example, spark.kubernetes.executor.volumes.persistentVolumeClaim.checkpointpvc.options.claimName=spark-pvc-claim. |
spark.kubernetes.memoryOverheadFactor | 0.1 | This sets the Memory Overhead Factor that will allocate memory to non-JVM memory, which includes off-heap memory allocations, non-JVM tasks, and various systems processes. For JVM-based jobs this value will default to 0.10 and 0.40 for non-JVM jobs. This is done as non-JVM tasks need more non-JVM heap space and such tasks commonly fail with “Memory Overhead Exceeded” errors. This prempts this error with a higher default. |
spark.kubernetes.pyspark.pythonVersion | "2" | Python版本,如果使用python的话 |
其余spark配置参考:https://spark.apache.org/docs/2.4.8/configuration.html。
举例:提交spark到k8s
可以这样来提交一个任务,同时设置 driver 和 executor 的 CPU、内存的资源 request 和 limit 值(driver 的内存 limit 值为 request 值的 110%)。
./spark-submit \
  // 设置cluster模式启动
  --deploy-mode cluster \
  --class org.apache.spark.examples.SparkPi \
  // 指定k8s apiserver的地址
  --master k8s://https://172.20.0.113:6443 \
  --kubernetes-namespace spark-cluster \
  // 指定k8s的serviceAccount
  --conf spark.kubernetes.authenticate.driver.serviceAccountName=spark \
  // k8s资源限额
  --conf spark.driver.memory=100G \
  --conf spark.executor.memory=10G \
  --conf spark.driver.cores=30 \
  --conf spark.executor.cores=2 \
  --conf spark.driver.maxResultSize=10240m \
  --conf spark.kubernetes.driver.limit.cores=32 \
  --conf spark.kubernetes.executor.limit.cores=3 \
  --conf spark.kubernetes.executor.memoryOverhead=2g \
  --conf spark.executor.instances=5 \
  --conf spark.app.name=spark-pi \
  // spark创建Pod模板
  --conf spark.kubernetes.driver.docker.image=sz-pg-oam-docker-hub-001.tendcloud.com/library/spark-driver:v2.1.0-kubernetes-0.3.1-1 \
  --conf spark.kubernetes.executor.docker.image=sz-pg-oam-docker-hub-001.tendcloud.com/library/spark-executor:v2.1.0-kubernetes-0.3.1-1 \
  --conf spark.kubernetes.initcontainer.docker.image=sz-pg-oam-docker-hub-001.tendcloud.com/library/spark-init:v2.1.0-kubernetes-0.3.1-1 \
  // 提交真正的计算任务
local:///opt/spark/examples/jars/spark-examples\_2.11-2.2.0-k8s-0.4.0-SNAPSHOT.jar 10000000
这将启动一个包含一千万个 task 的计算 pi 的 spark 任务,任务运行过程中,drvier 的 CPU 实际消耗大约为 3 核,内存 40G,每个 executor 的 CPU 实际消耗大约不到 1 核,内存不到 4G,我们可以根据实际资源消耗不断优化资源的 request 值。
PySpark库
什么是PySpark
前面使用过bin/pyspark 程序, 提供一个Python解释器执行环境来运行Spark任务,PySpark指的是Python的运行类库, 可以在Python代码中:import pyspark。
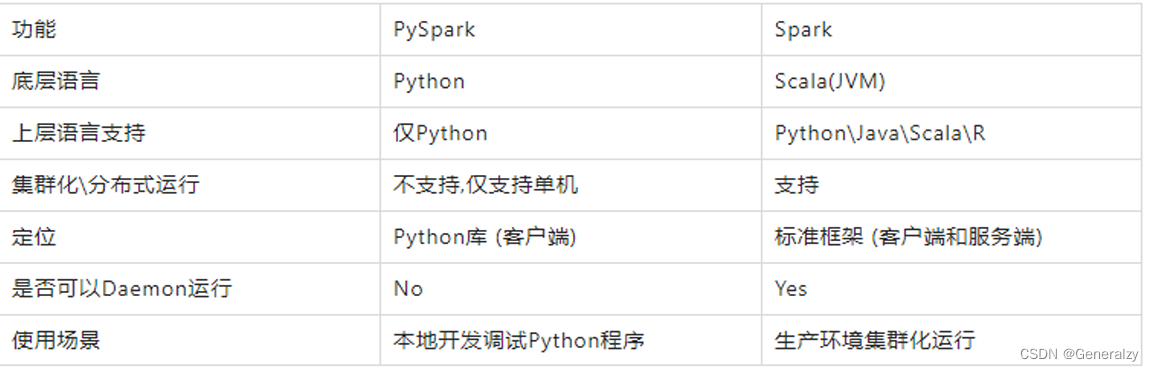
PySpark 是Spark官方提供的一个Python类库, 内置了完全的Spark API, 可以通过PySpark类库来编写Spark应用程序,并将其提交到Spark集群中运行.
下图是PySpark类库和标准Spark框架的简单对比:
可以通过Python自带的pip程序进行安装:pip install pyspark -i https://pypi.tuna.tsinghua.edu.cn/simple
应用入口:SparkContext
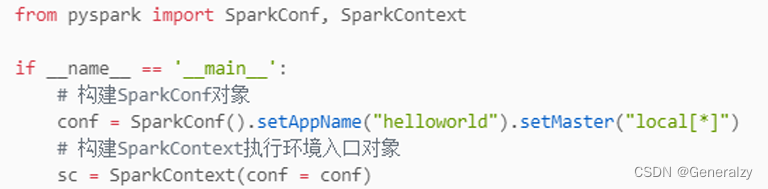
Spark Application程序入口为:SparkContext,任何一个应用首先需要构建SparkContext对象,如下两步构建:
- 第一步、创建SparkConf对象,设置Spark Application基本信息,比如应用的名称AppName和应用运行Master
- 第二步、基于SparkConf对象,创建SparkContext对象

WordCount代码实战
首先创建一个本地word.txt文件:
Hello Spark
Hello World
Hello Hello
然后编写对应处理脚本:
如果有如下报错:
24/03/17 19:46:06 ERROR Executor: Exception in task 0.0 in stage 1.0 (TID 2)
org.apache.spark.SparkException: Python worker failed to connect back.
	at org.apache.spark.api.python.PythonWorkerFactory.createSimpleWorker(PythonWorkerFactory.scala:192)
	at org.apache.spark.api.python.PythonWorkerFactory.create(PythonWorkerFactory.scala:109)
	at org.apache.spark.SparkEnv.createPythonWorker(SparkEnv.scala:124)
	at org.apache.spark.api.python.BasePythonRunner.compute(PythonRunner.scala:166)
	at org.apache.spark.api.python.PythonRDD.compute(PythonRDD.scala:65)
	at org.apache.spark.rdd.RDD.computeOrReadCheckpoint(RDD.scala:364)
	at org.apache.spark.rdd.RDD.iterator(RDD.scala:328)
	at org.apache.spark.scheduler.ResultTask.runTask(ResultTask.scala:92)
	at org.apache.spark.TaskContext.runTaskWithListeners(TaskContext.scala:161)
	at org.apache.spark.scheduler.Task.run(Task.scala:139)
	at org.apache.spark.executor.Executor$TaskRunner.$anonfun$run$3(Executor.scala:554)
	at org.apache.spark.util.Utils$.tryWithSafeFinally(Utils.scala:1529)
	at org.apache.spark.executor.Executor$TaskRunner.run(Executor.scala:557)
	at java.base/java.util.concurrent.ThreadPoolExecutor.runWorker(ThreadPoolExecutor.java:1136)
	at java.base/java.util.concurrent.ThreadPoolExecutor$Worker.run(ThreadPoolExecutor.java:635)
	at java.base/java.lang.Thread.run(Thread.java:833)
Caused by: java.net.SocketTimeoutException: Accept timed out
	at java.base/sun.nio.ch.NioSocketImpl.timedAccept(NioSocketImpl.java:708)
	at java.base/sun.nio.ch.NioSocketImpl.accept(NioSocketImpl.java:752)
	at java.base/java.net.ServerSocket.implAccept(ServerSocket.java:675)
	at java.base/java.net.ServerSocket.platformImplAccept(ServerSocket.java:641)
	at java.base/java.net.ServerSocket.implAccept(ServerSocket.java:617)
	at java.base/java.net.ServerSocket.implAccept(ServerSocket.java:574)
	at java.base/java.net.ServerSocket.accept(ServerSocket.java:532)
	at org.apache.spark.api.python.PythonWorkerFactory.createSimpleWorker(PythonWorkerFactory.scala:179)
	... 15 more
就需要加上两个环境变量:
os.environ['PYSPARK\_PYTHON'] = sys.executable
os.environ['PYSPARK\_DRIVER\_PYTHON'] = sys.executable
这两行代码的作用是设置环境变量,用于指定 Spark 使用的 Python 解释器以及驱动程序所使用的 Python 解释器。
os.environ[‘PYSPARK_PYTHON’] = sys.executable 将当前 Python 解释器的路径赋给环境变量 PYSPARK_PYTHON,这告诉 Spark 使用与当前 Python 解释器相同的解释器来执行 Python 代码。
os.environ[‘PYSPARK_DRIVER_PYTHON’] = sys.executable 将当前 Python 解释器的路径赋给环境变量 PYSPARK_DRIVER_PYTHON,这告诉 Spark 驱动程序使用与当前 Python 解释器相同的解释器。
from pyspark import SparkContext, SparkConf
import os
import sys

os.environ['PYSPARK\_PYTHON'] = sys.executable
os.environ['PYSPARK\_DRIVER\_PYTHON'] = sys.executable

spark_config = SparkConf().setAppName("minProject").setMaster("local[\*]")
spark_ctx = SparkContext(conf=spark_config)

# spark读取本地文件
rdd = spark_ctx.textFile("./word.txt")
print(rdd.collect())

# 分割为单词
flatMapRdd = rdd.flatMap(lambda line: line.split(" "))
print(flatMapRdd.collect())

# 转换为二元组,表示每个单词出现一次
mapRDD = flatMapRdd.map(lambda x: (x, 1))
print(mapRDD.collect())

# 按照Key分组聚合
resultRDD = mapRDD.reduceByKey(lambda a, b: a + b)

# 第三步、输出数据
print(resultRDD.collect())

原理分析:
最终将结果保存到本地:
# 第三步、输出数据
print(resultRDD.collect())
resultRDD.saveAsTextFile("./output.txt")

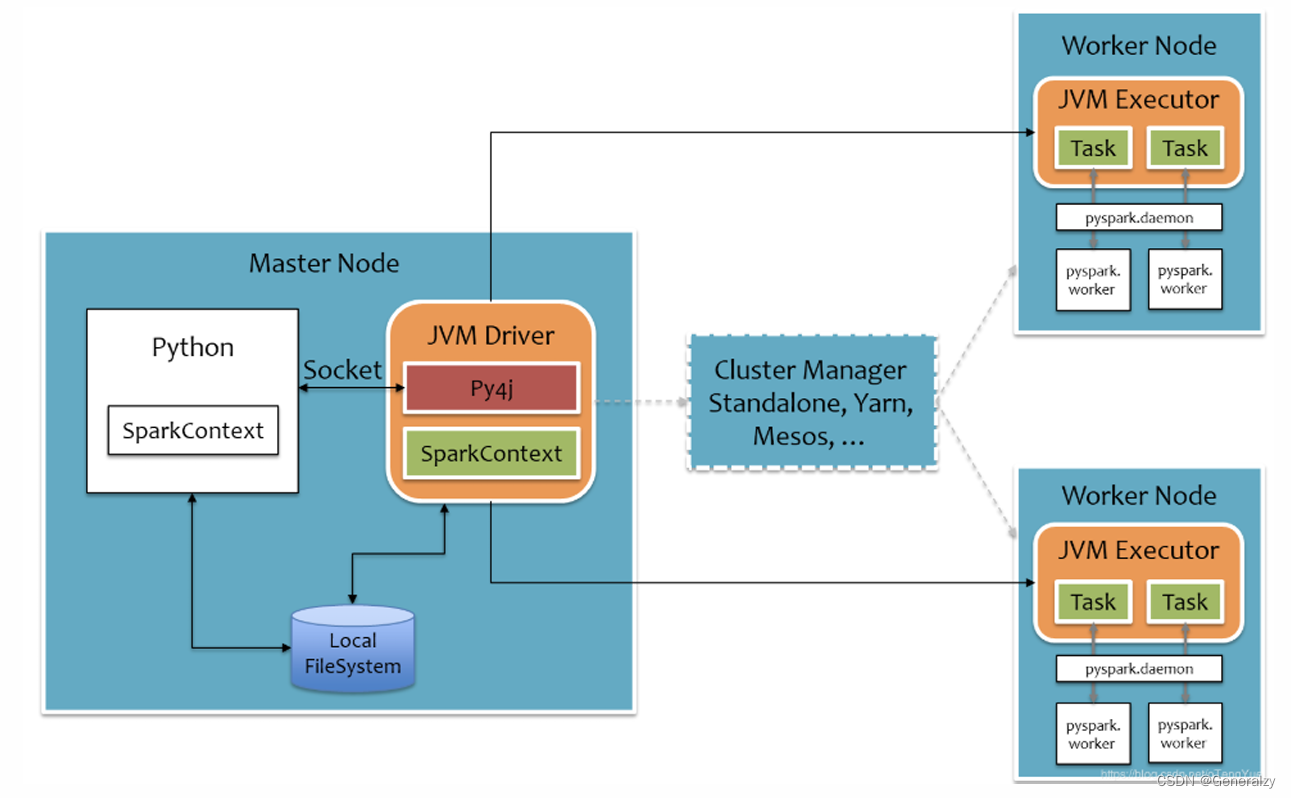
Python On Spark 执行原理
PySpark宗旨是在不破坏Spark已有的运行时架构,在Spark架构外层包装一层Python API,借助Py4j实现Python和Java的交互,进而实现通过Python编写Spark应用程序,其运行时架构如下图所示。

Spark核心编程
Spark 计算框架为了能够进行高并发和高吞吐的数据处理,封装了三大数据结构,用于处理不同的应用场景。三大数据结构分别是:
➢ RDD : 弹性分布式数据集
➢ 累加器:分布式共享只写变量
➢ 广播变量:分布式共享只读变量
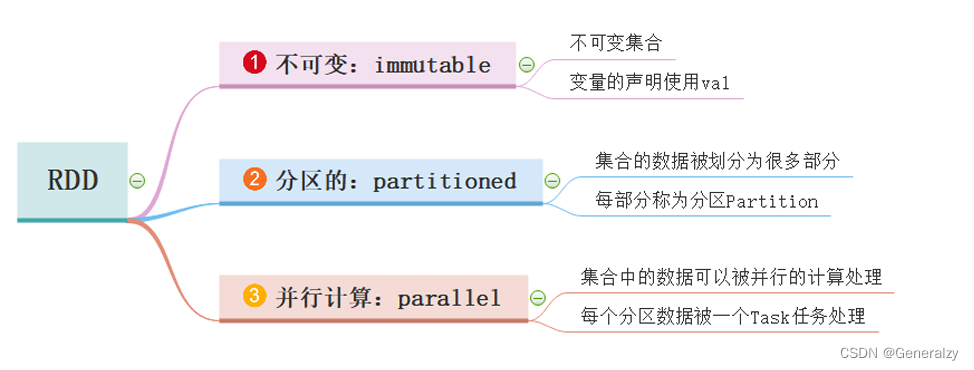
RDD
RDD(Resilient Distributed Dataset)叫做弹性分布式数据集,是 Spark 中最基本的数据处理模型。代码中是一个抽象类,它代表一个弹性的、不可变、可分区、里面的元素可并行计算的集合。
- 弹性
- 存储的弹性:内存与磁盘的自动切换;
- 容错的弹性:数据丢失可以自动恢复;
- 计算的弹性:计算出错重试机制;
- 分片的弹性:可根据需要重新分片。
- 分布式:数据存储在大数据集群不同节点上
- 数据集:RDD封装了计算逻辑,并不保存数据
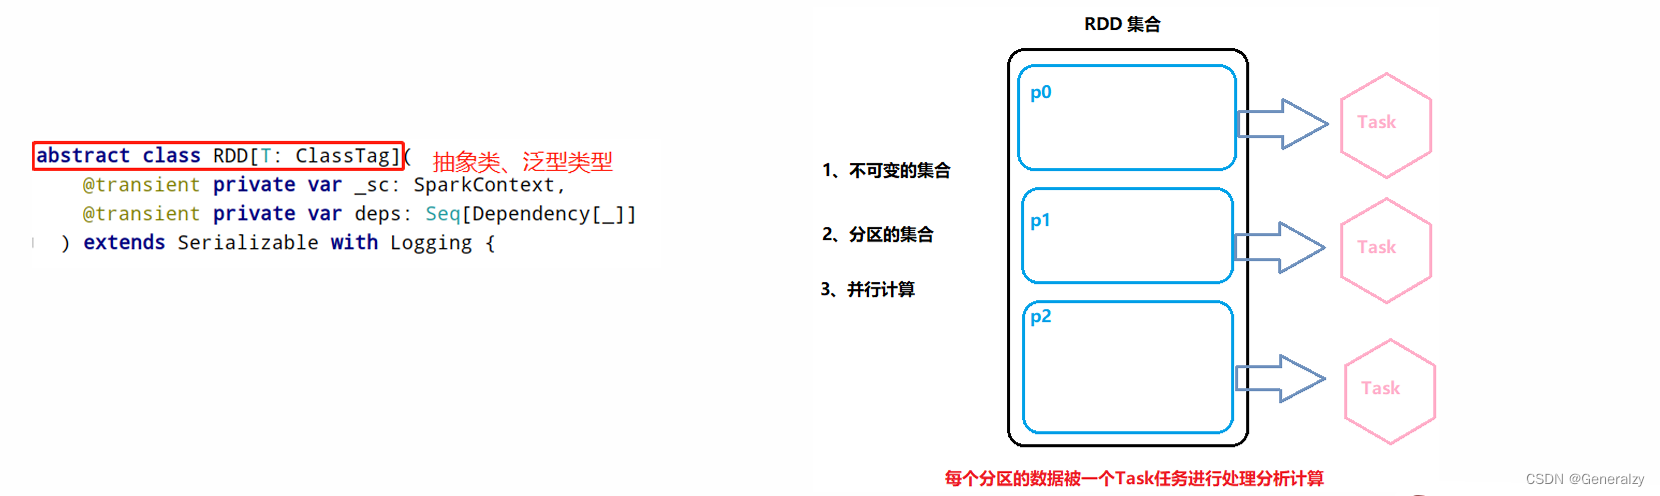
- 数据抽象:RDD是一个抽象类,需要子类具体实现
- 不可变:RDD封装了计算逻辑,是不可以改变的,想要改变,只能产生新的RDD,在新的RDD里面封装计算逻辑
- 可分区、并行计算
- RDD(Resilient Distributed Dataset)弹性分布式数据集,是Spark中最基本的数据抽象,代表一个不可变、可分区、里面的元素可并行计算的集合。
- 所有的运算以及操作都建立在RDD 数据结构的基础之上。
- 可以认为RDD是分布式的列表List或数组Array,抽象的数据结构,RDD是一个抽象类Abstract Class和泛型Generic Type
RDD的五大特性
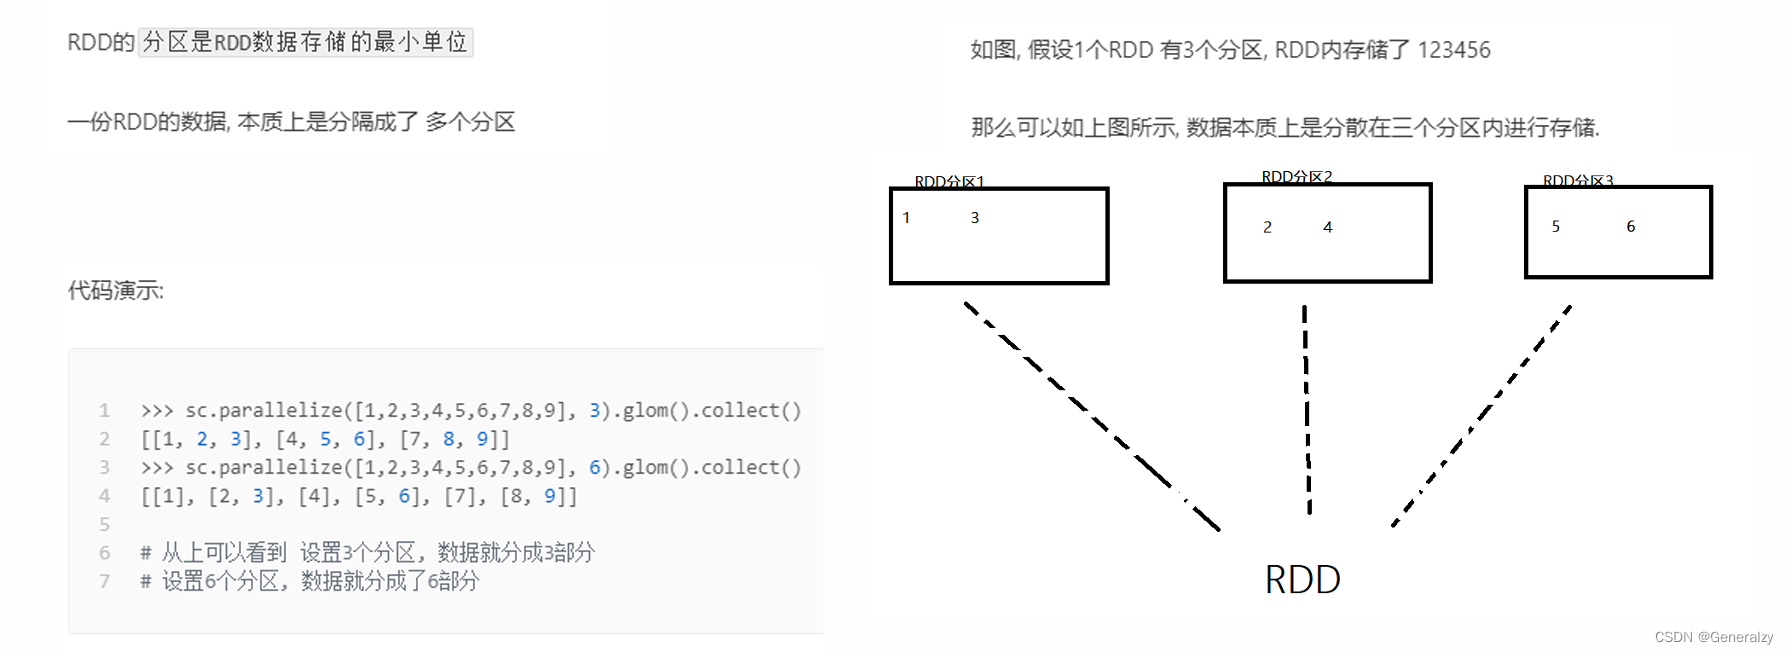
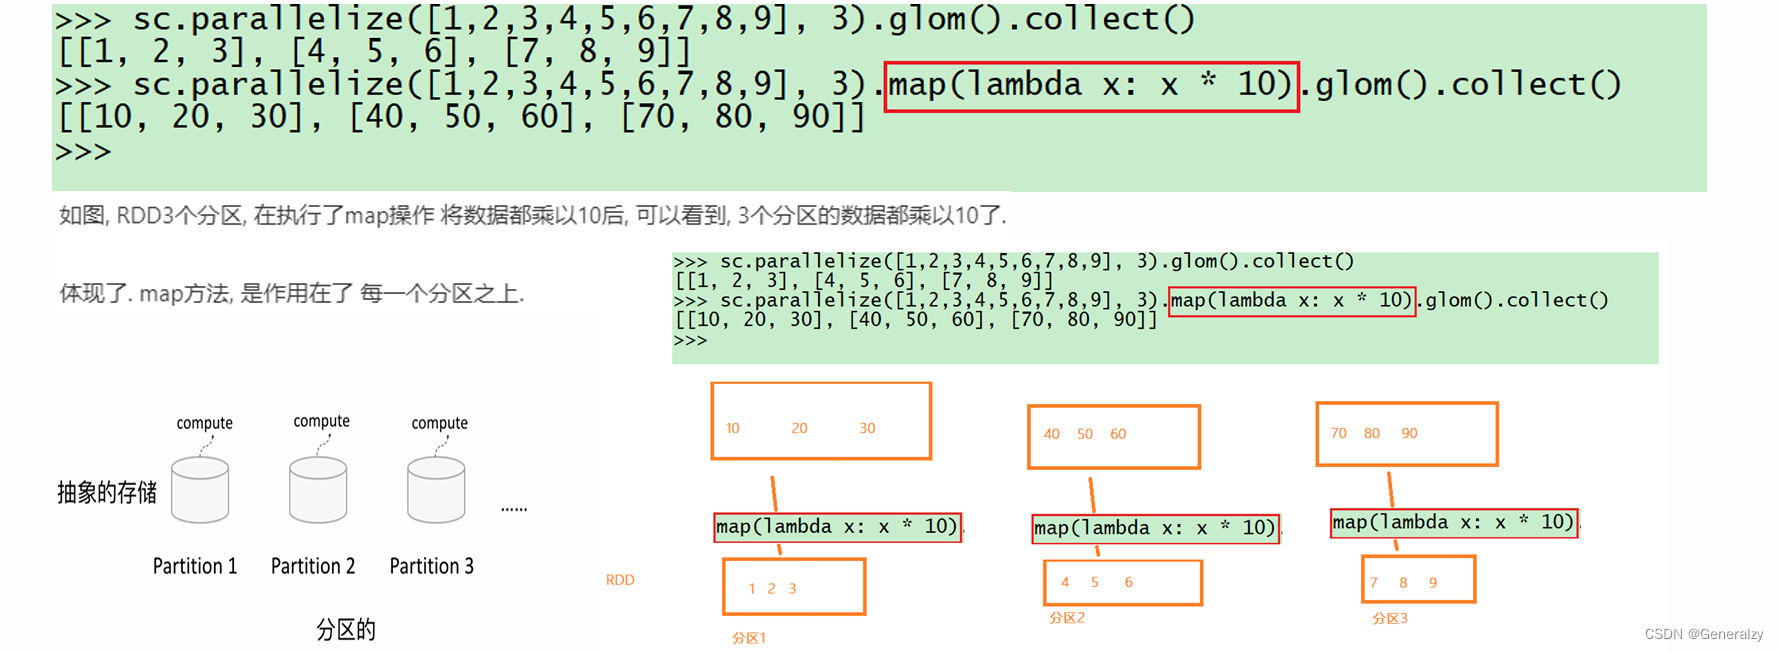
RDD是有分区的
RDD的方法会作用到所有分区上
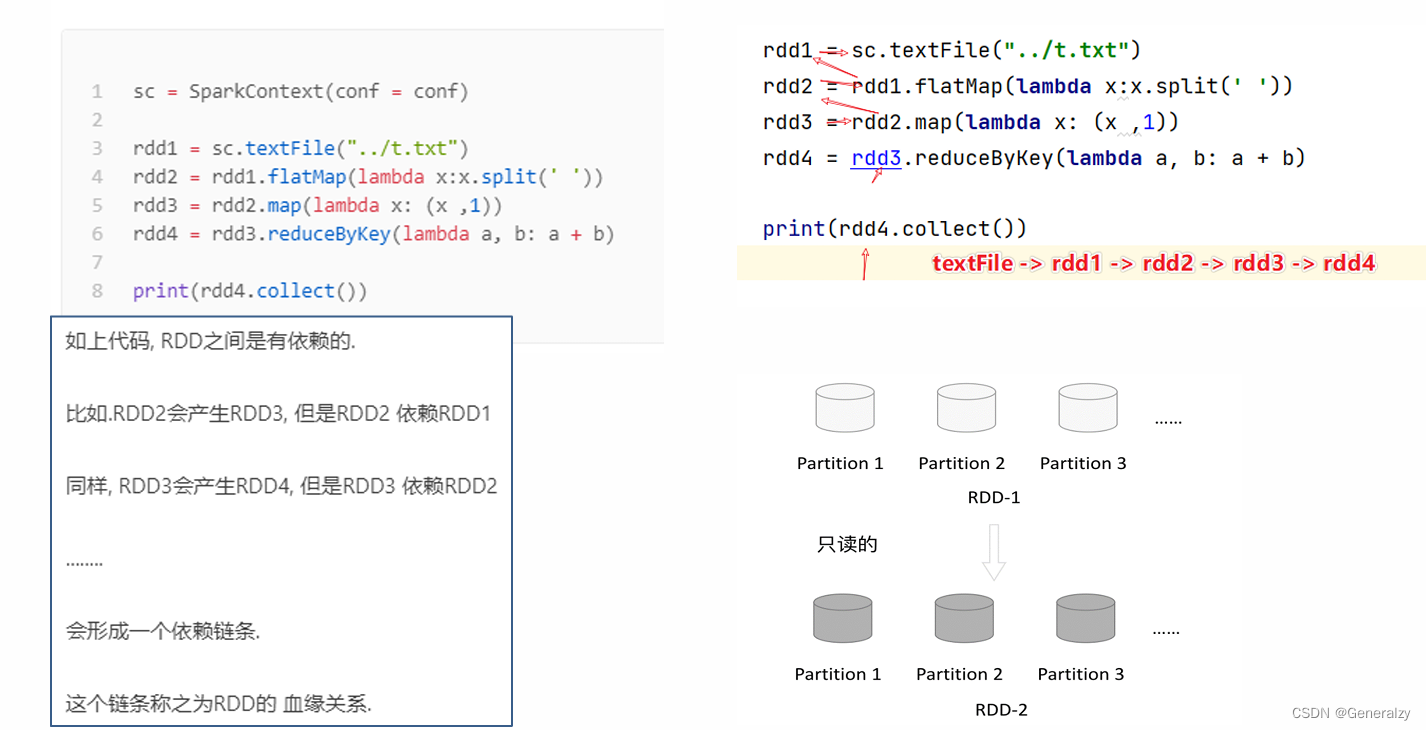
RDD之间是有依赖关系的
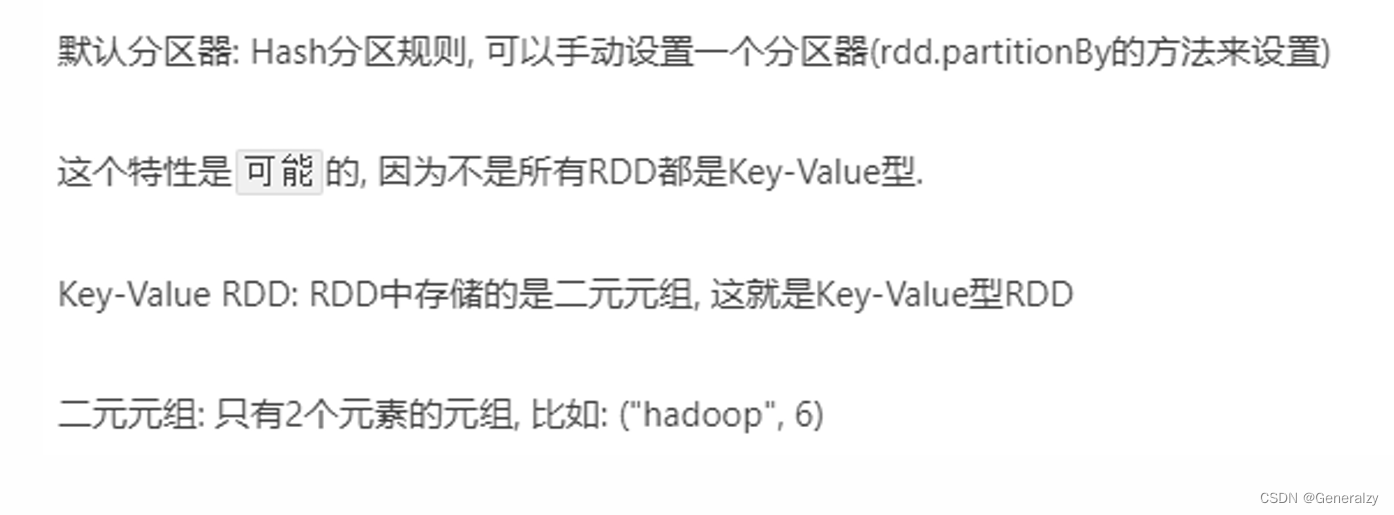
Key-Value型的RDD可以有分区器
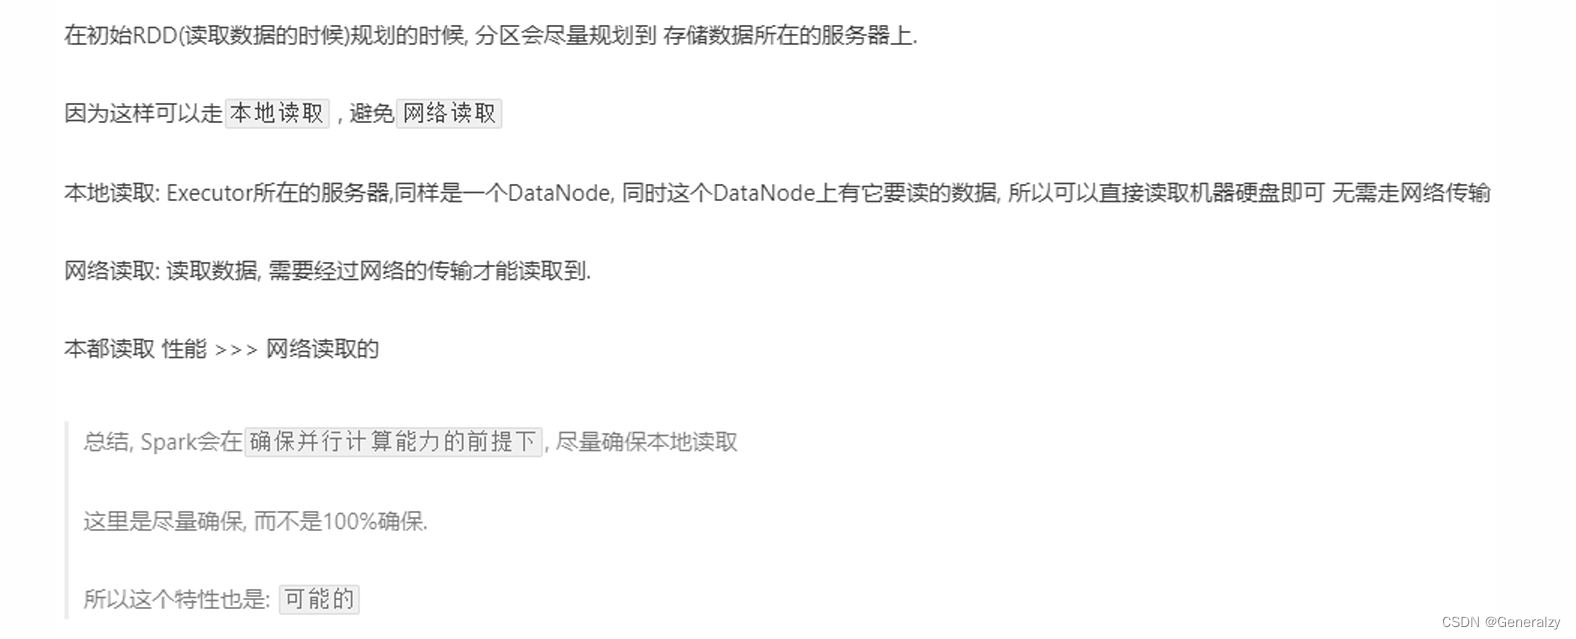
RDD的分区规划,会尽量靠近数据所在服务器
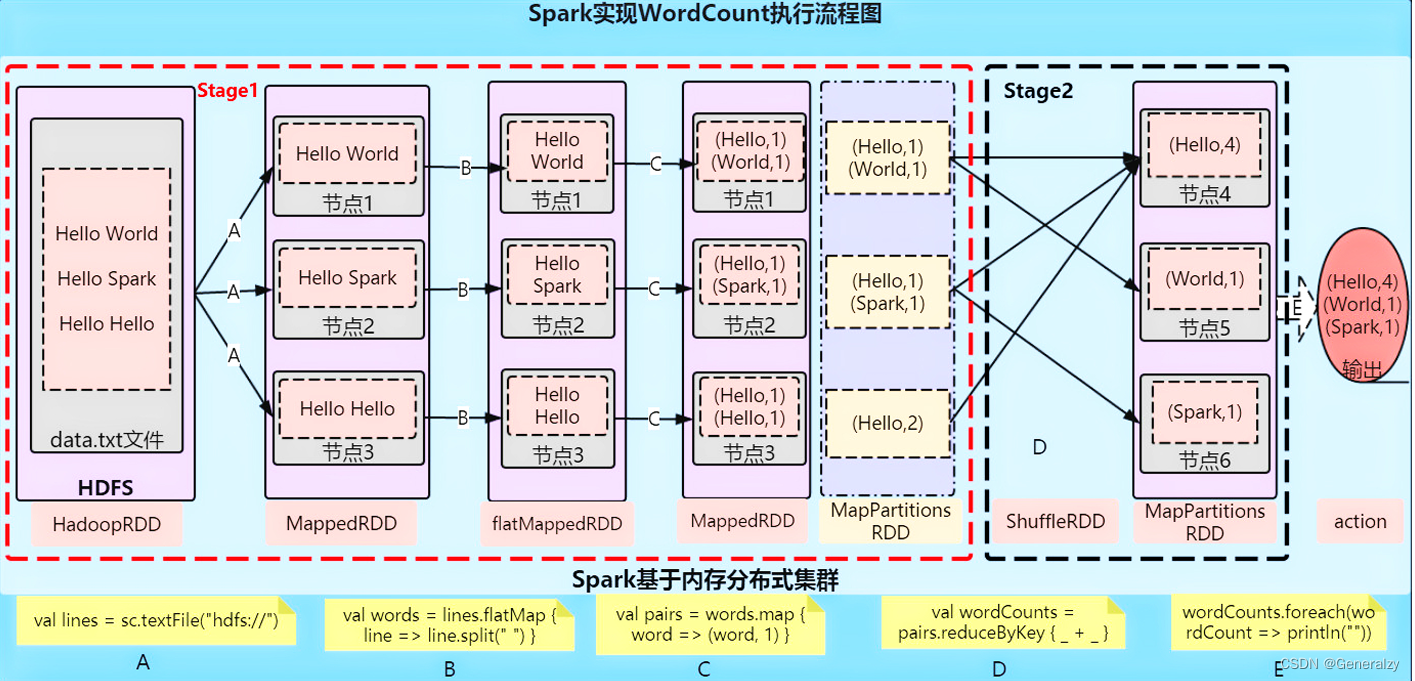
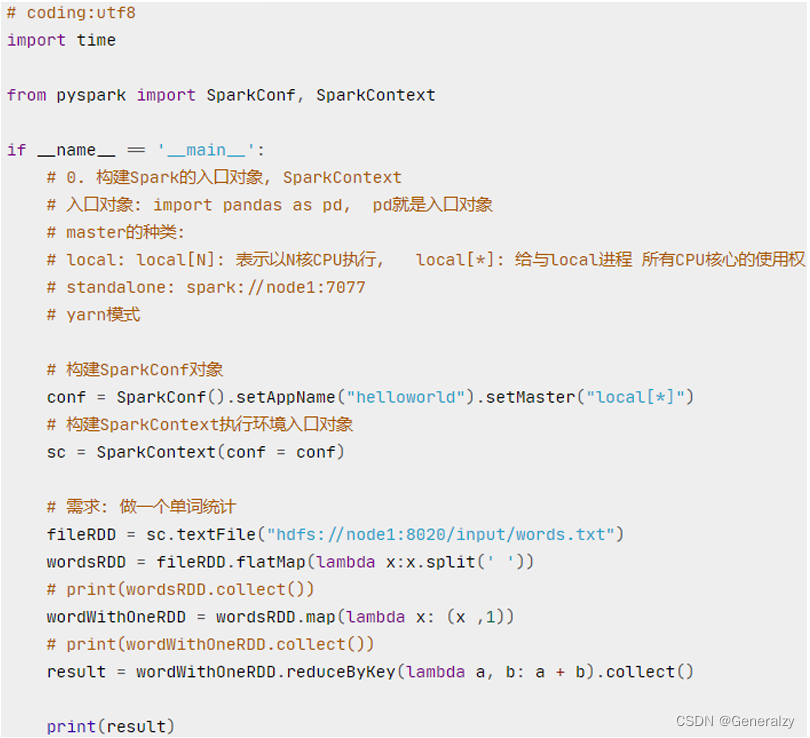
WordCount案例分析
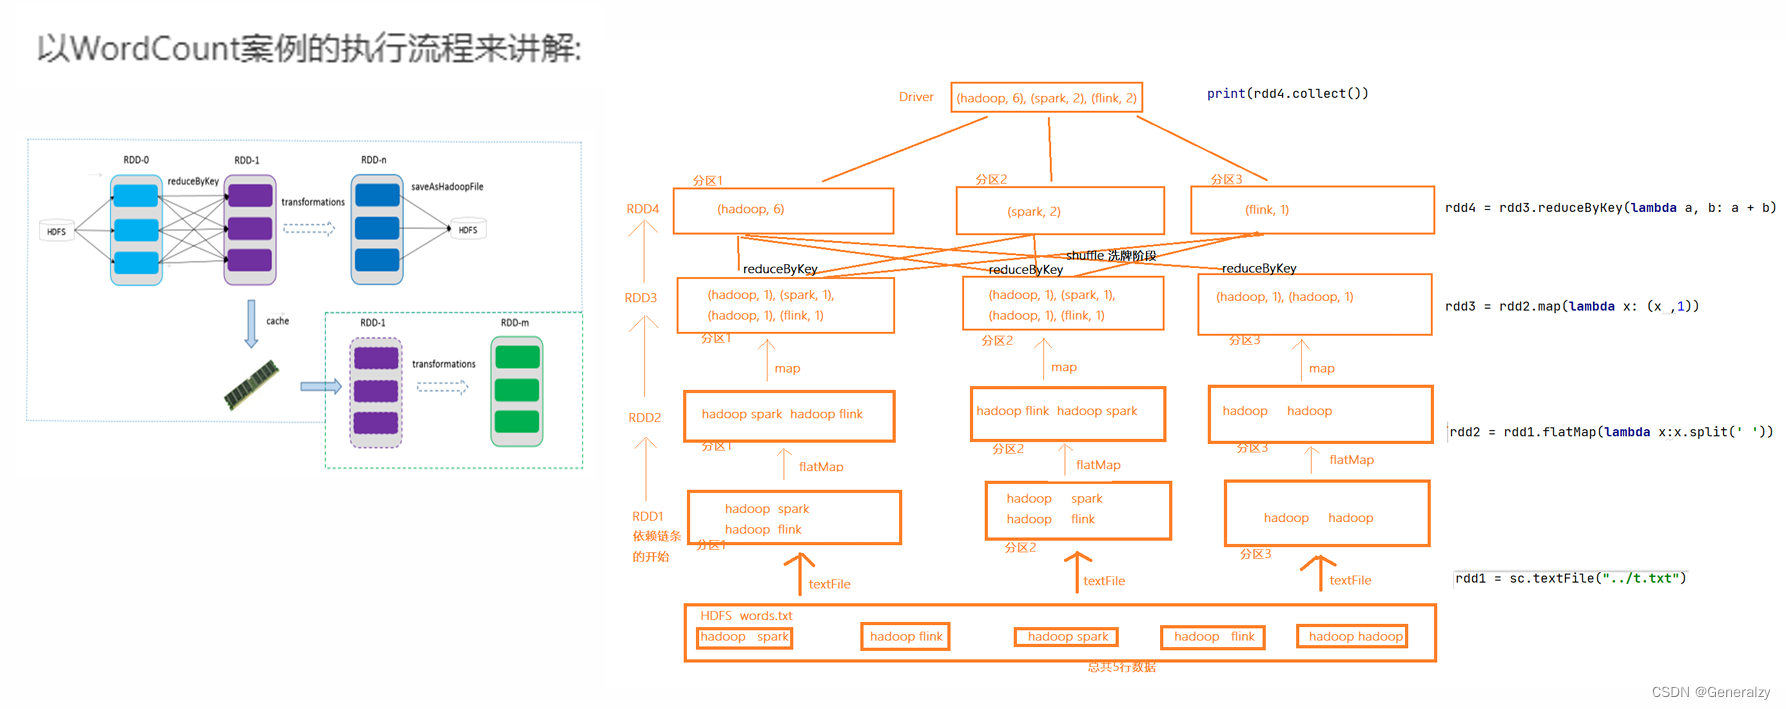
RDD编程
RDD的创建
Spark RDD 编程的程序入口对象是SparkContext对象(不论何种编程语言),只有构建出SparkContext, 基于它才能执行后续的API调用和计算。
本质上, SparkContext对编程来说, 主要功能就是创建第一个RDD出来。
RDD的创建主要有2种方式:
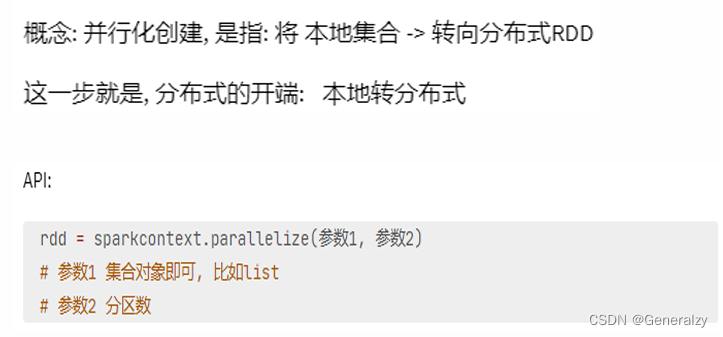
- 通过并行化集合创建( 本地对象转分布式RDD )
- 读取外部数据源( 读取文件)
并行化创建
from pyspark import SparkContext, SparkConf
import os
import sys

os.environ['PYSPARK\_PYTHON'] = sys.executable
os.environ['PYSPARK\_DRIVER\_PYTHON'] = sys.executable

spark_config = SparkConf().setAppName("create add").setMaster("local[4]")
spark_context = SparkContext(conf=spark_config)

data = [1, 2, 3, 4, 5, 6, 6, 7, 8]
rdd = spark_context.parallelize(data, 4)

print(rdd.collect())
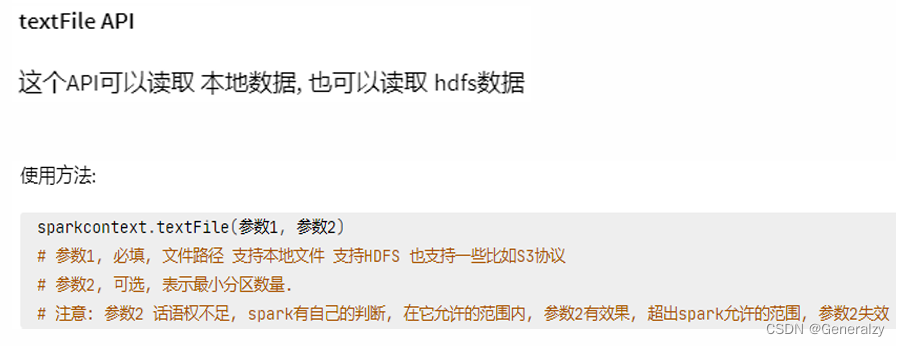
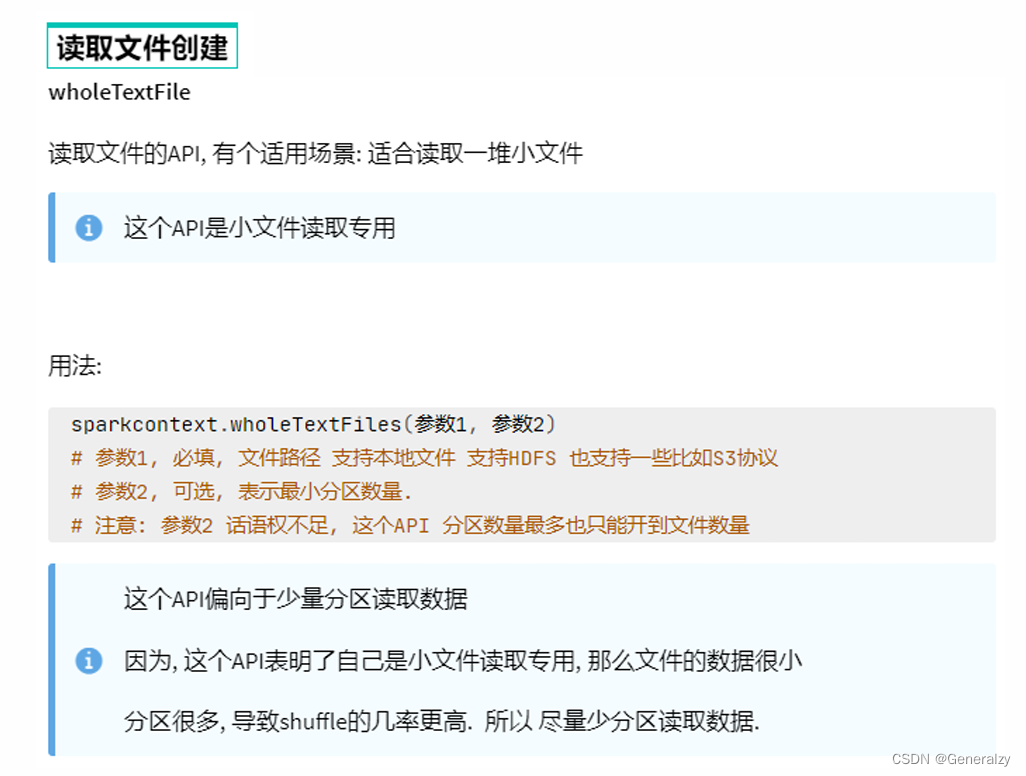
读取文件创建
from pyspark import SparkContext, SparkConf
import os
import sys

os.environ['PYSPARK\_PYTHON'] = sys.executable
os.environ['PYSPARK\_DRIVER\_PYTHON'] = sys.executable

spark_config = SparkConf().setAppName("create add").setMaster("local[4]")
spark_context = SparkContext(conf=spark_config)

rdd = spark_context.textFile("./word.txt")
print(rdd.collect())
RDD 算子
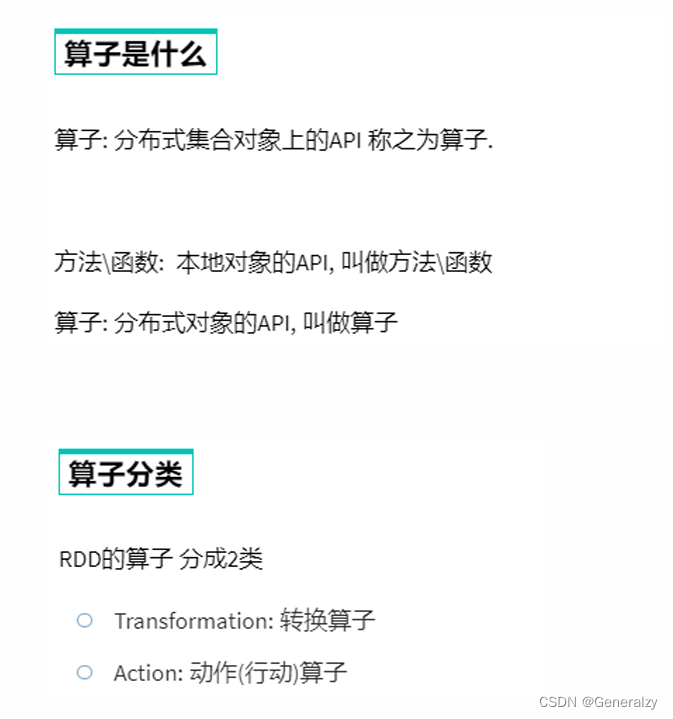
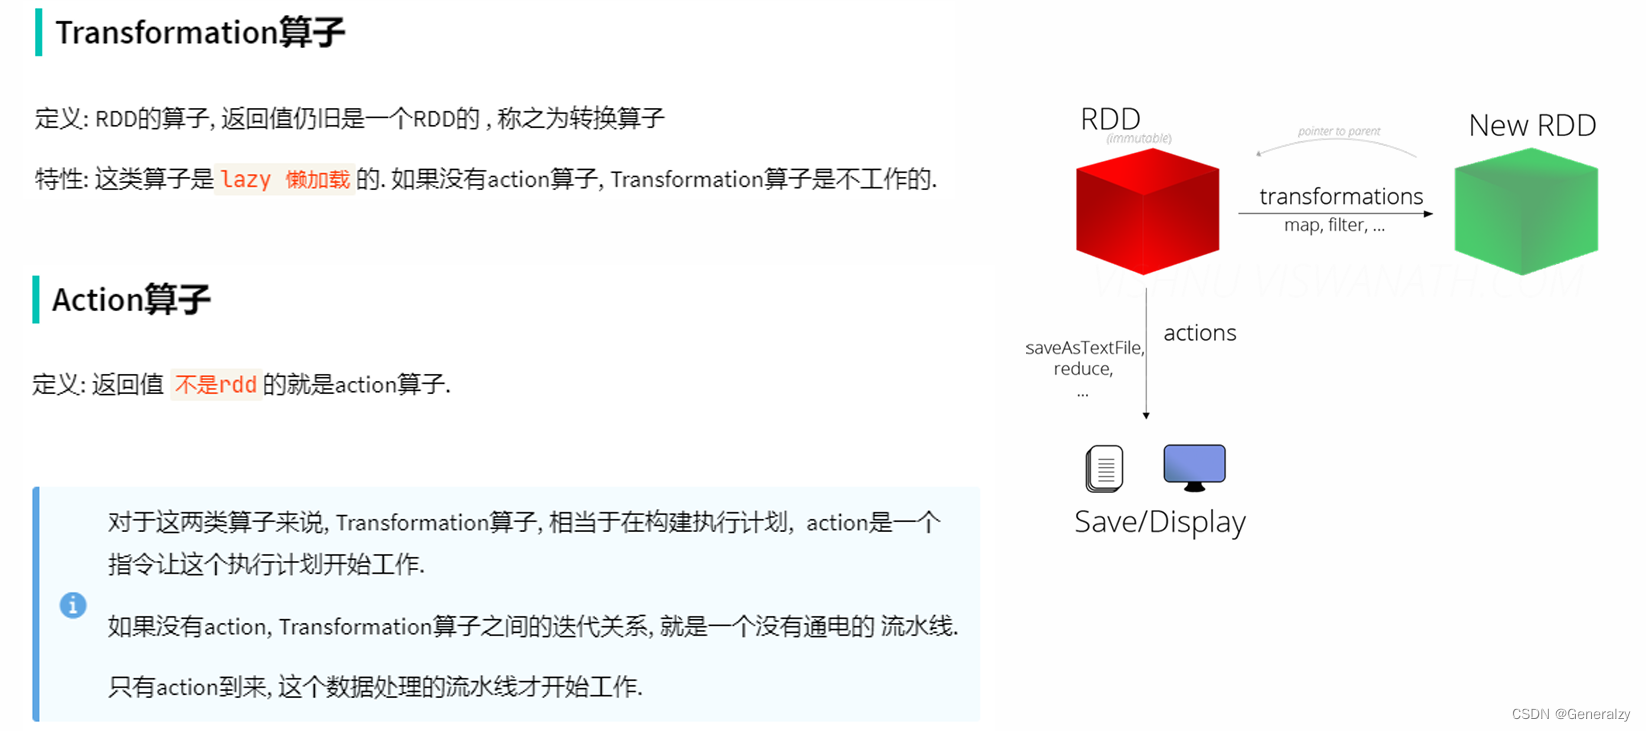

Transformation算子
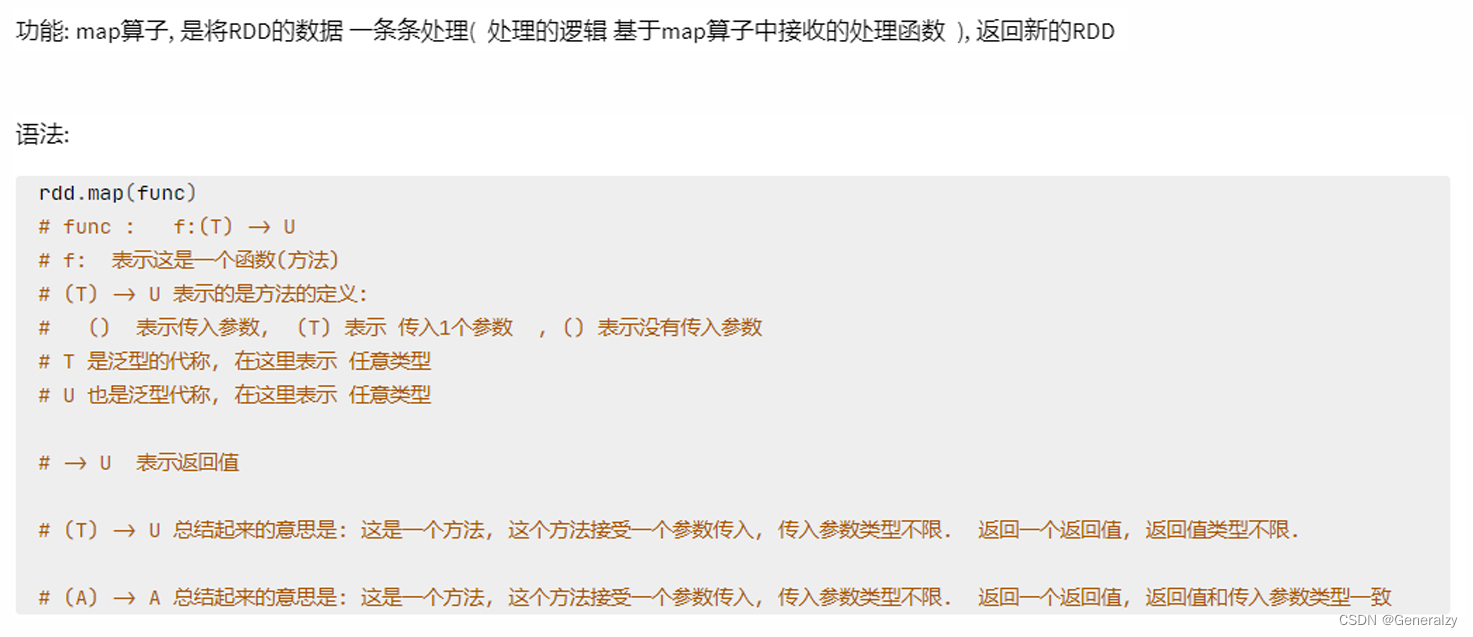
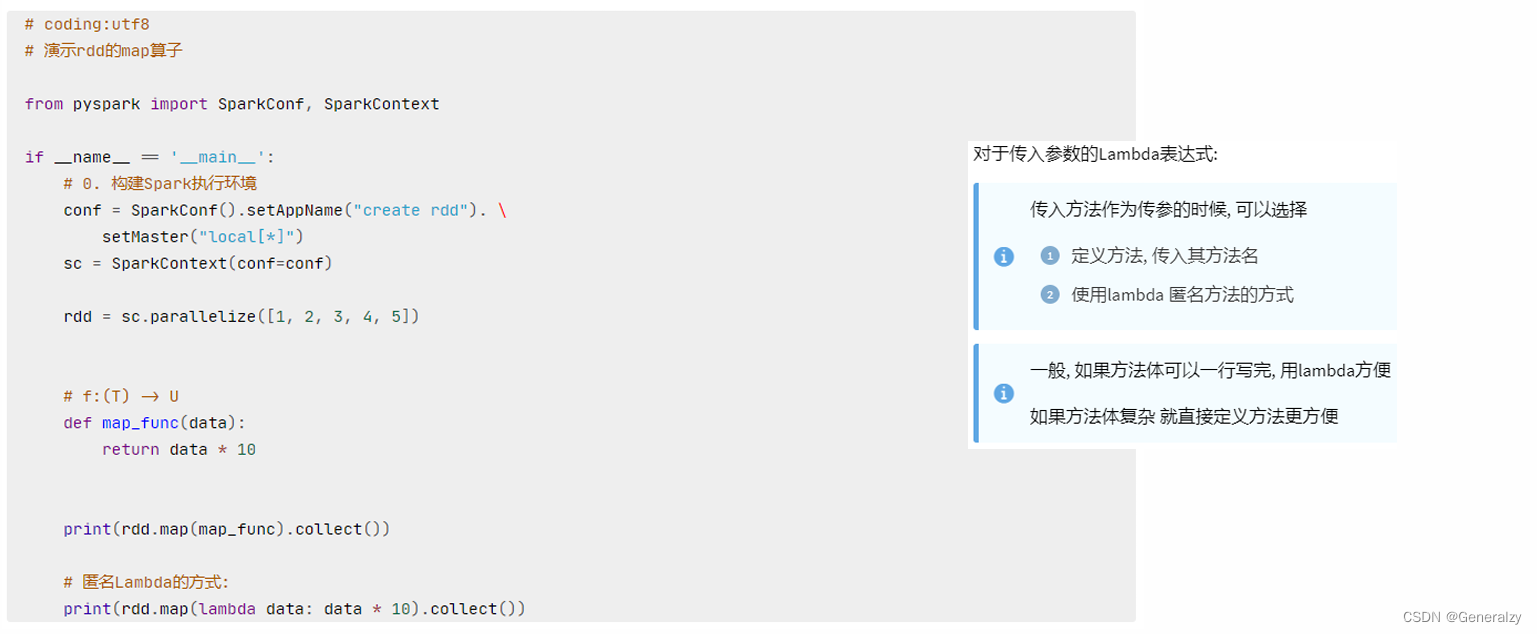
map算子
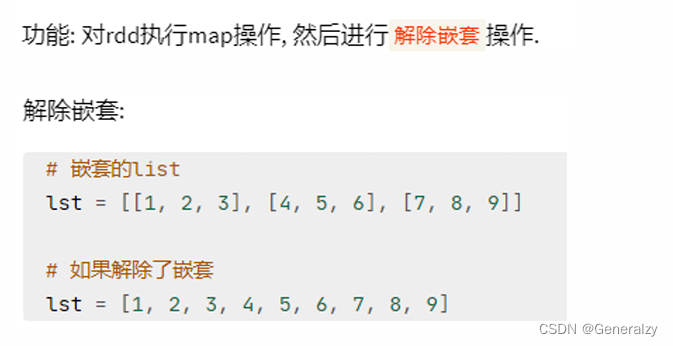
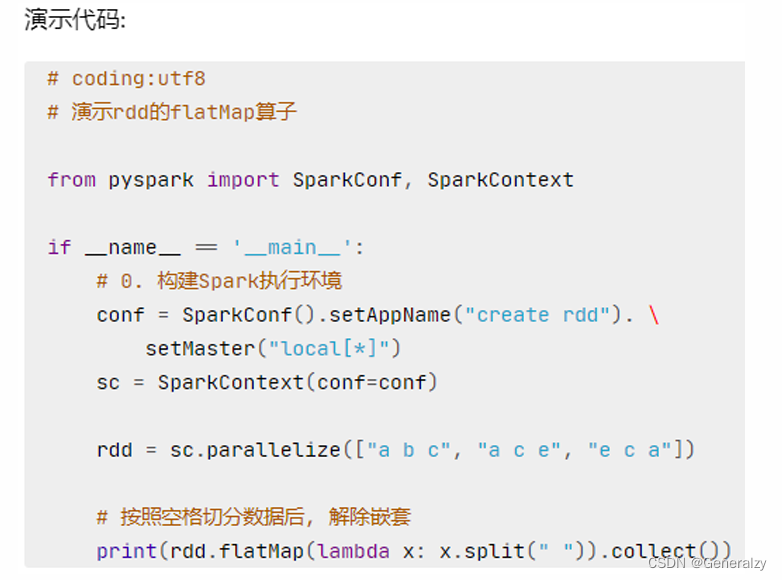
flatMap算子
reduceByKey算子
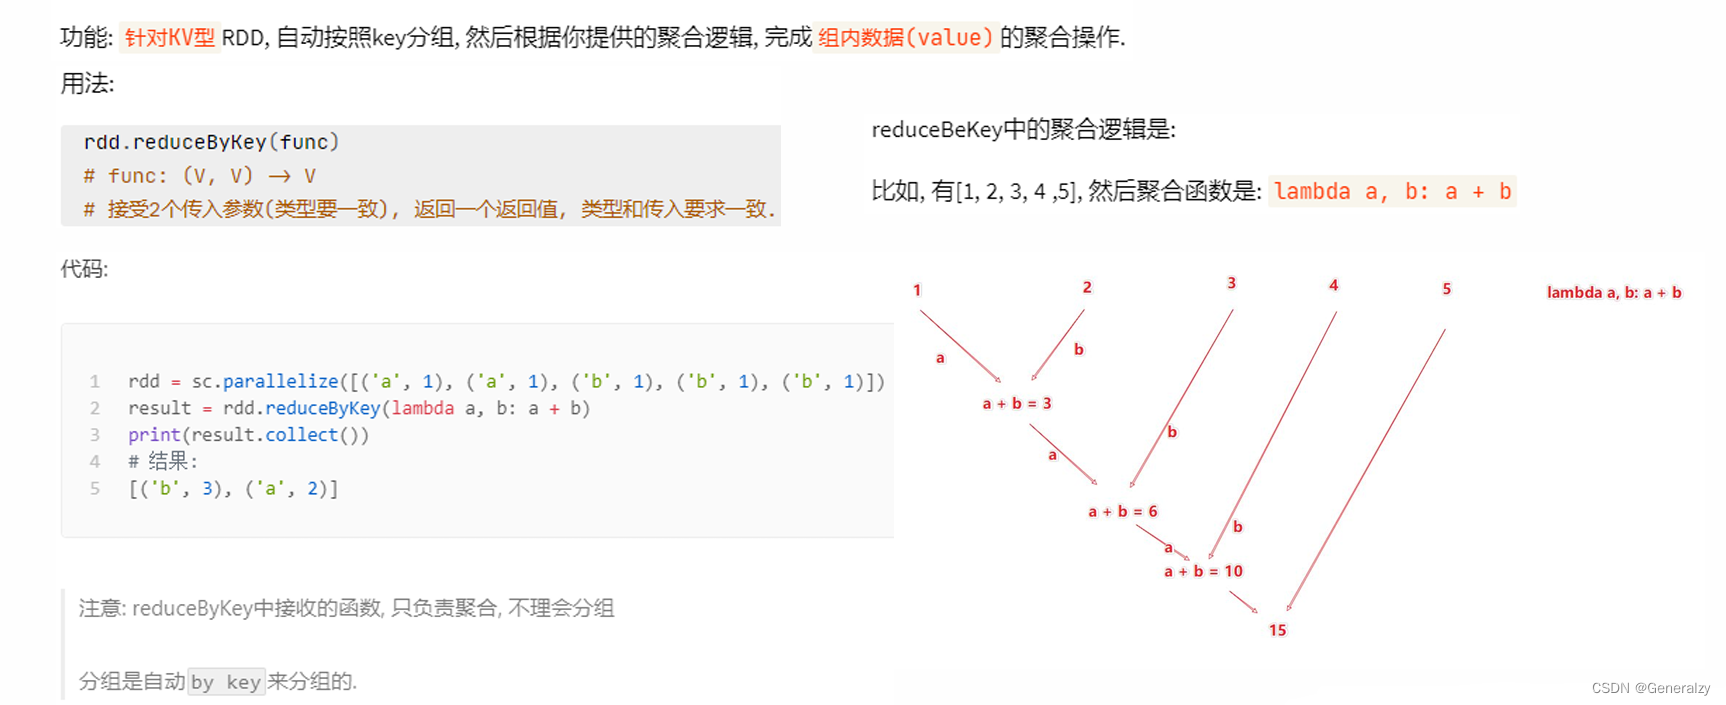
对于一个WordCount的应用,可以:
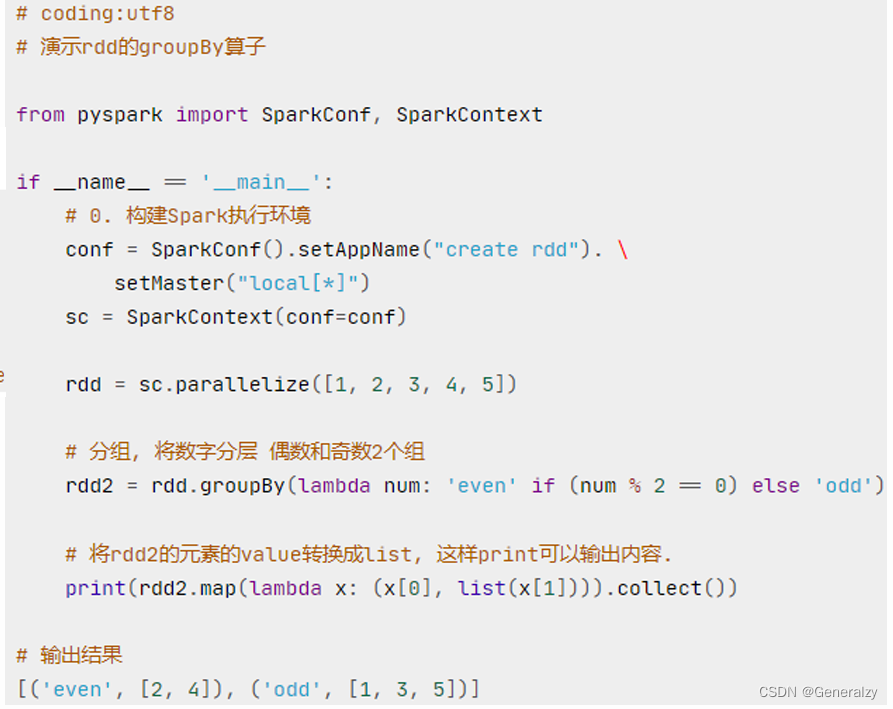
groupBy算子
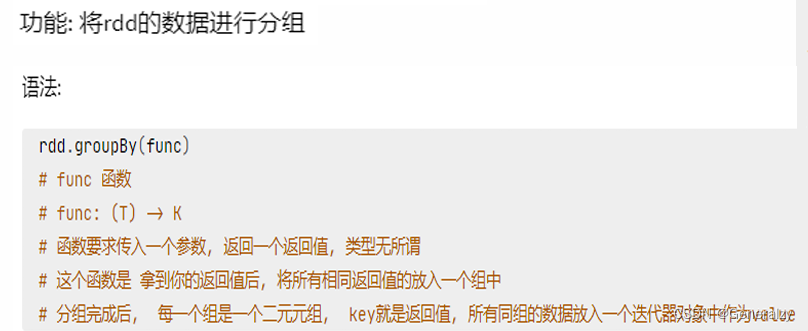
说白了也就是,一个函数的return值是分组的key,条件是分组的条件。
filter算子
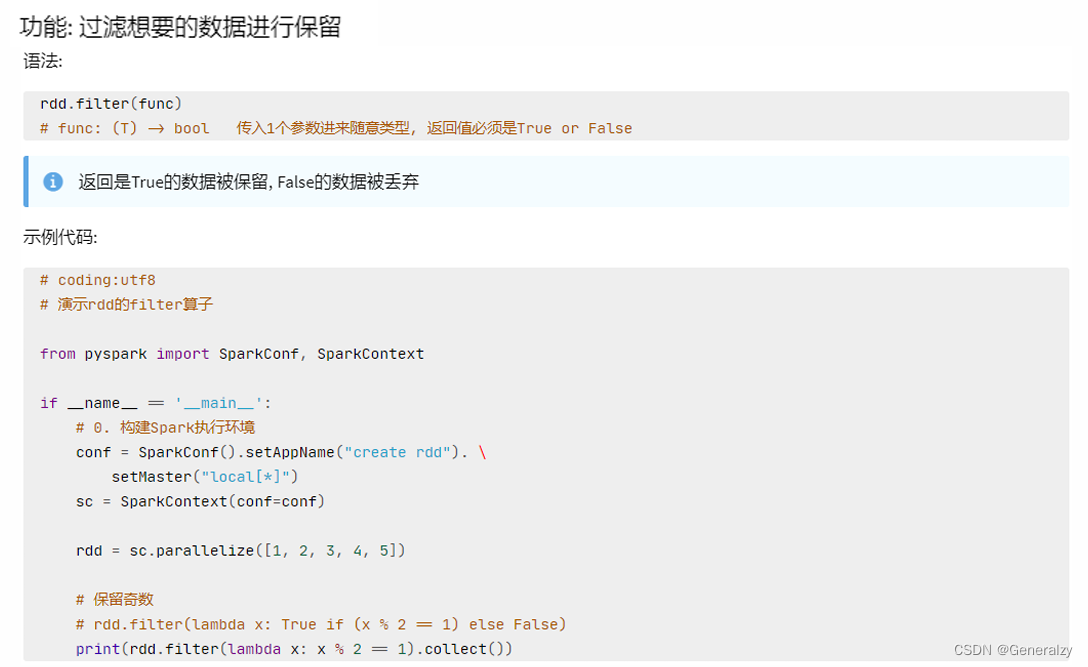
和python的filter一个意思,如果返回true则代表当前值有用,否则抛弃。
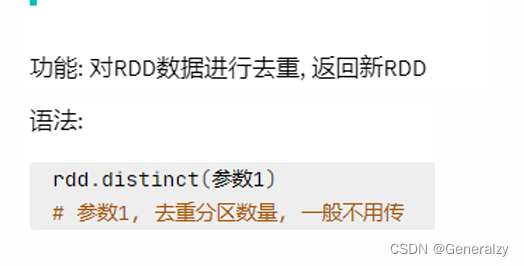
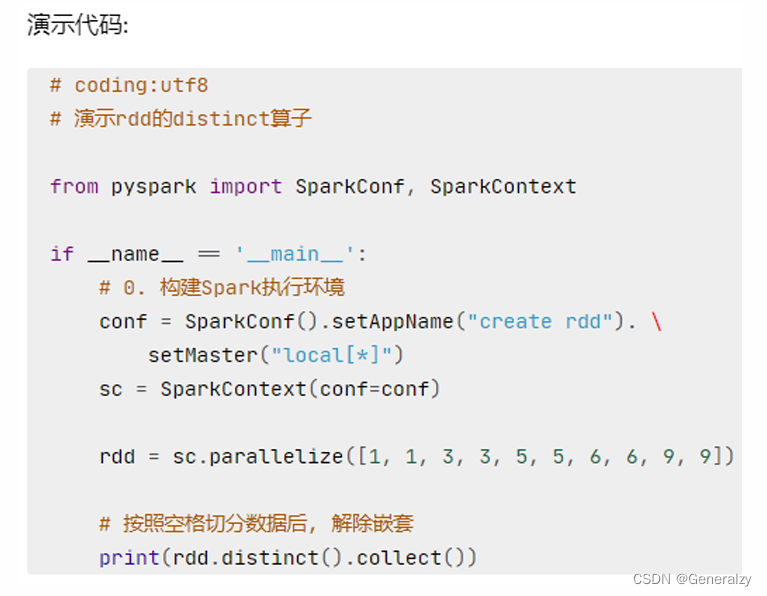
distinct算子
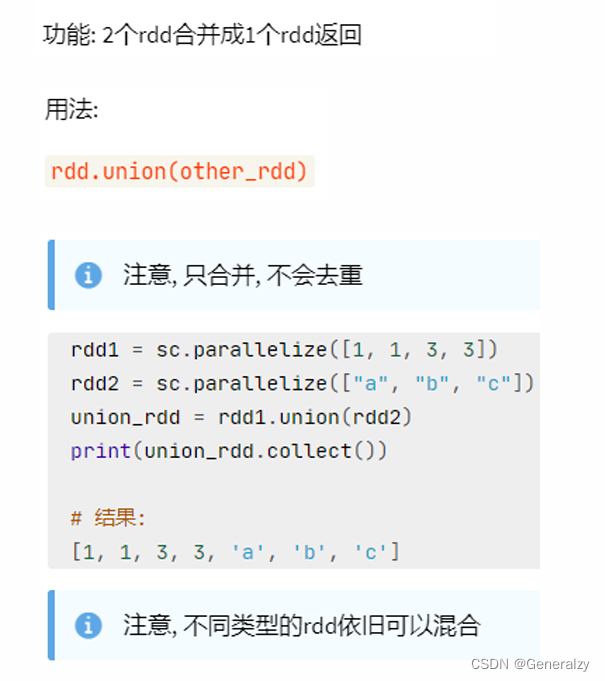
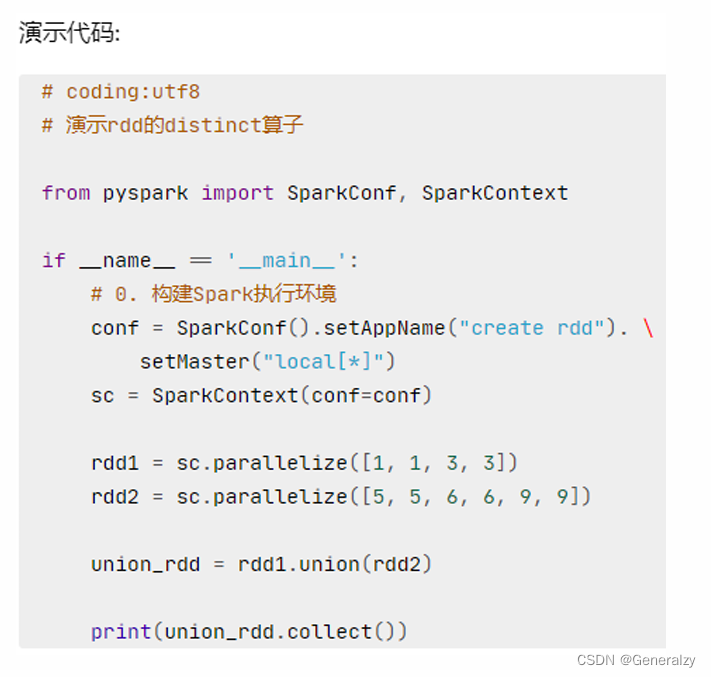
union算子
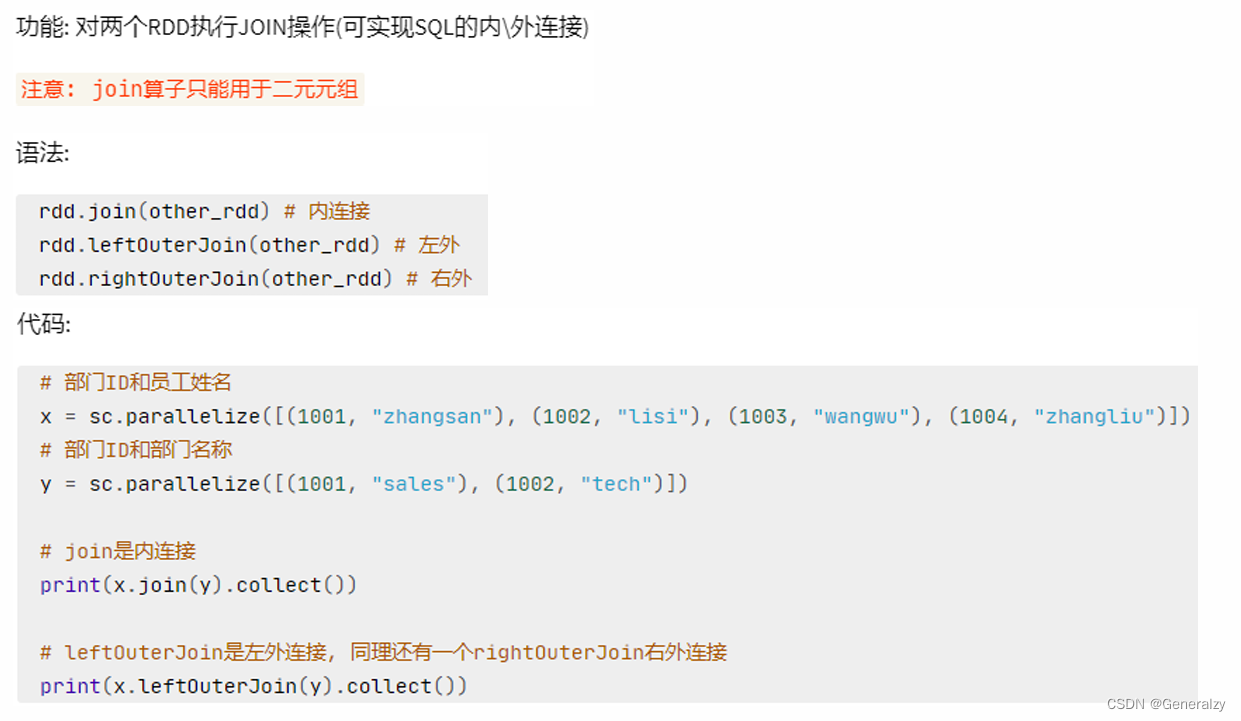
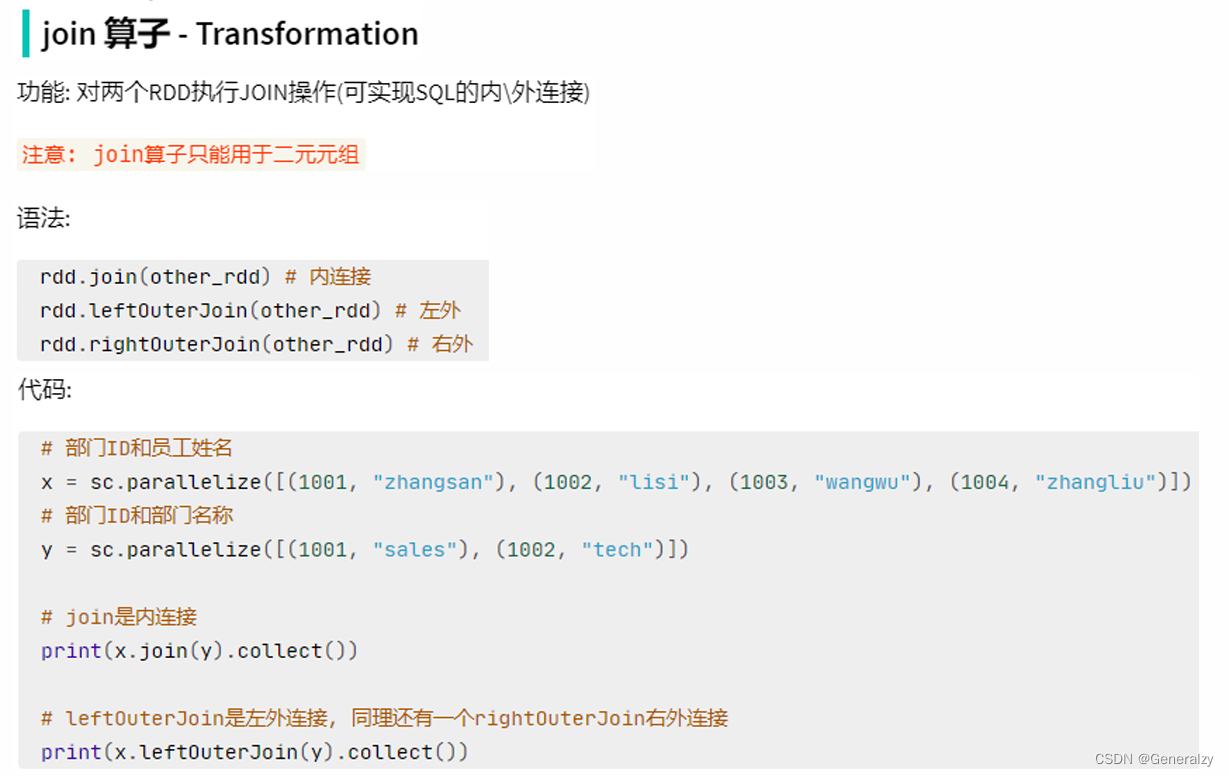
join算子
intersection算子

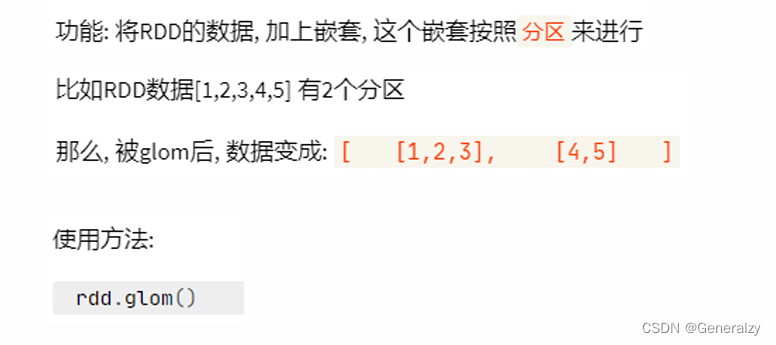
glom算子
import os
import sys

from pyspark import SparkContext, SparkConf

os.environ['PYSPARK\_PYTHON'] = sys.executable
os.environ['PYSPARK\_DRIVER\_PYTHON'] = sys.executable

spark_config = SparkConf().setAppName("create add").setMaster("local[4]")
spark_context = SparkContext(conf=spark_config)

rdd = spark_context.parallelize([1, 2, 3, 4, 5], 2)
rdd2 = rdd.glom()

print(rdd.collect())
[1, 2, 3, 4, 5]
print(rdd2.collect())
[[1, 2], [3, 4, 5]]
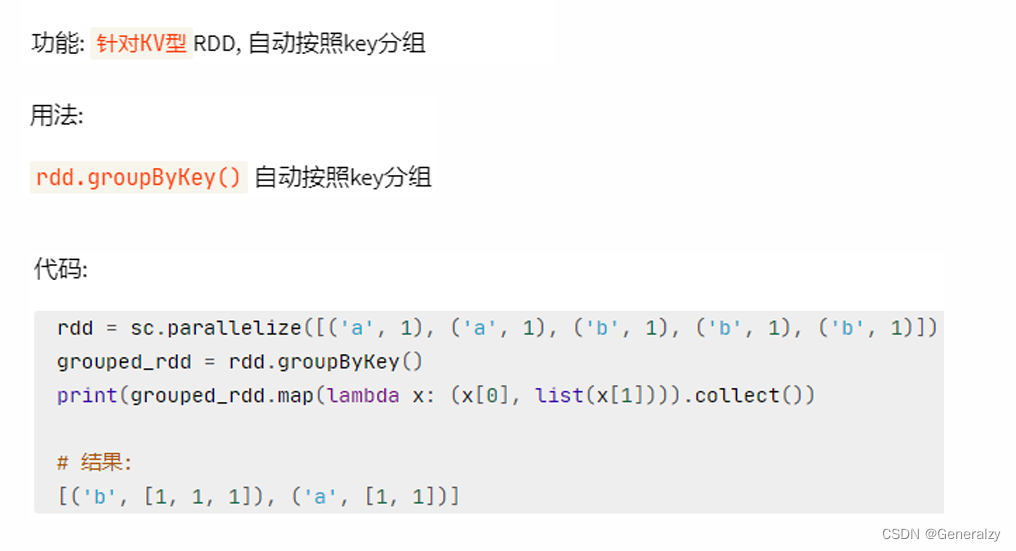
groupByKey算子
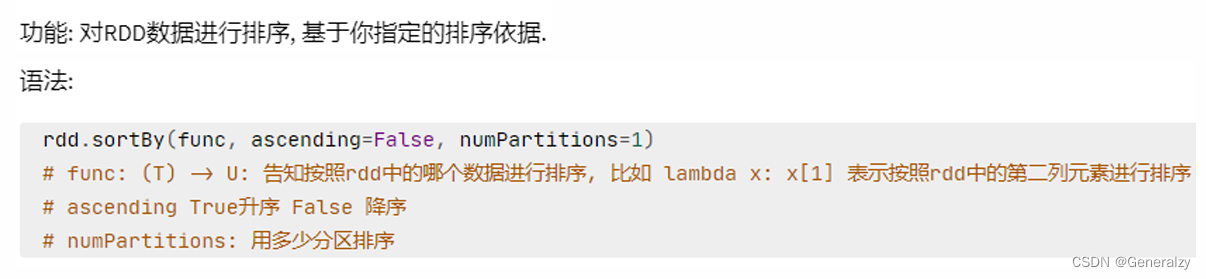
sortBy算子
import os
import sys
from random import shuffle

from pyspark import SparkContext, SparkConf

os.environ['PYSPARK\_PYTHON'] = sys.executable
os.environ['PYSPARK\_DRIVER\_PYTHON'] = sys.executable

spark_config = SparkConf().setAppName("create add").setMaster("local[4]")
spark_context = SparkContext(conf=spark_config)

data = [number for number in range(100)]
# 原地打乱
shuffle(data)

rdd = spark_context.parallelize(data, 10)

rdd2 = rdd.glom()
print(rdd2.collect())

rdd3 = rdd2.sortBy(lambda x: x[-1], ascending=True, numPartitions=1)
print(rdd3.collect())

官方给的案例:
 Examples
 --------
  >>> tmp = [('a', 1), ('b', 2), ('1', 3), ('d', 4), ('2', 5)]
  >>> sc.parallelize(tmp).sortBy(lambda x: x[0]).collect()
  [('1', 3), ('2', 5), ('a', 1), ('b', 2), ('d', 4)]
  >>> sc.parallelize(tmp).sortBy(lambda x: x[1]).collect()
  [('a', 1), ('b', 2), ('1', 3), ('d', 4), ('2', 5)]
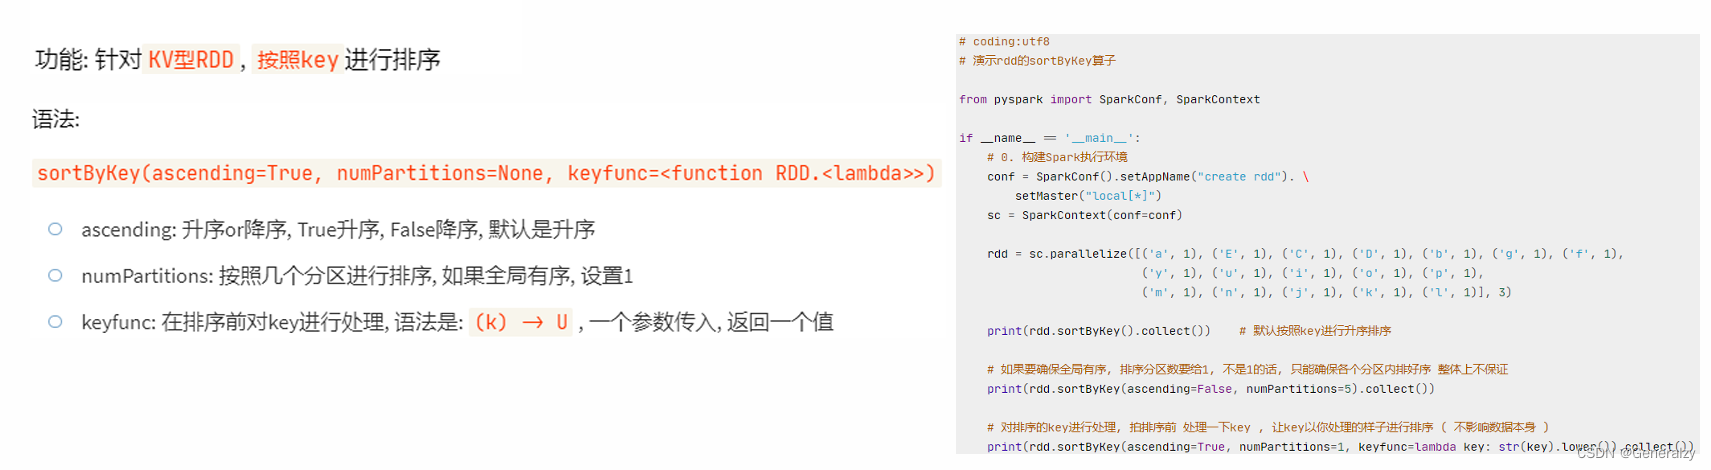
sortByKey算子
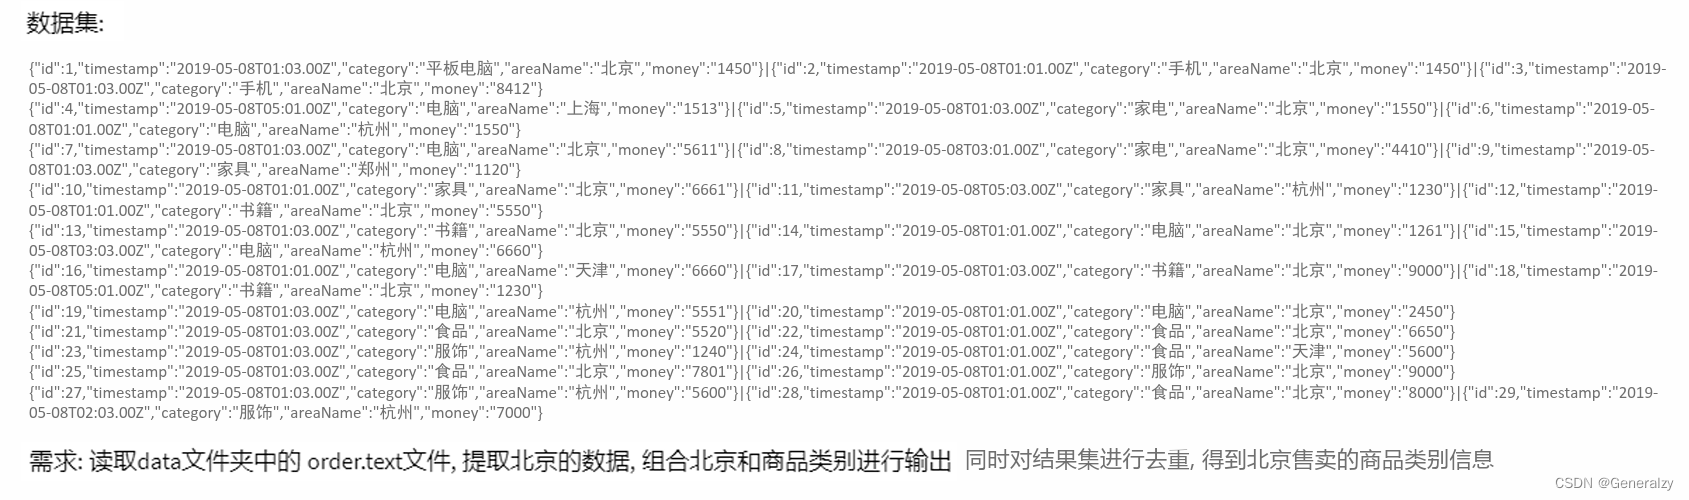
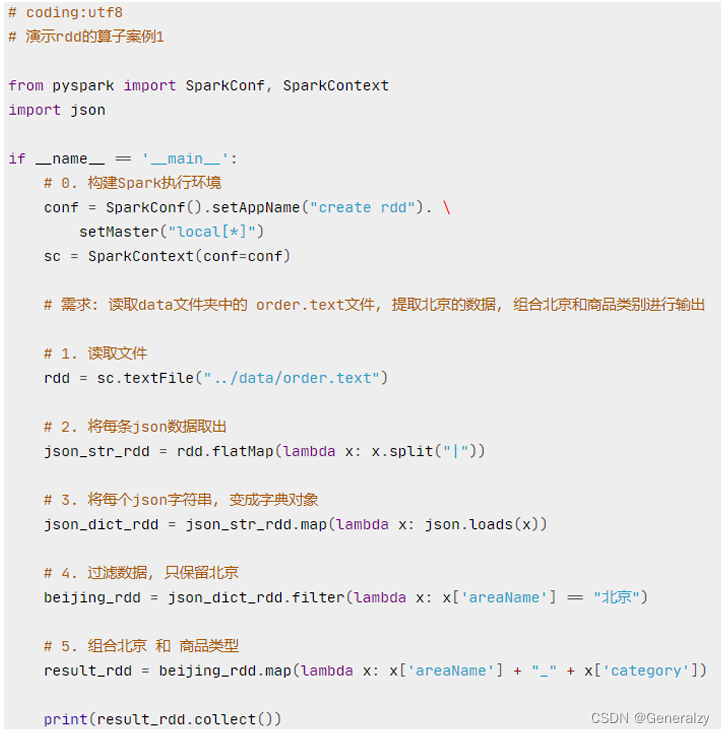
案例
Action算子
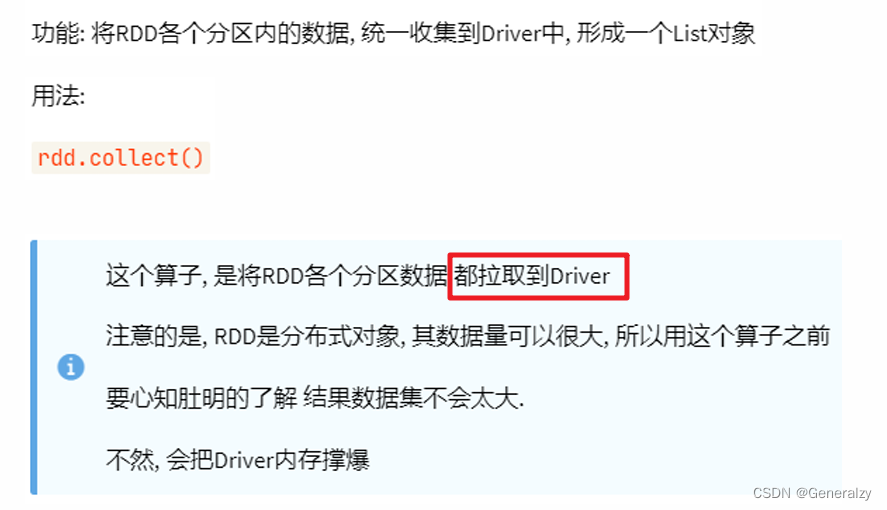
collection算子
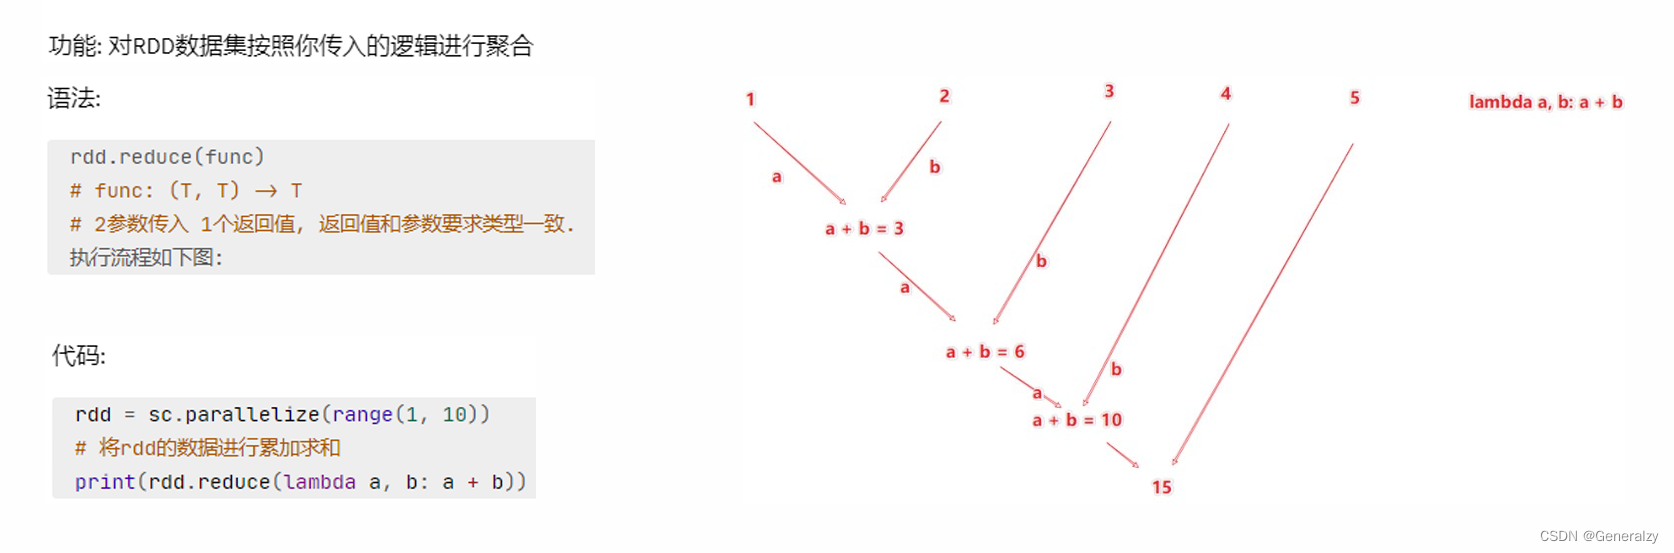
reduce算子
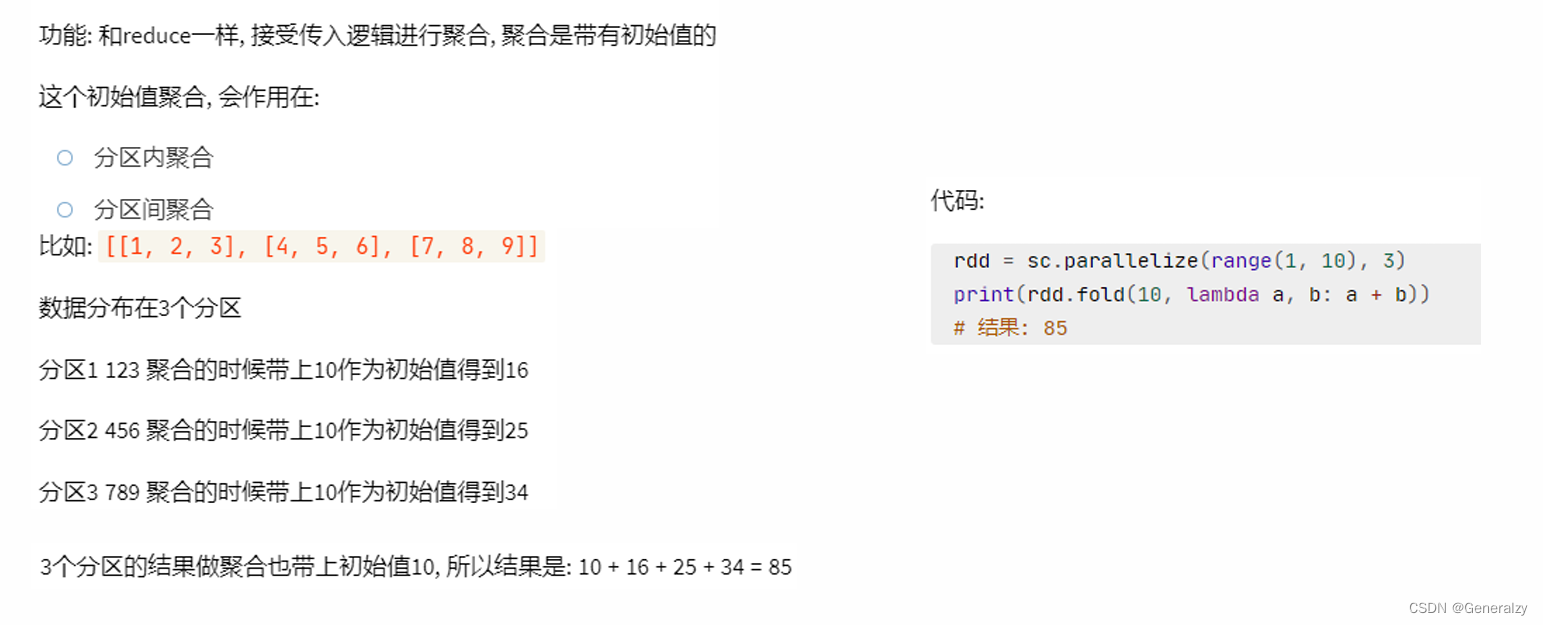
fold算子
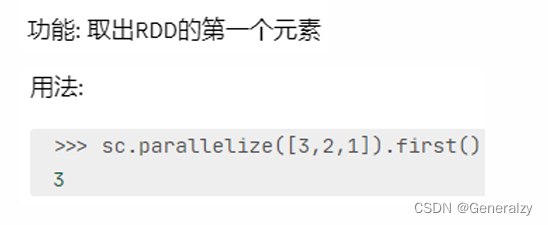
first算子
import os
import sys
from random import shuffle
from pyspark import SparkContext, SparkConf
os.environ['PYSPARK\_PYTHON'] = sys.executable
os.environ['PYSPARK\_DRIVER\_PYTHON'] = sys.executable
spark_config = SparkConf().setAppName("create add").setMaster("local[4]")
spark_context = SparkContext(conf=spark_config)
data = [number for number in range(100)]
# 原地打乱
shuffle(data)
rdd = spark_context.parallelize(data, 10)
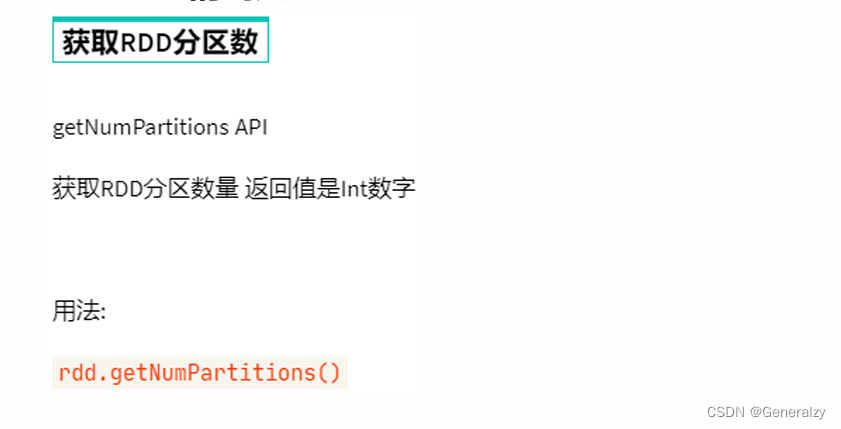
print(rdd.getNumPartitions())
# 为了可观性,多加一步glom运算
print(rdd.glom().collect())
first_number = rdd.first()
print(first_number)

可以看出取的是第一个分区的第一个元素。
take算子
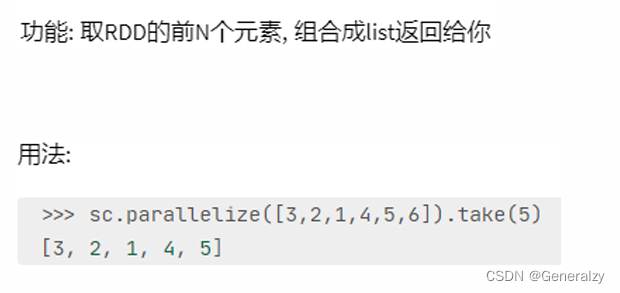
同理,take也是按顺序取出元素,当前分区不够就到下一个分区去找。
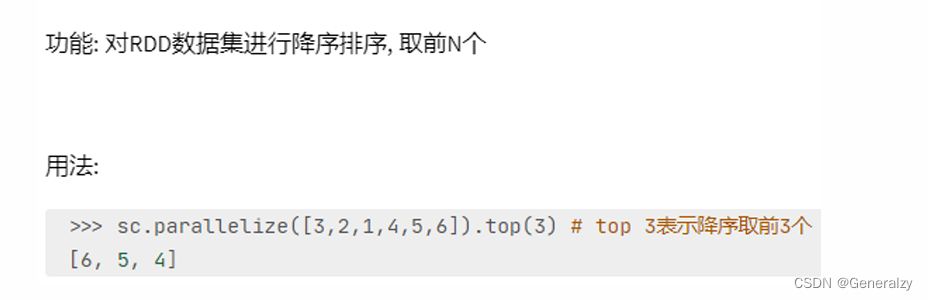
top算子
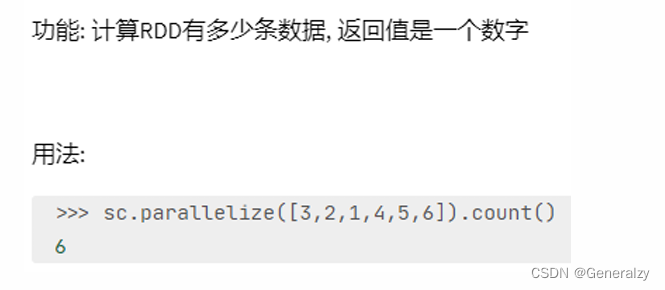
count算子
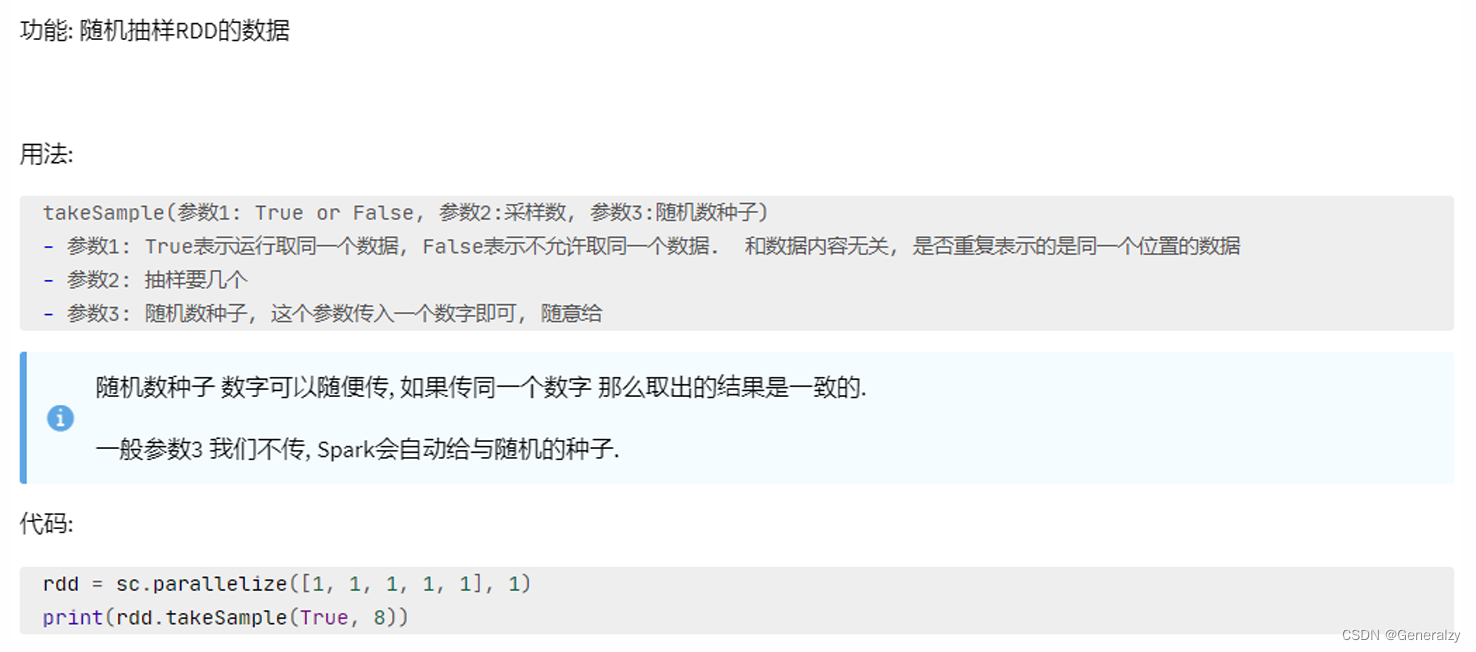
takeSample算子
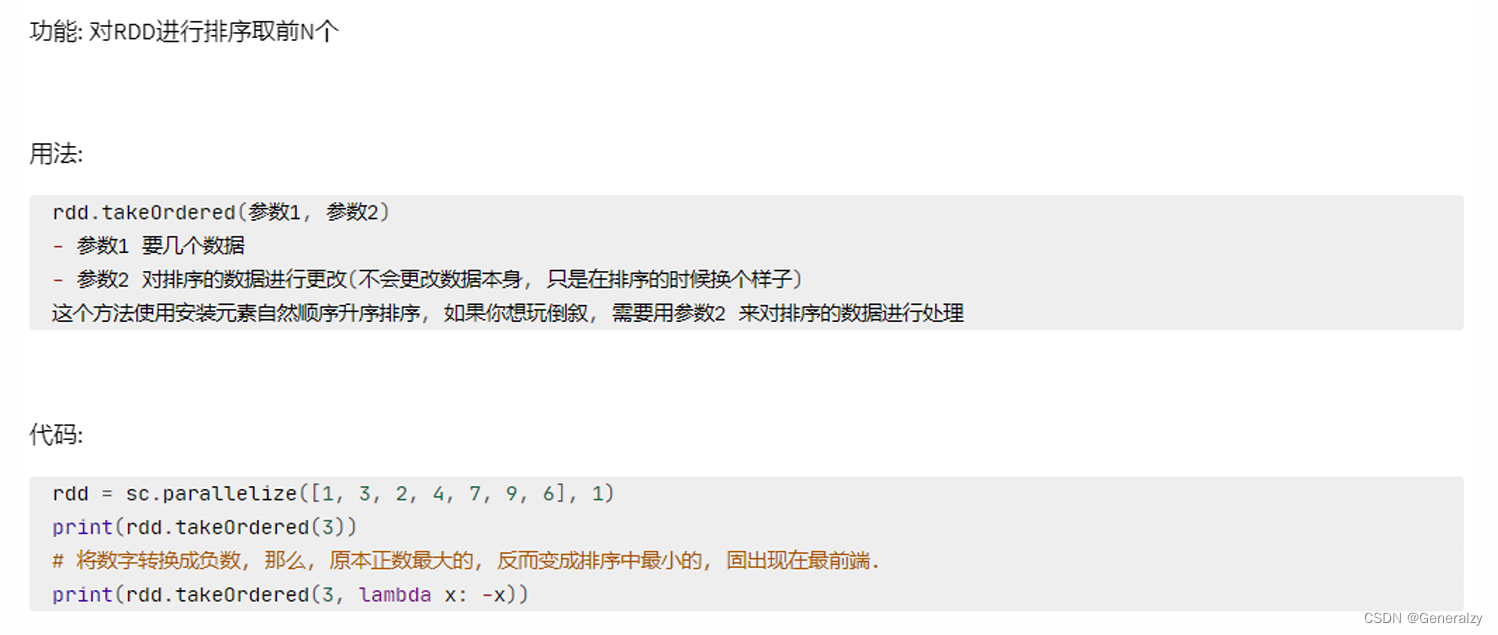
takeOrdered算子
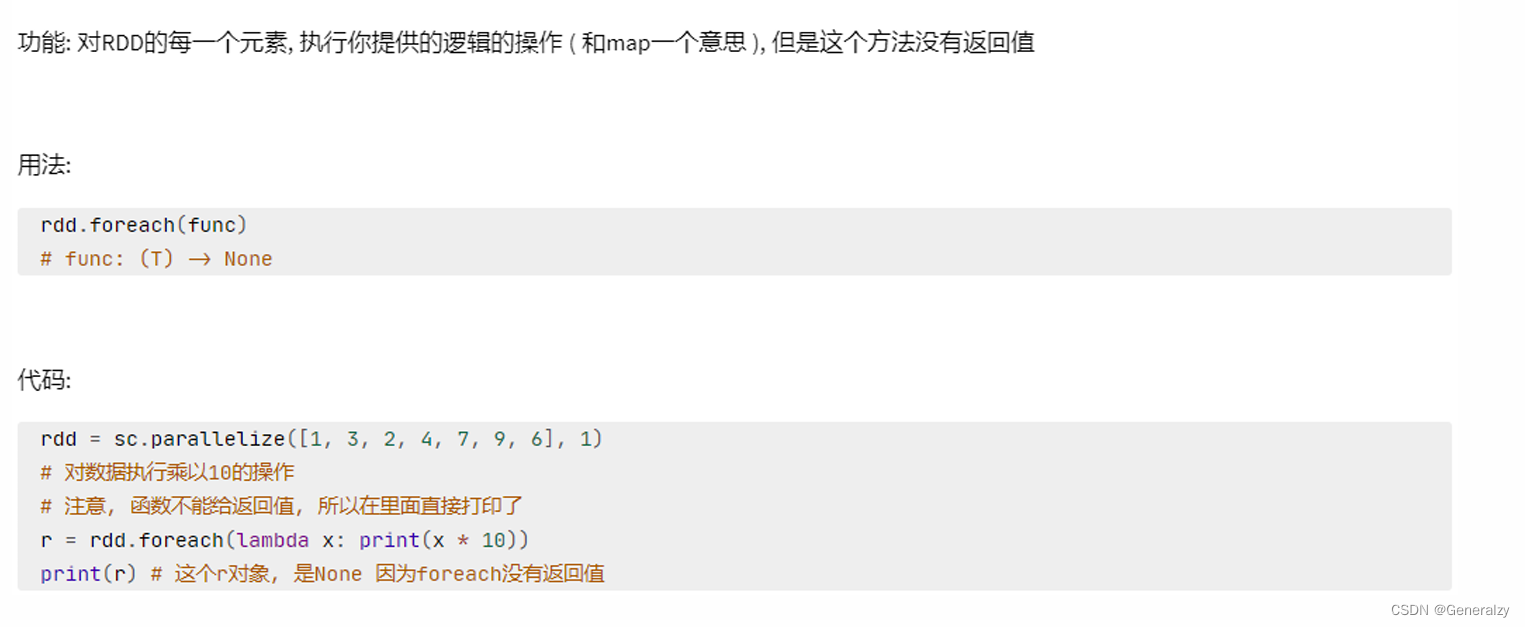
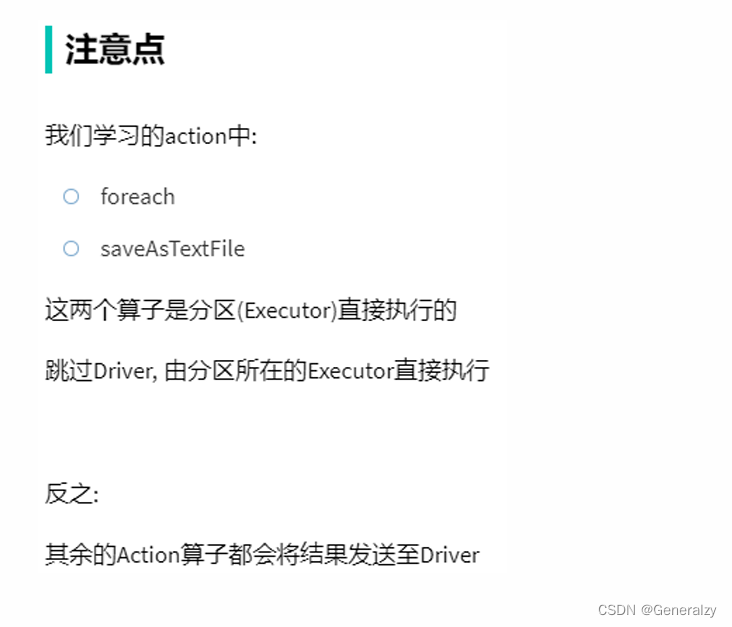
foreach算子
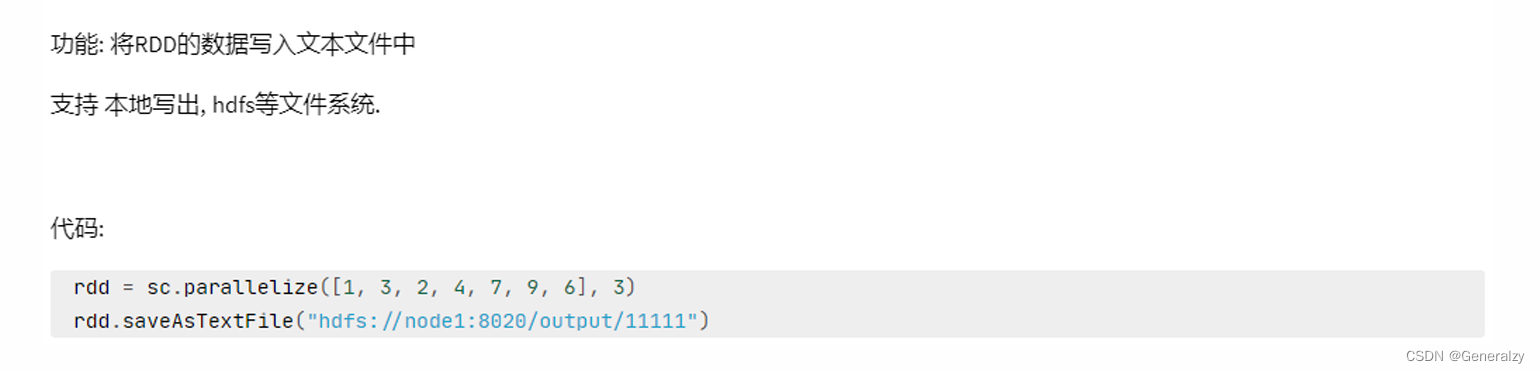
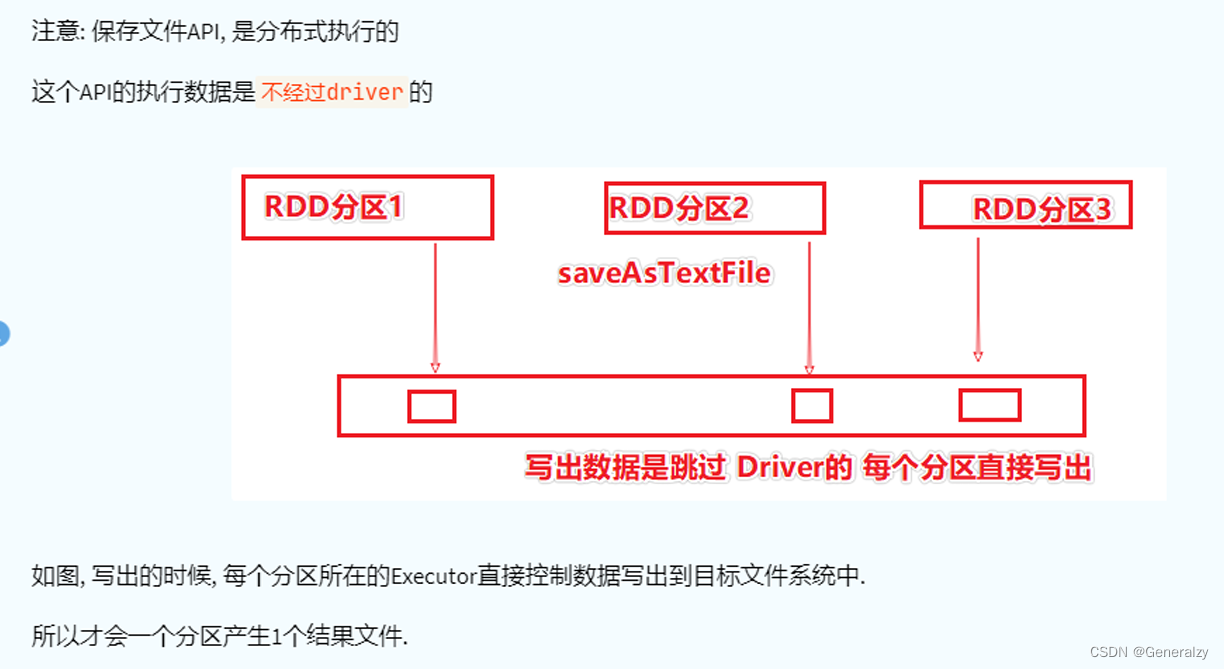
saveAsTextFile算子
分区操作算子
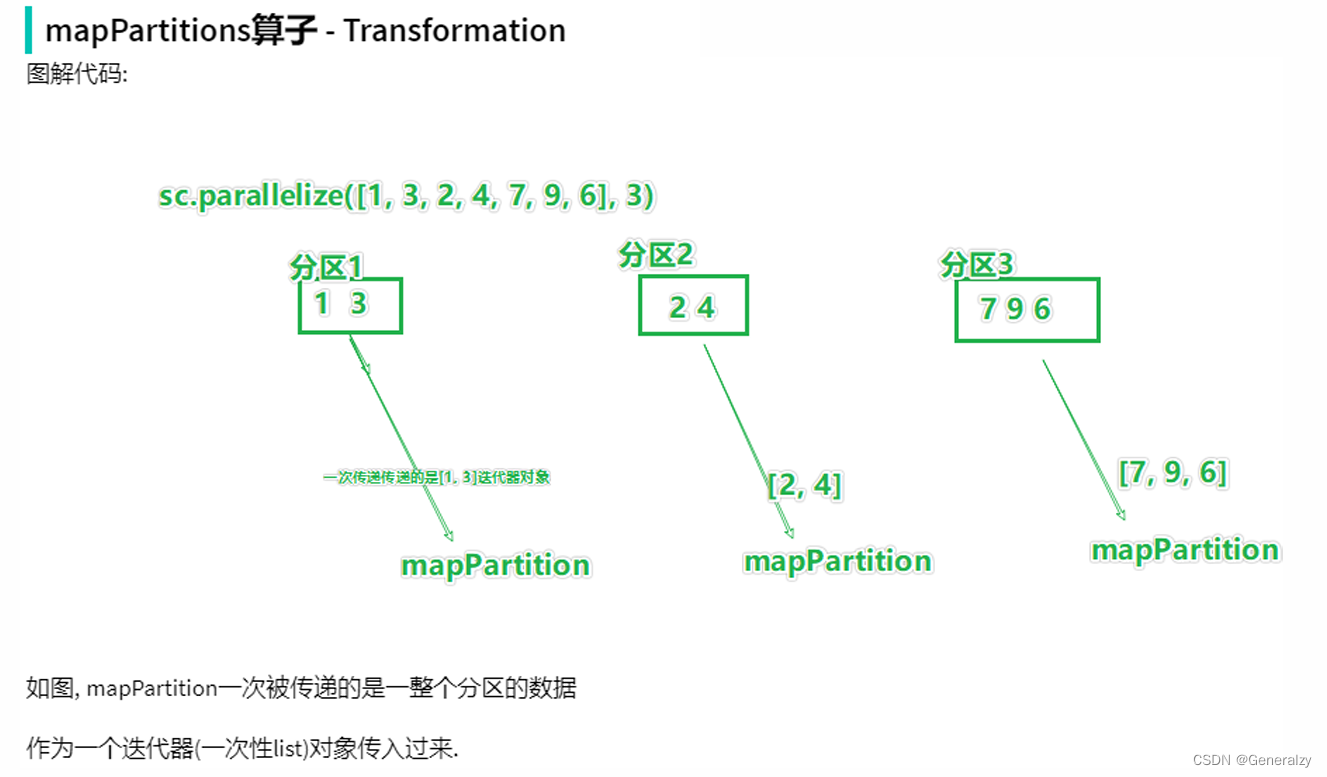
mapPartitions算子
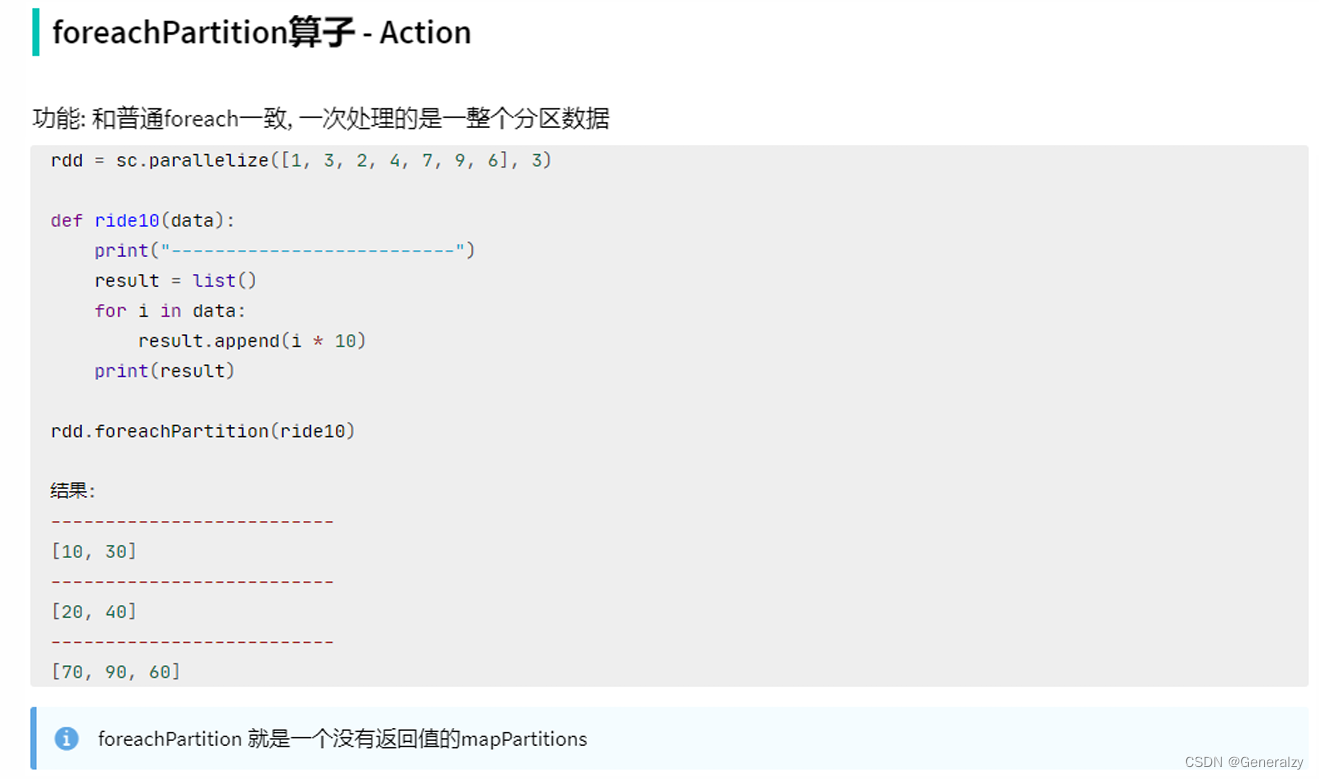
foreachPartition算子
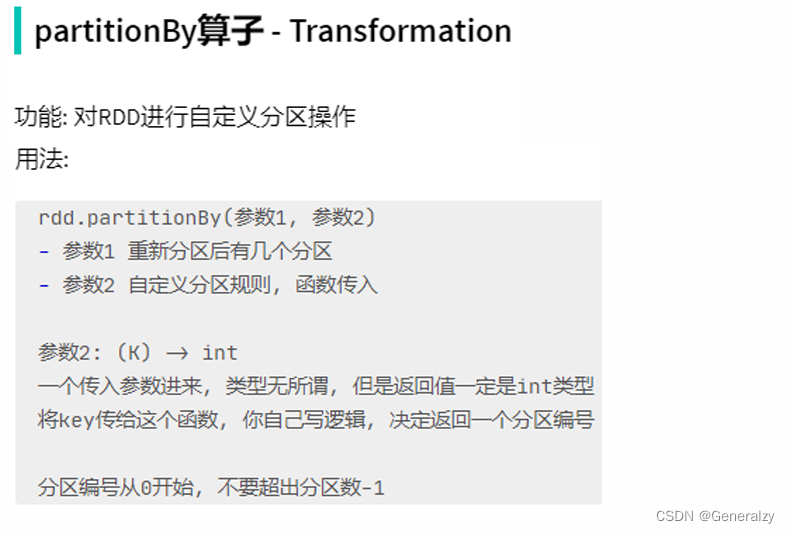
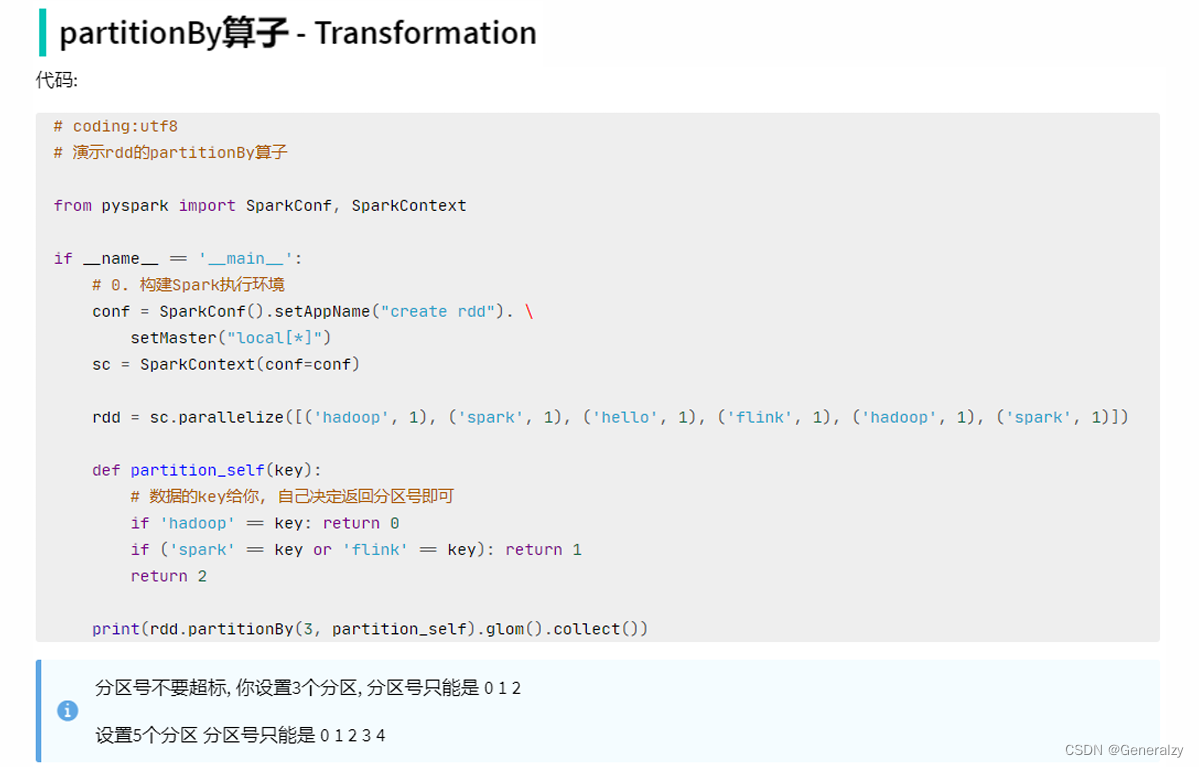
partitionBy算子
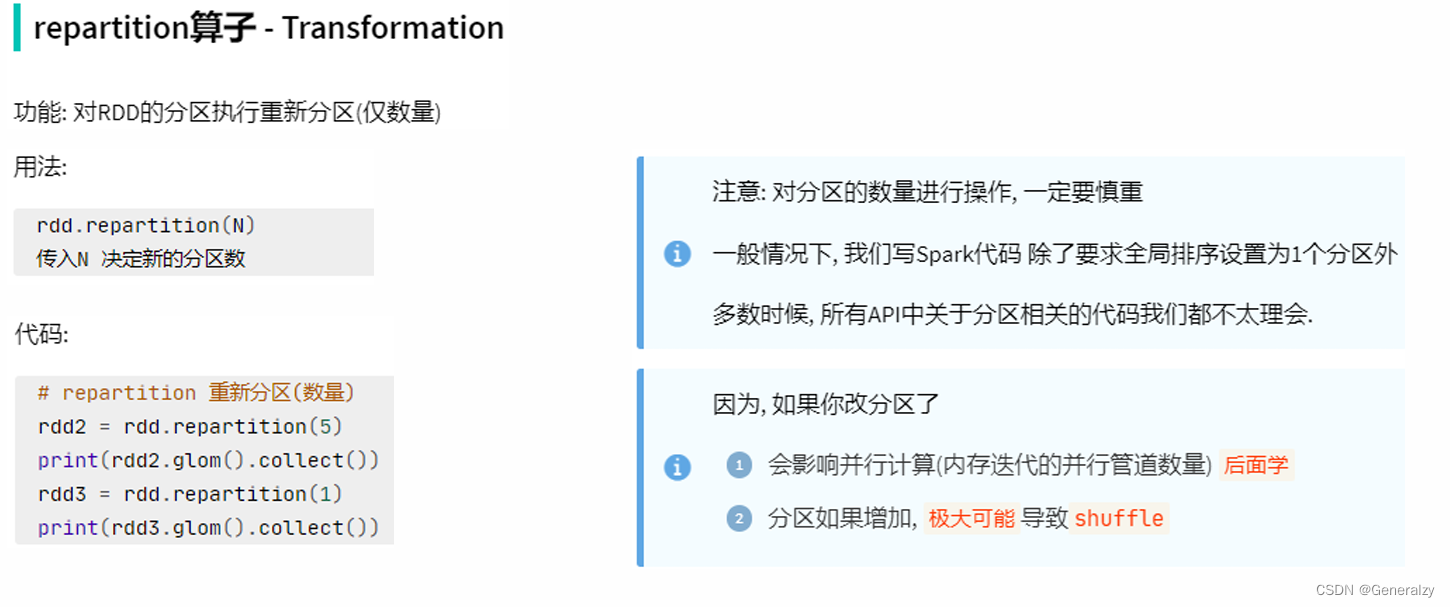
repartition算子
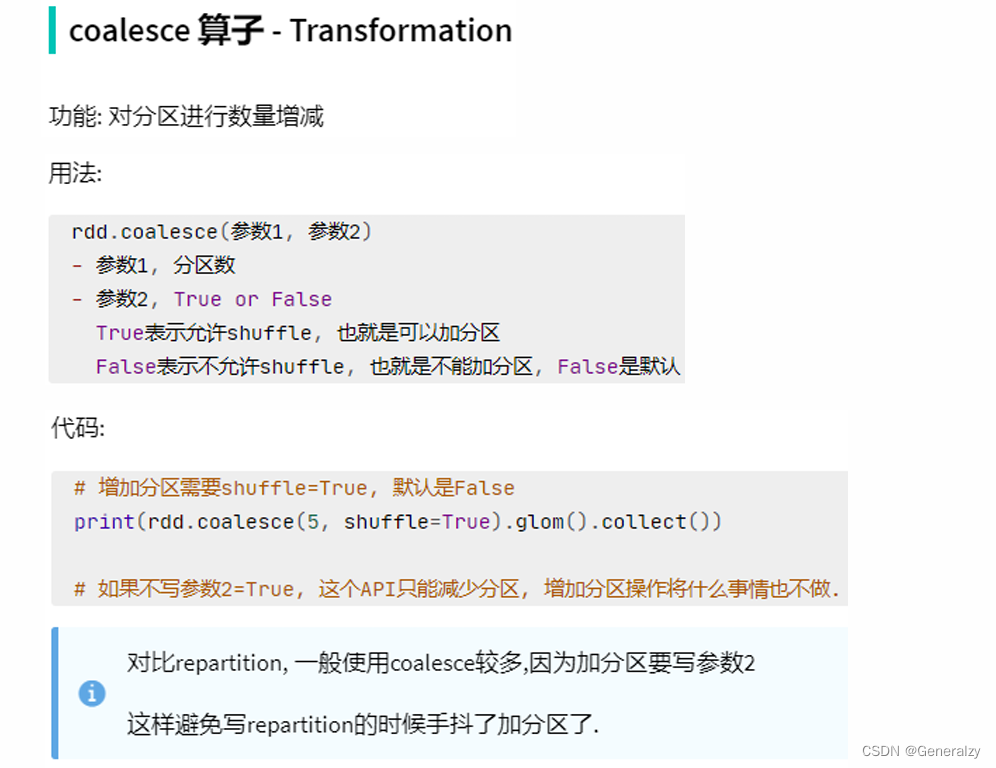
coalesce算子
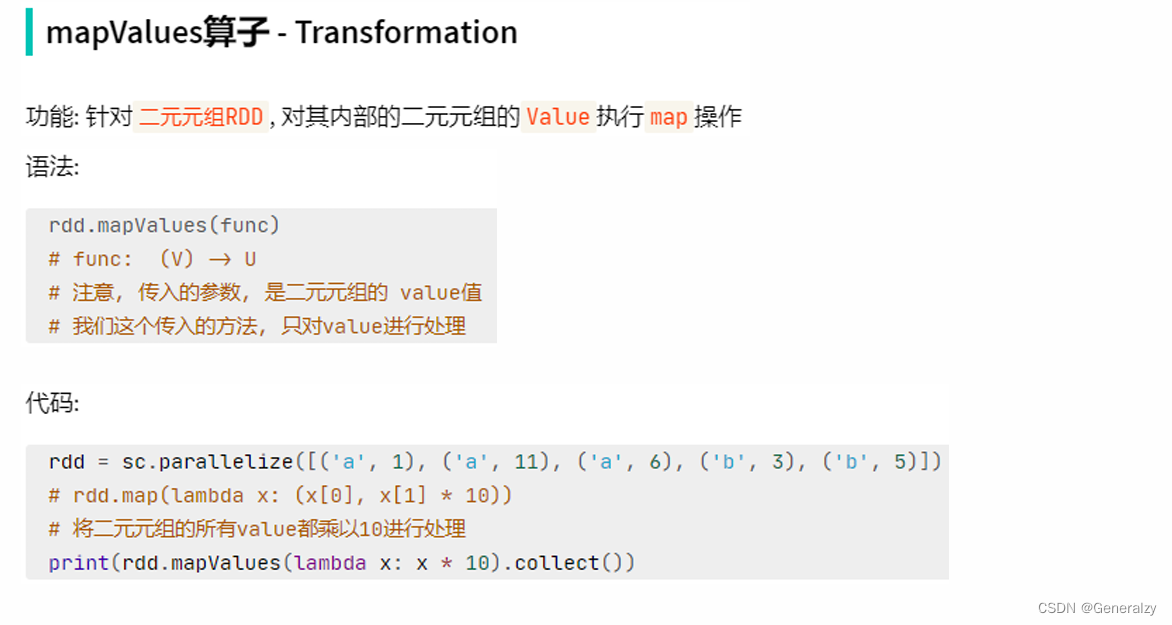
mapValues算子
join算子
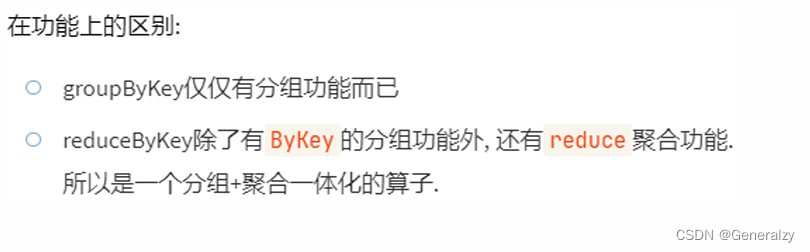
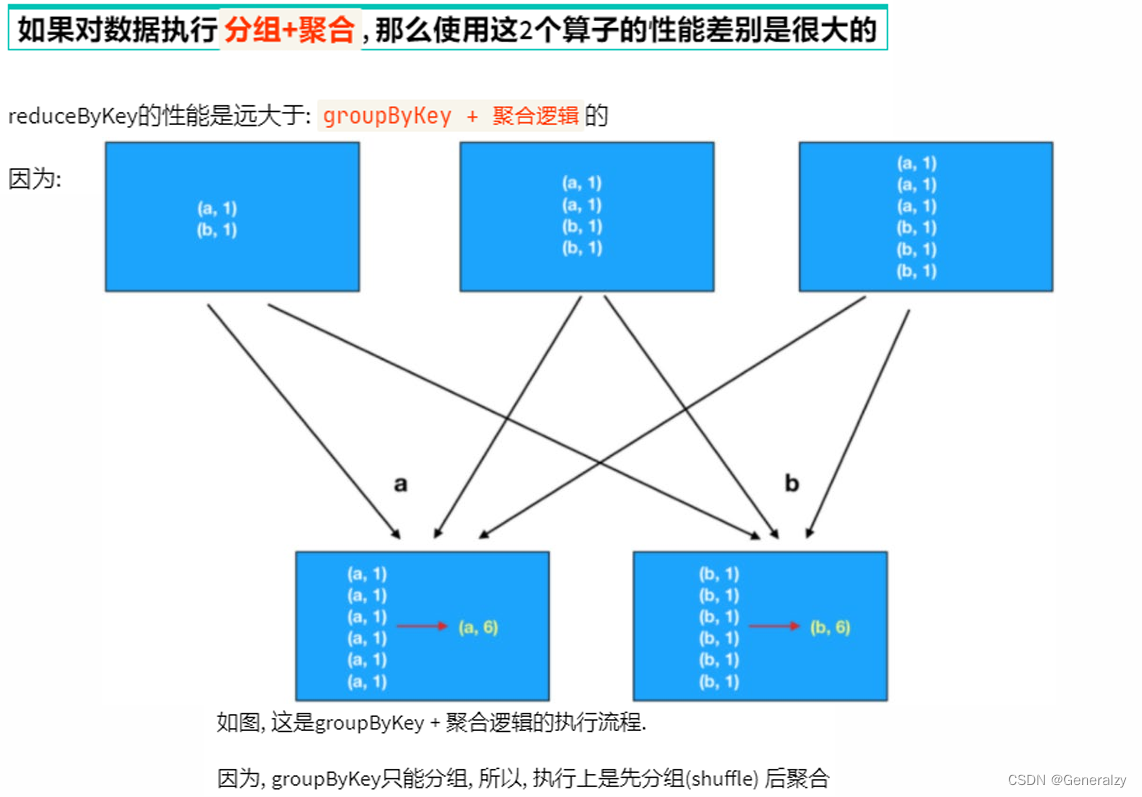
groupByKey和reduceByKey的区别

对于分区操作有什么要注意的地方
尽量不要增加分区, 可能破坏内存迭代的计算管道。
RDD的持久化
RDD 的数据是过程数据
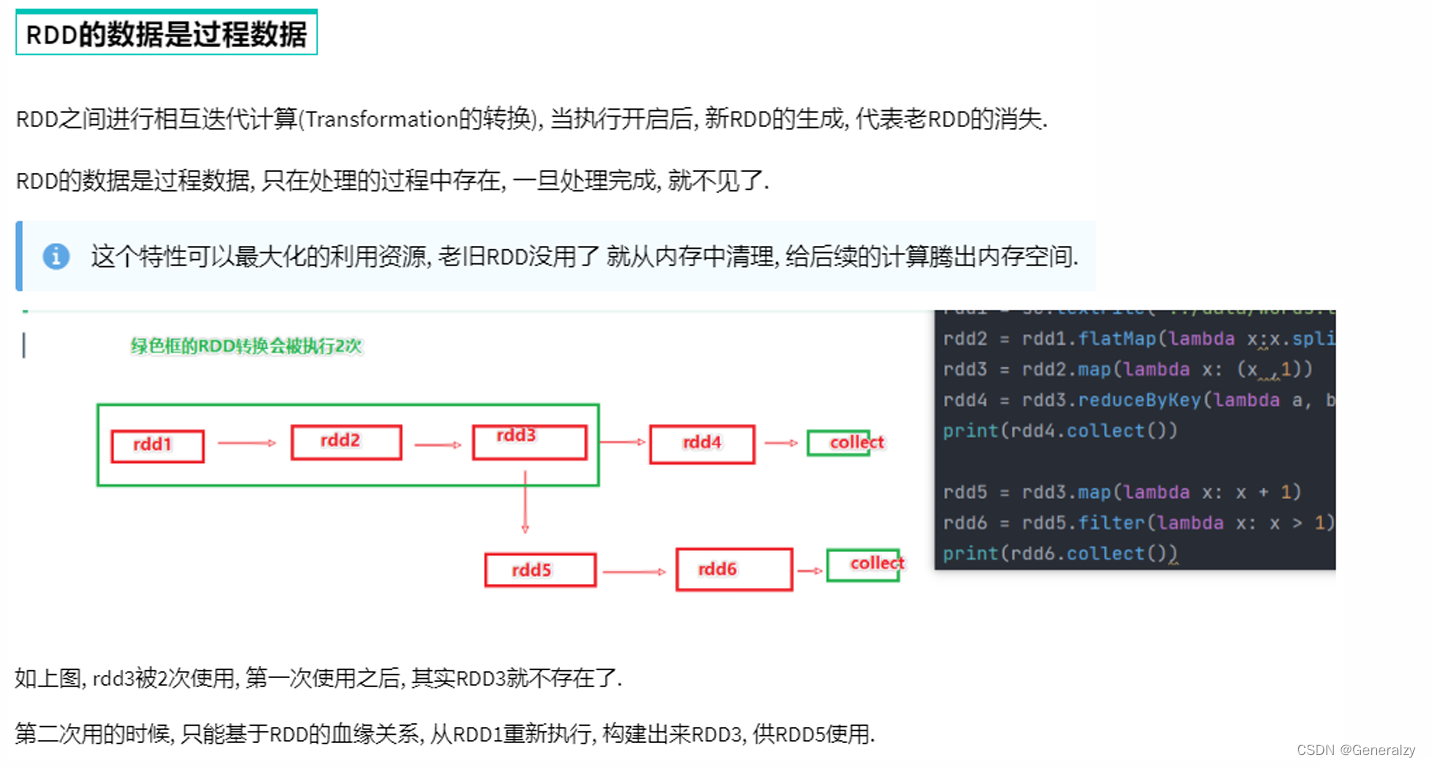
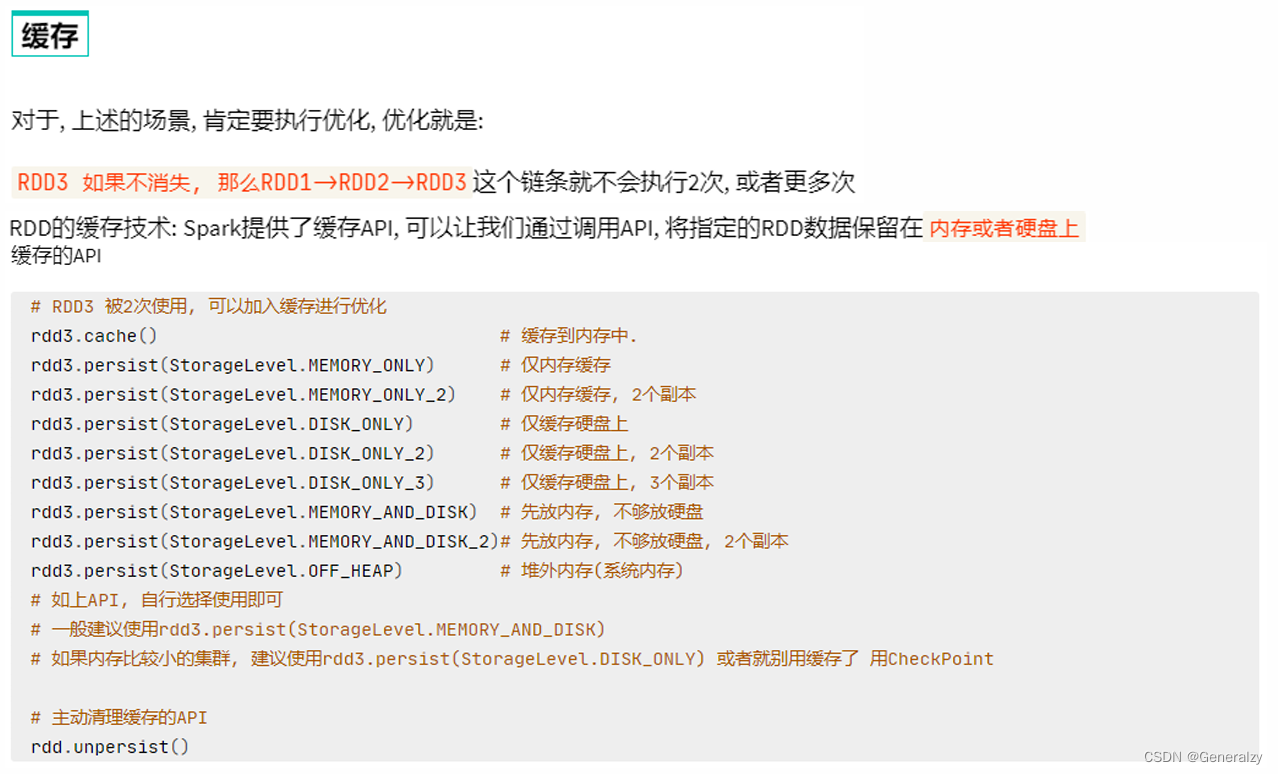
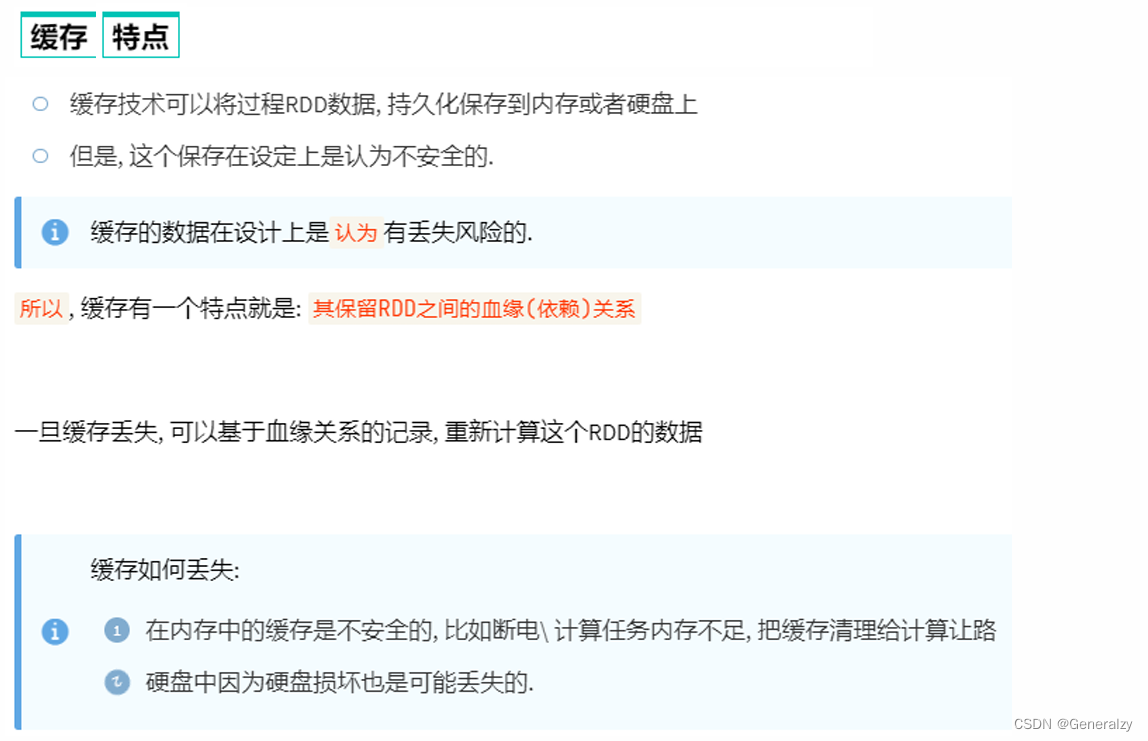
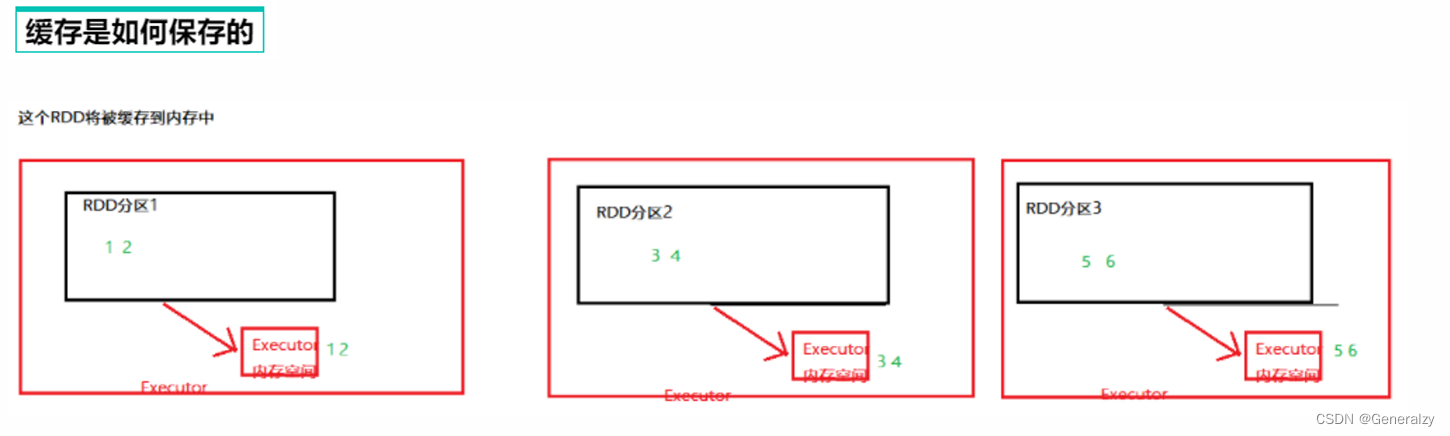
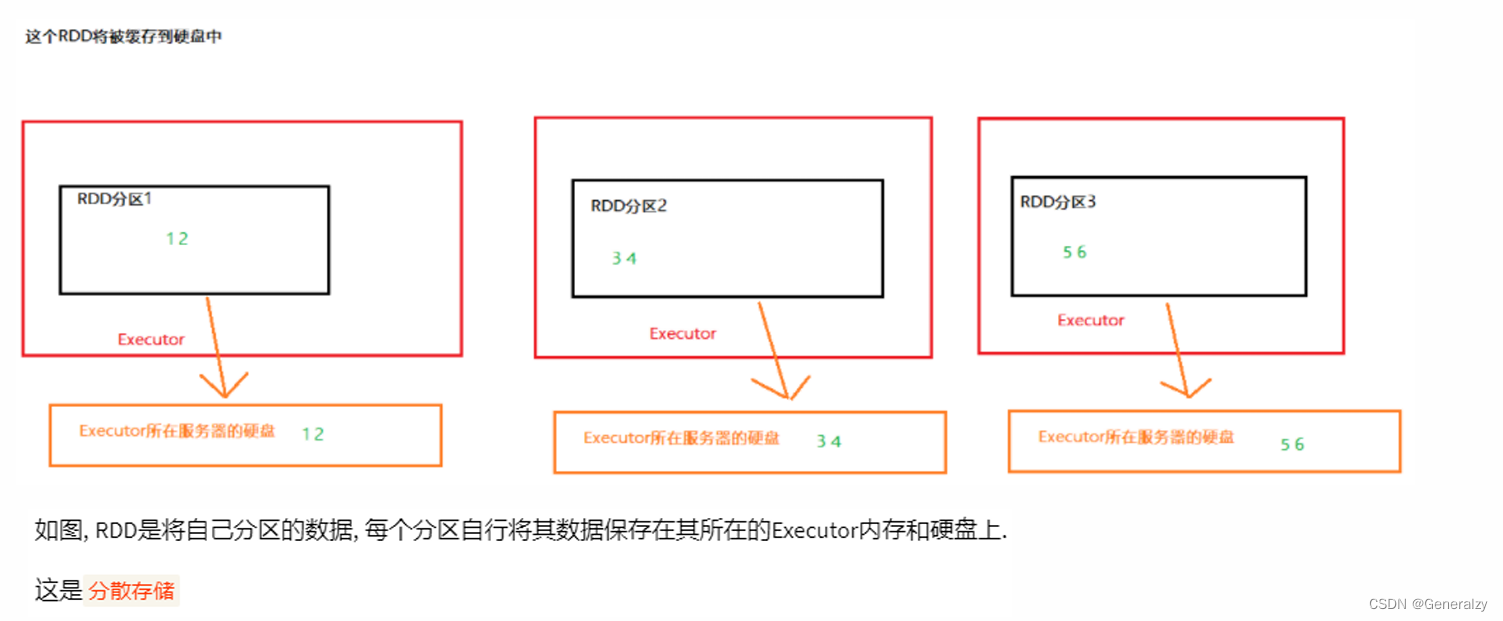
RDD 的缓存
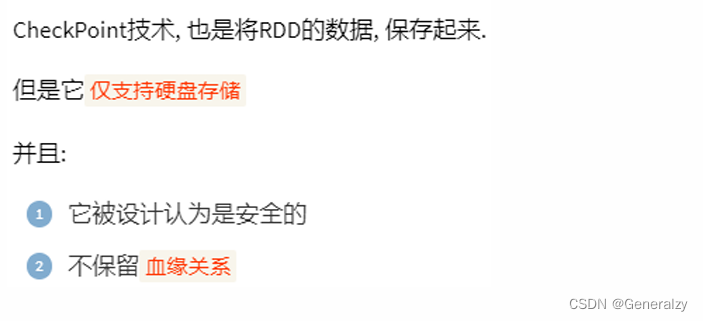
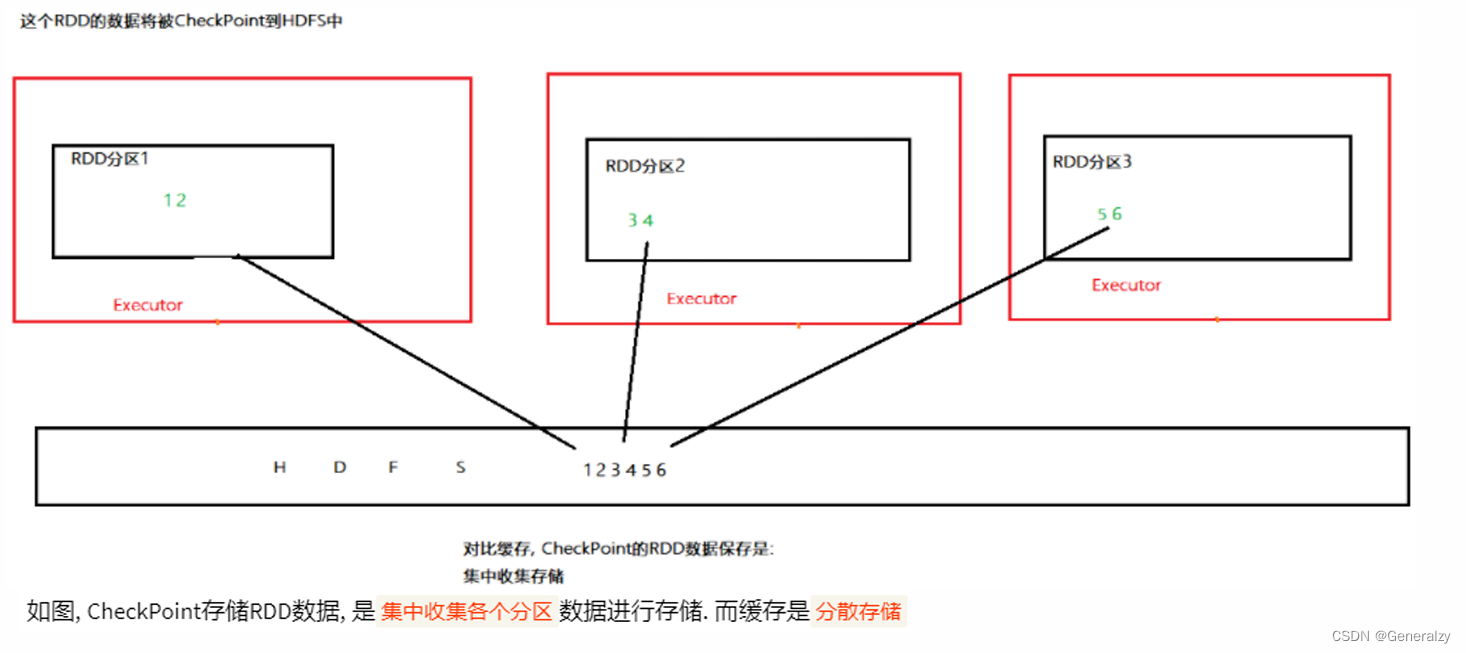
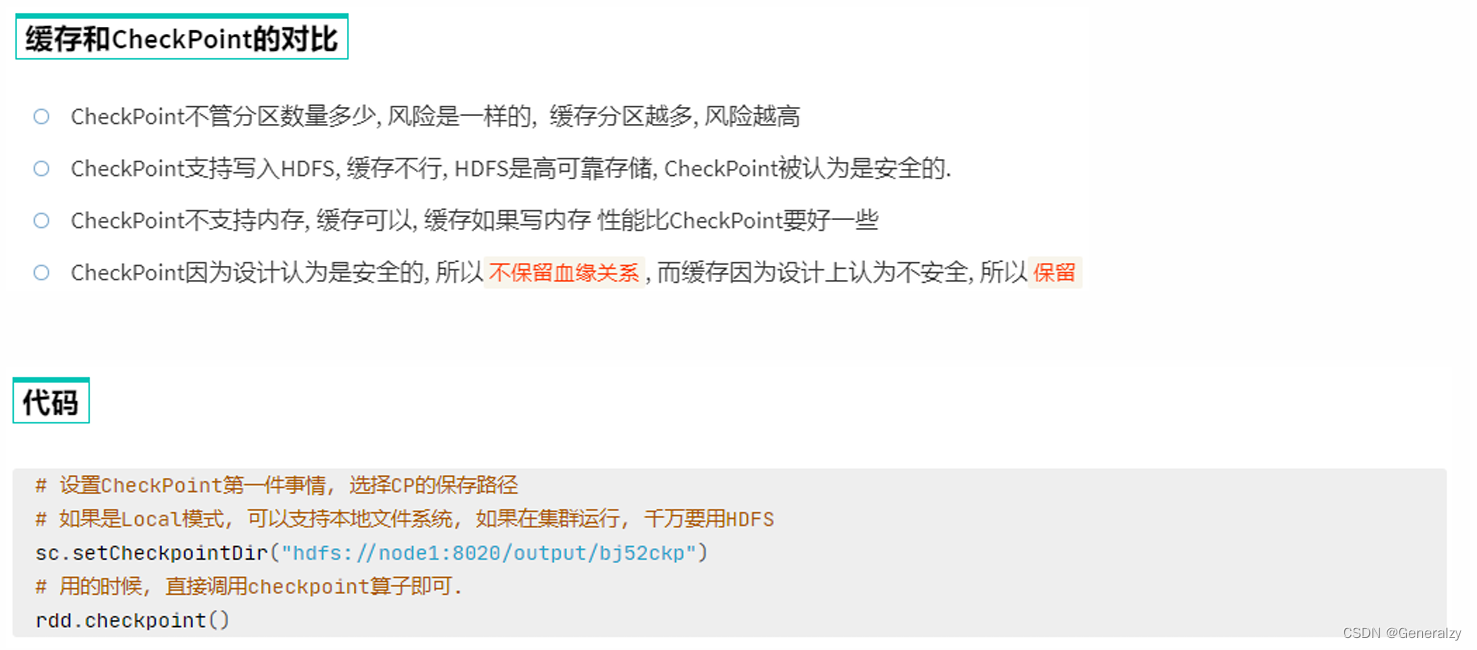
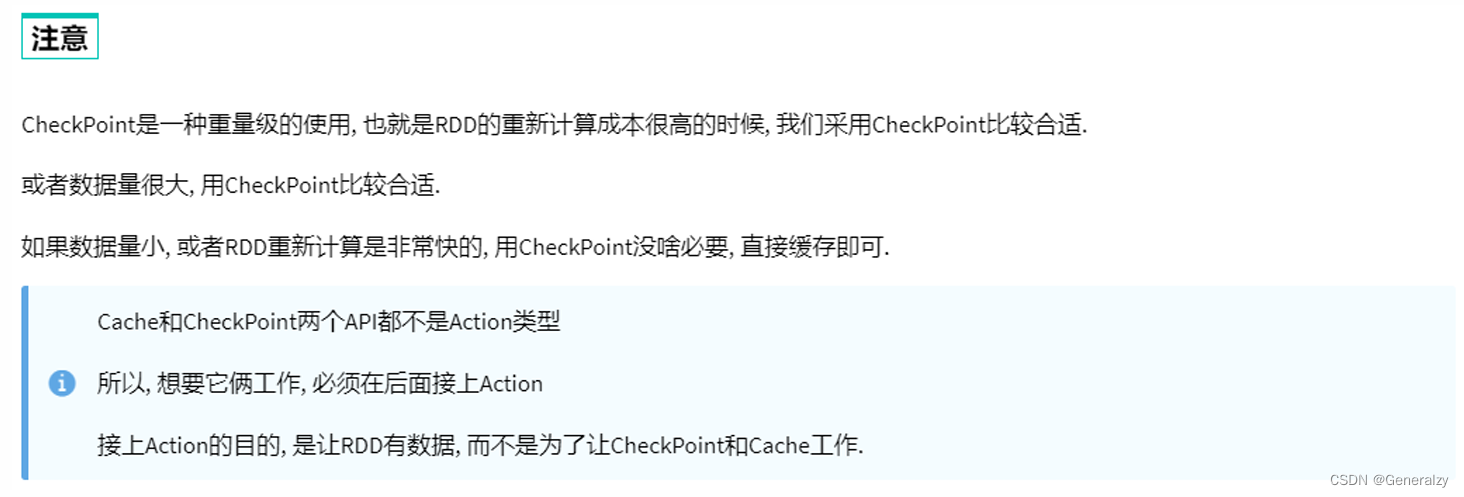
RDD 的CheckPoint
自我介绍一下,小编13年上海交大毕业,曾经在小公司待过,也去过华为、OPPO等大厂,18年进入阿里一直到现在。
深知大多数大数据工程师,想要提升技能,往往是自己摸索成长或者是报班学习,但对于培训机构动则几千的学费,着实压力不小。自己不成体系的自学效果低效又漫长,而且极易碰到天花板技术停滞不前!
因此收集整理了一份《2024年大数据全套学习资料》,初衷也很简单,就是希望能够帮助到想自学提升又不知道该从何学起的朋友。

既有适合小白学习的零基础资料,也有适合3年以上经验的小伙伴深入学习提升的进阶课程,基本涵盖了95%以上大数据开发知识点,真正体系化!
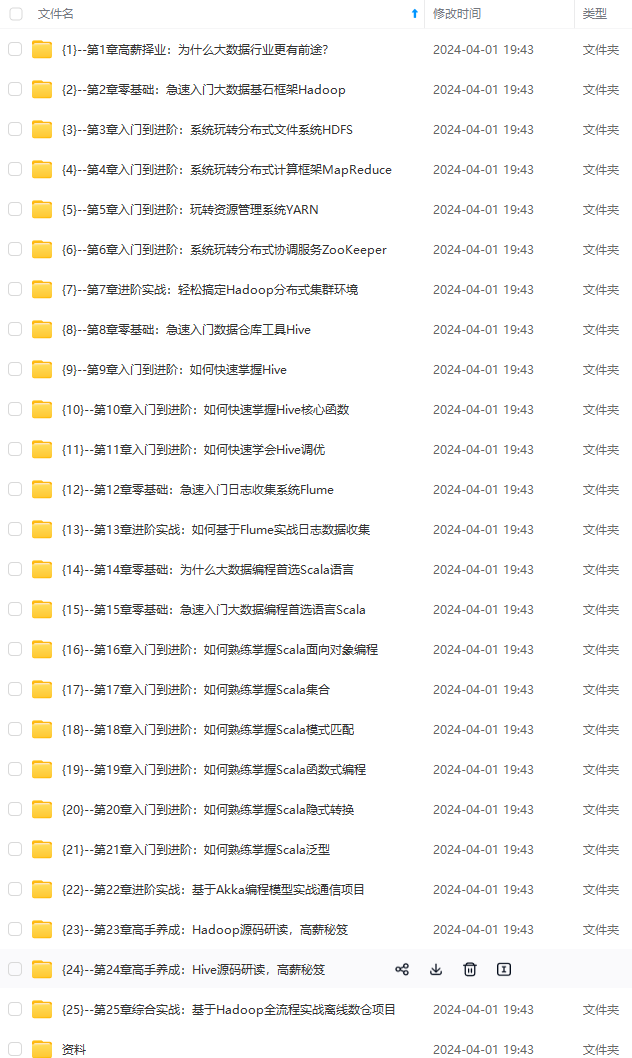
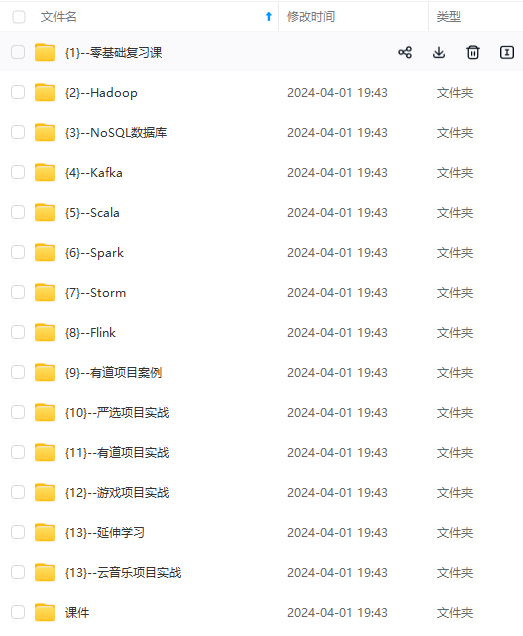
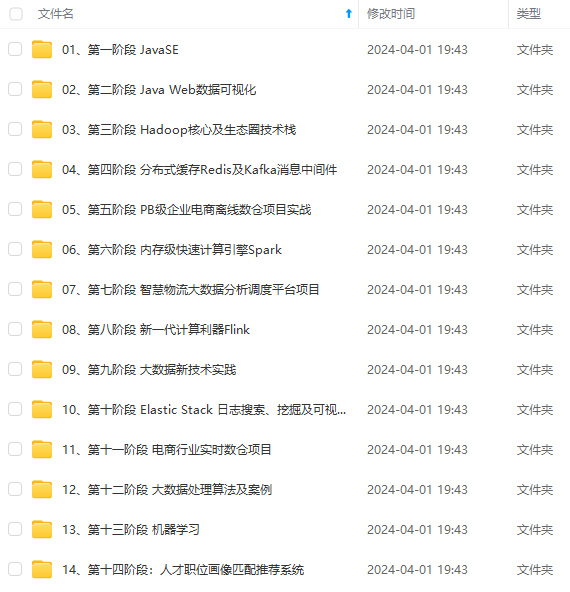
由于文件比较大,这里只是将部分目录大纲截图出来,每个节点里面都包含大厂面经、学习笔记、源码讲义、实战项目、讲解视频,并且后续会持续更新
如果你觉得这些内容对你有帮助,可以添加VX:vip204888 (备注大数据获取)

一个人可以走的很快,但一群人才能走的更远。不论你是正从事IT行业的老鸟或是对IT行业感兴趣的新人,都欢迎扫码加入我们的的圈子(技术交流、学习资源、职场吐槽、大厂内推、面试辅导),让我们一起学习成长!
sdnimg.cn/direct/a584217488ed4ff29f306d708b7591ce.png)
自我介绍一下,小编13年上海交大毕业,曾经在小公司待过,也去过华为、OPPO等大厂,18年进入阿里一直到现在。
深知大多数大数据工程师,想要提升技能,往往是自己摸索成长或者是报班学习,但对于培训机构动则几千的学费,着实压力不小。自己不成体系的自学效果低效又漫长,而且极易碰到天花板技术停滞不前!
因此收集整理了一份《2024年大数据全套学习资料》,初衷也很简单,就是希望能够帮助到想自学提升又不知道该从何学起的朋友。
[外链图片转存中…(img-XaQY8RSZ-1713107478978)]
[外链图片转存中…(img-qfbVddcH-1713107478978)]
[外链图片转存中…(img-XkTvtxRJ-1713107478978)]
[外链图片转存中…(img-dYjVO9SL-1713107478979)]
[外链图片转存中…(img-KHmbtEAn-1713107478979)]
既有适合小白学习的零基础资料,也有适合3年以上经验的小伙伴深入学习提升的进阶课程,基本涵盖了95%以上大数据开发知识点,真正体系化!
由于文件比较大,这里只是将部分目录大纲截图出来,每个节点里面都包含大厂面经、学习笔记、源码讲义、实战项目、讲解视频,并且后续会持续更新
如果你觉得这些内容对你有帮助,可以添加VX:vip204888 (备注大数据获取)
[外链图片转存中…(img-r8AfxKTF-1713107478979)]
一个人可以走的很快,但一群人才能走的更远。不论你是正从事IT行业的老鸟或是对IT行业感兴趣的新人,都欢迎扫码加入我们的的圈子(技术交流、学习资源、职场吐槽、大厂内推、面试辅导),让我们一起学习成长!


 833
833


 被折叠的 条评论
为什么被折叠?
被折叠的 条评论
为什么被折叠?
 到【灌水乐园】发言


