


3、Elasticsearch 的下载与安装
3.1、Elasticsearch 下载
Elasticsearch 下载地址:Past Releases of Elastic Stack Software | Elastic
3.2、Elasticsearch 安装
注:Elasticsearch 不支持 root 用户启动,需要新建用户,并且赋予新的用户权限,才可以启动Elasticsearch(这些操作在root用户下进行)。
# 1、解压到指定目录下(opt)(本文使用 elasticsearch-8.3.3 版本)
tar -zxvf elasticsearch-8.3.3-linux-x86_64.tar.gz -C /opt
# 2、新建用户
useradd elasticsearch
passwd elasticsearch  # 给新建的用户设置密码
# 3、给elasticsearch目录设置新用户
chown elasticsearch:elasticsearch -R elasticsearch-8.3.3/
3.3、Elasticsearch 目录结构解释
| 目录名称 | 说明 |
| bin | 可执行脚本文件目录 |
| config | 配置文件目录 |
| lib | 依赖包目录 |
| data | 默认数据保存目录,最好修改 |
| logs | 默认日志保存目录,最好修改 |
| plugins | 已经安装的插件保存目录 |
| jdk | 自带jdk目录 |
| modules | 所有Elasticsearch模块 |
3.3、配置文件初解(elasticsearch.yml)
# ---------------------------------- Cluster -----------------------------------
# Use a descriptive name for your cluster:
# cluster.name: my-application
# ------------------------------------ Node ------------------------------------
# Use a descriptive name for the node:
# node.name: node-1
# Add custom attributes to the node:
#node.attr.rack: r1
# ----------------------------------- Paths ------------------------------------
# Path to directory where to store the data (separate multiple locations by comma):
#path.data: /path/to/data
# Path to log files:
#path.logs: /path/to/logs
# ----------------------------------- Memory -----------------------------------
# Lock the memory on startup:
# bootstrap.memory_lock: true
# Make sure that the heap size is set to about half the memory available
# on the system and that the owner of the process is allowed to use this
# limit.
# Elasticsearch performs poorly when the system is swapping the memory.
# ---------------------------------- Network -----------------------------------
# By default Elasticsearch is only accessible on localhost. Set a different
# address here to expose this node on the network:
network.host: 192.168.0.90
# By default Elasticsearch listens for HTTP traffic on the first free port it
# finds starting at 9200. Set a specific HTTP port here:
http.port: 9200
# For more information, consult the network module documentation.
# --------------------------------- Discovery ----------------------------------
# Pass an initial list of hosts to perform discovery when this node is started:
# The default list of hosts is ["127.0.0.1", "[::1]"]
#discovery.seed_hosts: ["host1", "host2"]
# Bootstrap the cluster using an initial set of master-eligible nodes:
#cluster.initial_master_nodes: ["node-1", "node-2"]
# For more information, consult the discovery and cluster formation module documentation.
# --------------------------------- Readiness ----------------------------------
# Enable an unauthenticated TCP readiness endpoint on localhost
#readiness.port: 9399
# ---------------------------------- Various -----------------------------------
# Allow wildcard deletion of indices:
#action.destructive_requires_name: false
#----------------------- BEGIN SECURITY AUTO CONFIGURATION -----------------------

#----------------------- END SECURITY AUTO CONFIGURATION -------------------------
主要有几个模块:
| 模块名 | 说明 |
| Cluster | 配置集群名称 |
| Node | 配置当前节点信息(节点名称默认主机名) |
| Paths | 指定数据和日志保存路径 |
| Memory | 内存使用相关配置 |
| Network | 网络相关配置(主机ip,端口等) |
| Discovery | 集群相关参数配置 |
| BEGIN SECURITY AUTO CONFIGURATION | ES8.0默认使用security,启动时添加的配置 |
’4、Elasticsearch 启动
4.1、直接启动(默认开启security)
4.1.1、不修改配置文件启动
首次启动 Elasticsearch 时,会自动进行以下安全配置:
1)、为传输层和 HTTP 层生成 TLS 证书和密钥;
2)、TLS 配置设置被写入 elasticsearch.yml(BEGIN SECURITY AUTO CONFIGURATION 模块);
3)、为 elastic 用户生成密码。
4)、为 Kibana 生成一个注册令牌。
# 使用 elasticsearch 用户,进入bin目录执行
./elasticsearch -d
启动成功如下图:

验证服务状态,使用生成的密码登录(用户名:elastic,密码启动成功生成的):
4.1.2、修改密码
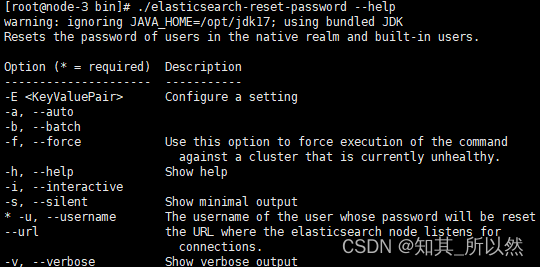
忘记密码怎么办,使用重新生成或者自定义密码。
# 1、重新生成密码
./elasticsearch-reset-password -u elastic # 可以使用./elasticsearch-reset-password --help查看使用
# 2、自定义密码
./elasticsearch-reset-password --username elastic -i
4.1.3、Elasticsearch 启动后配置文件(elasticsearch.yml)变化
新增如下内容(这些内容是针对security自动添加的):
#----------------------- BEGIN SECURITY AUTO CONFIGURATION -----------------------#
# Enable security features
xpack.security.enabled: true
xpack.security.enrollment.enabled: true
# Enable encryption for HTTP API client connections, such as Kibana, Logstash, and Agents
xpack.security.http.ssl:
enabled: true
keystore.path: certs/http.p12
# Enable encryption and mutual authentication between cluster nodes
xpack.security.transport.ssl:
enabled: true
verification_mode: certificate
keystore.path: certs/transport.p12
truststore.path: certs/transport.p12
# Create a new cluster with the current node only
# Additional nodes can still join the cluster later
cluster.initial_master_nodes: ["node-3"]
# Allow HTTP API connections from anywhere
# Connections are encrypted and require user authentication
http.host: 0.0.0.0
# Allow other nodes to join the cluster from anywhere
# Connections are encrypted and mutually authenticated
#transport.host: 0.0.0.0
#----------------------- END SECURITY AUTO CONFIGURATION -------------------------


**既有适合小白学习的零基础资料,也有适合3年以上经验的小伙伴深入学习提升的进阶课程,涵盖了95%以上大数据知识点,真正体系化!**
**由于文件比较多,这里只是将部分目录截图出来,全套包含大厂面经、学习笔记、源码讲义、实战项目、大纲路线、讲解视频,并且后续会持续更新**
**[需要这份系统化资料的朋友,可以戳这里获取](https://bbs.csdn.net/topics/618545628)**
]
**既有适合小白学习的零基础资料,也有适合3年以上经验的小伙伴深入学习提升的进阶课程,涵盖了95%以上大数据知识点,真正体系化!**
**由于文件比较多,这里只是将部分目录截图出来,全套包含大厂面经、学习笔记、源码讲义、实战项目、大纲路线、讲解视频,并且后续会持续更新**
**[需要这份系统化资料的朋友,可以戳这里获取](https://bbs.csdn.net/topics/618545628)**


 743
743


 被折叠的 条评论
为什么被折叠?
被折叠的 条评论
为什么被折叠?
 到【灌水乐园】发言


