


    .fontSize(50)
    .onClick(()=>{
      // 两个数组都包含项“3”。
      this.arr = this.arr[0] == 1 ? [3,4,5] : [1,2,3];
    })
  }
}
}
}
3、从父组件中的@State类对象属性到@Prop简单类型的同步
class Book {
public title: string;
public pages: number;
public readIt: boolean = false;
constructor(title: string, pages: number) {
this.title = title;
this.pages = pages;
}
}
@Component
struct ReaderComp {
@Prop title: string;
@Prop readIt: boolean;
build() {
Row() {
Text(this.title)
Text(... ${this.readIt ? 'I have read' : 'I have not read it'})
.onClick(() => this.readIt = true)
}
}
}
@Entry
@Component
struct Library {
@State book: Book = new Book(‘100 secrets of C++’, 765);
build() {
Column() {
ReaderComp({ title: this.book.title, readIt: this.book.readIt })
ReaderComp({ title: this.book.title, readIt: this.book.readIt })
}
}
}
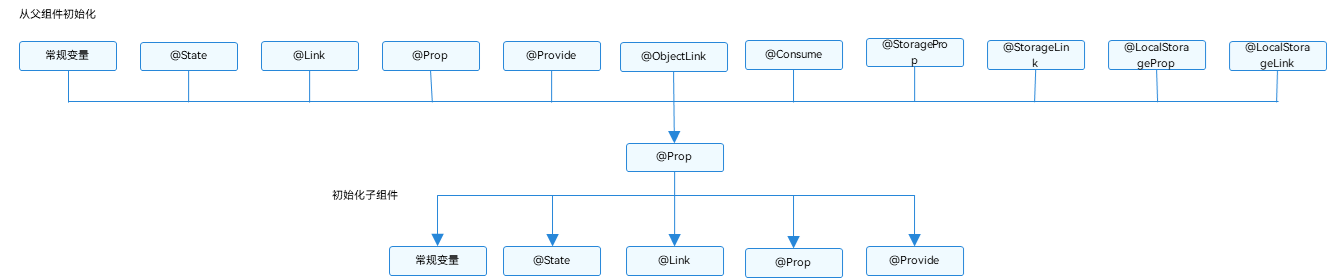
4、@Prop本地初始化不和父组件同步
@Component
struct MyComponent {
@Prop customCounter: number;
@Prop customCounter2: number = 5;
build() {
Column() {
Row() {
Text(From Main: ${this.customCounter}).width(90).height(40).fontColor(‘#FF0010’)
}
  Row() {
    Button('Click to change locally !').width(180).height(60).margin({ top: 10 })
      .onClick(() => {
        this.customCounter2++
      })
  }.height(100).width(180)
  Row() {
    Text(`Custom Local: ${this.customCounter2}`).width(90).height(40).fontColor('#FF0010')
  }
}
}
}
@Entry
@Component
struct MainProgram {
@State mainCounter: number = 10;
build() {
Column() {
Row() {
Column() {
Button(‘Click to change number’).width(480).height(60).margin({ top: 10, bottom: 10 })
.onClick(() => {
this.mainCounter++
})
}
}
Row() {
Column()
// customCounter必须从父组件初始化,因为MyComponent的customCounter成员变量缺少本地初始化;此处,customCounter2可以不做初始化。
MyComponent({ customCounter: this.mainCounter })
// customCounter2也可以从父组件初始化,父组件初始化的值会覆盖子组件customCounter2的本地初始化的值
MyComponent({ customCounter: this.mainCounter, customCounter2: this.mainCounter })
}
}
}
}
###### 🌈1.2.1.3 @Link 父子双向同步
父组件中@State, @StorageLink和@Link 和子组件@Link可以建立双向数据同步。
@Link 变量装饰器只支持string、number、boolean、enum类型,以及这些类型的数组。不支持复杂类型(比如any类型)
父子组件初始化和传递装饰图如下:
###### 🍬1.2.1.3.1 变化规则
* 当装饰的数据类型为boolean、string、number类型时,可以同步观察到数值的变化。
* 当装饰的数据类型为class或者Object时,可以观察到赋值和属性赋值的变化,即Object.keys(observedObject)返回的所有属性。
* 当装饰的对象是array时,可以观察到数组添加、删除、更新数组单元的变化。
###### 🍬1.2.1.3.2 使用场景
1、简单类型和类对象类型的@Link
class GreenButtonState {
width: number = 0;
constructor(width: number) {
this.width = width;
}
}
@Component
struct GreenButton {
@Link greenButtonState: GreenButtonState;
build() {
Button(‘Green Button’)
.width(this.greenButtonState.width)
.height(150.0)
.backgroundColor(‘#00ff00’)
.onClick(() => {
if (this.greenButtonState.width < 700) {
// 更新class的属性,变化可以被观察到同步回父组件
this.greenButtonState.width += 125;
} else {
// 更新class,变化可以被观察到同步回父组件
this.greenButtonState = new GreenButtonState(100);
}
})
}
}
@Component
struct YellowButton {
@Link yellowButtonState: number;
build() {
Button(‘Yellow Button’)
.width(this.yellowButtonState)
.height(150.0)
.backgroundColor(‘#ffff00’)
.onClick(() => {
// 子组件的简单类型可以同步回父组件
this.yellowButtonState += 50.0;
})
}
}
@Entry
@Component
struct ShufflingContainer {
@State greenButtonState: GreenButtonState = new GreenButtonState(300);
@State yellowButtonProp: number = 100;
build() {
Column() {
// 简单类型从父组件@State向子组件@Link数据同步
Button(‘Parent View: Set yellowButton’)
.onClick(() => {
this.yellowButtonProp = (this.yellowButtonProp < 700) ? this.yellowButtonProp + 100 : 100;
})
// class类型从父组件@State向子组件@Link数据同步
Button(‘Parent View: Set GreenButton’)
.onClick(() => {
this.greenButtonState.width = (this.greenButtonState.width < 700) ? this.greenButtonState.width + 100 : 100;
})
// class类型初始化@Link
GreenButton({ greenButtonState: $greenButtonState })
// 简单类型初始化@Link
YellowButton({ yellowButtonState: $yellowButtonProp })
}
}
}
2、数组类型的@Link
@Component
struct Child {
@Link items: number[];
build() {
Column() {
Button(Button1: push).onClick(() => {
this.items.push(this.items.length + 1);
})
Button(Button2: replace whole item).onClick(() => {
this.items = [100, 200, 300];
})
}
}
}
@Entry
@Component
struct Parent {
@State arr: number[] = [1, 2, 3];
build() {
Column() {
Child({ items: KaTeX parse error: Expected 'EOF', got '}' at position 5: arr }̲) ForEach…{item}`)
},
item => item.toString()
)
}
}
}
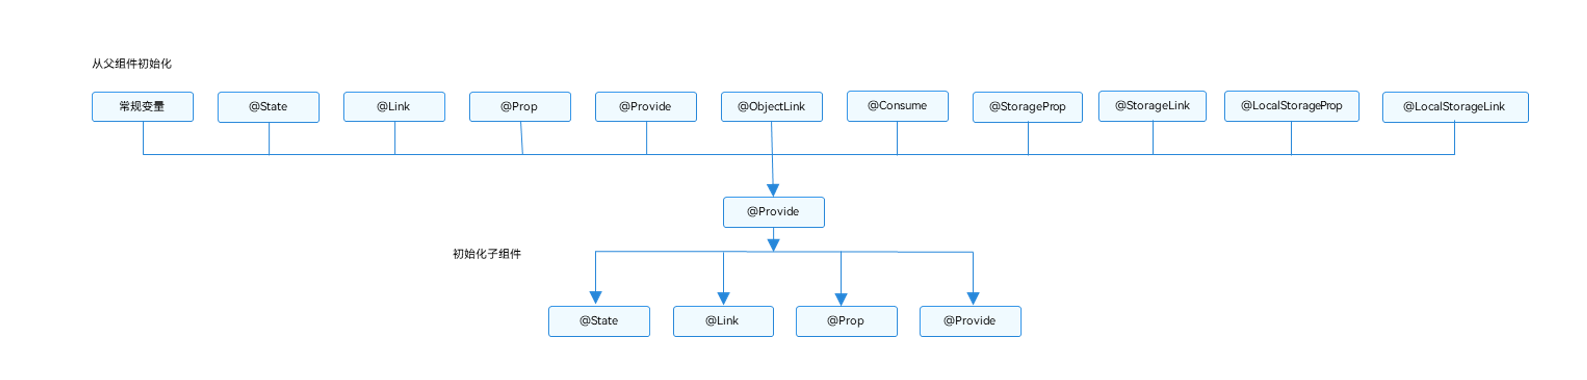
###### 🌈1.2.1.4 @Provide/@Consume 与后代组件双向同步
| 特点 | 描述 |
| --- | --- |
| 双向数据同步 | @Provide和@Consume应用于与后代组件的双向数据同步 |
| 状态数据传递 | @Provide和@Consume应用于状态数据在多个层级之间传递的场景 |
| 解除参数传递 | @Provide和@Consume摆脱参数传递机制的束缚,实现跨层级传递 |
| 绑定关系 | @Provide和@Consume通过相同的变量名或者相同的变量别名绑定时,@Provide修饰的变量和@Consume修饰的变量是一对多的关系 |
| 限制条件 | 不允许在同一个自定义组件内,包括其子组件中声明多个同名或者同别名的@Provide装饰的变量 |
@Prop变量装饰器只支持string、number、boolean、enum类型,以及这些类型的数组。不支持复杂类型(比如any类型)
父子组件初始化和传递装饰图如下:
###### 🍬1.2.1.4.1 变化规则
* 当装饰的数据类型为boolean、string、number类型时,可以观察到数值的变化。
* 当装饰的数据类型为class或者Object的时候,可以观察到赋值和属性赋值的变化(属性为Object.keys(observedObject)返回的所有属性)。
* 当装饰的对象是array的时候,可以观察到数组的添加、删除、更新数组单元。
###### 🍬1.2.1.4.2 使用场景
@Component
struct CompD {
// @Consume装饰的变量通过相同的属性名绑定其祖先组件CompA内的@Provide装饰的变量
@Consume reviewVotes: number;
build() {
Column() {
Text(reviewVotes(${this.reviewVotes}))
Button(reviewVotes(${this.reviewVotes}), give +1)
.onClick(() => this.reviewVotes += 1)
}
.width(‘50%’)
}
}
@Component
struct CompC {
build() {
Row({ space: 5 }) {
CompD()
CompD()
}
}
}
@Component
struct CompB {
build() {
CompC()
}
}
@Entry
@Component
struct CompA {
// @Provide装饰的变量reviewVotes由入口组件CompA提供其后代组件
@Provide reviewVotes: number = 0;
build() {
Column() {
Button(reviewVotes(${this.reviewVotes}), give +1)
.onClick(() => this.reviewVotes += 1)
CompB()
}
}
}
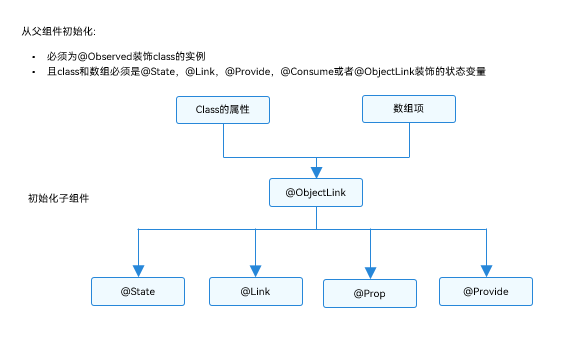
###### 🌈1.2.1.5 @Observed/@ObjectLink 嵌套类对象属性变化
| 特点 | 描述 |
| --- | --- |
| 双向数据同步 | @ObjectLink和@Observed类装饰器用于在涉及嵌套对象或数组的场景中进行双向数据同步 |
| 观察属性变化 | 被@Observed装饰的类,可以被观察到属性的变化 |
| 双向数据绑定 | 子组件中@ObjectLink装饰器装饰的状态变量用于接收@Observed装饰的类的实例,和父组件中对应的状态变量建立双向数据绑定 |
| 实例类型 | 这个实例可以是数组中的被@Observed装饰的项,或者是class object中的属性,这个属性同样也需要被@Observed装饰 |
| 搭配使用 | 单独使用@Observed是没有任何作用的,需要搭配@ObjectLink或者@Prop使用 |
| 限制条件 | 使用@Observed装饰class会改变class原始的原型链,@ObjectLink装饰器不能在@Entry装饰的自定义组件中使用 |
类型必须是@Observed装饰的class,可用于初始化常规变量、@State、@Link、@Prop、@Provide
嵌套类对象装饰图如下:
###### 🍬1.2.1.5.1 变化规则
class ClassA {
public c: number;
constructor(c: number) {
this.c = c;
}
}
@Observed
class ClassB {
public a: ClassA;
public b: number;
constructor(a: ClassA, b: number) {
this.a = a;
this.b = b;
}
}
@ObjectLink b: ClassB
// 赋值变化可以被观察到
this.b.a = new ClassA(5)
this.b.b = 5
// ClassA没有被@Observed装饰,其属性的变化观察不到
this.b.a.c = 5
###### 🍬1.2.1.5.2 使用场景


1、嵌套对象
// objectLinkNestedObjects.ets
let NextID: number = 1;
@Observed
class ClassA {
public id: number;
public c: number;
constructor(c: number) {
this.id = NextID++;
this.c = c;
}
}
@Observed
class ClassB {
public a: ClassA;
constructor(a: ClassA) {
this.a = a;
}
}
@Component
struct ViewA {
label: string = ‘ViewA1’;
@ObjectLink a: ClassA;
build() {
Row() {
Button(ViewA [${this.label}] this.a.c=${this.a.c} +1)
.onClick(() => {
this.a.c += 1;
})
}
}
}
@Entry
@Component
struct ViewB {
@State b: ClassB = new ClassB(new ClassA(0));
build() {
Column() {
ViewA({ label: ‘ViewA #1’, a: this.b.a })
ViewA({ label: ‘ViewA #2’, a: this.b.a })
Button(ViewB: this.b.a.c+= 1)
.onClick(() => {
this.b.a.c += 1;
})
Button(ViewB: this.b.a = new ClassA(0))
.onClick(() => {
this.b.a = new ClassA(0);
})
Button(ViewB: this.b = new ClassB(ClassA(0)))
.onClick(() => {
this.b = new ClassB(new ClassA(0));
})
}
}
}
2、对象数组
@Component
struct ViewA {
// 子组件ViewA的@ObjectLink的类型是ClassA
@ObjectLink a: ClassA;
label: string = ‘ViewA1’;
build() {
Row() {
Button(ViewA [${this.label}] this.a.c = ${this.a.c} +1)
.onClick(() => {
this.a.c += 1;
})
}
}
}
@Entry
@Component
struct ViewB {
// ViewB中有@State装饰的ClassA[]
@State arrA: ClassA[] = [new ClassA(0), new ClassA(0)];
build() {
Column() {
ForEach(this.arrA,
(item) => {
ViewA({ label: #${item.id}, a: item })
},
(item) => item.id.toString()
)
// 使用@State装饰的数组的数组项初始化@ObjectLink,其中数组项是被@Observed装饰的ClassA的实例
ViewA({ label: ViewA this.arrA[first], a: this.arrA[0] })
ViewA({ label: ViewA this.arrA[last], a: this.arrA[this.arrA.length-1] })
Button(ViewB: reset array)
.onClick(() => {
this.arrA = [new ClassA(0), new ClassA(0)];
})
Button(ViewB: push)
.onClick(() => {
this.arrA.push(new ClassA(0))
})
Button(ViewB: shift)
.onClick(() => {
this.arrA.shift()
})
Button(ViewB: chg item property in middle)
.onClick(() => {
this.arrA[Math.floor(this.arrA.length / 2)].c = 10;
})
Button(ViewB: chg item property in middle)
.onClick(() => {
this.arrA[Math.floor(this.arrA.length / 2)] = new ClassA(11);
})
}
}
}
3、二维数组
@Observed
class StringArray extends Array {
}
@Observed
class StringArray extends Array {
}
@Component
struct ItemPage {
@ObjectLink itemArr: StringArray;
build() {
Row() {
Text(‘ItemPage’)
.width(100).height(100)
  ForEach(this.itemArr,
    item => {
      Text(item)
        .width(100).height(100)
    },
    item => item
  )
}
}
}
@Entry
@Component
struct IndexPage {
@State arr: Array = [new StringArray(), new StringArray(), new StringArray()];
build() {
Column() {
ItemPage({ itemArr: this.arr[0] })
ItemPage({ itemArr: this.arr[1] })
ItemPage({ itemArr: this.arr[2] })
  Divider()

  ForEach(this.arr,
    itemArr => {
      ItemPage({ itemArr: itemArr })
    },
    itemArr => itemArr[0]
  )

  Divider()

  Button('update')
    .onClick(() => {
      console.error('Update all items in arr');
      if (this.arr[0][0] !== undefined) {
        // 正常情况下需要有一个真实的ID来与ForEach一起使用,但此处没有
        // 因此需要确保推送的字符串是唯一的。
        this.arr[0].push(`${this.arr[0].slice(-1).pop()}${this.arr[0].slice(-1).pop()}`);
        this.arr[1].push(`${this.arr[1].slice(-1).pop()}${this.arr[1].slice(-1).pop()}`);
        this.arr[2].push(`${this.arr[2].slice(-1).pop()}${this.arr[2].slice(-1).pop()}`);
      } else {
        this.arr[0].push('Hello');
        this.arr[1].push('World');
        this.arr[2].push('!');
      }
    })
}
}
}
##### 1.2.2 管理应用拥有的状态


| 存储方式 | 描述 |
| --- | --- |
| LocalStorage | 页面级UI状态存储,通常用于UIAbility内、页面间的状态共享 |
| AppStorage | 特殊的单例LocalStorage对象,由UI框架在应用程序启动时创建,为应用程序UI状态属性提供中央存储 |
| PersistentStorage | 持久化存储UI状态,通常和AppStorage配合使用,选择AppStorage存储的数据写入磁盘,以确保这些属性在应用程序重新启动时的值与应用程序关闭时的值相同 |
| Environment | 应用程序运行的设备的环境参数,环境参数会同步到AppStorage中,可以和AppStorage搭配使用 |


###### 🌈1.2.2.1 LocalStorage:页面级UI状态存储


###### 🍬1.2.2.1.1 变化规则


| 装饰器 | 描述 |
| --- | --- |
| @LocalStorageProp | @LocalStorageProp装饰的变量和与LocalStorage中给定属性建立单向同步关系 |
| @LocalStorageLink | @LocalStorageLink装饰的变量和在@Component中创建与LocalStorage中给定属性建立双向同步关系 |
| 限制条件 | LocalStorage创建后,命名属性的类型不可更改。后续调用Set时必须使用相同类型的值 LocalStorage是页面级存储,GetShared接口仅能获取当前Stage通过windowStage.loadContent传入的LocalStorage实例,否则返回undefined |


* 当@LocalStorageLink(key)装饰的数值改变被观察到时,修改将被同步回LocalStorage对应属性键值key的属性中。
* LocalStorage中属性键值key对应的数据一旦改变,属性键值key绑定的所有的数据(包括双向@LocalStorageLink和单向@LocalStorageProp)都将同步修改;
* 当@LocalStorageLink(key)装饰的数据本身是状态变量,它的改变不仅仅会同步回LocalStorage中,还会引起所属的自定义组件的重新渲染。


###### 🍬1.2.2.1.2 使用场景


1、应用逻辑使用LocalStorage
let storage = new LocalStorage({ ‘PropA’: 47 }); // 创建新实例并使用给定对象初始化
let propA = storage.get(‘PropA’) // propA == 47
let link1 = storage.link(‘PropA’); // link1.get() == 47
let link2 = storage.link(‘PropA’); // link2.get() == 47
let prop = storage.prop(‘PropA’); // prop.get() = 47
link1.set(48); // two-way sync: link1.get() == link2.get() == prop.get() == 48
prop.set(1); // one-way sync: prop.get()=1; but link1.get() == link2.get() == 48
link1.set(49); // two-way sync: link1.get() == link2.get() == prop.get() == 49
2、从UI内部使用LocalStorage
// 创建新实例并使用给定对象初始化
let storage = new LocalStorage({ ‘PropA’: 47 });
@Component
struct Child {
// @LocalStorageLink变量装饰器与LocalStorage中的’PropA’属性建立双向绑定
@LocalStorageLink(‘PropA’) storLink2: number = 1;
build() {
Button(Child from LocalStorage ${this.storLink2})
// 更改将同步至LocalStorage中的’PropA’以及Parent.storLink1
.onClick(() => this.storLink2 += 1)
}
}
// 使LocalStorage可从@Component组件访问
@Entry(storage)
@Component
struct CompA {
// @LocalStorageLink变量装饰器与LocalStorage中的’PropA’属性建立双向绑定
@LocalStorageLink(‘PropA’) storLink1: number = 1;
build() {
Column({ space: 15 }) {
Button(Parent from LocalStorage ${this.storLink1}) // initial value from LocalStorage will be 47, because ‘PropA’ initialized already
.onClick(() => this.storLink1 += 1)
// @Component子组件自动获得对CompA LocalStorage实例的访问权限。
Child()
}
}
}
3、@LocalStorageProp和LocalStorage单向同步的简单场景
// 创建新实例并使用给定对象初始化
let storage = new LocalStorage({ ‘PropA’: 47 });
// 使LocalStorage可从@Component组件访问
@Entry(storage)
@Component
struct CompA {
// @LocalStorageProp变量装饰器与LocalStorage中的’PropA’属性建立单向绑定
@LocalStorageProp(‘PropA’) storProp1: number = 1;
build() {
Column({ space: 15 }) {
// 点击后从47开始加1,只改变当前组件显示的storProp1,不会同步到LocalStorage中
Button(Parent from LocalStorage ${this.storProp1})
.onClick(() => this.storProp1 += 1)
Child()
}
}
}
@Component
struct Child {
// @LocalStorageProp变量装饰器与LocalStorage中的’PropA’属性建立单向绑定
@LocalStorageProp(‘PropA’) storProp2: number = 2;
build() {
Column({ space: 15 }) {
// 当CompA改变时,当前storProp2不会改变,显示47
Text(Parent from LocalStorage ${this.storProp2})
}
}
}
4、@LocalStorageLink和LocalStorage双向同步的简单场景
// 构造LocalStorage实例
let storage = new LocalStorage({ ‘PropA’: 47 });
// 调用link9+接口构造’PropA’的双向同步数据,linkToPropA 是全局变量
let linkToPropA = storage.link(‘PropA’);
@Entry(storage)
@Component
struct CompA {
// @LocalStorageLink(‘PropA’)在CompA自定义组件中创建’PropA’的双向同步数据,初始值为47,因为在构造LocalStorage已经给“PropA”设置47
@LocalStorageLink(‘PropA’) storLink: number = 1;
build() {
Column() {
Text(incr @LocalStorageLink variable)
// 点击“incr @LocalStorageLink variable”,this.storLink加1,改变同步回storage,全局变量linkToPropA也会同步改变
    .onClick(() => this.storLink += 1)
  // 并不建议在组件内使用全局变量linkToPropA.get(),因为可能会有生命周期不同引起的错误。
  Text(`@LocalStorageLink: ${this.storLink} - linkToPropA: ${linkToPropA.get()}`)
}
}
}
5、兄弟节点之间同步状态变量
let storage = new LocalStorage({ countStorage: 1 });
@Component
struct Child {
// 子组件实例的名字
label: string = ‘no name’;
// 和LocalStorage中“countStorage”的双向绑定数据
@LocalStorageLink(‘countStorage’) playCountLink: number = 0;
build() {
Row() {
Text(this.label)
.width(50).height(60).fontSize(12)
Text(playCountLink ${this.playCountLink}: inc by 1)
.onClick(() => {
this.playCountLink += 1;
})
.width(200).height(60).fontSize(12)
}.width(300).height(60)
}
}
@Entry(storage)
@Component
struct Parent {
@LocalStorageLink(‘countStorage’) playCount: number = 0;
build() {
Column() {
Row() {
Text(‘Parent’)
.width(50).height(60).fontSize(12)
Text(playCount ${this.playCount} dec by 1)
.onClick(() => {
this.playCount -= 1;
})
.width(250).height(60).fontSize(12)
}.width(300).height(60)
Row() {
Text(‘LocalStorage’)
.width(50).height(60).fontSize(12)
Text(countStorage ${this.playCount} incr by 1)
.onClick(() => {
storage.set(‘countStorage’, 1 + storage.get(‘countStorage’));
})
.width(250).height(60).fontSize(12)
}.width(300).height(60)
Child({ label: ‘ChildA’ })
Child({ label: ‘ChildB’ })
Text(playCount in LocalStorage for debug ${storage.get<number>('countStorage')})
.width(300).height(60).fontSize(12)
}
}
}
6、将LocalStorage实例从UIAbility共享到一个或多个视图
// EntryAbility.ts
import UIAbility from ‘@ohos.app.ability.UIAbility’;
import window from ‘@ohos.window’;
let para:Record<string,number> = { ‘PropA’: 47 };
let localStorage: LocalStorage = new LocalStorage(para);
export default class EntryAbility extends UIAbility {
storage: LocalStorage = localStorage
onWindowStageCreate(windowStage: window.WindowStage) {
windowStage.loadContent(‘pages/Index’, this.storage);
}
}
// 通过GetShared接口获取stage共享的LocalStorage实例
let storage = LocalStorage.GetShared()
@Entry(storage)
@Component
struct CompA {
// can access LocalStorage instance using
// @LocalStorageLink/Prop decorated variables
@LocalStorageLink(‘PropA’) varA: number = 1;
build() {
Column() {
Text(${this.varA}).fontSize(50)
}
}
}
###### 🌈1.2.2.2 AppStorage:AppStorage


###### 🍬1.2.2.2.1 变化规则


和前面一样传递的参数变成@StorageProp和@StorageLink


* 当装饰的数据类型为boolean、string、number类型时,可以观察到数值的变化。
* 当装饰的数据类型为class或者Object时,可以观察到赋值和属性赋值的变化,即Object.keys(observedObject)返回的所有属性。
* 当装饰的对象是array时,可以观察到数组添加、删除、更新数组单元的变化。


###### 🍬1.2.2.2.2 使用场景


1、从应用逻辑使用AppStorage和LocalStorage
AppStorage.SetOrCreate(‘PropA’, 47);
let storage: LocalStorage = new LocalStorage({ ‘PropA’: 17 });
let propA: number = AppStorage.Get(‘PropA’) // propA in AppStorage == 47, propA in LocalStorage == 17
var link1: SubscribedAbstractProperty = AppStorage.Link(‘PropA’); // link1.get() == 47
var link2: SubscribedAbstractProperty = AppStorage.Link(‘PropA’); // link2.get() == 47
var prop: SubscribedAbstractProperty = AppStorage.Prop(‘PropA’); // prop.get() == 47
link1.set(48); // two-way sync: link1.get() == link2.get() == prop.get() == 48
prop.set(1); // one-way sync: prop.get() == 1; but link1.get() == link2.get() == 48
link1.set(49); // two-way sync: link1.get() == link2.get() == prop.get() == 49
storage.get(‘PropA’) // == 17
storage.set(‘PropA’, 101);
storage.get(‘PropA’) // == 101
AppStorage.Get(‘PropA’) // == 49
link1.get() // == 49
link2.get() // == 49
prop.get() // == 49
2、从UI内部使用AppStorage和LocalStorage
AppStorage.SetOrCreate(‘PropA’, 47);
let storage = new LocalStorage({ ‘PropA’: 48 });
@Entry(storage)
@Component
struct CompA {
@StorageLink(‘PropA’) storLink: number = 1;
@LocalStorageLink(‘PropA’) localStorLink: number = 1;
build() {
Column({ space: 20 }) {
Text(From AppStorage ${this.storLink})
.onClick(() => this.storLink += 1)
Text(From LocalStorage ${this.localStorLink})
.onClick(() => this.localStorLink += 1)
}
}
}
3、不建议借助@StorageLink的双向同步机制实现事件通知
// xxx.ets
class ViewData {
title: string;
uri: Resource;
color: Color = Color.Black;
constructor(title: string, uri: Resource) {
this.title = title;
this.uri = uri
}
}
@Entry
@Component
struct Gallery2 {
dataList: Array = [new ViewData(‘flower’, $r(‘app.media.icon’)), new ViewData(‘OMG’, $r(‘app.media.icon’)), new ViewData(‘OMG’, $r(‘app.media.icon’))]
scroller: Scroller = new Scroller()
build() {
Column() {
Grid(this.scroller) {
ForEach(this.dataList, (item: ViewData, index?: number) => {
GridItem() {
TapImage({
uri: item.uri,
index: index
})
}.aspectRatio(1)
}, (item: ViewData, index?: number) => {
return JSON.stringify(item) + index;
})
}.columnsTemplate(‘1fr 1fr’)
}
}
}
@Component
export struct TapImage {
@StorageLink(‘tapIndex’) @Watch(‘onTapIndexChange’) tapIndex: number = -1;
@State tapColor: Color = Color.Black;
private index: number = 0;
private uri: Resource = {
id: 0,
type: 0,
moduleName: “”,
bundleName: “”
};
// 判断是否被选中
onTapIndexChange() {
if (this.tapIndex >= 0 && this.index === this.tapIndex) {
console.info(tapindex: ${this.tapIndex}, index: ${this.index}, red)
this.tapColor = Color.Red;
} else {
console.info(tapindex: ${this.tapIndex}, index: ${this.index}, black)
this.tapColor = Color.Black;
}
}
build() {
Column() {
Image(this.uri)
.objectFit(ImageFit.Cover)
.onClick(() => {
this.tapIndex = this.index;
})
.border({ width: 5, style: BorderStyle.Dotted, color: this.tapColor })
}
}
}
// xxx.ets
import emitter from ‘@ohos.events.emitter’;
let NextID: number = 0;
class ViewData {
title: string;
uri: Resource;
color: Color = Color.Black;
id: number;
constructor(title: string, uri: Resource) {
this.title = title;
this.uri = uri
this.id = NextID++;
}
}
@Entry
@Component
struct Gallery2 {
dataList: Array = [new ViewData(‘flower’, $r(‘app.media.icon’)), new ViewData(‘OMG’, $r(‘app.media.icon’)), new ViewData(‘OMG’, $r(‘app.media.icon’))]
scroller: Scroller = new Scroller()
private preIndex: number = -1
build() {
Column() {
Grid(this.scroller) {
ForEach(this.dataList, (item: ViewData) => {
GridItem() {
TapImage({
uri: item.uri,
index: item.id
})
}.aspectRatio(1)
.onClick(() => {
if (this.preIndex === item.id) {
return
}
let innerEvent: emitter.InnerEvent = { eventId: item.id }
// 选中态:黑变红
let eventData: emitter.EventData = {
data: {
“colorTag”: 1
}
}
emitter.emit(innerEvent, eventData)
if (this.preIndex != -1) {
console.info(preIndex: ${this.preIndex}, index: ${item.id}, black)
let innerEvent: emitter.InnerEvent = { eventId: this.preIndex }
// 取消选中态:红变黑
let eventData: emitter.EventData = {
data: {
“colorTag”: 0
}
}
emitter.emit(innerEvent, eventData)
}
this.preIndex = item.id
})
}, (item: ViewData) => JSON.stringify(item))
}.columnsTemplate(‘1fr 1fr’)
}
}
}
@Component
export struct TapImage {
@State tapColor: Color = Color.Black;
private index: number = 0;
private uri: Resource = {
id: 0,
type: 0,
moduleName: “”,
bundleName: “”
};
onTapIndexChange(colorTag: emitter.EventData) {
if (colorTag.data != null) {
this.tapColor = colorTag.data.colorTag ? Color.Red : Color.Black
}
}
aboutToAppear() {
//定义事件ID
let innerEvent: emitter.InnerEvent = { eventId: this.index }
emitter.on(innerEvent, data => {
this.onTapIndexChange(data)
})
}
build() {
Column() {
Image(this.uri)
.objectFit(ImageFit.Cover)
.border({ width: 5, style: BorderStyle.Dotted, color: this.tapColor })
}
}
}
以上通知事件逻辑简化成三元表达式
// xxx.ets
class ViewData {
title: string;
uri: Resource;
color: Color = Color.Black;
constructor(title: string, uri: Resource) {
this.title = title;
this.uri = uri
}
}
@Entry
@Component
struct Gallery2 {
dataList: Array = [new ViewData(‘flower’, $r(‘app.media.icon’)), new ViewData(‘OMG’, $r(‘app.media.icon’)), new ViewData(‘OMG’, $r(‘app.media.icon’))]
scroller: Scroller = new Scroller()
build() {
Column() {
Grid(this.scroller) {
ForEach(this.dataList, (item: ViewData, index?: number) => {
GridItem() {
TapImage({
uri: item.uri,
index: index
})
}.aspectRatio(1)
}, (item: ViewData, index?: number) => {
return JSON.stringify(item) + index;
})
}.columnsTemplate(‘1fr 1fr’)
}
}
}
@Component
export struct TapImage {
@StorageLink(‘tapIndex’) tapIndex: number = -1;
@State tapColor: Color = Color.Black;
private index: number = 0;
private uri: Resource = {
id: 0,
type: 0,
moduleName: “”,
bundleName: “”
};
build() {
Column() {
Image(this.uri)
.objectFit(ImageFit.Cover)
.onClick(() => {
this.tapIndex = this.index;
})
.border({
width: 5,
style: BorderStyle.Dotted,
color: (this.tapIndex >= 0 && this.index === this.tapIndex) ? Color.Red : Color.Black
})
}
}
}
AppStorage与PersistentStorage以及Environment配合使用时,需要注意以下几点:
* 在AppStorage中创建属性后,调用PersistentStorage.persistProp()接口时,会使用在AppStorage中已经存在的值,并覆盖PersistentStorage中的同名属性,所以建议要使用相反的调用顺序,反例可见在PersistentStorage之前访问AppStorage中的属性;
* 如果在AppStorage中已经创建属性后,再调用Environment.envProp()创建同名的属性,会调用失败。因为AppStorage已经有同名属性,Environment环境变量不会再写入AppStorage中,所以建议AppStorage中属性不要使用Environment预置环境变量名。
* 状态装饰器装饰的变量,改变会引起UI的渲染更新,如果改变的变量不是用于UI更新,只是用于消息传递,推荐使用 emitter方式。例子可见不建议借助@StorageLink的双向同步机制实现事件通知。
###### 🌈1.2.2.3 PersistentStorage:持久化存储UI状态
| 概述 | 解释 |
| --- | --- |
| 持久化 | PersistentStorage会将选定的AppStorage属性保存在设备磁盘上。应用程序可以使用API来决定哪些AppStorage属性应该被持久化。UI和业务逻辑不直接访问PersistentStorage中的属性,所有属性访问都是对AppStorage的访问,而且AppStorage中的更改会自动同步到PersistentStorage。 |
| 属性同步 | PersistentStorage和AppStorage中的属性建立双向同步。应用程序开发人员通常通过AppStorage访问PersistentStorage,还有一些接口可用于管理持久化属性,但业务逻辑始终通过AppStorage获取和设置属性。 |
| 限制条件 | PersistentStorage允许的类型和值包括数字、字符串、布尔值、枚举等简单类型以及可以通过JSON.stringify()和JSON.parse()重建的对象。不支持的类型和值包括嵌套对象(如对象数组、对象属性为对象等)、undefined和null。 |
| 性能 | 应避免持久化大型数据集和经常变化的变量,因为持久化数据是一个相对缓慢的操作。最好使用小于2kb的数据进行持久化,如果需要存储大量的数据,建议使用数据库API,因为PersistentStorage写入磁盘的操作是同步的,大量的数据本地化读写会同步在UI线程中执行,影响UI渲染性能。 |
| 使用限制 | PersistentStorage只能在UI页面内使用,否则将无法持久化数据。 |
###### 🍬1.2.2.3.1 变化规则
类似AppStorage,流程图如下:
**自我介绍一下,小编13年上海交大毕业,曾经在小公司待过,也去过华为、OPPO等大厂,18年进入阿里一直到现在。**
**深知大多数HarmonyOS鸿蒙开发工程师,想要提升技能,往往是自己摸索成长或者是报班学习,但对于培训机构动则几千的学费,着实压力不小。自己不成体系的自学效果低效又漫长,而且极易碰到天花板技术停滞不前!**
**因此收集整理了一份《2024年HarmonyOS鸿蒙开发全套学习资料》,初衷也很简单,就是希望能够帮助到想自学提升又不知道该从何学起的朋友,同时减轻大家的负担。**
**既有适合小白学习的零基础资料,也有适合3年以上经验的小伙伴深入学习提升的进阶课程,基本涵盖了95%以上HarmonyOS鸿蒙开发知识点,真正体系化!**
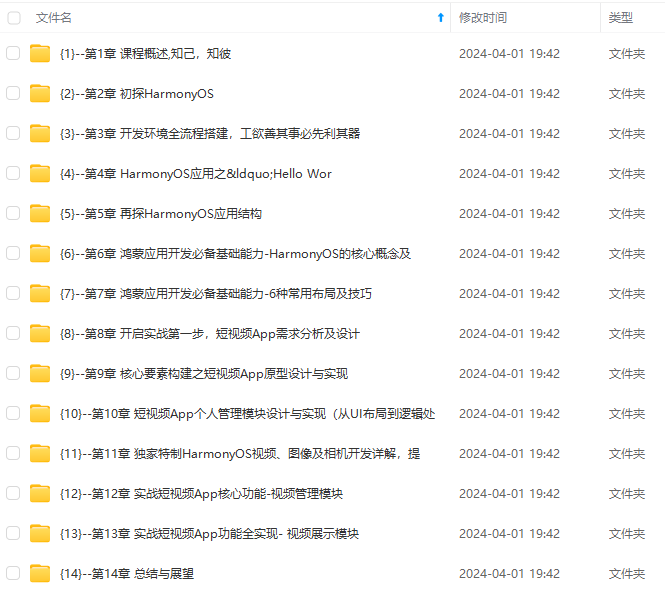
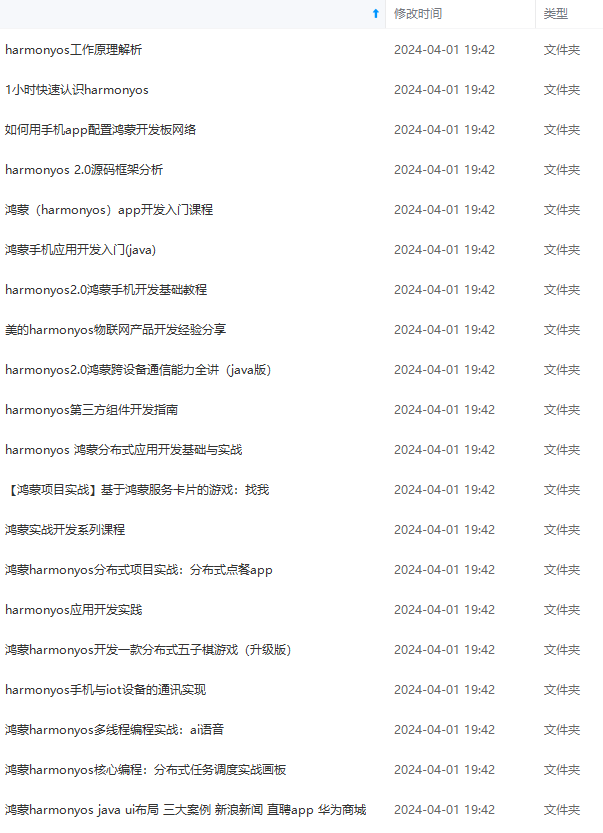
**由于文件比较大,这里只是将部分目录大纲截图出来,每个节点里面都包含大厂面经、学习笔记、源码讲义、实战项目、讲解视频,并且会持续更新**
**如果你觉得这些内容对你有帮助,可以添加VX:vip204888 (备注鸿蒙获取)**

**一个人可以走的很快,但一群人才能走的更远。不论你是正从事IT行业的老鸟或是对IT行业感兴趣的新人,都欢迎扫码加入我们的的圈子(技术交流、学习资源、职场吐槽、大厂内推、面试辅导),让我们一起学习成长!**
问PersistentStorage,还有一些接口可用于管理持久化属性,但业务逻辑始终通过AppStorage获取和设置属性。 |
| 限制条件 | PersistentStorage允许的类型和值包括数字、字符串、布尔值、枚举等简单类型以及可以通过JSON.stringify()和JSON.parse()重建的对象。不支持的类型和值包括嵌套对象(如对象数组、对象属性为对象等)、undefined和null。 |
| 性能 | 应避免持久化大型数据集和经常变化的变量,因为持久化数据是一个相对缓慢的操作。最好使用小于2kb的数据进行持久化,如果需要存储大量的数据,建议使用数据库API,因为PersistentStorage写入磁盘的操作是同步的,大量的数据本地化读写会同步在UI线程中执行,影响UI渲染性能。 |
| 使用限制 | PersistentStorage只能在UI页面内使用,否则将无法持久化数据。 |
###### 🍬1.2.2.3.1 变化规则
类似AppStorage,流程图如下:
**自我介绍一下,小编13年上海交大毕业,曾经在小公司待过,也去过华为、OPPO等大厂,18年进入阿里一直到现在。**
**深知大多数HarmonyOS鸿蒙开发工程师,想要提升技能,往往是自己摸索成长或者是报班学习,但对于培训机构动则几千的学费,着实压力不小。自己不成体系的自学效果低效又漫长,而且极易碰到天花板技术停滞不前!**
**因此收集整理了一份《2024年HarmonyOS鸿蒙开发全套学习资料》,初衷也很简单,就是希望能够帮助到想自学提升又不知道该从何学起的朋友,同时减轻大家的负担。**
[外链图片转存中...(img-M8rrvARH-1712917998178)]
[外链图片转存中...(img-Lg6neWRs-1712917998179)]
[外链图片转存中...(img-mfClC2ja-1712917998179)]
**既有适合小白学习的零基础资料,也有适合3年以上经验的小伙伴深入学习提升的进阶课程,基本涵盖了95%以上HarmonyOS鸿蒙开发知识点,真正体系化!**
**由于文件比较大,这里只是将部分目录大纲截图出来,每个节点里面都包含大厂面经、学习笔记、源码讲义、实战项目、讲解视频,并且会持续更新**
**如果你觉得这些内容对你有帮助,可以添加VX:vip204888 (备注鸿蒙获取)**
[外链图片转存中...(img-j27I29Xm-1712917998179)]
**一个人可以走的很快,但一群人才能走的更远。不论你是正从事IT行业的老鸟或是对IT行业感兴趣的新人,都欢迎扫码加入我们的的圈子(技术交流、学习资源、职场吐槽、大厂内推、面试辅导),让我们一起学习成长!**


 被折叠的 条评论
为什么被折叠?
被折叠的 条评论
为什么被折叠?
 到【灌水乐园】发言


