


./gradlew tinkerPatchRelease // 或者 ./gradlew tinkerPatchDebug
生成。
生成目录为:build/outputs/tinkerPatch

需要注意的是,需要在app/build.gradle中设置相比较的apk(即old.apk,本次为new.apk),
ext {
tinkerEnabled = true
//old apk file to build patch apk
tinkerOldApkPath = “${bakPath}/old.apk”
//proguard mapping file to build patch apk
tinkerApplyMappingPath = “${bakPath}/old-mapping.txt”
}
提供的例子,基本上展示了tinker的自定义扩展的方式,具体还可以参考:
所以,如果你使用命令行方式接入,也不要忘了学习下其支持哪些扩展。
三、Application是如何编译时生成的
从注释和命名上看:
//可选,用于生成application类
provided(‘com.tencent.tinker:tinker-android-anno:1.7.7’)
明显是该库,其结构如下:
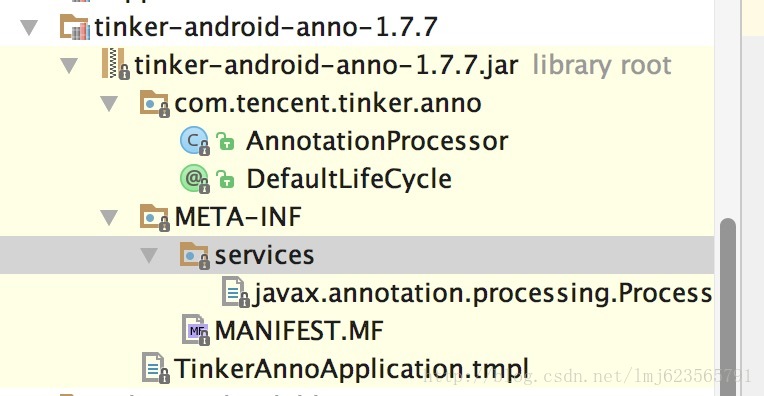
典型的编译时注解的项目,源码见tinker-android-anno。
入口为com.tencent.tinker.anno.AnnotationProcessor,可以在该services/javax.annotation.processing.Processor文件中找到处理类全路径。
再次建议,如果你不了解,简单阅读下Android 如何编写基于编译时注解的项目该文。
直接看AnnotationProcessor的process方法:
@Override
public boolean process(Set<? extends TypeElement> annotations, RoundEnvironment roundEnv) {
processDefaultLifeCycle(roundEnv.getElementsAnnotatedWith(DefaultLifeCycle.class));
return true;
}
直接调用了processDefaultLifeCycle:
private void processDefaultLifeCycle(Set<? extends Element> elements) {
// 被注解DefaultLifeCycle标识的对象
for (Element e : elements) {
// 拿到DefaultLifeCycle注解对象
DefaultLifeCycle ca = e.getAnnotation(DefaultLifeCycle.class);
String lifeCycleClassName = ((TypeElement) e).getQualifiedName().toString();
String lifeCyclePackageName = lifeCycleClassName.substring(0, lifeCycleClassName.lastIndexOf(‘.’));
lifeCycleClassName = lifeCycleClassName.substring(lifeCycleClassName.lastIndexOf(‘.’) + 1);
String applicationClassName = ca.application();
if (applicationClassName.startsWith(“.”)) {
applicationClassName = lifeCyclePackageName + applicationClassName;
}
String applicationPackageName = applicationClassName.substring(0, applicationClassName.lastIndexOf(‘.’));
applicationClassName = applicationClassName.substring(applicationClassName.lastIndexOf(‘.’) + 1);
String loaderClassName = ca.loaderClass();
if (loaderClassName.startsWith(“.”)) {
loaderClassName = lifeCyclePackageName + loaderClassName;
}
// /TinkerAnnoApplication.tmpl
final InputStream is = AnnotationProcessor.class.getResourceAsStream(APPLICATION_TEMPLATE_PATH);
final Scanner scanner = new Scanner(is);
final String template = scanner.useDelimiter(“\A”).next();
final String fileContent = template
.replaceAll(“%PACKAGE%”, applicationPackageName)
.replaceAll(“%APPLICATION%”, applicationClassName)
.replaceAll(“%APPLICATION_LIFE_CYCLE%”, lifeCyclePackageName + “.” + lifeCycleClassName)
.replaceAll(“%TINKER_FLAGS%”, “” + ca.flags())
.replaceAll(“%TINKER_LOADER_CLASS%”, “” + loaderClassName)
.replaceAll(“%TINKER_LOAD_VERIFY_FLAG%”, “” + ca.loadVerifyFlag());
JavaFileObject fileObject = processingEnv.getFiler().createSourceFile(applicationPackageName + “.” + applicationClassName);
processingEnv.getMessager().printMessage(Diagnostic.Kind.NOTE, "Creating " + fileObject.toUri());
Writer writer = fileObject.openWriter();
PrintWriter pw = new PrintWriter(writer);
pw.print(fileContent);
pw.flush();
writer.close();
}
}
代码比较简单,可以分三部分理解:
-
步骤1:首先找到被DefaultLifeCycle标识的Element(为类对象TypeElement),得到该对象的包名,类名等信息,然后通过该对象,拿到
@DefaultLifeCycle对象,获取该注解中声明属性的值。 -
步骤2:读取一个模板文件,读取为字符串,将各个占位符通过步骤1中的值替代。
-
步骤3:通过JavaFileObject将替换完成的字符串写文件,其实就是本例中的Application对象。
我们看一眼模板文件:
package %PACKAGE%;
import com.tencent.tinker.loader.app.TinkerApplication;
/**
-
Generated application for tinker life cycle
*/
public class %APPLICATION% extends TinkerApplication {
public %APPLICATION%() {
super(%TINKER_FLAGS%, “%APPLICATION_LIFE_CYCLE%”, “%TINKER_LOADER_CLASS%”, %TINKER_LOAD_VERIFY_FLAG%);
}
}
对应我们的SimpleTinkerInApplicationLike,
@DefaultLifeCycle(application = “.SimpleTinkerInApplication”,
flags = ShareConstants.TINKER_ENABLE_ALL,
loadVerifyFlag = false)
public class SimpleTinkerInApplicationLike extends ApplicationLike {}
主要就几个占位符:
-
包名,如果application属性值以点开始,则同包;否则则截取
-
类名,application属性值中的类名
-
%TINKER_FLAGS%对应flags
-
%APPLICATION_LIFE_CYCLE%,编写的ApplicationLike的全路径
-
“%TINKER_LOADER_CLASS%”,这个值我们没有设置,实际上对应
@DefaultLifeCycle的loaderClass属性,默认值为com.tencent.tinker.loader.TinkerLoader -
%TINKER_LOAD_VERIFY_FLAG%对应loadVerifyFlag
于是最终生成的代码为:
/**
-
Generated application for tinker life cycle
*/
public class SimpleTinkerInApplication extends TinkerApplication {
public SimpleTinkerInApplication() {
super(7, “com.zhy.tinkersimplein.SimpleTinkerInApplicationLike”, “com.tencent.tinker.loader.TinkerLoader”, false);
}
}
tinker这么做的目的,文档上是这么说的:
为了减少错误的出现,推荐使用Annotation生成Application类。
这样大致了解了Application是如何生成的。
接下来我们大致看一下tinker的原理。
四、原理

tinker贴了一张大致的原理图。
可以看出:
tinker将old.apk和new.apk做了diff,拿到patch.dex,然后将patch.dex与本机中apk的classes.dex做了合并,生成新的classes.dex,运行时通过反射将合并后的dex文件放置在加载的dexElements数组的前面。
运行时替代的原理,其实和Qzone的方案差不多,都是去反射修改dexElements。
两者的差异是:Qzone是直接将patch.dex插到数组的前面;而tinker是将patch.dex与app中的classes.dex合并后的全量dex插在数组的前面。
tinker这么做的目的还是因为Qzone方案中提到的CLASS_ISPREVERIFIED的解决方案存在问题;而tinker相当于换个思路解决了该问题。
接下来我们就从代码中去验证该原理。
本片文章源码分析的两条线:
-
应用启动时,从默认目录加载合并后的classes.dex
-
patch下发后,合成classes.dex至目标目录
五、源码分析
(1)加载patch
加载的代码实际上在生成的Application中调用的,其父类为TinkerApplication,在其attachBaseContext中辗转会调用到loadTinker()方法,在该方法内部,反射调用了TinkerLoader的tryLoad方法。
@Override
public Intent tryLoad(TinkerApplication app, int tinkerFlag, boolean tinkerLoadVerifyFlag) {
Intent resultIntent = new Intent();
long begin = SystemClock.elapsedRealtime();
tryLoadPatchFilesInternal(app, tinkerFlag, tinkerLoadVerifyFlag, resultIntent);
long cost = SystemClock.elapsedRealtime() - begin;
ShareIntentUtil.setIntentPatchCostTime(resultIntent, cost);
return resultIntent;
}
tryLoadPatchFilesInternal中会调用到loadTinkerJars方法:
private void tryLoadPatchFilesInternal(TinkerApplication app, int tinkerFlag, boolean tinkerLoadVerifyFlag, Intent resultIntent) {
// 省略大量安全性校验代码
if (isEnabledForDex) {
//tinker/patch.info/patch-641e634c/dex
boolean dexCheck = TinkerDexLoader.checkComplete(patchVersionDirectory, securityCheck, resultIntent);
if (!dexCheck) {
//file not found, do not load patch
Log.w(TAG, “tryLoadPatchFiles:dex check fail”);
return;
}
}
//now we can load patch jar
if (isEnabledForDex) {
boolean loadTinkerJars = TinkerDexLoader.loadTinkerJars(app, tinkerLoadVerifyFlag, patchVersionDirectory, resultIntent, isSystemOTA);
if (!loadTinkerJars) {
Log.w(TAG, “tryLoadPatchFiles:onPatchLoadDexesFail”);
return;
}
}
}
TinkerDexLoader.checkComplete主要是用于检查下发的meta文件中记录的dex信息(meta文件,可以查看生成patch的产物,在assets/dex-meta.txt),检查meta文件中记录的dex文件信息对应的dex文件是否存在,并把值存在TinkerDexLoader的静态变量dexList中。
TinkerDexLoader.loadTinkerJars传入四个参数,分别为application,tinkerLoadVerifyFlag(注解上声明的值,传入为false),patchVersionDirectory当前version的patch文件夹,intent,当前patch是否仅适用于art。
@TargetApi(Build.VERSION_CODES.ICE_CREAM_SANDWICH)
public static boolean loadTinkerJars(Application application, boolean tinkerLoadVerifyFlag,
String directory, Intent intentResult, boolean isSystemOTA) {
PathClassLoader classLoader = (PathClassLoader) TinkerDexLoader.class.getClassLoader();
String dexPath = directory + “/” + DEX_PATH + “/”;
File optimizeDir = new File(directory + “/” + DEX_OPTIMIZE_PATH);
ArrayList legalFiles = new ArrayList<>();
final boolean isArtPlatForm = ShareTinkerInternals.isVmArt();
for (ShareDexDiffPatchInfo info : dexList) {
//for dalvik, ignore art support dex
if (isJustArtSupportDex(info)) {
continue;
}
String path = dexPath + info.realName;
File file = new File(path);
legalFiles.add(file);
}
// just for art
if (isSystemOTA) {
parallelOTAResult = true;
parallelOTAThrowable = null;
Log.w(TAG, “systemOTA, try parallel oat dexes!!!”);
TinkerParallelDexOptimizer.optimizeAll(
legalFiles, optimizeDir,
new TinkerParallelDexOptimizer.ResultCallback() {
}
);
SystemClassLoaderAdder.installDexes(application, classLoader, optimizeDir, legalFiles);
return true;
}
找出仅支持art的dex,且当前patch是否仅适用于art时,并行去loadDex。
关键是最后的installDexes:
@SuppressLint(“NewApi”)
public static void installDexes(Application application, PathClassLoader loader, File dexOptDir, List files)
throws Throwable {
if (!files.isEmpty()) {
ClassLoader classLoader = loader;
if (Build.VERSION.SDK_INT >= 24) {
classLoader = AndroidNClassLoader.inject(loader, application);
}
//because in dalvik, if inner class is not the same classloader with it wrapper class.
//it won’t fail at dex2opt
if (Build.VERSION.SDK_INT >= 23) {
V23.install(classLoader, files, dexOptDir);
} else if (Build.VERSION.SDK_INT >= 19) {
V19.install(classLoader, files, dexOptDir);
} else if (Build.VERSION.SDK_INT >= 14) {
V14.install(classLoader, files, dexOptDir);
} else {
V4.install(classLoader, files, dexOptDir);
}
//install done
sPatchDexCount = files.size();
Log.i(TAG, "after loaded classloader: " + classLoader + “, dex size:” + sPatchDexCount);
if (!checkDexInstall(classLoader)) {
//reset patch dex
SystemClassLoaderAdder.uninstallPatchDex(classLoader);
throw new TinkerRuntimeException(ShareConstants.CHECK_DEX_INSTALL_FAIL);
}
}
}
这里实际上就是根据不同的系统版本,去反射处理dexElements。
我们看一下V19的实现(主要我看了下本机只有个22的源码~):
private static final class V19 {
private static void install(ClassLoader loader, List additionalClassPathEntries,
File optimizedDirectory)
throws IllegalArgumentException, IllegalAccessException,
NoSuchFieldException, InvocationTargetException, NoSuchMethodException, IOException {
Field pathListField = ShareReflectUtil.findField(loader, “pathList”);
Object dexPathList = pathListField.get(loader);
ArrayList suppressedExceptions = new ArrayList();
ShareReflectUtil.expandFieldArray(dexPathList, “dexElements”, makeDexElements(dexPathList,
new ArrayList(additionalClassPathEntries), optimizedDirectory,
suppressedExceptions));
if (suppressedExceptions.size() > 0) {
for (IOException e : suppressedExceptions) {
Log.w(TAG, “Exception in makeDexElement”, e);
throw e;
}
}
}
}
-
找到PathClassLoader(BaseDexClassLoader)对象中的pathList对象
-
根据pathList对象找到其中的makeDexElements方法,传入patch相关的对应的实参,返回Element[]对象
-
拿到pathList对象中原本的dexElements方法
-
步骤2与步骤3中的Element[]数组进行合并,将patch相关的dex放在数组的前面
-
最后将合并后的数组,设置给pathList
这里其实和Qzone的提出的方案基本是一致的。如果你以前未了解过Qzone的方案,可以参考此文:
(2)合成patch
这里的入口为:
TinkerInstaller.onReceiveUpgradePatch(getApplicationContext(),
Environment.getExternalStorageDirectory().getAbsolutePath() + “/patch_signed.apk”);
上述代码会调用DefaultPatchListener中的onPatchReceived方法:
DefaultPatchListener
@Override
public int onPatchReceived(String path) {
int returnCode = patchCheck(path);
if (returnCode == ShareConstants.ERROR_PATCH_OK) {
TinkerPatchService.runPatchService(context, path);
} else {
Tinker.with(context).getLoadReporter().onLoadPatchListenerReceiveFail(new File(path), returnCode);
}
return returnCode;
}
首先对tinker的相关配置(isEnable)以及patch的合法性进行检测,如果合法,则调用TinkerPatchService.runPatchService(context, path);。
public static void runPatchService(Context context, String path) {
try {
Intent intent = new Intent(context, TinkerPatchService.class);
intent.putExtra(PATCH_PATH_EXTRA, path);
intent.putExtra(RESULT_CLASS_EXTRA, resultServiceClass.getName());
context.startService(intent);
} catch (Throwable throwable) {
TinkerLog.e(TAG, “start patch service fail, exception:” + throwable);
}
}
TinkerPatchService是IntentService的子类,这里通过intent设置了两个参数,一个是patch的路径,一个是resultServiceClass,该值是调用Tinker.install的时候设置的,默认为DefaultTinkerResultService.class。由于是IntentService,直接看onHandleIntent即可,如果你对IntentService陌生,可以查看此文:[Android IntentService完全解析 当Service遇到Handler
]( )。
@Override
protected void onHandleIntent(Intent intent) {
final Context context = getApplicationContext();
Tinker tinker = Tinker.with(context);
String path = getPatchPathExtra(intent);
File patchFile = new File(path);
boolean result;
increasingPriority();
PatchResult patchResult = new PatchResult();
result = upgradePatchProcessor.tryPatch(context, path, patchResult);
patchResult.isSuccess = result;
patchResult.rawPatchFilePath = path;
patchResult.costTime = cost;
patchResult.e = e;
AbstractResultService.runResultService(context, patchResult, getPatchResultExtra(intent));
}
比较清晰,主要关注upgradePatchProcessor.tryPatch方法,调用的是UpgradePatch.tryPatch。ps:这里有个有意思的地方increasingPriority(),其内部实现为:
private void increasingPriority() {
TinkerLog.i(TAG, “try to increase patch process priority”);
try {
Notification notification = new Notification();
if (Build.VERSION.SDK_INT < 18) {
startForeground(notificationId, notification);
} else {
startForeground(notificationId, notification);
// start InnerService
startService(new Intent(this, InnerService.class));
}
} catch (Throwable e) {
TinkerLog.i(TAG, “try to increase patch process priority error:” + e);
}
}
如果你对“保活”这个话题比较关注,那么对这段代码一定不陌生,主要是利用系统的一个漏洞来启动一个前台Service。如果有兴趣,可以参考此文:关于 Android 进程保活,你所需要知道的一切。
下面继续回到tryPatch方法:
UpgradePatch
@Override
public boolean tryPatch(Context context, String tempPatchPath, PatchResult patchResult) {
Tinker manager = Tinker.with(context);
final File patchFile = new File(tempPatchPath);
//it is a new patch, so we should not find a exist
SharePatchInfo oldInfo = manager.getTinkerLoadResultIfPresent().patchInfo;
String patchMd5 = SharePatchFileUtil.getMD5(patchFile);
//use md5 as version
patchResult.patchVersion = patchMd5;
SharePatchInfo newInfo;
//already have patch
if (oldInfo != null) {
newInfo = new SharePatchInfo(oldInfo.oldVersion, patchMd5, Build.FINGERPRINT);
} else {
newInfo = new SharePatchInfo(“”, patchMd5, Build.FINGERPRINT);
}
//check ok, we can real recover a new patch
final String patchDirectory = manager.getPatchDirectory().getAbsolutePath();
final String patchName = SharePatchFileUtil.getPatchVersionDirectory(patchMd5);
final String patchVersionDirectory = patchDirectory + “/” + patchName;
//copy file
File destPatchFile = new File(patchVersionDirectory + “/” + SharePatchFileUtil.getPatchVersionFile(patchMd5));
// check md5 first
if (!patchMd5.equals(SharePatchFileUtil.getMD5(destPatchFile))) {
SharePatchFileUtil.copyFileUsingStream(patchFile, destPatchFile);
}
//we use destPatchFile instead of patchFile, because patchFile may be deleted during the patch process
if (!DexDiffPatchInternal.tryRecoverDexFiles(manager, signatureCheck, context, patchVersionDirectory,
destPatchFile)) {
TinkerLog.e(TAG, “UpgradePatch tryPatch:new patch recover, try patch dex failed”);
return false;
}
return true;
}
拷贝patch文件拷贝至私有目录,然后调用DexDiffPatchInternal.tryRecoverDexFiles:
protected static boolean tryRecoverDexFiles(Tinker manager, ShareSecurityCheck checker, Context context,
String patchVersionDirectory, File patchFile) {
String dexMeta = checker.getMetaContentMap().get(DEX_META_FILE);
boolean result = patchDexExtractViaDexDiff(context, patchVersionDirectory, dexMeta, patchFile);
return result;
}
直接看patchDexExtractViaDexDiff
private static boolean patchDexExtractViaDexDiff(Context context, String patchVersionDirectory, String meta, final File patchFile) {
String dir = patchVersionDirectory + “/” + DEX_PATH + “/”;
if (!extractDexDiffInternals(context, dir, meta, patchFile, TYPE_DEX)) {
TinkerLog.w(TAG, “patch recover, extractDiffInternals fail”);
return false;
}
自我介绍一下,小编13年上海交大毕业,曾经在小公司待过,也去过华为、OPPO等大厂,18年进入阿里一直到现在。
深知大多数Android工程师,想要提升技能,往往是自己摸索成长或者是报班学习,但对于培训机构动则几千的学费,着实压力不小。自己不成体系的自学效果低效又漫长,而且极易碰到天花板技术停滞不前!
因此收集整理了一份《2024年Android移动开发全套学习资料》,初衷也很简单,就是希望能够帮助到想自学提升又不知道该从何学起的朋友,同时减轻大家的负担。


既有适合小白学习的零基础资料,也有适合3年以上经验的小伙伴深入学习提升的进阶课程,基本涵盖了95%以上Android开发知识点,真正体系化!
由于文件比较大,这里只是将部分目录大纲截图出来,每个节点里面都包含大厂面经、学习笔记、源码讲义、实战项目、讲解视频,并且后续会持续更新
如果你觉得这些内容对你有帮助,可以添加V获取:vip204888 (备注Android)

最后
对于很多初中级Android工程师而言,想要提升技能,往往是自己摸索成长。而不成体系的学习效果低效漫长且无助。时间久了,付出巨大的时间成本和努力,没有看到应有的效果,会气馁是再正常不过的。
所以学习一定要找到最适合自己的方式,有一个思路方法,不然不止浪费时间,更可能把未来发展都一起耽误了。
如果你是卡在缺少学习资源的瓶颈上,那么刚刚好我能帮到你。
一个人可以走的很快,但一群人才能走的更远。不论你是正从事IT行业的老鸟或是对IT行业感兴趣的新人,都欢迎扫码加入我们的的圈子(技术交流、学习资源、职场吐槽、大厂内推、面试辅导),让我们一起学习成长!

ndroid工程师,想要提升技能,往往是自己摸索成长或者是报班学习,但对于培训机构动则几千的学费,着实压力不小。自己不成体系的自学效果低效又漫长,而且极易碰到天花板技术停滞不前!**
因此收集整理了一份《2024年Android移动开发全套学习资料》,初衷也很简单,就是希望能够帮助到想自学提升又不知道该从何学起的朋友,同时减轻大家的负担。
[外链图片转存中…(img-VMMviUpI-1712770682698)]
[外链图片转存中…(img-2bN54Qoz-1712770682698)]
[外链图片转存中…(img-gstEOIdJ-1712770682699)]
[外链图片转存中…(img-TJpVcxd3-1712770682699)]
[外链图片转存中…(img-ssOSnFHH-1712770682699)]
[外链图片转存中…(img-0L8bm7uN-1712770682700)]
既有适合小白学习的零基础资料,也有适合3年以上经验的小伙伴深入学习提升的进阶课程,基本涵盖了95%以上Android开发知识点,真正体系化!
由于文件比较大,这里只是将部分目录大纲截图出来,每个节点里面都包含大厂面经、学习笔记、源码讲义、实战项目、讲解视频,并且后续会持续更新
如果你觉得这些内容对你有帮助,可以添加V获取:vip204888 (备注Android)
[外链图片转存中…(img-kfOSeT5n-1712770682700)]
最后
对于很多初中级Android工程师而言,想要提升技能,往往是自己摸索成长。而不成体系的学习效果低效漫长且无助。时间久了,付出巨大的时间成本和努力,没有看到应有的效果,会气馁是再正常不过的。
所以学习一定要找到最适合自己的方式,有一个思路方法,不然不止浪费时间,更可能把未来发展都一起耽误了。
如果你是卡在缺少学习资源的瓶颈上,那么刚刚好我能帮到你。
一个人可以走的很快,但一群人才能走的更远。不论你是正从事IT行业的老鸟或是对IT行业感兴趣的新人,都欢迎扫码加入我们的的圈子(技术交流、学习资源、职场吐槽、大厂内推、面试辅导),让我们一起学习成长!
[外链图片转存中…(img-c4UdpwkR-1712770682700)]


 1481
1481


 被折叠的 条评论
为什么被折叠?
被折叠的 条评论
为什么被折叠?
 到【灌水乐园】发言


