


先自我介绍一下,小编浙江大学毕业,去过华为、字节跳动等大厂,目前阿里P7
深知大多数程序员,想要提升技能,往往是自己摸索成长,但自己不成体系的自学效果低效又漫长,而且极易碰到天花板技术停滞不前!
因此收集整理了一份《2024年最新大数据全套学习资料》,初衷也很简单,就是希望能够帮助到想自学提升又不知道该从何学起的朋友。
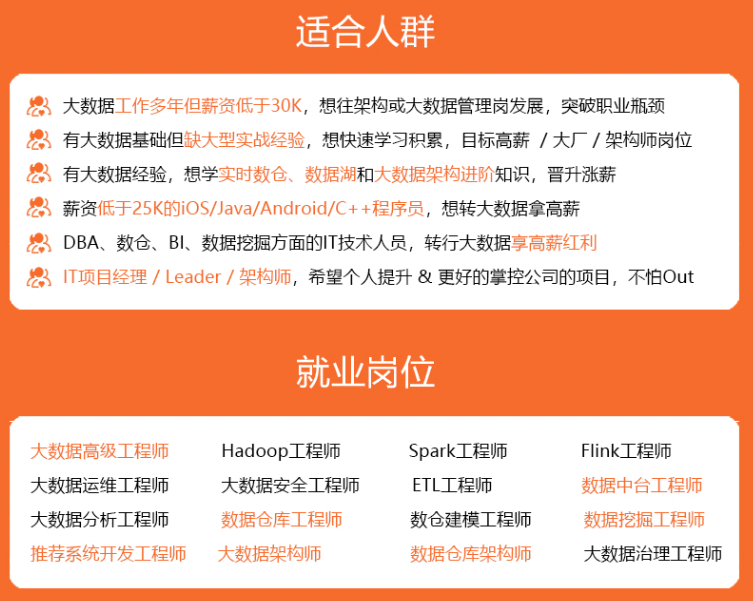


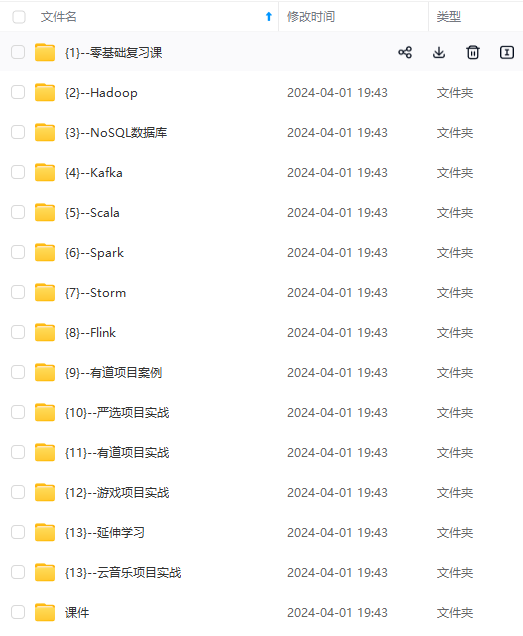

既有适合小白学习的零基础资料,也有适合3年以上经验的小伙伴深入学习提升的进阶课程,涵盖了95%以上大数据知识点,真正体系化!
由于文件比较多,这里只是将部分目录截图出来,全套包含大厂面经、学习笔记、源码讲义、实战项目、大纲路线、讲解视频,并且后续会持续更新
如果你需要这些资料,可以添加V获取:vip204888 (备注大数据)

正文
- 创建Store对象;
- 在app中通过插件安装;
- 创建store对象
// 1.导入createStore函数
import { createStore } from "vuex";

// 2.创建store对象
const store = createStore({
  // state函数要求返回一个对象
  state: () => ({
    counter: 0
  })
})

export default store
- 在app中通过插件安装
import { createApp } from 'vue'
import App from './App.vue'

// 1.导入状态管理store对象
import store from "./store/index"

const app = createApp(App)

// 2.注册store
app.use(store)

app.mount('#app')
在组件中使用store,我们按照如下的方式:
- 在模板中使用;
- 在options api中使用,比如computed;
- 在setup中使用;
- 在要使用couter的组件模板中访问store:
$store.state.counter
<template>
  <div class="app">
    <h2>当前计数: {{ $store.state.counter }}</h2>
  </div>
</template>
- 在options api中使用,比如computed
export default {
  computed: {
    storeCounter() {
      return this.$store.state.counter
    }
  }
}
- 在setup中使用
<h2>当前计数: {{ counter }}</h2>

<script setup>
 import { toRefs } from 'vue';
 import { useStore } from 'vuex';

 // 拿到store对象
 const store = useStore()

 // 通过store获取counter
 // 1.直接解构的话会丢失响应式的
 // const { counter } = store.state.counter

 // 2.解构时包裹toRefs函数, 返回的是ref对象, 会保留响应式
 const { counter } = toRefs(store.state)
</script>
单一状态树
Vuex 使用单一状态树:
用一个对象就包含了全部的应用程序的状态;
采用的是SSOT,Single Source of Truth,也可以翻译成
单一数据源;
这也意味着,每个应用将仅仅包含一个 store 实例;
单状态树和模块化并不冲突,后面我们会讲到module的概念;
单一状态树的优势:
如果你的状态信息是保存到多个Store对象中的,那么之后的管理和维护等等都会变得特别困难;
所以Vuex也使用了单一状态树来管理应用层级的全部状态;
单一状态树能够让我们最直接的方式找到某个状态的片段;
而且在之后的维护和调试过程中,也可以非常
方便的管理和维护;
核心概念State
🍟Options中获取状态
在前面我们已经学习过如何在组件中获取状态了。
但是如果我们获取很多种状态, 那么会觉得那种方式有点繁琐(表达式过长),我们虽然可以使用计算属性, 但是同样需要创建多个函数, 再写多个表达式
如果我们有很多个状态都需要获取话,其实 可以使用mapState的辅助函数:
mapState的方式一:数组类型;
mapState的方式二:对象类型;
也可以
使用展开运算符和来原有的computed混合在一起;
方式一: 数组类型
数组类型有个弊端, 要求数组中映射的名字和state中的名字一致
如果data数据中也有相似的名称那么就会冲突
<h2>{{ name }}</h2>
<h2>{{ age }}</h2>
<h2>{{ height }}</h2>

<script>
 import { mapState } from 'vuex';

 export default {
 computed: {
 // 数组的方式, 名称和state中的需要一一对应
 ...mapState(["name", "age", "height"])
 }
 }
</script>
方式二: 对象类型
对象类型可以自定义名称, 属性值为一个函数, 固定的写法
<h2>{{ sName }}</h2>
<h2>{{ sAge }}</h2>
<h2>{{ sHeight }}</h2>

<script>
 import { mapState } from 'vuex';

 export default {
 computed: {
 // 对象的方式, 可以自定义名称
 ...mapState({
 // 属性值为一个函数, 固定的写法
 sName: state => state.name,
 sAge: state => state.age,
 sHeight: state => state.height
 })
 }
 }
</script>
🍟setup中获取状态
在setup中如果我们单个获取装是非常简单的:
通过useStore拿到store后去获取某个状态即可;
但是如果我们
需要使用 mapState的功能呢?
默认情况下,Vuex并没有提供非常方便的使用mapState的方式, 在setup中使用mapState函数是比较复杂的
<h2>{{ aName }}</h2>
<h2>{{ aAge }}</h2>
<h2>{{ aHeight }}</h2>

<script setup>
 import { computed } from 'vue';
 import { mapState, useStore } from 'vuex';

 // 获取store对象
 const store = useStore()

 // 对返回的函数进行解构, 得到三个函数
 const {name, age, height} = mapState(["name", "age", "height"])

 // computed要求传入一个函数, 将解构的函数传入
 // 对解构的函数进行this绑定, 将this绑定到store上
 const aName = computed(name.bind({$store: store}))
 const aAge = computed(age.bind({$store: store}))
 const aHeight = computed(height.bind({$store: store}))

</script>
我们发现setup中使用mapState是非常麻烦的, 我们仅仅是想要获取到状态确这么麻烦
因此在开发中
不推荐大家在setup中使用mapState, 我们可以直接对store.state进行解构由于解构出来的数据不是响应式, 因此包裹一层toRefs()函数
<h2>{{ name }}</h2>
<h2>{{ age }}</h2>
<h2>{{ height }}</h2>

<script setup>
  import { toRefs } from 'vue';
  import { mapState, useStore } from 'vuex';

  // 获取store对象
  const store = useStore()

  // 解构同时包裹一层toRefs函数
  const {name, age, height} = toRefs(store.state)
</script>
核心概念Getters
🍧getters基本使用
某些属性我们可能需要经过变化后来使用,这个时候可以使用getters:
// 2.创建store对象
const store = createStore({
  state: () => ({
    counter: 100,
    users: [
      {id: 111, name: "chenyq", age: 19},
      {id: 112, name: "kaisa", age: 20},
      {id: 113, name: "vn", age: 21}
    ]
  }),
  // getters对应一个对象
  getters: {
    // 1.将counter的两倍返回
    doubleCounter(state) {
      return state.counter \* 2
    },
    // 2.将users中的年龄总和返回
    totalAge(state) {
      return state.users.reduce((preValue, item) => {
        return preValue + item
      }, 0)
    }
  }
})
- 拿到结果进行展示
<h2>{{ $store.getters.doubleCounter }}</h2>
<h2>{{ $store.getters.totalAge }}</h2>
getters可以接收第二个参数getters
例如返回一个name并且拼接上users的年龄总和
const store = createStore({
  state: () => ({
    name: "lin yj",
    counter: 100,
    users: [
      {id: 111, name: "chenyq", age: 19},
      {id: 112, name: "kaisa", age: 20},
      {id: 113, name: "vn", age: 21}
    ]
  }),
  // getters对应一个对象
  getters: {
    // 1.将counter的两倍返回
    doubleCounter(state) {
      return state.counter \* 2
    },
    // 2.将users中的年龄总和返回
    totalAge(state) {
      return state.users.reduce((preValue, item) => {
        return preValue + item.age
      }, 0)
    },
    // 3.name并且拼接上年龄总和
    message(state, getters) {
      // 由于年龄前面已经计算过一次了, 我们无需重新计算, 通过参数getters可以拿到
      return `${state.name}: ${getters.totalAge}`
    }
  }
})
- 拿到结果进行展示
getters的返回函数
getters中的函数本身,可以返回一个函数,那么在使用的地方相当于可以调用这个函数
例如上面代码中在getters中实现一个根据id返回用户信息的函数
const store = createStore({
  // state函数要求返回一个对象
  state: () => ({
    name: "lin yj",
    counter: 100,
    users: [
      {id: 111, name: "chenyq", age: 19},
      {id: 112, name: "kaisa", age: 20},
      {id: 113, name: "vn", age: 21}
    ]
  }),
  // getters对应一个对象
  getters: {
    getUserById(state) {
      // 返回一个函数
      return function(id) {
        const user = state.users.find(item => item.id === id)
        return user
      }
    }
  }
})
- 在使用的地方可以调用getUserById函数
<h2>{{ $store.getters.getUserById(111) }}</h2>
<h2>{{ $store.getters.getUserById(112) }}</h2>
<h2>{{ $store.getters.getUserById(113) }}</h2>
🍧getter辅助函数
和state类似, getters也有一个辅助函数mapGetters
Options API中使用辅助函数: 方便获取多个getters
使用方法基本上和mapState相似, 大家看看就行, 不再过多介绍
  <h2>{{ message }}</h2>
    <h2>{{ totalAge }}</h2>
    <h2>{{ meMessage }}</h2>
    <h2>{{ usersAge }}</h2>

  </div>
</template>

<script>
 import { mapGetters } from 'vuex'

 export default {
 computed: {
 // 1.数组的形式
 ...mapGetters(["message", "totalAge"]),
 // 2.对象的形式
 ...mapGetters({
 meMessage: "message",
 usersAge: "totalAge"
 })
 }
 }
</script>
在setup中使用mapGetters就像使用mapState一样, 是非常繁琐的, 不推荐使用;
使用的方法和mapState一样, 同样不再多说, 大家可以自行尝试
和state一样, setup中不推荐使用mapGetters
使用computd单独获取每一个元素
<h2>{{ message }}</h2>
<h2>{{ totalAge }}</h2>
<h2>{{ getUserById(111) }}</h2>

<script setup>
 import { useStore } from 'vuex';

 import { computed } from 'vue';

 const store = useStore()

 const message = computed(() => store.getters.message)
 const totalAge = computed(() => store.getters.totalAge)
 const getUserById = computed(() => store.getters.getUserById)
</script>
核心概念Mutation
🧁Mutation基本使用
更改 Vuex 的 store 中的状态的唯一方法是提交 mutation:
比如, 我们如果想要修改store中的state中的counter属性, 我们并不能直接通过
store.state.counter修改我们必须通过commit提交mutation, 在mutation中进行修改
const store = createStore({
  state: () => ({
    counter: 100,
  }),
  // commit提交到mutations
  mutations: {
    increment(state) {
      state.counter++
    },
    decrement(state) {
      state.counter--
    }
  }
})
<h2>当前计数: {{ counter }}</h2>
<button @click="add">+</button>
<button @click="sub">-</button>

<script setup>
 import { useStore } from 'vuex';

 // 拿到store对象
 const store = useStore()

 function add() {
 // 通过commit提交到mutation
 store.commit("increment")
 }

 function sub () {
 store.commit("decrement")
 }
</script>
🧁Mutation携带数据
很多时候我们在提交mutation的时候,会携带一些数据,这个时候我们可以使用参数:
例如修改state中的name属性时, 可以将修改的内容通过传递参数传出
const store = createStore({
  state: () => ({
    name: "lin yj",
  }),
  // commit提交到mutations
  mutations: {
    // payload接收传入的参数
    changeName(state, payload) {
      state.name = payload
    }
  }
})
<h2>{{ $store.state.name }}</h2>
<h2>{{ $store.state.age }}</h2>
<h2>{{ $store.state.height }}</h2>
<button @click="changeName">修改name</button>

<script setup>
 import { useStore } from 'vuex';

 // 拿到store对象
 const store = useStore().commit("decrement")

 function changeName() {
 // 参数传入修改的数据
 store.commit("changeName", "张三炮")
 }
</script>
payload也可以传入为对象类型
const store = createStore({
  state: () => ({
    name: "lin yj",
    age: 18,
    height: 1.88,name: "lin yj",
  }),
  // commit提交到mutations
  mutations: {
    // payload接收对象类型
    changeInfo(state, payload) {
      state.name = payload.name
      state.age = payload.age
      state.height = payload.height
    }
  }
})
<h2>{{ $store.state.name }}</h2>
<h2>{{ $store.state.age }}</h2>
<h2>{{ $store.state.height }}</h2>
<button @click="changeInfo">修改info</button>

<script setup>
 import { useStore } from 'vuex';

 // 拿到store对象
 const store = useStore().commit("decrement")
 }

 function changeInfo() {
 // 参数传入一个对象
 store.commit("changeInfo", {
 name: "王老五",
 age: 20,
 height: 1.58
 })
 }
</script>
🧁Mutation常量类型
我们发现, commit提交和mutation中的名称是需要保持一致的, 由于这个名称又不会更改, 所在开发中, 我们通常会给这些名称定义一个常量, 并将它放到独立的js文件中去
- 定义常量:mutation_type.js
export const CHANGE\_INFO = "CHANGE\_INFO"
- 使用常量定义mutation
// 导入常量
import { CHANGE\_INFO } from "./mutation\_types";

const store = createStore({
  state: () => ({
    name: "lin yj",
    age: 18,
    height: 1.88,name: "lin yj",
  }),
  mutations: {
    // 使用常量定义mutation
    [CHANGE\_INFO](state, payload) {
      state.name = payload.name
      state.age = payload.age
      state.height = payload.height
    }
  }
})
使用常量提交mutation
// 导入常量
import { CHANGE\_INFO } from "./store/mutation\_types"

function changeInfo() {
  // 参数传入一个对象
  store.commit([CHANGE\_INFO], {
    name: "王老五",
    age: 20,
    height: 1.58
  })
}
🧁Mutation辅助函数
我们也可以借助于辅助函数,帮助我们快速映射到对应的方法中:
- Options API中的使用
<h2>当前计数: {{ counter }}</h2>
<button @click="increment">+</button>
<button @click="decrement">-</button>

<h2>{{ $store.state.name }}</h2>
<h2>{{ $store.state.age }}</h2>
<h2>{{ $store.state.height }}</h2>
<button @click="changeInfo({name: '王老五', age: 20, height: 1.33})">
  修改info信息
</button>

<script>
 import { mapMutations } from "vuex";
 import { CHANGE\_INFO } from "./store/mutation\_types"

 export default {
 methods: {
 ...mapMutations(["increment", "decrement", CHANGE\_INFO])
 }
 }
</script>
- Setup中同样不推荐使用mapMutation
🧁mutation重要原则
Mutation有一条重要的原则就是: mutation中必须是同步函数
这是因为devtool工具会记录mutation的日记;
每一条mutation被记录,devtools都需要捕捉到前一状态和后一状态的快照;
但是在mutation中执行异步操作,就无法追踪到数据的变化;
所以Vuex的重要原则中要求 mutation必须是同步函数;
但是如果我们希望在Vuex中发送网络请求的话需要如何操作呢?
有事时候我们确实想要在Vuex中发送网络请求, 比如发送网络请求得到的数据是一些状态, 我们没必要在组件中发送网络请求再放到store中, 我们可以直接在store中发送网络请求
那么遇到这种情况, 就是我们接下来要学习的Actions核心, Actions是专门处理异步操作的地方, 我们的异步代码都需要在Actions中处理
核心概念Actions
🍸Actions基本使用
Action类似于Mutation,不同在于:
Action提交的是Mutation,而不是直接变更状态;也就是说, Action中想要修改state的话, 也需要提交Mutation, 不允许直接修改
Action可以包含任意异步操作, Mutation中只能进行同步操作;
mutations: {
  increment(state) {
    state.counter++
  }
},
actions: {
  incrementAction(context) {
    // action中修改state需要提交mutation
    context.commit("increment")
  }
}
我们发现这里有一个非常重要的参数context:
context是一个和store实例均有相同方法和属性的context对象;
所以我们可以从其中获取到commit方法来提交一个mutation,或者通过
context.state和context.getters来获取 state 和 getters;
actions: {
  incrementAction(context) {
    // 提交mutation
    context.commit("increment")
    // 获取state中的状态
    context.state.name
    // 获取getter中的数据
    context.getters.doubleCounter
  }
}
相信大家很疑惑为什么它不是store对象呢?这个在下面讲核心概念Modules时再具体来说
🍸Actions分发操作
Options中Action的分发
如何使用action呢?进行action的分发:
分发使用的是 store 上的
dispatch函数;
<h2>{{ counter }}</h2>
<button @click="add">按钮</button>

<script>
 export default {
 methods: {
 add() {
 // 分发到Action中
 this.$store.dispatch("incrementAction")
 console.log()
 }
 }
 }
</script>
同样的,它也可以携带我们的参数, 例如修改我们刚刚的Info
- 定义Action
actions: {
  // 接收参数payload提交到mutation
  changeNameAction(context, payload) {
    context.commit("changeName", payload)
  }
}
- 携带参数分发
<h2>{{ name }}</h2>
<button @click="changeName">改变Name</button>
**网上学习资料一大堆,但如果学到的知识不成体系,遇到问题时只是浅尝辄止,不再深入研究,那么很难做到真正的技术提升。**
**需要这份系统化的资料的朋友,可以添加V获取:vip204888 (备注大数据)**

**一个人可以走的很快,但一群人才能走的更远!不论你是正从事IT行业的老鸟或是对IT行业感兴趣的新人,都欢迎加入我们的的圈子(技术交流、学习资源、职场吐槽、大厂内推、面试辅导),让我们一起学习成长!**
context.state.name
// 获取getter中的数据
context.getters.doubleCounter
}
}
相信大家很疑惑为什么它不是store对象呢?这个在下面讲核心概念Modules时再具体来说
🍸Actions分发操作
Options中Action的分发
如何使用action呢?进行action的分发:
分发使用的是 store 上的
dispatch函数;
<h2>{{ counter }}</h2>
<button @click="add">按钮</button>

<script>
 export default {
 methods: {
 add() {
 // 分发到Action中
 this.$store.dispatch("incrementAction")
 console.log()
 }
 }
 }
</script>
同样的,它也可以携带我们的参数, 例如修改我们刚刚的Info
- 定义Action
actions: {
  // 接收参数payload提交到mutation
  changeNameAction(context, payload) {
    context.commit("changeName", payload)
  }
}
- 携带参数分发
<h2>{{ name }}</h2>
<button @click="changeName">改变Name</button>


**网上学习资料一大堆,但如果学到的知识不成体系,遇到问题时只是浅尝辄止,不再深入研究,那么很难做到真正的技术提升。**

**需要这份系统化的资料的朋友,可以添加V获取:vip204888 (备注大数据)**
[外链图片转存中...(img-0gcQRRz8-1713330225305)]

**一个人可以走的很快,但一群人才能走的更远!不论你是正从事IT行业的老鸟或是对IT行业感兴趣的新人,都欢迎加入我们的的圈子(技术交流、学习资源、职场吐槽、大厂内推、面试辅导),让我们一起学习成长!**


 被折叠的 条评论
为什么被折叠?
被折叠的 条评论
为什么被折叠?
 到【灌水乐园】发言


