


加入java有关的内容如下:
重启profile,使环境变量生效
命令:source /etc/profile
查看java版本以及安装目录
如下图所示代表成功
注意:以上内容需要在三台机器上重复完成。


2、ssh免密码验证 以及hosts和hostname修改
http://blog.csdn.net/xujing19920814/article/details/74942087
3、下载Hadoop地址
http://mirror.bit.edu.cn/apache/hadoop/common/
三、Haddop安装
在主机master操作
1、下载Hadoop
命令如图所示

2、Hadoop文件配置
2.1更改hadoop安装目录文件夹名称
命令:mv hadoop-1.2.1 hadoop
图中mv指令意思 http://www.cnblogs.com/piaozhe116/p/6084214.html

2.2修改hadoop配置文件
路径:/usr/local/hadoop/etc/hadoop 使用vim编辑器
hadoop-env.sh、  Hadoop环境配置 修改JAVA_HOME路径
core-site.xml、
hdfs-site.xml、  datanode配置等
mapred-site.xml(配置JobTracker,是Hadoop1.0版本才有的,现在已经没有了)
masters(填写主节点主机名即可)
slaves(填写从节点主机名,一行一个)
具体内容:
hadoop-env.sh
core-site.xml

<?xml version="1.0" encoding="UTF-8"?>
<?xml-stylesheet type="text/xsl" href="configuration.xsl"?>
<!--
 Licensed under the Apache License, Version 2.0 (the "License");
 you may not use this file except in compliance with the License.
 You may obtain a copy of the License at

 http://www.apache.org/licenses/LICENSE-2.0

 Unless required by applicable law or agreed to in writing, software
 distributed under the License is distributed on an "AS IS" BASIS,
 WITHOUT WARRANTIES OR CONDITIONS OF ANY KIND, either express or implied.
 See the License for the specific language governing permissions and
 limitations under the License. See accompanying LICENSE file.
-->

<!-- Put site-specific property overrides in this file. -->

<configuration>
<!-- 用户DFS命令模块中指定默认的文件系统协议 -->
    <property>
        <name>fs.default.name</name>
        <value>hdfs://xx01:9000</value>
        <final>true</final>
    </property>
    <property>
        <name>hadoop.tmp.dir</name>
        <value>/usr/local/hadoop/tmp</value>
        <description>A base for other temporary directories</description>
    </property>
<!--zookeeper location-->
    <property>
                <name>ha.zookeeper.quorum</name>
                <value>xx01:2181,xx02:2181,xx03:2181</value>
                <description>A base for other temporary directories</description>
        </property>
</configuration>
hdfs-site.xml
<?xml version="1.0" encoding="UTF-8"?>
<?xml-stylesheet type="text/xsl" href="configuration.xsl"?>
<!--
 Licensed under the Apache License, Version 2.0 (the "License");
 you may not use this file except in compliance with the License.
 You may obtain a copy of the License at

 http://www.apache.org/licenses/LICENSE-2.0

 Unless required by applicable law or agreed to in writing, software
 distributed under the License is distributed on an "AS IS" BASIS,
 WITHOUT WARRANTIES OR CONDITIONS OF ANY KIND, either express or implied.
 See the License for the specific language governing permissions and
 limitations under the License. See accompanying LICENSE file.
-->

<!-- Put site-specific property overrides in this file. -->

<configuration>
    <property>
        <name>dfs.name.dir</name>
        <value>/usr/local/hadoop/name</value>
        <final>true</final>
    </property>
    <property>
        <name>dfs.data.dir</name>
        <value>/usr/local/hadoop/data</value>
        <final>true</final>
    </property>
    <!-- 默认Block副本数,设置为副节点个数,这里为2个 -->
    <property>
                <name>dfs.replication</name>
                <value>2</value>
                <final>true</final>
        </property>
</configuration>
masters
xx01
conf/slaves
xx02
xx03
2.3复制文件至从机
将配置好的文件夹Hadoop 复制配置文件到从机xx02和xx03上去
scp -r /usr/local/hadoop root@xx02:/usr/local/
scp -r /usr/local/hadoop root@xx03:/usr/local/
3、Hadoop启动
3.1格式化namenode
配置已经修改完了,接下来是启动。在首次启动之前,先格式化NameNode,之后启动就不需要格式化了,
命令:hadoop namenode -format
图中显示successfully formatted表示成功

3.2启动Hadoop集群
启动在/usr/local/Hadoop/sbin/文件夹下的 start-all.sh文件
命令:

3.3检查进程是否正确启动
主机检查
从机检查


最后呈现

可能出现的问题
有一台从机没有启动成功
原因:hostname与slaves文件下的xx03不对应,解决方法
查看
四、安装配置Zookeeper
Master机器主要配置NameNode和JobTracker的角色,负责总管分布式数据和分解任务的执行;2个Salve机器配置DataNode 和TaskTracker的角色,负责分布式数据存储以及任务的执行。在hadoop2中可以有多个namenode节点,以配置hadoop的高可用性。每一个namenode都有相同的职能。其中一个是active状态的,另一个是standby状态的。当集群运行时,只有active状态的NameNode是正常工作的,standby状态的NameNode是处于待命状态的,时刻同步active状态NameNode的数据。一旦active状态的NameNode不能工作,通过手工或者自动切换,standby状态的NameNode就可以转变为active状态的,就可以继续工作了。这就是高可靠性(HA)
在这里,2个NameNode的数据其实是实时共享的。新HDFS采用了一种共享机制,JournalNode集群或者NFS进行共享。NFS是操作系统层面的,JournalNode是hadoop层面的,我们这里使用JournalNode集群进行数据共享。
这就需要使用ZooKeeper集群进行选择了。HDFS集群中的两个NameNode都在ZooKeeper中注册,当active状态的NameNode出故障时,ZooKeeper能检测到这种情况,它就会自动把standby状态的NameNode切换为active状态。
4.1下载解压安装
命令:curl -O http://mirror.bit.edu.cn/apache/zookeeper/zookeeper-3.4.9/zookeeper-3.4.9.tar.gz
添加Zookeeper环境变量
:vi /etc/profile
重启 source /etc/profile

4.2修改ZooKeeper配置文件
在/usr/hadoop/app/zookeeper/conf下新建zoo.cfg配置文件,并配置下述内容:
# The number of milliseconds of each tick
tickTime=2000
# The number of ticks that the initial
# synchronization phase can take
initLimit=10
# The number of ticks that can pass between
# sending a request and getting an acknowledgement
syncLimit=5
# the directory where the snapshot is stored.
# do not use /tmp for storage, /tmp here is just
# example sakes.
dataDir=/usr/hadoop/app/zookeeper/zkdata
datalogDir=/usr/hadoop/app/zookeeper/zkdatalog
# the port at which the clients will connect
clientPort=2181
server.1=master:2888:3888
server.2=slave1:2888:3888
server.3=slave2:2888:3888
# the maximum number of client connections.
# increase this if you need to handle more clients
#maxClientCnxns=60
#
# Be sure to read the maintenance section of the
# administrator guide before turning on autopurge.
#
# http://zookeeper.apache.org/doc/current/zookeeperAdmin.html#sc\_maintenance
#
# The number of snapshots to retain in dataDir
#autopurge.snapRetainCount=3
# Purge task interval in hours
# Set to "0" to disable auto purge feature
#autopurge.purgeInterval=1
在/usr/hadoop/app/zookeeper下新建zkdata与zkdatalog两个文件夹
进入zkdata目录,创建一个myid的文件,里面写入一个数字,比如xujing01,就写1。
4.3远程复制分发安装文件
将zookeeper文件夹发送至其余机器的/usr/local/hadoop/app/文件夹下,并且将zkdata目录下的myid文件根据机器修改
### 给大家的福利
**零基础入门**
对于从来没有接触过网络安全的同学,我们帮你准备了详细的学习成长路线图。可以说是最科学最系统的学习路线,大家跟着这个大的方向学习准没问题。
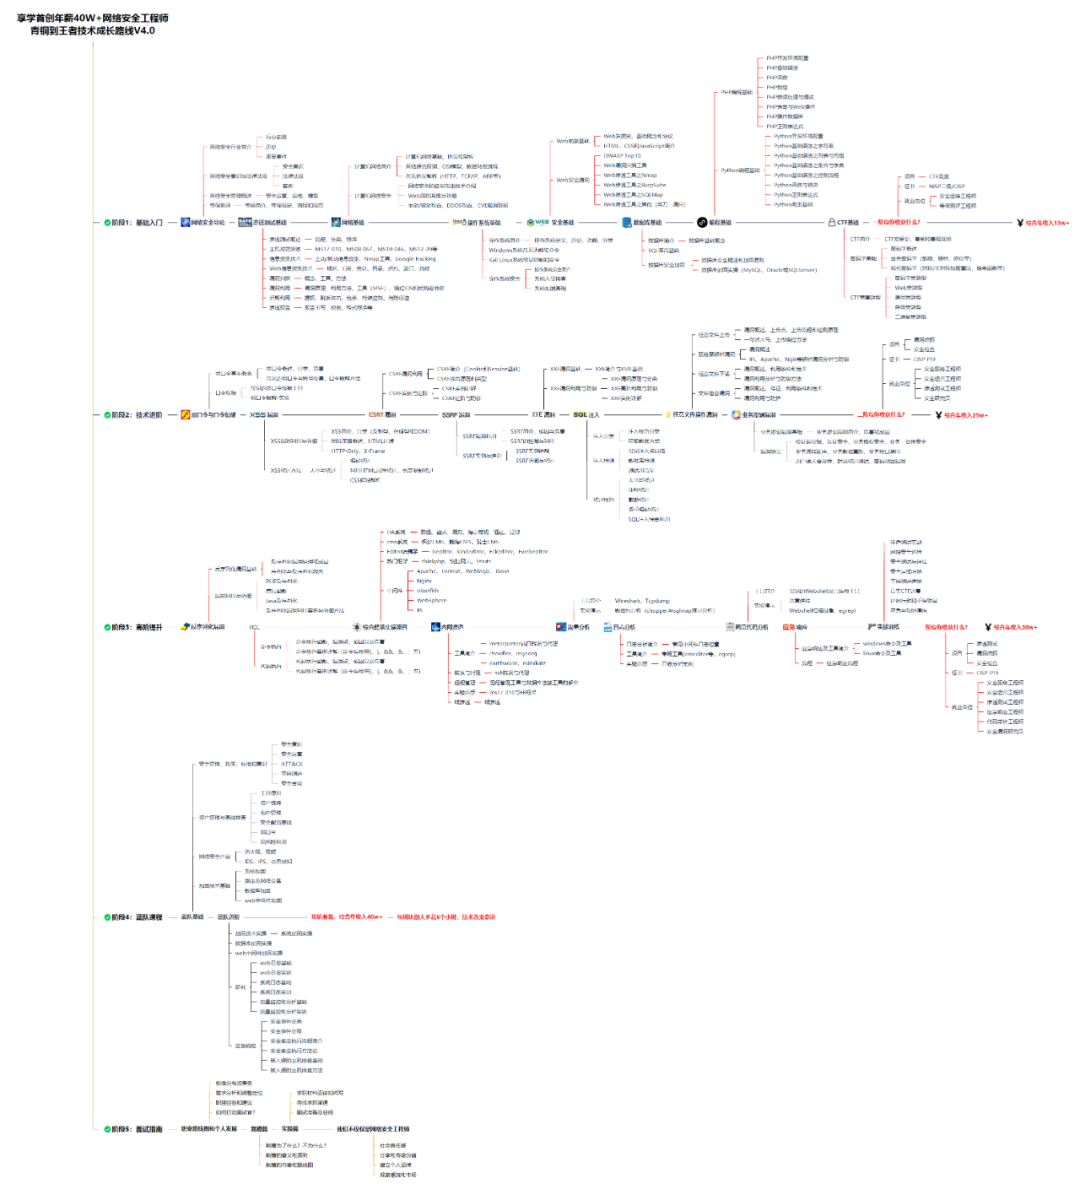
同时每个成长路线对应的板块都有配套的视频提供:

因篇幅有限,仅展示部分资料


 367
367


 被折叠的 条评论
为什么被折叠?
被折叠的 条评论
为什么被折叠?
 到【灌水乐园】发言


