


  this.cityInfo  =  await new Promise((resolve,reject)=>{
        this.AMap.plugin('AMap.Geocoder', () => {
            new this.AMap.Geocoder({ city: '',radius: 1000 }).getAddress([this.fromAppInfo.fromLongitude, this.fromAppInfo.fromLatitude],
              (status, result) => {
              if (status === 'complete' && result.regeocode) {

                let address = result.regeocode.addressComponent;
                address.adcode = adcodeDeal.dealAdCode(address.adcode)
                // 直辖市去除
                resolve(address)
              }else{
                resolve({adcode: null})
              }
            });
        })
      })
5. 绘制路线
// 规划绘制路线
drawRoute(planingRoutes) {
// 解析线路
const parseRouteToPath = (route) => {
let path = []
let continuityPath = []
for (let i = 0, l = route.steps.length; i < l; i++) {
let step = route.steps[i]
const arrayOfCoordinates = step.polyline.split(“;”).map(coord => coord.split(“,”));
path.push(arrayOfCoordinates.flat())
}
path = path.flat()
      for(let i=0;i < path.length -1;i++) {
        continuityPath.push([Number(path[i]),Number(path[i+1])])
        i++
      }
      return continuityPath
    }
    planingRoutes.forEach(itemRoute=>{
      this.routeLines.push(parseRouteToPath(itemRoute))
    })
    // 开始图标
    this.startMarker = new this.AMap.Marker({
      position: [this.routeLines[0][0][0],this.routeLines[0][0][1]],
      // icon: 'https://webapi.amap.com/theme/v1.3/markers/n/start.png',
      map: this.mapInstance,
      content: this.$refs.startMarkerRef,
      // offset: new this.AMap.Pixel(-80, -40),
      anchor: new this.AMap.Pixel(0,0),
      offset: new this.AMap.Pixel(-80,-50),
      size: new this.AMap.Size(100, 100)
    })
    // 结束图标
    this.endMarker = new this.AMap.Marker({
      position: [this.routeLines[0][this.routeLines[0].length-1][0],this.routeLines[0][this.routeLines[0].length-1][1]],
      // icon: 'https://webapi.amap.com/theme/v1.3/markers/n/end.png',
      map: this.mapInstance,
      content: this.$refs.endMarkerRef,
      // offset: new this.AMap.Pixel(-80, -40),
      anchor: new this.AMap.Pixel(0,0),
      offset: new this.AMap.Pixel(-80,-50),
      size: new this.AMap.Size(100, 100)
    })
    // 画线
    this.routeLinesInstance = []
    this.routeLines.forEach((path,index)=>{
      let polyline = new this.AMap.Polyline({
        path: path,
        isOutline: true,
        outlineColor: '#366d33',
        borderWeight: index === 0 ? 2 : 1,
        strokeWeight: index === 0 ? 5: 4,
        showDir: true,
        strokeOpacity: index === 0 ? 0.9 : 0.3,
        strokeColor: index === 0 ? '#45ed45' : '#30aa30',
        lineJoin: 'round',
        extData: {
          isSelect: index === 0,
          index: index
        }
      })
      polyline.hide()
      this.routeLinesInstance.push(polyline)
      this.mapInstance.add(polyline);
    })
    // 注册事件 实现点击切换线路
    this.routeLinesInstance.forEach((polyline,index)=>{
      polyline.on('click', (e) => {
        polyline.setOptions({
          borderWeight: 2,
          strokeWeight: 5,
          strokeOpacity: 0.9,
          strokeColor: '#45ed45',
          extData: {
            isSelect: true,
            index: index
          }
        })

        let otherPath= this.routeLinesInstance.filter((item,ind) =>ind !== index)
        otherPath.forEach(item=>{
          item.setOptions({
            borderWeight: 1,
            strokeWeight: 4,
            strokeOpacity: 0.3,
            strokeColor: '#30aa30',
            extData: {
              isSelect: false,
              index: item.getExtData().index,
            }
          })
        })
        // 变更路线
        this.$eventBus.$emit('changeRouteLine')
        // 调整视野达到最佳显示区域
        this.mapInstance.setFitView([ this.startMarker, this.endMarker, ...this.routeLinesInstance ], false, [70,260,60,60])
      })
    })
    this.routeLinesInstance[0].show()
    this.startMarker.show()
    this.endMarker.show()
  },
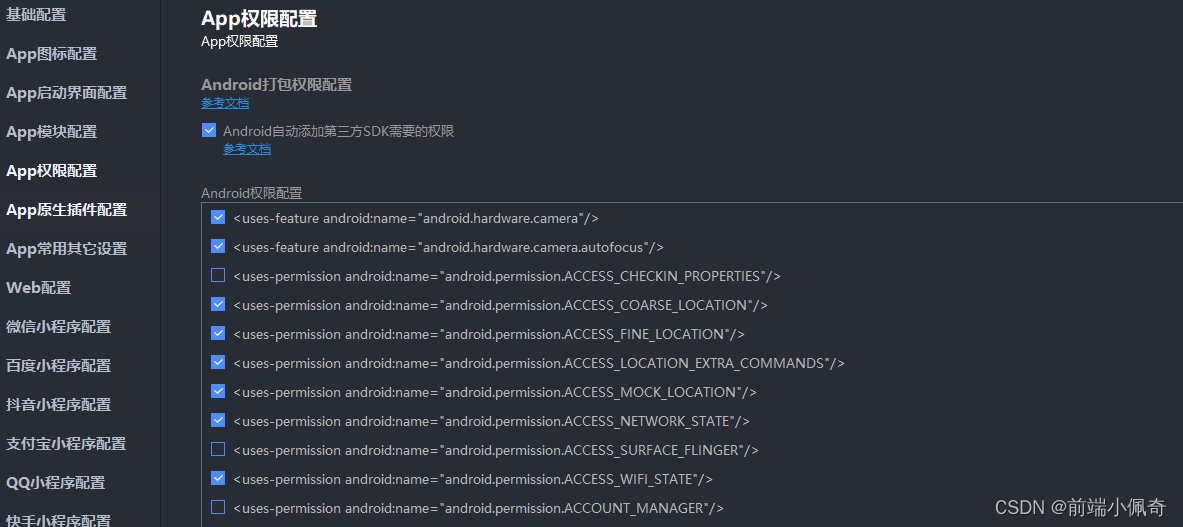
### 3. uniapp端开发
1. 在manifest.json将这些定位权限开启,还要将key填写到App模块配置里的高德key里
2. 在nvue中创建webview(nvue对webview层级问题和双向通信友好)
// webHeight = uni.getSystemInfoSync().windowHeight
### 3. uniapp与webview双向通信(微信小程序与app略有不同)


#### App中:app与webview双向通信
// app 向 web发送消息
-
通过src路径 拼接params参数传递
// app上发送
this.src = href + ‘?pageInfo=’ + encodeURIComponent(JSON.stringify(params))
// web上接收
const params = JSON.parse(this.$route.query.pageInfo) -
通过evalJs注册函数在web的windows上调用
// app向 web发送消息 (注意 需要将web在页面加载好了再调用,以防止报错,或加个延时再调用)
const params = JSON.stringify({id: ‘1234’,token: ‘xxxxxxx’})
this. r e f s . w e b v i e w R e f . e v a l J s ( ‘ s e n d M s g F r o m A p p ( refs.webviewRef.evalJs(`sendMsgFromApp( refs.webviewRef.evalJs(‘sendMsgFromApp({params})`)
// web上接收
window.sendMsgFromApp(params) {
console.log(params)
}
// web 向 app发消息
- 在web的index.html上引入这个uni插件(注意版本)
- 这个方法判断下插件是否注册挂载完成
document.addEventListener(‘UniAppJSBridgeReady’, () => {
// 挂载好了,可以使用插件中的方法了 - 向app发消息
uni.postMessage({ data: { message: ‘这是一段消息’ } })
// uni.navigateTo({url:‘xxx’}) // 直接跟uni方法一样
}) - app中webview上注册的方法 @onPostMessage=“getMessageFromWeb” 进行实时接收
#### 微信小程序中:微信小程序与webview双向通信
// 微信小程序 向 web发送消息
- 通过src路径 拼接params参数传递 ,这个方法每次调用都会让页面刷新(注意频率)
// 微信小程序 上发送
this.src = href + ‘?pageInfo=’ + encodeURIComponent(JSON.stringify(params))
// web上接收
const params = JSON.parse(this.$route.query.pageInfo)
-----> 注意不能使用evalJs调用…
// web 向 微信小程序发消息(由于微信小程序没法实时通过webview上onPostMessage方法调用,只能当页面摧毁或隐藏的时候才能调用,所以通过互转路由来获取web传递参数最好)
- 在web的index.html上引入这个微信的插件(注意版本)
- 这个方法判断下插件是否注册挂载完成
document.addEventListener(‘UniAppJSBridgeReady’, () => {
// 挂载好了,可以使用插件中的方法了 - 只能通过跳转url传参
uni.navigateTo({
url:/pages/pageRedirect?+payType=${params}
});
})
4.在 pageRedirect页面中接收参数
onLoad(options) {
this.webInfo = JSON.parse(decodeURIComponent(JSON.stringify(options)))
uni.navigateBack({delta:1})
},
onUnload() {
uni.KaTeX parse error: Expected 'EOF', got '}' at position 39: …this.webInfo); }̲ 5.当回到本页面时(写web…on(“webPageMsgEvent”, webInfo => {
// 拿到从web发向微信小程序中的参数
console.log(webinfo)
uni.$off(‘webPageMsgEvent’);
})
## 写在最后

**在结束之际,我想重申的是,学习并非如攀登险峻高峰,而是如滴水穿石般的持久累积。尤其当我们步入工作岗位之后,持之以恒的学习变得愈发不易,如同在茫茫大海中独自划舟,稍有松懈便可能被巨浪吞噬。然而,对于我们程序员而言,学习是生存之本,是我们在激烈市场竞争中立于不败之地的关键。一旦停止学习,我们便如同逆水行舟,不进则退,终将被时代的洪流所淘汰。因此,不断汲取新知识,不仅是对自己的提升,更是对自己的一份珍贵投资。让我们不断磨砺自己,与时代共同进步,书写属于我们的辉煌篇章。**


需要完整版PDF学习资源私我


**网上学习资料一大堆,但如果学到的知识不成体系,遇到问题时只是浅尝辄止,不再深入研究,那么很难做到真正的技术提升。**

**[需要这份系统化资料的朋友,可以点击这里获取](https://bbs.csdn.net/topics/618540462)**

**一个人可以走的很快,但一群人才能走的更远!不论你是正从事IT行业的老鸟或是对IT行业感兴趣的新人,都欢迎加入我们的的圈子(技术交流、学习资源、职场吐槽、大厂内推、面试辅导),让我们一起学习成长!**


 1011
1011


 被折叠的 条评论
为什么被折叠?
被折叠的 条评论
为什么被折叠?
 到【灌水乐园】发言


