


自学几个月前端,为什么感觉什么都没学到??
这种现象在很多的初学者和自学前端的同学中是比较的常见的。
因为自学走的弯路是比较的多的,会踩很多的坑,学习的过程中是比较的迷茫的。
最重要的是,在学习的过程中,不知道每个部分该学哪些知识点,学到什么程度才算好,学了能做什么。
很多自学的朋友往往都是自己去找资料学习的,资料上有的或许就学到了,资料上没有的或许就没有学到。
这就会给人一个错误的信息就是,我把资料上的学完了,估计也-就差不多的了。
但是真的是这样的吗?非也,因为很多人找的资料就是很基础的。学完了也就是掌握一点基础的东西。分享给你一份前端分析路线,你可以参考。
开源分享:【大厂前端面试题解析+核心总结学习笔记+真实项目实战+最新讲解视频】
还有很多的同学在学习的过程中一味的追求学的速度,很快速的刷视频,写了后面忘了前面,最后什么都没有学到,什么都知道,但是什么都不懂,要具体说,也说不出个所以然。
所以学习编程一定要注重实践操作,练习敲代码的时间一定要多余看视频的时间。
在 Vue.js 中,组件的 data 选项必须是一个函数,这是因为每个组件实例都应该有自己的状态,如果 data 不是一个函数,那么所有实例将共享同一个数据对象,这会导致组件之间的状态混乱。
12. SPA 单页面应用
单页面应用(Single-Page Application,简称 SPA)是一种架构方式,它在一个单独的网页中加载所有的资源,并使用 JavaScript 在客户端渲染用户界面,而不是通过服务器进行渲染。这意味着,当用户在 SPA 应用中导航到不同的页面时,不会发生实际的页面跳转,而是在当前页面内使用 JavaScript 更新内容。这使得 SPA 应用的体验非常流畅,因为不会有页面加载的延迟。
与传统的多页面应用相比,单页面应用具有许多优势,包括:
● 快速响应:由于不需要重新加载页面,因此 SPA 应用可以快速响应用户的操作。
● 减少服务器负载:由于大部分的处理都是在客户端进行的,因此 SPA 应用可以减少服务器的负载。
● 更好的用户体验:由于 SPA 应用的页面切换非常流畅,因此它可以提供更好的用户体验。
然而,单页面应用也有一些缺点,包括:
● 较难调试:由于 SPA 应用的代码都在客户端运行,因此调试可能会更加困难。
● SEO 难度较大:对于单页面应用,搜索引擎爬虫可能无法正常抓取页面内容,因此 SPA 应用的 SEO 较为困难。为了解决这个问题,可以使用服务端渲染(Server-Side Rendering,简称 SSR)技术,在服务器端渲染 SPA 应用的内容,使得爬虫可以正常抓取页面内容。
总的来说,单页面应用是一种有效的架构方式,它可以提供流畅的用户体验,但在 SEO 和离线使用方面存在一定的困难。
13. ref 与 vm.$refs
ref作用:用于给节点打标识
读取方式:this.$refs.xxx
vm.$refs就是所有标记了ref的组件的实例对象
14. Vue组件通信
1. 父子组件通信
props(父给子传参)
在父组件内,在子组件标签内绑定属性,在子组件内使用props接收
<template>
  <div class="home">
    <son-one :msg="msg"></son-one>
  </div>
</template>

<script>
import SonOne from '@/components/SonOne.vue'
export default {
 name: 'HomeView',
 components: {
 SonOne,
 },
 data() {
 return {
 msg: 'Hello my son!',
 }
 },
}
</script>
子组件接收
<template>
  <div class="son">
    <h3>我是子组件</h3>
    <div>父组件给我传了{{ msg }}</div>
  </div>
</template>

<script>
export default {
 name: 'SonOne',
 // props接收数据三种方式
 // 1. 数组形式
 // props: ['msg'],
 // 2. 对象形式
 // props: {
 // msg: String,
 // },
 // 3. 对象形式+类型限制+默认值
 props: {
 msg: {
 type: String,
 required: true, // 表示必须传的参数
 default: 'hello', // 默认值
 },
 },
 data() {
 return {}
 },
}
</script>
子给父传参
通过在父组件的子组件标签中自定义事件,子组件通过$emit接收
<template>
  <div class="home">
    <h3>我是父组件</h3>
    <div>{{ count }}</div>
    <son-one @changeCount="changeCount($event)"></son-one>
  </div>
</template>

<script>
import SonOne from '@/components/SonOne.vue'
export default {
 name: 'HomeView',
 components: {
 SonOne,
 },
 data() {
 return {
 count: 0,
 }
 },
 methods: {
 changeCount(value) {
 this.count = value
 },
 },
}
</script>
<template>
  <div class="son">
    <h3>我是子组件</h3>
    <button @click="$emit('changeCount')">修改父组件的count</button>
    <button @click="change">修改父组件的count</button>
  </div>
</template>

<script>
export default {
 name: 'SonOne',
 data() {
 return {}
 },
 methods: {
 change() {
 this.$emit('changeCount', 100)
 },
 },
}
</script>
2. 跨组件通信(事件总线)
main.js 中注册全局总线,在组件1用$bus.$emit调用事件将数据传给组件2, 在组件2中用$bus.$on监听事件并接收组件1传来的参数,$bus.$off关闭监听
new Vue({
  beforeCreate() {
    // 安装全局总线
    Vue.prototype.$bus = this
  },
  render: (h) => h(App),
}).$mount('#app')
组件1:
<template>
  <div class="son">
    <h3>我是子组件1</h3>
    <button @click="$bus.$emit('receiveParams', obj)">传值给组件2</button>
  </div>
</template>

<script>
export default {
 name: 'SonOne',
 data() {
 return {
 obj: {
 name: 'fg',
 age: 18,
 },
 },
 },
}
</script>
组件2:
<template>
  <div class="son">
    <h3>我是子组件2</h3>
    <div>{{ person.name }} -- {{ person.age }}</div>
  </div>
</template>

<script>
export default {
 name: 'SonTwo',
 data() {
 return {
 person: {},
 }
 },
 methods: {
 receiveParams(params) {
 console.log('子组件2接收的参数', params)
 this.person = params
 },
 },
 mounted() {
 this.$bus.$on('receiveParams', this.receiveParams)
 console.log('监听receiveParams事件')
 },
 beforeDestroy() {
 this.$bus.$off('receiveParams')
 console.log('取消监听receiveParams事件')
 },
}
</script>
3. 祖传孙 provide 与 inject
provide理解成广播数据,inject用来接收数据
注意:广播只广播一次,当数据改变时,后代组件当中接受不到更新的信息(包含基本数据类型和引用数据类型的地址),在使用引用数据类型的时候,对象的属性发生改变,后代组件可以接收到的。
祖先:
<template>
  <div class="home">
    <h3>我是父组件</h3>
    <div>content1: {{ content1 }}</div>
    <div>content2: {{ content2 }}</div>
    <button @click="changeContent1">修改Content1</button>
    <button @click="changeContent2">修改Content2</button>
 	<son-two></son-two>
  </div>
</template>

<script>
import SonTwo from '@/components/SonTwo.vue'
export default {
 name: 'HomeView',
 components: {
 SonTwo,
 },
 // 广播数据
 provide() {
 return {
 content1: this.content1,
 content2: this.content2,
 changeContent1: this.changeContent1,
 changeContent2: this.changeContent2,
 }
 },
 data() {
 return {
 content1: 'fg',
 content2: {
 name: 'tom',
 },
 }
 },
 methods: {
 changeContent1() {
 this.content1 = 'fgh'
 },
 changeContent2() {
 this.content2.name = 'jerry'
 },
 },
}
</script>
孙组件:
<template>
  <div class="smallSon">
    <h4>我是孙组件</h4>
    <div>祖先传来的content1: {{ content1 }}</div>
    <div>祖先传来的content2: {{ content2 }}</div>
    <button @click="changeContent1">调用祖先Content1</button>
    <button @click="changeContent2">调用祖先Content2</button>
  </div>
</template>

<script>
export default {
 name: 'SonTwo',
 // 接收数据
 inject: ['content1', 'content2', 'changeContent1', 'changeContent2'],
}
</script>
4. 父子组件间的数据同步
表单元素使用v-model(上面第二道已经解释)
非表单元素使用 .sync来绑定数据,使用@update: xxx作为自定义事件
父组件:
<template>
  <div class="home">
    <h3>我是父组件</h3>
    <div>{{ msg }}</div>
    <son-one :msg.sync="msg"></son-one>
  </div>
</template>

<script>
import SonOne from '@/components/SonOne.vue'
export default {
 name: 'HomeView',
 components: {
 SonOne,
 },
 data() {
 return {
 msg: '我爱你',
 }
 },
}
</script>
子组件:
<template>
  <div class="son">
    <h3>我是子组件1</h3>
    <h4>父组件传来的msg:{{ msg }}</h4>
    <button @click="changeMsg">修改父组件的msg</button>
  </div>
</template>

<script>
export default {
 name: 'SonOne',
 props: ['msg'],
 methods: {
 changeMsg() {
 this.$emit('update:msg', '子组件修改后的msg')
 },
 },
}
</script>
15. 插槽(slot)
在Vue2中,插槽(Slot)是一种将父组件中的内容传递给子组件的机制。通过插槽,父组件可以向子组件传递HTML代码、组件实例或其他任意内容,并在子组件中使用。
插槽分为两种类型:具名插槽和默认插槽。
具名插槽可以让父组件传递多个插槽到子组件中,并在子组件中通过插槽名称进行访问。
默认插槽是没有指定名称的插槽,当父组件没有传递具名插槽时,子组件就会使用默认插槽中的内容。
通过使用插槽,Vue2中的组件可以更加灵活地处理内容,可以在子组件中动态渲染内容,实现更加复杂的UI效果。
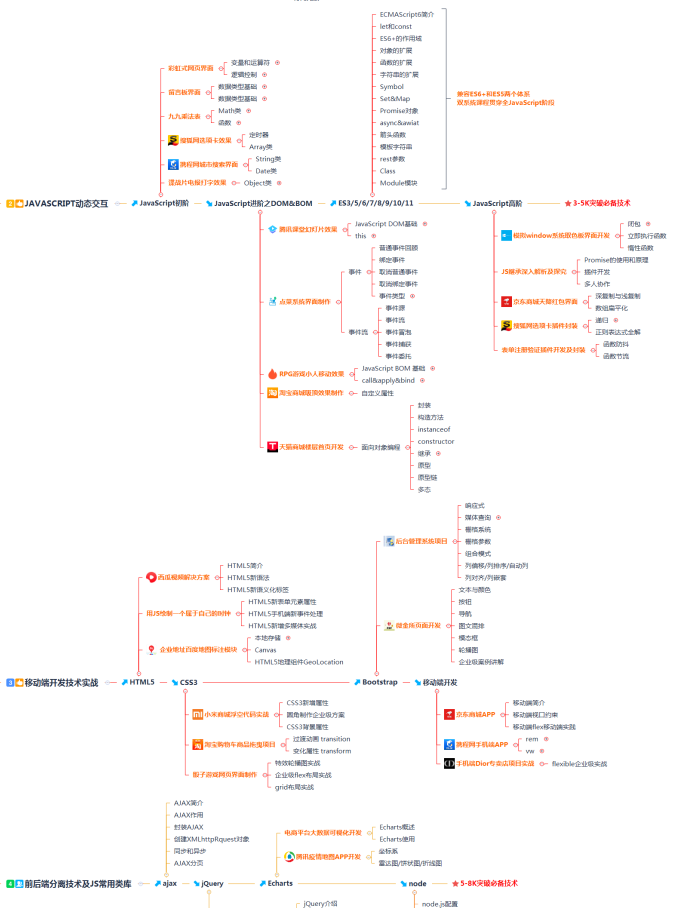
1. 默认插槽
<template>
  <div class="slotView">
    <slot-list title="美女">
      <img src="@/assets/imgs/7.jpg" alt="" />
    </slot-list>
    <slot-list title="电影"></slot-list>
    <slot-list title="美食">
      <img src="@/assets/imgs/4.jpg" alt="" />
    </slot-list>
  </div>
</template>

<script>
import SlotList from '@/components/list.vue'
export default {
 name: 'SlotView',
 components: {
 SlotList,
 },
}
</script>
<template>
  <div class="list">
    <h4>{{ title }}</h4>
    <!-- 插槽 -->
    <slot>我是默认值</slot>
  </div>
</template>

<script>
export default {
 name: 'SlotList',
 props: ['title'],
}
</script>
2. 具名插槽
<template>
  <div class="slotView">
    <slot-list title="美女">
      <img slot="center" src="@/assets/imgs/7.jpg" alt="" />
      <h4 slot="footer">耶耶耶</h4>
    </slot-list>
    <slot-list title="电影">
      <img slot="center" src="@/assets/imgs/3.jpg" alt="" />
    </slot-list>
    <slot-list title="美食">
      <img slot="footer" src="@/assets/imgs/4.jpg" alt="" />
    </slot-list>
  </div>
</template>
<template>
  <div class="list">
    <h4>{{ title }}</h4>
    <!-- 插槽 -->
    <slot name="center">我是中间默认值</slot>
    <slot name="footer">我是底部默认值</slot>
  </div>
</template>
16. Vue 组件化的理解
组件是可复用的 Vue 实例,准确讲它是 VueComponent 的实例,继承于 Vue。
- 通用型组件:实现最基本的功能,具有通用性、复用性。例如 按钮组件、输入框组件、布局组件等。
- 业务型组件:用于完成具体的业务,具有一定的复用性。例如 登录组件、轮播图组件。
- 页面组件:组织应用各部分独立内容,需要在不同页面组件间切换。例如 商品列表页、详情页组件。
组件的本质过程:组件配置 => VueComponent实例 => render() => Virtual DOM => DOM(产生虚拟DOM)
17. Vue.set() 和 Vue.delete() 方法
Vue.set(target, propertyName, value)给响应式对象中添加一个属性,并确保这个属性是响应式的,触发视图更新
Vue.delete(target, propertyName) 用于删除对象属性,如果对象是响应式的,删除能触发更新页面
<script>
import Vue from 'vue'
export default {
 data() {
 return {
 users: [
 { name: '张三', age: 18 },
 { name: '李四', age: 20 },
 ],
 }
 },
 beforeUpdate() {
 this.users.forEach((item) => {
 // 添加属性且是响应式的
 Vue.set(item, 'hobby', '打飞机')
 }),
 this.users.forEach((item) => {
 Vue.delete(item, 'age')
 }),
 },
}
</script>
18. $nextTick
nextTick 是 Vue.js 中一个用来在下一个事件循环中调用回调函数的方法。这个方法通常用在等待数据或 DOM 元素更新之后执行一些代码的情况下。
this.$nextTick(() => {
	// 异步执行的代码
})
19. Vue-Router
20. Object.defineProperty 的使用
Object.defineProperty 方法有三个参数:
- obj: 要在其上定义属性的对象。
- prop: 要定义或修改的属性的名称。
- descriptor: 将被定义或修改的属性描述符。
descriptor 可以是以下属性的对象:
● value: 属性的值。可以是任何有效的 JavaScript 值(数字,对象,函数等)。默认值为 undefined。
● writable: 如果为 true,则可以通过赋值运算符更改属性的值。默认值为 false。
● enumerable: 如果为 true,则可以枚举该属性。默认值为 false。
● configurable: 如果为 true,则可以通过 delete 运算符删除该属性,以及修改属性的特性。默认值为 false。
const obj = {
  age: 18
}
Object.defineProperty(obj, 'name', {
  value: 'fg',
  writable: true, // 表示可以修改
  enumerable: true,
  configurable: true
})

for (let k in obj) {
  console.log(k);  // name age
}

delete obj.name
console.log(obj) // { age: 18 }
let obj = {
  name: '小明',
  \_age: 18,
}

Object.defineProperty(obj, 'age', {
  get() {
    return this._age
  },
  set(newAge) {
    this._age = newAge
    console.log(this.name + '现在' + newAge + '岁')
  },
})
// 赋值
obj.age = 19
console.log(obj) // { name: '小明', \_age: 19 }
注意,如果同时定义了 value、writable 和 get、set 函数,则会抛出错误。你只能选择定义属性的值或访问器函数。
21. Vuex(单向数据流)
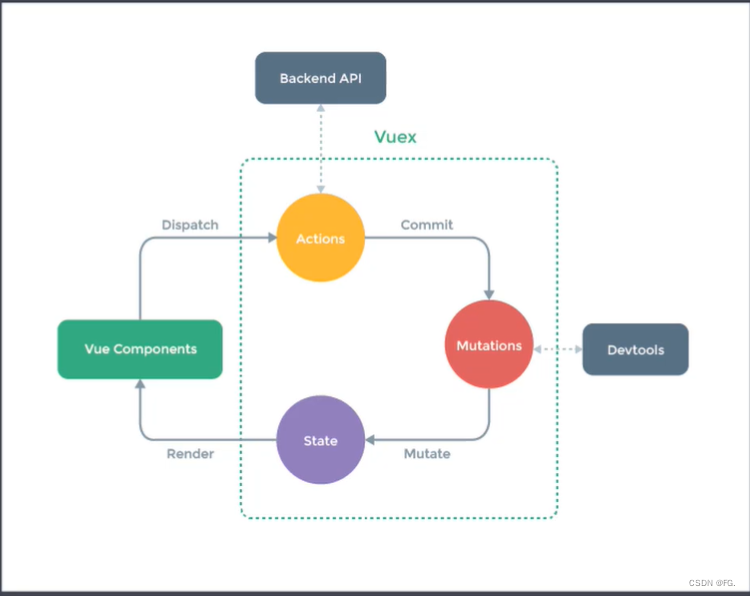
用户通过dispatch去触发actions,通过commit去触发提交mutations,改变的state会重新渲染页面。 actions是异步,mutations是同步。
这里使用了vue-presistedState持久化Vuex数据
index.js
import Vue from 'vue'
import Vuex from 'vuex'
import createPersistedState from 'vuex-persistedstate'
import cart from './cart'

Vue.use(Vuex)

export default new Vuex.Store({
  modules: {
    cart,
  },
  plugins: [createPersistedState()],
})
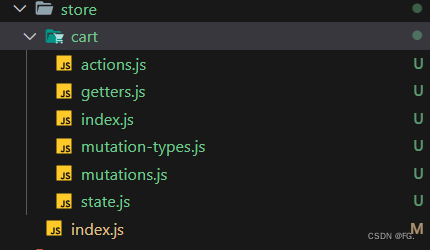
cart/index.js
import state from './state'
### 最后
**一个好的心态和一个坚持的心很重要**,很多冲着高薪的人想学习前端,但是能学到最后的没有几个,遇到困难就放弃了,这种人到处都是,就是因为有的东西难,所以他的回报才很大,我们评判一个前端开发者是什么水平,就是他解决问题的能力有多强。
**[开源分享:【大厂前端面试题解析+核心总结学习笔记+真实项目实战+最新讲解视频】](https://bbs.csdn.net/topics/618166371)**
**分享一些前端面试题以及学习路线给大家**


48dc95868af59cae2d78.png)
index.js
import Vue from ‘vue’
import Vuex from ‘vuex’
import createPersistedState from ‘vuex-persistedstate’
import cart from ‘./cart’
Vue.use(Vuex)
export default new Vuex.Store({
modules: {
cart,
},
plugins: [createPersistedState()],
})
cart/index.js
import state from ‘./state’
最后
一个好的心态和一个坚持的心很重要,很多冲着高薪的人想学习前端,但是能学到最后的没有几个,遇到困难就放弃了,这种人到处都是,就是因为有的东西难,所以他的回报才很大,我们评判一个前端开发者是什么水平,就是他解决问题的能力有多强。
开源分享:【大厂前端面试题解析+核心总结学习笔记+真实项目实战+最新讲解视频】
分享一些前端面试题以及学习路线给大家
[外链图片转存中…(img-UB10Dl1t-1714821772373)]
[外链图片转存中…(img-46R5NcZ2-1714821772374)]


 1003
1003


 被折叠的 条评论
为什么被折叠?
被折叠的 条评论
为什么被折叠?
 到【灌水乐园】发言


