


这里只是简单的继承了一下BaseFragment,然后就是DataBinding的绑定。
② Navigation绑定
然后我们需要在nav_graph.xml中添加这个布局。
<fragment
android:id=“@+id/map_fragment”
android:name=“com.llw.mvvm.ui.fragment.MapFragment”
android:label=“map_fragment”
tools:layout=“@layout/map_fragment” />
这里配置了,那么底部的菜单同样要配置,毕竟我们是通过菜单去控制Fragment的切换的,打开navigation_menu.xml,在里面添加一个item,代码如下:
<item
android:id=“@+id/map_fragment”
android:icon=“@mipmap/ic_map”
android:title=“地图” />
这个图标可以去我的源码里面去找,或者自己去网上找一个也行。
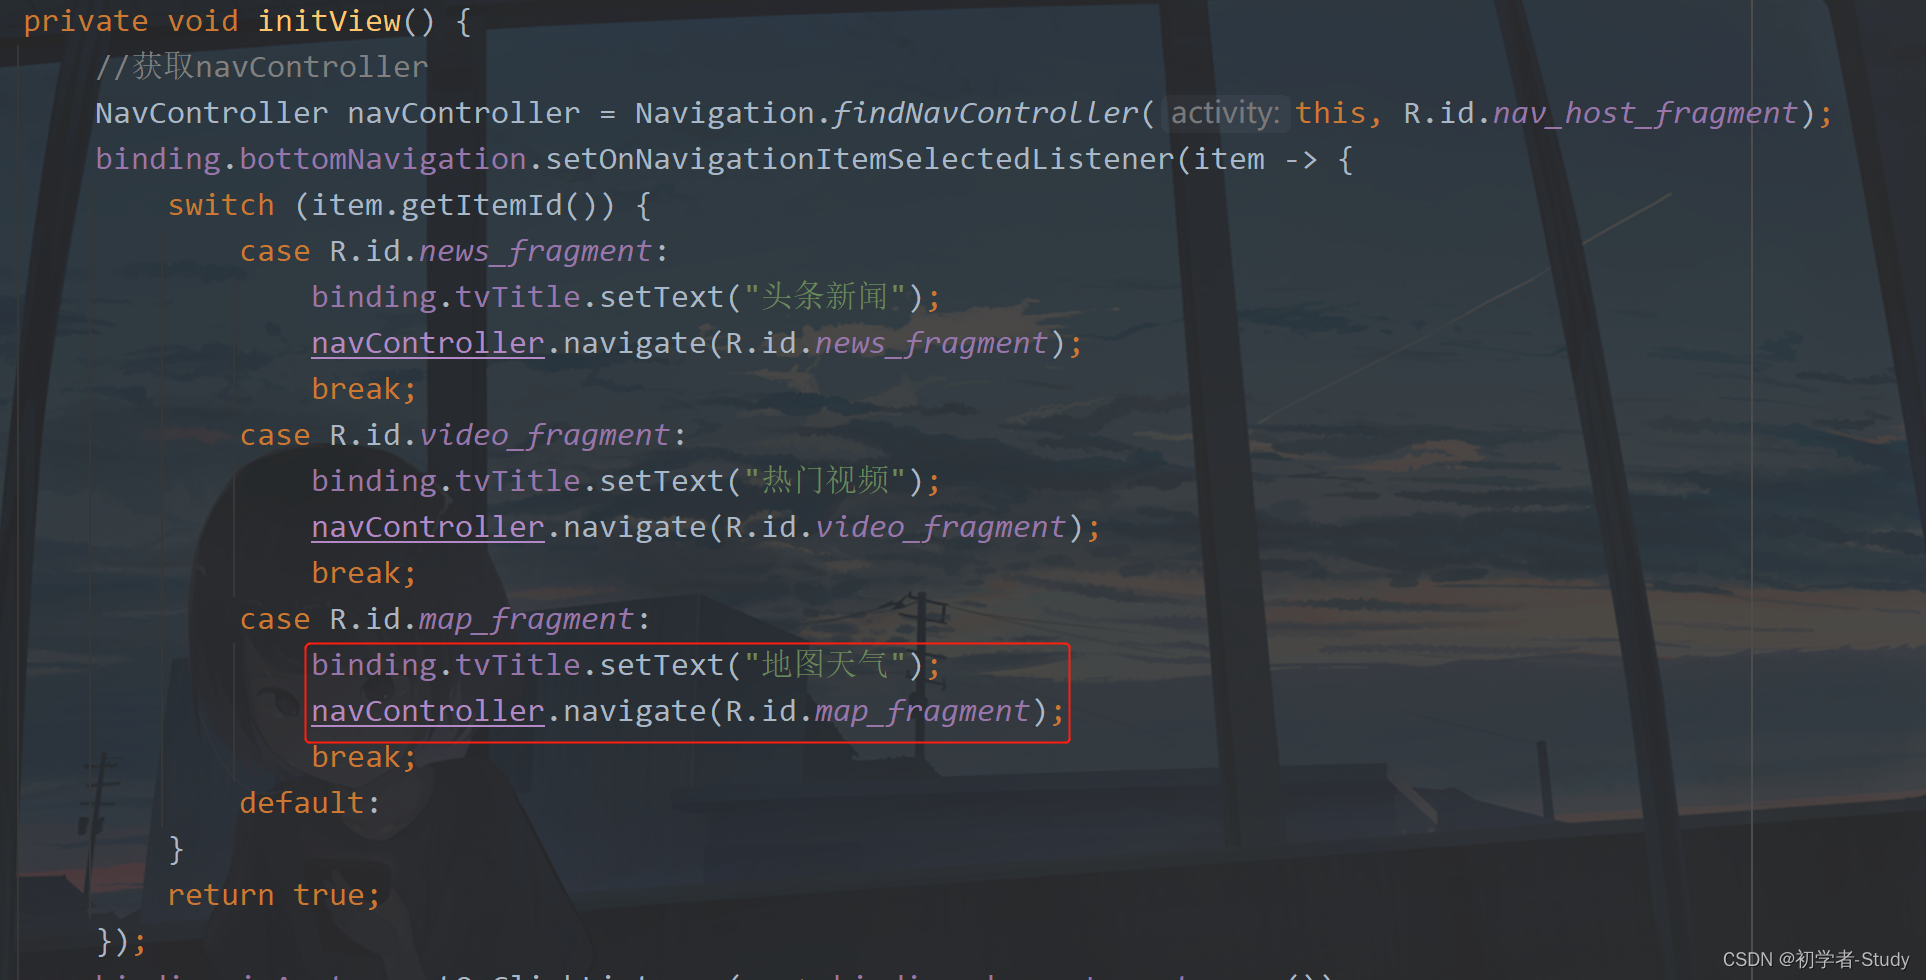
下面进入到HomeActivity中去配置,配置切换菜单时的Fragment布局改变,如下图所示:
③ Fragment中地图生命周期绑定
要显示地图需要将地图的生命周期与Fragment的生命周期绑定起来,如下图所示:
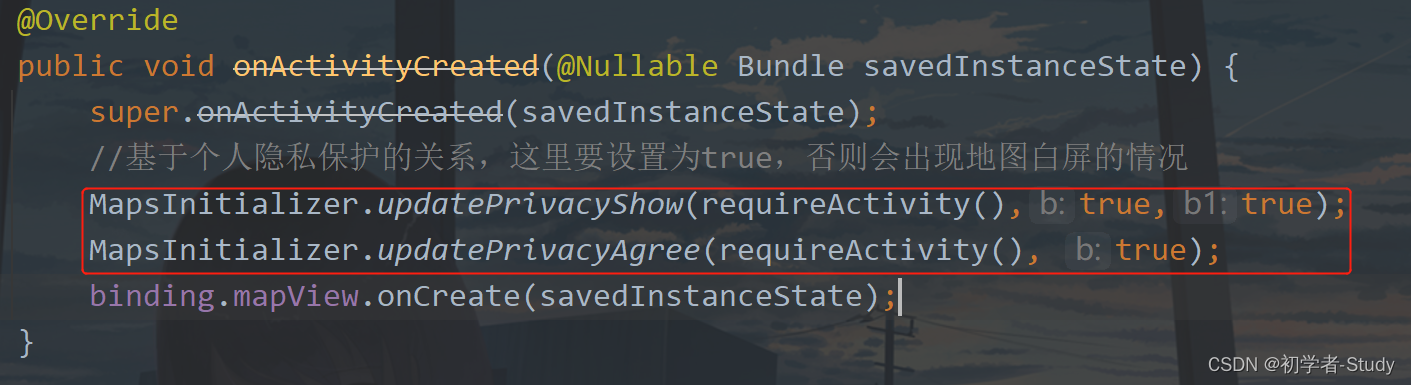
如果你是线上的项目你需要在隐私政策中引入高德SDK的说明,然后在MapFragment中绑定地图的生命周期。
@Override
public void onSaveInstanceState(@NonNull @NotNull Bundle outState) {
super.onSaveInstanceState(outState);
binding.mapView.onSaveInstanceState(outState);
}
@Override
public void onResume() {
super.onResume();
binding.mapView.onResume();
}
@Override
public void onPause() {
super.onPause();
binding.mapView.onPause();
}
@Override
public void onDestroy() {
super.onDestroy();
binding.mapView.onDestroy();
}
下面运行一下:

现在只是显示了地图,但是并没有定位到我当前所在地,这当然是不行的。
显示当前所在地则需要定位权限,之前在AndroidManifest.xml中已经配置好了,下面则需要在代码中动态请求。
① 定位动态权限申请
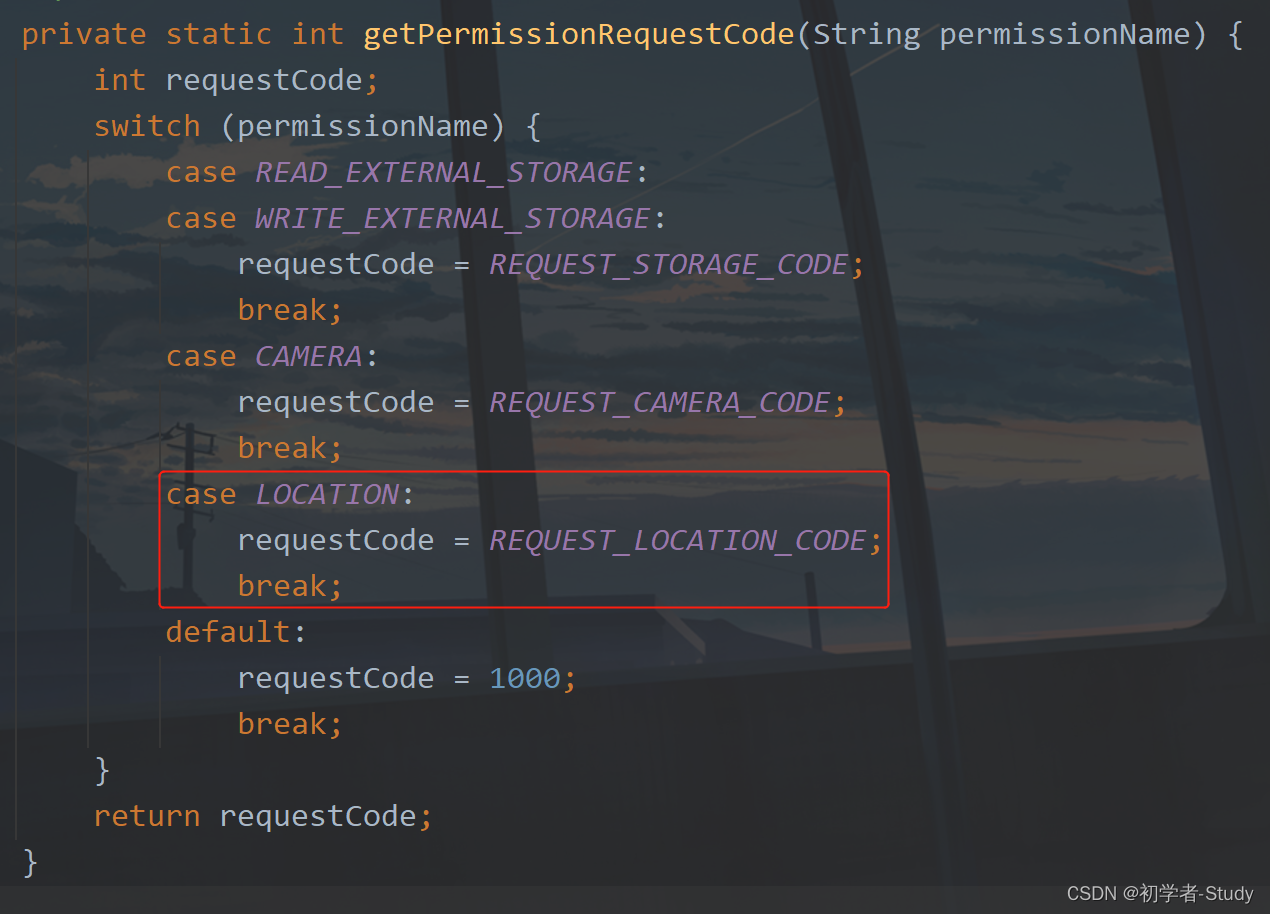
在上一篇文章中写过一个PermissionUtils类,这里给这个类再加一点东西进去,在PermissionUtils中增加如下代码:
public static final String LOCATION = Manifest.permission.ACCESS_FINE_LOCATION;
public static final int REQUEST_LOCATION_CODE = 1003;
然后在getPermissionRequestCode方法中增加一个case,如下图所示:
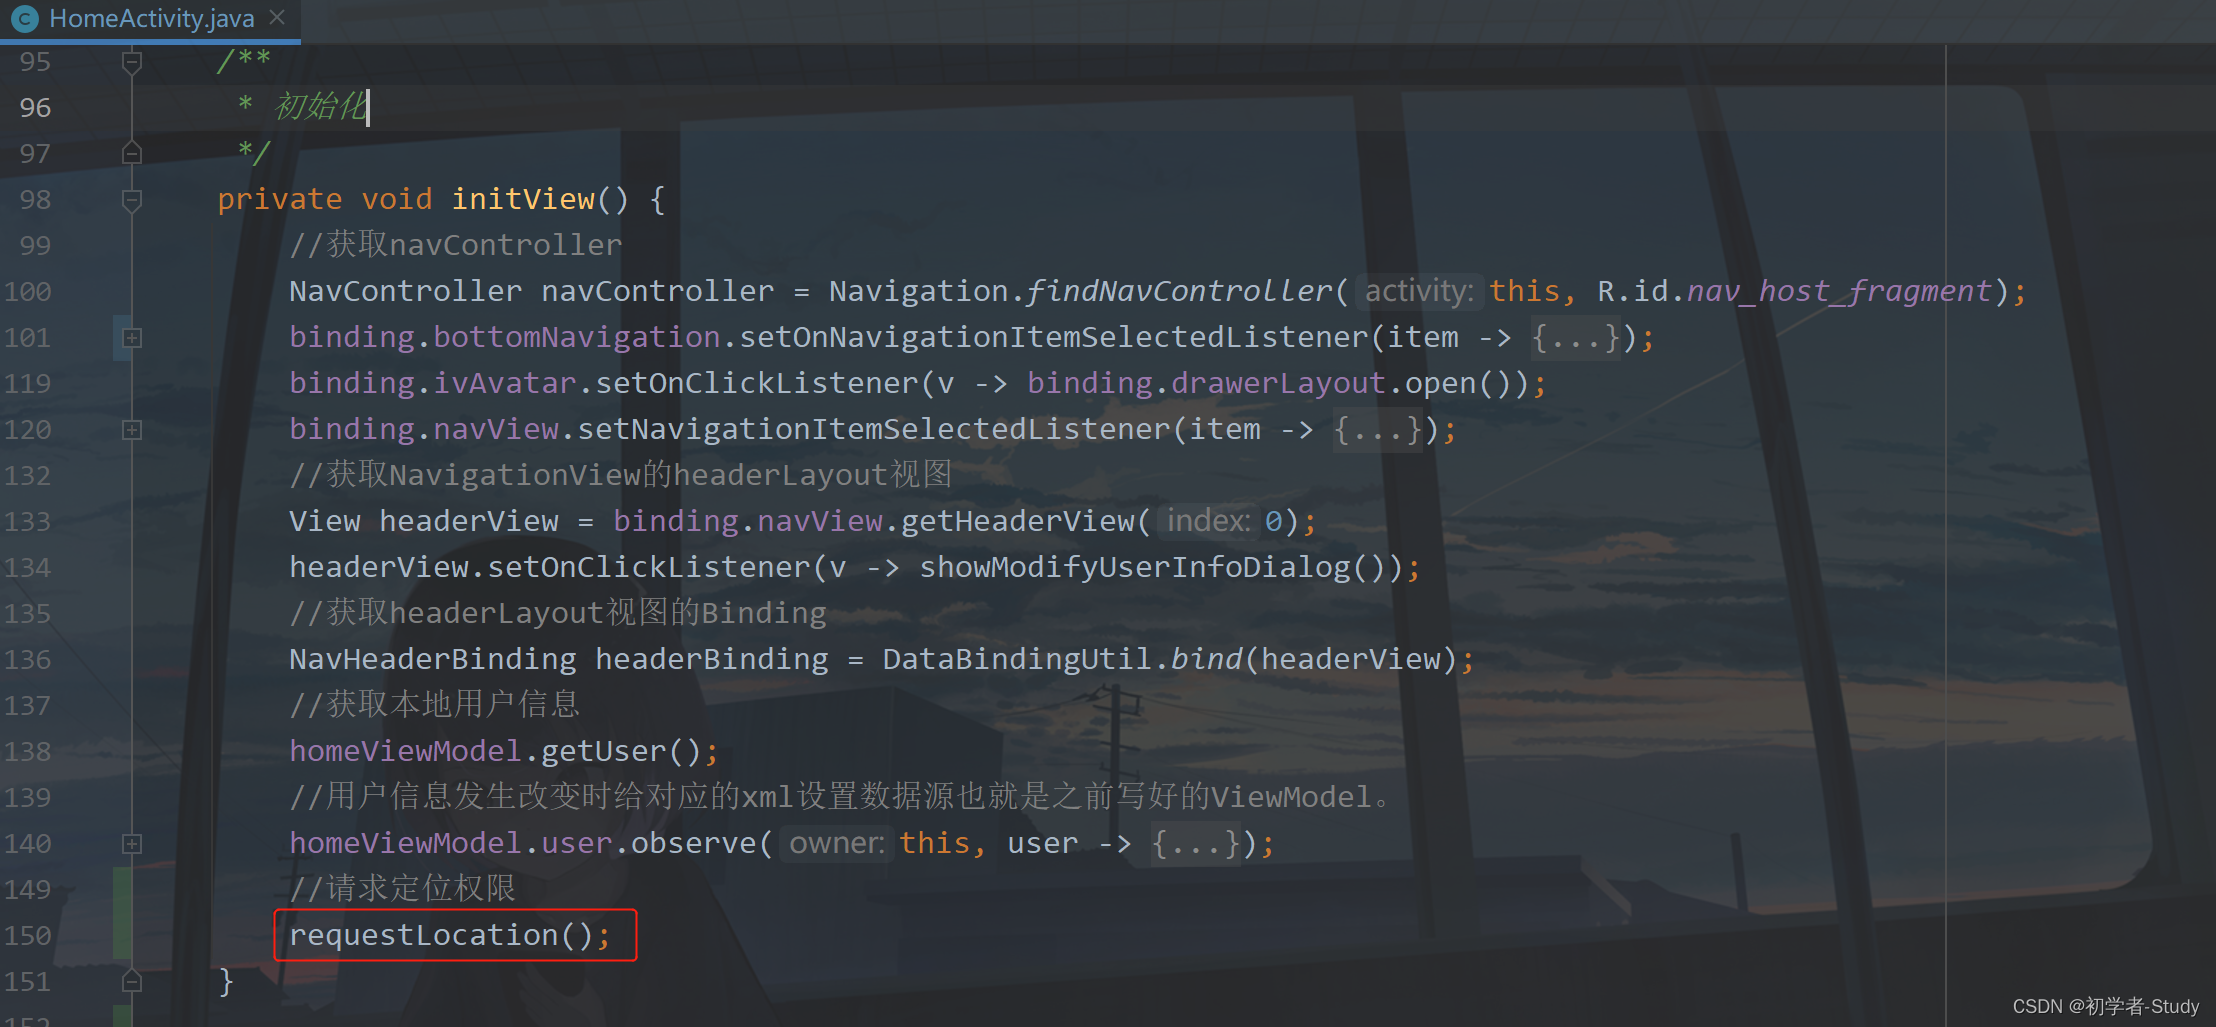
下面就是在HomeActivity中请求动态权限了,在HomeActivity中新增如下方法:
/**
- 请求定位权限
*/
private void requestLocation() {
if (isAndroid6()) {
if (!hasPermission(PermissionUtils.LOCATION)) {
requestPermission(PermissionUtils.LOCATION);
}
} else {
showMsg(“您无需动态请求权限”);
}
}
然后在initView方法中调用它,如下图所示:
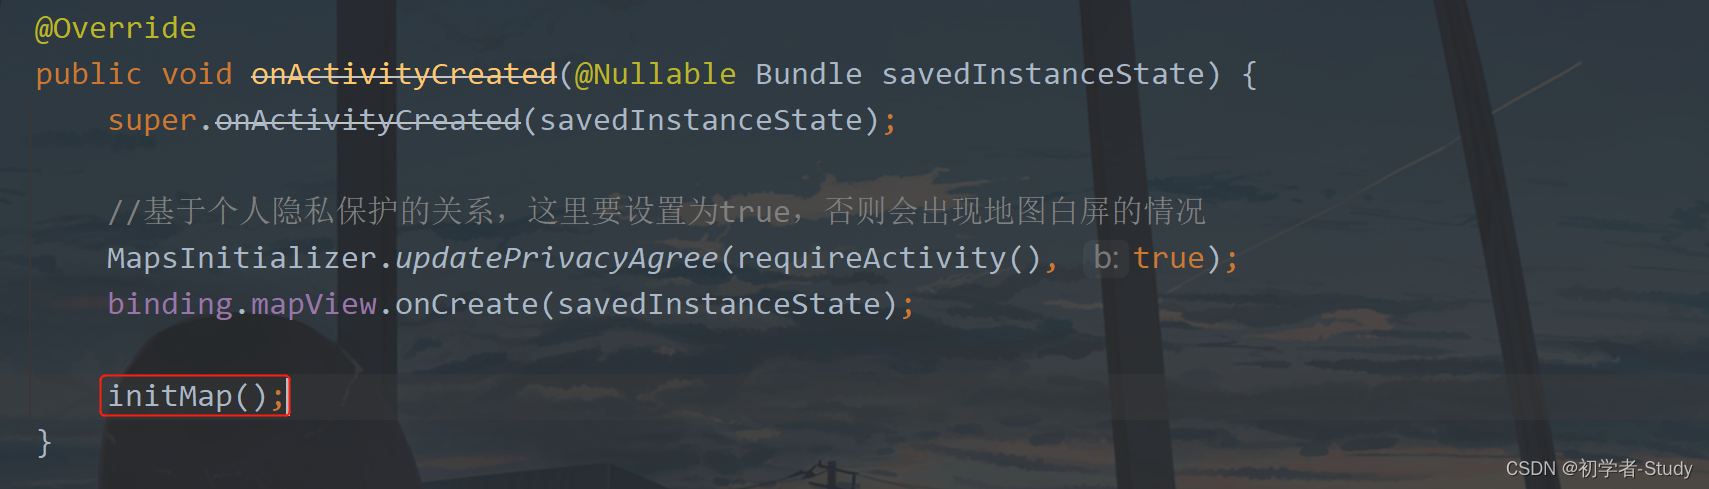
② 地图定位当前所在地
下面回到MapFragment,新增如下代码:
private static final String TAG = MapFragment.class.getSimpleName();
/**
- 初始化地图
*/
private void initMap() {
//初始化地图控制器对象
AMap aMap = binding.mapView.getMap();
// 设置为true表示显示定位层并可触发定位,false表示隐藏定位层并不可触发定位,默认是false
aMap.setMyLocationEnabled(true);
MyLocationStyle style = new MyLocationStyle();//初始化定位蓝点样式类myLocationStyle.myLocationType(MyLocationStyle.LOCATION_TYPE_LOCATION_ROTATE);//连续定位、且将视角移动到地图中心点,定位点依照设备方向旋转,并且会跟随设备移动。(1秒1次定位)如果不设置myLocationType,默认也会执行此种模式。
style.myLocationType(MyLocationStyle.LOCATION_TYPE_LOCATE) ;//定位一次,且将视角移动到地图中心点。
aMap.setMyLocationStyle(style);//设置定位蓝点的Style
aMap.getUiSettings().setMyLocationButtonEnabled(true);//设置默认定位按钮是否显示,非必需设置。
aMap.setMyLocationEnabled(true);// 设置为true表示启动显示定位蓝点,false表示隐藏定位蓝点并不进行定位,默认是false。
//设置SDK 自带定位消息监听
aMap.setOnMyLocationChangeListener(this);
}
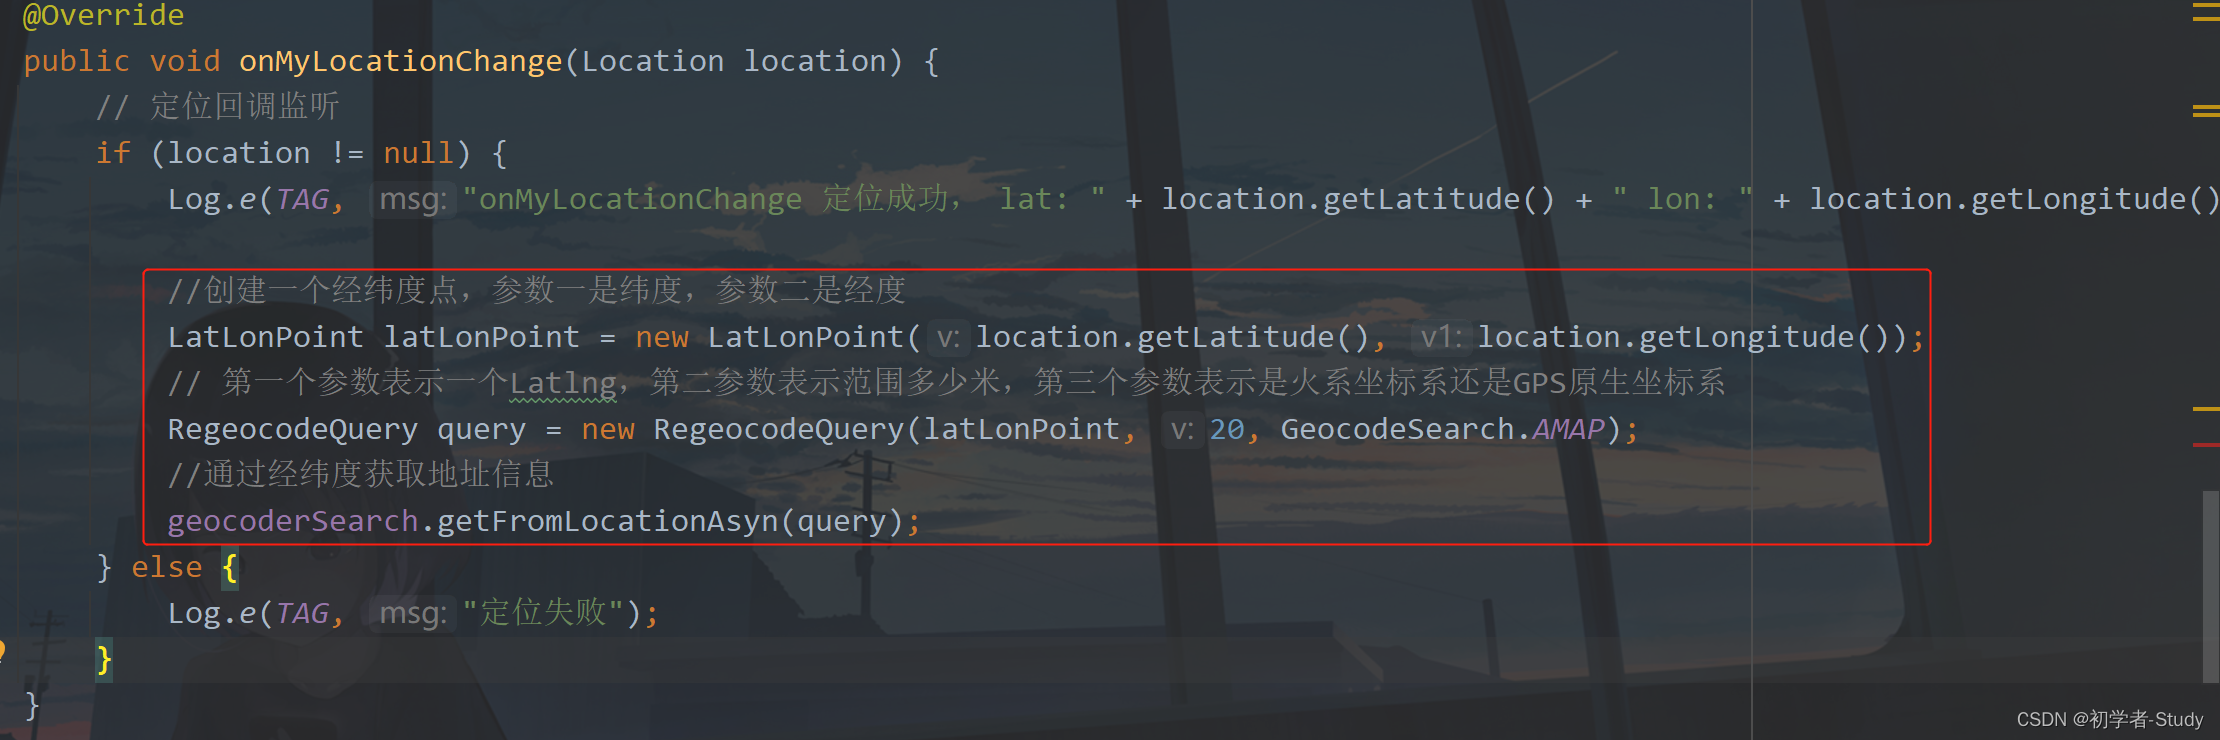
@Override
public void onMyLocationChange(Location location) {
// 定位回调监听
if(location != null) {
Log.e(TAG, "onMyLocationChange 定位成功, lat: " + location.getLatitude() + " lon: " + location.getLongitude());
} else {
Log.e(TAG, “定位失败”);
}
}
实现位置监听

调用initMap()
运行一下

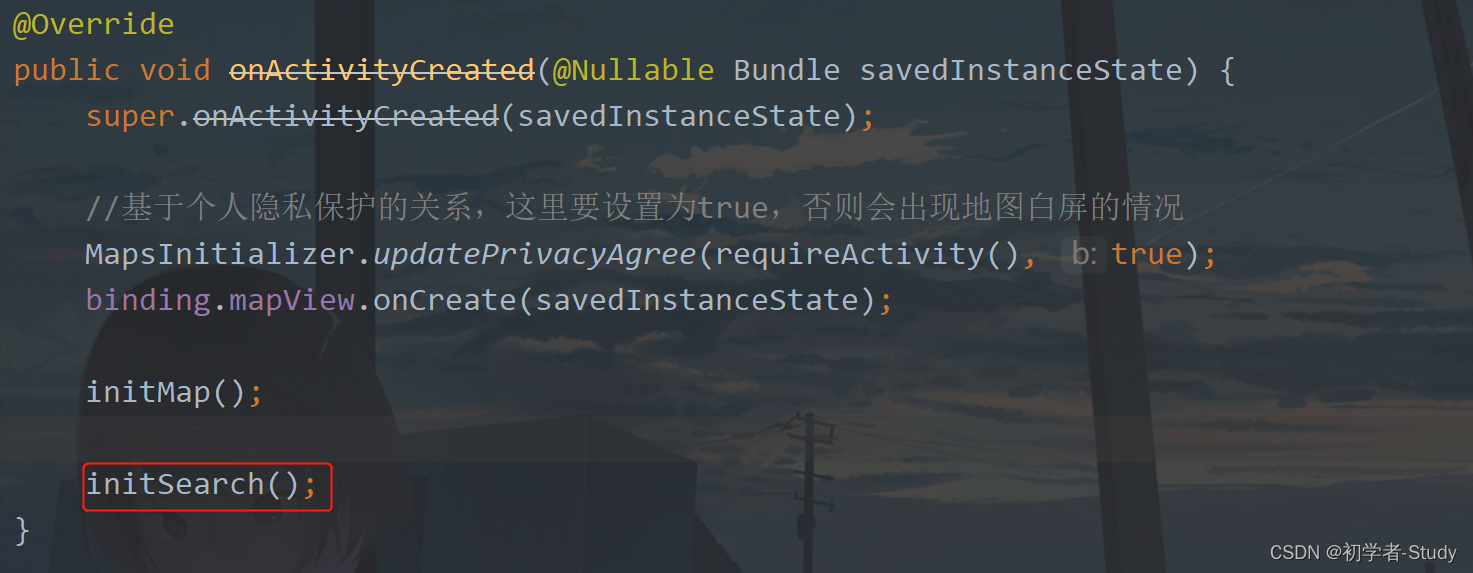
通过地图定位的方式定位在了当前所在地,但是onMyLocationChange的location中只有当前所在地的经纬度,如果我们需要拿到详细的地址信息要怎么做呢?通过SearchSDK实现,通过逆地理编码来将坐标转换成详细的地址。依然是在MapFragment,继承GeocodeSearch.OnGeocodeSearchListener,实现两个回调方法。代码如下:
/**
- 坐标转地址
*/
@Override
public void onRegeocodeSearched(RegeocodeResult regeocodeResult, int rCode) {
}
/**
- 地址转坐标
*/
@Override
public void onGeocodeSearched(GeocodeResult geocodeResult, int rCode) {
}
然后这个也需要初始化,代码如下:
//解析成功标识码
private static final int PARSE_SUCCESS_CODE = 1000;
private GeocodeSearch geocoderSearch = null;
private String district = null;// 区/县
下面写一个方法初始化搜索
/**
- 初始化搜索
*/
private void initSearch() {
try {
geocoderSearch = new GeocodeSearch(requireActivity());
geocoderSearch.setOnGeocodeSearchListener(this);
} catch (AMapException e) {
e.printStackTrace();
}
}
调用的地方如下图:
当收位置信息改变时,进行坐标的搜索,在onMyLocationChange中添加如下代码:
//创建一个经纬度点,参数一是纬度,参数二是经度
LatLonPoint latLonPoint = new LatLonPoint(location.getLatitude(), location.getLongitude());
// 第一个参数表示一个Latlng,第二参数表示范围多少米,第三个参数表示是火系坐标系还是GPS原生坐标系
RegeocodeQuery query = new RegeocodeQuery(latLonPoint, 20, GeocodeSearch.AMAP);
//通过经纬度获取地址信息
geocoderSearch.getFromLocationAsyn(query);
添加位置如下:
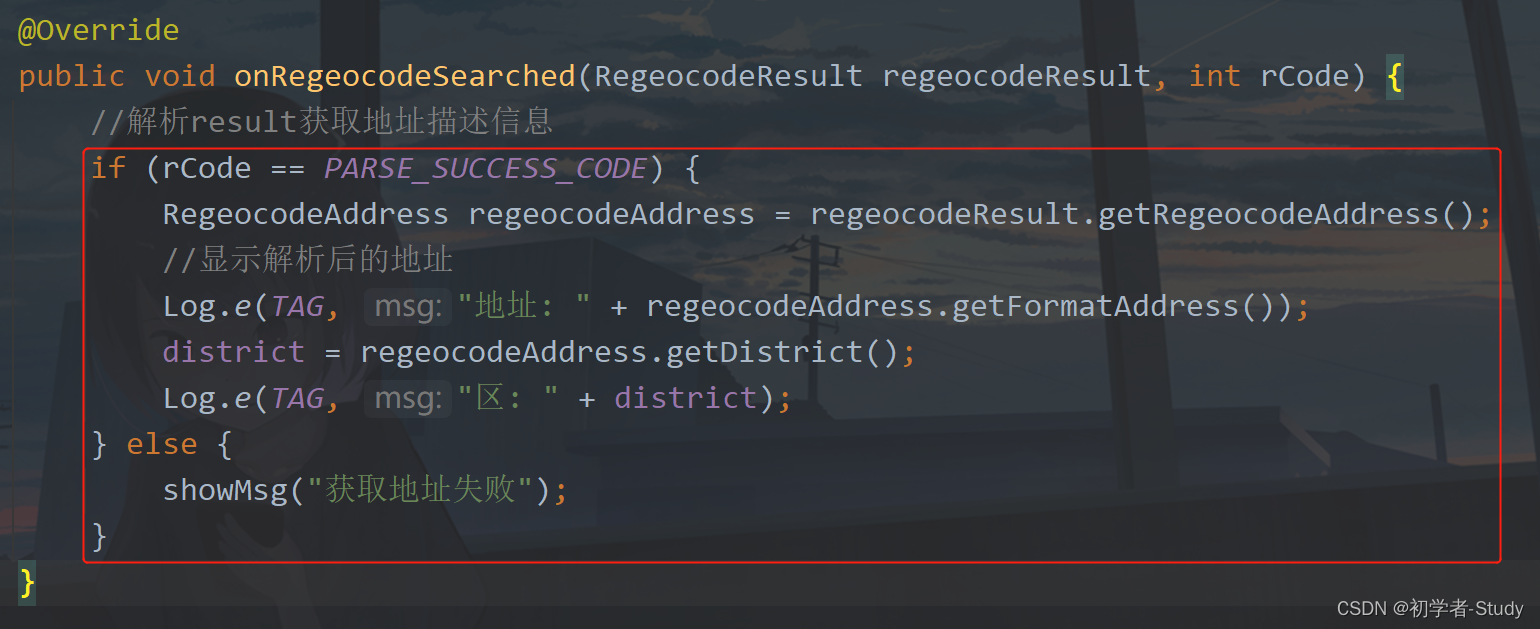
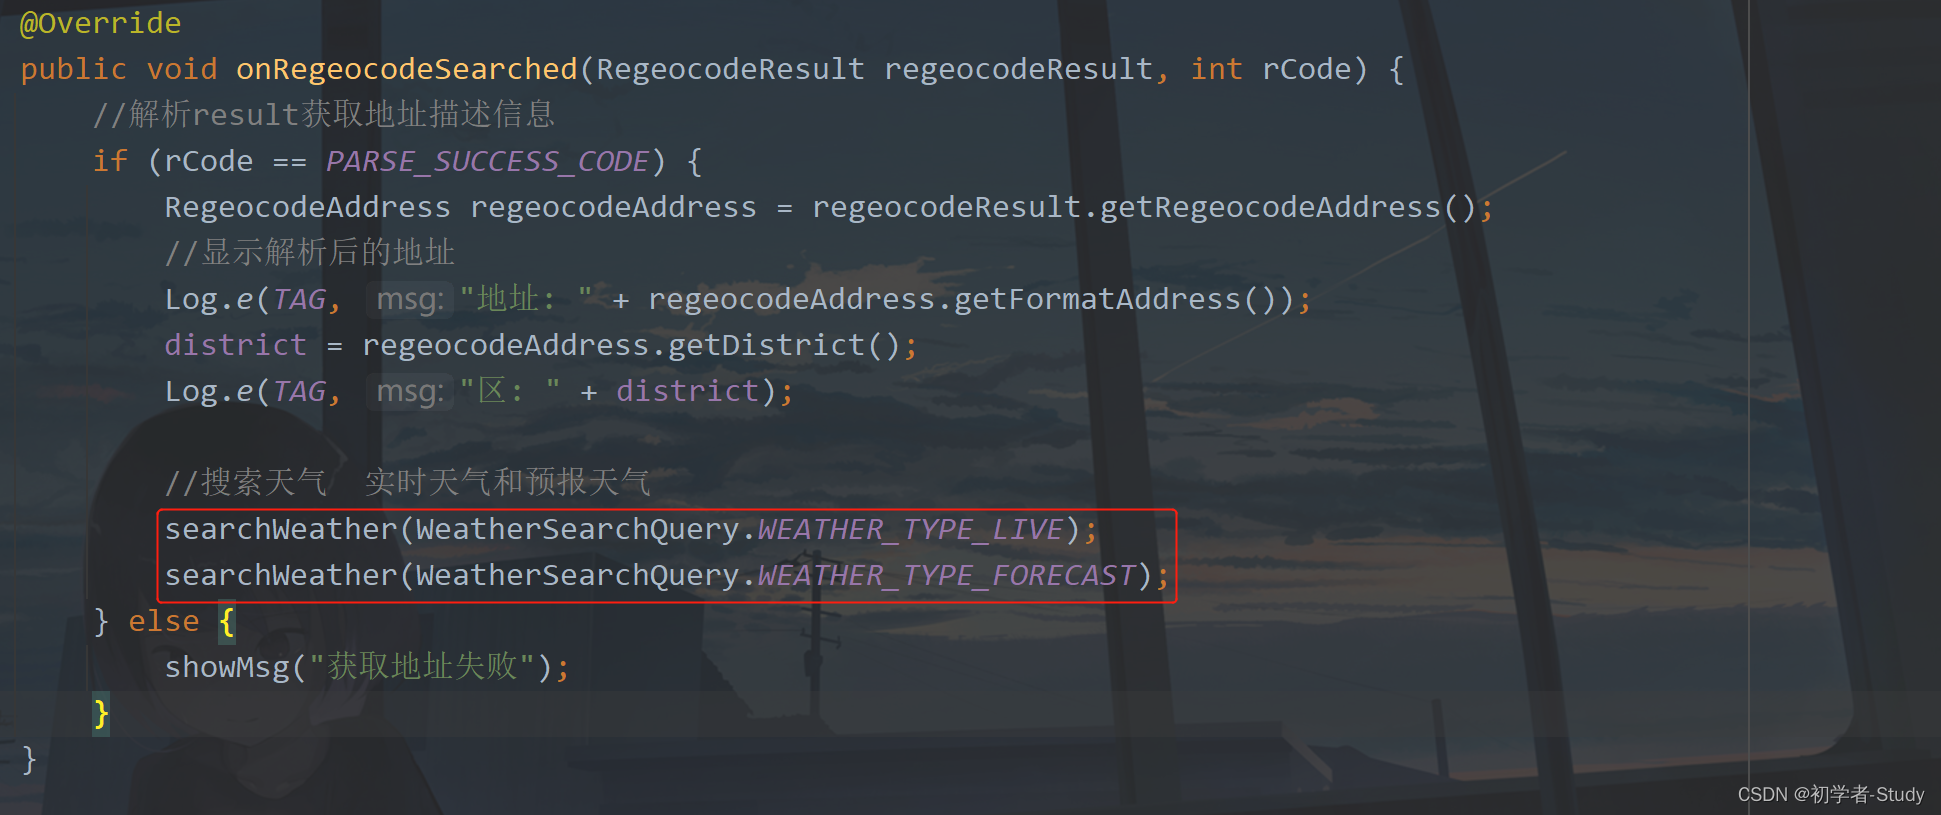
然后就会触发onRegeocodeSearched的回调,在onRegeocodeSearched中则对所在地的信息进行打印和简单的区/县赋值,在onRegeocodeSearched方法中添加如下代码:
//解析result获取地址描述信息
if (rCode == PARSE_SUCCESS_CODE) {
RegeocodeAddress regeocodeAddress = regeocodeResult.getRegeocodeAddress();
//显示解析后的地址
Log.e(TAG, "地址: " + regeocodeAddress.getFormatAddress());
district = regeocodeAddress.getDistrict();
Log.e(TAG, "区: " + district);
} else {
showMsg(“获取地址失败”);
}
添加位置如下:
下面运行一下:

这样就拿到了详细的位置信息。
高德是自带了天气数据接口的,可以用,只不过数据不是很多,如果需要更多的数据的话可以自己去对接天气API,例如和风、彩云。
在MapFragment创建变量
private LocalWeatherLive liveResult;
private LocalWeatherForecast forecastResult;
然后MapFragment继承WeatherSearch.OnWeatherSearchListener,实现两个方法。
/**
- 实时天气返回
*/
@Override
public void onWeatherLiveSearched(LocalWeatherLiveResult localWeatherLiveResult, int code) {
liveResult = localWeatherLiveResult.getLiveResult();
if (liveResult != null) {
Log.e(TAG, "onWeatherLiveSearched: " + new Gson().toJson(liveResult));
} else {
showMsg(“实时天气数据为空”);
}
}
/**
- 天气预报返回
*/
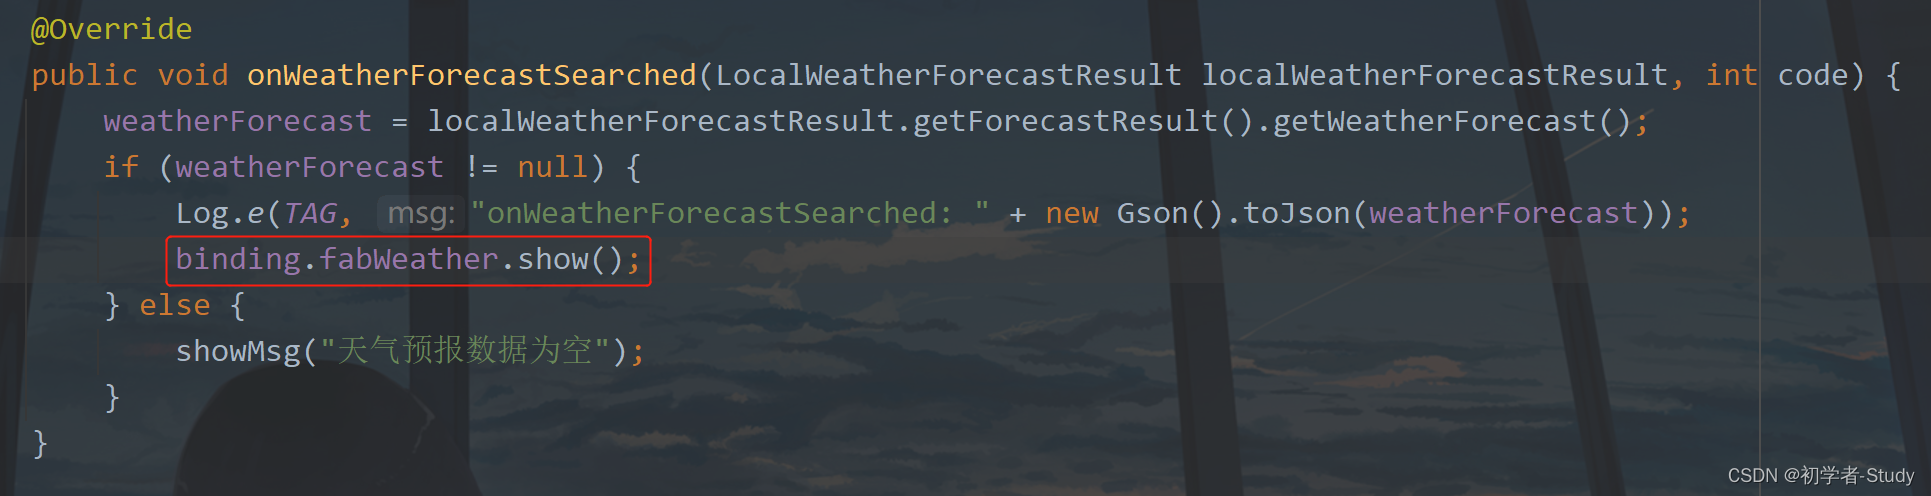
@Override
public void onWeatherForecastSearched(LocalWeatherForecastResult localWeatherForecastResult, int code) {
forecastResult = localWeatherForecastResult.getForecastResult();
if (forecastResult != null) {
Log.e(TAG, "onWeatherForecastSearched: " + new Gson().toJson(forecastResult));
} else {
showMsg(“天气预报数据为空”);
}
}
在方法回调中打印一下返回的数据,然后写一个搜索天气的方法,根据传入不同的天气类型,进行不同的天气数据搜索,代码如下:
/**
-
搜索天气
-
@param type WEATHER_TYPE_LIVE 实时天气 WEATHER_TYPE_FORECAST 预报天气
*/
private void searchWeather(int type) {
WeatherSearchQuery weatherSearchQuery = new WeatherSearchQuery(district, type);
try {
WeatherSearch weatherSearch = new WeatherSearch(requireActivity());
weatherSearch.setOnWeatherSearchListener(this);
weatherSearch.setQuery(weatherSearchQuery);
weatherSearch.searchWeatherAsyn(); //异步搜索
} catch (AMapException e) {
e.printStackTrace();
}
}
最后在onRegeocodeSearched中,拿到地址信息时调用searchWeather方法,代码如下:
//搜索天气 实时天气和预报天气
searchWeather(WeatherSearchQuery.WEATHER_TYPE_LIVE);
searchWeather(WeatherSearchQuery.WEATHER_TYPE_FORECAST);
添加位置如下:
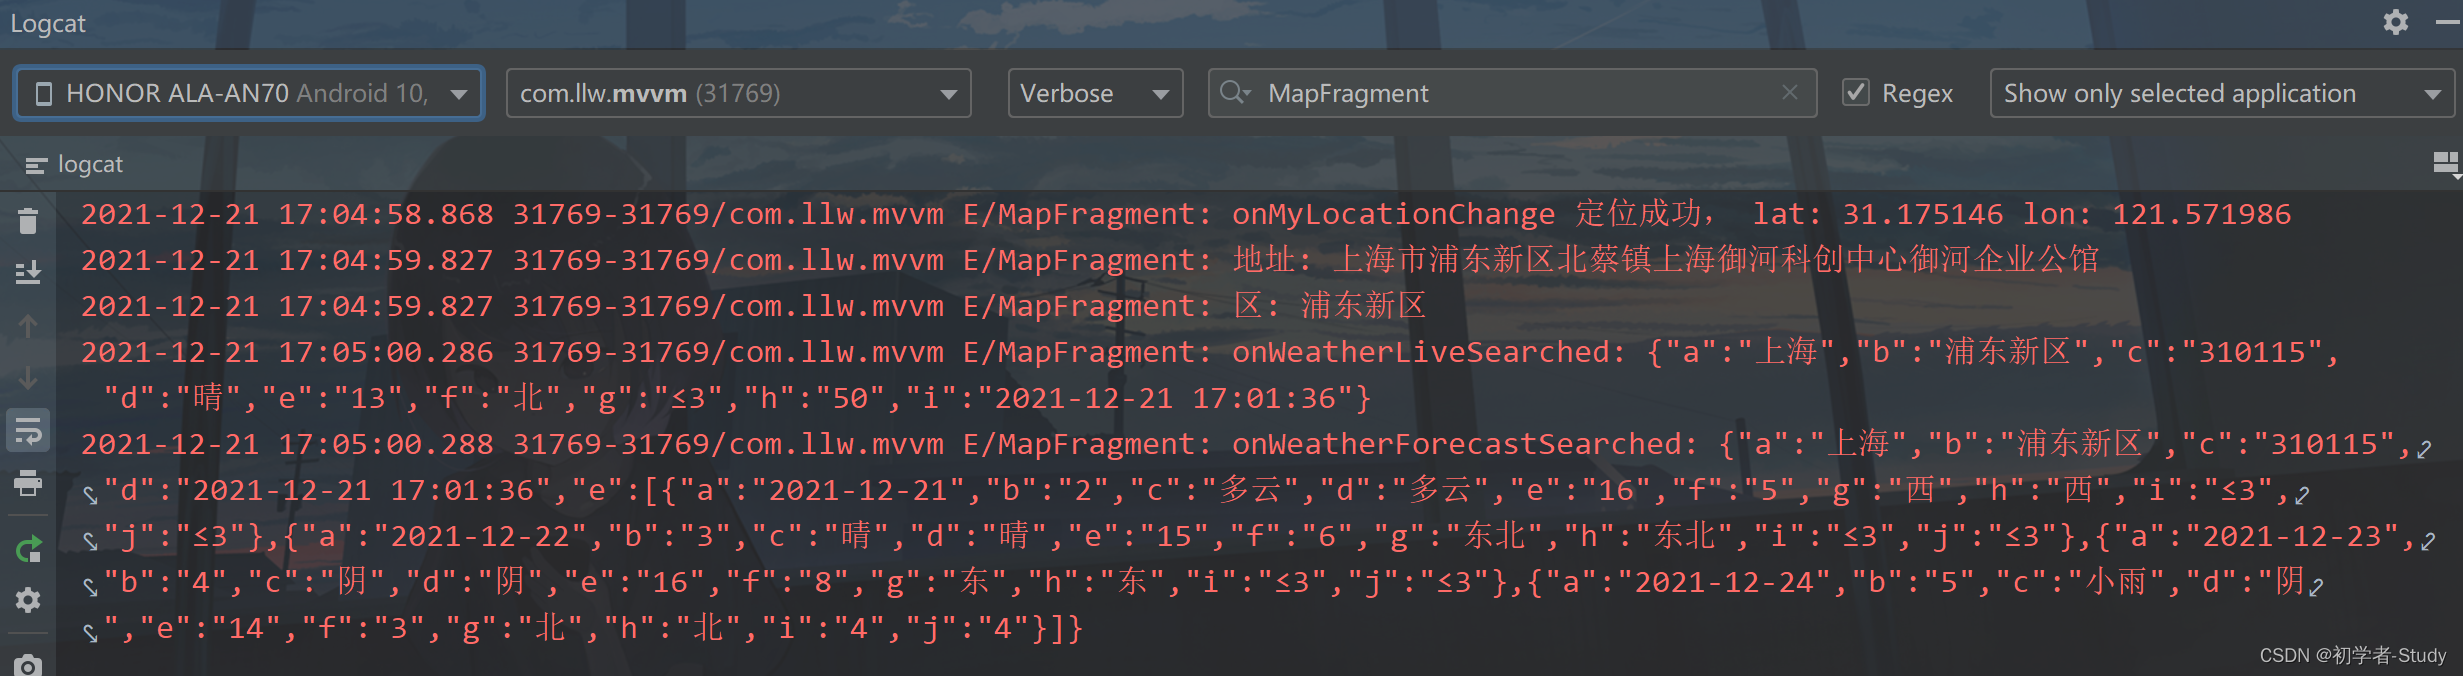
下面运行一下,查看日志,天气的数据就有了
有了天气数据之后就是显示天气数据了,这里我们可以这么做,就是在MapFragment中添加一个浮动按钮,点击之后从屏幕底部弹出一个,先来修改一下map_fragment中的代码,我们增加一个浮动按钮。
<com.google.android.material.floatingactionbutton.FloatingActionButton
android:id=“@+id/fab_weather”
android:layout_width=“wrap_content”
android:layout_height=“wrap_content”
android:layout_gravity=“end|bottom”
android:layout_margin=“20dp”
android:visibility=“gone”
android:contentDescription=“天气”
android:src=“@mipmap/ic_weather”
app:backgroundTint=“@color/white”
app:fabSize=“auto”
tools:ignore=“UsingOnClickInXml” />
添加的位置就如下图所示:

这里我先把这个按钮给隐藏了,当地图上获取了当前的位置,查询到了天气之后再显示这个按钮。下面回到MapFragment中,在initMap方法中增加一行代码,
//修改放大缩小按钮的位置
aMap.getUiSettings().setZoomPosition(AMapOptions.ZOOM_POSITION_RIGHT_CENTER);
这样做就是让我们的浮动按钮不至于挡住这个地图的放大缩小按钮。
在MapFragment中添加一个变量
//天气预报列表
private List weatherForecast;
然后在onWeatherForecastSearched回调中对找个变量赋值,这才是实际的天气数据
查询到天气预报数据后,显示这个按钮。
① 实时天气数据
现在已经可以看到所在地的天气了,当需要显示出来的时候你会发现找个数据里面是没有所在地的区/县的,只有省和市。因此在model包下新建一个LiveWeather,把我们在通过你地理编码返回时的区/县的值放进去,代码如下:
public class LiveWeather {
private String district;
private LocalWeatherLive localWeatherLive;
public LiveWeather(String district, LocalWeatherLive localWeatherLive) {
this.district = district;
this.localWeatherLive = localWeatherLive;
}
public String getDistrict() {
return district;
}
public void setDistrict(String district) {
this.district = district;
}
public LocalWeatherLive getLocalWeatherLive() {
return localWeatherLive;
}
public void setLocalWeatherLive(LocalWeatherLive localWeatherLive) {
this.localWeatherLive = localWeatherLive;
}
}
这个数据将会绑定到我们的天气弹窗,现在来创建这个弹窗的布局。
② 天气弹窗布局
弹窗布局分为两个环节,一个是实时天气,一个是预报天气。首先colors.xml创建一个颜色值,如下:
#90000000
然后在drawable下创建一个shape_translucent_radius_12.xml样式文件,代码如下:
<?xml version="1.0" encoding="utf-8"?>下面创建弹窗的布局,在layout下新建一个dialog_weather.xml,里面的代码如下:
<?xml version="1.0" encoding="utf-8"?><variable
name=“liveWeather”
type=“com.llw.mvvm.model.LiveWeather” />
<RelativeLayout
android:layout_width=“match_parent”
android:layout_height=“wrap_content”
android:background=“#00000000”
android:orientation=“vertical”
android:paddingStart=“12dp”
android:paddingEnd=“12dp”
android:paddingBottom=“?attr/actionBarSize”>
<TextView
android:id=“@+id/tv_city”
android:layout_width=“match_parent”
android:layout_height=“wrap_content”
android:layout_marginBottom=“12dp”
android:background=“@drawable/shape_translucent_radius_12”
android:gravity=“center”
android:padding=“12dp”
android:text=“@{liveWeather.district}”
android:textColor=“@color/white”
android:textSize=“28sp” />
<TextView
android:id=“@+id/tv_weather”
android:layout_width=“wrap_content”
android:layout_height=“wrap_content”
android:layout_above=“@+id/tv_report_time”
android:layout_below=“@+id/tv_city”
android:layout_alignParentStart=“true”
android:layout_marginEnd=“12dp”
android:layout_marginBottom=“12dp”
android:background=“@drawable/shape_translucent_radius_12”
android:gravity=“center”
android:padding=“12dp”
android:text=“@{liveWeather.localWeatherLive.weather}”
android:textColor=“@color/white”
android:textSize=“24sp” />
<LinearLayout
android:id=“@+id/wind_lay”
android:layout_width=“wrap_content”
android:layout_height=“44dp”
android:layout_below=“@+id/tv_city”
android:layout_toStartOf=“@+id/tv_temp”
android:layout_toEndOf=“@+id/tv_weather”
android:background=“@drawable/shape_translucent_radius_12”
android:gravity=“center”
android:orientation=“horizontal”>
<TextView
android:id=“@+id/tv_wind_direction”
android:layout_width=“wrap_content”
android:layout_height=“wrap_content”
android:layout_marginEnd=“12dp”
android:text=“@{liveWeather.localWeatherLive.windDirection+风}”
android:textColor=“@color/white” />
<TextView
android:id=“@+id/tv_wind_power”
android:layout_width=“wrap_content”
android:layout_height=“wrap_content”
android:layout_marginStart=“12dp”
android:text=“@{liveWeather.localWeatherLive.windPower+级}”
android:textColor=“@color/white” />
<LinearLayout
android:id=“@+id/humidity_lay”
android:layout_width=“wrap_content”
android:layout_height=“44dp”
android:layout_below=“@+id/wind_lay”
android:layout_marginTop=“12dp”
android:layout_toStartOf=“@+id/tv_temp”
android:layout_toEndOf=“@+id/tv_weather”
android:background=“@drawable/shape_translucent_radius_12”
android:gravity=“center”
android:orientation=“horizontal”>
<TextView
android:layout_width=“wrap_content”
android:layout_height=“wrap_content”
android:layout_marginEnd=“24dp”
android:text=“湿度”
android:textColor=“@color/white” />
<TextView
android:id=“@+id/tv_humidity”
android:layout_width=“wrap_content”
android:layout_height=“wrap_content”
android:text=“@{liveWeather.localWeatherLive.humidity+%}”
android:textColor=“@color/white” />
<TextView
android:id=“@+id/tv_temp”
android:layout_width=“100dp”
android:layout_height=“100dp”
android:layout_below=“@+id/tv_city”
android:layout_alignParentEnd=“true”
android:layout_marginStart=“12dp”
android:layout_marginBottom=“12dp”
android:background=“@drawable/shape_translucent_radius_12”
android:gravity=“center”
android:padding=“12dp”
android:text=“@{liveWeather.localWeatherLive.temperature+℃}”
android:textColor=“@color/white”
android:textSize=“32sp” />
<TextView
android:id=“@+id/tv_report_time”
android:layout_width=“match_parent”
android:layout_height=“wrap_content”
android:layout_below=“@+id/tv_temp”
android:background=“@drawable/shape_translucent_radius_12”
android:gravity=“center”
android:padding=“12dp”
android:text=“@{liveWeather.localWeatherLive.reportTime+发布}”
android:textColor=“@color/white” />
<androidx.recyclerview.widget.RecyclerView
android:id=“@+id/rv_forecast”
android:layout_width=“match_parent”
android:layout_height=“wrap_content”
android:layout_below=“@+id/tv_report_time”
android:layout_marginTop=“12dp” />
有列表就有对应的item布局,在layout下创建item_forecast.xml布局,代码如下:
<?xml version="1.0" encoding="utf-8"?><variable
name=“forecast”
type=“com.amap.api.services.weather.LocalDayWeatherForecast” />
<RelativeLayout
android:layout_width=“match_parent”
android:layout_height=“wrap_content”
android:layout_marginBottom=“12dp”
android:background=“@drawable/shape_translucent_radius_12”
android:padding=“12dp”>
<TextView
android:id=“@+id/tv_date”
android:layout_width=“wrap_content”
android:layout_height=“wrap_content”
android:text=“@{forecast.date}”
android:textColor=“@color/white” />
<TextView
android:id=“@+id/tv_week”
android:layout_width=“wrap_content”
android:layout_height=“wrap_content”
android:layout_marginStart=“12dp”
android:layout_toEndOf=“@+id/tv_date”
android:text=“@{EasyDate.getWeek(forecast.date)}”
android:textColor=“@color/white” />
<TextView
android:id=“@+id/tv_temp”
android:layout_width=“wrap_content”
android:layout_height=“wrap_content”
android:layout_alignParentEnd=“true”
android:text=“@{forecast.dayTemp+° /+ forecast.nightTemp+°}”
最后
我见过很多技术leader在面试的时候,遇到处于迷茫期的大龄程序员,比面试官年龄都大。这些人有一些共同特征:可能工作了5、6年,还是每天重复给业务部门写代码,工作内容的重复性比较高,没有什么技术含量的工作。问到这些人的职业规划时,他们也没有太多想法。
其实30岁到40岁是一个人职业发展的黄金阶段,一定要在业务范围内的扩张,技术广度和深度提升上有自己的计划,才有助于在职业发展上有持续的发展路径,而不至于停滞不前。
不断奔跑,你就知道学习的意义所在!


《Android学习笔记总结+移动架构视频+大厂面试真题+项目实战源码》,点击传送门,即可获取!
=“@drawable/shape_translucent_radius_12”
android:padding=“12dp”>
<TextView
android:id=“@+id/tv_date”
android:layout_width=“wrap_content”
android:layout_height=“wrap_content”
android:text=“@{forecast.date}”
android:textColor=“@color/white” />
<TextView
android:id=“@+id/tv_week”
android:layout_width=“wrap_content”
android:layout_height=“wrap_content”
android:layout_marginStart=“12dp”
android:layout_toEndOf=“@+id/tv_date”
android:text=“@{EasyDate.getWeek(forecast.date)}”
android:textColor=“@color/white” />
<TextView
android:id=“@+id/tv_temp”
android:layout_width=“wrap_content”
android:layout_height=“wrap_content”
android:layout_alignParentEnd=“true”
android:text=“@{forecast.dayTemp+° /+ forecast.nightTemp+°}”
最后
我见过很多技术leader在面试的时候,遇到处于迷茫期的大龄程序员,比面试官年龄都大。这些人有一些共同特征:可能工作了5、6年,还是每天重复给业务部门写代码,工作内容的重复性比较高,没有什么技术含量的工作。问到这些人的职业规划时,他们也没有太多想法。
其实30岁到40岁是一个人职业发展的黄金阶段,一定要在业务范围内的扩张,技术广度和深度提升上有自己的计划,才有助于在职业发展上有持续的发展路径,而不至于停滞不前。
不断奔跑,你就知道学习的意义所在!
[外链图片转存中…(img-3IlFfIZe-1714397484572)]
[外链图片转存中…(img-E0EGD7BU-1714397484574)]
《Android学习笔记总结+移动架构视频+大厂面试真题+项目实战源码》,点击传送门,即可获取!


 1万+
1万+


 被折叠的 条评论
为什么被折叠?
被折叠的 条评论
为什么被折叠?
 到【灌水乐园】发言


