


 本文介绍了如何利用高德地图API集成定位SDK和地图SDK,实现打卡签到功能。通过获取用户定位,绘制Marker展示位置,并设置围栏(如圆形、多边形)判断打卡是否在指定区域内。同时,提到了动态权限申请和地图生命周期管理。
前言
本章根据高德地图API,实现打卡签到功能。用到了定位SDK 和地图SDK、覆盖物。打卡范围图形可以支持多种形状,如:圆形、长方形、多边形。
核心逻辑:
获取当前定位信息,然后通过Marker绘制小图标进行展示,并在onLocationChanged回调方法中不断重新绘制当前位置Marker以保持时时最新。在指定打卡签到区域添加围栏,主要使用CircleOptions、PolygonOptions进行绘制,然后判断当前是否在打卡范围内,具体实现如下。
PS:另外提一句,也可以结合+电子围栏进行广播自动触发自动打卡
目录
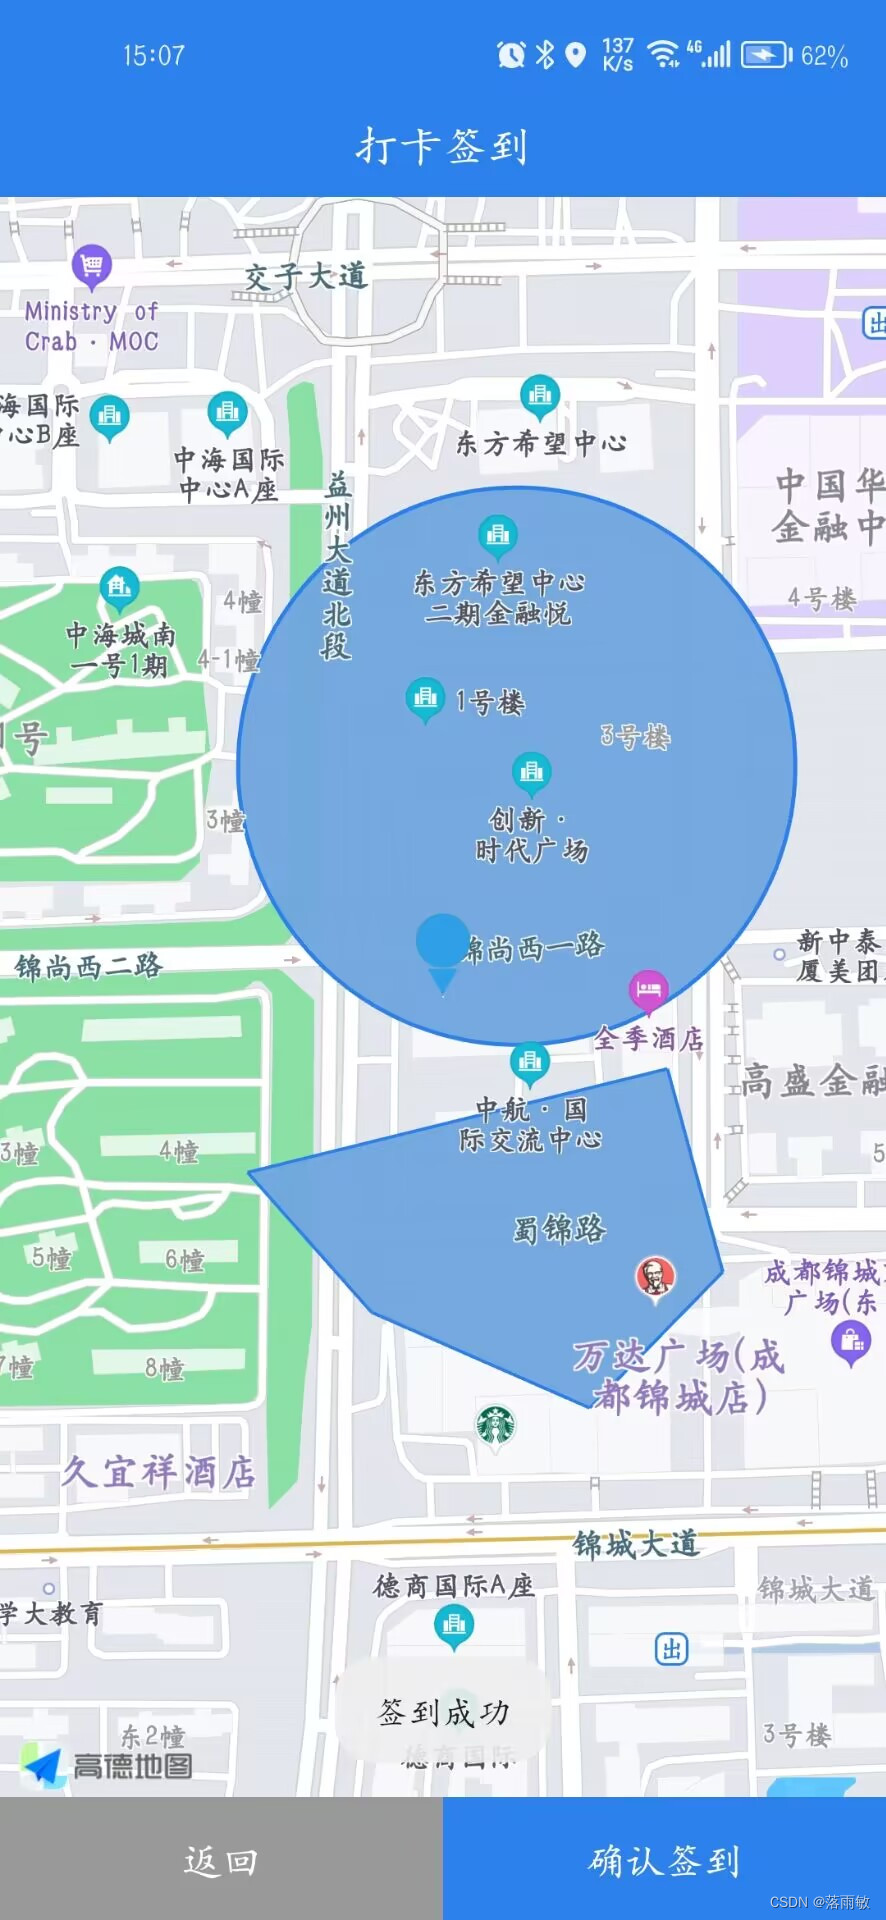
效果图:
1、添加高德地图SDK到项目依赖中
在项目的 build.gradle 文件中,添加以下依赖:
implementation 'com.amap.api:location:6.3.0'
implementation 'com.amap.api:navi-3dmap:7.4.0_3dmap7.4.0'
在项目的 AndroidManifest.xml 文件中,添加如下:
<!--高德key-->
<meta-data
      android:name="com.amap.api.v2.apikey"
      android:value="申请的key" />

<!--高德定位服务-->
<service android:name="com.amap.api.location.APSService"/>
2、获取定位权限
在项目的AndroidManifest.xml文件中,添加以下权限:
<uses-permission android:name="android.permission.ACCESS_FINE_LOCATION"/>
<uses-permission android:name="android.permission.ACCESS_COARSE_LOCATION"/>
在Activity页面中,记得申请动态权限( sdk> 6.0)
3、初始化高德地图:
1、xml布局引入:
ps:TextureMapView或MapView都可以,我这里使用的TextureMapView
<?xml version="1.0" encoding="utf-8"?>
<LinearLayout xmlns:android="http://schemas.android.com/apk/res/android"
    android:layout_width="match_parent"
    android:layout_height="match_parent"
    android:orientation="vertical">

    <RelativeLayout
        android:layout_width="match_parent"
        android:layout_height="44dp"
        android:background="#2c81ec">

        <TextView
            android:layout_width="wrap_content"
            android:layout_height="wrap_content"
            android:layout_centerInParent="true"
            android:textColor="@color/white"
            android:textSize="18sp"
            android:text="打卡签到" />

    </RelativeLayout>

    <com.amap.api.maps.TextureMapView
        android:id="@+id/mapView"
        android:layout_width="match_parent"
        android:layout_height="0dp"
        android:layout_weight="1"/>

    <LinearLayout
        android:layout_width="match_parent"
        android:layout_height="50dp">

        <TextView
            android:id="@+id/tv_cancel"
            android:layout_width="0dp"
            android:layout_weight="1"
            android:layout_height="match_parent"
            android:text="返回"
            android:gravity="center"
            android:textSize="16sp"
            android:textColor="@color/white"
            android:background="#999999"/>

        <TextView
            android:id="@+id/tv_submit"
            android:layout_width="0dp"
            android:layout_weight="1"
            android:layout_height="match_parent"
            android:text="确认签到"
            android:gravity="center"
            android:textSize="16sp"
            android:textColor="@color/white"
            android:background="#2c81ec"/>

    </LinearLayout>


</LinearLayout>
2、地图AMap、MapView 相关配置
    /**
     * 初始化 地图基础设置
     *
     * @param savedInstanceState
     */
    private void addMapViewSet(Bundle savedInstanceState) {
        // 显示地图
        mapView.onCreate(savedInstanceState);
        if (aMap == null) {
            aMap = mapView.getMap();//获取地图对象
        }
        //设置显示定位按钮 并且可以点击
        UiSettings uiSettings = aMap.getUiSettings();
        //设置定位监听:activate、deactivate
        aMap.setLocationSource(this);
        //缩放按钮隐藏(+ - )
        uiSettings.setZoomControlsEnabled(false);
        // TODO 自定义定位图标, 默认是蓝点
        aMap.setMyLocationStyle(addMyLocationStyle());
        // TODO 启动定位
        aMap.setMyLocationEnabled(true);

        //TODO 地址编码,当详细地址为空时使用
        initGeocodeQuery();
    }

    /**
     * 添加定位样式 (默认是蓝点)
     */
    private MyLocationStyle addMyLocationStyle() {
        MyLocationStyle locationStyle = new MyLocationStyle();
        locationStyle.myLocationIcon(BitmapDescriptorFactory.fromResource(R.mipmap.ic_seat_empty));
        locationStyle.showMyLocation(true);
        locationStyle.interval(4000);
        locationStyle.strokeColor(Color.argb(0, 0, 0, 0));
        locationStyle.radiusFillColor(Color.argb(0, 0, 0, 0));
        locationStyle.myLocationType(MyLocationStyle.LOCATION_TYPE_LOCATION_ROTATE_NO_CENTER);//中心位置不旋转
        return locationStyle;
    }


   //当详细地址为空时,经纬度解析地址 (非必要方法)
   private void initGeocodeQuery(){
        mGeocoderSearch = new GeocodeSearch(this);
        mGeocoderSearch.setOnGeocodeSearchListener(new GeocodeSearch.OnGeocodeSearchListener() {
            @Override
            public void onRegeocodeSearched(RegeocodeResult result, int rCode) {
                if(rCode==1000 && result.getRegeocodeAddress()!=null){
                    mCurrentDetailedAddress=result.getRegeocodeAddress().getFormatAddress();
                }
                Log.e("test-z","------逆地理编码地址="+mCurrentDetailedAddress);
            }

            @Override
            public void onGeocodeSearched(GeocodeResult result, int rCode) {

            }
        });
    }
3、MapView的生命周期设置
   @Override
    protected void onResume() {
        super.onResume();
        if (mapView != null)
            mapView.onResume();
    }

    @Override
    protected void onPause() {
        super.onPause();
        if (mapView != null)
            mapView.onPause();
    }

    @Override
    protected void onSaveInstanceState(@NonNull Bundle outState) {
        super.onSaveInstanceState(outState);
        if (mapView != null)
            mapView.onSaveInstanceState(outState);
    }

    @Override
    protected void onDestroy() {
        if (mapView != null) {
            mapView.onDestroy();
        }
        if (mLocationClient != null) {
            mLocationClient.stopLocation();
            mLocationClient.onDestroy();
            mLocationClient=null;
        }
        super.onDestroy();
    }
4、实现定位功能:
1、初始化定位相关参数配置
    /**
     * 初始化 定位配置
     */
    private void initLocationConfig() {
        try {
                //初始化定位
                mLocationClient = new AMapLocationClient(getApplicationContext());
                //设置定位回调监听
                mLocationClient.setLocationListener(this);
                //初始化定位参数
                mLocationOption = new AMapLocationClientOption();
                //设置定位模式为高精度模式,Battery_Saving为低功耗模式,Device_Sensors是仅设备模式
                mLocationOption.setLocationMode(AMapLocationClientOption.AMapLocationMode.Hight_Accuracy);
                //设置是否返回地址信息(默认返回地址信息)
                mLocationOption.setNeedAddress(true);
                //设置是否只定位一次,默认为false
                mLocationOption.setOnceLocation(false);
                mLocationOption.setHttpTimeOut(30000);
                //设置是否强制刷新WIFI,默认为强制刷新
                mLocationOption.setWifiActiveScan(true);
                //设置是否允许模拟位置,默认为false,不允许模拟位置
                mLocationOption.setMockEnable(false);
                //设置定位间隔,单位毫秒,默认为2000ms
                mLocationOption.setInterval(4000);
                //给定位客户端对象设置定位参数
                mLocationClient.setLocationOption(mLocationOption);
                //多次激活,最好调用一次stop,再调用start以保证场景模式生效
                //  mLocationClient.stopLocation();
               // 开始定位
                mLocationClient.startLocation();
        }catch (Exception e){
           //异常
        }
    }
2、定位信息的回调
AMapLocationListener类中,实现LocationSource接口,并重写onLocationChanged()方法,获取用户位置信息:
    @Override
    public void onLocationChanged(AMapLocation amapLocation) {
        if (amapLocation != null) {
            //定位成功回调信息
            if (amapLocation.getErrorCode() == 0) {
                mCurrentDetailedAddress = amapLocation.getAddress();
                if (isFirstLoc) {
                    //设置缩放级别17
                    aMap.moveCamera(CameraUpdateFactory.zoomTo(17));
                    //中心位置为当前坐标
                    aMap.moveCamera(CameraUpdateFactory.changeLatLng(new LatLng(amapLocation.getLatitude(), amapLocation.getLongitude())));
                    mListener.onLocationChanged(amapLocation);
                    //添加电子围栏列表
                    drawCompanyFenceList();
                    isFirstLoc=false;
                }
                // 记录当前定位的坐标
                mCurrentLatLng = new LatLng(amapLocation.getLatitude(), amapLocation.getLongitude());
                //添加当前位置的自定义图标
                addCurrentMarker(mCurrentLatLng, null, R.mipmap.ic_location_current);

                 //详细地址为空时,可通过逆地理编码获取地址
                getCurrentAddress();

                //重新移动到中心位置
                //aMap.moveCamera(CameraUpdateFactory.changeLatLng(new LatLng(amapLocation.getLatitude(), amapLocation.getLongitude())));
                Log.e("test-z", "----当前位置:"+amapLocation.getLatitude()+","+amapLocation.getLongitude()+" ,"+mCurrentDetailedAddress);
            } else {
                mCurrentLatLng = null;
            }
        }
    }
注意: 由于是异步解析,部分手机首次获取详细地址可能为空,可通过经纬度解析详细地址,并赋值使用。
//获取当前详细地址,那经纬度去解析  (非必要方法)
private void getCurrentAddress(){
        if(TextUtils.isEmpty(mCurrentDetailedAddress)){
            // Latlng,范围多少米,火系坐标系还是GPS原生坐标系
            RegeocodeQuery query = new RegeocodeQuery(new LatLonPoint(mCurrentLatLng.latitude,
                    mCurrentLatLng.longitude), 200,GeocodeSearch.AMAP);
            //发起请求
            mGeocoderSearch.getFromLocationAsyn(query);
        }
    }
3、添加当前位置的Marker
    /**
     * TODO 当前位置的小图标
     *
     * @param latLng
     * @param object
     * @param icon  小图标
     */
    private void addCurrentMarker(LatLng latLng, Object object, int icon) {
        MarkerOptions markerOption = new MarkerOptions();
        markerOption.position(latLng);
        //设置Marker可拖动
        markerOption.draggable(false);
        markerOption.icon(BitmapDescriptorFactory.fromResource(icon));
        // 将Marker设置为贴地显示,可以双指下拉地图查看效果
        //设置marker平贴地图效果
        markerOption.setFlat(true);
        if (mCurrentMarker != null) {
            mCurrentMarker.remove();
        }
        mCurrentMarker = aMap.addMarker(markerOption);
        // marker.setObject(object);
    }
5、打卡签到范围绘制
根据不同的图形进行绘制:
1、如果是圆形,只需要一个中心经纬度、半径,传入 CircleOptions 并在Map图层添加;
2、如果是多边形,将经纬度列表数据传入 PolygonOptions 并在Map图层添加即可
3、如果业务的打卡范围定时变化,重新绘制之前,需要先将原来的清除,建议将添加后返回的对象进行存储,方便重新时清除,同时也可以直接使用该对象判断打卡点是否在范围内
    /**
     * 类型:圆
     *
     * @param centers 中心坐标
     * @param radius 半径
     */
    public void drawTypeCircle(List<PointBean> centers, double radius) {
        if(centers!=null && centers.size()>0){
            LatLng  centerLatLng=new LatLng(centers.get(0).getLatitude(), centers.get(0).getLongitude());
            //圆形
            CircleOptions circleOptions=new CircleOptions();
            //属性信息
            circleOptions.center(centerLatLng)
                    .center(centerLatLng)
                    .radius(radius) //半径范围
                    .strokeColor(Color.parseColor("#2c81ec"))
                    .strokeWidth(5)
                    .fillColor(Color.parseColor("#F772a7df"));
            Circle  circle = aMap.addCircle(circleOptions);
            //添加记录
            mAddFences.add(circle);
        }
    }

    /**
     * 类型:多边形
     * 提示:坐标需按照 顺时针或逆时针依次添加,否则会重叠
     *
     * @param points 经纬度集合
     */
    private void drawTypePolygon(List<PointBean> points) {
        if(points!=null && points.size()>0){
            List<LatLng> latLngList=new ArrayList<>();
            for(int i=0;i<points.size();i++){
                latLngList.add(new LatLng(points.get(i).getLatitude(), points.get(i).getLongitude()));
            }

            // 定义多边形的属性信息
            PolygonOptions polygonOptions = new PolygonOptions();
            polygonOptions.addAll(latLngList);
            // 设置多边形的边框颜色,32位 ARGB格式,默认为黑色
            polygonOptions.strokeColor(Color.parseColor("#2c81ec"));
            // 设置多边形的边框宽度,单位:像素
            polygonOptions.strokeWidth(4);
            // 设置多边形的填充颜色,32位ARGB格式
            polygonOptions.fillColor(Color.parseColor("#F772a7df"));
            Polygon polygon = aMap.addPolygon(polygonOptions);
            //添加记录
            mAddFences.add(polygon);
        }
    }
6、判断打卡签到是否在范围内
在用户点击打卡时进行如下判断:
    for(int i=0;i<mAddFences.size();i++){
            if(mAddFences.get(i) instanceof Circle){
                Circle  circle= (Circle) mAddFences.get(i);
                if(circle.contains(mCurrentLatLng)){
                    return true;
                }
            }else if(mAddFences.get(i) instanceof Polygon){
                Polygon  polygon= (Polygon) mAddFences.get(i);
                if(polygon.contains(mCurrentLatLng)){
                    return true;
                }
            }
        }
最后,麻烦各位客官 点个赞 赞 赞
收藏+关注=下次不迷路


 202
202

 被折叠的 条评论
为什么被折叠?
被折叠的 条评论
为什么被折叠?
 到【灌水乐园】发言


