


return “网络中断,请稍后再试~”;
}
}
}
复制代码
2.2.2 消息接收者
接收者需要配置以下内容
-
交换器:直接new对应的交换器类型
-
队列:只有Queue类型,通过名称区分
-
交换器和队列的绑定:通过BindingBuilder.bind(队列).to(交换器).with(路由键);
-
只声明交换器和队列绑定,并不会马上创建,而是在发送消息或者监听队列时才会创建
import org.springframework.amqp.core.Binding;
import org.springframework.amqp.core.BindingBuilder;
import org.springframework.amqp.core.DirectExchange;
import org.springframework.amqp.core.Queue;
import org.springframework.context.annotation.Bean;
import org.springframework.context.annotation.Configuration;
@Configuration
public class AmqpSubscriberConfig {
/**
- 直连交换器
*/
@Bean
public DirectExchange emailDirectExchange() {
// 声明方式一
// return new DirectExchange(“exchange.direct.springboot.email”);
// 声明方式二
return ExchangeBuilder.directExchange(“exchange.direct.springboot.email”).build();
}
/**
- 声明队列
*/
@Bean
public Queue emailQueue() {
// 声明方式一
// return new Queue(“queue.direct.springboot.email”);
// 声明方式二
return QueueBuilder.durable(“queue.direct.springboot.email”).build();
}
/**
- 交换器和队列绑定
*/
@Bean
@Resource
public Binding emailBiding(Queue emailQueue, DirectExchange emailDirectExchange) {
// 将路由使用路由键绑定到交换器上
return BindingBuilder.bind(emailQueue).to(emailDirectExchange).with(“springboot.email.routing.key”);
}
}
复制代码
监听队列
-
监听的队列必须存在,否则将会报错
-
监听的队列消费完成会自动确认消息
-
如果多个队列同时监听一个队列,则消息会轮训地由不同方法处理
-
可以在参数中指定接收类型,消息将会自动转为对应类型
-
也可以指定Message参数获取对应消息信息
-
org.springframework.amqp.core.Message
-
获取消息属性:message.getMessageProperties()
-
获取消息内容:message.getBody()
import org.springframework.amqp.rabbit.annotation.RabbitListener;
import org.springframework.stereotype.Component;
/**
- 消息订阅监听
*/
@Component
public class SubscriberListener {
/**
- direct监听,相同监听队列消息将会轮流处理
*/
@RabbitListener(queues = “queue.direct.springboot.email”)
public void receiver01(String msg) {
System.out.println("receiver01 message = " + msg);
}
@RabbitListener(queues = “queue.direct.springboot.email”)
public void receiver02(String msg) {
System.out.println("receiver02 message = " + msg);
}
}
复制代码
2.1.3 消息发布订阅
1.先启动订阅者,可以看到队列声明
 2. 启动发布者,然后发布消息
import org.springframework.amqp.AmqpException;
import org.springframework.amqp.rabbit.core.RabbitTemplate;
import org.springframework.web.bind.annotation.RequestMapping;
import org.springframework.web.bind.annotation.RestController;
import javax.annotation.Resource;
@RestController
public class PublishController {
@Resource
private RabbitTemplate rabbitTemplate;
@RequestMapping(“/direct”)
public Object direct(String message) {
try {
// 指定发送的交换器和路由键
rabbitTemplate.convertAndSend(“exchange.direct.springboot.email”, “springboot.email.routing.key”, message);
return message;
} catch (AmqpException e) {
System.out.println(e.getMessage());
return “网络中断,请稍后再试~”;
}
}
}
复制代码
3.订阅者会轮流收到信息
receiver01 message = direct
receiver02 message = direct
receiver01 message = direct
receiver02 message = direct
receiver01 message = direct
receiver02 message = direct
复制代码
2.2 topic - 主题交换器
2.2.1 消息发送者
声明topic交换器
import org.springframework.amqp.core.TopicExchange;
import org.springframework.context.annotation.Bean;
import org.springframework.context.annotation.Configuration;
@Configuration
public class BlogPublisherConfig {
@Bean
public Exchange blogTopicExchange() {
return ExchangeBuilder.topicExchange(“exchange.topic.springboot.blog”).build();
}
}
复制代码
声明controller
@RequestMapping(“/topic”)
public Object topic(String routingKey, String message) {
rabbitTemplate.convertAndSend(“exchange.topic.springboot.blog”, routingKey, message);
return routingKey + " : " + message;
}
复制代码
2.2.2 消息接收者
声明交换器、三个队列、队列的绑定
-
*:匹配一个串
-
#:匹配一个或者多个串
import org.springframework.amqp.core.Binding;
import org.springframework.amqp.core.BindingBuilder;
import org.springframework.amqp.core.Queue;
import org.springframework.amqp.core.TopicExchange;
import org.springframework.context.annotation.Bean;
import org.springframework.context.annotation.Configuration;
import javax.annotation.Resource;
@Configuration
public class BlogSubscriberConfig {
/**
- 主题交换器
*/
@Bean
public TopicExchange blogTopicExchange() {
return ExchangeBuilder.topicExchange(“exchange.topic.springboot.blog”).build();
}
@Bean
public Queue blogJavaQueue() {
return QueueBuilder.durable(“queue.topic.springboot.blog.java”).build();
}
@Bean
public Queue blogMqQueue() {
return QueueBuilder.durable(“queue.topic.springboot.blog.mq”).build();
}
@Bean
public Queue blogAllQueue() {
return QueueBuilder.durable(“queue.topic.springboot.blog.all”).build();
}
@Bean
@Resource
public Binding blogJavaBinding(TopicExchange blogTopicExchange, Queue blogJavaQueue) {
return BindingBuilder.bind(blogJavaQueue).to(blogTopicExchange).with(“springboot.blog.java.routing.key”);
}
@Bean
@Resource
public Binding blogMqBinding(TopicExchange blogTopicExchange, Queue blogMqQueue) {
return BindingBuilder.bind(blogMqQueue).to(blogTopicExchange).with(“springboot.blog.mq.routing.key”);
}
@Bean
@Resource
public Binding blogAllBinding(TopicExchange blogTopicExchange, Queue blogAllQueue) {
// #: 匹配一个或者多个 *:匹配一个
return BindingBuilder.bind(blogAllQueue).to(blogTopicExchange).with(“springboot.blog.#.routing.key”);
}
}
复制代码
监听队列
import org.springframework.amqp.rabbit.annotation.RabbitListener;
import org.springframework.stereotype.Service;
@Service
public class BlogService {
/**
- topic监听
*/
@RabbitListener(queues = “queue.topic.springboot.blog.java”)
public void blogJavaListener(String message) {
System.out.println("blogJavaListener message = " + message);
}
@RabbitListener(queues = “queue.topic.springboot.blog.mq”)
public void blogMqListener(String message) {
System.out.println("blogMqListener message = " + message);
}
@RabbitListener(queues = “queue.topic.springboot.blog.all”)
public void blogAllaListener(String message) {
System.out.println("blogAllListener message = " + message);
}
}
复制代码
2.2.3 消息发布订阅
- 发布者发送消息
-
http://localhost:8071/topic?routingKey=springboot.blog.java.routing.key&message=hello
-
http://localhost:8071/topic?routingKey=springboot.blog.mq.routing.key&message=hello
- 订阅者收到消息
-
全匹配和模糊匹配
-
全匹配无论是哪个都会被匹配上
blogJavaListener message = hello
blogAllListener message = hello
blogAllListener message = hello
blogMqListener message = hello
复制代码
2.3 fanout - 广播交换器
2.3.1 消息发送者
声明fanout交换器
import org.springframework.amqp.core.FanoutExchange;
import org.springframework.context.annotation.Bean;
import org.springframework.context.annotation.Configuration;
@Configuration
public class NoticePublisherConfig {
@Bean
public Exchange radioFanoutExchange() {
return ExchangeBuilder.fanoutExchange(“exchange.fanout.springboot.radio”).build();
}
}
复制代码
声明controller
@RequestMapping(“/fanout”)
public Object fanout(String message) {
rabbitTemplate.convertAndSend(“exchange.fanout.springboot.radio”, null, message);
return message;
}
复制代码
2.32 消息接收者
创建交换器、路由键、绑定
- 不需要使用路由键
import org.springframework.amqp.core.*;
import org.springframework.context.annotation.Bean;
import org.springframework.context.annotation.Configuration;
import javax.annotation.Resource;
@Configuration
public class NoticeSubscriberConfig {
@Bean
public FanoutExchange radioFanoutExchange() {
return ExchangeBuilder.fanoutExchange(“exchange.fanout.springboot.radio”).build();
}
@Bean
public Queue radioQueue() {
return QueueBuilder.durable(“queue.fanout.springboot.radio”).build();
}
@Bean
@Resource
public Binding radioBinding(FanoutExchange radioFanoutExchange, Queue radioQueue) {
// 广播交换器绑定没有路由键,只要绑定即可收到
return BindingBuilder.bind(radioQueue).to(radioFanoutExchange);
}
}
复制代码
监听队列
import org.springframework.amqp.rabbit.annotation.RabbitListener;
import org.springframework.stereotype.Service;
@Service
public class NoticeService {
@RabbitListener(queues = “queue.fanout.springboot.radio”)
public void radioListener(String message) {
System.out.println("radioListener message = " + message);
}
}
复制代码
2.3.3 消息发布订阅
发布者发送消息
订阅者收到消息
radioListener message = fanout
复制代码
2.4 headers - 头交换器
2.4.1 消息发送者
-
headers模式通过头匹配,会忽略路由键
-
发送者需要创建队列
import org.springframework.amqp.core.HeadersExchange;
import org.springframework.context.annotation.Bean;
import org.springframework.context.annotation.Configuration;
@Configuration
public class HeadersPublisherConfig {
@Bean
public Exchange radioHeadersExchange() {
return ExchangeBuilder.headersExchange(“exchange.headers.springboot.headers”).build();
}
}
复制代码
创建controller发送消息
-
MessageProperties和Message包是:org.springframework.amqp.core
-
需要创建MessageProperties对象用于设置头信息
-
Message用于存储消息和消息属性信息
@RequestMapping(“/headers”)
public Object headers(@RequestParam Map<String, String> param) {
MessageProperties properties = new MessageProperties();
properties.setHeader(“name”, param.get(“name”));
properties.setHeader(“token”, param.get(“token”));
Message mqMessage = new Message(param.get(“message”).getBytes(), properties);
rabbitTemplate.convertAndSend(“exchange.headers.springboot.headers”, null, mqMessage);
return properties;
}
复制代码
2.4.2 消息接收者
接收者和上面三种一样,同样需要声明交换器、队列、绑定
-
在队列绑定时需要使用不同规则
-
BindingBuilder.bind(headersQueue01).to(headersExchange).whereAll(key).match()
-
所有字段属性和值全部匹配
-
BindingBuilder.bind(headersQueue02).to(headersExchange).whereAny(key).match()
-
任意字段属性和值全部匹配
-
BindingBuilder.bind(headersQueue03).to(headersExchange).whereAll(“name”, “token”).exist()
-
指定所有属性字段存在
-
BindingBuilder.bind(headersQueue03).to(headersExchange).whereAny(“name”, “token”).exist()
-
指定任意属性存在
-
headerMap中存放的属性就是发送者中封装的属性,属性完全匹配则正确路由到此处
import org.springframework.amqp.core.Binding;
import org.springframework.amqp.core.BindingBuilder;
import org.springframework.amqp.core.HeadersExchange;
import org.springframework.amqp.core.Queue;
import org.springframework.context.annotation.Bean;
import org.springframework.context.annotation.Configuration;
import javax.annotation.Resource;
import java.util.HashMap;
import java.util.Map;
@Configuration
public class HeadersSubscriberConfig {
@Bean
public HeadersExchange headersExchange() {
return ExchangeBuilder.headersExchange(“exchange.headers.springboot.headers”).build();
}
@Bean
public Queue headersQueue01() {
return QueueBuilder.durable(“queue.headers.springboot.01”).build();
}
@Bean
public Queue headersQueue02() {
return QueueBuilder.durable(“queue.headers.springboot.02”).build();
}
@Bean
public Queue headersQueue03() {
return QueueBuilder.durable(“queue.headers.springboot.03”).build();
}
@Bean
@Resource
public Binding headers01Binding(HeadersExchange headersExchange,Queue headersQueue01) {
Map<String, Object> key = new HashMap<>(4);
key.put(“name”, “java”);
key.put(“token”, “001”);
return BindingBuilder.bind(headersQueue01).to(headersExchange).whereAll(key).match();
}
@Bean
@Resource
public Binding headers02Binding(HeadersExchange headersExchange,Queue headersQueue02) {
Map<String, Object> key = new HashMap<>(4);
key.put(“name”, “java”);
key.put(“token”, “002”);
return BindingBuilder.bind(headersQueue02).to(headersExchange).whereAny(key).match();
}
@Bean
@Resource
public Binding headers03Binding(HeadersExchange headersExchange,Queue headersQueue03) {
// name和token都需要存在
return BindingBuilder.bind(headersQueue03).to(headersExchange).whereAll(“name”, “token”).exist();
// 任意name或者token存在
// return BindingBuilder.bind(headersQueue03).to(headersExchange).whereAny(“name”, “token”).exist();
}
}
复制代码
队列监听
import org.springframework.amqp.rabbit.annotation.RabbitListener;
import org.springframework.stereotype.Service;
@Service
public class HeadersService {
@RabbitListener(queues = “queue.headers.springboot.01”)
public void headers01Listener(String message) {
System.out.println("headers01Listener message = " + message);
}
@RabbitListener(queues = “queue.headers.springboot.02”)
public void headers02Listener(String message) {
System.out.println("headers02Listener message = " + message);
}
@RabbitListener(queues = “queue.headers.springboot.03”)
public void headers03Listener(String message) {
System.out.println("headers03Listener message = " + message);
}
}
复制代码
2.4.3 消息发布订阅
- 发送消息
-
http://localhost:8071/headers?name=java&token=001&message=headers
-
http://localhost:8071/headers?name=java&token=002&message=headers
-
http://localhost:8071/headers?name=mq&token=003&message=headers
- 接收消息
headers01Listener message = headers
headers02Listener message = headers
headers03Listener message = headers
headers02Listener message = headers
headers03Listener message = headers
headers03Listener message = headers
三、发送者异常监控
=========
3.1 发送者异常种类
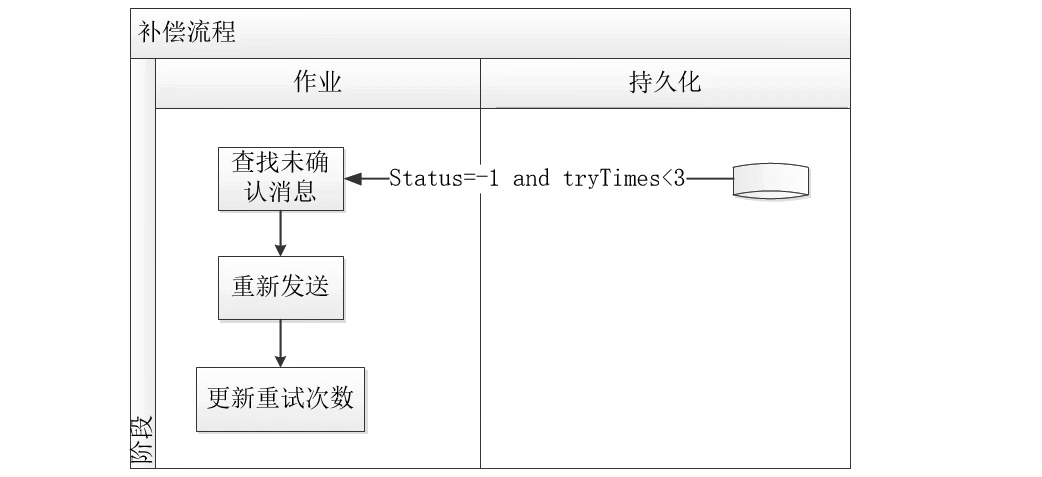
基本处理流程
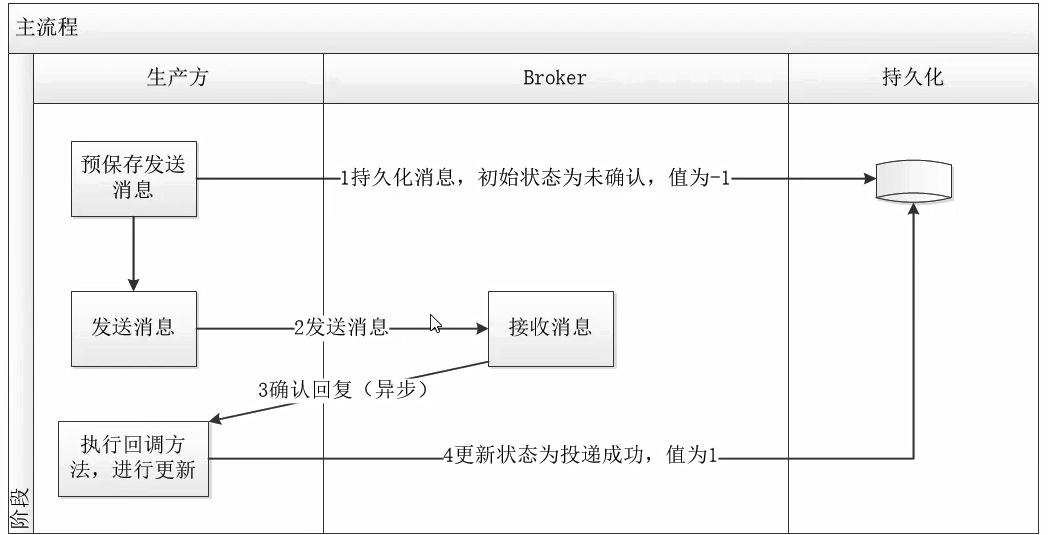
- 补偿(兜底)方案
模拟broker宕机:修改发送者端口如5673,然后启动,发送消息,端口不对无法连接主机
-
错误信息:java.net.ConnectException: Connection timed out: connect
-
补偿方案:加入异常处理,如果不可达则返回错误
-
这种错误在发送的时候就已经可以发现,直接将错误返回给调用方即可
@RequestMapping(“/direct”)
public Object sendEmail(String msg) {
try {
rabbitTemplate.convertAndSend(“exchange.direct.springboot.email”, “queue.email.routing.key”, msg);
return msg;
} catch (AmqpException e) {
System.out.println(“发送出现异常:” + e.getMessage());
return “网络中断,请稍后再试”;
}
}
复制代码
模拟无交换器异常
-
错误信息
-
ERROR 4880 — [.200.57.39:5672] o.s.a.r.c.CachingConnectionFactory : Channel shutdown: channel error; protocol method: #method<channel.close>(reply-code=404, reply-text=NOT_FOUND - no exchange ‘noExchange’ in vhost ‘/’, class-id=60, method-id=40)
-
错误说明:如果没有交换器并不会报错,只会输出一条日志
-
补偿方案:需要采用发送回调来确认是否成功发送消息
模拟无路由异常
-
错误信息:无任何提示,消息直接被丢弃
-
补偿方案:需要采用发送回调来确认是否成功发送消息
3.2 消息发送回调
因为消息是异步发送,所以需要确保消息能正确发送
所以可配置RabbitTemplate然后指定回调信息
步骤01:修改配置文件,配置回调参数
-
publisher-confirm-type
-
org.springframework.boot.autoconfigure.amqp.RabbitProperties#publisherConfirmType
-
org.springframework.amqp.rabbit.connection.CachingConnectionFactory.ConfirmType
spring:
rabbitmq:
host: 127.0.0.1
port: 5672
username: tianxin
password: tianxin
开启消息发broker回调
publisher-confirm-type: correlated
开启路由消息路由回调
publisher-returns: true
强制确认,也可以在代码中开启
template:
mandatory: true
复制代码
/**
- The type of publisher confirms to use.
*/
public enum ConfirmType {
/**
-
Use {@code RabbitTemplate#waitForConfirms()} (or {@code waitForConfirmsOrDie()}
-
within scoped operations.
*/
SIMPLE,
/**
-
Use with {@code CorrelationData} to correlate confirmations with sent
-
messsages.
*/
CORRELATED,
/**
- Publisher confirms are disabled (default).
*/
NONE
}
复制代码
步骤02:配置RabbitTemplate,设置交换器确认回调和路由回调
-
setConfirmCallback:无论成功与否都会调用
-
setReturnCallback:错误时才调用
import org.springframework.amqp.rabbit.connection.ConnectionFactory;
import org.springframework.amqp.rabbit.core.RabbitTemplate;
import org.springframework.context.annotation.Bean;
import org.springframework.context.annotation.Configuration;
import java.util.Objects;
@Configuration
public class CustomRabbitTemplate {
@Bean
public RabbitTemplate rabbitTemplate(ConnectionFactory connectionFactory) {
RabbitTemplate rabbitTemplate = new RabbitTemplate();
// 开启mandatory为true才能触发回调方法,无论消息推送结果如何强制调用回调方法
rabbitTemplate.setMandatory(true);
// 设置连接工厂信息
rabbitTemplate.setConnectionFactory(connectionFactory);
// 消息发broker回调:发送者到broker的exchange是否正确找到
rabbitTemplate.setConfirmCallback((correlationData, ack, cause) -> {
System.out.println(“setConfirmCallback 消息数据:” + correlationData);
if (Objects.nonNull(correlationData)) {
System.out.println(“setConfirmCallback 消息数据:” + correlationData.getReturnedMessage());
}
System.out.println(“setConfirmCallback 消息确认:” + ack);
System.out.println(“setConfirmCallback 原因:” + cause);
System.out.println(“-----------------------------------”);
});
// 消息路由回调:从交换器路由到队列是否正确发送
rabbitTemplate.setReturnCallback((message, replyCode, replyText, exchange, routingKey) -> {
System.out.println(“setReturnCallback 消息:” + message);
System.out.println(“setReturnCallback 回应码:” + replyCode);
System.out.println(“setReturnCallback 回应信息:” + replyText);
System.out.println(“setReturnCallback 交换器:” + exchange);
System.out.println(“setReturnCallback 路由键:” + routingKey);
System.out.println(“-----------------------------------”);
});
return rabbitTemplate;
}
}
复制代码
- 路由回调和消息回调
/**
-
A callback for publisher confirmations.
*/
@FunctionalInterface
public interface ConfirmCallback {
/**
-
Confirmation callback.
-
@param correlationData correlation data for the callback.
-
@param ack true for ack, false for nack
-
@param cause An optional cause, for nack, when available, otherwise null.
*/
void confirm(@Nullable CorrelationData correlationData, boolean ack, @Nullable String cause);
}
/**
-
A callback for returned messages.
*/
@FunctionalInterface
public interface ReturnCallback {
/**
-
Returned message callback.
-
@param message the returned message.
-
@param replyCode the reply code.
-
@param replyText the reply text.
-
@param exchange the exchange.
-
@param routingKey the routing key.
*/
void returnedMessage(Message message, int replyCode, String replyText, String exchange, String routingKey);
}
复制代码
步骤03:测试controller
-
convertAndSend(String exchange, String routingKey, final Object object, @Nullable CorrelationData correlationData)
-
指定CorrelationData(关联数据/对比数据)
-
CorrelationData中可以指定消息id和回调消息
-
{“id”: “dataId”, data: “biz数据”}
测试无交换器
-
找不到交换器:直接回调setConfirmCallback,不再继续调用
@RequestMapping(“/noExchange”)
public Object noExchange(String message) {
try {
// 连接不上路由,则消息直接丢弃
String id = UUID.randomUUID().toString();
rabbitTemplate.convertAndSend(“noExchange”, “springboot.email.routing.key”, message, new CorrelationData(id));
return “ok”;
} catch (AmqpException e) {
System.out.println(e.getMessage());
return e.getMessage();
}
}
复制代码
setConfirmCallback 消息数据:CorrelationData [id=9aca9a83-5815-455b-acf0-71b0caed534c]
setConfirmCallback 消息数据:null
setConfirmCallback 消息确认:false
setConfirmCallback 原因:channel error; protocol method: #method<channel.close>(reply-code=404, reply-text=NOT_FOUND - no exchange ‘noExchange’ in vhost ‘/’, class-id=60, method-id=40)
复制代码
测试无路由
-
找不到路由:先回调setReturnCallback再回调setConfirmCallback
@RequestMapping(“/noQueue”)
public Object noQueue(String message) {
try {
// 发送不到队列 ,则消息直接丢弃
String id = UUID.randomUUID().toString();
rabbitTemplate.convertAndSend(“exchange.direct.springboot.email”, “noQueue”, message, new CorrelationData(id));
return “ok”;
} catch (AmqpException e) {
System.out.println(e.getMessage());
return e.getMessage();
}
}
复制代码
setReturnCallback 消息:(Body:‘direct’ MessageProperties [headers={spring_returned_message_correlation=a4b6e77c-4b13-48e4-9a2e-21bd6ef4a697}, contentType=text/plain, contentEncoding=UTF-8, contentLength=0, receivedDeliveryMode=PERSISTENT, priority=0, deliveryTag=0])
setReturnCallback 回应码:312
setReturnCallback 回应信息:NO_ROUTE
setReturnCallback 交换器:exchange.direct.springboot.email
setReturnCallback 路由键:noQueue
setConfirmCallback 消息数据:CorrelationData [id=a4b6e77c-4b13-48e4-9a2e-21bd6ef4a697]
setConfirmCallback 消息数据:(Body:‘direct’ MessageProperties [headers={spring_listener_return_correlation=42813c45-b804-4303-b9f0-10a73dad71ca, spring_returned_message_correlation=a4b6e77c-4b13-48e4-9a2e-21bd6ef4a697}, contentType=text/plain, contentEncoding=UTF-8, contentLength=0, receivedDeliveryMode=PERSISTENT, priority=0, redelivered=false, receivedExchange=exchange.direct.springboot.email, receivedRoutingKey=noQueue, deliveryTag=0])
setConfirmCallback 消息确认:true
setConfirmCallback 原因:null
复制代码
测试消息正常发送
-
消息发送成功:只回调setConfirmCallback
@RequestMapping(“/direct/confirm”)
public Object directConfirm(String message) {
try {
String id = UUID.randomUUID().toString();
rabbitTemplate.convertAndSend(“exchange.direct.springboot.email”, “springboot.email.routing.key”, message, new CorrelationData(id));
return “ok”;
} catch (AmqpException e) {
自我介绍一下,小编13年上海交大毕业,曾经在小公司待过,也去过华为、OPPO等大厂,18年进入阿里一直到现在。
深知大多数Java工程师,想要提升技能,往往是自己摸索成长或者是报班学习,但对于培训机构动则几千的学费,着实压力不小。自己不成体系的自学效果低效又漫长,而且极易碰到天花板技术停滞不前!
因此收集整理了一份《2024年Java开发全套学习资料》,初衷也很简单,就是希望能够帮助到想自学提升又不知道该从何学起的朋友,同时减轻大家的负担。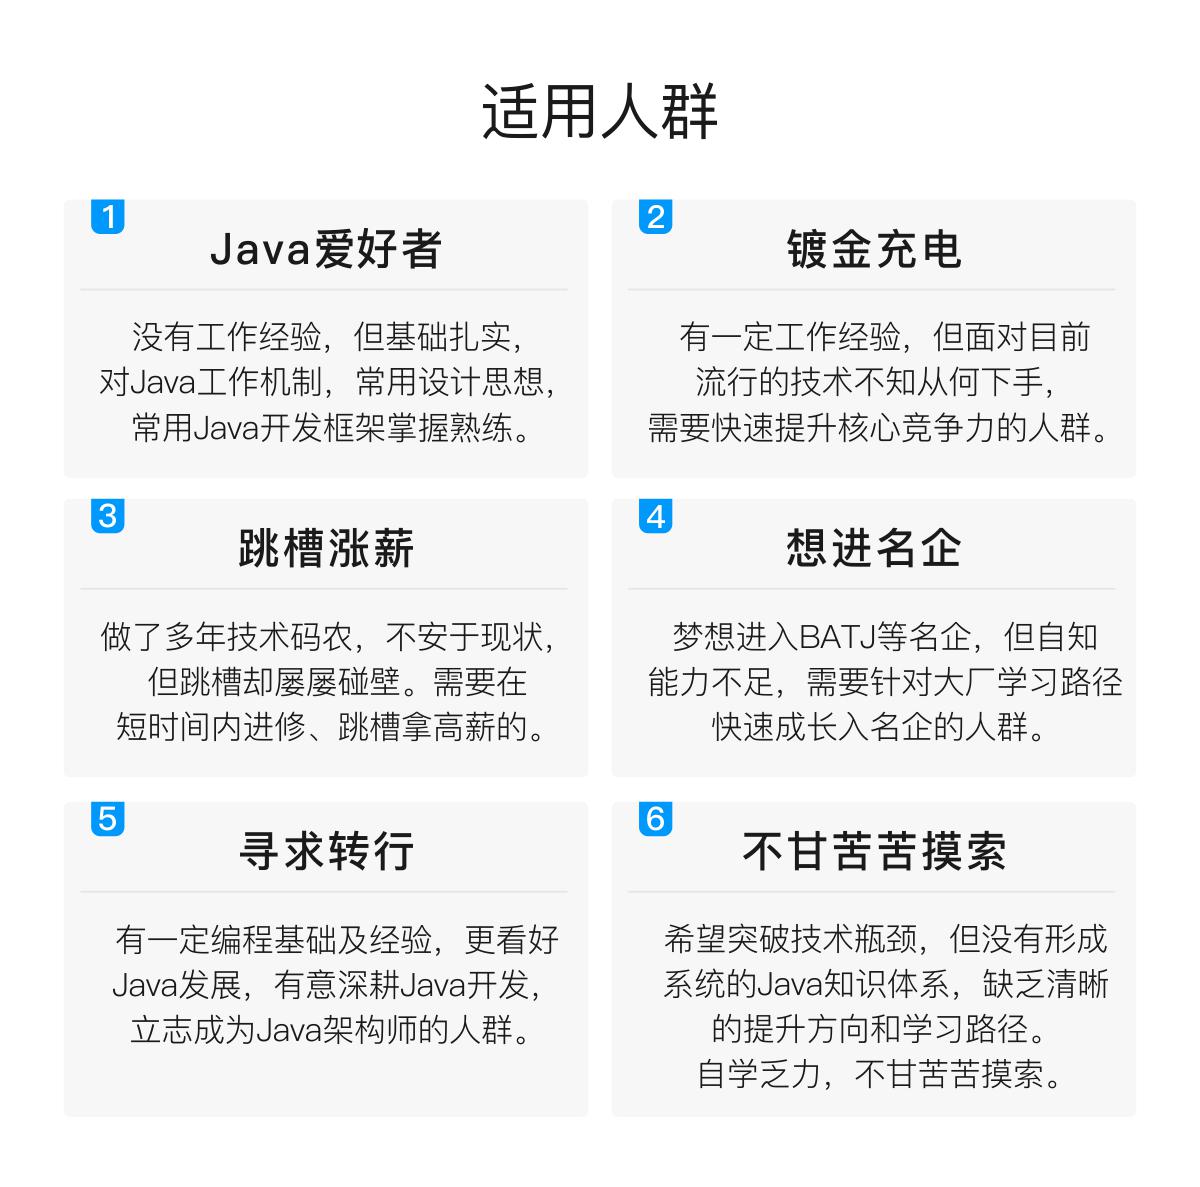

既有适合小白学习的零基础资料,也有适合3年以上经验的小伙伴深入学习提升的进阶课程,基本涵盖了95%以上Java开发知识点,真正体系化!
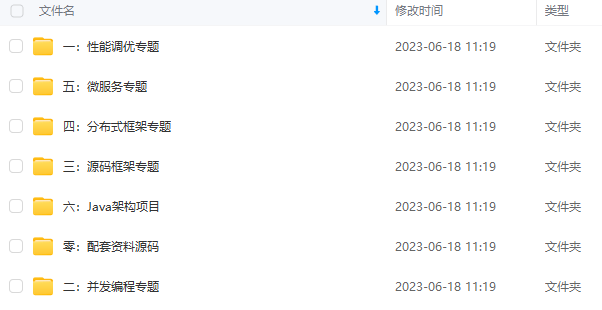
由于文件比较大,这里只是将部分目录截图出来,每个节点里面都包含大厂面经、学习笔记、源码讲义、实战项目、讲解视频,并且会持续更新!
如果你觉得这些内容对你有帮助,可以扫码获取!!(备注Java获取)

最后:学习总结——MyBtis知识脑图(纯手绘xmind文档)
学完之后,若是想验收效果如何,其实最好的方法就是可自己去总结一下。比如我就会在学习完一个东西之后自己去手绘一份xmind文件的知识梳理大纲脑图,这样也可方便后续的复习,且都是自己的理解,相信随便瞟几眼就能迅速过完整个知识,脑补回来。下方即为我手绘的MyBtis知识脑图,由于是xmind文件,不好上传,所以小编将其以图片形式导出来传在此处,细节方面不是特别清晰。但可给感兴趣的朋友提供完整的MyBtis知识脑图原件(包括上方的面试解析xmind文档)

除此之外,前文所提及的Alibaba珍藏版mybatis手写文档以及一本小小的MyBatis源码分析文档——《MyBatis源码分析》等等相关的学习笔记文档,也皆可分享给认可的朋友!
《互联网大厂面试真题解析、进阶开发核心学习笔记、全套讲解视频、实战项目源码讲义》点击传送门即可获取!
测试消息正常发送
-
消息发送成功:只回调setConfirmCallback
@RequestMapping(“/direct/confirm”)
public Object directConfirm(String message) {
try {
String id = UUID.randomUUID().toString();
rabbitTemplate.convertAndSend(“exchange.direct.springboot.email”, “springboot.email.routing.key”, message, new CorrelationData(id));
return “ok”;
} catch (AmqpException e) {
自我介绍一下,小编13年上海交大毕业,曾经在小公司待过,也去过华为、OPPO等大厂,18年进入阿里一直到现在。
深知大多数Java工程师,想要提升技能,往往是自己摸索成长或者是报班学习,但对于培训机构动则几千的学费,着实压力不小。自己不成体系的自学效果低效又漫长,而且极易碰到天花板技术停滞不前!
因此收集整理了一份《2024年Java开发全套学习资料》,初衷也很简单,就是希望能够帮助到想自学提升又不知道该从何学起的朋友,同时减轻大家的负担。[外链图片转存中…(img-qQfWWYce-1713562633821)]
[外链图片转存中…(img-fnKlRK3Q-1713562633822)]
[外链图片转存中…(img-a5Ep4ghU-1713562633823)]
既有适合小白学习的零基础资料,也有适合3年以上经验的小伙伴深入学习提升的进阶课程,基本涵盖了95%以上Java开发知识点,真正体系化!
由于文件比较大,这里只是将部分目录截图出来,每个节点里面都包含大厂面经、学习笔记、源码讲义、实战项目、讲解视频,并且会持续更新!
如果你觉得这些内容对你有帮助,可以扫码获取!!(备注Java获取)
最后:学习总结——MyBtis知识脑图(纯手绘xmind文档)
学完之后,若是想验收效果如何,其实最好的方法就是可自己去总结一下。比如我就会在学习完一个东西之后自己去手绘一份xmind文件的知识梳理大纲脑图,这样也可方便后续的复习,且都是自己的理解,相信随便瞟几眼就能迅速过完整个知识,脑补回来。下方即为我手绘的MyBtis知识脑图,由于是xmind文件,不好上传,所以小编将其以图片形式导出来传在此处,细节方面不是特别清晰。但可给感兴趣的朋友提供完整的MyBtis知识脑图原件(包括上方的面试解析xmind文档)
[外链图片转存中…(img-8kvouyhB-1713562633824)]
除此之外,前文所提及的Alibaba珍藏版mybatis手写文档以及一本小小的MyBatis源码分析文档——《MyBatis源码分析》等等相关的学习笔记文档,也皆可分享给认可的朋友!
《互联网大厂面试真题解析、进阶开发核心学习笔记、全套讲解视频、实战项目源码讲义》点击传送门即可获取!


 417
417


 被折叠的 条评论
为什么被折叠?
被折叠的 条评论
为什么被折叠?
 到【灌水乐园】发言


