


总结
其实要轻松掌握很简单,要点就两个:
- 找到一套好的视频资料,紧跟大牛梳理好的知识框架进行学习。
- 多练。 (视频优势是互动感强,容易集中注意力)
你不需要是天才,也不需要具备强悍的天赋,只要做到这两点,短期内成功的概率是非常高的。
对于很多初中级Android工程师而言,想要提升技能,往往是自己摸索成长,不成体系的学习效果低效漫长且无助。下面资料部分截图是我花费几个月时间整理的,诚意满满:特别适合有3-5年开发经验的Android程序员们学习。

网上学习资料一大堆,但如果学到的知识不成体系,遇到问题时只是浅尝辄止,不再深入研究,那么很难做到真正的技术提升。
一个人可以走的很快,但一群人才能走的更远!不论你是正从事IT行业的老鸟或是对IT行业感兴趣的新人,都欢迎加入我们的的圈子(技术交流、学习资源、职场吐槽、大厂内推、面试辅导),让我们一起学习成长!
FATAL EXCEPTION: main
java.lang.UnsupportedOperationException:
addView(View, LayoutParams) is not supported in AdapterView
嗯,没错没有图3,第三种写法会报错。
由上面三行代码的变化,产生3个不同的结果,可以看到
inflater(resId, null )的确不能正确处理宽高的值,但是inflater(resId,parent,false)并非和inflater(resId, null )效果一致,它可以看出完美的显示了宽和高。
而inflater(resId,parent,true)报错了(错误的原因在解析源码的时候说)。
由此可见:文章开始提出的理解是绝对错误的。
3、源码解析
下面我通过源码来解释,这三种写法真正的差异
这三个方法,最终都会执行下面的代码:
public View inflate(XmlPullParser parser, ViewGroup root, boolean attachToRoot) {
synchronized (mConstructorArgs) {
final AttributeSet attrs = Xml.asAttributeSet(parser);
Context lastContext = (Context)mConstructorArgs[0];
mConstructorArgs[0] = mContext;
View result = root;
try {
// Look for the root node.
int type;
while ((type = parser.next()) != XmlPullParser.START_TAG &&
type != XmlPullParser.END_DOCUMENT) {
// Empty
}
if (type != XmlPullParser.START_TAG) {
throw new InflateException(parser.getPositionDescription()
- “: No start tag found!”);
}
final String name = parser.getName();
if (DEBUG) {
System.out.println(“**************************”);
System.out.println("Creating root view: "
- name);
System.out.println(“**************************”);
}
if (TAG_MERGE.equals(name)) {
if (root == null || !attachToRoot) {
throw new InflateException(" can be used only with a valid "
- “ViewGroup root and attachToRoot=true”);
}
rInflate(parser, root, attrs, false);
} else {
// Temp is the root view that was found in the xml
View temp;
if (TAG_1995.equals(name)) {
temp = new BlinkLayout(mContext, attrs);
} else {
temp = createViewFromTag(root, name, attrs);
}
ViewGroup.LayoutParams params = null;
if (root != null) {
if (DEBUG) {
System.out.println("Creating params from root: " +
root);
}
// Create layout params that match root, if supplied
params = root.generateLayoutParams(attrs);
if (!attachToRoot) {
// Set the layout params for temp if we are not
// attaching. (If we are, we use addView, below)
temp.setLayoutParams(params);
}
}
if (DEBUG) {
System.out.println(“-----> start inflating children”);
}
// Inflate all children under temp
rInflate(parser, temp, attrs, true);
if (DEBUG) {
System.out.println(“-----> done inflating children”);
}
// We are supposed to attach all the views we found (int temp)
// to root. Do that now.
if (root != null && attachToRoot) {
root.addView(temp, params);
}
// Decide whether to return the root that was passed in or the
// top view found in xml.
if (root == null || !attachToRoot) {
result = temp;
}
}
} catch (XmlPullParserException e) {
InflateException ex = new InflateException(e.getMessage());
ex.initCause(e);
throw ex;
} catch (IOException e) {
InflateException ex = new InflateException(
parser.getPositionDescription()
- ": " + e.getMessage());
ex.initCause(e);
throw ex;
} finally {
// Don’t retain static reference on context.
mConstructorArgs[0] = lastContext;
mConstructorArgs[1] = null;
}
return result;
}
}
第6行:首先声明了View result = root ;//最终返回值为result
第43行执行了:temp = createViewFromTag(root, name, attrs);创建了View
然后直接看48-59:
if(root!=null)
{
params = root.generateLayoutParams(attrs);
if (!attachToRoot)
{
temp.setLayoutParams(params);
}
}
可以看到,当root不为null,attachToRoot为false时,为temp设置了LayoutParams.
继续往下,看73-75行:
if (root != null && attachToRoot)
{
root.addView(temp, params);
}
当root不为null,attachToRoot为true时,将tmp按照params添加到root中。
然后78-81行:
if (root == null || !attachToRoot) {
result = temp;
}
如果root为null,或者attachToRoot为false则,将temp赋值给result。
最后返回result。
从上面的分析已经可以看出:
Inflate(resId , null ) 只创建temp ,返回temp
Inflate(resId , parent, false )创建temp,然后执行temp.setLayoutParams(params);返回temp
Inflate(resId , parent, true ) 创建temp,然后执行root.addView(temp, params);最后返回root
由上面已经能够解释:
Inflate(resId , null )不能正确处理宽和高是因为:layout_width,layout_height是相对了父级设置的,必须与父级的LayoutParams一致。而此temp的getLayoutParams为null
Inflate(resId , parent,false ) 可以正确处理,因为temp.setLayoutParams(params);这个params正是root.generateLayoutParams(attrs);得到的。
Inflate(resId , parent,true )不仅能够正确的处理,而且已经把resId这个view加入到了parent,并且返回的是parent,和以上两者返回值有绝对的区别,还记得文章前面的例子上,MyAdapter里面的getView报的错误:
java.lang.UnsupportedOperationException:
addView(View, LayoutParams) is not supported in AdapterView
这是因为源码中调用了root.addView(temp, params);而此时的root是我们的ListView,ListView为AdapterView的子类:
直接看AdapterView的源码:
@Override
public void addView(View child) {
throw new UnsupportedOperationException(“addView(View) is not supported in AdapterView”);
}
可以看到这个错误为啥产生了。
4、 进一步的解析
上面我根据源码得出的结论可能大家还是有一丝的迷惑,我再写个例子论证我们上面得出的结论:
主布局文件:
<Button xmlns:android=“http://schemas.android.com/apk/res/android”
xmlns:tools=“http://schemas.android.com/tools”
android:id=“@+id/id_btn”
android:layout_width=“120dp”
android:layout_height=“120dp”
android:text=“Button” >
主Activity:
package com.example.zhy_layoutinflater;
import android.app.ListActivity;
import android.os.Bundle;
import android.util.Log;
import android.view.LayoutInflater;
import android.view.View;
import android.view.ViewGroup;
public class MainActivity extends ListActivity
{
private LayoutInflater mInflater;
@Override
protected void onCreate(Bundle savedInstanceState)
{
super.onCreate(savedInstanceState);
mInflater = LayoutInflater.from(this);
View view1 = mInflater.inflate(R.layout.activity_main, null);
View view2 = mInflater.inflate(R.layout.activity_main,
(ViewGroup)findViewById(android.R.id.content), false);
View view3 = mInflater.inflate(R.layout.activity_main,
(ViewGroup)findViewById(android.R.id.content), true);
Log.e(“TAG”, “view1 = " + view1 +” , view1.layoutParams = " + view1.getLayoutParams());
Log.e(“TAG”, “view2 = " + view2 +” , view2.layoutParams = " + view2.getLayoutParams());
Log.e(“TAG”, "view3 = " + view3 );
}
}
可以看到我们的主Activity并没有执行setContentView,仅仅执行了LayoutInflater的3个方法。
注:parent我们用的是Activity的内容区域:即android.R.id.content,是一个FrameLayout,我们在setContentView(resId)时,其实系统会自动为了包上一层FrameLayout(id=content)。
按照我们上面的说法:
view1的layoutParams 应该为null
view2的layoutParams 应该不为null,且为FrameLayout.LayoutParams
view3为FrameLayout,且将这个button添加到Activity的内容区域了(因为R.id.content代表Actvity内容区域)
下面看一下输出结果,和Activity的展示:
07-27 14:17:36.703: E/TAG(2911): view1 = android.widget.Button@429d1660 , view1.layoutParams = null
07-27 14:17:36.703: E/TAG(2911): view2 = android.widget.Button@42a0e120 , view2.layoutParams = android.widget.FrameLayout$LayoutParams@42a0e9a0
07-27 14:17:36.703: E/TAG(2911): view3 = android.widget.FrameLayout@42a0a240
效果图:
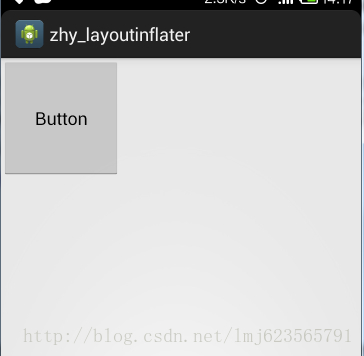
可见,虽然我们没有执行setContentView,但是依然可以看到绘制的控件,是因为
View view3 = mInflater.inflate(R.layout.activity_main,(ViewGroup)findViewById(android.R.id.content), true);
这个方法内部已经执行了root.addView(temp , params); 上面已经解析过了。
也可以看出:和我们的推测完全一致,到此已经完全说明了inflate3个重载的方法的区别。相信大家以后在使用时也能选择出最好的方式。不过下面准备从ViewGroup和View的角度来说一下,为啥layoutParams为null,就不能这确的处理。
尾声
如果你想成为一个优秀的 Android 开发人员,请集中精力,对基础和重要的事情做深度研究。
对于很多初中级Android工程师而言,想要提升技能,往往是自己摸索成长,不成体系的学习效果低效漫长且无助。 整理的这些架构技术希望对Android开发的朋友们有所参考以及少走弯路,本文的重点是你有没有收获与成长,其余的都不重要,希望读者们能谨记这一点。
这里,笔者分享一份从架构哲学的层面来剖析的视频及资料分享给大家梳理了多年的架构经验,筹备近6个月最新录制的,相信这份视频能给你带来不一样的启发、收获。
PS:之前因为秋招收集的二十套一二线互联网公司Android面试真题 (含BAT、小米、华为、美团、滴滴)和我自己整理Android复习笔记(包含Android基础知识点、Android扩展知识点、Android源码解析、设计模式汇总、Gradle知识点、常见算法题汇总。)

架构篇
《Jetpack全家桶打造全新Google标准架构模式》

网上学习资料一大堆,但如果学到的知识不成体系,遇到问题时只是浅尝辄止,不再深入研究,那么很难做到真正的技术提升。
一个人可以走的很快,但一群人才能走的更远!不论你是正从事IT行业的老鸟或是对IT行业感兴趣的新人,都欢迎加入我们的的圈子(技术交流、学习资源、职场吐槽、大厂内推、面试辅导),让我们一起学习成长!
份从架构哲学的层面来剖析的视频及资料分享给大家梳理了多年的架构经验,筹备近6个月最新录制的,相信这份视频能给你带来不一样的启发、收获。[外链图片转存中…(img-7Gj7miLm-1715799491076)]
PS:之前因为秋招收集的二十套一二线互联网公司Android面试真题 (含BAT、小米、华为、美团、滴滴)和我自己整理Android复习笔记(包含Android基础知识点、Android扩展知识点、Android源码解析、设计模式汇总、Gradle知识点、常见算法题汇总。)
[外链图片转存中…(img-Rp3e4ikh-1715799491076)]
架构篇
《Jetpack全家桶打造全新Google标准架构模式》
[外链图片转存中…(img-vjy0C3Fe-1715799491077)]
网上学习资料一大堆,但如果学到的知识不成体系,遇到问题时只是浅尝辄止,不再深入研究,那么很难做到真正的技术提升。
一个人可以走的很快,但一群人才能走的更远!不论你是正从事IT行业的老鸟或是对IT行业感兴趣的新人,都欢迎加入我们的的圈子(技术交流、学习资源、职场吐槽、大厂内推、面试辅导),让我们一起学习成长!


 被折叠的 条评论
为什么被折叠?
被折叠的 条评论
为什么被折叠?
 到【灌水乐园】发言


