


既有适合小白学习的零基础资料,也有适合3年以上经验的小伙伴深入学习提升的进阶课程,涵盖了95%以上软件测试知识点,真正体系化!
由于文件比较多,这里只是将部分目录截图出来,全套包含大厂面经、学习笔记、源码讲义、实战项目、大纲路线、讲解视频,并且后续会持续更新
         '''         创建商品API定义         createCommodityParams: 创建商品接口入参         return:创建商品接口响应结果         '''          def createCommodityRequest(createCommodityParams):          return api.getUrl("testApi.create.commodity").post.params(createCommodityParams)                 '''         创建分类API定义         createCategoryParams: 创建分类接口入参         return:创建分类接口响应结果         '''          def createCategoryRequest(createCategoryParams)          return api.getUrl("testApi.create.category").post.params(createCategoryParams)                  # 创建优惠券接口定义         def createCouponRequest(createCouponParams)          return api.getUrl("testApi.create.coupon").post.params(createCouponParams)                 # 创建活动接口定义         def createPublicityRequest(createPublicityParams)          return api.getUrl("testApi.create.publicity").post.params(createPublicityParams)                 # ...其余省略
复制代码
2、Service 层
上面我们已经将接口的定义抽离出来,解决了 API 重复定义的问题,但是再继续分析会发现有一个问题依然没有解决,就是场景的复用性.
再看刚才的图:
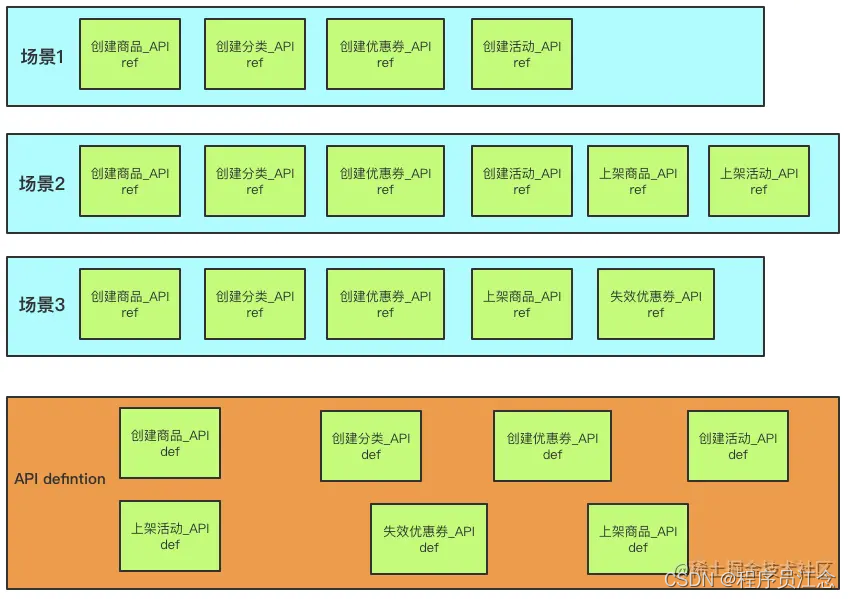
3个场景中都有重复的步骤,类似创建商品、创建分类、创建优惠券这些,并且这些步骤都是一个个API的组合,一个步骤对应一个API,在各个步骤之间还会有数据的处理与传递,为了解决这些问题,将对场景再次做抽离,这里我称之为 service 层。
这一层之所以叫做
service(服务)层,是因为它的作用是用来提供测试用例所需要的各种“服务”,好比参数构建、接口请求、数据处理、测试步骤。
用下图先来看分层的目标:

我们希望将常用的测试场景步骤封装至service层中,供用例场景调用,增加复用性,也可以理解为测试用例的前置处理;
但是这里还是有一点小问题,就是service层的东西太多太杂,有些场景步骤可能只适用于我当前的项目用例,在实际的工作中,各个系统间是相互依赖的,前台APP的测试很大可能就依赖后台创建作为前置条件
好比我在APP端只要商品和分类,可能只想创建商品和分类,并不想创建优惠券,这个时候service层就没有适用的场景步骤供调用,那么我就需要根据自己的需要重新封装;可是对于很多单接口的前置数据处理又是一致的,比如:
        createCommodityParams["input"]["title"] = "autoTest" + str(time.time())        createCommodityParams["input"]["mallCode"] = self.mallCode        createCommodityParams["input"]["skuList"][0]["price"] = random.randint(1,10)        createCategoryParams["input"]["categoryName"] = "autoTestCategory" + str(time.time())        createCouponParams。。。        createPublicityParams。。。        publishCommodityParams。。。        publishPublicityParams。。。
复制代码
重新封装的话还要再处理这一步,就有点麻烦且不符合我们的复用性设计了,因此我们对service层再细化为3层,分别为:
apiObject:
单接口的预处理层,这一层主要作用是单接口入参的构造,接口的请求与响应值返回
- 每个接口请求不依赖与业务步骤,都是单接口的请求;
- 此外一些简单固定的入参构建也直接放在这里处理,比如随机的商品名,title等,和具体业务流程无关,针对所有调用此接口的场景均适用
caseService:
多接口的预处理层,这一层主要是
测试步骤(teststep)或场景的有序集合。
用例所需要的步骤,通过每一个请求进行组合,每一个步骤都对应着一个API请求,这些步骤会组成一个个场景,各个场景之间可以互相调用组成新的场景,以适应不同的测试用例需求。
场景封装好以后可以供不同的测试用例调用,除了当前项目的用例,其他业务线需要的话也可从此caseService中选择调用,提高复用性的同时也避免了用例相互依赖的问题。
util:
这一层主要放置针对当前业务的接口需要处理的数据
- 在实际编写测试步骤时,可能部分接口的参数是通过其他接口获取后经过处理才可以使用,或是修改数据格式,或是修改字段名称,亦或是某些 value 的加解密处理等。
细化分层后,各层的职责便更加清晰明确,具体如下图:

实例演示
apiObject:
        class ApiObject:         def createCommodity(createCommodityParams):          inputParams = ApiParamsBuild().createCommodityParamsBuild(createCommodityParams)          response = APIDefinition().createCommodityRequest(inputParams)          return response                 def createCategory(createCategoryParams):          ...                 def createCoupon(createCouponParams):          ...                 ......                  class ApiParamsBuild:         def createCommodityParamsBuild(createCommodityParams):          createCommodityParams["input"]["title"] = "autoTest" + str(time.time())          createCommodityParams["input"]["mallCode"] = self.mallCode          createCommodityParams["input"]["skuList"][0]["price"] = random.randint(1,10)          return createCommodityParams                 def createCategoryParamsBuild(createCategoryParams):          ...                 def createCouponParamsBuild(createCouponParams):          ...                 ......
复制代码
到此,我们来看看原始的用例经过目前封装后的模样:
        # 1、参数构造        createCommodityParams = {            "input": {                "title": "活动商品",                "subtitle": "",                "brand": "",                "categoryLevel1Code": "12",                "categoryLevel2Code": "1312",                "categoryLevel3Code": "131211",                "detail": [                    {                        "uri": "ecommerce/1118d9.jpg",                        "type": 0                    }                ],                "installInfo": {                    "installType": 1,                    "installFee": null                },                "pictureList": [                    {                        "uri": "ecommerce/222.jpg",                        "main": true                    }                ],                "postageInfo": {                    "postageType": 2,                    "postageFee": 1,                    "postageId": null                },                "sellerDefinedCode": "",                "publish": 1,                "skuList": [                    {                        "skuCode": "",                        "externalSkuCode": "",                        "price": 1,                        "retailPrice": 6,                        "stock": 100,                        "weight": 0,                        "suggestPrice": 0,                        "skuAttrValueList": [                            {                                "attrCode": "COLOR",                                "attrName": "颜色",                                "attrValue": "绿色",                                "attrValueId": "1001"                            }                        ]                    }                ],                "jumpSwitch":false,                "recommendCommodityCodeList": [],                "recommendFittingCodeList": [],                "mallCode": "8h4xxx"            }        }        createCategoryParams = {......}        createCouponParams = {......}        createPublicityParams = {......}        publishCommodityParams = {......}        publishPublicityParams = {......}                # 2、发起请求,获取响应         # 创建商品并获取商品code        createCommodityRes = ApiObject().createCommodity(createCommodityParams)        commodityCode = createCommodityRes["commodityCode"]         # 创建分类并获取分类code        createCategoryRes = ApiObject().createCategory(createCategoryParams)        categoryCode = createCategoryRes["categoryCode"]         # 创建优惠券并获取优惠券code        createCouponRes = ApiObject().createCoupon(createCouponParams)        couponCode = createCouponRes["couponCode"]         # 创建活动并关联商品,绑定优惠券,设置分类        createPublicityParams["input"]["commodityCode"] = commodityCode        createPublicityParams["input"]["categoryCode"] = categoryCode        createPublicityParams["input"]["couponCode"] = couponCode        createPublicityRes = ApiObject().createPublicity(createPublicityParams)                # 结果校验(断言)        assert.equal(createPublicityRes["code"], 0)        assert.equal(createPublicityRes["publicityName"], createPublicityParams["publicityName"])        。。。
复制代码
可以看到,现在接口请求的url、method、通用入参处理等已经不会在用例中体现了,接下来继续封装caseService层。
caseService:
我们将多接口的场景步骤进行封装
        class CaseService:         def createPublicityByCategory(params):           # 创建商品并获取商品code          createCommodityRes = ApiObject().createCommodity(createCommodityParams)          commodityCode = createCommodityRes["commodityCode"]           # 创建分类并获取分类code          createCategoryRes = ApiObject().createCategory(createCategoryParams)          categoryCode = createCategoryRes["categoryCode"]           # 创建优惠券并获取优惠券code          createCouponRes = ApiObject().createCoupon(createCouponParams)          couponCode = createCouponRes["couponCode"]           # 创建活动并关联商品,绑定优惠券,设置分类          createPublicityParams["input"]["commodityCode"] = commodityCode          createPublicityParams["input"]["categoryCode"] = categoryCode          createPublicityParams["input"]["couponCode"] = couponCode          createPublicityRes = ApiObject().createPublicity(createPublicityParams)          return createPublicityRes                 ......
复制代码
这时体现在用例中的表现就如下层testcase层所示.
3、testcase 层
我们想要的是一个清晰明了,“一劳永逸”的自动化测试用例,就像我们的手工测试用例一样,我们的前置条件可以复用,我们入参可以任意修改,但测试步骤都是固定不变的(前提可能是产品没有偷偷改需求~)。
这一层其实是对应的testsuite(测试用例集),是测试用例的无序集合。其中各个用例之间应该是相互独立,互不干扰,不存在依赖关系,每个用例都可以单独运行。
最终我们期望自动化用例的维护过程中达到的效果如下:
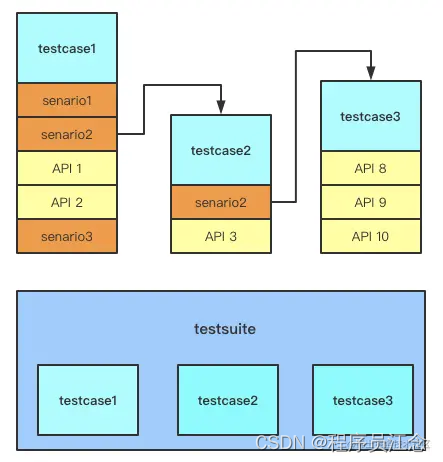
testcase 层:
    # 1、参数构造     createCommodityParams = {         "input": {             "title": "活动商品",             "subtitle": "",             "brand": "",             "categoryLevel1Code": "12",             "categoryLevel2Code": "1312",             "categoryLevel3Code": "131211",             "detail": [                 {                     "uri": "ecommerce/1118d9.jpg",                     "type": 0                 }             ],             "installInfo": {                 "installType": 1,                 "installFee": null             },             "pictureList": [                 {                     "uri": "ecommerce/222.jpg",                     "main": true                 }             ],             "postageInfo": {                 "postageType": 2,                 "postageFee": 1,                 "postageId": null             },             "sellerDefinedCode": "",             "publish": 1,             "skuList": [                 {                     "skuCode": "",                     "externalSkuCode": "",                     "price": 1,                     "retailPrice": 6,                     "stock": 100,                     "weight": 0,                     "suggestPrice": 0,                     "skuAttrValueList": [                         {                             "attrCode": "COLOR",                             "attrName": "颜色",                             "attrValue": "绿色",                             "attrValueId": "1001"                         }                     ]                 }             ],             "jumpSwitch":false,             "recommendCommodityCodeList": [],             "recommendFittingCodeList": [],             "mallCode": "8h4xxx"         }     }     createCategoryParams = {......}     createCouponParams = {......}     createPublicityParams = {......}     publishCommodityParams = {......}     publishPublicityParams = {......}          # 2、发起请求,获取响应     createPublicityRes = CaseService().createPublicityByCategory(createCommodityParams,createCategoryParams,createCouponParams...)          # 结果校验(断言)     assert.equal(createPublicityRes["code"], 0)     assert.equal(createPublicityRes["publicityName"], createPublicityParams["publicityName"])     。。。
复制代码
可以看到,这时涉及到用例场景步骤的代码已经非常少了,并且完全独立,与框架、其他用例等均无耦合。
到这里我们再看用例,会发现一点,测试数据依然冗长,那么下面就开始对测试数据进行参数化和数据驱动的处理。
4、testdata
此层用来管理测试数据,作为参数化场景的数据驱动。
参数化: 所谓参数化,简单来说就是将入参利用变量的形式传入,不要将参数写死,增加灵活性,好比搜索商品的接口,不同的关键字和搜索范围作为入参,就会得到不同的搜索结果。上面的例子中其实已经是参数化了。
数据驱动:对于参数,我们可以将其放入一个文件中,可以存放多个入参,形成一个参数列表的形式,然后从中读取参数传入接口即可。常见做数据驱动的有 JSON、CSV、YAML 等。
实例演示
我们以CSV为例,不特别依照某个框架,通常测试框架都具备参数化的功能。
将所需要的入参放入test.csv文件中:
        createCommodityParams,createCategoryParams,...        {             "input": {                 "title": "活动商品",                 "subtitle": "",                 "brand": "",                 "categoryLevel1Code": "12",                 "categoryLevel2Code": "1312",                 "categoryLevel3Code": "131211",                 "detail": [                     {                         "uri": "ecommerce/1118d9.jpg",                         "type": 0                     }                 ],                 "installInfo": {                     "installType": 1,                     "installFee": null                 },                 "pictureList": [                     {                         "uri": "ecommerce/222.jpg",                         "main": true                     }                 ],                 "postageInfo": {                     "postageType": 2,                     "postageFee": 1,                     "postageId": null                 },                 "sellerDefinedCode": "",                 "publish": 1,                 "skuList": [                     {                         "skuCode": "",                         "externalSkuCode": "",                         "price": 1,                         "retailPrice": 6,                         "stock": 100,                         "weight": 0,                         "suggestPrice": 0,                         "skuAttrValueList": [                             {                                 "attrCode": "COLOR",                                 "attrName": "颜色",                                 "attrValue": "绿色",                                 "attrValueId": "1001"                             }                         ]                     }                 ],                 "jumpSwitch":false,                 "recommendCommodityCodeList": [],                 "recommendFittingCodeList": [],                 "mallCode": "8h4xxx"             }         },         ...
复制代码
然后再回到用例层,利用框架参数化的功能对数据进行读取
        # 1、参数构造        @parametrize(params = readCsv("test.csv"))        # 2、发起请求,获取响应        createPublicityRes = CaseService().createPublicityByCategory(params)        # 结果校验(断言)        assert.equal(createPublicityRes["code"], 0)        assert.equal(createPublicityRes["publicityName"], createPublicityParams["publicityName"])        。。。
复制代码
注:这里的测试数据,不仅仅局限于接口的请求参数,既然做数据驱动,那么断言也可以维护在此,以减少用例层的代码冗余。
5、rawData
这一层是存放接口原始入参的地方。
某些接口的入参可能很多,其中很多参数值又可能是固定不变的,构建入参的时候我们只想对"变"的值进行动态的维护,而不维护的值就使用原始参数中的默认值,以此减少工作量(emmm…可能也就是CV大法的量吧~)
再者就是数据驱动的数据文件中只维护需要修改的参数,使数据文件更简洁,可阅读性更强。
实例演示:
这种利用原始参数(rawData)的方法我们称之为模板化,实际工作中有多种方式可实现,例如jsonpath、Mustache或者自己根据需求实现方法,本文重点在介绍分层设计,所以就不具体演示模板化技术的细节了,仅说明设计此层的作用。
以实例中的入参createCommodityParams为例,未用模板化技术前,我们要在CSV里面维护完整的入参:
    createCommodityParams,createCategoryParams,...     {          "input": {              "title": "活动商品",              "subtitle": "",              "brand": "",              "categoryLevel1Code": "12",              "categoryLevel2Code": "1312",              "categoryLevel3Code": "131211",              "detail": [                  {                      "uri": "ecommerce/1118d9.jpg",                      "type": 0                  }              ],              "installInfo": {                  "installType": 1,                  "installFee": null              },              "pictureList": [                  {                      "uri": "ecommerce/222.jpg",                      "main": true                  }              ],              "postageInfo": {                  "postageType": 2,                  "postageFee": 1,                  "postageId": null              },              "sellerDefinedCode": "",              "publish": 1,              "skuList": [                  {                      "skuCode": "",                      "externalSkuCode": "",                      "price": 1,                      "retailPrice": 6,                      "stock": 100,                      "weight": 0,                      "suggestPrice": 0,                      "skuAttrValueList": [                          {                              "attrCode": "COLOR",                              "attrName": "颜色",                              "attrValue": "绿色",                              "attrValueId": "1001"                          }                      ]                  }              ],              "jumpSwitch":false,              "recommendCommodityCodeList": [],              "recommendFittingCodeList": [],              "mallCode": "8h4xxx"          }      },      ...
复制代码
但是实际上,我们可能仅仅需要修改维护其中某个或某几个字段(例如只想维护商品价格),其余的使用默认值即可,使用模板化技术后可能在CSV中就是这样的表现:
    createCommodityParams,createCategoryParams,...     {          "input": {              "skuList": [                  {                      "price": 1,                      "retailPrice": 6          }      },      ...
复制代码
或者这样


**既有适合小白学习的零基础资料,也有适合3年以上经验的小伙伴深入学习提升的进阶课程,涵盖了95%以上软件测试知识点,真正体系化!**
**由于文件比较多,这里只是将部分目录截图出来,全套包含大厂面经、学习笔记、源码讲义、实战项目、大纲路线、讲解视频,并且后续会持续更新**
**[需要这份系统化的资料的朋友,可以戳这里获取](https://bbs.csdn.net/forums/4f45ff00ff254613a03fab5e56a57acb)**
8530)]
[外链图片转存中...(img-Yt7BShoa-1715230098530)]
**既有适合小白学习的零基础资料,也有适合3年以上经验的小伙伴深入学习提升的进阶课程,涵盖了95%以上软件测试知识点,真正体系化!**
**由于文件比较多,这里只是将部分目录截图出来,全套包含大厂面经、学习笔记、源码讲义、实战项目、大纲路线、讲解视频,并且后续会持续更新**
**[需要这份系统化的资料的朋友,可以戳这里获取](https://bbs.csdn.net/forums/4f45ff00ff254613a03fab5e56a57acb)**


 85
85

 被折叠的 条评论
为什么被折叠?
被折叠的 条评论
为什么被折叠?
 到【灌水乐园】发言


