


最后
不知道你们用的什么环境,我一般都是用的Python3.6环境和pycharm解释器,没有软件,或者没有资料,没人解答问题,都可以免费领取(包括今天的代码),过几天我还会做个视频教程出来,有需要也可以领取~
给大家准备的学习资料包括但不限于:
Python 环境、pycharm编辑器/永久激活/翻译插件
python 零基础视频教程
Python 界面开发实战教程
Python 爬虫实战教程
Python 数据分析实战教程
python 游戏开发实战教程
Python 电子书100本
Python 学习路线规划

网上学习资料一大堆,但如果学到的知识不成体系,遇到问题时只是浅尝辄止,不再深入研究,那么很难做到真正的技术提升。
一个人可以走的很快,但一群人才能走的更远!不论你是正从事IT行业的老鸟或是对IT行业感兴趣的新人,都欢迎加入我们的的圈子(技术交流、学习资源、职场吐槽、大厂内推、面试辅导),让我们一起学习成长!
font = QtGui.QFont()
font.setPointSize(11)
self.label_2.setFont(font)
self.label_2.setObjectName("label\_2")
self.label_3 = QtWidgets.QLabel(self.scrollAreaWidgetContents_3)
self.label_3.setGeometry(QtCore.QRect(10, 40, 321, 81))
self.label_3.setObjectName("label\_3")
self.scrollArea_3.setWidget(self.scrollAreaWidgetContents_3)
self.scrollArea_4 = QtWidgets.QScrollArea(self.centralwidget)
self.scrollArea_4.setGeometry(QtCore.QRect(1040, 510, 161, 131))
self.scrollArea_4.setWidgetResizable(True)
self.scrollArea_4.setObjectName("scrollArea\_4")
self.scrollAreaWidgetContents_4 = QtWidgets.QWidget()
self.scrollAreaWidgetContents_4.setGeometry(QtCore.QRect(0, 0, 159, 129))
self.scrollAreaWidgetContents_4.setObjectName("scrollAreaWidgetContents\_4")
self.pushButton_2 = QtWidgets.QPushButton(self.scrollAreaWidgetContents_4)
self.pushButton_2.setGeometry(QtCore.QRect(20, 50, 121, 31))
self.pushButton_2.setObjectName("pushButton\_2")
self.pushButton = QtWidgets.QPushButton(self.scrollAreaWidgetContents_4)
self.pushButton.setGeometry(QtCore.QRect(20, 90, 121, 31))
self.pushButton.setObjectName("pushButton")
self.label_4 = QtWidgets.QLabel(self.scrollAreaWidgetContents_4)
self.label_4.setGeometry(QtCore.QRect(10, 10, 111, 20))
font = QtGui.QFont()
font.setPointSize(11)
self.label_4.setFont(font)
self.label_4.setObjectName("label\_4")
self.scrollArea_4.setWidget(self.scrollAreaWidgetContents_4)
MainWindow.setCentralWidget(self.centralwidget)
self.statusbar = QtWidgets.QStatusBar(MainWindow)
self.statusbar.setObjectName("statusbar")
MainWindow.setStatusBar(self.statusbar)
self.retranslateUi(MainWindow)
QtCore.QMetaObject.connectSlotsByName(MainWindow)
self.retranslateUi(MainWindow)
QtCore.QMetaObject.connectSlotsByName(MainWindow)
self.pushButton.clicked.connect(self.__openimage)  # 设置点击事件
self.pushButton.setStyleSheet('''QPushButton{background:#222225;border-radius:5px;}QPushButton:hover{background:#2B2B2B;}''')
self.pushButton_2.clicked.connect(self.__writeFiles)  # 设置点击事件
self.pushButton_2.setStyleSheet('''QPushButton{background:#222225;border-radius:5px;}QPushButton:hover{background:#2B2B2B;}''')
self.retranslateUi(MainWindow)
self.close_widget = QtWidgets.QWidget(self.centralwidget)
self.close_widget.setGeometry(QtCore.QRect(1130, 0, 90, 50))
self.close_widget.setObjectName("close\_widget")
self.close_layout = QGridLayout()  # 创建左侧部件的网格布局层
self.close_widget.setLayout(self.close_layout)  # 设置左侧部件布局为网格
self.left_close = QPushButton("")  # 关闭按钮
self.left_close.clicked.connect(self.close)
self.left_visit = QPushButton("")  # 空白按钮
self.left_visit.clicked.connect(MainWindow.big)
self.left_mini = QPushButton("")  # 最小化按钮
self.left_mini.clicked.connect(MainWindow.mini)
self.close_layout.addWidget(self.left_mini, 0, 0, 1, 1)
self.close_layout.addWidget(self.left_close, 0, 2, 1, 1)
self.close_layout.addWidget(self.left_visit, 0, 1, 1, 1)
self.left_close.setFixedSize(15, 15)  # 设置关闭按钮的大小
self.left_visit.setFixedSize(15, 15)  # 设置按钮大小
self.left_mini.setFixedSize(15, 15)  # 设置最小化按钮大小
self.left_close.setStyleSheet(
    '''QPushButton{background:#F76677;border-radius:5px;}QPushButton:hover{background:red;}''')
self.left_visit.setStyleSheet(
    '''QPushButton{background:#F7D674;border-radius:5px;}QPushButton:hover{background:yellow;}''')
self.left_mini.setStyleSheet(
    '''QPushButton{background:#6DDF6D;border-radius:5px;}QPushButton:hover{background:green;}''')

QtCore.QMetaObject.connectSlotsByName(MainWindow)
self.ProjectPath = os.getcwd()  # 获取当前工程文件位置
self.scrollAreaWidgetContents.setStyleSheet(sc)
self.scrollAreaWidgetContents_3.setStyleSheet(sc)
self.scrollAreaWidgetContents_4.setStyleSheet(sc)
b =             '''
color:white;
background:#2B2B2B;
‘’’
self.label_0.setStyleSheet(b)
self.label_1.setStyleSheet(b)
self.label_2.setStyleSheet(b)
self.label_3.setStyleSheet(b)
MainWindow.setWindowOpacity(0.95) # 设置窗口透明度
MainWindow.setAttribute(Qt.WA_TranslucentBackground)
MainWindow.setWindowFlag(Qt.FramelessWindowHint) # 隐藏边框
author:CSDN-Dragon少年
def retranslateUi(self, MainWindow):
_translate = QtCore.QCoreApplication.translate
MainWindow.setWindowTitle(_translate(“MainWindow”, “车牌识别系统”))
self.label_0.setText(_translate(“MainWindow”, “原始图片:”))
self.label.setText(_translate(“MainWindow”, “”))
self.label_1.setText(_translate(“MainWindow”, “识别结果:”))
self.label_2.setText(_translate(“MainWindow”, “车牌区域:”))
self.label_3.setText(_translate(“MainWindow”, “”))
self.pushButton.setText(_translate(“MainWindow”, “打开文件”))
self.pushButton_2.setText(_translate(“MainWindow”, “导出数据”))
self.label_4.setText(_translate(“MainWindow”, “事件:”))
self.scrollAreaWidgetContents_1.show()
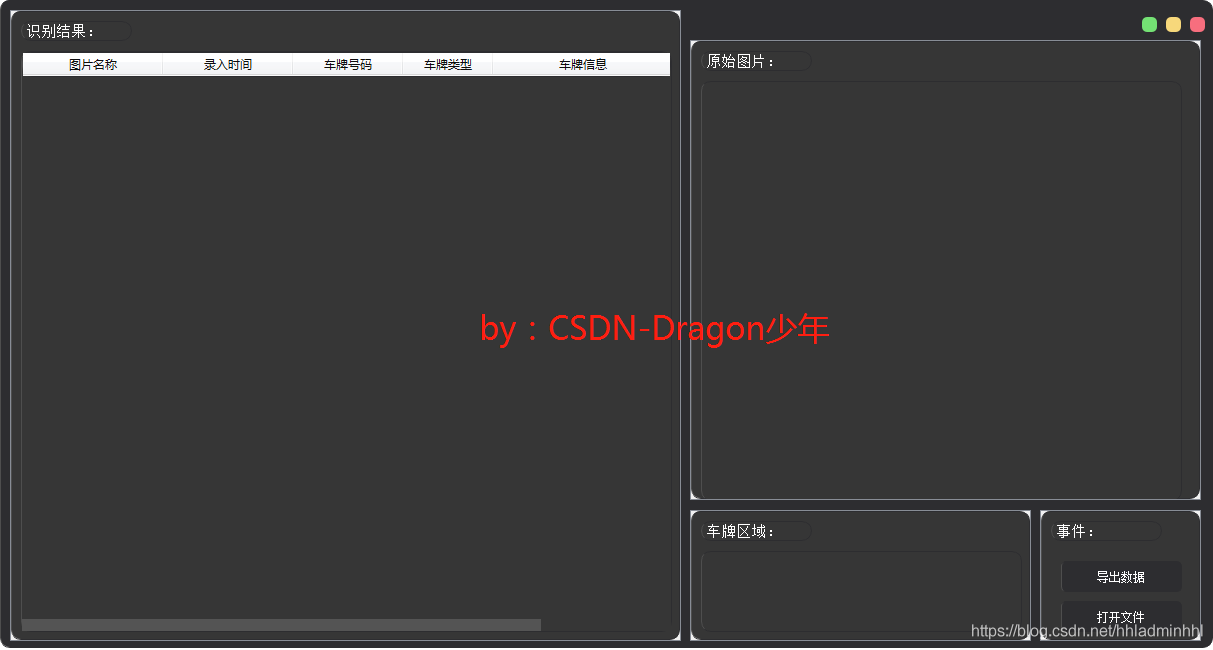
UI实现效果如下:
##### 2. 车牌识别
接下来我们需要实现两个核心功能,包括获取**车牌ROI区域**和**车牌自动识别**功能。
**车牌ROI区域提取:**
根据读取的车辆图片,预处理进行车牌ROI区域提取,主要通过Opencv的图像处理相关知识点来完成。主要包括对图像去噪、二值化、边缘轮廓提取、矩形区域矫正、蓝绿黄车牌颜色定位识别。核心代码如下:
author:CSDN-Dragon少年
预处理
def pretreatment(self, car_pic):
if type(car_pic) == type(“”):
img = self.__imreadex(car_pic)
else:
img = car_pic
pic_hight, pic_width = img.shape[:2]
if pic_width > self.MAX_WIDTH:
    resize_rate = self.MAX_WIDTH / pic_width
    img = cv2.resize(img, (self.MAX_WIDTH, int(pic_hight \* resize_rate)),
                     interpolation=cv2.INTER_AREA)  # 图片分辨率调整
blur = self.cfg["blur"]
# 高斯去噪
if blur > 0:
    img = cv2.GaussianBlur(img, (blur, blur), 0)
oldimg = img
img = cv2.cvtColor(img, cv2.COLOR_BGR2GRAY)
kernel = np.ones((20, 20), np.uint8)
img_opening = cv2.morphologyEx(img, cv2.MORPH_OPEN, kernel)  # 开运算
img_opening = cv2.addWeighted(img, 1, img_opening, -1, 0);  # 与上一次开运算结果融合
# cv2.imshow('img\_opening', img\_opening)

# 找到图像边缘
ret, img_thresh = cv2.threshold(img_opening, 0, 255, cv2.THRESH_BINARY + cv2.THRESH_OTSU)  # 二值化
img_edge = cv2.Canny(img_thresh, 100, 200)
# cv2.imshow('img\_edge', img\_edge)

# 使用开运算和闭运算让图像边缘成为一个整体
kernel = np.ones((self.cfg["morphologyr"], self.cfg["morphologyc"]), np.uint8)
img_edge1 = cv2.morphologyEx(img_edge, cv2.MORPH_CLOSE, kernel)  # 闭运算
img_edge2 = cv2.morphologyEx(img_edge1, cv2.MORPH_OPEN, kernel)  # 开运算
# cv2.imshow('img\_edge2', img\_edge2)
# cv2.imwrite('./edge2.png', img\_edge2)
# 查找图像边缘整体形成的矩形区域,可能有很多,车牌就在其中一个矩形区域中
image, contours, hierarchy = cv2.findContours(img_edge2, cv2.RETR_TREE, cv2.CHAIN_APPROX_SIMPLE)
contours = [cnt for cnt in contours if cv2.contourArea(cnt) > self.Min_Area]
# 逐个排除不是车牌的矩形区域
car_contours = []
for cnt in contours:
    # 框选 生成最小外接矩形 返回值(中心(x,y), (宽,高), 旋转角度)
    rect = cv2.minAreaRect(cnt)
    # print('宽高:',rect[1])
    area_width, area_height = rect[1]
    # 选择宽大于高的区域
    if area_width < area_height:
        area_width, area_height = area_height, area_width
    wh_ratio = area_width / area_height
    # print('宽高比:',wh\_ratio)
    # 要求矩形区域长宽比在2到5.5之间,2到5.5是车牌的长宽比,其余的矩形排除
    if wh_ratio > 2 and wh_ratio < 5.5:
        car_contours.append(rect)
        box = cv2.boxPoints(rect)
        box = np.int0(box)
# 矩形区域可能是倾斜的矩形,需要矫正,以便使用颜色定位
card_imgs = []
for rect in car_contours:
    if rect[2] > -1 and rect[2] < 1:  # 创造角度,使得左、高、右、低拿到正确的值
        angle = 1
    else:
        angle = rect[2]
    rect = (rect[0], (rect[1][0] + 5, rect[1][1] + 5), angle)  # 扩大范围,避免车牌边缘被排除
    box = cv2.boxPoints(rect)
    heigth_point = right_point = [0, 0]
    left_point = low_point = [pic_width, pic_hight]
    for point in box:
        if left_point[0] > point[0]:
            left_point = point
        if low_point[1] > point[1]:
            low_point = point
        if heigth_point[1] < point[1]:
            heigth_point = point
        if right_point[0] < point[0]:
            right_point = point
    if left_point[1] <= right_point[1]:  # 正角度
        new_right_point = [right_point[0], heigth_point[1]]
        pts2 = np.float32([left_point, heigth_point, new_right_point])  # 字符只是高度需要改变
        pts1 = np.float32([left_point, heigth_point, right_point])
        M = cv2.getAffineTransform(pts1, pts2)
        dst = cv2.warpAffine(oldimg, M, (pic_width, pic_hight))
        self.__point_limit(new_right_point)
        self.__point_limit(heigth_point)
        self.__point_limit(left_point)
        card_img = dst[int(left_point[1]):int(heigth_point[1]), int(left_point[0]):int(new_right_point[0])]
        card_imgs.append(card_img)

    elif left_point[1] > right_point[1]:  # 负角度

        new_left_point = [left_point[0], heigth_point[1]]
        pts2 = np.float32([new_left_point, heigth_point, right_point])  # 字符只是高度需要改变
        pts1 = np.float32([left_point, heigth_point, right_point])
        M = cv2.getAffineTransform(pts1, pts2)
        dst = cv2.warpAffine(oldimg, M, (pic_width, pic_hight))
        self.__point_limit(right_point)
        self.__point_limit(heigth_point)
        self.__point_limit(new_left_point)
        card_img = dst[int(right_point[1]):int(heigth_point[1]), int(new_left_point[0]):int(right_point[0])]
        card_imgs.append(card_img)
#使用颜色定位,排除不是车牌的矩形,目前只识别蓝、绿、黄车牌
colors = []
for card_index, card_img in enumerate(card_imgs):
    green = yellow = blue = black = white = 0
    try:
        # 有转换失败的可能,原因来自于上面矫正矩形出错
        card_img_hsv = cv2.cvtColor(card_img, cv2.COLOR_BGR2HSV)
    except:
        print('BGR转HSV失败')
        card_imgs = colors = None
        return card_imgs, colors

    if card_img_hsv is None:
        continue
    row_num, col_num = card_img_hsv.shape[:2]
    card_img_count = row_num \* col_num

    # 确定车牌颜色
    for i in range(row_num):
        for j in range(col_num):
            H = card_img_hsv.item(i, j, 0)
            S = card_img_hsv.item(i, j, 1)
            V = card_img_hsv.item(i, j, 2)
            if 11 < H <= 34 and S > 34:  # 图片分辨率调整
                yellow += 1
            elif 35 < H <= 99 and S > 34:  # 图片分辨率调整
                green += 1
            elif 99 < H <= 124 and S > 34:  # 图片分辨率调整
                blue += 1

            if 0 < H < 180 and 0 < S < 255 and 0 < V < 46:
                black += 1
            elif 0 < H < 180 and 0 < S < 43 and 221 < V < 225:
                white += 1
    color = "no"
    # print('黄:{:<6}绿:{:<6}蓝:{:<6}'.format(yellow,green,blue))

    limit1 = limit2 = 0
    if yellow \* 2 >= card_img_count:
        color = "yellow"
        limit1 = 11
        limit2 = 34  # 有的图片有色偏偏绿
    elif green \* 2 >= card_img_count:
        color = "green"
        limit1 = 35
        limit2 = 99
    elif blue \* 2 >= card_img_count:
        color = "blue"
        limit1 = 100
        limit2 = 124  # 有的图片有色偏偏紫
    elif black + white >= card_img_count \* 0.7:
        color = "bw"
    # print(color)
    colors.append(color)
    # print(blue, green, yellow, black, white, card\_img\_count)
    if limit1 == 0:
        continue

    # 根据车牌颜色再定位,缩小边缘非车牌边界
    xl, xr, yh, yl = self.accurate_place(card_img_hsv, limit1, limit2, color)
    if yl == yh and xl == xr:
        continue
    need_accurate = False
    if yl >= yh:
        yl = 0
        yh = row_num
        need_accurate = True
    if xl >= xr:
        xl = 0
        xr = col_num
        need_accurate = True
    card_imgs[card_index] = card_img[yl:yh, xl:xr] \
        if color != "green" or yl < (yh - yl) // 4 else card_img[yl - (yh - yl) // 4:yh, xl:xr]
    if need_accurate:  # 可能x或y方向未缩小,需要再试一次
        card_img = card_imgs[card_index]
        card_img_hsv = cv2.cvtColor(card_img, cv2.COLOR_BGR2HSV)
        xl, xr, yh, yl = self.accurate_place(card_img_hsv, limit1, limit2, color)
        if yl == yh and xl == xr:
            continue
        if yl >= yh:
            yl = 0
            yh = row_num
        if xl >= xr:
            xl = 0
            xr = col_num
    card_imgs[card_index] = card_img[yl:yh, xl:xr] \
        if color != "green" or yl < (yh - yl) // 4 else card_img[yl - (yh - yl) // 4:yh, xl:xr]
# cv2.imshow("result", card\_imgs[0])
# cv2.imwrite('1.jpg', card\_imgs[0])
# print('颜色识别结果:' + colors[0])
return card_imgs, colors
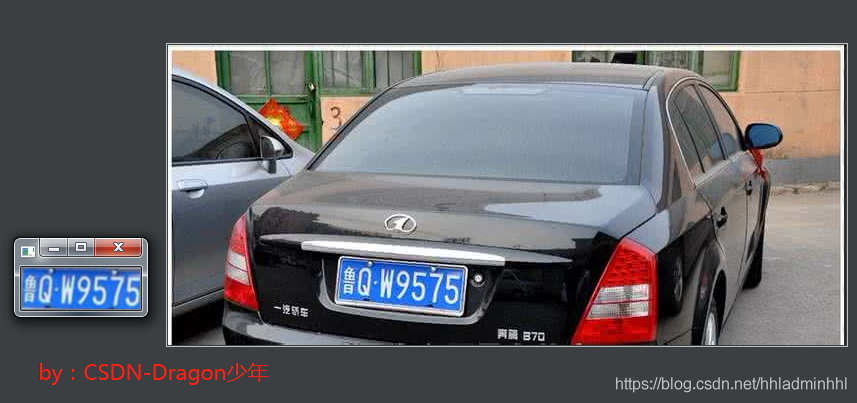
至此我们就可以输出车牌ROI区域和车牌颜色了,效果如下:
**车牌自动识别:**
车牌识别博主自己写了一个基于Opencv和SVM的识别系统,由于代码篇幅较长,本篇不进行展示(**感兴趣的可以私信博主获取源码**)。本篇介绍调用百度AI提供的车牌识别接口 – [百度AI开放平台链接](https://bbs.csdn.net/topics/618317507),识别效果也非常不错。
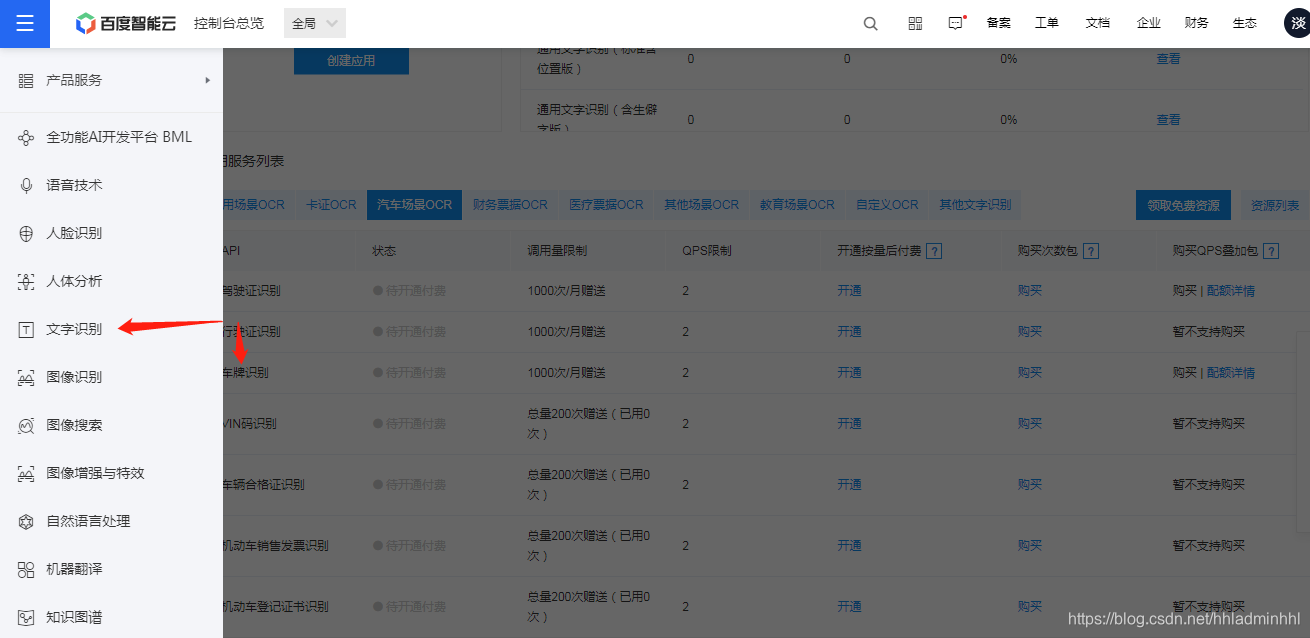
这里面我们可以创建一个车牌识别的应用,其中的**API Key及Secret Key**后面我们调用车牌识别检测接口时会用到。

我们可以看到官方提供的帮助文档,介绍了如何**调用请求URL数据格式,向API服务地址使用POST发送请求**,必须在URL中带上参数**access\_token**,可通过后台的API Key和Secret Key生成。这里面的API Key和Secret Key就是我们上面提到的。
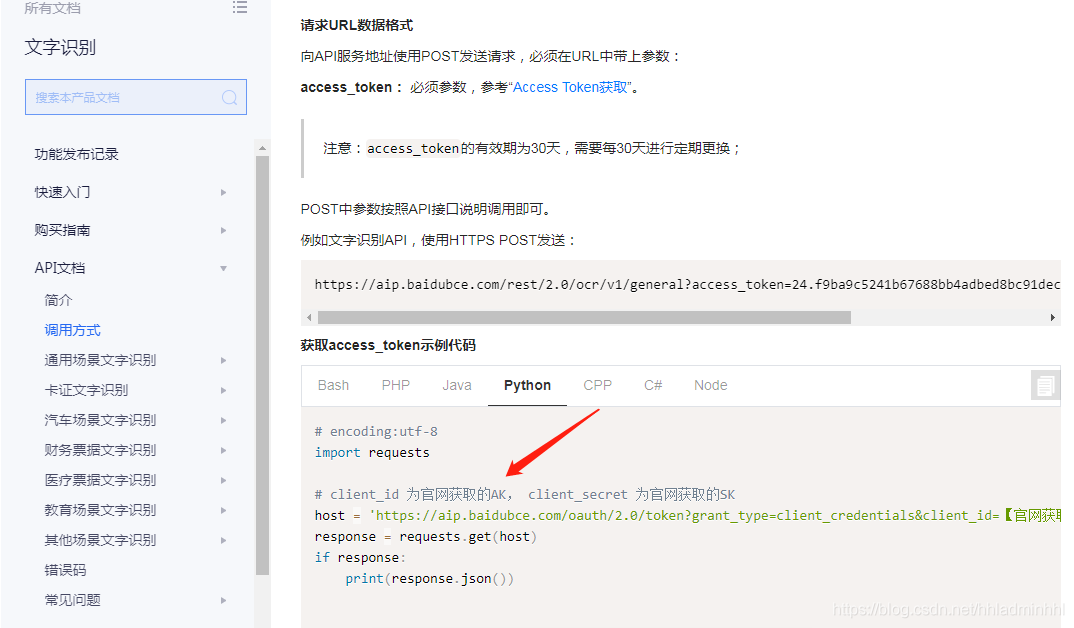
接下来我们看看调用车牌识别接口代码示例。
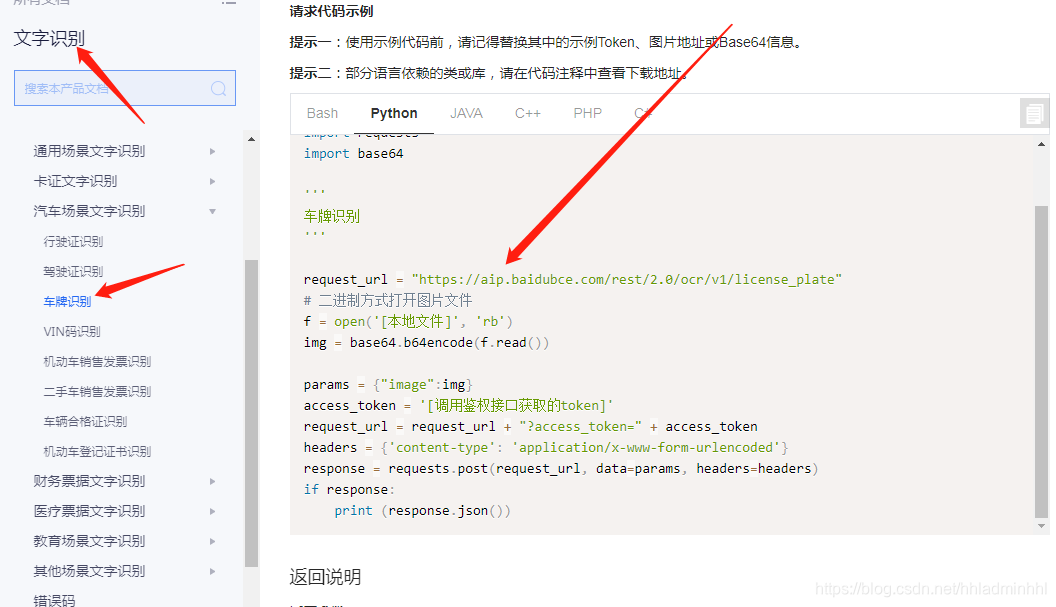
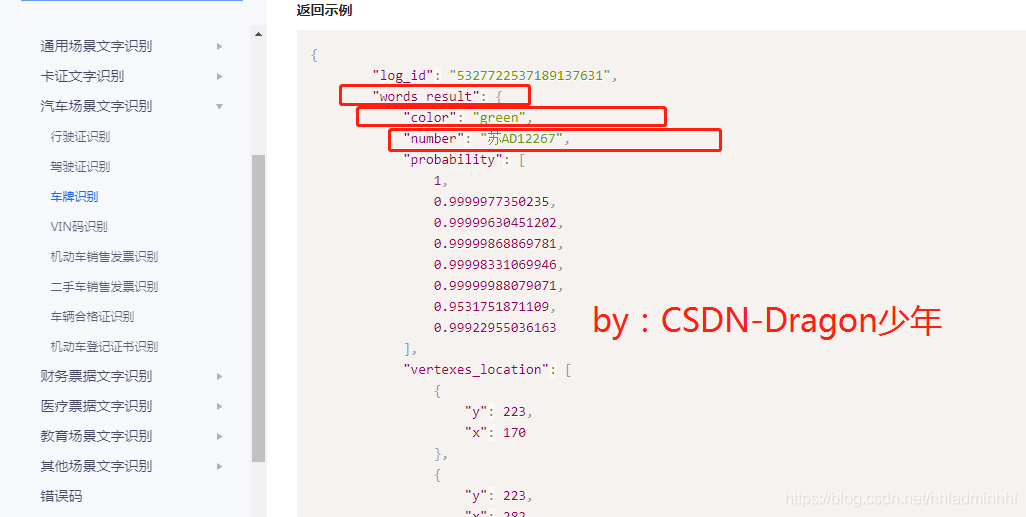
那我们如何获取识别的车牌号码呢?API文档可以看到里面有个**words\_result字典** ,其中的**color代表车牌颜色** ,**number代表车牌号码** 。这样我就可以知道识别的车牌颜色和车牌号了。
车牌识别的接口调用流程基本已经清楚了,下面就可以进行代码实现了。
author:CSDN-Dragon少年
def get_token(self):
host = ‘https://aip.baidubce.com/oauth/2.0/token?grant_type=client_credentials&client_id=’ + self.client_id + ‘&client_secret=’ + self.client_secret
response = requests.get(host)
if response:
token_info = response.json()
token_key = token_info[‘access_token’]
return token_key
author:CSDN-Dragon少年
def get_license_plate(self, car_pic):
result = {}
card_imgs, colors = self.pretreatment(car_pic)
request_url = “https://aip.baidubce.com/rest/2.0/ocr/v1/license_plate”
# 二进制方式打开图片文件
f = open(car_pic, ‘rb’)
img = base64.b64encode(f.read())
params = {“image”: img}
access_token = self.get_token()
request_url = request_url + “?access_token=” + access_token
headers = {‘content-type’: ‘application/x-www-form-urlencoded’}
response = requests.post(request_url, data=params, headers=headers)
if response:
print(response.json())
license_result = response.json()[‘words_result’][‘number’]
card_color = response.json()[‘words_result’][‘color’]
if license_result != []:
result[‘InputTime’] = time.strftime(“%Y-%m-%d %H:%M:%S”)
result[‘Type’] = self.cardtype[card_color]
result[‘Picture’] = card_imgs[0]
result[‘Number’] = ‘’.join(license_result[:2]) + ‘·’ + ‘’.join(license_result[2:])
try:
result[‘From’] = ‘’.join(self.Prefecture[license_result[0]][license_result[1]])
except:
result[‘From’] = ‘未知’
最后
🍅 硬核资料:关注即可领取PPT模板、简历模板、行业经典书籍PDF。
🍅 技术互助:技术群大佬指点迷津,你的问题可能不是问题,求资源在群里喊一声。
🍅 面试题库:由技术群里的小伙伴们共同投稿,热乎的大厂面试真题,持续更新中。
🍅 知识体系:含编程语言、算法、大数据生态圈组件(Mysql、Hive、Spark、Flink)、数据仓库、Python、前端等等。
网上学习资料一大堆,但如果学到的知识不成体系,遇到问题时只是浅尝辄止,不再深入研究,那么很难做到真正的技术提升。
一个人可以走的很快,但一群人才能走的更远!不论你是正从事IT行业的老鸟或是对IT行业感兴趣的新人,都欢迎加入我们的的圈子(技术交流、学习资源、职场吐槽、大厂内推、面试辅导),让我们一起学习成长!


 4万+
4万+

 被折叠的 条评论
为什么被折叠?
被折叠的 条评论
为什么被折叠?
 到【灌水乐园】发言


