


BOM 和 DOM
文章目录
一、介绍
到目前为止,我们已经学过了JavaScript的一些简单的语法。但是这些简单的语法,并没有和浏览器有任何交互。
也就是我们还不能制作一些我们经常看到的网页的一些交互,我们需要继续学习BOM和DOM相关知识。
JavaScript分为 ECMAScript,DOM,BOM。
BOM(Browser Object Model)是指浏览器对象模型 ,作用是通过js代码操作浏览器
DOM ( Document Object Model)是指文档对象模型,作用是通过js代码操作标签。通过它访问HTML文档的所有元素。
Window对象是客户端JavaScript最高层对象之一,由于window对象是其它大部分对象的共同祖先,在调用window对象的方法和属性时,可以省略window对象的引用。例如:window.document.write()可以简写成:document.write()。
BOM结构图
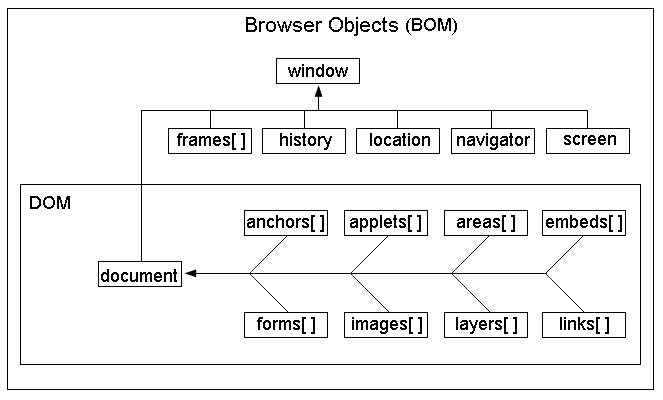
从上图可以看出来:
- DOM对象也是BOM的一部分
- window对象是BOM的顶层(核心)对象
window对象是BOM的顶层(核心)对象
#1、在调用window对象的方法和属性时,可以省略window,例如:window.document.location可以简写为document.location

#2、全局变量也是windows对象的属性,全局的函数时window对象的方法
二、BOM
1. window对象
window对象指代的就是浏览器窗口
console.log(window.innerHeight);  // 927 (浏览器窗口内的高度)
console.log(window.innerWidth);   // 1918 (浏览器窗口内的宽度)


// window.open('https://www.baidu.com', '', 'height=400px, width=400px, top=400px, left=400px'); // 新建窗口打开页面 第二个参数写空即可 第三个参数写新建的窗口的大小和位置
// window.close(); // 关闭当前页面
// window.opener(); // 扩展父子页面通信(了解)


// 总结
/\*
window.innerHeight(); 浏览器内部高度
window.innerWidth(); 浏览器内部宽度
window.open(url, '', '宽高+位置');
window.close(); 关闭当前页面
window.opener();
\*/
2. window的子对象
提示: 如果是window的子对象 那么window可以省略不写, 下面写是为了更加见名知意.
2.1 navigator对象
console.log(window.navigator.appName);     // Netscape (浏览器名称)
console.log(window.navigator.appVersion);  // 5.0 (Windows NT 10.0; WOW64) AppleWebKit/537.36 (KHTML, like Gecko) Chrome/75.0.3770.100 Safari/537.36 (返回浏览器版本)

console.log(window.navigator.userAgent);  // Mozilla/5.0 (Windows NT 10.0; WOW64) AppleWebKit/537.36 (KHTML, like Gecko) Chrome/75.0.3770.100 Safari/537.36 (掌握: 解析出用户信息)
// 扩展:仿爬措施
/\*
1.最简单最常用的一个就是校验当前请求的发起者是否是一个浏览器
 userAgent
 user-agent: Mozilla/5.0 (Macintosh; Intel Mac OS X 10\_14\_6) AppleWebKit/537.36 (KHTML, like Gecko) Chrome/81.0.4044.138 Safari/537.36
如何破解该措施
 在你的代码中加上上面的user-agent配置即可
\*/

console.log(window.navigator.platform);  // Win32 (平台)


// 总结
/\*
window.navigator.appName; 浏览器名称
window.navigator.appVersion; 返回浏览器版本
window.navigator.userAgent; 解析出用户信息
window.navigator.platform; 平台
\*/
2.2 history对象
// 对应的就是你浏览器左上方的两个的箭头
window.history.back();     // 回退到上一页
window.history.forward();  // 前进到下一页
2.3 location对象(掌握)
// 一. location对象的浏览器的位置操作
// 1. href属性: 获取url地址栏的,整个url(统一资源定位器)
	console.log(location.href);
// 2. host属性: 获取url地址栏的,IP和端口号
	console.log(location.host);
// 3. hostname属性: 获取url地址栏的,IP
	console.log(location.hostname);
// 4. port属性: 获取url地址栏的,端口号
	console.log(location.port);
// 5. protocol属性: 获取url地址栏的,协议名称
	console.log(location.protocol);
// 6. search属性: 获取url地址栏的,?后面查询的内容
	console.log(location.search);
// 7. pathname属性: 获取url地址栏的,html文件路径地址
	console.log(location.pathname);


// 二. location对象的浏览器的位置操作
// 1. location.href = 'url', 当前页面跳转新的网址,保留历史记录
	location.href = 'https://www.baidu.com';
// 2. location.replace('url'), 当前页面跳转新的网址,不保留历史记录
	location.replace('https://www.baidu.com');
// 3. location.reload(), 重载当前网页(用的少)
	location.reload();
2.4 弹出框
alert('警告框');
console.log(confirm('确认框')); // 返回布尔值
console.log(prompt('提示框'));  // 返回输入值
2.5 定时器
function func1() {
    alert('111');
}
let t1 = setTimeout(func1, 3000);  // 毫秒为单位 3秒之后自动执行func1函数
// clearTimeout(t1); // 取消定时任务 如果你想要清除定时任务 需要提前前用变量(t1)指代定时任务
// cleatTimeout(setTimeout(func1, 3000)); // 简写


function func2() {
    alert('222');
}
function show() {
    let t2 = setInterval(func2, 3000);
    function inner() {
        clearInterval(t2);
    }
    setTimeout(inner, 9000);  // 9秒中之后触发inner清除定时器t2
}
show();


// 总结:
/\*
一次性定时器:
 let t = setTimeout(func, 毫秒);
 clearTimeout(t);

多次性定时器:
 function show() {
 let t = setInterval(func, 毫秒);
 function inner() {
 clearInterval(t);
 }
 setTimeout(inner, 毫秒);
 }
\*/
3.小结
Browser Object Model
window对象
    innerHeight;  浏览器内高
    innerWidth;   浏览器内宽
    open(url, '', '宽高+位置');
    close();


window子对象:
    navigator
        navigator.appName;    浏览器名
        navigator.appVersion; 浏览器版本
        navigator.userAgent;  解析用户信息
        navigator.platform;   平台

    history:
        history.back();     回退
        history.forward();  前进

    location:
        location.href     获取url
        location.href=url 跳转url
        location.reload   重载

弹出框:
    警告框: alert(value);
    确认框: confirm(value);  返回布尔
    提示框: prompt(value);   返回输入内容

定时器:
    一次性:
        let t = setTimeout(func, 3000);
        clearTimeout(t);
    多次性:
        function show() {
            let t = setInterval(func, 3000);
            function inner() {
                clearInterval(t);
            }
            setTimeout(inner, 9000);
        }
4.练习
练习:上一页下一页
================page11.html
<!DOCTYPE html>
<html lang="en">
<head>
    <meta charset="UTF-8">
    <title>Title</title>
</head>
<body>
<p>第一个页</p>
<a href="page22.html">点我进入下一页</a>
</body>
</html>


================page22.html
<!DOCTYPE html>
<html lang="en">
<head>
    <meta charset="UTF-8">
    <title>Title</title>
</head>
<body>
<p>第二个页</p>
<a href="page33.html">点我进入下一页</a>
</body>
</html>


================page33.html
<!DOCTYPE html>
<html lang="en">
<head>
    <meta charset="UTF-8">
    <title>Title</title>
    <script>
 function back() {
 window.history.back()
 }
 </script>
</head>
<body>
<p>第三个页</p>

<input type="button" value="点我进入上一页" onclick="back()">

</body>
</html>
location.href练习2:3s后,自动跳转页面
<!doctype html>
<html lang="en">
<head>
    <meta charset="UTF-8">
    <title>Document</title>
</head>
<body>
<div>这天下,本就是大争之世,孤的儿子,不仅要争,而且要争的光芒万丈</div>
<script>
 setTimeout(function () {
 location.href = 'https://www.cnblogs.com/linhaifeng';
 }, 3000)
</script>
</body>
</html>
location.href练习3:3s后让网页整个刷新
<!doctype html>
<html lang="en">
<head>
    <meta charset="UTF-8">
    <title>Document</title>
</head>
<body>
<div>这天下,本就是大争之世,孤的儿子,不仅要争,而且要争的光芒万丈</div>
<script>
 setTimeout(function () {
 location.reload();
 }, 3000)
</script>
</body>
</html>
三、DOM
DOM(Document Object Model)是一套对文档的内容进行抽象和概念化的方法。
当网页被加载时,浏览器会创建页面的文档对象模型(Document Object Model)。DOM标准规定HTML文档中的每个成员都是一个节点(node)
HTML DOM 模型被构造为对象的树,HTML DOM树如下图:
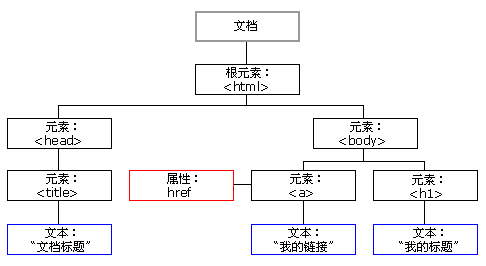
"""
DOM树的概念

所有的标签都可以称之为是节点

JavaScript 可以通过DOM创建动态的 HTML:

JavaScript 能够改变页面中的所有 HTML 元素
JavaScript 能够改变页面中的所有 HTML 属性
JavaScript 能够改变页面中的所有 CSS 样式
JavaScript 能够对页面中的所有事件做出反应


DOM操作操作的是标签 而一个html页面上的标签有很多
	1.先学如何查找标签
	2.再学DOM操作标签

DOM操作需要用关键字document起手
"""
1. 查找标签之直接查找
三种查找标签方法: id查找, 类查找, 标签查找
<!DOCTYPE html>
<html lang="en">
<head>
<meta charset="UTF-8">
<title>Title</title>
</head>
<body>
<div>div上面的div</div>
<div>div上面的div</div>
<div id="d1">div
<div>div>div</div>
<p>div>p
<span class="c1">div>p>span
<span>div>p>span>span</span>
</span>
<span class="c1">div>p>span+span</span>
</p>
<p>div>p</p>
</div>
<div>div下面的div</div>
<div>div下面的div</div>
<script>
// 三种查找标签方法: id查找, 类查找, 标签查找
/\*直接查找\*/
let divEle = document.getElementById('d1');
console.log(divEle); // 返回#d1自己+所有后代元素
/\*
<div id="d1">div
<div>div>div</div>
<p>div>p
<span class="c1">div>p>span</span>
</p>
<p>div>p</p>
</div>
\*/
let spanEle = document.getElementsByClassName('c1');
console.log(spanEle); // 返回所有的.c1(数组)
/\*
HTMLCollection [span.c1]
0: span.c1
length: 1
\_\_proto\_\_: HTMLCollection
\*/
console.log(spanEle[0]);
/\*
<span class="c1">div>p>span
<span>div>p>span>span</span>
</span>
\*/
let pEle = document.getElementsByTagName('p');
console.log(pEle); // 返回所有的p(数组)
/\*
HTMLCollection(2) [p, p]
0: p
1: p
length: 2
\_\_proto\_\_: HTMLCollection
\*/
console.log(pEle[0]);
/\*
<p>div>p
<span class="c1">div>p>span
<span>div>p>span>span</span>
</span>
<span class="c1">div>p>span+span</span>
</p>
\*/
</script>
</body>
</html>
总结:
id查找  document.getElementById();
        返回对象. 可以拿到自己+后代所有

类查找  document.getElementsByClassName();
        返回数组对象. 通过索引取值可以拿到自己+后代所有

元素查找 document.getElementsByTagName();
        返回数组对象. 通过索引取值可以拿到自己+后代所有
2.间接查找
| 语法 | 含义 |
|---|---|
| childNodes | 获取所有的子节点,除了元素还有文本等 |
| children | 获取所有元素子节点,不包含文本 |
| parentNode | 获取父节点 |
| previousSibling | 获取上一个兄弟节点,包含文本 |
| previousElementSibling | 获取上一个兄弟元素节点,不包含文本 |
| nextSibling | 获取下一个兄弟节点,包含文本 |
| nextElementSibling | 获取下一个兄弟元素节点,不包含文本 |
| firstChild | 获取第一个子节点,包含文本 |
| firstElementChild | 获取第一个子节点,不包含文本 |
| lastChild | 获取最后一个子节点,包含文本 |
| lastElementChild | 获取父元素最后一个元素节点。不包含文本 |
代码示例:
<!DOCTYPE html>
<html lang="en">
<head>
    <meta charset="UTF-8">
    <title>Title</title>
</head>
<body>
<div>div上面的div</div>
<div>div上面的div</div>
<div id="d1">div
    <div>div>div</div>
    <p>div>p
        <span class="c1">div>p>span
            <span>div>p>span>span</span>
        </span>
        <span class="c1">div>p>span+span</span>
    </p>
    <p>div>p</p>
</div>
<div>div下面的div</div>
<div>div下面的div</div>

<script>
 /\*间接查找\*/
 let divEle = document.getElementById('d1');
 console.log(divEle.parentElement); // 拿父节点
 console.log(divEle.parentElement.parentElement); // 拿父节点的父节点
 console.log(divEle.parentElement.parentElement.parentElement); // 拿父节点的拿父节点的拿父节点(没有返回null)

 console.log(divEle.children); // 获取所有的子标签(返回数组对象)

 console.log(divEle.children[0]); // 通过索引取值第一个子标签
 console.log(divEle.firstElementChild); // 与上面等同

 console.log(divEle.children[divEle.children.length-1]); // 通过索引获取最后一个子标签
 console.log(divEle.lastElementChild); // 与上面等同

 console.log(divEle.nextElementSibling); // 同级别下面第一个
 console.log(divEle.previousElementSibling); // 同级别上面第一个

 // 总结
 /\*
 注意: 下面所有拿到的标签如果没有后代标签则就是单个. 如果有那么后代标签对象也会被包含, 只是以当前拿到的标签作为起始.
 拿父标签: 没有父标签返回null
 nodeEle.parentElement

 拿所有子标签: nodeEle.children
 返回所有子标签, 以数组的形式呈现. 可以通过索引取值获取其内部的子标签.

 拿子标签第一个:
 nodeEle.firstElementChild
 nodeEle.children[0]

 拿子标签最后一个:
 nodeEle.lastElementChild
 nodeEle.children[nodeEle.children.length-1]

 拿同级别上一个:
 nodeEle.nextElementSibling
 拿同级别下一个:
 nodeEle.previousElementSibling
 \*/
</script>
</body>
</html>
3.节点操作
涵盖了: 创建标签, 为创建的标签添加属性, 为创建的标签添加文本, 对创建的标签进行追加, 对创建的标签进行插入.
以及补充的获取标签属性, 删除标签属性. 删除标签, 替换标签
<!DOCTYPE html>
<html lang="en">
<head>
<meta charset="UTF-8">
<title>Title</title>
</head>
<body>
<div id="d1">
<p id="d2">div>p</p>
<span>div>span</span>
</div>
<script>
/\*
通过DOM操作动态的创建img标签
并且给标签加属性
最后将标签添加到文本中
\*/
/\*创建标签\*/
let imgEle = document.createElement('img'); // 创建标签
imgEle.src = 'https://img2020.cnblogs.com/blog/1402974/202005/1402974-20200518221931333-1731690860.png'; // 给标签设置默认的属性
imgEle.useranme = 'jsaon'; // 自定义的属性没办法点的方式直接设置
console.log(imgEle);
/\*
<img src="https://img2020.cnblogs.com/blog/1402974/202005/1402974-20200518221931333-1731690860.png">
\*/
imgEle.setAttribute('username', 'jsaon'); // 既可以设置自定义的属性也可以设置默认的书写
console.log(imgEle);
/\*
<img src="https://img2020.cnblogs.com/blog/1402974/202005/1402974-20200518221931333-1731690860.png" username="jsaon">
\*/
/\*标签内部添加元素\*/
let divEle = document.getElementById('d1');
divEle.appendChild(imgEle); // 尾部追加
console.log(divEle);
/\*
<div id="d1">
<p id="d2">div>p</p>
<span>div>span</span>
<img src="https://img2020.cnblogs.com/blog/1402974/202005/1402974-20200518221931333-1731690860.png" username="jsaon">
</div>
\*/
/\*
创建a标签
设置属性
设置文本
添加到标签内部
添加到指定的标签的上面
\*/
let aEle = document.createElement('a'); // 创建a标签
aEle.href = 'https://www.baidu.com'; // 设置属性
aEle.innerText = '点我有你好看!'; // 给标签设置文本内容
// let divEle = document.getElementById('d1');
let pEle = divEle.firstElementChild;
// let pEle = document.getElementById('d2');
divEle.insertBefore(aEle, pEle); // 添加标签内容指定位置添加
console.log(divEle);
/\*
<div id="d1">
<a href="https://www.baidu.com">点我有你好看!</a><p id="d2">div>p</p>
<span>div>span</span>
<img src="https://img2020.cnblogs.com/blog/1402974/202005/1402974-20200518221931333-1731690860.png" username="jsaon">
</div>
\*/
// innerText与innerHTML
// let divEle = document.getElementById('d1');
console.log(divEle.innerText); // 获取标签内部所有的文本
/\*
点我有你好看!
div>p
div>span
\*/
console.log(divEle.innerHTML); // 内部文本和标签都拿到
/\*
点我有你好看!
div>p
div>span
<a href="https://www.baidu.com">点我有你好看!</a><p id="d2">div>p</p>
<span>div>span</span>
<img src="https://img2020.cnblogs.com/blog/1402974/202005/1402974-20200518221931333-1731690860.png" username="jsaon">
\*/
divEle.innerText = '哈哈哈';
console.log(divEle.innerText); // 哈哈哈
divEle.innerHTML = '嘻嘻嘻';
console.log(divEle.innerHTML); // 嘻嘻嘻
divEle.innerText = '<h1>哈哈哈</h1>'; // 不识别html标签
console.log(divEle.innerText); // <h1>哈哈哈</h1>
divEle.innerHTML = '<h1>嘻嘻嘻</h1>'; // 识别html标签
console.log(divEle.innerText); // 嘻嘻嘻
// 额外补充
/\*
appendChild()
removeChild()
replaceChild()
setAttribute() 设置属性
getAttribute() 获取属性
removeAttribute() 移除属性
\*/
</script>
</body>
</html>
总结:
    创建标签: let imgEle = document.createElement('img');

    设置属性:
        只能设置内置属性:  imgEle.src='';
        内置属性+自定义属性: imgEle.setAttribute('username', 'jason');

    追加标签:
        let divEle = document.getElementById('d1');
        divEle.appendChild(imgEle);

    插入标签:
        let divEle = document.getElementById('d1');
        let pEle = divEle.firstElementChild();
        let aEle = document.creatElement('a');
        divEle.insertBefore(aEle, pEle)  // 将aEle插入到divEle中的第一个子标签pEle之前.(第一个参数始是要插入的元素, 第二个参数是插入的位置. 还需要明确是在那个标签中插.)

    innerText 和 innerHTML
        访问内容:
            访问内容所有文本:  divEle.innerText
            访问内容所有文本+标签:  divEle.innerHTML
        设置内容:
            let aEle = document.createElement('a');
            只设置文本内容:
                aEle.innerText = '哈哈哈';
            文本内容+标签:
                aEle.innerHTML = '<h1>哈哈哈</h1>';
4.获取值操作
<!DOCTYPE html>
<html lang="en">
<head>
    <meta charset="UTF-8">
    <title>Title</title>
</head>
<body>
<input type="text" id="d1" value="111">

<select name="" id="d2">
    <option value="haha" selected>哈哈</option>
    <option value="heihei">嘿嘿</option>
    <option value="momo">摸摸</option>
</select>

<input type="file" id="d3" multiple>


<script>
 /\*获取用户数据标签内部的数据\*/
 var inputEle = document.getElementById('d1');
 console.log(inputEle.value); // 111

 var seEle = document.getElementById('d2');
 console.log(seEle.value); // haha

 var fileEle = document.getElementById('d3');
 console.log(fileEle.value); // C:\fakepath\2sCode.zip (只能获取到文件的本地路径, 无法获取到文件数据)
 console.log(fileEle.files);
 /\*
 FileList {0: File, 1: File, length: 2}
 0: File {name: "2sCode.zip", lastModified: 1588031367082, lastModifiedDate: Tue Apr 28 2020 07:49:27 GMT+0800 (中国标准时间), webkitRelativePath: "", size: 8192, …}
 1: File {name: "6组发布内容.txt", lastModified: 1587516178144, lastModifiedDate: Wed Apr 22 2020 08:42:58 GMT+0800 (中国标准时间), webkitRelativePath: "", size: 2553, …}
 length: 2
 \_\_proto\_\_: FileList
 \*/
 console.log(fileEle.files[0]); // 获取文件数据
 /\*
 File {name: "2sCode.zip", lastModified: 1588031367082, lastModifiedDate: Tue Apr 28 2020 07:49:27 GMT+0800 (中国标准时间), webkitRelativePath: "", size: 8192, …}
 \*/

 // 总结:
 /\*
 非文件获取值:
 var inputEle = document.getElementById('d1');
 inputEle.value
 针对文件:
 var fileEle = document.getElementById('d3');
 获取本地上传路径: fileEle.value
 获取文件对象们: fileEle.files
 获取文件对象: fileEle.files[0]

 补充: 如果想重置某标签下的所有值使用inputEle.value='';
 \*/
</script>
</body>
</html>
5.class、css操作
<!DOCTYPE html>
<html lang="en">
<head>
    <meta charset="UTF-8">
    <title>Title</title>
    <style>
 #d1 {
 height: 400px;
 width: 400px;
 border-radius: 50%;
 }
 .bg\_green {
 background-color: green;
 }
 .bg\_red {
 background-color: red;
 }
 </style>
</head>
<body>
<div id="d1" class="c1 bg\_green bg\_red"></div>
<p>呼呼哈哈哈哈哈哈</p>

<script>
 let divEle = document.getElementById('d1');
 console.log(divEle.classList); // 获取标签所有的类属性
 /\*
 DOMTokenList(3) ["c1", "bg\_green", "bg\_red", value: "c1 bg\_green bg\_red"]
 0: "c1"
 1: "bg\_green"
 length: 2
 value: "c1 bg\_green"
 \_\_proto\_\_: DOMTokenList
 \*/

 divEle.classList.remove('bg\_red');
 console.log(divEle.classList); // 移除某个类属性
 /\*
 DOMTokenList(2) ["c1", "bg\_green", value: "c1 bg\_green"]
 0: "c1"
 1: "bg\_green"
 length: 2
 value: "c1 bg\_green"
 \_\_proto\_\_: DOMTokenList
 \*/

 divEle.classList.add('bg\_red');
 console.log(divEle.classList); // 添加类属性
 /\*
 DOMTokenList(3) ["c1", "bg\_green", "bg\_red", value: "c1 bg\_green bg\_red"]
 0: "c1"
 1: "bg\_green"
 length: 2
 value: "c1 bg\_green"
 \_\_proto\_\_: DOMTokenList
 \*/

 console.log(divEle.classList.contains('c1')); // true
 console.log(divEle.classList.contains('c99')); // false

 console.log(divEle.classList.toggle('bg\_red')); // false (有则删除无则添加. 执行之前是有的, 执行之后发现有就删除了, 所以打印是false)
 // console.log(divEle.classList.toggle('bg\_red')); // true
 // console.log(divEle.classList.toggle('bg\_red')); // false
 // console.log(divEle.classList.toggle('bg\_red')); // true


 /\*DOM操作操作标签样式 统一先用style起手\*/
 let pEle = document.getElementsByTagName('p')[0];
 pEle.style.color = 'red';
 pEle.style.fontSize = '28px';
 pEle.style.backgroundColor = 'yellow';
 pEle.style.border = '3px solid red';

 // 总结:
 /\*
 属性操作:
 获取标签所有类属性 divEle.classList; --> 返回数组对象
 获取标签所有类属性中的某个属性: divEle.classList[0];
 删除获取的标签所有类属性中的某个属性: divEle.classList.remove('bg\_red');
 往获取的标签所有类属性中添加某个属性: divEle.classList.add('bg\_red');
 对获取的标签所有类属性中判断某个属性是否存在: divEle.classList.contains('c1'); --> 返回布尔值
 对获取的标签所有类属性中如果属性存在则删除,不存在则添加: divEle.classList.toggle('bg\_red'); --> 之前有布尔值为true, 执行了以后删除了它, 布尔值就是false

 样式设置:
 pEle.style.属性名 = 属性值;
 \*/
</script>
</body>
</html>
6.事件
6.1 什么是事件?
事件就是达到某一特定的条件自动触发的某种功能
HTML 4.0 的新特性之一是有能力使 HTML 事件触发浏览器中的动作(action),比如当用户点击某个 HTML 元素时执行一段JavaScript。下面是一个属性列表,这些属性可插入 HTML 标签来定义事件动作。
6.2 常用事件
onclick         鼠标单击
ondblclick      双击后激活事件

onfocus         获得焦点时触发
onblur          失去焦点时触发               应用场景:用于表单验证,用户离开某个输入框时,代表已经输入完了,我们可以对它进行验证.
onchange        域的内容被改变。             应用场景:通常用于表单元素,当元素内容被改变时触发.(select联动)

onkeydown       某个键盘按键被按下。          应用场景: 当用户在最后一个输入框按下回车按键时,表单提交
onkeypress      某个键盘按键被按下并松开。
onkeyup         某个键盘按键被松开。

onload          载入网页时

onmousedown     鼠标按钮被按下。
onmousemove     鼠标被移动。
onmouseout      鼠标从某元素移开。
onmouseover     鼠标移到某元素之上。

onselect        在文本框中的文本被选中时发生。
onsubmit        确认按钮被点击,使用的对象是form。
6.3 事件之导入js的2种方式 和 绑定事件的2种方式
<!DOCTYPE html>
<html lang="en">
<head>
    <meta charset="UTF-8">
    <title>Title</title>
    <script>
 /\*导入js的第二种方式实现: 使用window.onload预加载, 等待以下标签都加载完毕以后才执行以下代码\*/
 // 注意: onload事件只能声明一个,声明多个会出现事件覆盖现象,下面的定义的事件覆盖上面的事件
 window.onload = function () {
 // 第一种绑定事件的方式: 这种方式的缺点就是无法执行οnclick="func1()"这种绑定方式, 所以还是推荐使用第一种方式将js代码写在body标签底部
 function func1() {
 prompt('提示框');
 }


 // 第二种绑定事件的方式:: 推荐
 let btnEle = document.getElementById('d1');
 btnEle.onclick = function () {
 confirm(navigator.userAgent);
 }
 }
 </script>
</head>
<body>
<button onclick="func1()">点我</button>
<button id="d1">点我</button>

<script>
 /\*导入js的第一种方式实现: 在以上标签都加载完毕以后才执行以下代码\*/
 // function func1() {
 // prompt('提示框');
 // }
 //
 //
 // let btnEle = document.getElementById('d1');
 // btnEle.onclick = function () {
 // confirm(navigator.userAgent);
 // }
</script>
</body>
</html>
6.4 事件之onclick实例: 开关灯
<!DOCTYPE html>
<html lang="en">
<head>
    <meta charset="UTF-8">
    <title>Title</title>
    <style>
 #d1 {
 height: 400px;
 width: 400px;
 border-radius: 50%;
 }
 .bg\_green {
 background-color: green;
 }
 .bg\_red {
 background-color: red;
 }
 </style>
</head>
<body>
<div id="d1" class="c1 bg\_red bg\_green"></div>
<button id="d2">变色</button>

<script>
 // onclick: 鼠标单击触发
 let divEle = document.getElementById('d1');
 let btnEle = document.getElementById('d2');
 btnEle.onclick = function () {
 divEle.classList.toggle('bg\_red');
 };
</script>
</body>
</html>
6.5 事件之onfoucs+onblur实例: input框
<!DOCTYPE html>
<html lang="en">
<head>
    <meta charset="UTF-8">
    <title>Title</title>
</head>
<body>
<input type="text" value="老板去吗?" id="d1">

<script>
 /\*
 onfocus: 获得焦点时触发
 onblur: 失去焦点时触发. 应用场景:用于表单验证,用户离开某个输入框时,代表已经输入完了,我们可以对它进行验证.
 \*/
 /\*
 解题思路:
 1. 当鼠标获取inputEle焦点时, 内容被清空
 2. 当鼠标移开inputEle焦点时, 内容又展示
 \*/
 let inputEle = document.getElementById('d1');
 inputEle.onfocus = function () {
 inputEle.value=''; // 点value就是获取 等号赋值就是设置
 };
 inputEle.onblur = function () {
 inputEle.value='不去, 没钱!'; // 给input标签重写赋值
 };
</script>
</body>
</html>
6.6 事件之onclick+定时器实例: 展示当前时间
<!DOCTYPE html>
<html lang="en">
<head>
    <meta charset="UTF-8">
    <title>Title</title>
</head>
<body>
<input type="text" id="d1">
<button id="d2">开始</button>
<button id="d3">结束</button>

<script>
 let t; // 3. 那么定义一个全局存储定时器的变量, 提供清除定时器能够访问到这个变量
 let inputEle = document.getElementById('d1');
 let startBtnEle = document.getElementById('d2');
 let endBtnEle = document.getElementById('d3');
 function showTime() {
 let currentTime = new Date();
 inputEle.value = currentTime.toLocaleString();
 }
 startBtnEle.onclick = function () {
 if (!t) { // 2. 所以限制定时器只能开一个
 t = setInterval(showTime, 1000); // 1. 每点击一次就会开设一个定时器 而t只指代最后一个
 }
 };
 endBtnEle.onclick = function () {
 clearInterval(t);
 t = null; // 4. 清除完了定时器, 还应该将t重置为空, 如果不置位空, 下次点击!t布尔值位true
 }
</script>
</body>
</html>
6.7 事件之onchange实例: 省市联动
<!DOCTYPE html>
<html lang="en">
<head>
    <meta charset="UTF-8">
    <title>Title</title>
</head>
<body>
<select name="" id="d1"></select>
<select name="" id="d2"></select>
<script>
 // onchange: 文本域变化事件. 应用场景:通常用于表单元素,当元素内容被改变时触发.
 let proEle = document.getElementById('d1');
 let cityEle = document.getElementById('d2');
 let data = {
 "河北省": ["廊坊", "邯郸"],
 "北京": ["朝阳区", "海淀区"],
 "山东": ["威海市", "烟台市"]
 };

 // 1. 为proEle和cityEle初始化提示option
 proEle.innerHTML = "<option disabled selected>--请选择省--</option>";
 cityEle.innerHTML = '<option disabled selected>--请选择市--</option>';

 // 2. for循环取值获取省, 并将获取到的省添加到proEle内
 for (let key in data) {
 let optEle = document.createElement('option');
 optEle.value = key;
 optEle.innerText = key;
 proEle.appendChild(optEle);
 }

 // 3. 当proEle被改变了自动触发绑定的onchange事件, 准备为cityEle添加对应的市区提供选择
 proEle.onchange = function () {
 cityEle.innerHTML = ''; // 关键: 一上来就清空市区optEle, 为了防止下面多次选择触发appendChild出现一直追加的情况.
 let cityArray = data[proEle.value];

 // 4. 循环所有的市 渲染到第二个select中
 // // 方法一: 使用for循环. (提示: for循环取值争对数组取出来的是索引. 争对对象{}取出来的是key)
 // for (let index in cityArray) {
 // let optEle = document.createElement('option');
 // optEle.value = cityArray[index];
 // optEle.innerText = cityArray[index];
 // cityEle.appendChild(optEle);
 // }

 // 方法二: 使用forEach
 cityArray.forEach(function (city) {
 let optEle = document.createElement('option');
 optEle.value = city;
 optEle.innerText = city;
 cityEle.appendChild(optEle);
 }, this);
 };
</script>
</body>
</html>
7.练习
案例一:模态框
<!doctype html>
<html lang="en">
<head>
    <meta charset="UTF-8">
    <title>Document</title>
    <style>
 \* {
 margin: 0;
 padding: 0;
 }

 html, body {
 height: 100%;
 }

 #bg {
 height: 100%;
 background-color: rgba(0, 0, 0, 0.3);
 }

 #content {
 position: relative;
 top: 150px;
 width: 400px;
 height: 200px;
 line-height: 200px;
 text-align: center;
 color: red;
 background-color: white;
 margin: 0 auto;

 }

 #cancel {
 position: absolute;
 top: 0;
 right: 0;
 color: white;
 width: 30px;
 height: 30px;
 line-height: 30px;
 text-align: center;
 background-color: red;
 }
 </style>
</head>
<body>
<input type="button" value="弹出模态框" id="btn">
<script>
 var oBtn = document.getElementById('btn');
 var oDiv = document.createElement('div');
 var oP = document.createElement('p');
 var oSpan = document.createElement('span');

 oDiv.id = 'bg';
 oP.id = 'content';
 oSpan.id = 'cancel';

 oP.innerHTML = '弹出模态框';
 oSpan.innerHTML = 'X';

 oDiv.appendChild(oP);
 oP.appendChild(oSpan);


 oBtn.onclick = function () {
 this.parentNode.replaceChild(oDiv, this);
 };

 oSpan.onclick =function () {
 oDiv.parentNode.replaceChild(oBtn,oDiv);
 }

</script>
</body>
</html>

<!doctype html>
<html lang="en">
<head>
    <meta charset="UTF-8">
    <title>Document</title>
    <style>
 \* {
 margin: 0;
 padding: 0;
 }
 html,body {
 height: 100%;
 }

 #bg {
 position: absolute;
 top: 0;
 left: 0;
 right: 0;
 bottom: 0;
 background-color: rgba(0,0,0,0.3);
 display: none;
 }
 #content {
 position: absolute;
 top: 100px;
 left: 50%;
 margin-left: -150px;
 background-color: white;
 width: 300px;
 height: 200px;

 }
 #content p:nth-child(3) {
 position: absolute;
 top: 100px;
 }


 </style>
</head>
<body>
<input type="button" value="弹出" id="btn">
<div id="bg">
    <div id="content">
        <p>
            <label for="inp-username">用户名: </label><input type="text" name="username" id="inp-username">
        </p>
        <p>
            <label for="inp-password">密码: </label><input type="text" name="username" id="inp-password">
        </p>
        <p>
            <input type="button" value="提交" >
            <input type="button" value="取消" id="cancel">
        </p>
    </div>
</div>

<script>
 var oBtn = document.getElementById('btn');
 var oBg = document.getElementById('bg');
 var oInpUsername=document.getElementById('inp-username');
 var oInpPwd=document.getElementById('inp-password');

 var oInp=document.getElementById('cancel');
 oBtn.onclick=function () {
 oBg.style.display='block';
 }

 oInp.onclick=function () {
 oInpUsername.value='';
 oInpPwd.value='';
 oBg.style.display='none'
 }


</script>

</body>
</html>
案例二:点击有惊喜
<!doctype html>
<html lang="en">
<head>
    <meta charset="UTF-8">
    <title>Document</title>
    <style>
 \* {
 margin: 0;
 padding: 0;
 }

 .box {
 width: 200px;
 height: 200px;
 background: red;
 text-align: center;
 color: white;
 line-height: 200px;
 font-size: 23px;
 font-weight: bold;
 margin: 20px auto;
 }
 </style>
</head>
<body>
<div class="box">点击有惊喜!!!</div>
<script>
 var oBox = document.getElementsByClassName('box')[0];

 //初始化点击的次数。通过次数的增加来改变DOM的样式
 var a = 0;
 oBox.onclick = function () {
 a++;
 console.log(a % 4);
 if (a % 4 === 1) {
 this.style.background = 'green';
 this.innerText = '继续点击哦!!!';
 } else if (a % 4 == 2) {
 this.style.background = 'blue';
 this.innerText = '骗你的,傻逼';
 } else if (a % 4 == 3) {
 this.style.background = 'transparent';
 this.innerText = '';
 } else {
 this.style.background = 'red';
 this.innerText = '点击有惊喜!!!';
 }

 }
</script>
</body>
</html>
案例三:简易评论板
<!doctype html>
<html lang="en">
<head>
    <meta charset="UTF-8">
    <title>Document</title>
    <style>
 \* {
 margin: 0;
 padding: 0;
 }

 #comment {
 background-color: #b0b0b0;
 width: 500px;
 }

 #comment ul li {
 list-style: none;
 background-color: wheat;
 border: 1px dashed #000;
 margin: 0px 10px 10px;
 word-break: break-all;
 word-wrap: break-word;
 }
 </style>
</head>
<body>
<div id="comment">
    <p>评论内容:</p>
</div>
<div id="box">
    <p>留言内容:</p>
    <textarea name="" id="content" cols="30" rows="10"></textarea>
    <p>
        <input type="button" value="提交" id="btn">
        <input type="button" value="统计" id="calculate">
    </p>
</div>
<script>
 var comment = document.getElementById('comment');
 var box = document.getElementById('box');
 var submit = document.getElementById('submit');
 var content = document.getElementById('content');
 var btn = document.getElementById('btn');
 var calculate=document.getElementById('calculate');

 var ul = document.createElement('ul');
 comment.appendChild(ul);

 var count=0;
 btn.onclick = function () {
 var val = content.value;
 if (val.length != 0) {
 var date = new Date();
 var subTime = date.toLocaleString();

 var li = document.createElement('li');
 var p1 = document.createElement('h3');
 var p2 = document.createElement('p');

 var spans = document.getElementsByClassName('del');
 count=spans.length+1;

 p1.innerHTML = '#'+'<span class="num">'+count+'</span>'+'楼'+' '+subTime + '<span class="del"> 删除</span>';
 p2.innerHTML = val;
 li.appendChild(p1);
 li.appendChild(p2);

 ul.appendChild(li);
 content.value = '';
 }

 function aa() {
 var spans = document.getElementsByClassName('del');
 for (var i = 0; i < spans.length; i++) {
 spans[i].onclick=function (currentIndex) {
 function bb() {
 ul.removeChild(this.parentNode.parentNode);
 count--;
 var ss=document.getElementsByClassName('num');
 for (var j=currentIndex;j<ss.length;j++){
 ss[j].innerHTML=parseInt(ss[j].innerHTML)-1;
 }
 aa();
 }
 return bb;

 }(i);
 }
 }
 aa()

 };

 calculate.onclick = function () {
 alert('一共发布了'+count+'条评论');
 }
</script>

</body>
</html>
案例四:选项卡
<!doctype html>
<html lang="en">
<head>
    <meta charset="UTF-8">
    <title>Document</title>
    <style>
 \* {
 margin: 0;
 padding: 0;
 }
 .tab {
 width: 480px;
 height: 200px;
 border: 1px solid red;
 margin: 0 auto;
 }

 ul li {
 list-style: none;
 width: 160px;
 height: 60px;
 line-height: 60px;
 text-align: center;
 background-color: #b0b0b0;
 float: left;
 }

 li.active {
 background-color: #55BBBB;
 }
 p {
 display: none;
 height: 200px;
 text-align: center;
 line-height: 200px;
 background-color: white;
 }
 p.active {
 display: block;
 }
 </style>
</head>
<body>
<div class="tab">
    <ul>
        <li class="active">首页</li>
        <li>新闻</li>
        <li>图片</li>
    </ul>
    <p class="active">首页内容</p>
    <p>新闻内容</p>
    <p>图片内容</p>
</div>
<script>
 var aLi=document.getElementsByTagName('li');
 var aP=document.getElementsByTagName('p');
 for (var i=0;i<aLi.length;i++){
 aLi[i].index=i;
 aLi[i].onclick=function () {
 for (var j=0;j<aLi.length;j++){
 aLi[j].className='';
 aP[j].className='';
 }
 this.className='active';
 aP[this.index].className='active';
 }
 }
</script>
</body>
</html>
案例五:仿淘宝搜索框
<!doctype html>
<html lang="en">
<head>
    <meta charset="UTF-8">
    <title>Document</title>
    <style>
 \* {
 margin: 0;
 padding: 0;
 }

 #search {
 position: relative;
 }

 input {
 outline: none;
 display: block;
 border: 2px solid #f2a83c;
 border-radius: 10px;
 width: 490px;
 height: 50px;
 margin-top: 20px;
 }

 label {
 position: absolute;
 top: 20px;
 left: 10px;
 font-size: 8px;
 color: gray;
 }
 </style>
</head>
<body>
<div id="search">
    <input type="text" id="text">
    <label for="text" id="msg">老男孩上海校区</label>
</div>

<script>
 var txt = document.getElementById('text');
 var msg = document.getElementById('msg');

 //检测用户表单输入的时候
 txt.oninput = function () {
 //控制元素显示隐藏
 if (this.value == '') {
 msg.style.display = 'block';
 } else {
 msg.style.display = 'none';
 }
 }
</script>
</body>
</html>
案例六:获取当前时间
<!doctype html>
<html lang="en">
<head>
    <meta charset="UTF-8">
    <title>Document</title>
</head>
<body>


<script>
 setInterval(function () {

 var date = new Date();

 var y = date.getFullYear();
 var m = date.getMonth();
 var d = date.getDate();
 var h = date.getHours();
 var min = date.getMinutes();
 var s = date.getSeconds();

 //今天是2018年2月23日 8:23:09


 document.body.innerHTML = "今天是" + y + '年' + num(m + 1) + "月" + num(d) + "日" + num(h) + ":" + num(min) + ":" + num(s)

 }, 1000)

 function num(n) {
 if (n < 10) {
 return "0" + n;

 }
 return n
 }
</script>
</body>
</html>
案例七:匀速运动
<!doctype html>
<html lang="en">
<head>
    <meta charset="UTF-8">
    <title>Document</title>
    <style>
 \* {
 padding: 0;
 margin: 0;
 }

 .box {
 width: 200px;
 height: 200px;
 background-color: #FF0000;
 position: absolute;
 top: 50px;
 left: 0px;
 }
 </style>
</head>
<body>
<div id="wrap">

    <button id="btn1">前进</button>
    <button id="btn2">后退</button>
    <div class="box" id="box1">

    </div>

</div>

<script>
 var btn1 = document.getElementById('btn1');
 var btn2 = document.getElementById('btn2');

 var box1 = document.getElementById('box1')

 var count = 0;
 var time1 = null;
 var time2 = null;

 btn1.onclick = function () {
 clearInterval(time2);

 time1 = setInterval(function () {
 count += 10;
 if (count > 1000) {
 box1.style.left = '1000px';
 box1.style.borderRadius = '50%';

 clearInterval(time1);
 } else {
 box1.style.left = count + 'px';
 box1.style.borderRadius = count / 2000 \* 100 + '%';
 }


 }, 10)

 };
 btn2.onclick = function () {
 clearInterval(time1);
 time2 = setInterval(function () {
 count -= 10;
 if (count <= 0) {
 box1.style.left = '0px';
 box1.style.borderRadius = '';

 clearInterval(time2);
 } else {
 box1.style.left = count + 'px';
 box1.style.borderRadius = count / 2000 \* 100 + '%';
 ;

 }


 }, 10)

 }


</script>
</body>
</html>
案例八:5s后关闭广告
<!doctype html>
<html lang="en">
<head>
    <meta charset="UTF-8">
    <title>Document</title>
    <style>
 \* {
 padding: 0;
 margin: 0;
 }

 img {
 position: fixed;
 width: 300px;
 }

 ul {
 list-style: none;
 }

 #left {
 left: 0;
 }

 #right {
 right: 0;
 }

 ul li {
 font-size: 25px;
 }
 </style>
</head>
<body>
<img src="images/1.jpg" id="left">
<img src="images/1.jpg" id="right">
<ul>
    <li>屠龙宝刀,点击就送</li>
    <li>屠龙宝刀,点击就送</li>
    <li>屠龙宝刀,点击就送</li>
    <li>屠龙宝刀,点击就送</li>
    <li>屠龙宝刀,点击就送</li>
    <li>屠龙宝刀,点击就送</li>
    <li>屠龙宝刀,点击就送</li>
    <li>屠龙宝刀,点击就送</li>
    <li>屠龙宝刀,点击就送</li>
    <li>屠龙宝刀,点击就送</li>
    <li>屠龙宝刀,点击就送</li>
    <li>屠龙宝刀,点击就送</li>
    <li>屠龙宝刀,点击就送</li>
    <li>屠龙宝刀,点击就送</li>
    <li>屠龙宝刀,点击就送</li>
    <li>屠龙宝刀,点击就送</li>
    <li>屠龙宝刀,点击就送</li>
    <li>屠龙宝刀,点击就送</li>
    <li>屠龙宝刀,点击就送</li>
    <li>屠龙宝刀,点击就送</li>
    <li>屠龙宝刀,点击就送</li>
    <li>屠龙宝刀,点击就送</li>
    <li>屠龙宝刀,点击就送</li>
    <li>屠龙宝刀,点击就送</li>
    <li>屠龙宝刀,点击就送</li>
    <li>屠龙宝刀,点击就送</li>
    <li>屠龙宝刀,点击就送</li>
    <li>屠龙宝刀,点击就送</li>
    <li>屠龙宝刀,点击就送</li>
    <li>屠龙宝刀,点击就送</li>

</ul>

<script>
 window.onload = function () {
 var left = document.getElementById('left');
 var right = document.getElementById('right');

 setTimeout(function () {
 left.style.display = 'none';
 right.style.display = 'none';


 }, 5000)
 }

</script>
</body>
</html>
案例九:小米滚动
<!doctype html>
<html lang="en">
<head>
    <meta charset="UTF-8">
    <title>Document</title>
    <style>
 \* {
 padding: 0;
 margin: 0;
 }

 .wrap {
 width: 512px;
 height: 400px;
 border: 3px solid #808080;
 position: relative;
 overflow: hidden;
 margin: 100px auto;
 }

 .wrap span {
 width: 100%;
 height: 200px;
 position: absolute;
 background-color: transparent;
 border: 1px solid #000;
 }

 .up {
 top: 0;
 }

 .down {
 bottom: 0;
 }

 img {
 position: absolute;
 top: 0;
 left: 0;
 height: 200px;
 }
 </style>
</head>
<body>
<div id="box" class="wrap">
    <img src="images/mi.png" id="xiaomi">

    <span class="up" id="picUp">11111</span>

    <span class="down" id="picDown">22222</span>


</div>

<script>
 var up = document.getElementById('picUp');
 var down = document.getElementById('picDown');

 var img = document.getElementById('xiaomi');

 var count = 0;
 var time = null;
 //鼠标移入的时候吧
 up.onmouseover = function () {

 //不管怎样 上来先清定时器
 clearInterval(time);
 time = setInterval(function () {
 count -= 3;

 count >= -1070 ? img.style.top = count + 'px' : clearInterval(time);


 }, 30)
 };
 down.onmouseover = function () {
 clearInterval(time);

 time = setInterval(function () {
 count += 1;

 count < 0 ? img.style.top = count + 'px' : clearInterval(time);


 }, 30)
 }

</script>
</body>
</html>
案例十:无缝轮播
<!doctype html>
<html lang="en">
<head>
    <meta charset="UTF-8">
    <title>Document</title>
    <style>
 \* {
 padding: 0;
 margin: 0;
 }

 ul {
 list-style: none;
 }

 .box {
 width: 600px;
 height: 700px;
 margin: 50px auto;
 overflow: hidden;
 position: relative;
 border: 1px solid #000;

 }

 ul li {
 float: left;
 }

 .box ul {
 width: 500%;
 position: absolute;
 top: 0;
 left: 0;


 }
 img {
 width: 600px;
 }
 </style>
</head>
<body>
<div class="box">
    <ul>
        <li><img src="https://images2018.cnblogs.com/blog/1036857/201805/1036857-20180516225816920-580320384.jpg"/></li>
        <li><img src="https://images2018.cnblogs.com/blog/1036857/201805/1036857-20180516225809591-1990809146.jpg"/></li>
        <li><img src="https://images2018.cnblogs.com/blog/1036857/201805/1036857-20180516225724530-539090864.jpg"/></li>
        <li><img src="https://images2018.cnblogs.com/blog/1036857/201805/1036857-20180516225751362-1832630751.jpg"/></li>
        <li><img src="https://images2018.cnblogs.com/blog/1036857/201805/1036857-20180516225816920-580320384.jpg"/></li>

    </ul>


</div>

<script>
 var box = document.getElementsByClassName('box')[0];

 var ul = box.children[0];


 var num = 0;
 var timer = null;

 timer = setInterval(autoPlay, 3);

 //函数的声明
 function autoPlay() {
 num--;


 num <= -2400? num = 0: num;
 ul.style.left = num + 'px'

 }

 //鼠标移动上去
 box.onmouseover = function () {
 clearInterval(timer)
 };
 box.onmouseout = function () {
 timer = setInterval(autoPlay, 3);
 }
</script>
</body>
</html>
案例十一:用户名和密码校验
<!doctype html>
<html lang="en">
<head>
    <meta charset="UTF-8">
    <meta name="viewport"
 content="width=device-width, user-scalable=no, initial-scale=1.0, maximum-scale=1.0, minimum-scale=1.0">
    <meta http-equiv="X-UA-Compatible" content="ie=edge">
    <title>Document</title>
    <style>
 span {
 background-color: red;
 }

 </style>
</head>
<body>
<form>
    <p>
        <input type="text" name="username">
        <span></span>
    </p>

    <p>
        <input type="password" name="password">
        <span></span>

    </p>

    <p>
        <input type="button" value="提交" id="btn">
    </p>
</form>


<script>
 var isOk1=false
 var reg1=new RegExp('(?!^[0-9]+$)(?!^[a-zA-Z]+$)^[0-9A-Za-z]{4}$')
 var inp1 = document.getElementsByName("username")[0]

 inp1.onblur=function () {
 var res=reg1.test(this.value)
 this.style.border="1px solid red"

 if (!res) {
 this.nextElementSibling.innerText="用户名必须由4位字母和数字组成"
 setTimeout(function () {
 inp1.nextElementSibling.innerText=""
 inp1.value=""
 },3000)
 }else {
 this.style.border="1px solid green"
 isOk1=true
 }
 }


 var isOk2=false
 var reg2=new RegExp('(?!^[0-9]+$)(?!^[a-zA-Z]+$)^[0-9A-Za-z]{6}$')
 var inp2 = document.getElementsByName("password")[0]

 inp2.onblur=function () {
 var res=reg2.test(this.value)
 this.style.border="1px solid red"

 if (!res) {
 this.nextElementSibling.innerText="密码必须由6位字母和数字组成"
 setTimeout(function () {
 inp2.nextElementSibling.innerText=""
 inp2.value=""
 },3000)
 }else {
 this.style.border="1px solid green"
 isOk2=true
 }
 }

 var btn=document.getElementById("btn")
 btn.onclick=function () {
 if(isOk1 && isOk2) {
 alert("提交成功")
 }else {
 alert("请重新填写")
 }
 }
</script>
</body>
</html>
四、总结:
/*
查找标签:
    直接查找:
        id查找    document.getElementById()          返回对象
        类名查找   document.getElementsByClassName()  返回数组对象
        标签名查找  document.getElementByTagName()     返回数组对象

    间接查找:
        查找父标签: 没有父标签则返回null
            divEle.parentElement
        查找所有子标签: 返回数组对象, 通过索引取值获取对应子标签
            divEle.children
        查找第一个子标签:
            divEle.firstElementChild
            divEle.children[0]
        查找最后一个子标签:
            divEle.lastElementChild
            divEle.children[divEle.children.length-1]
        查找同级别上一个:
            divEle.nextElementSibling
        查找同级别下一个:
            divEle.previousElementSibling

节点操作:
    创建标签:
        let aEle = document.createElement('a');
    添加属性:
        添加内置: aEle.alt='';
        添加内置+自定义: aEle.setAttribute('username', 'egon');
        拓展: getAttribute('username')  removeAttribute('username')

    文本操作:
        获取所有文本:       aEle.innerText;
        获取所有文本+标签:   aEle.innerHTML;
        添加文本:          aEle.innerText='xxx';
        添加文本+标签:      aEle.innerHTML='<h1>xxx</h1>;

    追加标签:
        let divEle = document.getElementById('d1');
        divEle.appendChild(aEle);
        拓展: removeChild(aEle) replaceChild(src, dst)

    插入标签:
        let pEle = divEle.children[0];
        divEle.inertBefore(aEle, pEle)

获取值操作:
    获取非文件: inputEle.value
    获取文件:
        获取文件本次上传路径: inputEle.value
        获取文件对象集合:    inputEle.files  返回格式{0: 文件对象, 1: 文件对象1}
        获取某一个文件对象:   inputEle.files[0]
    拓展: 值清空
        inputEle.value=''

class, css操作:
    class操作:
        获取所有类属性: divEle.classList 返回数组对象
        获取某一个类属性: divEle.classList[0] 返回数组对象中按照索引取值的类名
        对获取到的所有类属性进行追加: divEle.classList.add('bg_red')
        对获取到的所有类属性进行删除: divEle.classList.remove('bg_red')
        对获取到的所有类属性判断是否存在某个类: divEle.classList.contains('bg_red')  返回布尔值
        对获取到的所有类属性判断有则删除,无则添加: divEle.classList.toggle('bg_red')  之前有布尔值为true, 执行了以后删除了它, 布尔值就是false

    css操作: 统一style起手, 将css中的横杆换成驼峰体
        divEle.style.backgroundColor = 'red';
        divEle.style.fontSize = '28px';

事件: 满足某种条件自动触发的功能
    导入js的2种方式:
        head中绑定预加载事件window.onload. 预加载无法执行以下的绑定事件的第一种方式. 且不能多次声明, 多次绑定, 下面会覆盖上面
        body中底部

    绑定事件的2种方式:
        标签中定义属性οnclick='func()'
        通过DOM操作获取标签对象, 再通过标签对象绑定事件. 例如: aEle.onclick = function () {}

    onclick 鼠标单击事件.
        实例1: 开关灯. 主要利用nodeEle.classList.toggle实现
        实例2: 展示当前时间. 主要利用创建时间对象new Date() + 循环定时器实现

    onfocus 获得焦点时触发事件 + onblur 失去焦点时触发事件.
        实例: input框的焦点获取与失去. 主要利用inputEle.value实现

    onchange 文本域变化事件
        实例: 省市联动. 主要利用节点操(创建标签, 为标签添加属性, 为标签添加文本内容, 找到需要添加的位置添加)

    常用事件总结:
        onclick         鼠标单击
        ondblclick      双击后激活事件

        onfocus         获得焦点时触发
        onblur          失去焦点时触发               应用场景:用于表单验证,用户离开某个输入框时,代表已经输入完了,我们可以对它进行验证.
        onchange        域的内容被改变。             应用场景:通常用于表单元素,当元素内容被改变时触发.(select联动)

        onkeydown       某个键盘按键被按下。          应用场景: 当用户在最后一个输入框按下回车按键时,表单提交
        onkeypress      某个键盘按键被按下并松开。
        onkeyup         某个键盘按键被松开。

        onload          载入网页时

        onmousedown     鼠标按钮被按下。
        onmousemove     鼠标被移动。
        onmouseout      鼠标从某元素移开。
        onmouseover     鼠标移到某元素之上。

        onselect        在文本框中的文本被选中时发生。
        onsubmit        确认按钮被点击,使用的对象是form。
*/
学好 Python 不论是就业还是做副业赚钱都不错,但要学会 Python 还是要有一个学习规划。最后大家分享一份全套的 Python 学习资料,给那些想学习 Python 的小伙伴们一点帮助!
一、Python所有方向的学习路线
Python所有方向路线就是把Python常用的技术点做整理,形成各个领域的知识点汇总,它的用处就在于,你可以按照上面的知识点去找对应的学习资源,保证自己学得较为全面。

二、学习软件
工欲善其事必先利其器。学习Python常用的开发软件都在这里了,给大家节省了很多时间。
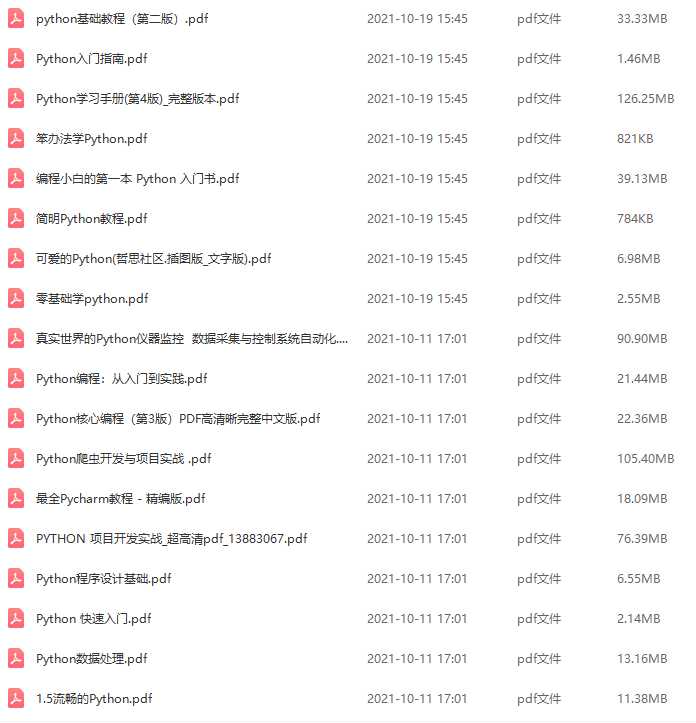
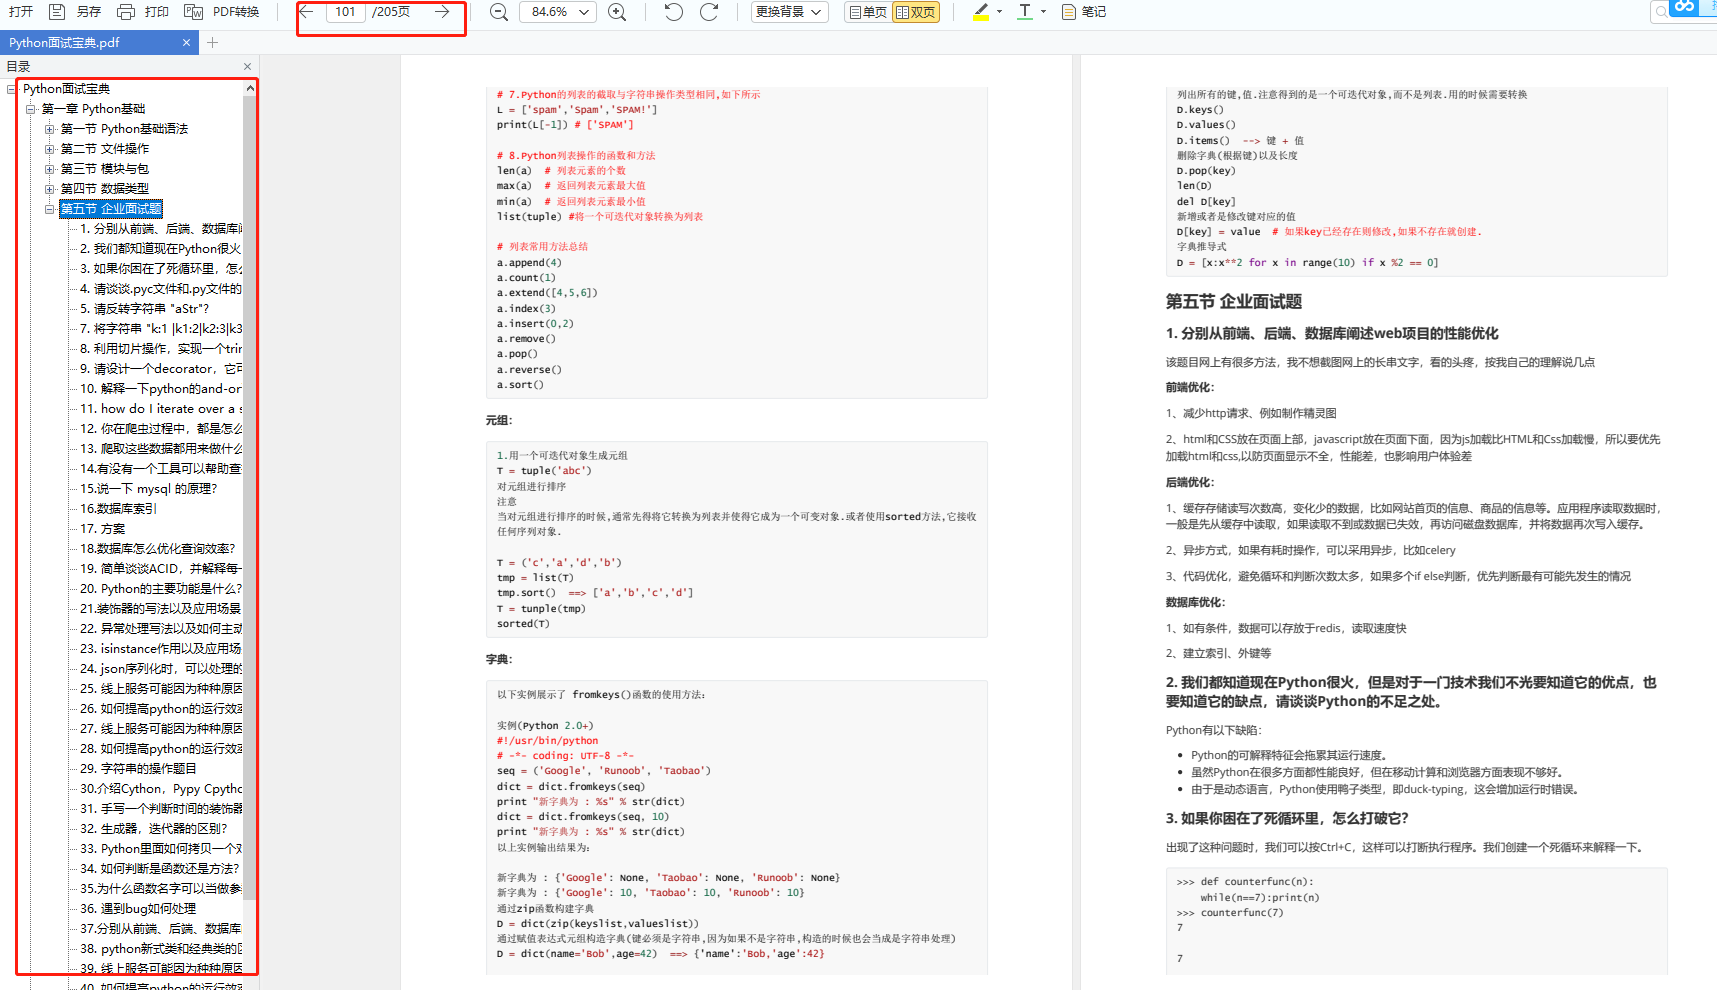
三、全套PDF电子书
书籍的好处就在于权威和体系健全,刚开始学习的时候你可以只看视频或者听某个人讲课,但等你学完之后,你觉得你掌握了,这时候建议还是得去看一下书籍,看权威技术书籍也是每个程序员必经之路。
四、入门学习视频
我们在看视频学习的时候,不能光动眼动脑不动手,比较科学的学习方法是在理解之后运用它们,这时候练手项目就很适合了。
五、实战案例
光学理论是没用的,要学会跟着一起敲,要动手实操,才能将自己的所学运用到实际当中去,这时候可以搞点实战案例来学习。
六、面试资料
我们学习Python必然是为了找到高薪的工作,下面这些面试题是来自阿里、腾讯、字节等一线互联网大厂最新的面试资料,并且有阿里大佬给出了权威的解答,刷完这一套面试资料相信大家都能找到满意的工作。
网上学习资料一大堆,但如果学到的知识不成体系,遇到问题时只是浅尝辄止,不再深入研究,那么很难做到真正的技术提升。
一个人可以走的很快,但一群人才能走的更远!不论你是正从事IT行业的老鸟或是对IT行业感兴趣的新人,都欢迎加入我们的的圈子(技术交流、学习资源、职场吐槽、大厂内推、面试辅导),让我们一起学习成长!


 366
366

 被折叠的 条评论
为什么被折叠?
被折叠的 条评论
为什么被折叠?
 到【灌水乐园】发言


