


跳槽是每个人的职业生涯中都要经历的过程,不论你是搜索到的这篇文章还是无意中浏览到的这篇文章,希望你没有白白浪费停留在这里的时间,能给你接下来或者以后的笔试面试带来一些帮助。
也许是互联网未来10年中最好的一年。WINTER IS COMING。但是如果你不真正的自己去尝试尝试,你永远不知道市面上的行情如何。这次找工作下来,我自身感觉市场并没有那么可怕,也拿到了几个大厂的offer。在此进行一个总结,给自己,也希望能帮助到需要的同学。
面试准备
开源分享:【大厂前端面试题解析+核心总结学习笔记+真实项目实战+最新讲解视频】
面试准备根据每个人掌握的知识不同,准备的时间也不一样。现在对于前端岗位,以前也许不是很重视算法这块,但是现在很多公司也都会考。建议大家平时有空的时候多刷刷leetcode。算法的准备时间比较长,是一个长期的过程。需要在掌握了大部分前端基础知识的情况下,再有针对性的去复习算法。面试的时候算法能做出来肯定加分,但做不出来也不会一票否决,面试官也会给你提供一些思路。
在scripts下添加"lint:script": "eslint --ext .jsx,.vue,.tsx,.ts,.js --fix",完整代码:
{
  "name": "vite-vue3-ts-project",
  "private": true,
  "version": "0.0.0",
  "type": "module",
  "scripts": {
    "dev": "vite",
    "build": "vue-tsc && vite build",
    "preview": "vite preview",
    "lint:script": "eslint --ext .jsx,.vue,.tsx,.ts,.js --fix"
  },
  "dependencies": {
    "vue": "^3.3.4"
  },
  "devDependencies": {
    "@typescript-eslint/eslint-plugin": "^6.7.2",
    "@vitejs/plugin-vue": "^4.2.3",
    "eslint": "^8.50.0",
    "eslint-config-standard-with-typescript": "^39.1.0",
    "eslint-plugin-import": "^2.28.1",
    "eslint-plugin-n": "^16.1.0",
    "eslint-plugin-promise": "^6.1.1",
    "eslint-plugin-vue": "^9.17.0",
    "scss": "^0.2.4",
    "typescript": "^5.2.2",
    "vite": "^4.4.5",
    "vue-tsc": "^1.8.5"
  }
}
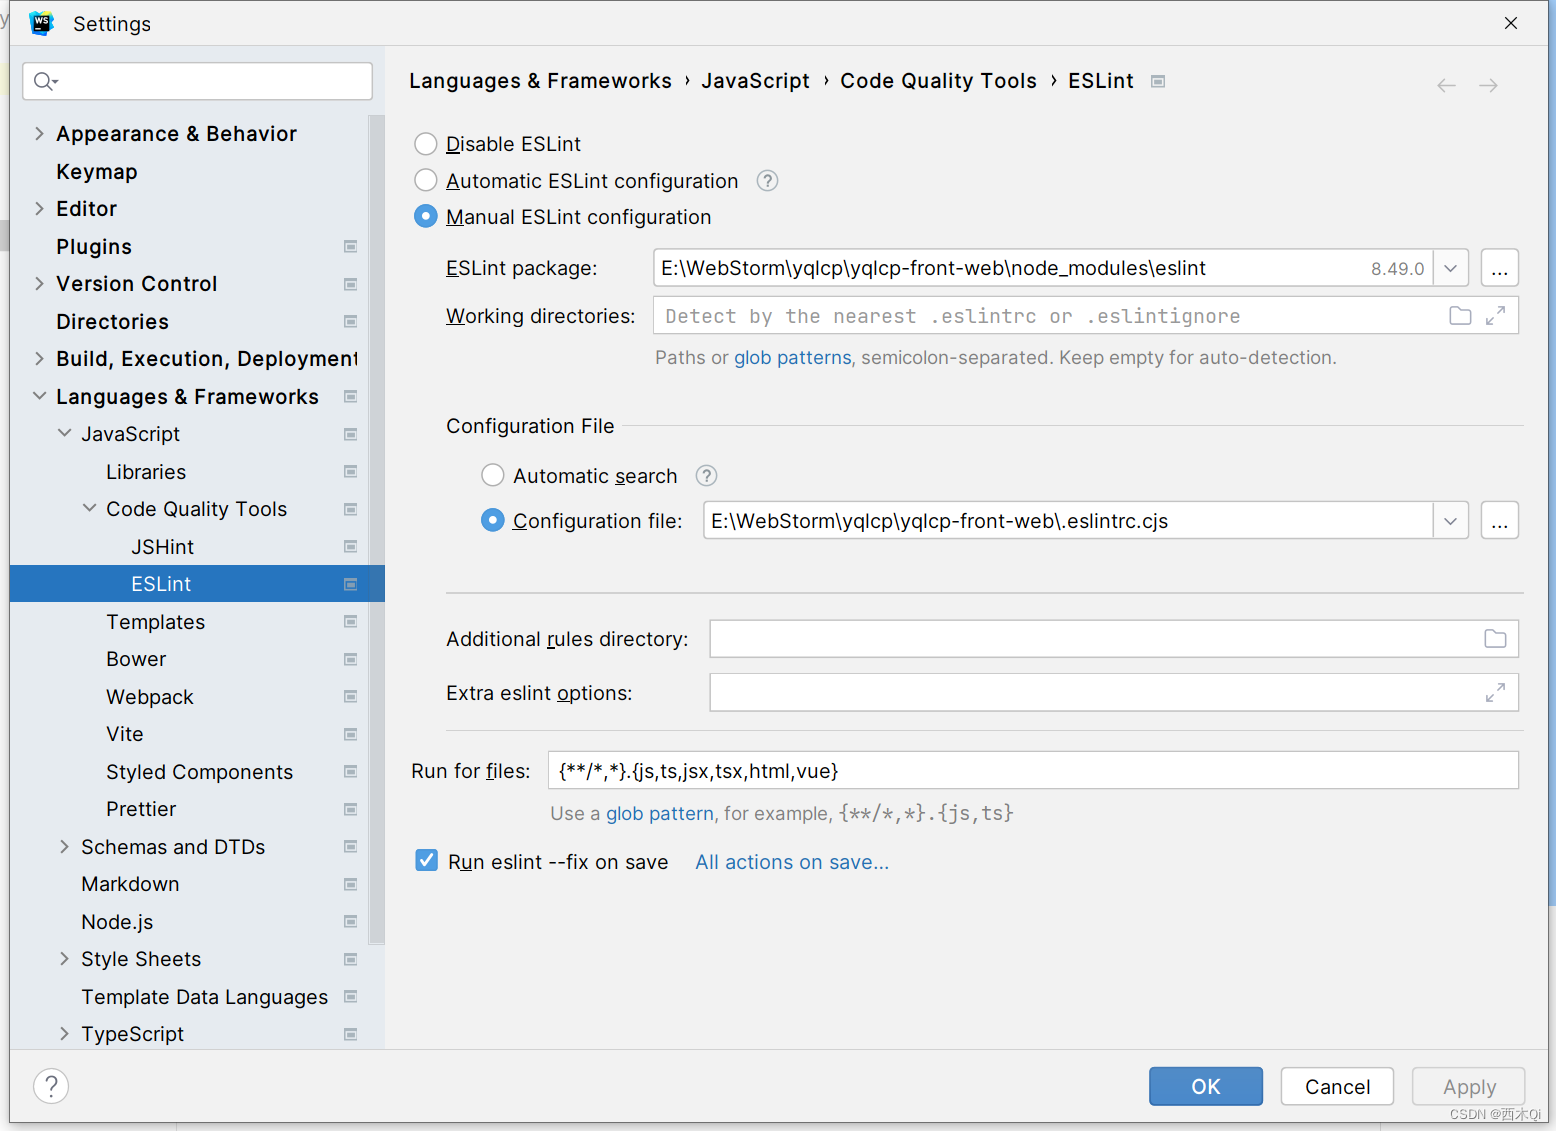
- 在根目录下的.eslintrc.cjs中按如下配置添加
// eslint配置,用于校验代码
module.exports = {
    // env指定环境 支持的环境: browser node commonjs es6 es2016~es2022...
    // 环境很多,详情查看文档https://zh-hans.eslint.org/docs/latest/use/configure/language-options
    "env": {
        "browser": true,
        "es2021": true,
        "node": true,
    },
    // 使用插件配置
    "extends": [
        "eslint:recommended",
        "plugin:vue/vue3-essential",
        "plugin:@typescript-eslint/recommended"
    ],
    // "overrides": [
    //     {
    //         "env": {
    //             "node": true
    //         },
    //         "files": [
    //             ".eslintrc.{js,cjs}"
    //         ],
    //         "parserOptions": {
    //             "sourceType": "script"
    //         }
    //     }
    // ],
    // 配置支持的js语言选项
    "parserOptions": {
        "ecmaVersion": "latest",
        "sourceType": "module",
        "parser": "@typescript-eslint/parser"
    },
    // eslint第三方插件配置
    "plugins": [
        "vue",
        "@typescript-eslint"
    ],
    // eslint规则配置,还有很多规则配置项,在官网查看 https://eslint.org/docs/latest/rules/
    "rules": {
        '@typescript-eslint/no-var-requires': 0, //解决报错:Require statement not part of import statement.
        'vue/multi-word-component-names': 'off', //关闭组件命名规则校验
        // => 前后有空格
        "arrow-spacing": [
            2,
            {
                before: true,
                after: true,
            },
        ],
        "block-spacing": [2, "always"],
        // 对象字面量项尾是否有逗号
        "comma-dangle": [2, "always-multiline"],
    }
}
- WebStorm配置ESLint【可选】
3.5 安装Prettier
prettier 是代码格式化工具,用它可以统一代码格式,风格。
- 安装Prettier依赖
npm install -D prettier
- 依赖安装完毕后,在项目的根目录下创建
.prettierrc.cjs配置文件,添加如下配置:
//.prettierrc.cjs
module.exports = {
    printWidth: 80, //一行的字符数,如果超过会进行换行,默认为80
    singleAttributePerLine: false, //每行强制换行,只能使用单个属性
    tabWidth: 2, // 一个 tab 代表几个空格数,默认为 2 个
    useTabs: false, //是否使用 tab 进行缩进,默认为false,表示用空格进行缩减
    singleQuote: true, // 字符串是否使用单引号,默认为 false,使用双引号
    semi: false, // 行尾是否添加分号,默认为true
    trailingComma: 'none', //行使用逗号分隔 可选值: es5 none all
    bracketSpacing: true, // 对象大括号直接是否有空格,默认为 true,效果:{ a: 1 }
    endOfLine: 'auto', // 文本文件中的行结束方式 可选值: lf crlf cr auto
    jsxBracketSameLine: false, // 在jsx中把'>' 是否单独放一行
    vueIndentScriptAndStyle: false, // <script>Vue 文件中的代码和标签是否缩进<style>。
    arrowParens: "always", // 箭头函数的括号
}
- 同时在根目录创建
.prettierignore文件用来忽略不需要Prettier格式化代码的文件
.DS_Store
node_modules
dist
/src/assets/\*
dist-ssr

\*\*/\*.svg
\*\*/\*.sh
- (没有冲突时可先不配置)
eslint和prettier的配置难免会有冲突,如果发生冲突,目前比较成熟的方案是使用以下两个插件:eslint-plugin-prettier: 基于prettier代码风格的eslint规则,即eslint使用pretter规则来格式化代码。eslint-config-prettier: 禁用所有与格式相关的eslint规则,解决prettier与eslint规则冲突,确保将其放在extends队列最后,这样它将覆盖其他配置。
npm install -D eslint-config-prettier eslint-plugin-prettier
安装完成后在.eslintrc.cjs文件中extends的最后添加一个配置
    // 使用插件配置
    "extends": [
        "eslint:recommended",
        "plugin:vue/vue3-essential",
        "plugin:@typescript-eslint/recommended",
        "plugin:prettier/recommended" // 新增,必须放在最后面
    ],
3.6 自动导入
- 安装
npm install -D unplugin-vue-components unplugin-auto-import
vite.config.ts引入配置
import { defineConfig } from 'vite'
import vue from '@vitejs/plugin-vue'

//1、 导入 path 模块,帮助我们解析路径
import { resolve } from 'path'

//2-1 自动导入vue中hook reactive ref等
import AutoImport from 'unplugin-auto-import/vite'
//2-2 自动导入ui-组件 比如说ant-design-vue element-plus等
import Components from 'unplugin-vue-components/vite'

// https://vitejs.dev/config/
export default defineConfig({
    plugins: [
        vue(),
        AutoImport({
            //安装两行后你会发现在组件中不用再导入ref,reactive等
            imports: ['vue', 'vue-router'],
            //存放的位置
            dts: "src/auto-import.d.ts",
        }),
        Components({
            // 引入组件的,包括自定义组件,存放的位置
            dts: "src/components.d.ts",
        }),
    ],

    //1、 ↓解析配置
    resolve: {
        // ↓路径别名
        alias: {
            "@": resolve(__dirname, "./src"),
            "\_c": resolve(__dirname, "./src/components")
        }
    }
})
- components.d.ts配置(仅供参考)
/\* eslint-disable \*/
/\* prettier-ignore \*/
// @ts-nocheck
// Generated by unplugin-vue-components
// Read more: https://github.com/vuejs/core/pull/3399
export {}

declare module 'vue' {
    export interface GlobalComponents {
        HelloWorld: typeof import('./components/HelloWorld.vue')['default']
        RouterLink: typeof import('vue-router')['RouterLink']
        RouterView: typeof import('vue-router')['RouterView']
    }
}
- auto-import.d.ts配置(仅供参考)
/\* eslint-disable \*/
/\* prettier-ignore \*/
// @ts-nocheck
// noinspection JSUnusedGlobalSymbols
// Generated by unplugin-auto-import
export {}
declare global {
    const EffectScope: typeof import('vue')['EffectScope']
    const computed: typeof import('vue')['computed']
    const createApp: typeof import('vue')['createApp']
    const customRef: typeof import('vue')['customRef']
    const defineAsyncComponent: typeof import('vue')['defineAsyncComponent']
    const defineComponent: typeof import('vue')['defineComponent']
    const effectScope: typeof import('vue')['effectScope']
    const getCurrentInstance: typeof import('vue')['getCurrentInstance']
    const getCurrentScope: typeof import('vue')['getCurrentScope']
    const h: typeof import('vue')['h']
    const inject: typeof import('vue')['inject']
    const isProxy: typeof import('vue')['isProxy']
    const isReactive: typeof import('vue')['isReactive']
    const isReadonly: typeof import('vue')['isReadonly']
    const isRef: typeof import('vue')['isRef']
    const markRaw: typeof import('vue')['markRaw']
    const nextTick: typeof import('vue')['nextTick']
    const onActivated: typeof import('vue')['onActivated']
    const onBeforeMount: typeof import('vue')['onBeforeMount']
    const onBeforeRouteLeave: typeof import('vue-router')['onBeforeRouteLeave']
    const onBeforeRouteUpdate: typeof import('vue-router')['onBeforeRouteUpdate']
    const onBeforeUnmount: typeof import('vue')['onBeforeUnmount']
    const onBeforeUpdate: typeof import('vue')['onBeforeUpdate']
    const onDeactivated: typeof import('vue')['onDeactivated']
    const onErrorCaptured: typeof import('vue')['onErrorCaptured']
    const onMounted: typeof import('vue')['onMounted']
    const onRenderTracked: typeof import('vue')['onRenderTracked']
    const onRenderTriggered: typeof import('vue')['onRenderTriggered']
    const onScopeDispose: typeof import('vue')['onScopeDispose']
    const onServerPrefetch: typeof import('vue')['onServerPrefetch']
    const onUnmounted: typeof import('vue')['onUnmounted']
    const onUpdated: typeof import('vue')['onUpdated']
    const provide: typeof import('vue')['provide']
    const reactive: typeof import('vue')['reactive']
    const readonly: typeof import('vue')['readonly']
    const ref: typeof import('vue')['ref']
    const resolveComponent: typeof import('vue')['resolveComponent']
    const shallowReactive: typeof import('vue')['shallowReactive']
    const shallowReadonly: typeof import('vue')['shallowReadonly']
    const shallowRef: typeof import('vue')['shallowRef']
    const toRaw: typeof import('vue')['toRaw']
    const toRef: typeof import('vue')['toRef']
    const toRefs: typeof import('vue')['toRefs']
    const toValue: typeof import('vue')['toValue']
    const triggerRef: typeof import('vue')['triggerRef']
    const unref: typeof import('vue')['unref']
    const useAttrs: typeof import('vue')['useAttrs']
    const useCssModule: typeof import('vue')['useCssModule']
    const useCssVars: typeof import('vue')['useCssVars']
    const useLink: typeof import('vue-router')['useLink']
    const useRoute: typeof import('vue-router')['useRoute']
    const useRouter: typeof import('vue-router')['useRouter']
    const useSlots: typeof import('vue')['useSlots']
    const watch: typeof import('vue')['watch']
    const watchEffect: typeof import('vue')['watchEffect']
    const watchPostEffect: typeof import('vue')['watchPostEffect']
    const watchSyncEffect: typeof import('vue')['watchSyncEffect']
}
// for type re-export
declare global {
    // @ts-ignore
    export type {
        Component,
        ComponentPublicInstance,
        ComputedRef,
        InjectionKey,
        PropType,
        Ref,
        VNode,
        WritableComputedRef
    } from 'vue'
}
3.7 安装配置router
- npm方式
npm install vue-router@4
-
配置步骤
- 创建测试页面
views/about/index.vue
- 创建测试页面
<template>
    <div>
        <h1>About Page</h1>
    </div>
</template>

<script>
export default {
 name: "index"
}
</script>

<style scoped>

</style>
* `views/home/index.vue`
<template>
    <div>
        <h1>Home Page</h1>
    </div>
</template>

<script>
export default {
 name: "index"
}
</script>

<style scoped>

</style>
2. 配置路由,在`src`下创建一个`router`文件夹,再创建一个`index.ts`文件
 **注意**:必须要有`path`为`"/"`的路由,否则浏览器控制台报`No match found for location with path "/"`
import { createRouter, createWebHistory } from "vue-router"

const routes = [
    {
        path: '/',
        redirect: 'index',
    },
    {
        path: '/index',
        name: 'Home',
        component: () => import('@/views/home/index.vue')
    },
    {
        path: '/about',
        name: 'About',
        //使用import可以路由懒加载,如果不使用,太多组件一起加载会造成白屏
        component: () => import('@/views/about/index.vue')
    },
    //{
    //配置404页面
    //path: '/:catchAll(.\*)',
    //name: '404',
    //component: () => import(''),
    //}
]
// 路由
const router = createRouter({
    history: createWebHistory(),
    routes
})
// 导出
export default router
- 在src的
main.ts文件引入。
import { createApp } from 'vue'
import './style.css'
import App from './App.vue'

//1、route
import router from '@/router/index'

const app = createApp(App)

//1、route
app.use(router)
app.mount('#app')
- App.vue使用路由
<script setup lang="ts">
</script>

<template>
  <!--    路由跳转-->
    <router-link to="/">首页</router-link>
    <br>
    <router-link to="/about">关于</router-link>
    <router-view></router-view>
</template>

<style scoped>

</style>
3.8 安装Pinia
参考1:Vue3 Vite3 状态管理 pinia 基本使用、持久化、在路由守卫中的使用
因为是vue3+ts,安装Pinia更好点,vuex拥抱ts没有Pinia好。
Pinia介绍
参考:什么是Pinia?
Pinia和Vuex一样都是是vue的全局状态管理器。其实Pinia就是Vuex5,只不过为了尊重原作者的贡献就沿用了这个看起来很甜的名字Pinia。
3.8.1 Pinia的使用
- npm方式安装
npm install pinia
- 在src下创建一个
store文件夹,再创建一个index.ts文件
其它名也可以,因为
pinia它有一个根文件,会把createPinia第一个参数当id值,相当于vuex中的module自动引入,也会在Vue.js devtools插件中以第一个参数名展示(下面展示)
注意:createPinia第一个参数很重要,而且是唯一值。它的命名在devtools插件能方便找到这个文件的数据,方便调试。
import { createPinia } from 'pinia'

const pinia = createPinia()
export default pinia
- 在
src的main.ts引入
import { createApp } from 'vue'
import './style.css'
import App from './App.vue'

//1、route
import router from '@/router/index'

//2、pinia
import pinia from '@/store'

const app = createApp(App)

//1、route
app.use(router)
//2、pinia
app.use(pinia)
app.mount('#app')
- 在
store文件夹下创建modules目录,存储每个模块的状态,新建demo.ts。这里使用最新的Composition APIsetup的方式来定义状态。
import { defineStore } from 'pinia'
import { ref } from 'vue'

const useDemoStore = defineStore('demo', () => {
    const counter = ref(0)
    const increment = () => {
        counter.value++
    }
    return {
        counter,
        increment
    }
})
export default useDemoStore
- 使用
pinia
在路由示例的about.vue页面使用!
<template>
    <div>
        <h1>About Page</h1>
        <h3>counter: {{ counter }}</h3>
        <button @click="add">计数</button>
    </div>
</template>

<script setup lang="ts">
import useDemoStore from '@/store/modules/demo'
import { storeToRefs } from 'pinia'

const demoStore = useDemoStore()
const {counter} = storeToRefs(demoStore)
const add = () => {
 demoStore.increment()
}
</script>

<style scoped>
button {
 color: cornflowerblue;
 font-size: 30px;
}
</style>
3.8.2 Pinia状态持久化
在3.7.1中,假设计数器加到5,如果刷新浏览器,counter的值又会被初始化为0。这是因为状态是存储在浏览器内存中的,刷新浏览器后,重新加载页面时会重新初始化vue、pinia,而pinia中状态的值仅在内存中存在,而刷新导致浏览器存储中的数据没了,所以counter的值就被初始化为0。
要解决这个问题非常简单,在状态改变时将其同步到浏览器的存储中,如cookie、localStorage、sessionStorage。每次初始化状态时从存储中去获取初始值即可。
使用pinia的插件pinia-plugin-persistedstate来实现。
- 安装依赖
npm install pinia-plugin-persistedstate
- 引入该插件,在src的store文件夹下修改index.ts文件:
import { createPinia } from 'pinia'

import piniaPluginPersistedstate from 'pinia-plugin-persistedstate'

const pinia = createPinia()

pinia.use(piniaPluginPersistedstate)
export default pinia
- 设置
persist持久化
在需要持久化状态的模块中设置persist。假设demo模块需要对状态需要持久化,defineStore第一个参数定义唯一的模块名,第二个参数传递setup,其实还有第三个参数options,在options中便可开启持久化:
修改store/modules/demo.ts:
import { defineStore } from 'pinia'
import { ref } from 'vue'

const useDemoStore = defineStore('demo', () => {
    const counter = ref(0)
    const increment = () => {
        counter.value++
    }
    return {
        counter,
        increment
    }
}, {
    persist: true
})
export default useDemoStore
会将状态缓存在localStorage中。
4. 如果需要将其存储在sessionStorage中,就需要设置persist的值为一个对象:
import { defineStore } from 'pinia'
import { ref } from 'vue'

const useDemoStore = defineStore('demo', () => {
    const counter = ref(0)
    const increment = () => {
        counter.value++
    }
    return {
        counter,
        increment
    }
}, {
    persist: {
        key: 'aaa',
        storage: sessionStorage
    }
})
export default useDemoStore
3.9 安装配置axios
- npm方式安装
npm install axios
- 封装request
在src下创建一个utils文件夹,添加request.ts文件
import axios from 'axios'
// 创建axios实例
const request = axios.create({
    baseURL: '',// 所有的请求地址前缀部分(没有后端请求不用写)
    timeout: 80000, // 请求超时时间(毫秒)
    withCredentials: true,// 异步请求携带cookie
    // headers: {
    // 设置后端需要的传参类型
    // 'Content-Type': 'application/json',
    // 'token': x-auth-token',//一开始就要token
    // 'X-Requested-With': 'XMLHttpRequest',
    // },
})

// request拦截器
request.interceptors.request.use(
    config => {
        // 如果你要去localStor获取token
        let token = localStorage.getItem("x-auth-token");
        if (token) {
            //添加请求头
            config.headers["Authorization"] = "Bearer " + token
        }
        return config
    },
    error => {
        // 对请求错误做些什么
        Promise.reject(error)
    }
)

// response 拦截器
request.interceptors.response.use(
    response => {
        // 对响应数据做点什么
        return response.data
    },
    error => {
        // 对响应错误做点什么
        return Promise.reject(error)
    }
)
export default request
- 创建调用的接口
在src下创建一个api文件夹,然后再在api下创建login文件夹,添加login.ts文件
定义接口格式:
export const 自定义接口名 = (形参:请求类型):返回类型 => instance.方法(路径,后端要的参数);
import instance from "@/utils/request";

//一般情况下,接口类型会放到一个文件
// 下面两个TS接口,表示要传的参数
interface ReqLogin {
    name: string
    paw: string
}

interface ReqStatus {
    id: string
    navStatus: string
}


// Res是返回的参数,T是泛型,需要自己定义,返回对数统一管理\*\*\*
type Res<T> = Promise<ItypeAPI<T>>;
// 一般情况下响应数据返回的这三个参数,
// 但不排除后端返回其它的可能性,
interface ItypeAPI<T> {
    data: T,//请求的数据,用泛型
    msg: string | null // 返回状态码的信息,如请求成功等
    code: number //返回后端自定义的200,404,500这种状态码
}


// post请求 ,没参数
export const LogoutAPI = (): Res<null> => instance.post("/admin/logout");

// post请求,有参数,如传用户名和密码
export const loginAPI = (data: ReqLogin): Res<string> =>
    instance.post("/admin/login", data);

// post请求 ,没参数,但要路径传参
export const StatusAPI = (data: ReqStatus): Res<null> =>
    instance.post(`/productCategory?ids=${data.id}&navStatus=${data.navStatus}`);


// get请求,没参数,
export const FlashSessionListApi = (): Res<null> =>
    instance.get("/flashSession/list");

// get请求,有参数,路径也要传参 (也可能直接在这写类型,不过不建议,大点的项目会维护一麻烦)
export const ProductCategoryApi = (params: { parentId: number }): Res<any> =>
    instance.get(`/productCategory/list/${params.parentId}`, {params});

// get请求,有参数,(如果你不会写类型也可以使用any,不过不建议,因为用了之后 和没写TS一样)
export const AdminListAPI = (params: any): Res<any> => instance.get("/admin/list", {params});
- 在要请求的组件上使用
方式1:使用.then
<script setup lang="ts">
import {loginAPI} from "@/api/login";

const login= () => {
    loginAPI({
        ...val,
    }).then((res) => {
        console.log('\*\*\*',res );
        let { list, pageNum, pageSize, total } = res.data
    })

};
</script>
方式2:直接使用(和vue2在cretae上用一样,setup自带async,await在顶层可以直接使用)
<script setup lang="ts">
import { loginAPI} from "@/api/login";
    //直接使用,一般用在进入页面入请求数据的接口
    let res = await loginAPI()
    console.log( "\*\*\*" ,res);
}
</script>
方式3:使用async/await,(setup虽然自带async,但单独用await只能在顶层使用,如果在函数下还是要async/await一起写)
<script setup lang="ts">
import { loginAPI} from "@/api/login";

const search = async(val: IUseTableParam) => {
    let res = await loginAPI({
        ...val,
    })
    console.log( "\*\*\*" ,res);
    let { list, pageNum, pageSize, total } = res.data
    console.log(list, pageNum, pageSize, total);
}
</script>
- 代理
需要代理才写
在src目录的utils下的request.ts添加文件
const request = axios.create({
    //这时你要代理
    //填写后端统一的前缀,
    //如:123.xx.xx.xx:456/api/...
    //这个/api是每一个接口都有的,就写它
    //如果没有,也写,下面会讲区别
    baseURL: '/api',
})
完整代码:
import axios from 'axios'
// 创建axios实例
const request = axios.create({
    // baseURL: '',// 所有的请求地址前缀部分(没有后端请求不用写)

    //这时你要代理
    //填写后端统一的前缀,
    //如:123.xx.xx.xx:456/api/...
    //这个/api是每一个接口都有的,就写它
    //如果没有,也写,下面会讲区别
    baseURL: '/api',
    timeout: 80000, // 请求超时时间(毫秒)
    withCredentials: true,// 异步请求携带cookie
    // headers: {
    // 设置后端需要的传参类型
    // 'Content-Type': 'application/json',
    // 'token': x-auth-token',//一开始就要token
    // 'X-Requested-With': 'XMLHttpRequest',
    // },
})

// request拦截器
request.interceptors.request.use(
    config => {
        // 如果你要去localStor获取token
        let token = localStorage.getItem("x-auth-token");
        if (token) {
            //添加请求头
            config.headers["Authorization"] = "Bearer " + token
        }
        return config
    },
    error => {
        // 对请求错误做些什么
        Promise.reject(error)
    }
)

// response 拦截器
request.interceptors.response.use(
    response => {
        // 对响应数据做点什么
        return response.data
    },
    error => {
        // 对响应错误做点什么
        return Promise.reject(error)
    }
)
export default request
vite.config.ts 文件:只需添加server部分即可。
import { defineConfig } from 'vite'
import vue from '@vitejs/plugin-vue'

//1、 导入 path 模块,帮助我们解析路径
import { resolve } from 'path'

//2-1 自动导入vue中hook reactive ref等
import AutoImport from 'unplugin-auto-import/vite'
//2-2 自动导入ui-组件 比如说ant-design-vue element-plus等
import Components from 'unplugin-vue-components/vite'

// https://vitejs.dev/config/
export default defineConfig({
    plugins: [
        vue(),
        AutoImport({
            //安装两行后你会发现在组件中不用再导入ref,reactive等
            imports: ['vue', 'vue-router'],
            //存放的位置
            dts: "src/auto-import.d.ts",
        }),
        Components({
            // 引入组件的,包括自定义组件,存放的位置
            dts: "src/components.d.ts",
        }),
    ],

    //1、 ↓解析配置
    resolve: {
        // ↓路径别名
        alias: {
            "@": resolve(__dirname, "./src"),
            "\_c": resolve(__dirname, "./src/components")
        }
    },

    //代理
    server: {
        proxy: {
            '/api': { // 匹配请求路径,
                target: '你要代理的地址', // 代理的目标地址
                // 开发模式,默认的127.0.0.1,开启后代理服务会把origin修改为目标地址
                changeOrigin: true,
                // secure: true, // 是否https接口
                // ws: true, // 是否代理websockets

                // 路径重写,\*\*\*\* 如果你的后端有统一前缀(如:/api),就不开启;没有就开启
                //简单来说,就是是否改路径 加某些东西
                rewrite: (path) => path.replace(/^\/api/, '')
            }
        }
    }
})
3.10 自定义组件名setup语法糖
在 vue 3.2.34 或以上的版本中,使用
<script setup>的单文件组件会自动根据文件名生成对应的 name 选项,无需再手动声明。也就是说,除非你想换名,并且又不想写两个 script 标签,就可以通过下面的链接去做。
- 安装
vite-plugin-vue-setup-extend
npm install -D vite-plugin-vue-setup-extend
- 配置
vite.config.ts
import { defineConfig } from 'vite'
import vue from '@vitejs/plugin-vue'

//1、 导入 path 模块,帮助我们解析路径
import { resolve } from 'path'

//2-1 自动导入vue中hook reactive ref等
import AutoImport from 'unplugin-auto-import/vite'
//2-2 自动导入ui-组件 比如说ant-design-vue element-plus等
import Components from 'unplugin-vue-components/vite'

//3、vue3语法糖
import VueSetupExtend from 'vite-plugin-vue-setup-extend'

// https://vitejs.dev/config/
export default defineConfig({
    plugins: [
        vue(),
        AutoImport({
            //安装两行后你会发现在组件中不用再导入ref,reactive等
            imports: ['vue', 'vue-router'],
            //存放的位置
            dts: "src/auto-import.d.ts",
        }),
        Components({
            // 引入组件的,包括自定义组件,存放的位置
            dts: "src/components.d.ts",
        }),
        VueSetupExtend(),
    ],

    //1、 ↓解析配置
    resolve: {
        // ↓路径别名
        alias: {
            "@": resolve(__dirname, "./src"),
            "\_c": resolve(__dirname, "./src/components")
        }
    },

    //代理
    server: {
        proxy: {
            '/api': { // 匹配请求路径,
                target: '你要代理的地址', // 代理的目标地址
                // 开发模式,默认的127.0.0.1,开启后代理服务会把origin修改为目标地址
                changeOrigin: true,
                // secure: true, // 是否https接口
                // ws: true, // 是否代理websockets

                // 路径重写,\*\*\*\* 如果你的后端有统一前缀(如:/api),就不开启;没有就开启
                //简单来说,就是是否改路径 加某些东西
                rewrite: (path) => path.replace(/^\/api/, '')
            }
        }
    }
})
文末
我一直觉得技术面试不是考试,考前背背题,发给你一张考卷,答完交卷等通知。
首先,技术面试是一个 认识自己 的过程,知道自己和外面世界的差距。
更重要的是,技术面试是一个双向了解的过程,要让对方发现你的闪光点,同时也要 试图去找到对方的闪光点,因为他以后可能就是你的同事或者领导,所以,面试官问你有什么问题的时候,不要说没有了,要去试图了解他的工作内容、了解这个团队的氛围。
前端面试题汇总
JavaScript
开源分享:【大厂前端面试题解析+核心总结学习笔记+真实项目实战+最新讲解视频】
性能
linux
前端资料汇总


 1102
1102

 被折叠的 条评论
为什么被折叠?
被折叠的 条评论
为什么被折叠?
 到【灌水乐园】发言


