


},
试一下调用该方法
if (this.currentBook) {
this.currentBook.ready.then(()=>{
this.doSearch(‘added’).then(results=>{
console.log(results);
})
})
}
得到的是一组多维数组

因为得到的是二维数组,所以需要像 目录那样降维。

实际上这句就已经采用了降维的方法。
想要实现搜索功能,需要在我们搜索的时候,把目录列表隐藏掉,然后把搜索列表展示出来

再添加搜索列表

试一下 执行

看,成功打印出来了

4-13 全文搜索功能实现 (搜索关键字高亮+搜索结果高亮显示)
把返回的text 中的关键字 replace成 用span包裹起来,让span中的文字高亮
search(){
if (this.currentBook&&this.searchText.length>0&&this.searchText){
this.currentBook.ready.then(()=>{
this.doSearch(this.searchText)
.then((results)=>{
this.searchList = results
this.searchList.map(item=>{
item.excerpt = item.excerpt.replace(this.searchText,<span class="content-search-text">${this.searchText}</span>);
return item;
})
});
})
}
},
当在输入框按下回车键的时候执行该方法

成功完成任务

接下来,要实现的是 点击对应的搜索列表项 跳转到对应的搜索结果页面,

只需要添加这个点击事件即可实现,当然,跳转后应该将菜单栏消失
所以我们把点击方法改成
displaySearch(target){
this.display(target,()=>{
this.hideMenuVisible();
})
},
还没完成,跳转到对应的页面之后,也应该将关键词高亮显示
电子书提供了一个方法
同时把上面方法改一下
displaySearch(target,highlight = false){
this.display(target,()=>{
this.hideMenuVisible();
if (highlight){
this.currentBook.rendition.annotations.highlight(target);
}
})
},

可见搜索结果高亮显示也完成了。
4-14 目录加载动画实现
效果如图

组件代码
========================================================================================
5-1 书签手势实现(页面下拉)
epub电子书是没有touchmove这个监听事件的,要想要这个效果,就必须添加个蒙层

当然要把它背景弄成透明
这样,监听事件就放在 这个蒙层上就好,通过蒙层来改变 offsetY的值,再通过offsetY的值来改变ebook的位置
蒙层上的监听事件
move(e){
let offsetY = 0;
if (this.firstOffsetY){
offsetY = e.changedTouches[0].clientY - this.firstOffsetY
this.setOffsetY(offsetY)
console.log(this.offsetY);
} else{
this.firstOffsetY = e.changedTouches[0].clientY;
}
e.preventDefault();
e.stopPropagation();
},
moveEnd(e){
this.setOffsetY(0);
this.firstOffsetY = null;
},
onMaskClick(e){
const offsetX = e.offsetX;
const width = window.innerWidth;
if (offsetX>0 && offsetX<width * 0.3){
this.prevPage();
} else if(offsetX>0&&offsetX>width*0.7){
this.nextPage();
}else {
this.toggleTitleAndMenu();
}
},
可见,已经改变了offsetY的值
接下来 index.vue中监听offsetY的改变来改变reader的top
watch:{
offsetY(v){
if(v>0){
this.move(v)
}else if(v===0){
this.restore()
}
}
},
methods:{
restore(){
this.$refs.ebook.style.top = 0+‘px’;
this.$refs.ebook.style.transition = ‘all 0.2s linear’;
setTimeout(()=>{
this.$refs.ebook.style.transition = ‘’;
},200)
},
move(v){
this.$refs.ebook.style.top = v+‘px’;
},
},
这样就实现了 下拉功能。
这里需要解释一下里面的
setTimeout(()=>{
this.$refs.ebook.style.transition = ‘’;
},200)
这是因为,那里设置的
this.$refs.ebook.style.transition = ‘all 0.2s linear’; 刚好为两秒,当松手后,动画结束,事件刚好200ms
5-2 书签手势实现(书签组件)
先创建这个大组件


这也是一个组件
5-3 书签手势实现(下拉状态管理)
下拉阶段分为三个阶段
第一阶段:不变。
第二阶段:
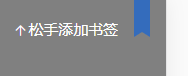
第三阶段: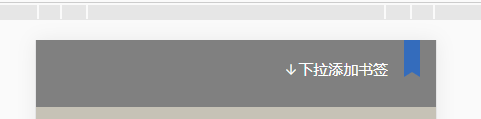
代码实现,通过监听offsetY:
watch:{
offsetY(v){
if(v>=this.height && v<=this.threshold){
console.log(“到达第二阶段”);
this. r e f s . b o o k m a r k . s t y l e . t o p = ‘ refs.bookmark.style.top = ` refs.bookmark.style.top=‘{-v}px` //使书签吸顶
this.text = this.$t(‘book.pulldownAddMark’); //文字改为添加书签
this.color = WHITE;
}else if(v>=this.threshold){
console.log(“到达第三阶段”);
this. r e f s . b o o k m a r k . s t y l e . t o p = ‘ refs.bookmark.style.top = ` refs.bookmark.style.top=‘{-v}px` //使书签吸顶
this.text = this.$t(‘book.pulldownAddMark’); //文字改为释放书签
this.color = BLUE;
}
}
},
5-4 书签手势实现(书签添加删除交互)
先改变 箭头方向,在第三阶段的时候,箭头向上
第二阶段的时候,箭头向下

在上面代码中添加这个即可实现

添加功能完成 ,我们也应该想想一下,删除书签该怎么操作,
所以下拉的时候,要判断,是已经有了标签,还是没有,有了就是要进行的是删除操作
添加一阶段,和释放阶段
释放的时候,判断 是否 当前为书签页,是则 删除,否则添加,
watch:{
offsetY(v){
if (!this.bookAvailable || this.menuVisible){
return;
}
if(v>=this.height && v<=this.threshold){//console.log(“到达第二阶段”);
this.beforeThreshold(v);
}else if(v>=this.threshold){// console.log(“到达第三阶段”);
this.afterThreshold(v);
}else if(v>0&&v<this.height){//第一阶段
this.beforeHeight(v);
}else if (v ===0 ){//状态为0时
this.restore()
}
},
isFixed(v){
// console.log(v);
}
},
methods:{
addBookmark(){
},
removeBookmark(){
},
//下拉的第一阶段
beforeHeight(){
学习分享,共勉
题外话,毕竟我工作多年,深知技术改革和创新的方向,Flutter作为跨平台开发技术、Flutter以其美观、快速、高效、开放等优势迅速俘获人心
png)
第二阶段的时候,箭头向下
在上面代码中添加这个即可实现
添加功能完成 ,我们也应该想想一下,删除书签该怎么操作,
所以下拉的时候,要判断,是已经有了标签,还是没有,有了就是要进行的是删除操作
添加一阶段,和释放阶段
释放的时候,判断 是否 当前为书签页,是则 删除,否则添加,
watch:{
offsetY(v){
if (!this.bookAvailable || this.menuVisible){
return;
}
if(v>=this.height && v<=this.threshold){//console.log(“到达第二阶段”);
this.beforeThreshold(v);
}else if(v>=this.threshold){// console.log(“到达第三阶段”);
this.afterThreshold(v);
}else if(v>0&&v<this.height){//第一阶段
this.beforeHeight(v);
}else if (v ===0 ){//状态为0时
this.restore()
}
},
isFixed(v){
// console.log(v);
}
},
methods:{
addBookmark(){
},
removeBookmark(){
},
//下拉的第一阶段
beforeHeight(){
学习分享,共勉
题外话,毕竟我工作多年,深知技术改革和创新的方向,Flutter作为跨平台开发技术、Flutter以其美观、快速、高效、开放等优势迅速俘获人心


 477
477


 被折叠的 条评论
为什么被折叠?
被折叠的 条评论
为什么被折叠?
 到【灌水乐园】发言


