


网上学习资料一大堆,但如果学到的知识不成体系,遇到问题时只是浅尝辄止,不再深入研究,那么很难做到真正的技术提升。
一个人可以走的很快,但一群人才能走的更远!不论你是正从事IT行业的老鸟或是对IT行业感兴趣的新人,都欢迎加入我们的的圈子(技术交流、学习资源、职场吐槽、大厂内推、面试辅导),让我们一起学习成长!
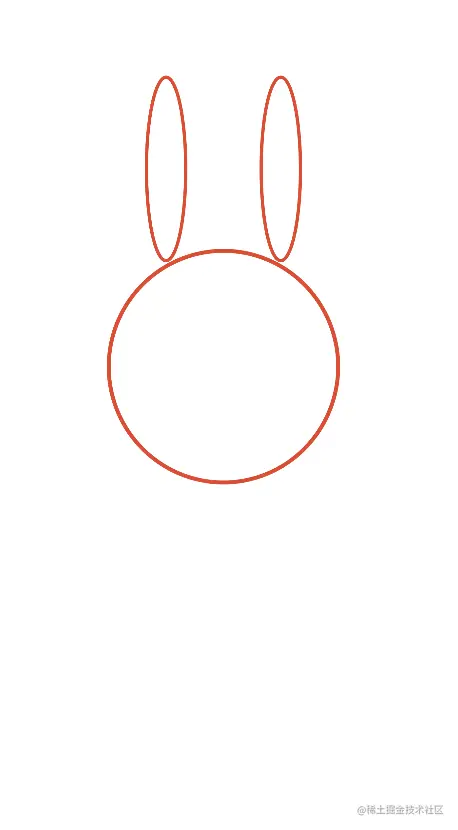
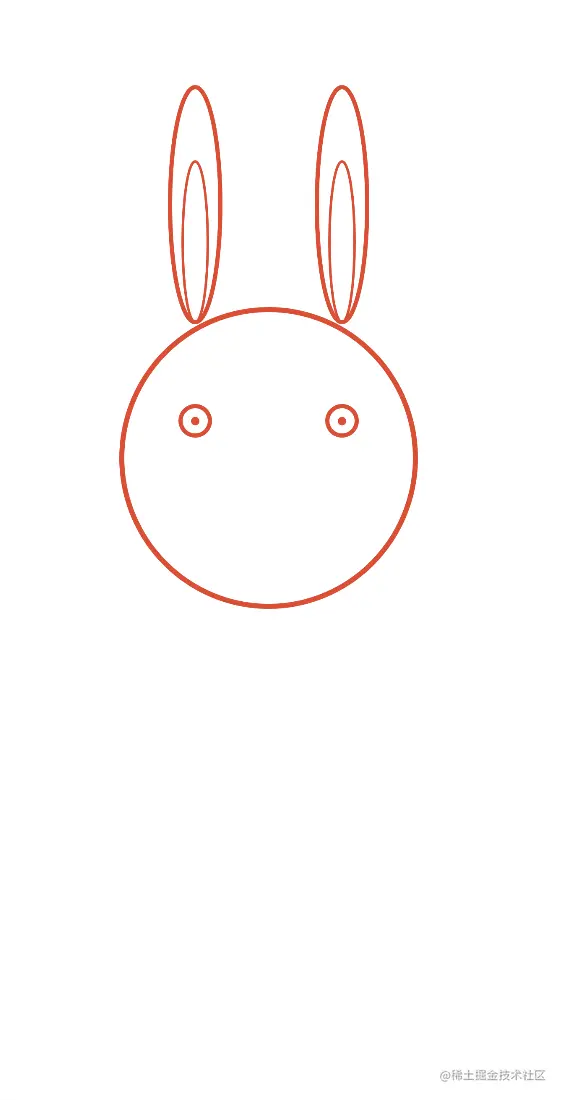
内耳
这样感觉耳朵不是很立体,看起来有点平面,毕竟兔耳朵会有点往里凹的感觉,所以我们给这副耳朵加个内耳增加点立体感,内耳其实很简单,道理同外面的耳朵一样,只是中心点跟左上点,右下点的xy坐标会小一点,我们稍微改一下外耳的path就可以了
val leftEarSubPath = Path()
val leftEarSubPathX = screenWidth() * 3 / 8
val leftEarSubPathY = screenHeight() / 4
leftEarSubPath.moveTo(leftEarSubPathX, leftEarSubPathY)
leftEarSubPath.addOval(
    Rect(
        leftEarSubPathX - 30f,
        screenHeight() / 6,
        leftEarSubPathX + 30f,
        startY + 30f
    )
)
leftEarSubPath.close()

val rightEarSubPath = Path()
val rightEarSubPathX = screenWidth() * 5 / 8
val rightEarSubPathY = screenHeight() / 4
rightEarSubPath.moveTo(rightEarSubPathX, rightEarSubPathY)
rightEarSubPath.addOval(
    Rect(
        rightEarSubPathX - 30f,
        screenHeight() / 6,
        rightEarSubPathX + 30f,
        startY + 30f
    )
)
rightEarSubPath.close()
Canvas(
    modifier = Modifier
        .size(screenWidth().dp, screenHeight().dp)
        .background(color = Color.White)
) {
    drawPath(path = leftEarSubPath, color = drawColor, style = Stroke(width = 6f))
    drawPath(path = rightEarSubPath, color = drawColor, style = Stroke(width = 6f))
}
看下效果图
有内味儿了,内耳的画笔粗细稍微调小了一点,为了突出个近大远小嘛哈哈哈,我们接着下一步
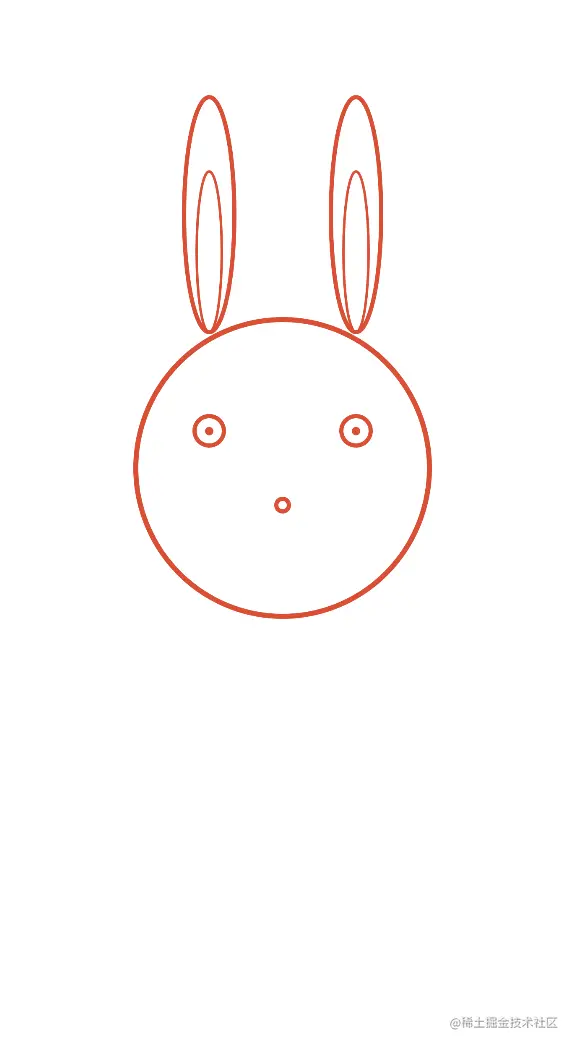
眼睛
画完耳朵我们开始画眼睛了,眼睛也很好画,主要是先找到中心点位置就好,中心点的x坐标其实跟耳朵的x坐标是一样的,y坐标在脑袋中心点y坐标稍微靠上一点的位置
val leftEyePath = Path()
val leftEyePathX = screenWidth() * 3 / 8
val leftEyePathY = screenHeight() * 11 / 24
leftEyePath.moveTo(leftEyePathX, leftEyePathY)
leftEyePath.addOval(
    Rect(
        leftEyePathX - 35f,
        leftEyePathY - 35f,
        leftEyePathX + 35f,
        leftEyePathY + 35f
    )
)
leftEyePath.close()

val rightEyePath = Path()
val rightEyePathX = screenWidth() * 5 / 8
val rightEyePathY = screenHeight() * 11 / 24
rightEyePath.moveTo(rightEyePathX, rightEyePathY)
rightEyePath.addOval(
    Rect(
        rightEyePathX - 35f,
        rightEyePathY - 35f,
        rightEyePathX + 35f,
        rightEyePathY + 35f
    )
)
rightEyePath.close()
Canvas(
    modifier = Modifier
        .size(screenWidth().dp, screenHeight().dp)
        .background(color = Color.White)
) {
    drawPath(path = leftEyePath, color = drawColor, style = Stroke(width = 10f))
    drawPath(path = rightEyePath, color = drawColor, style = Stroke(width = 10f))
}
效果图如下
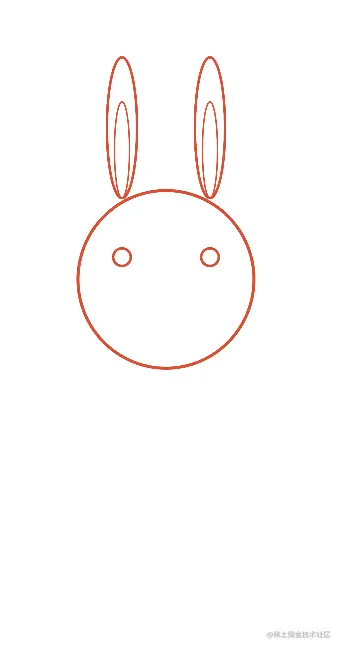
眼神有点空洞,无神是不,缺个眼珠子,那我们再给小兔子画上眼珠吧,眼珠就在眼睛的中心点位置,画一个圆点,圆点就要用到drawCircle,它有这些属性
fun drawCircle(
    color: Color,
    radius: Float = size.minDimension / 2.0f,
    center: Offset = this.center,
    /*@FloatRange(from = 0.0, to = 1.0)*/
    alpha: Float = 1.0f,
    style: DrawStyle = Fill,
    colorFilter: ColorFilter? = null,
    blendMode: BlendMode = DefaultBlendMode
)
我们不需要用到全部,只需要用到颜色color,也就是红色,圆点半径radius,肯定要比眼睛的半径要小一点,我们就设置为10f,圆点中心坐标center,就是眼睛的中心点坐标,知道了以后我们开始绘制眼珠
Canvas(
    modifier = Modifier
        .size(screenWidth().dp, screenHeight().dp)
        .background(color = Color.White)
) {
    drawCircle(color = drawColor, radius = 10f, center = Offset(leftEyePathX,leftEyePathY))
    drawCircle(color = drawColor, radius = 10f, center = Offset(rightEyePathX,rightEyePathY))
}
我们再看下效果图
鼻子
接下去我们画鼻子,鼻子肯定在脑袋的中间,所以中心点x坐标就是脑袋中心点的x坐标,那鼻子的y坐标就设置成比中心点y坐标稍微高一点的位置,代码如下
val nosePath = Path()
val nosePathX = screenWidth() / 2
val nosePathY = screenHeight() * 13 / 24
nosePath.moveTo(nosePathX, nosePathY)
nosePath.addOval(Rect(nosePathX - 15f, nosePathY - 15f, nosePathX + 15f, nosePathY + 15f))
nosePath.close()
Canvas(
    modifier = Modifier
        .size(screenWidth().dp, screenHeight().dp)
        .background(color = Color.White)
) {
    drawPath(path = nosePath, color = drawColor, style = Stroke(width = 10f))
}
我们看下效果图
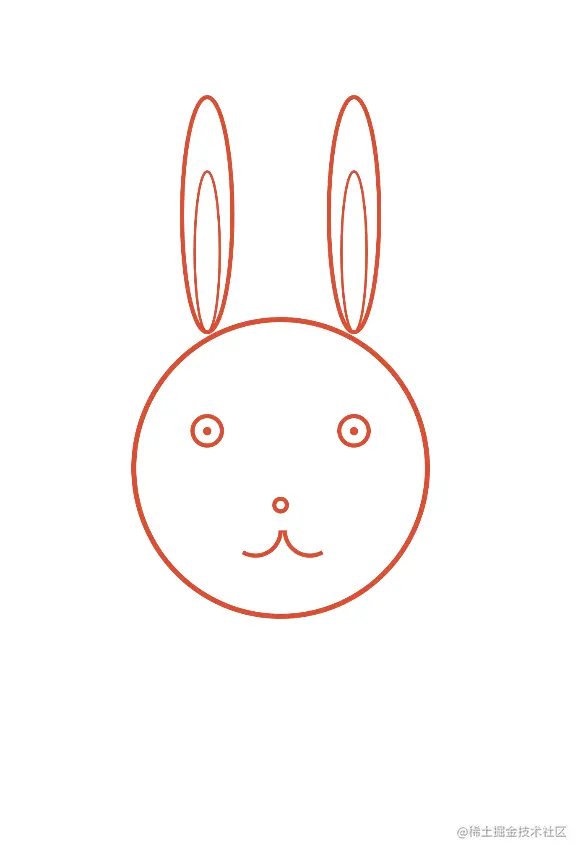
兔唇
兔子的样子逐渐出来了,画完鼻子我们接着画啥呢?没错,兔子最有特点的位置也就是兔唇,我们脑补下兔唇长啥样子,首先位置肯定是在鼻子的下面,然后从鼻子开始往两边分叉,也就是两个扇形,扇形怎么画呢,我们也有现成的api,drawArc,我们看下drawArc都提供了哪些属性
fun drawArc(
    color: Color,
    startAngle: Float,
    sweepAngle: Float,
    useCenter: Boolean,
    topLeft: Offset = Offset.Zero,
    size: Size = this.size.offsetSize(topLeft),
    /*@FloatRange(from = 0.0, to = 1.0)*/
    alpha: Float = 1.0f,
    style: DrawStyle = Fill,
    colorFilter: ColorFilter? = null,
    blendMode: BlendMode = DefaultBlendMode
)
我们需要用到的就是颜色color,这个扇形起始角度startAngle,扇形终止的角度sweepAngle,是否扇形两端跟中心点连接起来的布尔值useCenter,扇形的左上位置topLeft以及扇形的大小size也就是设置半径,知道这些以后我们开始逐个代入参数吧
Canvas(
    modifier = Modifier
        .size(screenWidth().dp, screenHeight().dp)
        .background(color = Color.White)
) {
    drawArc(
        color = drawColor,
        0f,
        120f,
        style = Stroke(width = 10f),
        useCenter = false,
        size = Size(120f, 120f),
        topLeft = Offset(nosePathX - 120f, nosePathY)
    )

    drawArc(
        color = drawColor,
        180f,
        -120f,
        style = Stroke(width = 10f),
        useCenter = false,
        size = Size(120f, 120f),
        topLeft = Offset(nosePathX + 10f, nosePathY)
    )
}
画兔唇的时候其实就是在鼻子的两端各画一个坐标轴,左边的兔唇起始角度就是从x轴开始也就是0度,顺时针旋转120度,左上位置的x坐标刚好离开鼻子一个半径的位置,右边的兔唇刚好相反,逆时针旋转120度,起始角度是180度,左上位置的x坐标刚好在鼻子的位置那里,稍微加个10f让兔唇可以对称一些,我们看下效果图
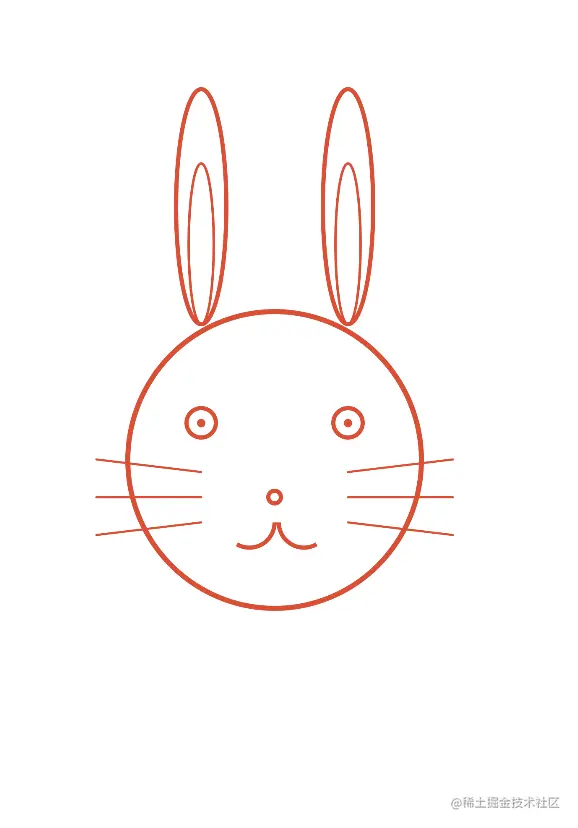
胡须
脸上好像空了点,兔子的胡须还没有呢,胡须其实就是两边各画三条线,用drawLine这个api,起始位置的x坐标跟眼睛中心点的x坐标一样,中间胡须起始位置的y坐标跟鼻子的y坐标一样,上下胡须的y坐标各减去一定的数值
Canvas(
    modifier = Modifier
        .size(screenWidth().dp, screenHeight().dp)
        .background(color = Color.White)
) {
    drawLine(
        color = drawColor,
        start = Offset(leftEyePathX, nosePathY - 60f),
        end = Offset(leftEyePathX - 250f, nosePathY - 90f),
        strokeWidth = 5f,
        cap = StrokeCap.Round
    )
    drawLine(
        color = drawColor,
        start = Offset(leftEyePathX, nosePathY),
        end = Offset(leftEyePathX - 250f, nosePathY),
        strokeWidth = 5f,
        cap = StrokeCap.Round
    )
    drawLine(
        color = drawColor,
        start = Offset(leftEyePathX, nosePathY + 60f),
        end = Offset(leftEyePathX - 250f, nosePathY + 90f),
        strokeWidth = 5f,
        cap = StrokeCap.Round
    )

    drawLine(
        color = drawColor,
        start = Offset(rightEyePathX, nosePathY - 60f),
        end = Offset(rightEyePathX + 250f, nosePathY - 90f),
        strokeWidth = 5f,
        cap = StrokeCap.Round
    )
    drawLine(
        color = drawColor,
        start = Offset(rightEyePathX, nosePathY),
        end = Offset(rightEyePathX + 250f, nosePathY),
        strokeWidth = 5f,
        cap = StrokeCap.Round
    )
    drawLine(
        color = drawColor,
        start = Offset(rightEyePathX, nosePathY + 60f),
        end = Offset(rightEyePathX + 250f, nosePathY + 90f),
        strokeWidth = 5f,
        cap = StrokeCap.Round
    )
}
很简单的画了六条线,线的粗细也稍微设置的小一点,毕竟胡须还是比较细的,我们看下效果图
就这样兔子脑袋部分所有元素都画完了,我们接着给兔子画身体
身体
身体其实也是个椭圆,位置刚好在画布下方三分之一的位置,左上x坐标比脑袋左上x坐标大一点,y坐标就是画布三分之二的位置处,右下x坐标比脑袋右下x坐标稍微小一点,y坐标就是画布的底端,知道以后我们就仿照着脑袋画身体
val bodyPath = Path()
val bodyPathX = screenWidth() / 2
val bodyPathY = screenHeight() * 5 / 6
bodyPath.moveTo(bodyPathX, bodyPathY)
bodyPath.addOval(
    Rect(
        startX + 50f,
        screenHeight() * 2 / 3,
        screenWidth() - startX - 50f,
        screenHeight()
    )
)
bodyPath.close()
Canvas(
    modifier = Modifier
        .size(screenWidth().dp, screenHeight().dp)
        .background(color = Color.White)
) {
    drawPath(path = bodyPath, color = drawColor, style = Stroke(width = 10f))
}
效果图如下

双爪
画完身体我们再画兔子的双爪,双爪其实也是画两个椭圆,椭圆中心点的x坐标同两只眼睛的x坐标一样,y坐标在画布六分之五的位置
val leftHandPath = Path()
val leftHandPathX = screenWidth() * 3 / 8
val leftHandPathY = screenHeight() * 5 / 6
leftHandPath.moveTo(leftHandPathX, leftHandPathY)
leftHandPath.addOval(
Rect(
leftHandPathX - 35f,
leftHandPathY - 90f,
leftHandPathX + 35f,
leftHandPathY + 90f
)
)
**深知大多数程序员,想要提升技能,往往是自己摸索成长,但自己不成体系的自学效果低效又漫长,而且极易碰到天花板技术停滞不前!**
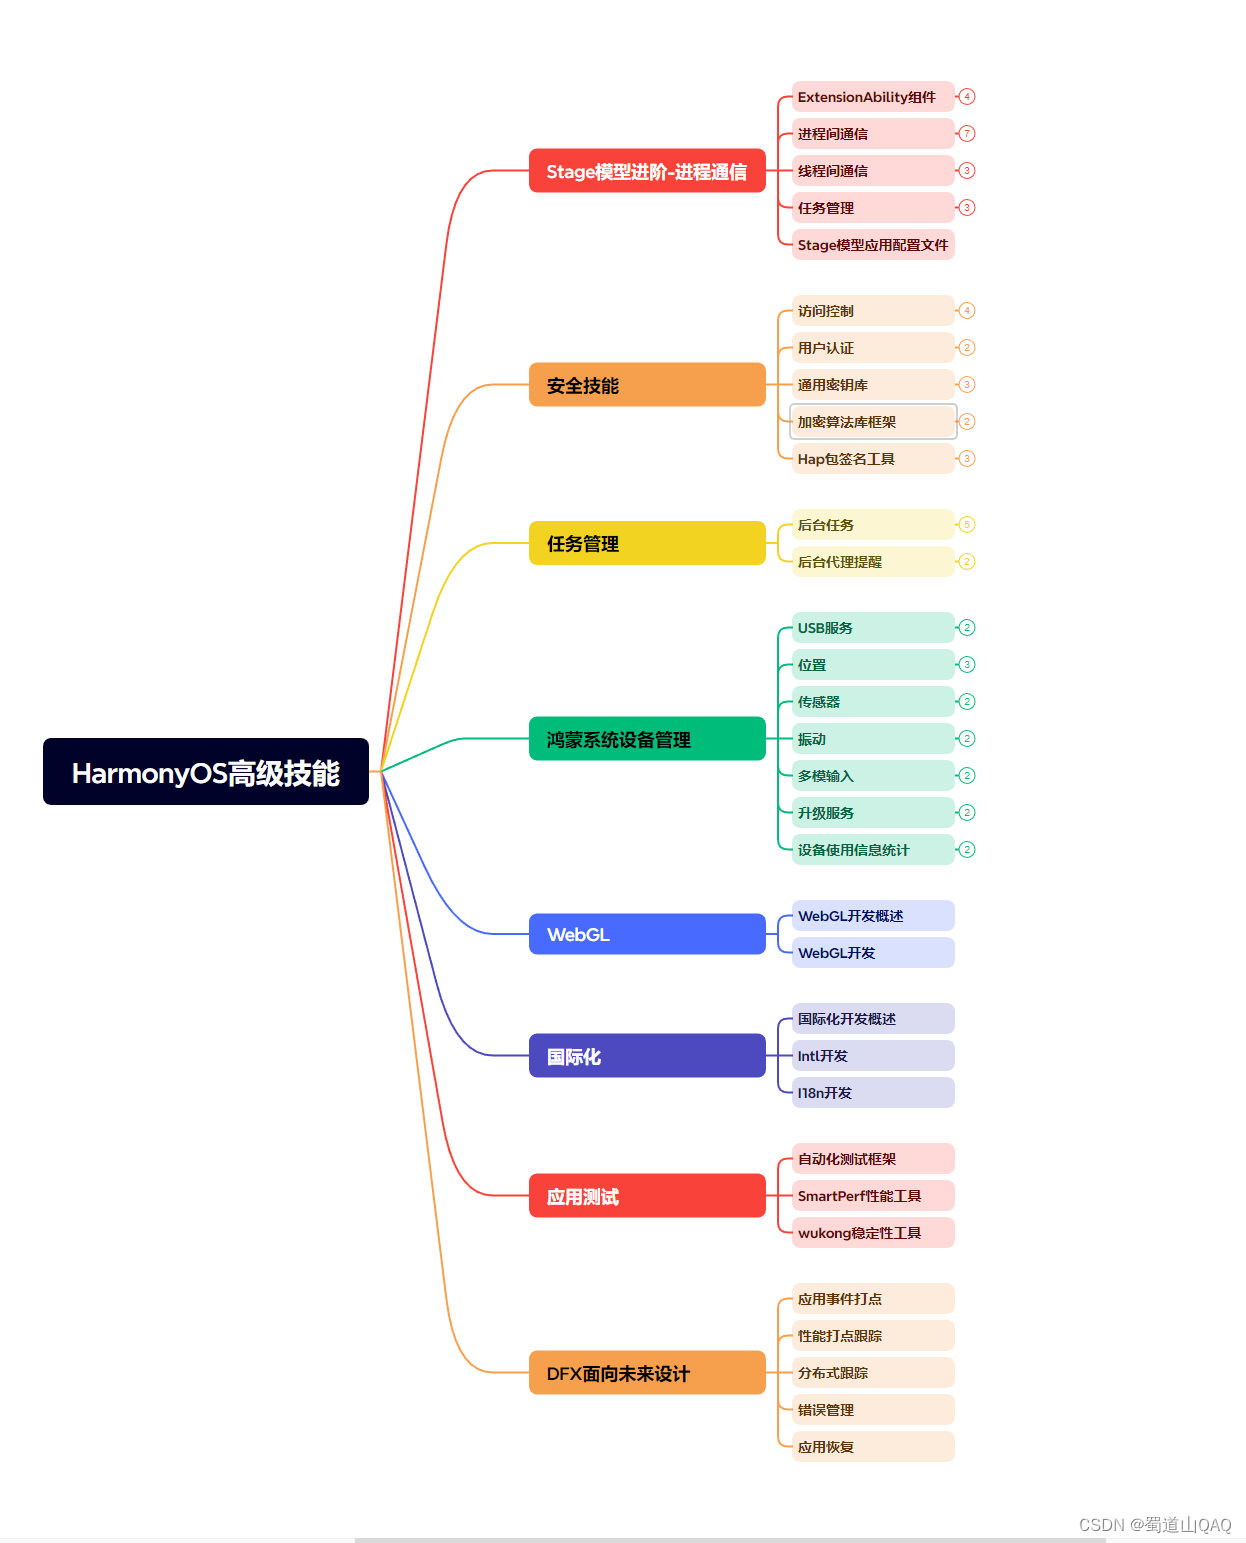


**既有适合小白学习的零基础资料,也有适合3年以上经验的小伙伴深入学习提升的进阶课程,涵盖了95%以上鸿蒙开发知识点,真正体系化!**
**由于文件比较多,这里只是将部分目录截图出来,全套包含大厂面经、学习笔记、源码讲义、实战项目、大纲路线、讲解视频,并且后续会持续更新**
**[需要这份系统化的资料的朋友,可以戳这里获取](https://bbs.csdn.net/topics/618636735)**
且极易碰到天花板技术停滞不前!**

[外链图片转存中...(img-0CWbs9j8-1715746616704)]
[外链图片转存中...(img-jkrp4sB4-1715746616704)]
**既有适合小白学习的零基础资料,也有适合3年以上经验的小伙伴深入学习提升的进阶课程,涵盖了95%以上鸿蒙开发知识点,真正体系化!**
**由于文件比较多,这里只是将部分目录截图出来,全套包含大厂面经、学习笔记、源码讲义、实战项目、大纲路线、讲解视频,并且后续会持续更新**
**[需要这份系统化的资料的朋友,可以戳这里获取](https://bbs.csdn.net/topics/618636735)**


 被折叠的 条评论
为什么被折叠?
被折叠的 条评论
为什么被折叠?
 到【灌水乐园】发言


