


android:scaleX=“1.5”
android:scaleY=“1.5”
android:alpha=“0.7”/>
最终代码如上所示,是不是很 easy?这里我们在途经路线中添加一些特定的 keyAttribute ,并改变它们的属性状态,这里变化的属性只涉及到 scaleX、scaleY 和 alpha 。
考虑到 KeyAttribute 中提供的属性有限,所以,CustomAttribute 横空出世,它支持任意自定义的属性,常见的有 TextView 的 textColor、background 或者是 ImageView 的 src 、tint 等。当然还不止这些,我们平时自定义 View 中提供的自定义属性同样支持哦。就像 GitHub 上的一个 ShapeOfView 的开源项目,可以提供给我们自定义控件形状的功能,那么结合了 MotionLayout 中的 CustomAttribute,我们就可以达到下面这种平滑转换的效果:
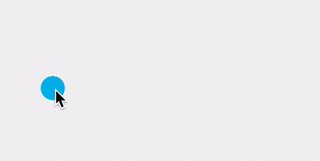
举个简单的例子,上面的小球加载动画我们希望它能够在运动过程中颜色也随之变化,然而 中并没有提供相关属性,这里我们就可以借助于 来实现啦。改动部分代码如下所示:
…
我们设置了 colorFilter 属性,作用相当于 tint,重新运行后,可以看到如下效果:
需要我们注意的是,这里的自定义属性的 attributeName 对应的值并不一定是在 xml 布局文件中控件对应的属性名称,而是在对应控件中拥有 setter 设置的属性名称。怎么理解呢?其实归根结底 CustomAttribute 内部还是利用的反射,从下面的部分源码中就能够察觉到:
public void applyCustomAttributes(ConstraintLayout constraintLayout) {
int count = constraintLayout.getChildCount();
for(int i = 0; i < count; ++i) {
View view = constraintLayout.getChildAt(i);
int id = view.getId();
if (!this.mConstraints.containsKey(id)) {
Log.v(“ConstraintSet”, "id unknown " + Debug.getName(view));
} else {
if (this.mForceId && id == -1) {
throw new RuntimeException(“All children of ConstraintLayout must have ids to use ConstraintSet”);
}
if (this.mConstraints.containsKey(id)) {
ConstraintSet.Constraint constraint = (ConstraintSet.Constraint)this.mConstraints.get(id);
ConstraintAttribute.setAttributes(view, constraint.mCustomConstraints);
}
}
}
}
…
public static void setAttributes(View view, HashMap<String, ConstraintAttribute> map) {
Class<? extends View> viewClass = view.getClass();
Iterator var3 = map.keySet().iterator();
while(var3.hasNext()) {
String name = (String)var3.next();
ConstraintAttribute constraintAttribute = (ConstraintAttribute)map.get(name);
String methodName = “set” + name;
try {
Method method;
switch(constraintAttribute.mType) {
case COLOR_TYPE:
method = viewClass.getMethod(methodName, Integer.TYPE);
method.invoke(view, constraintAttribute.mColorValue);
break;
case COLOR_DRAWABLE_TYPE:
method = viewClass.getMethod(methodName, Drawable.class);
ColorDrawable drawable = new ColorDrawable();
drawable.setColor(constraintAttribute.mColorValue);
method.invoke(view, drawable);
break;
case INT_TYPE:
method = viewClass.getMethod(methodName, Integer.TYPE);
method.invoke(view, constraintAttribute.mIntegerValue);
break;
case FLOAT_TYPE:
method = viewClass.getMethod(methodName, Float.TYPE);
method.invoke(view, constraintAttribute.mFloatValue);
break;
case STRING_TYPE:
method = viewClass.getMethod(methodName, CharSequence.class);
method.invoke(view, constraintAttribute.mStringValue);
break;
case BOOLEAN_TYPE:
method = viewClass.getMethod(methodName, Boolean.TYPE);
method.invoke(view, constraintAttribute.mBooleanValue);
break;
case DIMENSION_TYPE:
method = viewClass.getMethod(methodName, Float.TYPE);
method.invoke(view, constraintAttribute.mFloatValue);
}
} catch (NoSuchMethodException var9) {
Log.e(“TransitionLayout”, var9.getMessage());
Log.e(“TransitionLayout”, " Custom Attribute “” + name + “” not found on " + viewClass.getName());
Log.e(“TransitionLayout”, viewClass.getName() + " must have a method " + methodName);
} catch (IllegalAccessException var10) {
Log.e(“TransitionLayout”, " Custom Attribute “” + name + “” not found on " + viewClass.getName());
var10.printStackTrace();
} catch (InvocationTargetException var11) {
Log.e(“TransitionLayout”, " Custom Attribute “” + name + “” not found on " + viewClass.getName());
var11.printStackTrace();
}
}
}
首先在 MotionLayout 中,如果是自定义属性,那么会执行 ConstraintSet 类中的 applyCustomAttributes 方法,接着会调用 ConstraintAttribute 类中的 setAttributes 方法,就如上代码中所写的那样,它会根据属性名称组装成对应的 set 方法,然后通过反射调用。是不是有种恍然大悟的感觉?话说,这样的机制是不是好像哪里见到过?没错,正是属性动画。
KeyCycle
什么是 KeyCycle 呢?下面是来自 Gal Maoz 的总结:
A
KeyCycleis a highly-detailed, custom-made interpolator for a specific view, whereas the interpolator is influencing the entire scene, with a large focus on repetitive actions (hence the cycle in the name).
简单来说,KeyCycle 是针对特定视图的非常详细的定制化插值器。它比较适合我们常说的波形或周期运动场景,比如实现控件的抖动动画或者周期性的循环动画。
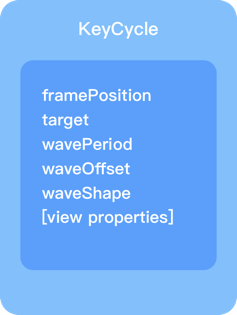
如上图所示,KeyCycle 主要由以上几个属性组成,前两个相信大家都比较熟悉了,这里不必多说,另外 view properties 正如之前的 KeyAttribute 结构图中所描述的那样,代表View的各种属性,如 rotation、translation、alpha 等等。 这里主要介绍另外三个比较重要且具有特色的属性:
wavePeriod:这个表示在当前场景位置下需要执行动画的波(周期)的数量。这样说可能不太容易理解,别急,我们待会举个例子说明。waveOffset:表示当前控件需要变化的属性的偏移量,即 view properties 所对应的初始值或者基准值。例如,如果我们在动画执行的某个位置设置了scaleX为 0.3,而设置了waveOffset值为 1,那么,动画执行到该位置,控件的实际宽度会变为1 + 0.3 = 1.3,也就是会扩大为 1.3 倍,而不是缩小为之前的 0.3 倍。waveShape:这个属性比较好理解,即波的形状,常见的值有:sin、cos、sawtooth 等,更多可参考官网API:developer.android.com/reference/a…
下面举个简单的例子帮助理解,以下面这个效果为例:
对应的 KeyFrameSet 代码如下所示:
根据动画效果结合代码可以知道,我们这个放大的Q弹的效果只是改变了 scaleX 这个属性,并且让它“摇摆了”大概三个来回(周期),恰好 wavePeriod 属性值为 3。也许动画不太方便察觉,这样,我们借助于 Google 提供的专门用来查看 KeyCycle 波形变化的快捷工具来查看它波形变化过程:
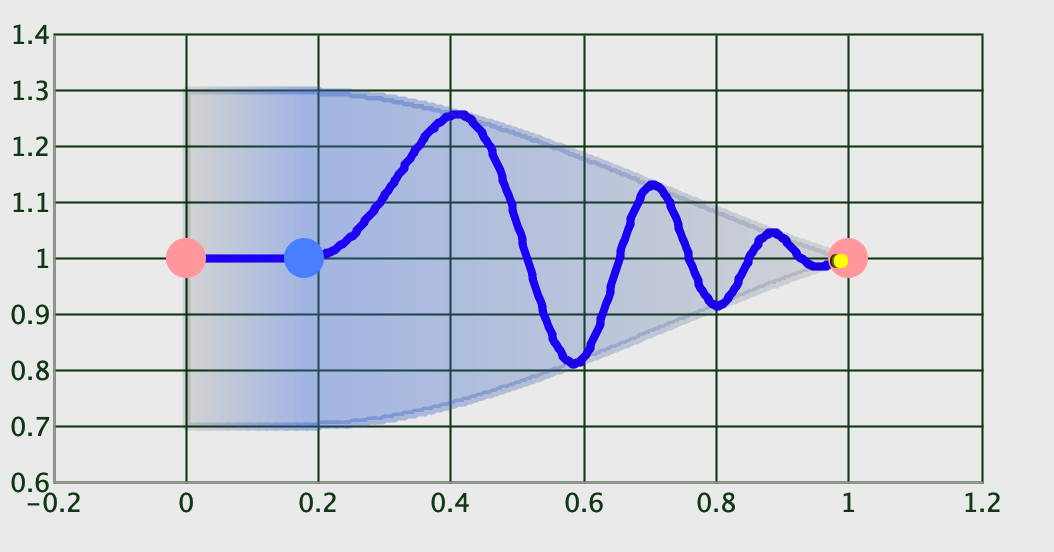
如此一来,我们就很直观地看到上图中描绘的波形变化过程了,的确是三个周期没有错,并且是以正弦 sin 来变化的。
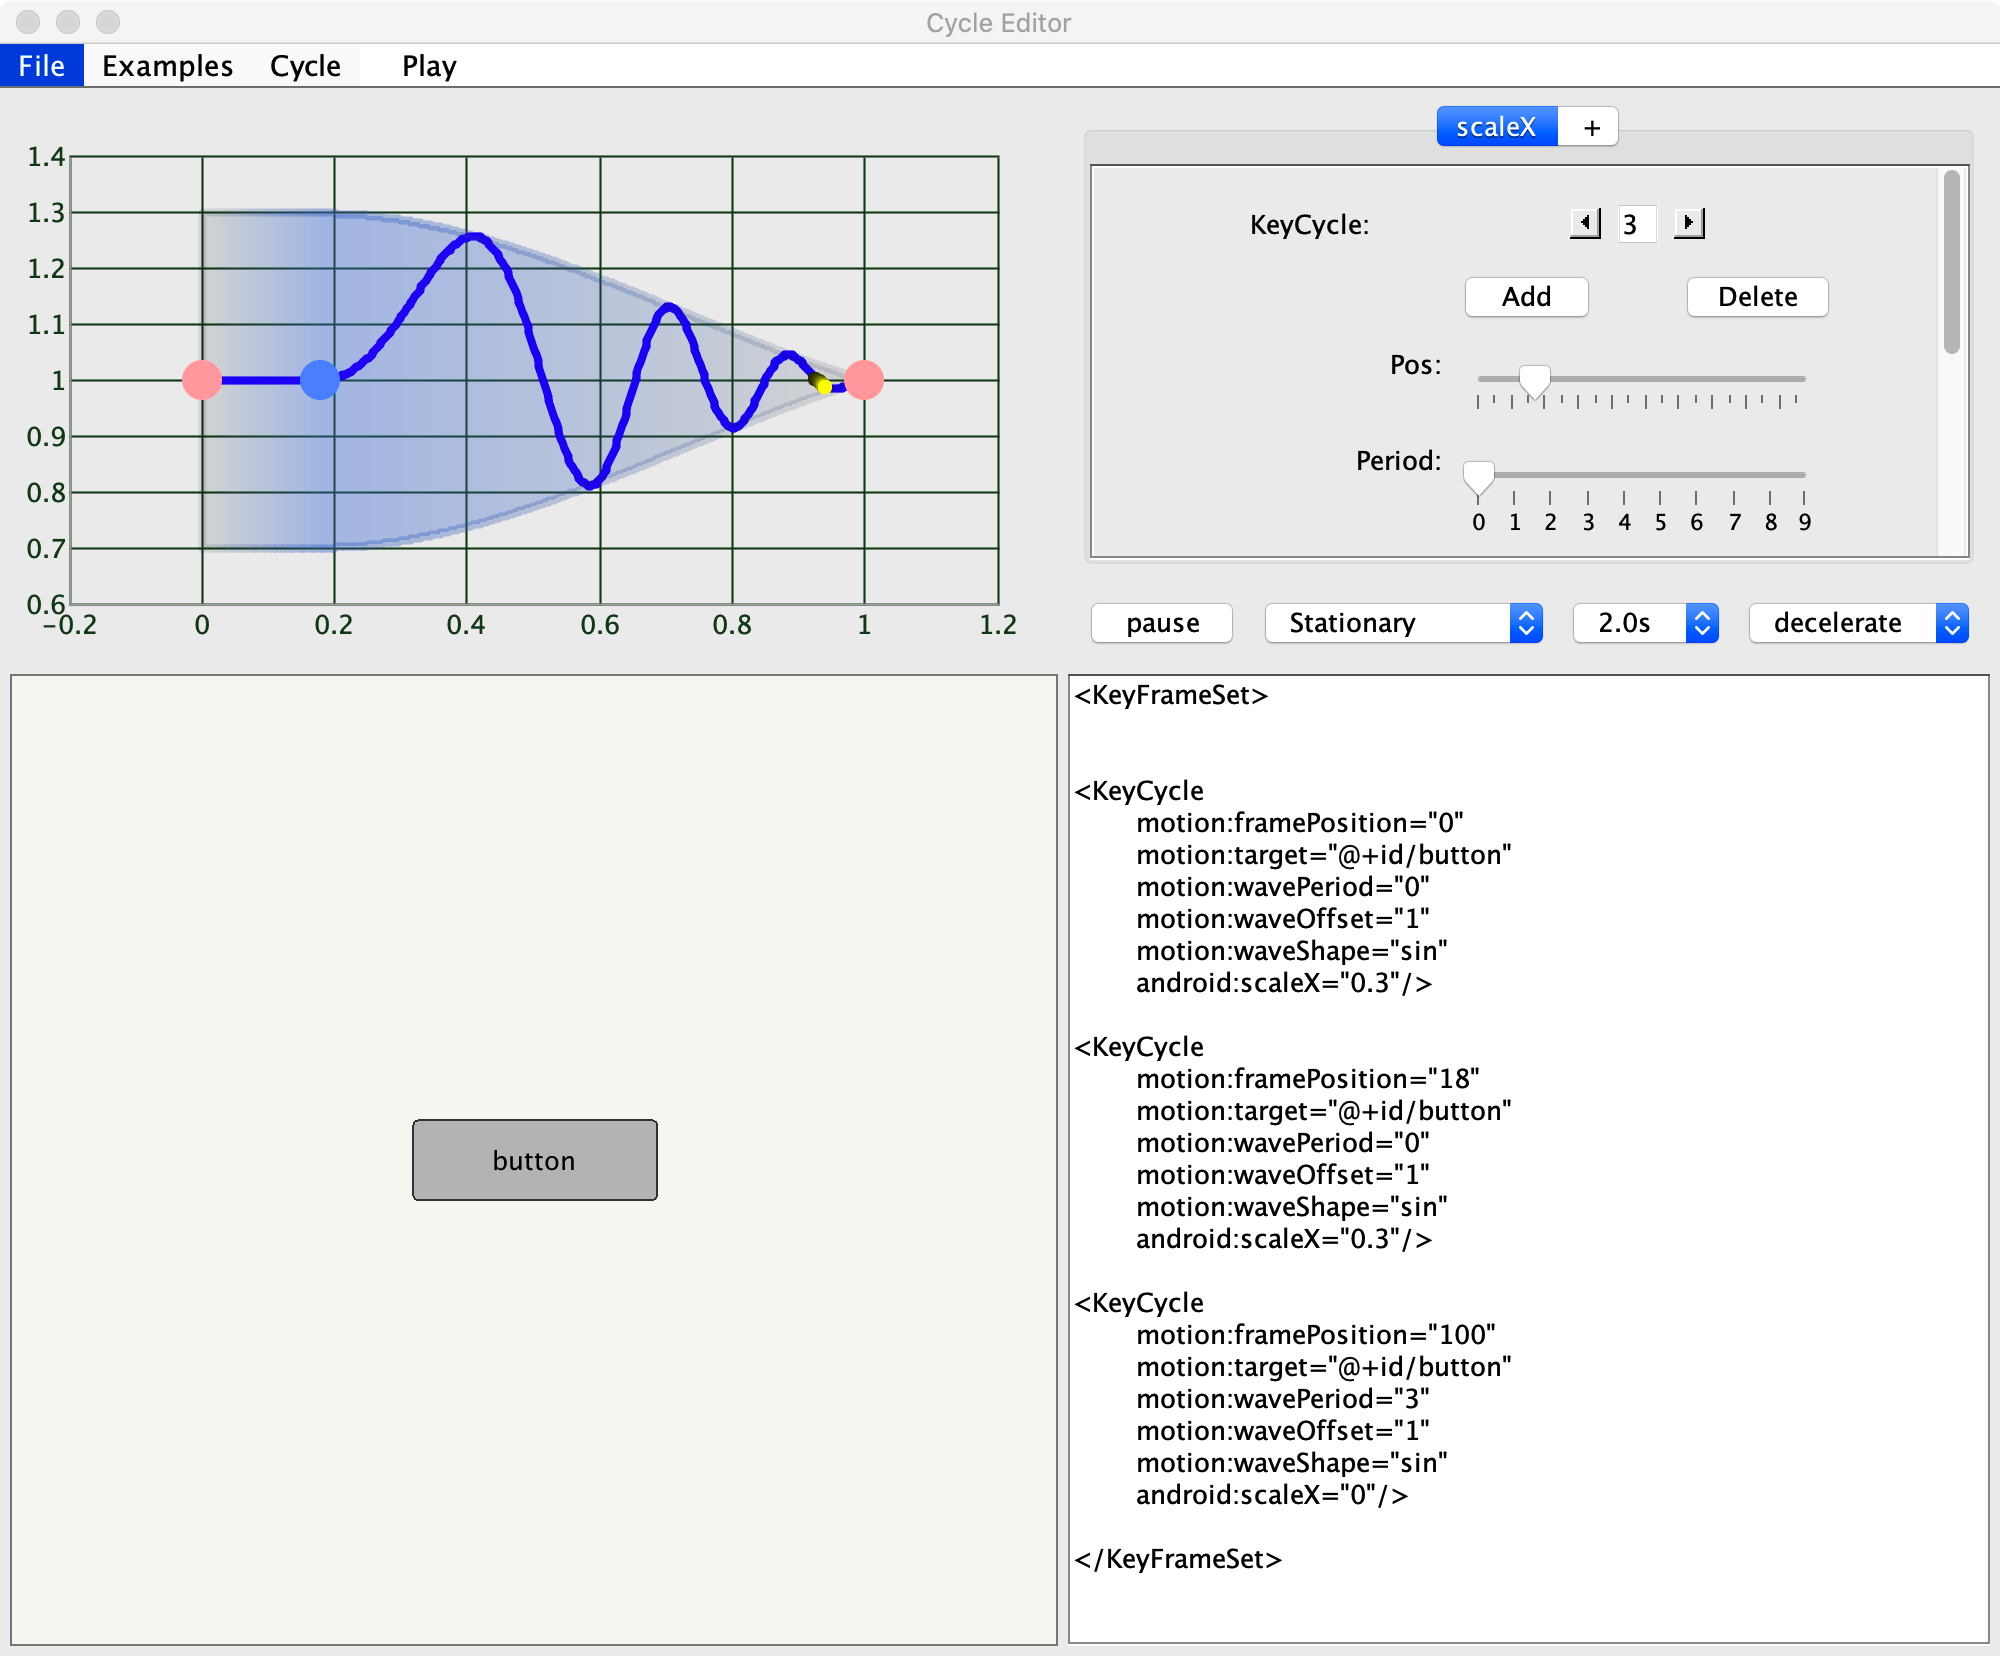
关于这款工具的使用,大家可以前往:github.com/googlearchi… 上下载,然后通过执行 java -jar [xx/CycleEditor.jar] 即可看到可视化界面,然后将 KeyFrameSet 部分的代码 copy 到编辑栏,然后点击 File -> parse xml 即可看到代码对应的波形走势。如下所示:
我们来看看下面这个效果:

这个Q弹的效果就是基于 KeyCycle 实现的,我们来看看它的场景实现:
<?xml version="1.0" encoding="utf-8"?>
我们在动画路径上添加一些关键帧,并稍微改变控件的旋转角度,配合 keyCycle 就能达到上面的弹性动画,大家可以自己动手尝试体验一下。
MotionLayout 的联动性
很多时候,我们的控件并不只是单一的个体,而是需要与其他控件产生“交互上的关联”,常见地,Android 的Material design components 全家桶中提供了一套“优雅灵动”的组件,相信大家都体验过了,那么,我们的 MotionLayout 可以与它们碰撞出怎样的火花呢?
一切从“头”开始
Material design 组件库中提供了一个 AppBarLayout 组件,我们经常使用它来配合 CoordinatorLayout 控件实现一些简单的交互动作,例如头部导航栏的伸缩效果,各位应该或多或少都用到过,这里不再介绍。下面我们就从 AppBarLayout 开始,看看如何实现与 MotionLayout 的联动。首先,我们先来看下面这个简单的效果:
我们知道,通过 CoordinatorLayout 和 AppBarLayout 也可以实现类似的交互效果,但显然 MotionLayout 会更加灵活多变。其实上面的动画效果很简单,只是在 AppBarLayout 高度变化过程中改变背景色、标题的位置和大小即可,对应的 MotionScene 文件代码如下所示:
结合以上效果图,我们很容易理解上面的场景实现代码,那么,我们再来看下布局文件:
<?xml version="1.0" encoding="utf-8"?><androidx.coordinatorlayout.widget.CoordinatorLayout
xmlns:android=“http://schemas.android.com/apk/res/android”
android:id=“@+id/content”
android:layout_width=“match_parent”
android:layout_height=“match_parent”
android:fitsSystemWindows=“false”
android:background=“@android:color/white”
xmlns:app=“http://schemas.android.com/apk/res-auto”>
<com.google.android.material.appbar.AppBarLayout
android:id=“@+id/appBarLayout”
android:layout_width=“match_parent”
android:layout_height=“260dp”
android:theme=“@style/AppTheme.AppBarOverlay”>
<com.moos.constraint.widget.MotionToolBar
android:id=“@+id/motionLayout”
android:layout_width=“match_parent”
android:layout_height=“match_parent”
app:motionDebug=“NO_DEBUG”
app:layoutDescription=“@xml/motion_scene_simple_appbar”
android:minHeight=“52dp”
app:layout_scrollFlags=“scroll|enterAlways|snap|exitUntilCollapsed”>
</com.moos.constraint.widget.MotionToolBar>
</com.google.android.material.appbar.AppBarLayout>
<androidx.core.widget.NestedScrollView
android:layout_width=“match_parent”
android:layout_height=“match_parent”
app:layout_behavior=“com.google.android.material.appbar.AppBarLayout$ScrollingViewBehavior”>
</androidx.core.widget.NestedScrollView>
</androidx.coordinatorlayout.widget.CoordinatorLayout>
观察上面布局文件,其实代码与传统 CoordinatorLayout & AppBarLayout 交互的代码大同小异,只不过我们在 AppBarLayout 内部添加了一个 MotionToolBar 控件,这其实是个 MotionLayout,只不过内部根据 AppBarLayout 伸缩的高度动态改变动画进度而已,我们来看下具体实现:
class MotionToolBar @JvmOverloads constructor(
context: Context, attrs: AttributeSet? = null, defStyleAttr: Int = 0
) : MotionLayout(context, attrs, defStyleAttr), AppBarLayout.OnOffsetChangedListener {
override fun onOffsetChanged(appBarLayout: AppBarLayout?, verticalOffset: Int) {
Log.e(“MotionToolBar”, “onOffsetChanged: ----->$verticalOffset, scroll range–> ${appBarLayout?.totalScrollRange}”)
val seekPosition = -verticalOffset / (appBarLayout?.totalScrollRange!!.toFloat()/5*3)
progress = seekPosition
}
override fun onAttachedToWindow() {
super.onAttachedToWindow()
(parent as? AppBarLayout)?.addOnOffsetChangedListener(this)
}
}
代码量很少,通过在 onOffsetChanged 方法中监听 AppBarLayout 的伸缩高度,并经过换算后得到当前的进度值传递给 progress,该字段就对应着 MotionLayout 的 setProgress 方法,如此一来就能够动态的改变其动画进度了。
理解了上述代码,就不难实现下面的效果了:

文末
我总结了一些Android核心知识点,以及一些最新的大厂面试题、知识脑图和视频资料解析。
以后的路也希望我们能一起走下去。(谢谢大家一直以来的支持)
部分资料一览:
- 330页PDF Android学习核心笔记(内含8大板块)


-
Android学习的系统对应视频
-
Android进阶的系统对应学习资料

- Android BAT大厂面试题(有解析)

《Android学习笔记总结+移动架构视频+大厂面试真题+项目实战源码》,点击传送门,即可获取!
我总结了一些Android核心知识点,以及一些最新的大厂面试题、知识脑图和视频资料解析。
以后的路也希望我们能一起走下去。(谢谢大家一直以来的支持)
部分资料一览:
- 330页PDF Android学习核心笔记(内含8大板块)
[外链图片转存中…(img-1U3g7fkF-1715581952757)]
[外链图片转存中…(img-D71q5BYy-1715581952758)]
-
Android学习的系统对应视频
-
Android进阶的系统对应学习资料
[外链图片转存中…(img-iAWuYCro-1715581952759)]
- Android BAT大厂面试题(有解析)
[外链图片转存中…(img-8Ov1qsw3-1715581952760)]
《Android学习笔记总结+移动架构视频+大厂面试真题+项目实战源码》,点击传送门,即可获取!


 1万+
1万+


 被折叠的 条评论
为什么被折叠?
被折叠的 条评论
为什么被折叠?
 到【灌水乐园】发言


