


前言
MotionLayout 的使用大家应该都会了,如果不会看这里。
本文就不科普如何使用,什么属性是什么意思,怎么使用之类的了,这里只是探讨一下 MotionLayout 效果实现的几种方式。
一、ConstraintLayout 的方式定义
我们知道 MotionLayout 是 ConstraintLayout 库中的功能,我们可以直接使用ConstraintLayout 来定义两组不同的 ConstraintLayout 布局,使用ConstraintSet来切换不同的布局。
原始布局:
<?xml version="1.0" encoding="utf-8"?>
<androidx.constraintlayout.widget.ConstraintLayout xmlns:android="http://schemas.android.com/apk/res/android"
    xmlns:app="http://schemas.android.com/apk/res-auto"
    android:id="@+id/constraint_parent"
    android:layout_width="match_parent"
    android:layout_height="match_parent"
    android:background="@color/colorPrimary"
    app:layout_constraintVertical_bias="0.3">

    <TextView
        android:id="@+id/view_2"
        android:layout_width="200dp"
        android:layout_height="wrap_content"
        android:background="@android:color/white"
        android:padding="16dp"
        app:layout_constraintBottom_toBottomOf="@id/view_1"
        app:layout_constraintEnd_toEndOf="@id/view_1"
        app:layout_constraintStart_toStartOf="@id/view_1" />

    <androidx.appcompat.widget.AppCompatImageView
        android:id="@+id/view_1"
        android:layout_width="200dp"
        android:layout_height="170dp"
        android:background="@color/colorAccent"
        app:layout_constraintBottom_toBottomOf="parent"
        app:layout_constraintEnd_toEndOf="parent"
        app:layout_constraintStart_toStartOf="parent"
        app:layout_constraintTop_toTopOf="parent" />


    <androidx.appcompat.widget.AppCompatImageView
        android:id="@+id/icon"
        android:layout_width="32dp"
        android:layout_height="32dp"
        android:layout_margin="16dp"
        android:src="@mipmap/ic_launcher_round"
        app:layout_constraintBottom_toBottomOf="@id/view_1"
        app:layout_constraintEnd_toEndOf="@id/view_1"
        app:layout_constraintTop_toTopOf="@id/view_1" />


    <View
        android:id="@+id/bottom"
        android:layout_width="match_parent"
        android:layout_height="50dp"
        android:background="@color/colorAccent"
        app:layout_constraintEnd_toEndOf="parent"
        app:layout_constraintStart_toStartOf="parent"
        app:layout_constraintTop_toBottomOf="parent" />

</androidx.constraintlayout.widget.ConstraintLayout>
改变后的布局:
<?xml version="1.0" encoding="utf-8"?>
<androidx.constraintlayout.widget.ConstraintLayout
    xmlns:android="http://schemas.android.com/apk/res/android"
    xmlns:app="http://schemas.android.com/apk/res-auto"
    android:layout_width="match_parent"
    android:background="@color/colorPrimary"
    app:layout_constraintVertical_bias="0.3"
    android:layout_height="match_parent">

    <TextView
        android:id="@+id/view_2"
        app:layout_constraintStart_toStartOf="@id/view_1"
        app:layout_constraintEnd_toEndOf="@id/view_1"
        android:layout_width="200dp"
        android:background="@android:color/white"
        android:padding="16dp"
        app:layout_constraintTop_toBottomOf="@id/view_1"
        android:layout_height="wrap_content"
        />

    <androidx.appcompat.widget.AppCompatImageView
        android:layout_width="200dp"
        android:layout_height="150dp"
        android:id="@+id/view_1"
        android:background="@color/colorAccent"
        app:layout_constraintStart_toStartOf="parent"
        app:layout_constraintEnd_toEndOf="parent"
        app:layout_constraintBottom_toBottomOf="parent"
        app:layout_constraintTop_toTopOf="parent"/>


    <androidx.appcompat.widget.AppCompatImageView
        android:layout_width="32dp"
        android:src="@mipmap/ic_launcher_round"
        android:id="@+id/icon"
        app:layout_constraintEnd_toEndOf="@id/view_1"
        app:layout_constraintTop_toBottomOf="@id/view_1"
        app:layout_constraintBottom_toBottomOf="@id/view_1"
        android:layout_margin="16dp"
        android:layout_height="32dp"/>


    <View android:layout_width="match_parent"
        android:layout_height="50dp"
        android:id="@+id/bottom"
        app:layout_constraintTop_toBottomOf="parent"
        app:layout_constraintStart_toStartOf="parent"
        app:layout_constraintEnd_toEndOf="parent"
        android:background="@color/colorAccent"/>

</androidx.constraintlayout.widget.ConstraintLayout>
使用的时候:
        val raw = ConstraintSet().apply {
            this.clone(this@Demo13JavaActivity, R.layout.activity_demo13_java)
        }

        val detail = ConstraintSet().apply {
            this.clone(this@Demo13JavaActivity, R.layout.activity_demo13_java_transform)
        }

        val constraintLayout = findViewById<ConstraintLayout>(R.id.constraint_parent)

        constraintLayout.click {
            val constraintSet = if (toggle) detail else raw
            TransitionManager.beginDelayedTransition(constraintLayout)
            constraintSet.applyTo(constraintLayout)

            toggle = !toggle
        }
效果:
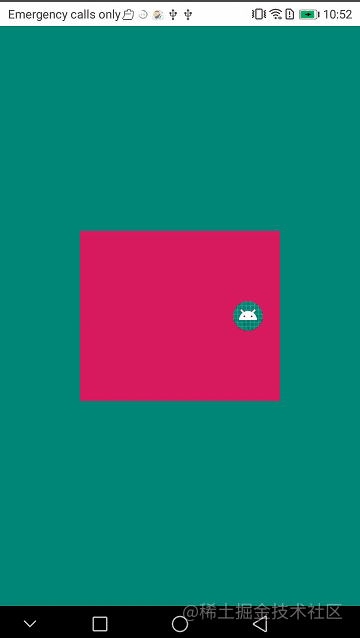
需要注意的是这里的View的数量和Id需要一 一对 应 哦!
二、MotionLayout Xml 的方式定义
也就是默认的定义,最为普遍的方式,在之前的文章中有一些复杂的定义方式。
这里就以一个简单的Demo说下如何使用:
<androidx.constraintlayout.motion.widget.MotionLayout xmlns:android="http://schemas.android.com/apk/res/android"
   xmlns:app="http://schemas.android.com/apk/res-auto"
   xmlns:tools="http://schemas.android.com/tools"
   android:layout_width="match_parent"
   android:layout_height="match_parent"
   android:background="@color/white"
   app:layoutDescription="@xml/activity_demo13_xml_scene"
   app:showPaths="true">


   <View
       android:id="@+id/button"
       android:layout_width="wrap_content"
       android:layout_height="wrap_content"
       android:background="@color/colorAccent" />


</androidx.constraintlayout.motion.widget.MotionLayout>
定义的场景xml:
<?xml version="1.0" encoding="utf-8"?>
<MotionScene xmlns:android="http://schemas.android.com/apk/res/android"
   xmlns:motion="http://schemas.android.com/apk/res-auto">

   <!--  只能设置一些Constraint布局的一些专用属性 用于位置变换  -->
   <ConstraintSet android:id="@+id/start">
       <Constraint
           android:id="@+id/button"
           android:layout_width="64dp"
           android:layout_height="64dp"
           android:layout_marginStart="8dp"
           motion:layout_constraintBottom_toBottomOf="parent"
           motion:layout_constraintStart_toStartOf="parent"
           motion:layout_constraintTop_toTopOf="parent">

           <!--  可以设置自定义的属性  -->
           <CustomAttribute
               motion:attributeName="backgroundColor"
               motion:customColorValue="#D81B60" />

       </Constraint>

   </ConstraintSet>

   <ConstraintSet android:id="@+id/end">
       <Constraint
           android:id="@+id/button"
           android:layout_width="34dp"
           android:layout_height="34dp"
           android:layout_marginEnd="8dp"
           motion:layout_constraintBottom_toBottomOf="parent"
           motion:layout_constraintEnd_toEndOf="parent"
           motion:layout_constraintTop_toTopOf="parent">

           <!--  可以设置自定义的属性  -->
           <CustomAttribute
               motion:attributeName="backgroundColor"
               motion:customColorValue="#9999FF" />

       </Constraint>
   </ConstraintSet>


   <Transition
       motion:constraintSetEnd="@+id/end"
       motion:constraintSetStart="@+id/start"
       motion:duration="1000"
       motion:motionInterpolator="linear">

       <!--   点击     -->
       <OnClick
           motion:clickAction="toggle"
           motion:targetId="@+id/button" />


       <KeyFrameSet>

           <KeyAttribute
               android:rotation="-45"
               android:scaleX="2"
               android:scaleY="2"
               motion:framePosition="40"
               motion:motionTarget="@+id/button" />

           <KeyPosition
               motion:framePosition="70"
               motion:keyPositionType="parentRelative"
               motion:motionTarget="@+id/button"
               motion:percentY="0.25" />

       </KeyFrameSet>


   </Transition>

</MotionScene>
效果:
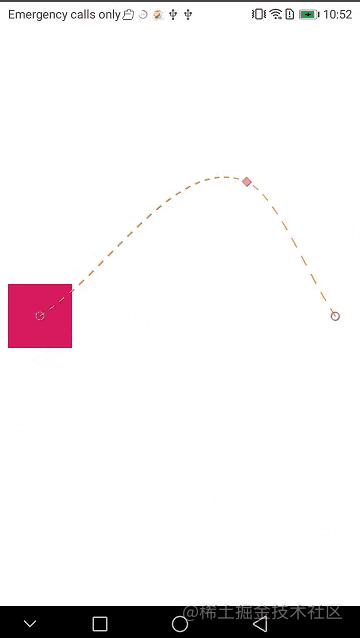
场景内部的设置涉及到关键帧位置与关键帧属性的配置,代码中都有详细的注释,大家留意即可!
三、MotionLayout 配合 AppbarLayout
封装一个自己的 MotionLayout,当 AppbarLayout 滚动的过程中监听它的完成度,设置 MotionLayout 的Progress。
自定义MotionLayout:
class MyAppbarMotionLayout @JvmOverloads constructor(
    context: Context, attrs: AttributeSet? = null, defStyleAttr: Int = 0
) : MotionLayout(context, attrs, defStyleAttr), AppBarLayout.OnOffsetChangedListener {

    override fun onOffsetChanged(appBarLayout: AppBarLayout?, verticalOffset: Int) {
        val progressVal = -verticalOffset / appBarLayout?.totalScrollRange?.toFloat()!!
        YYLogUtils.w("progress:$progressVal")
        progress = progressVal

    }

    override fun onAttachedToWindow() {
        super.onAttachedToWindow()
        (parent as? AppBarLayout)?.addOnOffsetChangedListener(this)
    }
}
使用:
<?xml version="1.0" encoding="utf-8"?>
<LinearLayout xmlns:android="http://schemas.android.com/apk/res/android"
    xmlns:app="http://schemas.android.com/apk/res-auto"
    android:layout_width="match_parent"
    android:layout_height="match_parent"
    android:background="@color/white"
    android:orientation="vertical">


    <com.guadou.lib_baselib.view.titlebar.EasyTitleBar
        android:layout_width="match_parent"
        android:layout_height="wrap_content"
        app:Easy_title="协同AppbarLayout" />


    <androidx.coordinatorlayout.widget.CoordinatorLayout
        android:layout_width="match_parent"
        android:layout_height="wrap_content">


        <com.google.android.material.appbar.AppBarLayout
            android:layout_width="match_parent"
            android:layout_height="wrap_content"
            android:background="@color/white"
            android:orientation="vertical"
            app:elevation="0dp">

            <com.guadou.kt_demo.demo.demo13_motionlayout.view.MyAppbarMotionLayout
                android:id="@+id/motionLayout"
                android:layout_width="match_parent"
                android:layout_height="200dp"
                android:minHeight="50dp"
                app:layoutDescription="@xml/scene_13_appbar"
                app:layout_scrollFlags="scroll|enterAlways|snap|exitUntilCollapsed">


                <ImageView
                    android:id="@+id/background"
                    android:layout_width="match_parent"
                    android:layout_height="200dp"
                    android:scaleType="centerCrop"
                    android:src="@drawable/chengxiao" />

                <TextView
                    android:id="@+id/label"
                    android:layout_width="wrap_content"
                    android:layout_height="wrap_content"
                    android:text="Cheng Xiao"
                    android:textColor="#FFFFFF"
                    android:textSize="25dp"
                    android:transformPivotX="0dp"
                    android:transformPivotY="0dp" />

            </com.guadou.kt_demo.demo.demo13_motionlayout.view.MyAppbarMotionLayout>

        </com.google.android.material.appbar.AppBarLayout>


        <androidx.core.widget.NestedScrollView
            android:layout_width="match_parent"
            android:layout_height="wrap_content"
            app:layout_behavior="@string/appbar_scrolling_view_behavior">

            <TextView
                android:layout_width="match_parent"
                android:layout_height="wrap_content"
                android:text="@string/scroll_content" />

        </androidx.core.widget.NestedScrollView>

    </androidx.coordinatorlayout.widget.CoordinatorLayout>


</LinearLayout>
定义的场景:
<?xml version="1.0" encoding="utf-8"?>
<MotionScene xmlns:android="http://schemas.android.com/apk/res/android"
    xmlns:motion="http://schemas.android.com/apk/res-auto">

    <Transition
        motion:constraintSetEnd="@+id/end"
        motion:constraintSetStart="@+id/start" />

    <ConstraintSet android:id="@+id/start">
        <Constraint
            android:id="@+id/background"
            android:layout_width="match_parent"
            android:layout_height="200dp"
            android:alpha="1.0"
            motion:layout_constraintBottom_toBottomOf="parent" />

        <Constraint
            android:id="@+id/label"
            android:layout_width="wrap_content"
            android:layout_height="wrap_content"
            android:rotation="-90.0"
            motion:layout_constraintBottom_toBottomOf="@+id/background"
            motion:layout_constraintLeft_toLeftOf="@id/background">

            <CustomAttribute
                motion:attributeName="textSize"
                motion:customFloatValue="25" />

            <CustomAttribute
                motion:attributeName="textColor"
                motion:customColorValue="@color/white" />

        </Constraint>
    </ConstraintSet>

    <ConstraintSet android:id="@+id/end">

        <Constraint
            android:id="@+id/background"
            android:layout_width="match_parent"
            android:layout_height="50dp"
            android:alpha="0.7"
            motion:layout_constraintBottom_toBottomOf="parent" />

        <Constraint
            android:id="@+id/label"
            android:layout_width="wrap_content"
            android:layout_height="wrap_content"
            android:layout_marginStart="8dp"
            android:layout_marginBottom="8dp"
            android:rotation="0.0"
            motion:layout_constraintBottom_toBottomOf="@+id/background"
            motion:layout_constraintLeft_toLeftOf="@id/background"
            motion:layout_constraintRight_toRightOf="@id/background"
            motion:layout_constraintTop_toTopOf="@id/background">

            <CustomAttribute
                motion:attributeName="textSize"
                motion:customFloatValue="18" />

            <CustomAttribute
                motion:attributeName="textColor"
                motion:customColorValue="@color/black" />

        </Constraint>

    </ConstraintSet>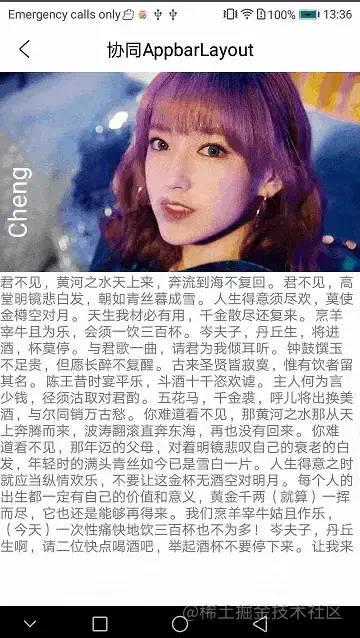
</MotionScene>这样就能实现MotionLayout 跟随 AppbarLayout的滚动做对应滚动了。
效果:
四、MotionLayout 配合 ViewPager
这样的效果和 AppbarLayout 的情况类似,当ViewPager滚动页面的时候,顶部的MotionLayout做对应的动画。
自定义MotionLayout:
class MyViewpagerMotionLayout @JvmOverloads constructor(
    context: Context, attrs: AttributeSet? = null, defStyleAttr: Int = 0
) : MotionLayout(context, attrs, defStyleAttr), ViewPager.OnPageChangeListener {

    override fun onPageScrollStateChanged(state: Int) {
    }

    override fun onPageScrolled(position: Int, positionOffset: Float, positionOffsetPixels: Int) {
        val numPages = 3
        progress = (position + positionOffset) / (numPages - 1)
    }

    override fun onPageSelected(position: Int) {
    }

    override fun onAttachedToWindow() {
        super.onAttachedToWindow()

        val viewGroup = (parent as? ViewGroup)!!
        for (i in 0 until viewGroup.childCount) {
            val view = viewGroup.getChildAt(i)
            if (view is ViewPager) {
                view.addOnPageChangeListener(this)
                break
            }
        }

    }
}
使用的xml:
<?xml version="1.0" encoding="utf-8"?>
<LinearLayout xmlns:android="http://schemas.android.com/apk/res/android"
    xmlns:app="http://schemas.android.com/apk/res-auto"
    android:layout_width="match_parent"
    android:layout_height="match_parent"
    android:background="@color/white"
    android:orientation="vertical">


    <com.guadou.lib_baselib.view.titlebar.EasyTitleBar
        android:layout_width="match_parent"
        android:layout_height="wrap_content"
        app:Easy_title="协同AppbarLayout" />


    <com.guadou.kt_demo.demo.demo13_motionlayout.view.MyViewpagerMotionLayout
        android:id="@+id/motionLayout"
        android:layout_width="match_parent"
        android:layout_height="200dp"
        app:layoutDescription="@xml/scene_13_viewpager">


        <ImageView
            android:id="@+id/background"
            android:layout_width="match_parent"
            android:layout_height="200dp"
            android:scaleType="centerCrop"
            android:src="@drawable/chengxiao" />

        <TextView
            android:id="@+id/label"
            android:layout_width="wrap_content"
            android:layout_height="wrap_content"
            android:text="Cheng Xiao"
            android:textColor="#FFFFFF"
            android:textSize="25dp" />

    </com.guadou.kt_demo.demo.demo13_motionlayout.view.MyViewpagerMotionLayout>

    <androidx.viewpager.widget.ViewPager
        android:id="@+id/viewpager"
        android:layout_width="match_parent"
        android:layout_height="match_parent">

    </androidx.viewpager.widget.ViewPager>


</LinearLayout>
场景的xml:
<?xml version="1.0" encoding="utf-8"?>
<MotionScene xmlns:android="http://schemas.android.com/apk/res/android"
    xmlns:motion="http://schemas.android.com/apk/res-auto">

    <Transition
        motion:constraintSetEnd="@+id/end"
        motion:constraintSetStart="@+id/start" />


    <KeyFrameSet>

        <KeyAttribute
            motion:framePosition="50"
            motion:motionTarget="@id/label" >

            <CustomAttribute
                motion:attributeName="textSize"
                motion:customFloatValue="15" />

            <CustomAttribute
                motion:attributeName="textColor"
                motion:customColorValue="@android:color/holo_blue_light" />

        </KeyAttribute>

        <KeyPosition
            motion:framePosition="50"
            motion:keyPositionType="parentRelative"
            motion:motionTarget="@id/label"
            motion:percentY="0.15" />

    </KeyFrameSet>

    <ConstraintSet android:id="@+id/start">
        <Constraint
            android:id="@+id/background"
            android:layout_width="match_parent"
            android:layout_height="200dp"
            android:alpha="1.0"
            motion:layout_constraintBottom_toBottomOf="parent" />

        <Constraint
            android:id="@+id/label"
            android:layout_width="wrap_content"
            android:layout_height="wrap_content"
            motion:layout_constraintBottom_toBottomOf="@+id/background"
            motion:layout_constraintLeft_toLeftOf="parent"
            motion:layout_constraintStart_toStartOf="parent"
            motion:layout_constraintTop_toTopOf="@id/background">

            <CustomAttribute
                motion:attributeName="textSize"
                motion:customFloatValue="25" />

            <CustomAttribute
                motion:attributeName="textColor"
                motion:customColorValue="@color/white" />

        </Constraint>
    </ConstraintSet>

    <ConstraintSet android:id="@+id/end">

        <Constraint
            android:id="@+id/background"
            android:layout_width="match_parent"
            android:layout_height="200dp"
            android:alpha="1.0"
            motion:layout_constraintBottom_toBottomOf="parent" />

        <Constraint
            android:id="@+id/label"
            android:layout_width="wrap_content"
            android:layout_height="wrap_content"
            motion:layout_constraintBottom_toBottomOf="@+id/background"
            motion:layout_constraintRight_toRightOf="parent"
            motion:layout_constraintEnd_toEndOf="parent"
            motion:layout_constraintTop_toTopOf="@id/background">

            <CustomAttribute
                motion:attributeName="textSize"
                motion:customFloatValue="25" />

            <CustomAttribute
                motion:attributeName="textColor"
                motion:customColorValue="@android:color/holo_red_dark" />

        </Constraint>

    </ConstraintSet>
</MotionScene>
当ViewPager滚动的时候,设置MotionLayout的 progress 。
效果:
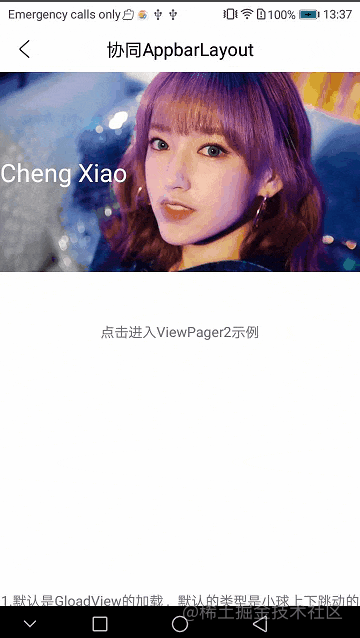
此效果的场景内部的设置涉及到关键帧位置与关键帧属性的配置,关键帧属性内又定义了自定义属性,大家留意!
总结
MotionLayout 可以 配合的控件很多,这里只是列出了常用的一些控件,它还能配合DrawerLayout、 TabLayout等。本质都是监听事件,改变 MotionLayout 的 Progress 值。
结合这几种常用的方式,我们就能完成大部分的页面动画效果了!
源码地址
https://gitee.com/newki123456/Kotlin-Room


 382
382

 被折叠的 条评论
为什么被折叠?
被折叠的 条评论
为什么被折叠?
 到【灌水乐园】发言


