


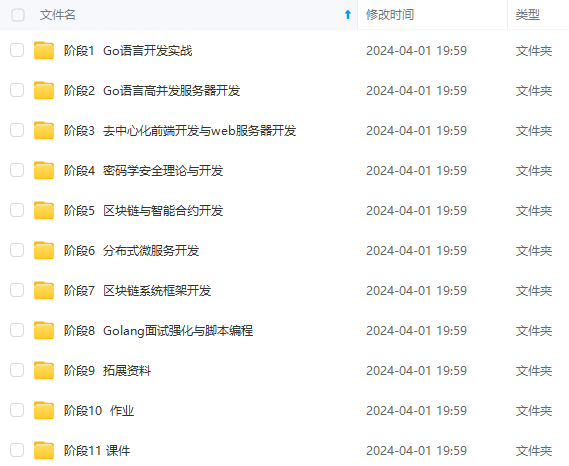

既有适合小白学习的零基础资料,也有适合3年以上经验的小伙伴深入学习提升的进阶课程,涵盖了95%以上Go语言开发知识点,真正体系化!
由于文件比较多,这里只是将部分目录截图出来,全套包含大厂面经、学习笔记、源码讲义、实战项目、大纲路线、讲解视频,并且后续会持续更新
<version>0.0.1-SNAPSHOT</version>
<name>eureka</name>
<description>Demo project for Spring Boot</description>


<properties>
	<project.build.sourceEncoding>UTF-8</project.build.sourceEncoding>
	<project.reporting.outputEncoding>UTF-8</project.reporting.outputEncoding>
	<java.version>1.8</java.version>
	<spring-cloud.version>Finchley.SR2</spring-cloud.version>
</properties>

<dependencies>

	<!-- eureka 服务端 -->
	<dependency>
		<groupId>org.springframework.cloud</groupId>
		<artifactId>spring-cloud-starter-netflix-eureka-server</artifactId>
	</dependency>

	<!-- 安全认证 -->
	<dependency>
		<groupId>org.springframework.boot</groupId>
		<artifactId>
</dependencies>

<dependencyManagement>
	<dependencies>
		<dependency>
			<groupId>org.springframework.cloud</groupId>
			<artifactId>spring-cloud-dependencies</artifactId>
			<version>${spring-cloud.version}</version>
			<type>pom</type>
			<scope>import</scope>
		</dependency>
	</dependencies>
</dependencyManagement>
### 搭建单节点


单节点搭建非常简单,引入上面的依赖,然后编写配置文件


#### application.yml
#单节点,正确
#应用名称及验证账号
server:
port: 7900
spring:
application:
name: eureka
security:
user:
# eureka登陆账号密码
name: root
password: root
eureka:
client:
register-with-eureka: false
fetch-registry: false
service-url:
defaultZone: http://root:root@localhost:7900/eureka/
server:
#关闭自我保护
enable-self-preservation: false
#清理间隔时间
eviction-interval-timer-in-ms: 5000
#### 启动类添加注解
import org.springframework.boot.SpringApplication;
import org.springframework.boot.autoconfigure.SpringBootApplication;
import org.springframework.cloud.netflix.eureka.server.EnableEurekaServer;
import com.netflix.eureka.registry.InstanceRegistry;
import com.netflix.eureka.registry.PeerAwareInstanceRegistry;
import com.netflix.eureka.registry.PeerAwareInstanceRegistryImpl;
@EnableEurekaServer // eureka服务端启动注解
@SpringBootApplication
public class EurekaApplication {
public static void main(String[] args) {
	SpringApplication.run(EurekaApplication.class, args);
}
}
这样单节点就构建完成了。


但是单节点一般来说仅仅是个人开发时使用,因为单节点容易出现问题,当该节点因为网络或者其他情况不可用时,其他服务之间的调用就会出现问题。


因此注册中心都是搭建集群来使用。


### eureka集群搭建


pom文件启动类还是与单机时没有任何区别,唯有配置文件需要更改


为了演示,这里我们仅仅只建立一个项目,但是启动三次,模拟三个节点的高可用集群,配置文件如下
#高可用3个节点,正确。
#应用名称及验证账号
spring:
application:
name: eureka
security:
user:
name: root
password: root
logging:
level:
root: info
eureka:
server:
# 设置 eureka server同步失败的等待时间 默认 5分 , 在这期间,它不向客户端提供服务注册信息
wait-time-in-ms-when-sync-empty: 0
client:
serviceUrl:
defaultZone: http://root:root@localhost:7901/eureka/,http://root:root@localhost:7902/eureka/,http://root:root@localhost:7903/eureka/
spring:
profiles: 7901
server:
port: 7901
eureka:
instance:
hostname: eureka-7901
spring:
profiles: 7902
server:
port: 7902
eureka:
instance:
hostname: eureka-7902
spring:
profiles: 7903
server:
port: 7903
eureka:
instance:
hostname: eureka-7903
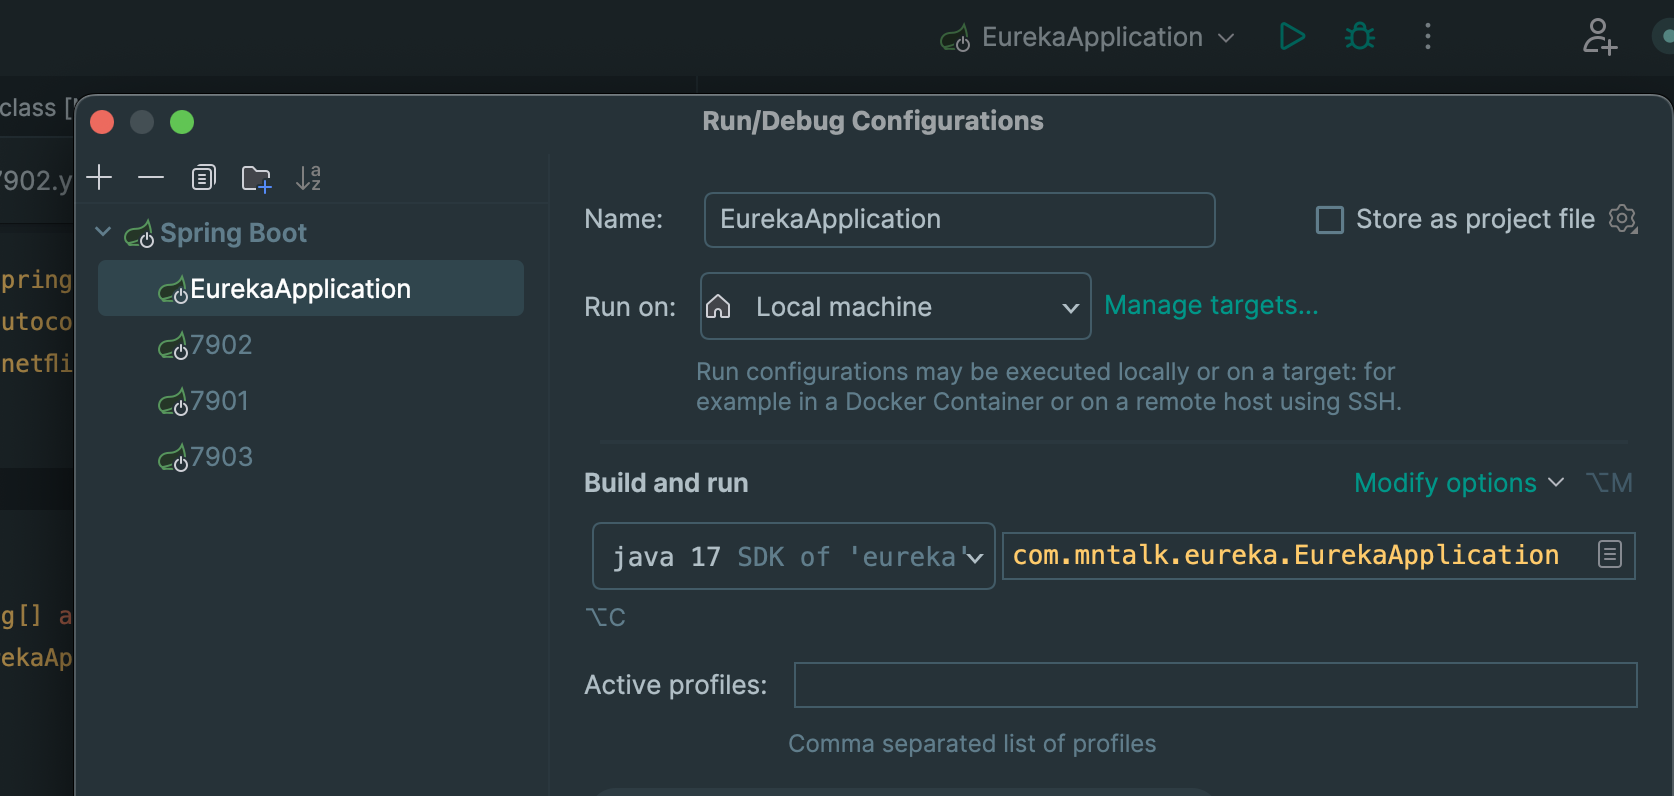
怎样在一个项目中启动三次服务,这个看截图
点击左上角的 “+” ,添加springboot启动项,Name是启动项名称,build and run 下,前者是jdk,后者选择服务启动类,最后在 Active profiles 分别填写对应的 profiles 即可
这样集群就搭建完成了
#### 关闭csrf
需要注意的是,搭建集群时,若引入spring security后,需要关闭csrf,不然会一只报注册失败
关闭csrf代码如下
import org.springframework.context.annotation.Configuration;
import org.springframework.security.config.annotation.web.builders.HttpSecurity;
import org.springframework.security.config.annotation.web.configuration.EnableWebSecurity;
import org.springframework.security.config.annotation.web.configuration.WebSecurityConfigurerAdapter;
@Configuration
@EnableWebSecurity
public class WebSecurityConfig extends WebSecurityConfigurerAdapter {
@Override
protected void configure(HttpSecurity http) throws Exception {
// 关闭csrf
// http.csrf().disable();
/*
* 默认情况下添加SpringSecurity依赖的应用每个请求都需要添加CSRF token才能访问,Eureka客户端注册时并不会添加,所以需要配置/eureka/**路径不需要CSRF token。
*/
http.csrf().ignoringAntMatchers(“/eureka/**”);
// 开启认证支持HttpBasic
http.authorizeRequests().anyRequest().authenticated().and().httpBasic();
}
}
### eureka 多节点注意事项
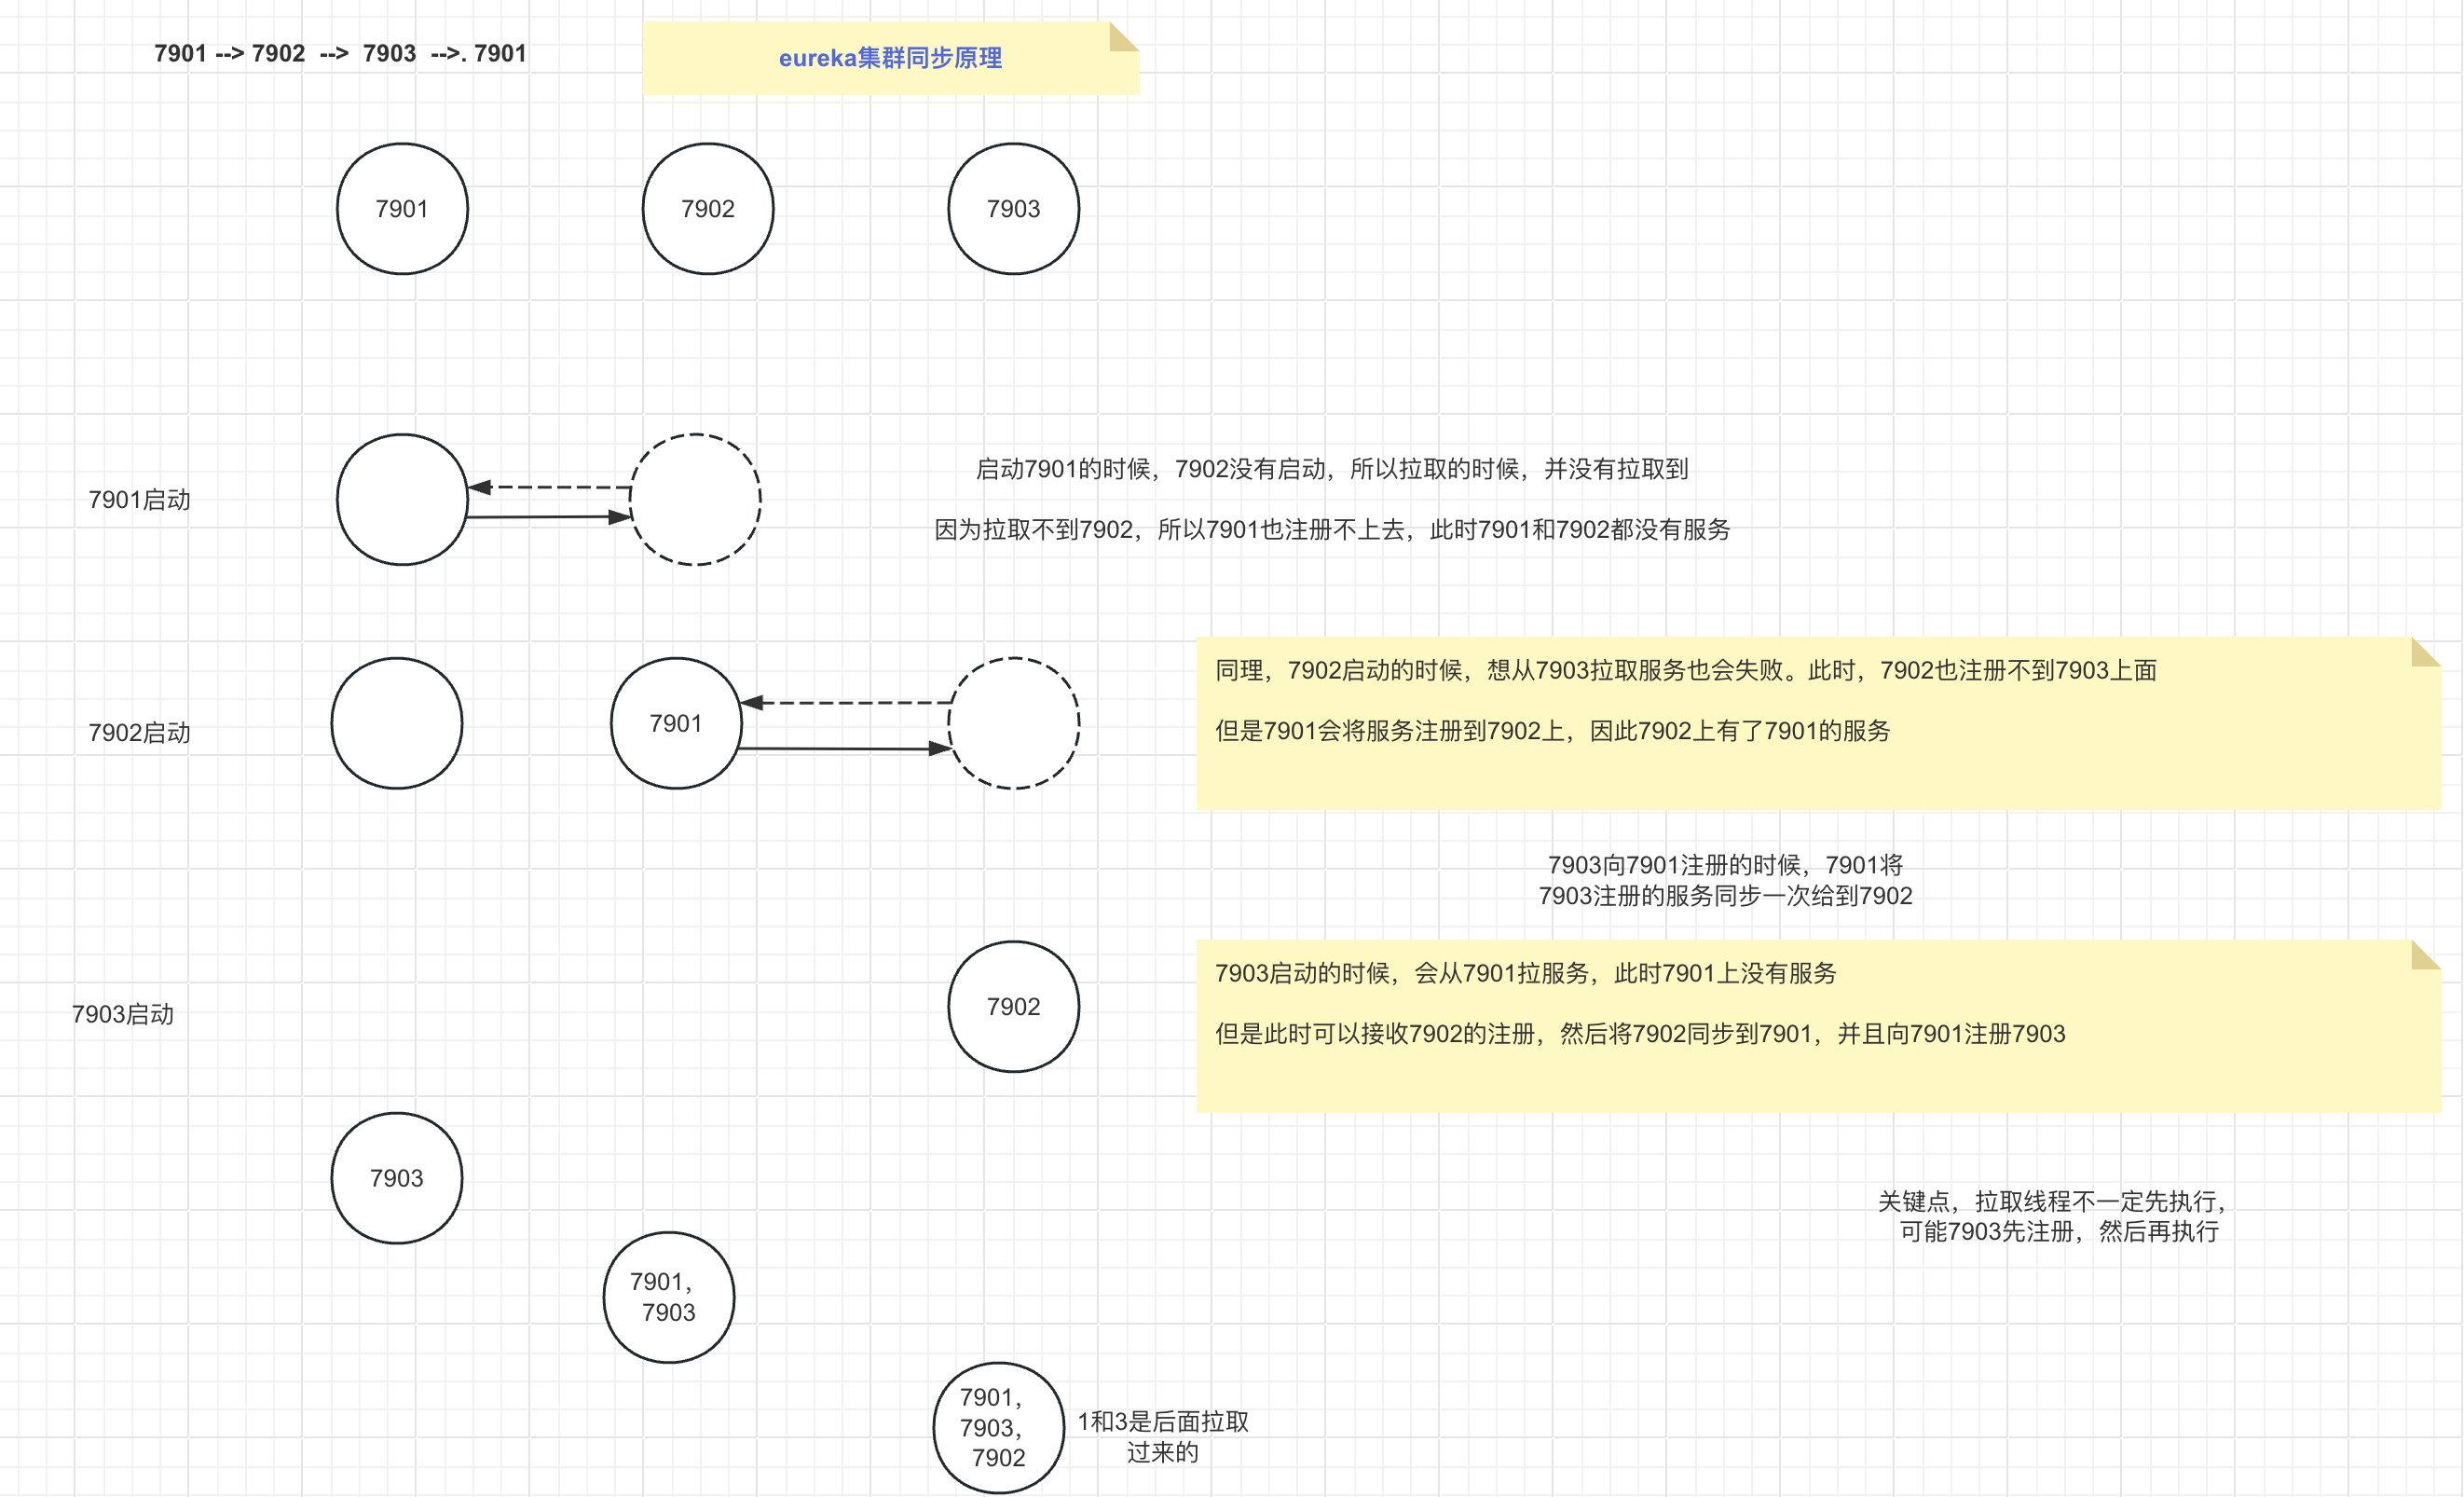
问题:eureka server间 设置peer。A->B,B->C,C->A,结果注册信息并不同步。
看例子:
依次启动7901,7902,7903。
启动成功,注册api-driver ->7901
发现只有7901和7902有 api-driver而 7903没有。
简单说:api-driver向 7901注册,7902将api-driver同步到7902,但是不会同步到7903。后面源码会讲到。
多节点建议:设置A->B,A->C其他类似。尽量不要跨 eureka节点。一对多,面面对到。
讲解下图。前置概念peer。清除流程。
功能点:
peer启动:
1、拉取它的peer的注册表。
2、把自己注册到peer上。
3、完成2之后,2中的peer会把它同步到,2中peer的peer。
>
> eureka集群复制流程图
>
>
>
## Eureka 原理
1. 本质:存储了每个客户端的注册信息。EurekaClient从EurekaServer同步获取服务注册列表。通过一定的规则选择一个服务进行调用。
2. Eureka架构图
>
> Eureka架构图
>
>
>
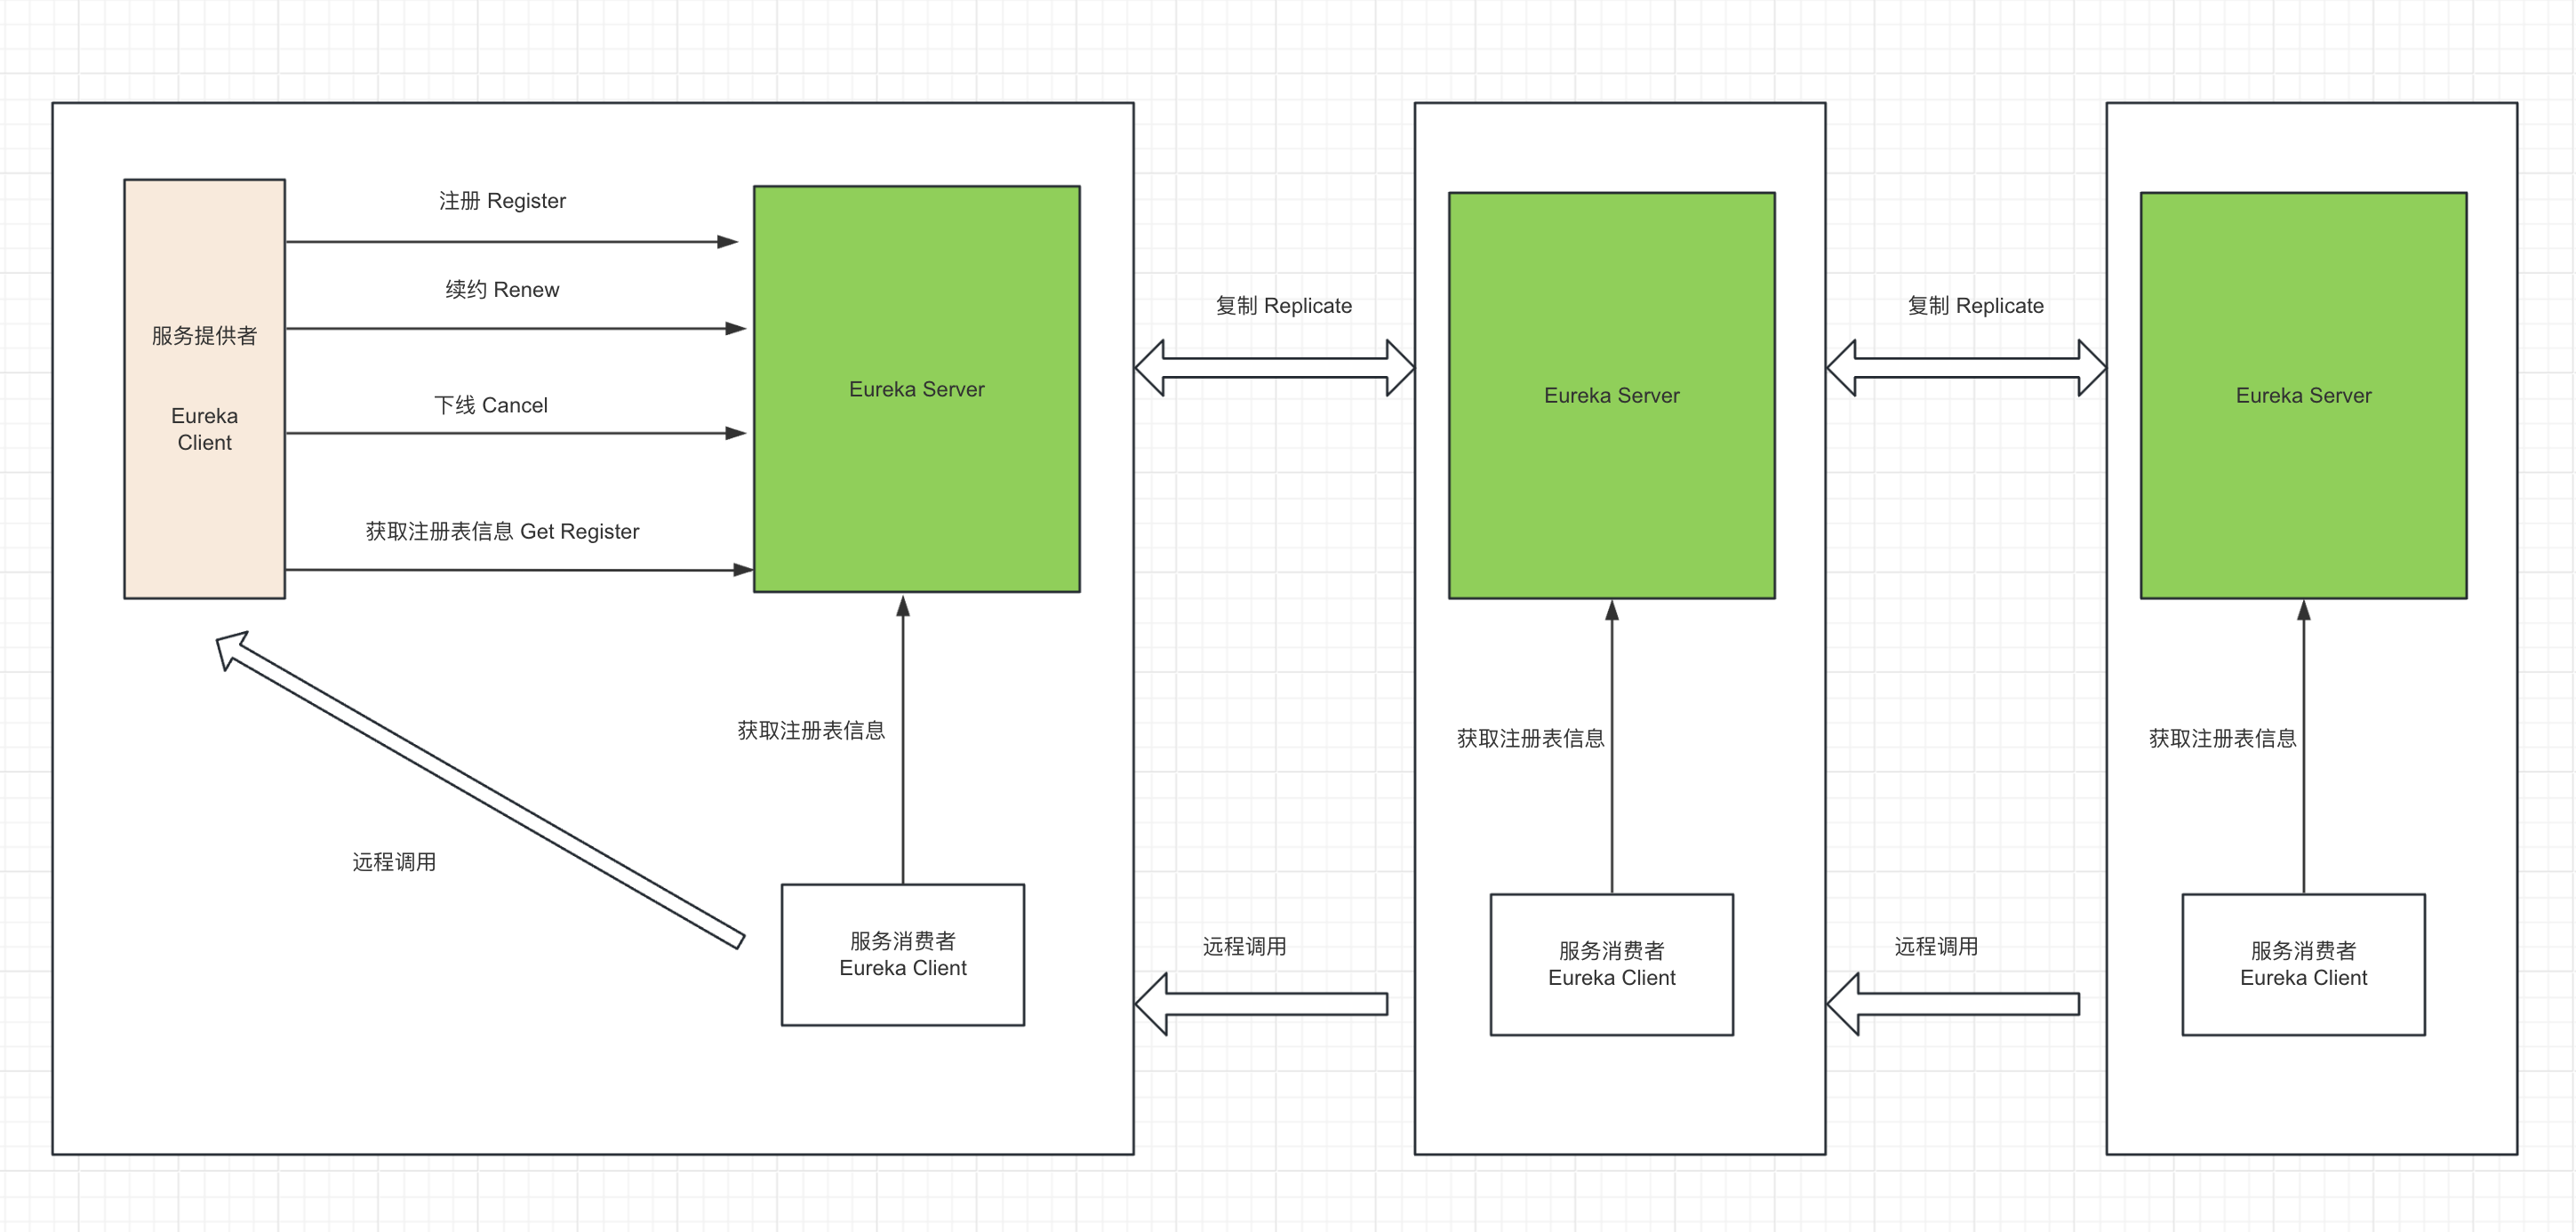
3. 详解
* 服务提供者:是一个eureka client,向Eureka Server注册和更新自己的信息,同时能从Eureka Server注册表中获取到其他服务的信息。
* 服务注册中心:提供服务注册和发现的功能。每个Eureka Cient向Eureka Server注册自己的信息,也可以通过Eureka Server获取到其他服务的信息达到发现和调用其他服务的目的。
* 服务消费者:是一个eureka client,通过Eureka Server获取注册到其上其他服务的信息,从而根据信息找到所需的服务发起远程调用。
* 同步复制:Eureka Server之间注册表信息的同步复制,使Eureka Server集群中不同注册表中服务实例信息保持一致。
* 远程调用:服务客户端之间的远程调用。
* 注册:Client端向Server端注册自身的元数据以供服务发现。
* 续约:通过发送心跳到Server以维持和更新注册表中服务实例元数据的有效性。当在一定时长内,Server没有收到Client的心跳信息,将默认服务下线,会把服务实例的信息从注册表中删除。
* 下线:Client在关闭时主动向Server注销服务实例元数据,这时Client的服务实例数据将从Server的注册表中删除。
* 获取注册表:Client向Server请求注册表信息,用于服务发现,从而发起服务间远程调用。
如果让我们自己做,该如何做 ?
客户端:
拉取注册表
从注册表选一个
调用
服务端:
写个web server。
功能:
1、定义注册表:
Map<name,Map<id,InstanceInfo>>。
2、别人可以向我注册自己的信息。
3、别人可以从我这里拉取他人的注册信息。
4、我和我的同类可以共享注册表。
eureka是用:jersey实现,也是个mvc框架。
我们可以自己写个spring boot web实现。
## Eureka 源码


### Eureka Client源码


1. eureka 接口
https://github.com/Netflix/eureka/wiki/Eureka-REST-operations
注意地址中的v2 是没有的。
查询所有实例信息:http://localhost:7900/eureka/apps
注册服务:http://localhost:7900/eureka/apps/{applicationName}
>
> Eureka Client工作流程图
>
>
>
2. 源码解读
下面的讲解按照顺序进行。
* spring boot项目引入eureka-client依赖,并注入spring 容器。
在spring-boot项目中pom文件里面添加的依赖中的bean。是如何注册到spring-boot项目的spring容器中的呢?spring.factories文件是帮助spring-boot项目包以外的bean(即在pom文件中添加依赖中的bean)注册到spring-boot项目的spring容器的。
由于@ComponentScan注解只能扫描spring-boot项目包内的bean并注册到spring容器中,因此需要@EnableAutoConfiguration(在SpringBootApplication下),注解来注册项目包外的bean。而spring.factories文件,则是用来记录项目包外需要注册的bean类名。点进去@SpringBootApplication注解,发现@EnableAutoConfiguration。点@EnableAutoConfiguration进去。
@Import(AutoConfigurationImportSelector.class)
public @interface EnableAutoConfiguration {
点AutoConfigurationImportSelector进去
发现下面代码
@Override
public String[] selectImports(AnnotationMetadata annotationMetadata) {
if (!isEnabled(annotationMetadata)) {
return NO_IMPORTS;
}
AutoConfigurationMetadata autoConfigurationMetadata = AutoConfigurationMetadataLoader
.loadMetadata(this.beanClassLoader);
AutoConfigurationEntry autoConfigurationEntry = getAutoConfigurationEntry(autoConfigurationMetadata,
annotationMetadata);
return StringUtils.toStringArray(autoConfigurationEntry.getConfigurations());
}
 此方法时,向spring ioc容器注入bean。selectImports,返回bean全名。import将bean全名注入。而注入的bean都是些什么呢?

 点:getAutoConfigurationEntry进去,有一句
List configurations = getCandidateConfigurations(annotationMetadata, attributes);
点getCandidateConfigurations进去:
List configurations = SpringFactoriesLoader.loadFactoryNames(getSpringFactoriesLoaderFactoryClass(),
getBeanClassLoader());
点SpringFactoriesLoader进去:
public static final String FACTORIES_RESOURCE_LOCATION = “META-INF/spring.factories”;
* 找eureka client 配置相关类
在api-listen-order(其他eureka client项目均可)项目中,找到
spring-cloud-netflix-eureka-client-2.1.2.RELEASE下META-INF下spring.factories。此文件中,有如下配置信息:
EurekaClientAutoConfiguration(Eureka client自动配置类,负责Eureka client中关键beans的配置和初始化),
RibbonEurekaAutoConfiguration(Ribbon负载均衡相关配置)
EurekaDiscoveryClientConfiguration(配置自动注册和应用的健康检查器)。
* EurekaDiscoveryClientConfiguration介绍
找到此类:org.springframework.cloud.netflix.eureka.EurekaDiscoveryClientConfiguration中的注解@ConditionalOnClass(EurekaClientConfig.class),
* EurekaClientConfig介绍
点击进去查看EurekaClientConfig是个接口,查看其实现类EurekaClientConfigBean。此类里封装了Eureka Client和Eureka Server交互所需要的配置信息。看此类代码:
public static final String PREFIX = “eureka.client”;
表示在配置文件中用eureka.client.属性名配置。
* Eureka 实例相关配置
从org.springframework.cloud.client.discovery.DiscoveryClient顶级接口入手,前面介绍过spring common。看其在Eureka中的实现类org.springframework.cloud.netflix.eureka.EurekaDiscoveryClient。有一个属性:
private final EurekaClient eurekaClient,查看其实现类:com.netflix.discovery.DiscoveryClient。
有一个属性:
private final ApplicationInfoManager applicationInfoManager(应用信息管理器,点进去此类,发现此类总有两个属性:
private InstanceInfo instanceInfo;
private EurekaInstanceConfig config;
服务实例的信息类InstanceInfo和服务实例配置信息类EurekaInstanceConfig)。
* InstanceInfo介绍
打开InstanceInfo里面有instanceId等服务实例信息。
InstanceInfo封装了将被发送到Eureka Server进行注册的服务实例元数据。它在Eureka Server列表中代表一个服务实例,其他服务可以通过instanceInfo了解到该服务的实例相关信息,包括地址等,从而发起请求。
* EurekaInstanceConfig介绍
EurekaInstanceConfig是个接口,找到它的实现类org.springframework.cloud.netflix.eureka.EurekaInstanceConfigBean。
此类封装了EurekaClient自身服务实例的配置信息,主要用于构建InstanceInfo。看到此类有一段代码:@ConfigurationProperties(“eureka.instance”),
在配置文件中用eureka.instance.属性配置。EurekaInstanceConfigBean提供了默认值。
* 通过EurekaInstanceConfig构建instanceInfo
在ApplicationInfoManager中有一个方法
public void initComponent(EurekaInstanceConfig config)中有一句:
this.instanceInfo = new EurekaConfigBasedInstanceInfoProvider(config).get();
通过EurekaInstanceConfig构造instanceInfo。
* 顶级接口DiscoveryClient介绍
介绍一下spring-cloud-commons-2.2.1.realease包下,org.springframework.cloud.client.discovery.DiscoveryClient接口。定义用来服务发现的客户端接口,是客户端进行服务发现的核心接口,是spring cloud用来进行服务发现的顶级接口,在common中可以看到其地位。在Netflix Eureka和Consul中都有具体的实现类。
org.springframework.cloud.client.discovery.DiscoveryClient的类注释:
Represents read operations commonly available to discovery services such as Netflix Eureka or consul.io。
代表通用于服务发现的读操作,例如在 eureka或consul中。
有
String description();//获取实现类的描述。
List getServices();//获取所有服务实例id。
List getInstances(String serviceId);//通过服务id查询服务实例信息列表。
* Eureka 的实现
接下来我们找Eureka的实现类。org.springframework.cloud.netflix.eureka.EurekaDiscoveryClient。
查看方法。
public List getInstances(String serviceId),
组合了com.netflix.discovery.EurekaClient来实现。
* EurekaClient的实现
EurekaClient有一个注解@ImplementedBy(DiscoveryClient.class),此类的默认实现类:com.netflix.discovery.DiscoveryClient。提供了:
服务注册到server方法register().
续约boolean renew().
下线public synchronized void shutdown().
查询服务列表 功能。
想想前面的图中client的功能。提供了于Eureka Server交互的关键逻辑。
* com.netflix.discovery.DiscoveryClient
com.netflix.discovery.DiscoveryClient实现了EurekaClient(继承了LookupService)
* com.netflix.discovery.shared.LookupService
LookupService作用:发现活跃的服务实例。
根据服务实例注册的appName来获取封装有相同appName的服务实例信息容器:
Application getApplication(String appName)。
获取所有的服务实例信息:
Applications getApplications();
根据实例id,获取服务实例信息:
List getInstancesById(String id);
上面提到一个Application,它持有服务实例信息列表。它是同一个服务的集群信息。比如api-passenger的所有服务信息,这些服务都在api-passenger服务名下面。
而instanceInfo代表一个服务实例的信息。为了保证原子性,比如对某个instanceInfo的操作,使用了大量同步的代码。比如下面代码:
public void addInstance(InstanceInfo i) {
instancesMap.put(i.getId(), i);
synchronized (instances) {
instances.remove(i);
instances.add(i);
isDirty = true;
}
}
Applications是注册表中,所有服务实例信息的集合。
* 健康检测器和事件监听器
EurekaClient在LookupService上做了扩充。提供了更丰富的获取服务实例的方法。按住不表。我们看一下另外两个方法:
public void registerHealthCheck(HealthCheckHandler healthCheckHandler),向client注册 健康检查处理器,client存在一个定时任务通过HealthCheckHandler检查当前client状态,当client状态发生变化时,将会触发新的注册事件,去更新eureka server的注册表中的服务实例信息。
通过HealthCheckHandler 实现应用状态检测。HealthCheckHandler的实现类org.springframework.cloud.netflix.eureka.EurekaHealthCheckHandler,看其构造函数:
public EurekaHealthCheckHandler(HealthAggregator healthAggregator) {
Assert.notNull(healthAggregator, “HealthAggregator must not be null”);
this.healthIndicator = new CompositeHealthIndicator(healthAggregator);
}
private final CompositeHealthIndicator healthIndicator;此类事属于org.springframework.boot.actuate.health包下,可以得出,是通过actuator来实现对应用的检测的。
public void registerEventListener(EurekaEventListener eventListener)注册事件监听器,当实例信息有变时,触发对应的处理事件。
* 找到com.netflix.discovery.DiscoveryClient
在api-listen-order项目中,找到spring-cloud-netflix-eureka-client-2.1.2.RELEASE下META-INF下spring.factories。此文件中org.springframework.cloud.bootstrap.BootstrapConfiguration=
org.springframework.cloud.netflix.eureka.config.EurekaDiscoveryClientConfigServiceBootstrapConfiguration,此类有个注解:
@Import({ EurekaDiscoveryClientConfiguration.class, // this emulates
// @EnableDiscoveryClient, the import
// selector doesn’t run before the
// bootstrap phase
EurekaClientAutoConfiguration.class })
注解中有个类: EurekaClientAutoConfiguration,此类中有如下代码:
CloudEurekaClient cloudEurekaClient = new CloudEurekaClient(appManager,
config, this.optionalArgs, this.context);
(debug可以调试到)
通过CloudEurekaClient找到:public class CloudEurekaClient extends DiscoveryClient。
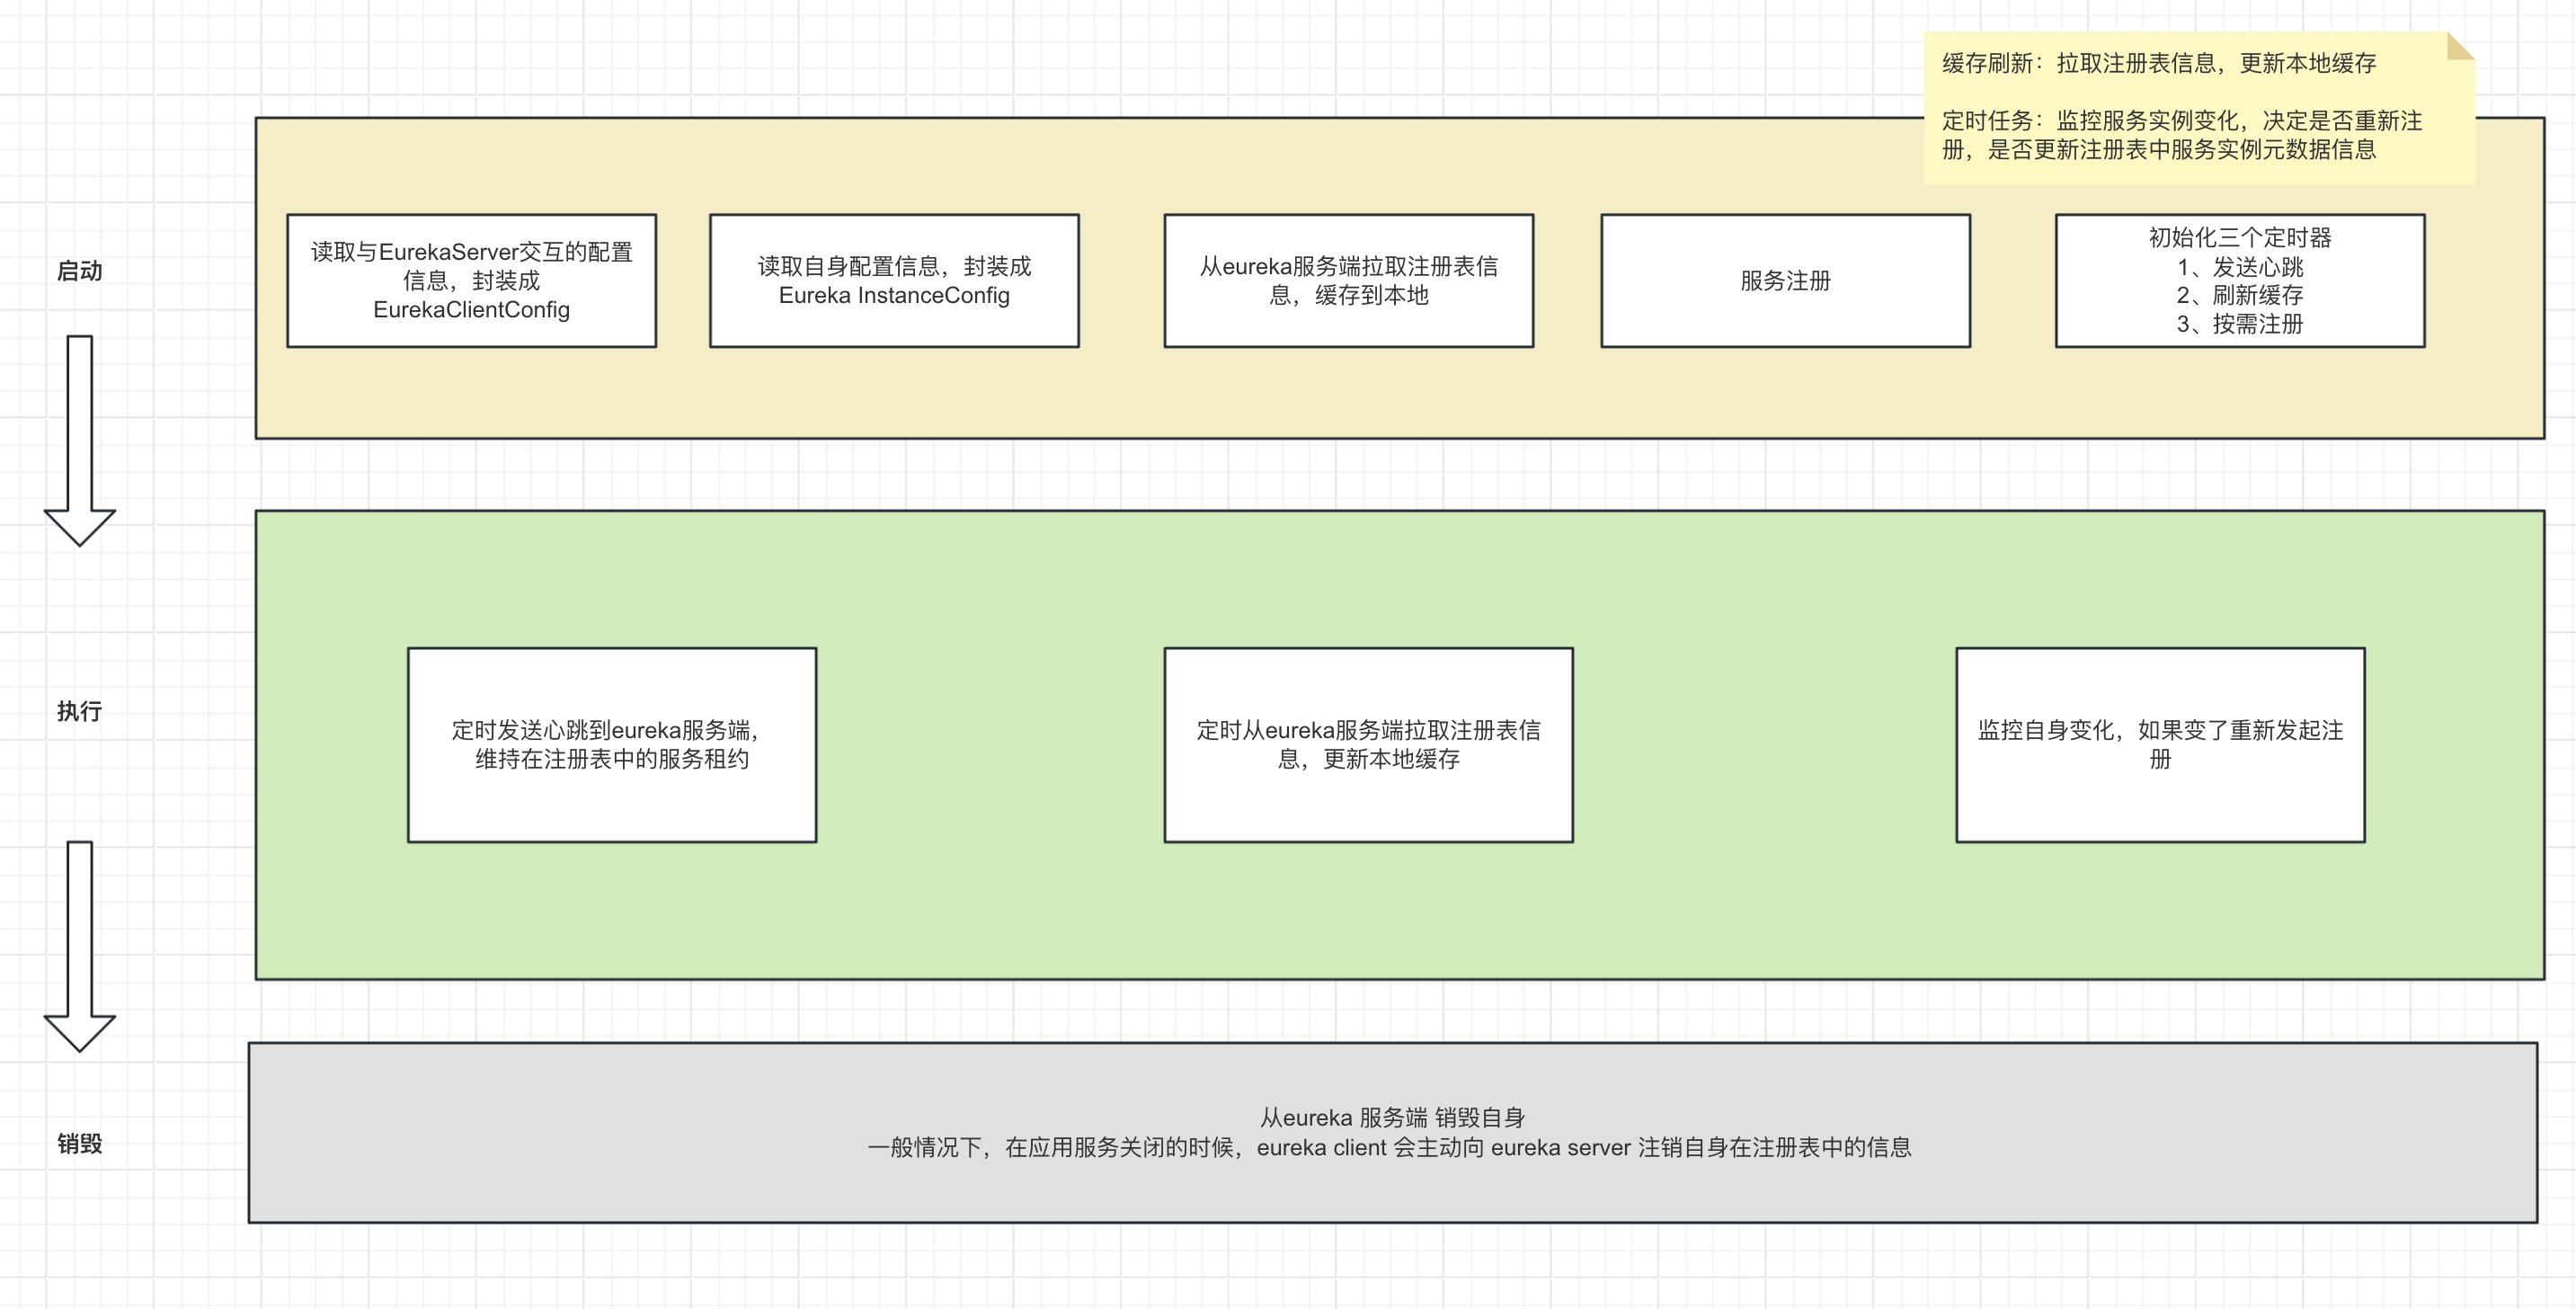
* com.netflix.discovery.DiscoveryClient构造函数-不注册不拉取
DiscoveryClient的构造函数:
DiscoveryClient(ApplicationInfoManager applicationInfoManager, EurekaClientConfig config, AbstractDiscoveryClientOptionalArgs args,Provider backupRegistryProvider, EndpointRandomizer endpointRandomizer)
此方法中依次执行了 从eureka server中拉取注册表,服务注册,初始化发送心跳,缓存刷新(定时拉取注册表信息),按需注册定时任务等,贯穿了Eureka Client启动阶段的各项工作。
构造函数353行:
if (config.shouldFetchRegistry()) {
this.registryStalenessMonitor = new ThresholdLevelsMetric(this, METRIC_REGISTRY_PREFIX + “lastUpdateSec_”, new long[]{15L, 30L, 60L, 120L, 240L, 480L});
} else {
this.registryStalenessMonitor = ThresholdLevelsMetric.NO_OP_METRIC;
}
shouldFetchRegistry,点其实现类EurekaClientConfigBean,找到它其实对应于:eureka.client.fetch-register,true:表示client从server拉取注册表信息。
下面:
if (config.shouldRegisterWithEureka()) {
this.heartbeatStalenessMonitor = new ThresholdLevelsMetric(this, METRIC_REGISTRATION_PREFIX + “lastHeartbeatSec_”, new long[]{15L, 30L, 60L, 120L, 240L, 480L});
} else {
this.heartbeatStalenessMonitor = ThresholdLevelsMetric.NO_OP_METRIC;
}
shouldRegisterWithEureka,点其实现类EurekaClientConfigBean,找到它其实对应于:
eureka.client.register-with-eureka:true:表示client将注册到server。
if (!config.shouldRegisterWithEureka() && !config.shouldFetchRegistry()) {
如果以上两个都为false,则直接返回,构造方法执行结束,既不服务注册,也不服务发现。
* com.netflix.discovery.DiscoveryClient构造函数-两个定时任务
顺着上面代码往下看:
scheduler = Executors.newScheduledThreadPool(2,
new ThreadFactoryBuilder()
.setNameFormat(“DiscoveryClient-%d”)
.setDaemon(true)
.build());
定义了一个基于线程池的定时器线程池,大小为2。
往下:
heartbeatExecutor:用于发送心跳,
cacheRefreshExecutor:用于刷新缓存。
* com.netflix.discovery.DiscoveryClient构造函数-client和server交互的Jersey客户端
接着构建eurekaTransport = new EurekaTransport();它是eureka Client和eureka server进行http交互jersey客户端。点开EurekaTransport,看到许多httpclient相关的属性。
* com.netflix.discovery.DiscoveryClient构造函数-拉取注册信息
if (clientConfig.shouldFetchRegistry() && !fetchRegistry(false)) {
fetchRegistryFromBackup();
}
如果判断的前部分为true,执行后半部分fetchRegistry。此时会从eureka server拉取注册表中的信息,将注册表缓存到本地,可以就近获取其他服务信息,减少于server的交互。
* com.netflix.discovery.DiscoveryClient构造函数-服务注册
if (clientConfig.shouldRegisterWithEureka() && clientConfig.shouldEnforceRegistrationAtInit()) {
try {
if (!register() ) {
throw new IllegalStateException(“Registration error at startup. Invalid server response.”);
}
} catch (Throwable th) {
logger.error(“Registration error at startup: {}”, th.getMessage());
throw new IllegalStateException(th);
}
}注册失败抛异常。
* com.netflix.discovery.DiscoveryClient构造函数-启动定时任务
在构造方法的最后initScheduledTasks();此方法中,启动3个定时任务。方法内有statusChangeListener,按需注册是一个事件StatusChangeEvent,状态改变,则向server注册。
* com.netflix.discovery.DiscoveryClient构造函数-总结
总结DiscoveryClient构造关键过程:
初始化一堆信息。
从拉取注册表信息。
向server注册自己。
初始化3个任务。
详细后面继续讲。源码就是这样,得层层拨开。
* 拉取注册表信息详解
上面的fetchRegistry(false),点进去,看注释:
// If the delta is disabled or if it is the first time, get all applications。
如果增量式拉取被禁止或第一次拉取注册表,则进行全量拉取:getAndStoreFullRegistry()。
否则进行增量拉取注册表信息getAndUpdateDelta(applications)。
一般情况,在Eureka client第一次启动,会进行全量拉取。之后的拉取都尽量尝试只进行增量拉取。
拉取服务注册表:
全量拉取:getAndStoreFullRegistry();
增量拉取:getAndUpdateDelta(applications);
* 全量拉取
进入getAndStoreFullRegistry() 方法,有一方法:eurekaTransport.queryClient.getApplications。
通过debug发现 实现类是AbstractJerseyEurekaHttpClient,点开,debug出
webResource地址为:http://root:root@eureka-7900:7900/eureka/apps/,此端点用于获取server中所有的注册表信息。
getAndStoreFullRegistry()可能被多个线程同时调用,导致新拉取的注册表被旧的覆盖(如果新拉取的动作设置apps阻塞的情况下)。
此时用了AutomicLong来进行版本管理,如果更新时版本不一致,不保存apps。
通过这个判断fetchRegistryGeneration.compareAndSet(currentUpdateGeneration, currentUpdateGeneration + 1),如果版本一致,并设置新版本(+1),
接着执行localRegionApps.set(this.filterAndShuffle(apps));过滤并洗牌apps。点开this.filterAndShuffle(apps)实现,继续点apps.shuffleAndIndexInstances,继续点shuffleInstances,继续点application.shuffleAndStoreInstances,继续点_shuffleAndStoreInstances,发现if (filterUpInstances && InstanceStatus.UP != instanceInfo.getStatus())。只保留状态为UP的服务。
* 增量拉取
回到刚才的fetchRegistry方法中,getAndUpdateDelta,增量拉取。通过getDelta方法,看到实际拉取的地址是:apps/delta,如果获取到的delta为空,则全量拉取。
通常来讲是3分钟之内注册表的信息变化(在server端判断),获取到delta后,会更新本地注册表。
增量式拉取是为了维护client和server端 注册表的一致性,防止本地数据过久,而失效,采用增量式拉取的方式,减少了client和server的通信量。
client有一个注册表缓存刷新定时器,专门负责维护两者之间的信息同步,但是当增量出现意外时,定时器将执行,全量拉取以更新本地缓存信息。更新本地注册表方法updateDelta,有一个细节。
if (ActionType.ADDED.equals(instance.getActionType())) ,public enum ActionType {
ADDED, // Added in the discovery server
MODIFIED, // Changed in the discovery server
DELETED
// Deleted from the discovery server
},
在InstanceInfo instance中有一个instance.getActionType(),ADDED和MODIFIED状态的将更新本地注册表applications.addApplication,DELETED将从本地剔除掉existingApp.removeInstance(instance)。
* 服务注册
好了拉取完eureka server中的注册表了,接着进行服务注册。回到DiscoveryClient构造函数。
拉取fetchRegistry完后进行register注册。由于构造函数开始时已经将服务实例元数据封装好了instanceInfo,所以此处之间向server发送instanceInfo,
通过方法httpResponse = eurekaTransport.registrationClient.register(instanceInfo);看到String urlPath = “apps/” + info.getAppName();又是一个server端点,退上去f7,httpResponse.getStatusCode() == Status.NO_CONTENT.getStatusCode();204状态码,则注册成功。
* 初始化3个定时任务
接着
// finally, init the schedule tasks (e.g. cluster resolvers, heartbeat, instanceInfo replicator, fetch
initScheduledTasks();看注释初始化3个定时任务。
题外话:
client会定时向server发送心跳,维持自己服务租约的有效性,用心跳定时任务实现;
而server中会有不同的服务实例注册进来,一进一出,就需要数据的同步。所以client需要定时从server拉取注册表信息,用缓存定时任务实现;
client如果有变化,也会及时更新server中自己的信息,用按需注册定时任务实现。
就是这三个定时任务。
进 initScheduledTasks()方法中,clientConfig.shouldFetchRegistry(),
从server拉取注册表信息。
int registryFetchIntervalSeconds = clientConfig.getRegistryFetchIntervalSeconds()拉取的时间间隔,eureka.client.registry-fetch-interval-seconds进行设置。
int renewalIntervalInSecs = nstanceInfo.getLeaseInfo().getRenewalIntervalInSecs();心跳定时器,默认30秒。
心跳定时任务和缓存刷新定时任务是有scheduler 的 schedule提交的,鼠标放到scheduler上,看到一句话 A scheduler to be used for the following 3 tasks:- updating service urls- scheduling a TimedSuperVisorTask。
知道循环逻辑是由TimedSuperVisorTask实现的。
new TimedSupervisorTask(
“heartbeat”,
scheduler,
heartbeatExecutor,
renewalIntervalInSecs,
TimeUnit.SECONDS,
expBackOffBound,
new HeartbeatThread()看到HeartbeatThread线程。
点进去public void run() {
if (renew()) {
lastSuccessfulHeartbeatTimestamp = System.currentTimeMillis();
}
}
里面是renew()方法。
scheduler.schedule(
new TimedSupervisorTask(
“cacheRefresh”,
scheduler,
cacheRefreshExecutor,
registryFetchIntervalSeconds,
TimeUnit.SECONDS,
expBackOffBound,
new CacheRefreshThread()
),
看到CacheRefreshThread,进去,发现 class CacheRefreshThread implements Runnable {
public void run() {
refreshRegistry();
}
}是用的refreshRegistry,进去发现fetchRegistry。回到原来讲过的地方。
boolean renew() {
EurekaHttpResponse httpResponse;
try {
httpResponse = eurekaTransport.registrationClient.sendHeartBeat(instanceInfo.getAppName(), instanceInfo.getId(), instanceInfo, null);
logger.debug(PREFIX + “{} - Heartbeat status: {}”, appPathIdentifier, httpResponse.getStatusCode());
if (httpResponse.getStatusCode() == Status.NOT_FOUND.getStatusCode()) {
REREGISTER_COUNTER.increment();
logger.info(PREFIX + “{} - Re-registering apps/{}”, appPathIdentifier, instanceInfo.getAppName());
long timestamp = instanceInfo.setIsDirtyWithTime();
boolean success = register();
if (success) {
instanceInfo.unsetIsDirty(timestamp);
}
return success;
}
return httpResponse.getStatusCode() == Status.OK.getStatusCode();
} catch (Throwable e) {
logger.error(PREFIX + “{} - was unable to send heartbeat!”, appPathIdentifier, e);
return false;
}
}看到如果遇到404,server没有此实例,则重新发起注册。如果续约成功返回 200.
点sendHeartBeat进去String urlPath = “apps/” + appName + ‘/’ + id;
还有一个定时任务,按需注册。当instanceinfo和status发生变化时,需要向server同步,去更新自己在server中的实例信息。保证server注册表中服务实例信息的有效和可用。
// InstanceInfo replicator
instanceInfoReplicator = new InstanceInfoReplicator(
this,
instanceInfo,
clientConfig.getInstanceInfoReplicationIntervalSeconds(),
2); // burstSize
      statusChangeListener = new ApplicationInfoManager.StatusChangeListener() {
          @Override
          public String getId() {
              return "statusChangeListener";
          }

       @Override
          public void notify(StatusChangeEvent statusChangeEvent) {
              if (InstanceStatus.DOWN == statusChangeEvent.getStatus() ||
                      InstanceStatus.DOWN == statusChangeEvent.getPreviousStatus()) {
                  // log at warn level if DOWN was involved
                  logger.warn("Saw local status change event {}", statusChangeEvent);
              } else {
                  logger.info("Saw local status change event {}", statusChangeEvent);
              }
              instanceInfoReplicator.onDemandUpdate();
          }
      };
      if (clientConfig.shouldOnDemandUpdateStatusChange()) {
          applicationInfoManager.registerStatusChangeListener(statusChangeListener);
      }
  instanceInfoReplicator.start(clientConfig.getInitialInstanceInfoReplicationIntervalSeconds());

网上学习资料一大堆,但如果学到的知识不成体系,遇到问题时只是浅尝辄止,不再深入研究,那么很难做到真正的技术提升。
一个人可以走的很快,但一群人才能走的更远!不论你是正从事IT行业的老鸟或是对IT行业感兴趣的新人,都欢迎加入我们的的圈子(技术交流、学习资源、职场吐槽、大厂内推、面试辅导),让我们一起学习成长!
event {}", statusChangeEvent);
} else {
logger.info(“Saw local status change event {}”, statusChangeEvent);
}
instanceInfoReplicator.onDemandUpdate();
}
};
if (clientConfig.shouldOnDemandUpdateStatusChange()) {
applicationInfoManager.registerStatusChangeListener(statusChangeListener);
}
instanceInfoReplicator.start(clientConfig.getInitialInstanceInfoReplicationIntervalSeconds());
[外链图片转存中…(img-qRDym0Zq-1715667579345)]
[外链图片转存中…(img-stM2A9IT-1715667579345)]
网上学习资料一大堆,但如果学到的知识不成体系,遇到问题时只是浅尝辄止,不再深入研究,那么很难做到真正的技术提升。
一个人可以走的很快,但一群人才能走的更远!不论你是正从事IT行业的老鸟或是对IT行业感兴趣的新人,都欢迎加入我们的的圈子(技术交流、学习资源、职场吐槽、大厂内推、面试辅导),让我们一起学习成长!


 1527
1527


 被折叠的 条评论
为什么被折叠?
被折叠的 条评论
为什么被折叠?
 到【灌水乐园】发言


