


end
以上面这种方式就可以实现切换三个板块了。
三、ListView添加列表项并设置列表点击事件
我们可以看到效果图里面每个板块下面有对应的列表,它是使用Cocos2d-x UI中的ListView所呈现的。
笔者感觉使用ListView比较麻烦,这里笔者给出相应的使用方法供大家参考:
–首先我们为ListView提供三组数据
– 初始化三组数据
local array = {}
for i = 1, 20 do
array[i] = string.format(“请叫我巫大大%d”, i - 1)
end
local array1 = {}
for i = 1, 20 do
array1[i] = string.format(“公会开放啦%d”, i - 1 )
end
local array2 = {}
for i = 1, 20 do
array2[i] = string.format(“私聊列表项%d”, i - 1 )
end
–设置默认模型
– 创建模型
local default_button = ccui.Button:create(“cocosui/backtotoppressed.png”, “cocosui/backtotopnormal.png”)
default_button:setName(“Title Button”)
– 创建默认item
local default_itme = ccui.Layout:create()
default_itme:setTouchEnabled(true)
default_itme:setContentSize(default_button:getContentSize())
default_button:setPosition(cc.p( default_itme:getContentSize().width / 2.0, default_itme:getContentSize().height / 2.0 ))
default_itme:addChild(default_button)
– 设置模型
worldList:setItemModel(default_itme)
–添加自定义项
– 获得数组的大小
local count = table.getn(array)
print(“count:”…count)
– 添加自定义item
for i = 1, count do
– 创建一个Button
local custom_button = ccui.Button:create(“cocosui/button.png”, “cocosui/buttonHighlighted.png”)
– 设置Button名字
custom_button:setName(“Title Button”)
– 设置按钮使用九宫(scale9)渲染器进行渲染
custom_button:setScale9Enabled(true)
– 设置内容尺寸
custom_button:setContentSize(default_button:getContentSize())
– 创建一个布局
local custom_item = ccui.Layout:create()
– 设置内容大小
custom_item:setContentSize(custom_button:getContentSize())
– 设置位置
custom_button:setPosition(cc.p(custom_item:getContentSize().width / 2.0, custom_item:getContentSize().height / 2.0))
– 往布局中添加一个按钮
custom_item:addChild(custom_button)
– 往ListView中添加一个布局
worldList:addChild(custom_item)
end
–每一项数据
– 设置item data
items_count = table.getn(worldList:getItems())
for i = 1, items_count do
– 返回一个索引和参数相同的项.
local item = worldList:getItem( i - 1 )
local button = item:getChildByName(“Title Button”)
local index = worldList:getIndex(item)
button:setTitleText(array[index + 1])
end
–设置ListView的点击事件和滚动事件
– 设置ListView的监听事件
worldList:addScrollViewEventListener(scrollViewEvent)
worldList:addEventListener(listViewEvent)
– ListView点击事件回调
local function listViewEvent(sender, eventType)
– 事件类型为点击结束
if eventType == ccui.ListViewEventType.ONSELECTEDITEM_END then
print("select child index = ",sender:getCurSelectedIndex())
if dialog:isVisible() == true then
dialog:setVisible(false)
else
ChatScene.showDialog()
end
end
end
– 滚动事件方法回调
local function scrollViewEvent(sender, eventType)
– 滚动到底部
if eventType == ccui.ScrollviewEventType.scrollToBottom then
print(“SCROLL_TO_BOTTOM”)
– 滚动到顶部
elseif eventType == ccui.ScrollviewEventType.scrollToTop then
print(“SCROLL_TO_TOP”)
end
end
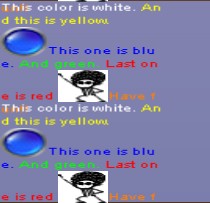
四、 富文本实现(可显示颜色文字和图片、动画)
何为富文本?笔者的理解是有着丰富文本的展示方式,比如可以展示颜色文本、图片、动画、还有超链接的这种就叫富文本。以前旧的版本Cocos2d-x可能并未提供这方面的支持,至于是哪个版本支持的笔者也没有去深究,笔者这里使用版本是Cocos2d-x 3.2,它就提供了类似富文本的类,满足基本的需求。
代码实现:
–[[
==================
RichText
富文本
=================
]]–
function ChatScene.RichText()
local richText = ccui.RichText:create()
richText:ignoreContentAdaptWithSize(false)
richText:setContentSize(cc.size(100, 100))
local re1 = ccui.RichElementText:create( 1, cc.c3b(255, 255, 255), 255, "This color is white. ", “Helvetica”, 10 )
local re2 = ccui.RichElementText:create( 2, cc.c3b(255, 255, 0), 255, "And this is yellow. ", “Helvetica”, 10 )
local re3 = ccui.RichElementText:create( 3, cc.c3b(0, 0, 255), 255, "This one is blue. ", “Helvetica”, 10 )
local re4 = ccui.RichElementText:create( 4, cc.c3b(0, 255, 0), 255, "And green. ", “Helvetica”, 10 )
local re5 = ccui.RichElementText:create( 5, cc.c3b(255, 0, 0), 255, "Last one is red ", “Helvetica”, 10 )
local reimg = ccui.RichElementImage:create( 6, cc.c3b(255, 255, 255), 255, “cocosui/sliderballnormal.png” )
– 添加ArmatureFileInfo, 由ArmatureDataManager管理
ccs.ArmatureDataManager:getInstance():addArmatureFileInfo( “cocosui/100/100.ExportJson” )
local arr = ccs.Armature:create( “100” )
arr:getAnimation():play( “Animation1” )
local recustom = ccui.RichElementCustomNode:create( 1, cc.c3b(255, 255, 255), 255, arr )
local re6 = ccui.RichElementText:create( 7, cc.c3b(255, 127, 0), 255, "Have fun!! ", “Helvetica”, 10 )
richText:pushBackElement(re1)
richText:insertElement(re2, 1)
richText:pushBackElement(re3)
richText:pushBackElement(re4)
richText:pushBackElement(re5)
richText:insertElement(reimg, 2)
richText:pushBackElement(recustom)
richText:pushBackElement(re6)
richText:setLocalZOrder(10)
return richText
end
五、文本输入框实现(解决pc键盘无法删除字符的bug)
CocostudioUI编辑器提供TextField(输入框),笔者在这里也对它进行了实现,聊天系统一般需要玩家输入信息,所以这里提供了一个输入框。但笔者在使用这个UI的时候,发现在win32平台不能对输入的文本进行删除,但在移动设备可以使用输入法对它进行编辑,所以笔者在这里做了相关的处理把这个bug修正了。
— 键盘事件监听回调方法
local function onkeyPressed(keycode, event)
print(“keypress”)
if keycode == cc.KeyCode.KEY_BACKSPACE then
local str = inputBox:getStringValue()
str = string.sub( str, 0, string.len( str ) - 1 )
inputBox:setText( str )
end
end
– 键盘监听事件
local keyListener = cc.EventListenerKeyboard:create()
keyListener:registerScriptHandler(onkeyPressed,cc.Handler.EVENT_KEYBOARD_PRESSED)
local eventDispatcher = ChatScene.uiLayer:getEventDispatcher()
eventDispatcher:addEventListenerWithSceneGraphPriority(keyListener, ChatScene.uiLayer)
通过以上方式,我们就可以使用简拼的BackSpace对字符进行删除了。大家请叫我活雷锋。
六、动态往ListView添加列表项
笔者想到聊天系统的列表是不断刷新的,所以可能需要实现动态添加列表项,其实这个实现很简单的,只需要在代码中监听相应的事件,然后往ListView添加一项就可以了。
这里我监听了发送按钮的点击事件,然后获取到输入框的文本,在把文本添加到列表项中去。
if sender:getTag() == TAG_SEND_BUTTON then
print(“sendText…”)
– 获得输入框的文本
local value = inputBox:getStringValue()
local textView = ccui.Text:create(value,“Arial”,20)
print(“value:”…value)
if eventType == ccui.TouchEventType.began then
– local custom_text = ChatScene.RichText()
local custom_item = ccui.Layout:create()
custom_item:setContentSize( textView:getContentSize() )
textView:setPosition( cc.p( custom_item:getContentSize().width / 2.0, custom_item:getContentSize().height / 2.0 ) )
custom_item:addChild( textView )
– 如果当前Tag为世界
if ChatScene.getCurrentTag() == TAG_WORLD then
– 插入自定义项
worldList:insertCustomItem( custom_item, 0 )
– worldList:addChild(custom_item)
elseif ChatScene.getCurrentTag() == TAG_PARTY then
– partyList:addChild(custom_item)
partyList:insertCustomItem( custom_item, 0 )
elseif ChatScene.getCurrentTag() == TAG_CHAT then
– chatList:addChild(custom_item)
chatList:insertCustomItem( custom_item, 0 )
end
end
以上基本是笔者这个聊天系统的重要内容,下面把完整的实现代码给大家:
–[[
===============
ChatSence
聊天系统模块
===============
]]–
– 类
local ChatScene = {}
ChatScene.uiLayer = nil
ChatScene.widget = nil
– 窗口大小
local winSize = nil
– 获得UI界面上的3个按钮
local worldButton = nil
local partyButton = nil
local chatButton = nil
– 获得三个每个按钮对应的三个面板
local wordPanel = nil
local partyPanel = nil
local chatPanel = nil
– 获得每个面板的ListView
local worldList = nil
local partyList = nil
local chatList = nil
– 列表项
local listview_item = nil
local head_icon = nil
local level = nil
local name = nil
local text = nil
– 列表项个数
local items_count = nil
– 获得输入框
local inputBox = nil
local sendButton = nil
– 弹出对话框
local dialog = nil
local chat = nil
local lahei = nil
local closeButton = nil
– 三个标记
local flag = nil
local TAG_WORLD = 1 – 标识世界
local TAG_PARTY = 2 – 标识公会
local TAG_CHAT = 3 – 标识私聊
– 一些按钮的Tag
local TAG_WORLD_BUTTON = 1
local TAG_PARTY_BUTTON = 2
local TAG_CHAT_BUTTON = 3
local TAG_SEND_BUTTON = 4
local TAG_CHAT_BUTTON2 = 5
local TAG_LAHEI_BUTTON = 6
local TAG_CLOSE_BUTTON = 7
– 场景创建
ChatScene.create = function()
local scene = cc.Scene:create()
scene:addChild( ChatScene.createChatLayer() )
return scene
end
–[[
touchEvent
触摸事件回调方法
]]–
local function touchEvent( sender, eventType )
if sender:getTag() == TAG_WORLD_BUTTON then
wordPanel:setVisible(true)
partyPanel:setVisible(false)
chatPanel:setVisible(false)
dialog:setVisible(false)
ChatScene.setCurrentTag( TAG_WORLD )
elseif sender:getTag() == TAG_PARTY_BUTTON then
partyPanel:setVisible(true)
wordPanel:setVisible(false)
chatPanel:setVisible(false)
dialog:setVisible(false)
ChatScene.setCurrentTag( TAG_PARTY )
elseif sender:getTag() == TAG_CHAT_BUTTON then
partyPanel:setVisible(false)
wordPanel:setVisible(false)
chatPanel:setVisible(true)
dialog:setVisible(false)
ChatScene.setCurrentTag( TAG_CHAT )
elseif sender:getTag() == TAG_SEND_BUTTON then
print(“sendText…”)
– 获得输入框的文本
local value = inputBox:getStringValue()
local textView = ccui.Text:create(value,“Arial”,20)
print(“value:”…value)
if eventType == ccui.TouchEventType.began then
– local custom_text = ChatScene.RichText()
local custom_item = ccui.Layout:create()
custom_item:setContentSize( textView:getContentSize() )
textView:setPosition( cc.p( custom_item:getContentSize().width / 2.0, custom_item:getContentSize().height / 2.0 ) )
custom_item:addChild( textView )
– 如果当前Tag为世界
if ChatScene.getCurrentTag() == TAG_WORLD then
– 插入自定义项
worldList:insertCustomItem( custom_item, 0 )
– worldList:addChild(custom_item)
elseif ChatScene.getCurrentTag() == TAG_PARTY then
– partyList:addChild(custom_item)
partyList:insertCustomItem( custom_item, 0 )
elseif ChatScene.getCurrentTag() == TAG_CHAT then
– chatList:addChild(custom_item)
chatList:insertCustomItem( custom_item, 0 )
end
end
elseif sender:getTag() == TAG_CHAT_BUTTON2 then
partyPanel:setVisible(false)
wordPanel:setVisible(false)
chatPanel:setVisible(true)
dialog:setVisible(false)
elseif sender:getTag() == TAG_LAHEI_BUTTON then
print(“我就把你拉黑,逗比”)
elseif sender:getTag() == TAG_CLOSE_BUTTON then
dialog:setVisible(false)
elseif sender:getTag() == 8 then
if eventType == ccui.TouchEventType.ended then
ChatScene.widget:setVisible( not ChatScene.widget:isVisible() )
end
end
end
local function onExit(strEventName)
ChatScene.uiLayer:release()
ChatScene.uiLayer = nil
end
–[[
=================
addOpenButton
添加一个打开的按钮
=================
]]–
function ChatScene.addOpenButton()
local openButton = ccui.Button:create() – 创建一个按钮
openButton:setTouchEnabled(true)-- 设置可触摸
openButton:loadTextures( “cocosui/animationbuttonnormal.png”, “cocosui/animationbuttonpressed.png”, “” )–加载纹理
openButton:setAnchorPoint( cc.p( 0, 0 ) )
openButton:setPosition( cc.p( winSize.width -100, winSize.height - 50 ) )
ChatScene.uiLayer:addChild(openButton, 1)
openButton:setTag(8)
openButton:addTouchEventListener(touchEvent)
end
–[[
==============
textFieldEvent
输入框监听事件回调方法
==============
]]–
local function textFieldEvent(sender, eventType)
if eventType == ccui.TextFiledEventType.attach_with_ime then
print(“attach_with_ime”)
elseif eventType == ccui.TextFiledEventType.detach_with_ime then
print(“detach_with_ime”)
elseif eventType == ccui.TextFiledEventType.insert_text then
print(“insert_text”)
elseif eventType == ccui.TextFiledEventType.delete_backward then
print(“delete_backward”)
end
end
– ListView点击事件回调
local function listViewEvent(sender, eventType)
– 事件类型为点击结束
if eventType == ccui.ListViewEventType.ONSELECTEDITEM_END then
print("select child index = ",sender:getCurSelectedIndex())
if dialog:isVisible() == true then
dialog:setVisible(false)
else
ChatScene.showDialog()
end
end
end
– 滚动事件方法回调
local function scrollViewEvent(sender, eventType)
– 滚动到底部
if eventType == ccui.ScrollviewEventType.scrollToBottom then
print(“SCROLL_TO_BOTTOM”)
– 滚动到顶部
elseif eventType == ccui.ScrollviewEventType.scrollToTop then
print(“SCROLL_TO_TOP”)
end
end
–[[
====================
createChatLayer
创建聊天层
====================
]]–
function ChatScene.createChatLayer()
ChatScene.uiLayer = cc.Layer:create()-- 创建ui层
print(“getReferenceCount1:”…ChatScene.uiLayer:getReferenceCount())
winSize = cc.Director:getInstance():getWinSize()-- 获得屏幕大小
ChatScene.setCurrentTag(TAG_WORLD)
ChatScene.addOpenButton()
ChatScene.findViews()
ChatScene.setTouchEnabled()
ChatScene.setTags()
ChatScene.addTouchEventListener()
– 初始化三组数据
local array = {}
for i = 1, 20 do
array[i] = string.format(“请叫我巫大大%d”, i - 1)
end
local array1 = {}
for i = 1, 20 do
array1[i] = string.format(“公会开放啦%d”, i - 1 )
end
local array2 = {}
for i = 1, 20 do
array2[i] = string.format(“私聊列表项%d”, i - 1 )
end
– 创建模型
local default_button = ccui.Button:create(“cocosui/backtotoppressed.png”, “cocosui/backtotopnormal.png”)
default_button:setName(“Title Button”)
– 创建默认item
local default_itme = ccui.Layout:create()
default_itme:setTouchEnabled(true)
default_itme:setContentSize(default_button:getContentSize())
default_button:setPosition(cc.p( default_itme:getContentSize().width / 2.0, default_itme:getContentSize().height / 2.0 ))
default_itme:addChild(default_button)
– 设置模型
worldList:setItemModel(default_itme)
– 这里是5项
– for i = 1, math.floor( count / 4 ) do
– print(“i:”…i)
– – 压栈一个默认项(通过克隆创建的)进listView.
– worldList:pushBackDefaultItem()
– end
–
– – 插入默认项
– for i = 1, math.floor( count / 4 ) do
– – 插入一个默认项(通过克隆创建的)进listView.
– worldList:insertDefaultItem(0)
– end
–使用cleanup清空容器(container)中的所有子节点(children)
– worldList:removeAllChildren()
– local testSprite = cc.Sprite:create(“cocosui/backtotoppressed.png”)
– testSprite:setPosition(cc.p(200,200))
– worldList:addChild(testSprite)
– 获得数组的大小
local count = table.getn(array)
print(“count:”…count)
– 添加自定义item
for i = 1, count do
– 创建一个Button
local custom_button = ccui.Button:create(“cocosui/button.png”, “cocosui/buttonHighlighted.png”)
– 设置Button名字
custom_button:setName(“Title Button”)
– 设置按钮使用九宫(scale9)渲染器进行渲染
custom_button:setScale9Enabled(true)
– 设置内容尺寸
custom_button:setContentSize(default_button:getContentSize())
– 创建一个布局
local custom_item = ccui.Layout:create()
– 设置内容大小
custom_item:setContentSize(custom_button:getContentSize())
– 设置位置
custom_button:setPosition(cc.p(custom_item:getContentSize().width / 2.0, custom_item:getContentSize().height / 2.0))
– 往布局中添加一个按钮
custom_item:addChild(custom_button)
– 往ListView中添加一个布局
worldList:addChild(custom_item)
end
– local function customButtonListener(sender, touchType)
– if sender:getTag() == 1 then
– dialog:setVisible(true)
– end
– end
for i = 1, 20 do
local custom_button = ccui.Button:create(“cocosui/button.png”, “cocosui/buttonHighlighted.png”)
custom_button:setName(“wwj”)
custom_button:setScale9Enabled(true)
custom_button:setContentSize(default_button:getContentSize())
local custom_item = ccui.Layout:create()
custom_item:setContentSize(custom_button:getContentSize())
custom_button:setPosition(cc.p(custom_item:getContentSize().width / 2.0, custom_item:getContentSize().height / 2.0) )
custom_item:addChild(custom_button)
partyList:addChild(custom_item)
end
for i = 1, 20 do
local custom_button = ccui.Button:create( “cocosui/button.png”, “cocosui/buttonHighlighted.png” )
custom_button:setName(“wwj”)
custom_button:setScale9Enabled(true)
custom_button:setContentSize( default_button:getContentSize() )
local custom_item = ccui.Layout:create()
custom_item:setContentSize( custom_button:getContentSize() )
custom_button:setPosition( cc.p( custom_item:getContentSize().width / 2.0, custom_item:getContentSize().height / 2.0 ) )
custom_item:addChild( custom_button )
chatList:addChild( custom_item )
end
for i = 1, 5 do
local custom_text = ChatScene.RichText()
local custom_item = ccui.Layout:create()
custom_item:setTouchEnabled(true)
custom_item:setContentSize( custom_text:getContentSize() )
custom_text:setPosition( cc.p( custom_item:getContentSize().width / 2.0, custom_item:getContentSize().height / 2.0) )
custom_item:addChild( custom_text )
chatList:addChild( custom_item )
– local custom_button = ccui.Button:create(“cocosui/button.png”, “cocosui/buttonHighlighted.png”)
– custom_button:setName(“wwj”)
– custom_button:setScale9Enabled(true)
– custom_button:setContentSize(default_button:getContentSize())
– local custom_item2 = ccui.Layout:create()
– custom_item2:setContentSize(custom_button:getContentSize())
– custom_button:setPosition(cc.p(custom_item2:getContentSize().width / 0.6, custom_item2:getContentSize().height / 0.6) )
– custom_item2:addChild(custom_button)
– custom_button:setTag(i)
– custom_button:addTouchEventListener(customButtonListener)
– chatList:addChild(custom_item2)
end
– 插入自定义item
local items = worldList:getItems()–返回项的集合
– 获得项的个数
local items_count = table.getn(items)
– for i = 1, math.floor( count / 4 ) do
– local custom_button = ccui.Button:create(“cocosui/button.png”, “cocosui/buttonHighlighted.png”)
– custom_button:setName(“Title Button”)–改变widget的名字,使用名字可以更轻松地识别出该widget
– custom_button:setScale9Enabled(true)-- 设置按钮使用九宫(scale9)渲染器进行渲染
– custom_button:setContentSize(default_button:getContentSize())
–
– local custom_item = ccui.Layout:create()
– custom_item:setContentSize(custom_button:getContentSize())
– custom_button:setPosition(cc.p(custom_item:getContentSize().width / 2.0, custom_item:getContentSize().height / 2.0))
– custom_item:addChild(custom_button)
– custom_item:setTag(1)
– worldList:insertCustomItem(custom_item, items_count)
– end
– 设置item data
items_count = table.getn(worldList:getItems())
for i = 1, items_count do
– 返回一个索引和参数相同的项.
local item = worldList:getItem( i - 1 )
local button = item:getChildByName(“Title Button”)
local index = worldList:getIndex(item)
button:setTitleText(array[index + 1])
end
local partyListItems_count = table.getn(partyList:getItems())
for i = 1, partyListItems_count do
local item = partyList:getItem( i - 1 )
local button = item:getChildByName(“wwj”)
local index = partyList:getIndex(item)
button:setTitleText(array1[index + 1])
end
local chatListItems_count = table.getn(chatList:getItems())
for i = 1, 20 do
local item = chatList:getItem( i - 1 )
local button = item:getChildByName( “wwj” )
local index = chatList:getIndex( item )
button:setTitleText( array2[ index + 1 ] )
end
– 移除Tag=1的子节点
– worldList:removeChildByTag(1)
– 移除项by index
– items_count = table.getn(worldList:getItems())
– worldList:removeItem(items_count - 1)
– 设置ListView对齐方式为横向居中
worldList:setGravity(ccui.ListViewGravity.centerVertical)
–set items margin
worldList:setItemsMargin(2.0)
worldList:setBounceEnabled(true)
– 设置ListView对齐方式为横向居中
partyList:setGravity(ccui.ListViewGravity.centerVertical)
–set items margin
partyList:setItemsMargin(2.0)
inputBox:addEventListener(textFieldEvent)
ChatScene.uiLayer:addChild(ChatScene.widget)
ChatScene.widget:setVisible(false)
– ChatScene.uiLayer:registerScriptHandler(onExit)
return ChatScene.uiLayer
end
local function ListViewItem()
local layout = ccui.Layout:create()
layout:setSizePercent( cc.p( 200, 200 ) )
layout:setBackGroundColorType( ccui.LayoutBackGroundColorType.solid )
layout:setBackGroundColor(cc.c3b(255,0,0))
local image = ccui.ImageView:create(“”)
layout:addChild(image)
return layout
end
local function loadListViewItemFromJson()
listview_item = ccs.GUIReader:getInstance():widgetFromJsonFile( “res/listview_item/listview_item.ExportJson” )
head_icon = listview_item:getChildByTag( 6 )
level = listview_item:getChildByTag( 7 )
name = listview_item:getChildByTag( 8 )
text = listview_item:getChildByTag( 9 )
最后
自我介绍一下,小编13年上海交大毕业,曾经在小公司待过,也去过华为、OPPO等大厂,18年进入阿里一直到现在。
深知大多数初中级Android工程师,想要提升技能,往往是自己摸索成长,自己不成体系的自学效果低效漫长且无助。
因此我收集整理了一份《2024年Android移动开发全套学习资料》,初衷也很简单,就是希望能够帮助到想自学提升又不知道该从何学起的朋友,同时减轻大家的负担。

既有适合小白学习的零基础资料,也有适合3年以上经验的小伙伴深入学习提升的进阶课程,基本涵盖了95%以上Android开发知识点!不论你是刚入门Android开发的新手,还是希望在技术上不断提升的资深开发者,这些资料都将为你打开新的学习之门
如果你觉得这些内容对你有帮助,需要这份全套学习资料的朋友可以戳我获取!!
由于文件比较大,这里只是将部分目录截图出来,每个节点里面都包含大厂面经、学习笔记、源码讲义、实战项目、讲解视频,并且会持续更新!
iLayer:registerScriptHandler(onExit)
return ChatScene.uiLayer
end
local function ListViewItem()
local layout = ccui.Layout:create()
layout:setSizePercent( cc.p( 200, 200 ) )
layout:setBackGroundColorType( ccui.LayoutBackGroundColorType.solid )
layout:setBackGroundColor(cc.c3b(255,0,0))
local image = ccui.ImageView:create(“”)
layout:addChild(image)
return layout
end
local function loadListViewItemFromJson()
listview_item = ccs.GUIReader:getInstance():widgetFromJsonFile( “res/listview_item/listview_item.ExportJson” )
head_icon = listview_item:getChildByTag( 6 )
level = listview_item:getChildByTag( 7 )
name = listview_item:getChildByTag( 8 )
text = listview_item:getChildByTag( 9 )
最后
自我介绍一下,小编13年上海交大毕业,曾经在小公司待过,也去过华为、OPPO等大厂,18年进入阿里一直到现在。
深知大多数初中级Android工程师,想要提升技能,往往是自己摸索成长,自己不成体系的自学效果低效漫长且无助。
因此我收集整理了一份《2024年Android移动开发全套学习资料》,初衷也很简单,就是希望能够帮助到想自学提升又不知道该从何学起的朋友,同时减轻大家的负担。
[外链图片转存中…(img-ymiy5yCT-1715557160317)]
[外链图片转存中…(img-MKeJTlPR-1715557160318)]
[外链图片转存中…(img-2qNWMW7o-1715557160319)]
[外链图片转存中…(img-LlHsxckO-1715557160320)]
既有适合小白学习的零基础资料,也有适合3年以上经验的小伙伴深入学习提升的进阶课程,基本涵盖了95%以上Android开发知识点!不论你是刚入门Android开发的新手,还是希望在技术上不断提升的资深开发者,这些资料都将为你打开新的学习之门
如果你觉得这些内容对你有帮助,需要这份全套学习资料的朋友可以戳我获取!!
由于文件比较大,这里只是将部分目录截图出来,每个节点里面都包含大厂面经、学习笔记、源码讲义、实战项目、讲解视频,并且会持续更新!


 6535
6535

 被折叠的 条评论
为什么被折叠?
被折叠的 条评论
为什么被折叠?
 到【灌水乐园】发言


