


收集整理了一份《2024年最新物联网嵌入式全套学习资料》,初衷也很简单,就是希望能够帮助到想自学提升的朋友。

需要这些体系化资料的朋友,可以加我V获取:vip1024c (备注嵌入式)
一个人可以走的很快,但一群人才能走的更远!不论你是正从事IT行业的老鸟或是对IT行业感兴趣的新人
都欢迎加入我们的的圈子(技术交流、学习资源、职场吐槽、大厂内推、面试辅导),让我们一起学习成长!
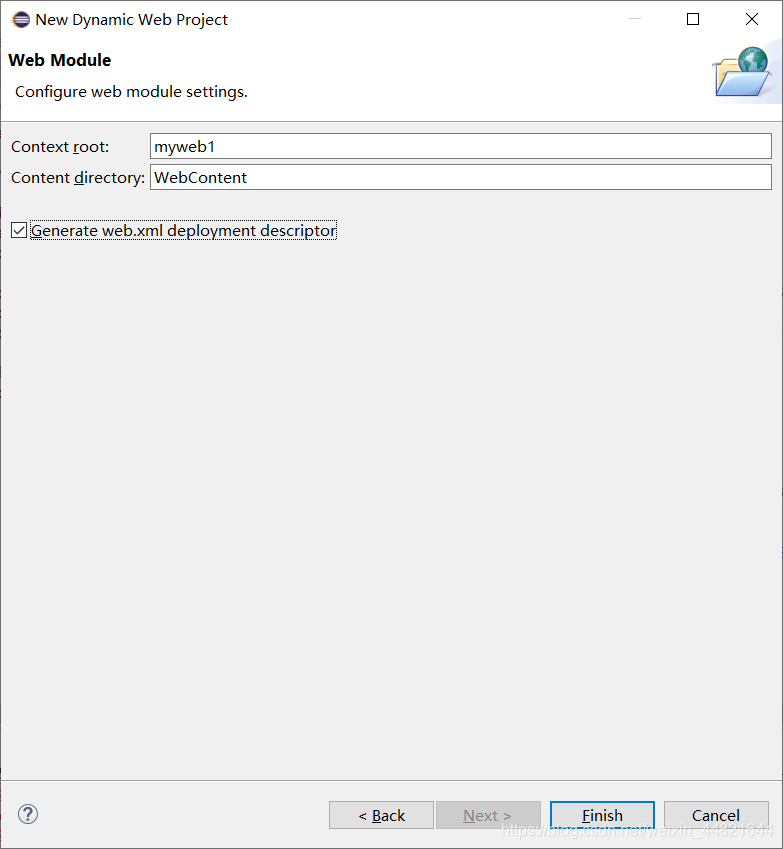
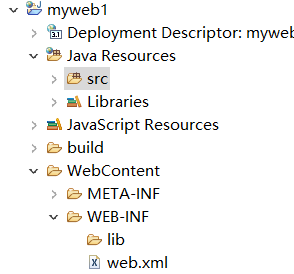
web.xml是配置web服务器的文件,java resources是放java文件的
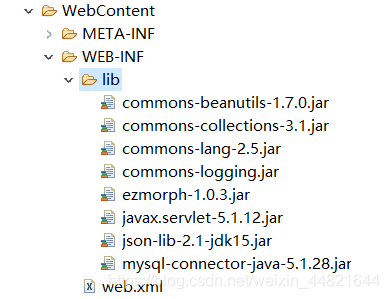
在下图lib文件夹下添加需要用到的库文件,然后把库文件真正导入项目
库文件请到项目仓库中下载:https://gitee.com/killerp/emqx-web
在webcontent/web-inf/lib
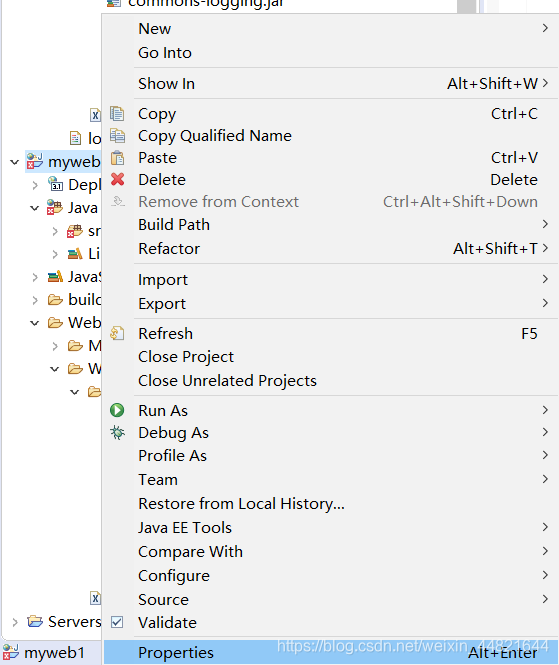
右击项目,选择properties,选择java build path ,点击add jars 找到你的项目lib里的库文件,全部添加进去,最后apply and close,导入库文件完成!

接下来编写一个Java 类,myhttpservlet,它继承自HttpServlet ,用来接收EMQX post过来的数据;
HttpServlet 是一个实现http协议的最重要的java类可以参考这篇博客 httpservlet详解
package myweb;

import java.io.BufferedReader;
import java.io.IOException;
import java.io.InputStream;
import java.io.InputStreamReader;
import java.io.PrintWriter;
import java.io.Reader;
import java.io.StringWriter;
import java.io.Writer;

import javax.servlet.ServletException;
import javax.servlet.ServletRequest;
import javax.servlet.ServletResponse;
import javax.servlet.http.HttpServlet;
import javax.servlet.http.HttpServletRequest;
import javax.servlet.http.HttpServletResponse;

import org.apache.tomcat.util.http.fileupload.IOUtils;

import com.mysql.jdbc.StringUtils;
import com.oracle.webservices.internal.api.message.ContentType;
import com.sun.xml.internal.bind.CycleRecoverable.Context;
import com.sun.xml.internal.ws.wsdl.writer.document.Service;

import net.sf.json.JSONArray;
import net.sf.json.JSONObject;

public class FirstServlet extends HttpServlet {
	//用来读取post过来的json的缓存区的数据长度
	private static final int BUFFER_SIZE = 1024 \* 8;
	//一些emqx post过来的数据
	private String app_id,device_id,remark,time,state,type;

	/\*\*
 \* 不知道是什么,反正是必须的
 \*/
	private static final long serialVersionUID = 1L;

	//用来处理get消息
	@Override
	protected void doGet(HttpServletRequest request, HttpServletResponse response) throws ServletException, IOException {
		//doPost(request,response);
		//get请求用来获取数据库的数据

	}

		//用来处理post消息
	@Override
protected void doPost(HttpServletRequest request, HttpServletResponse response) throws ServletException, IOException {
		//获取post过来的输入流
		InputStream in=request.getInputStream();
		//创建一个缓存读取器来暂时存贮输入流里的数据
		BufferedReader reader = new BufferedReader(new InputStreamReader(in));

		//body是json字符串,要解析字符串,拿到对应的值插入数据库
		//读取缓存读取器里的body数据并转为字符串格式,这里的body数据为json字符串格式
		String body = read(reader);
		//从json字符串里获取json对象
		JSONObject J=JSONObject.fromObject(body);

		//通过键值对的形式,获取json里的值并赋值给变量
			app_id= J.getString("app\_id");

			device_id=J.getString("device\_id");
			time=J.getString("mytime");
			state=J.getString("state");
			type=J.getString("device\_type");
			remark=J.getString("remark");

		//把变量的值保存到数据库
		DBUutil.update(app_id,device_id,remark,time,state,type);

}

	public static String read(Reader reader) throws IOException
    {
        StringWriter writer = new StringWriter();
        try
        {
            write(reader, writer);
            return writer.getBuffer().toString();
        }
        finally{ writer.close(); }
    }

	public static long write(Reader reader, Writer writer) throws IOException
    {
        return write(reader, writer, BUFFER_SIZE);
    }
	//把缓存器的json数据写入缓存区
	public static long write(Reader reader, Writer writer, int bufferSize) throws IOException
    {
        int read;
        long total = 0;
        char[] buf = new char[BUFFER_SIZE];
        while( ( read = reader.read(buf) ) != -1 )
        {
            writer.write(buf, 0, read);
            total += read;
        }
        return total;
    }

}
再新建一个java 类,dbutil,这个类的作用是对数据库进行操作,这里只写了对数据库进行插入数据的操作,其他操作如更新,删除,查询都可实现
package myweb;

import java.sql.DriverManager;
import java.sql.PreparedStatement;
import java.sql.ResultSet;
import java.sql.SQLException;
import java.util.ArrayList;
import java.util.Iterator;
import java.util.List;

import com.mysql.jdbc.Connection;
import com.mysql.jdbc.log.Log;

public class DBUutil {
	static List<ESP8266> ESPlist=new ArrayList<>();//����豸������
    private static ESP8266 Device=new ESP8266();//��ʼ������

	private static String driver = "com.mysql.jdbc.Driver";// MySql驱动
	private static String user = "app";// MySQL的用户名和密码
    private static String password = "123456";

  //连接数据库的方法
    private static Connection getConn(String dbName){
        Connection connection;
         connection = null;
        try{
            Class.forName(driver);//加载驱动,需要驱动才能对数据库进行操作
            String ip = "118.31.20.121";//数据库的ip地址ַ

            //连接数据库,驱动+ip地址+端口号+用户名+密码,端口号默认是3306
            connection = (Connection) DriverManager.getConnection("jdbc:mysql://" + ip + ":3306/" + dbName,
                    user, password);


        }catch (Exception e){
            e.printStackTrace();

        }
        	//返回一个connection对象
        return connection;
    }
    //这个是添加设备到数据库,不用看
    public static  void bind\_id(String app_id,String device_id){

             Connection connection=getConn("MQTTDATA");
        String sql="INSERT INTO user\_bind\_devices (app\_id,device\_id) VALUES (?,?)";
        if (connection!=null){
            try {
                PreparedStatement ps=connection.prepareStatement(sql);
                if (ps!=null){
                    ps.setString(1,app_id);
                    ps.setString(2,device_id);
                    //执行语句,注意!!!如果你的SQL 语句是诸如update,insert的更新语句,应该用statement的execute()方法
                    // select用的是statement的executeQuery()
                    ps.execute();

                    connection.close();
                    ps.close();
                }
            } catch (SQLException e) {
                e.printStackTrace();

            }
        }
    }
    //这个是把数据保存到MQTTDATA库的 current表格
    //我需要插入app\_id,device\_id。。。。。。
    public static void update(String app_id,String device_id,String remark,String time,String state,String device_type) {
    	//先跟MySQL数据库里的MQTTDATA库建立连接
    	Connection connection=getConn("MQTTDATA");
    	//定义一个语句,这个语句的功能是对current表格的app\_id,device\_id,remark,mytime,state,device\_type列分别插入我们的参数的值
    	//这里的?可以看成一个傀儡,用ps.setString()方法可以将?替换成我们的参数的值
    	String sql="INSERT INTO current (app\_id,device\_id,remark,mytime,state,device\_type) VALUES (?,?,?,?,?,?)";
    	if	(connection!=null) {
    		try {
    			//准备我们的mysql操作语句
				PreparedStatement ps=connection.prepareStatement(sql);
				//把第一个?替换成参数里的app\_id,第二个?替换成device\_id........
				if(ps!=null) {
					ps.setString(1, app_id);
					ps.setString(2, device_id);
					ps.setString(3, remark);
					ps.setString(4, time);
					ps.setString(5, state);
					ps.setString(6, device_type);
					ps.execute();
					connection.close();
					ps.close();
				}
			} catch (SQLException e) {

				// TODO Auto-generated catch block
				e.printStackTrace();
			}
    	}
    }

}
前面说了web.xml是web服务器的配置文件,这里我们需要在web.xml里对myhttpservlet进行配置
在web.xml添加内容如下: (这里需要注意一下,app,名称可以随便取,主要是为了程序员方便查找。)
< servlet-class >myweb.myhttpservlet</ servlet-class > 前面是你的项目名称 .后面是我们刚刚写的myhttpservlet类。
< servlet-mapping >是把名称为app的httpservlet类映射到url的一个路径,/first的意思就是当你在浏览器输入:
http://你的web服务器ip地址:端口号/first 就会执行myhttpservlet类里的内容。
<?xml version="1.0" encoding="UTF-8"?>
<web-app xmlns:xsi="http://www.w3.org/2001/XMLSchema-instance" xmlns="http://xmlns.jcp.org/xml/ns/javaee" xsi:schemaLocation="http://xmlns.jcp.org/xml/ns/javaee http://xmlns.jcp.org/xml/ns/javaee/web-app\_3\_1.xsd" id="WebApp\_ID" version="3.1">
<display-name>myweb1</display-name>
<welcome-file-list>
<welcome-file>index.html</welcome-file>
<welcome-file>index.htm</welcome-file>
<welcome-file>index.jsp</welcome-file>
<welcome-file>default.html</welcome-file>
<welcome-file>default.htm</welcome-file>
<welcome-file>default.jsp</welcome-file>
</welcome-file-list>
<servlet>
<servlet-name>app</servlet-name>
<servlet-class>myweb.myhttpservlet</servlet-class>
</servlet>
<servlet-mapping>
<servlet-name>app</servlet-name>
<url-pattern>/first</url-pattern>
**收集整理了一份《2024年最新物联网嵌入式全套学习资料》,初衷也很简单,就是希望能够帮助到想自学提升的朋友。**


**[如果你需要这些资料,可以戳这里获取](https://bbs.csdn.net/topics/618679757)**
**需要这些体系化资料的朋友,可以加我V获取:vip1024c (备注嵌入式)**
**一个人可以走的很快,但一群人才能走的更远!不论你是正从事IT行业的老鸟或是对IT行业感兴趣的新人**
**都欢迎加入我们的的圈子(技术交流、学习资源、职场吐槽、大厂内推、面试辅导),让我们一起学习成长!**
很简单,就是希望能够帮助到想自学提升的朋友。**
[外链图片转存中...(img-SyPrthcF-1715869959983)]
[外链图片转存中...(img-Mird51PH-1715869959984)]
**[如果你需要这些资料,可以戳这里获取](https://bbs.csdn.net/topics/618679757)**
**需要这些体系化资料的朋友,可以加我V获取:vip1024c (备注嵌入式)**
**一个人可以走的很快,但一群人才能走的更远!不论你是正从事IT行业的老鸟或是对IT行业感兴趣的新人**
**都欢迎加入我们的的圈子(技术交流、学习资源、职场吐槽、大厂内推、面试辅导),让我们一起学习成长!**


 3734
3734


 被折叠的 条评论
为什么被折叠?
被折叠的 条评论
为什么被折叠?
 到【灌水乐园】发言


