


// 生产环境
// @Profile(“pro”)
@Bean(“proDataSource”)
public DataSource dataSourcePro() throws PropertyVetoException {
ComboPooledDataSource dataSource = new ComboPooledDataSource();
dataSource.setUser(“root”);
dataSource.setPassword(“806188”);
dataSource.setJdbcUrl(“jdbc:mysql://localhost:3306/vhr”);
dataSource.setDriverClass(“com.mysql.cj.jdbc.Driver”);
return dataSource;
}
}
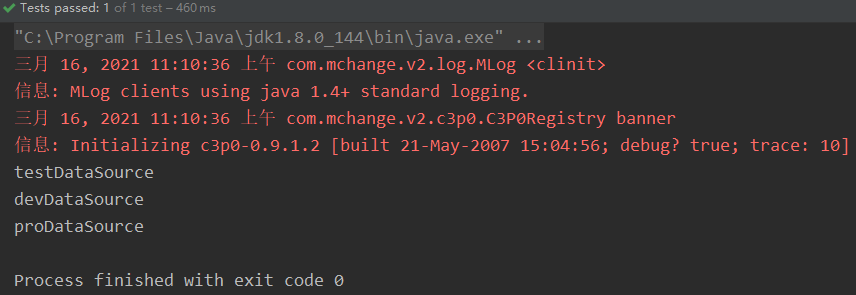
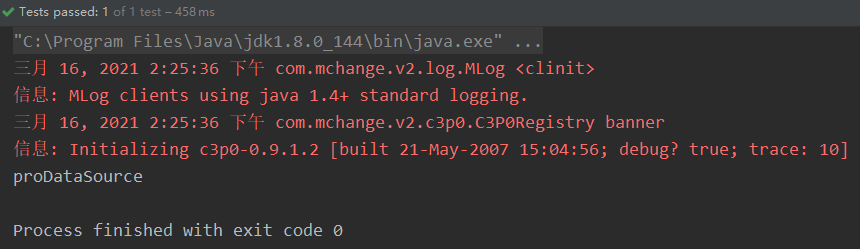
可以看到,在配置类中,有不同的数据源配置,分别是测试环境、开发环境、生产环境,我们可以通过@Profile注解来指定注入哪种环境,当不指定则任何环境都能注册这个组件,也就是上面代码,运行测试类,输出结果如下,三个数据源组价都进行了注入:
将数据源使用@Profile注解进行标识,也就是将上面代码三个@Profile注解打开,此时因为没有激活注册环境,所以这个三个数据源都不能被注入。下面来进行激活。
【2】激活注册环境
-
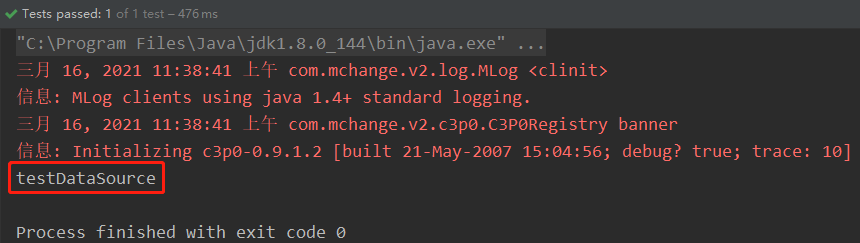
default默认环境:
@Profile("default") -
使用命令行动态参数:
-Dspring.profiles.active=dev -
使用代码手动激活指定环境:要使用无参构造方法
-
配置在配置类上:只有在指定环境的时候,整个配置类的所有配置才能生效
- default默认环境,使用
@Profile("default"),标识默认当前环境
// 测试环境
@Profile(“default”)
// @Profile(“test”)
@Bean(“testDataSource”)
public DataSource dataSourceTest() throws PropertyVetoException {
ComboPooledDataSource dataSource = new ComboPooledDataSource();
dataSource.setUser(“root”);
dataSource.setPassword(“806188”);
dataSource.setJdbcUrl(“jdbc:mysql://localhost:3306/vhr”);
dataSource.setDriverClass(“com.mysql.cj.jdbc.Driver”);
return dataSource;
}
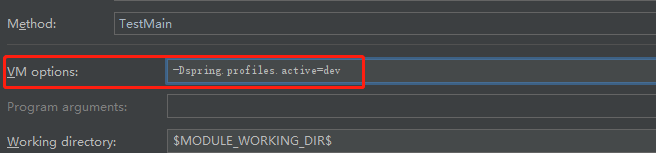
- 使用命令行动态参数,编辑运行配置的VM options,参数为:
-Dspring.profiles.active=dev,通过该配置来标注是何种环境
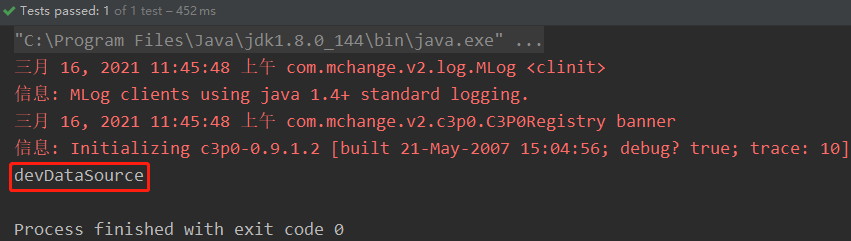
运行启动类,可以看到devDataSource被注入:
- 使用代码手动激活指定环境,使用这种方法不能让有参构造器代码执行,因为执行有参构造器加载配置类的时候,执行refresh()方法容器就启动刷新了,就将配置写死了,所以这里要用无参构造器,手动激活指定环境。修改启动类:
@Test
public void TestMain() {
// 创建IOC容器
// AnnotationConfigApplicationContext applicationContext = new AnnotationConfigApplicationContext(AppConfig.class);
AnnotationConfigApplicationContext applicationContext = new AnnotationConfigApplicationContext();
// 设置需要激活的环境
applicationContext.getEnvironment().setActiveProfiles(“pro”);
// 注册主配置类
applicationContext.register(AppConfig.class);
// 启动刷新容器
applicationContext.refresh();
String[] namesForType = applicationContext.getBeanNamesForType(DataSource.class);
for (String string : namesForType) {
System.out.println(string);
}
}
修改后,手动设置需要激活的环境,运行启动类,输出结果如下:
- 在配置类上加@Profile注解,则只有在指定环境的时候,整个配置类的所有配置才能生效,如下:
@Profile(“test”)
@Configuration
public class AppConfig {…}
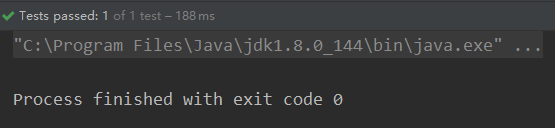
运行启动类,此时启动类是手动代码配置了pro环境,因为配置类上是@Profile("test"),只有在test环境下该配置类才会生效,所以没有输出:
三、源码追踪
查看@Profile注解源码,我们可以看到,@Profile实际上是一个@Conditional注解:
@Target({ElementType.TYPE, ElementType.METHOD})
@Retention(RetentionPolicy.RUNTIME)
@Documented
@Conditional({ProfileCondition.class})
public @interface Profile {
String[] value();
}
@Conditional注解在前面的文章讲解过,可以进行参考:@Conditional注解 -【Spring底层原理】,这里简单分析一下
@Conditinal是一个条件注解,参数是一个class,这个class都要实现Condition接口,重写matches()方法。例如,上面示例代码中的ProfileCondition.class
class ProfileCondition implements Condition {
ProfileCondition() {
}
// Spring从ConditionContext中拿到激活的Profile和注解上的字符串进行比对,以决定是否实例化这个bean
public boolean matches(ConditionContext context, AnnotatedTypeMetadata metadata) {
MultiValueMap<String, Object> attrs = metadata.getAllAnnotationAttributes(Profile.class.getName());
if (attrs != null) {
Iterator var4 = ((List)attrs.get(“value”)).iterator();
Object value;
do {
if (!var4.hasNext()) {
return false;
}
value = var4.next();
} while(!context.getEnvironment().acceptsProfiles(Profiles.of((String[])((String[])value))));
《MySql面试专题》


《MySql性能优化的21个最佳实践》


《MySQL高级知识笔记》


文中展示的资料包括:**《MySql思维导图》《MySql核心笔记》《MySql调优笔记》《MySql面试专题》《MySql性能优化的21个最佳实践》《MySq高级知识笔记》**如下图

关注我,点赞本文给更多有需要的人
9248652826)]
[外链图片转存中…(img-uBmAnTKy-1719248652827)]
[外链图片转存中…(img-y0UyWxf0-1719248652827)]
[外链图片转存中…(img-fZtHfzJF-1719248652827)]
文中展示的资料包括:**《MySql思维导图》《MySql核心笔记》《MySql调优笔记》《MySql面试专题》《MySql性能优化的21个最佳实践》《MySq高级知识笔记》**如下图
[外链图片转存中…(img-Ilo7IauA-1719248652828)]
关注我,点赞本文给更多有需要的人


 198
198

 被折叠的 条评论
为什么被折叠?
被折叠的 条评论
为什么被折叠?
 到【灌水乐园】发言


