


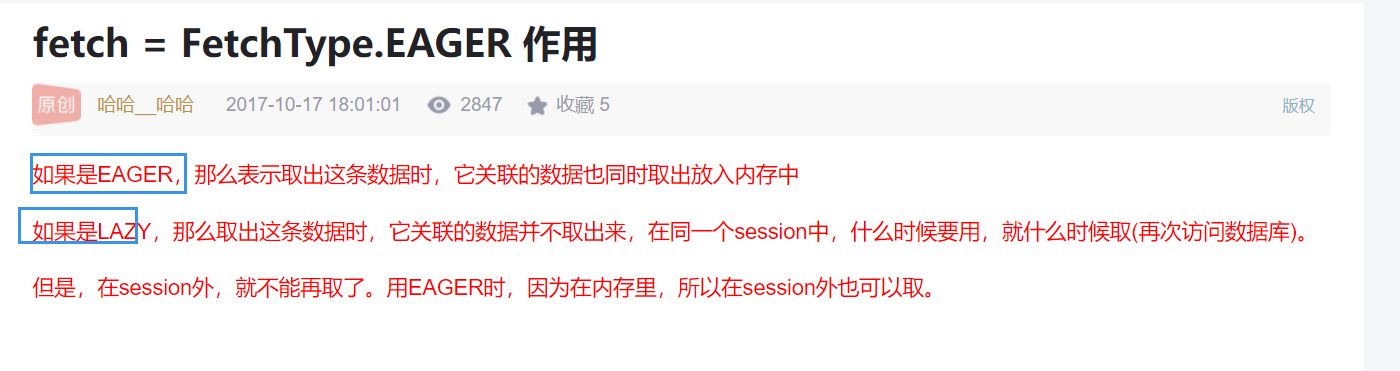
5.fetchType:指定关联时是否启用延迟加载。有2个属性值:lazy(懒加载)、eager,具体解释如下图:
因为这里是一对一:所以使用association元素就可以了。可以这样理解:
查询出business表后,将business中order的id赋值给下面字段为column的。最后通过下面的select语句映射的sql语句查出对应的order(当然现实生活中一般都是一对多,或多对多)
select* from business
where id=#{id}
有2种方式:(推荐使用嵌套结果查询)
1.通过嵌套查询(简单来说,就是将前一个表的查询出来的外键传递给另外一个语句,最后返回查询结果)
2.另外一种是嵌套结果查询
具体如下:
1.嵌套查询
比如1个user有多个order
查询步骤:
查询该对应user(把business当左user就好了)的记录,然后将该user的id赋值给下面的column。然后select关联的sql再从order表中查询出所有user_id=user.id的订单,最后返回数据。注意:接收order表数据的属性是哟个List集合(因为可能有多条数据)
2.嵌套结果查询
注意点:collection中的字段名不能和resultMap中的一样,不然下面查询的结果会出错。
select b.*,o.id as order_id,o.number,o.username as order_username,o.order_name
from business b,order o
where o.user_id=b.id
and b.id=#{id}
思想:将多对多的两个表的主键都放到一个中间表中。当要进行多对多查询时,将会利用中间表寻找到对应的id,然后再寻找出另外一个表的id,就可以查出数据了。直接举个例子吧:
现在有3个表:order(订单)、order_user(中间表)、user(表)。我现在需要查询出user表中id=1的用户的订单有多少。
解决方案:
直接上sql语句
select
from order,order_user,user
where
user.id=#{id} 先获取要查询的id值 这里#不是注释!!
order_user.user_id=user.id #查询中间表中user_id等于user.id的有哪些数据,这时就可以得到order表的id值了
order.id=order_user.order_id #查询出order表中id等于oder_user中order_id的数据就可以查询关联的所有数据了
可参照如下代码:
注意点:collection中的字段名不能和resultMap中的一样,不然下面查询的结果会出错。
select b.* ,o.id as order_id,o.number,o.username oder_username,o.order_name
from order o,business b,t_order_business t
where b.id=#{id}
and t.business_id=b.id
and o.id=t.order_id
!!! 推荐MapperScanerConfigurer整合方式
需要相关的几个包:
…(还有其他的一些包)
org.mybatis
mybatis-spring
2.0.3
org.mybatis
mybatis
3.5.6
spring整合mybatis (标注为sm)与原生的mybatis(m)区别主要在于:
1.sm是以bean的方式来进行整合的(将mybatis的全局配置文件放入其中,总而言之:就是整个都加载到bean这个配置文件中)。而m主要是通过全局配置文件来进行加载的。
2.元素的m需要自己配置数据操作对象SqlSession,而sm相对来说简化了这一步操作。(通过bean,向接口的实现类注入SqlSessionFactory,从而得到SqlSession,进而操作数据库)
spring整合mybatis的几种方式
下面来具体说一下这几种整合的方式
1.传统Dao方式整合
注意点:
1.接口的方法名需要和mapper文件中对于sql语句的id一样。
2.mapper中的namespace空间的值必须为接口的全路径。
3.需要接口和实现类(通过将SqlSession对象注入到接口的实现类中从而获取操作对象)
<?xml version="1.0" encoding="UTF-8"?><beans xmlns=“http://www.springframework.org/schema/beans”
xmlns:xsi=“http://www.w3.org/2001/XMLSchema-instance”
xmlns:context=“http://www.springframework.org/schema/context”
xmlns:aop=“http://www.springframework.org/schema/aop”
xmlns:tx=“http://www.springframework.org/schema/tx”
xsi:schemaLocation="http://www.springframework.org/schema/beans
http://www.springframework.org/schema/beans/spring-beans-4.3.xsd
http://www.springframework.org/schema/context
http://www.springframework.org/schema/context/spring-context.xsd
http://www.springframework.org/schema/aop
http://www.springframework.org/schema/aop/spring-aop.xsd
http://www.springframework.org/schema/tx
http://www.springframework.org/schema/tx/spring-tx.xsd">
读取外在的数据库连接属性
<context:property-placeholder location=“classpath:db.properties” />
读取外在的数据库连接属性
<tx:annotation-driven transaction-manager=“transactionManager”/>
2.Mapper接口整合
----Mapper接口整合 又分为MapperFactoryBean的整合和MapperScanerConfigurer的整合
其中MapperScanerConfigurer的整合更加简单。MapperFactoryBean的整合对于严格性比较高(容易出错)
MapperFactoryBean的整合
好处:
1.不需要执行执行文件(mapper)中的id。
2.不需要实现类。只要有个接口就可以了。
3.会自动生成mapper接口的实现类的代理对象,从而简化开发。
需要遵循的规范:
1.mapper接口的名称必须和mapper.xml文件的名称一样。(主要这点容易出错)
2.mapper.xml中的namespace必须与mapper接口中的类路径相同。
3.mapper接口中方法名和mapper.xml中定义的每个执行语句的id相同。
4.mapper.xml中输入参数类型要和输出参数类型要和接口的一样。
<?xml version="1.0" encoding="UTF-8"?><beans xmlns=“http://www.springframework.org/schema/beans”
xmlns:xsi=“http://www.w3.org/2001/XMLSchema-instance”
xmlns:context=“http://www.springframework.org/schema/context”
xmlns:aop=“http://www.springframework.org/schema/aop”
xmlns:tx=“http://www.springframework.org/schema/tx”
xsi:schemaLocation="http://www.springframework.org/schema/beans
http://www.springframework.org/schema/beans/spring-beans-4.3.xsd
http://www.springframework.org/schema/context
http://www.springframework.org/schema/context/spring-context.xsd
http://www.springframework.org/schema/aop
http://www.springframework.org/schema/aop/spring-aop.xsd
http://www.springframework.org/schema/tx
http://www.springframework.org/schema/tx/spring-tx.xsd">
<context:property-placeholder location=“classpath:db.properties” />
<tx:annotation-driven transaction-manager=“transactionManager”/>
MapperScanerConfigurer整合(首选,简单易用)
好处:
1.只需要接口,不需要实现类。
2.bean配置文件通过包扫描自动扫描接口
3.不需要再bean配置文件中配置对应接口,只需要通过扫描对于包。就可以自动配置所有接口。简化开发
基本上spring与mybatis整合都需要满足以下者三点
只要满足以下3点就可以了(相对于MapperFactoryBean)
1.mapper.xml中的namespace必须与mapper接口中的类路径相同。
2.mapper接口中方法名和mapper.xml中定义的每个执行语句的id相同。
3.mapper.xml中输入参数类型要和输出参数类型要和接口的一样。
<?xml version="1.0" encoding="UTF-8"?><beans xmlns=“http://www.springframework.org/schema/beans”
xmlns:xsi=“http://www.w3.org/2001/XMLSchema-instance”
xmlns:context=“http://www.springframework.org/schema/context”
xmlns:aop=“http://www.springframework.org/schema/aop”
xmlns:tx=“http://www.springframework.org/schema/tx”
xsi:schemaLocation="http://www.springframework.org/schema/beans
http://www.springframework.org/schema/beans/spring-beans-4.3.xsd
http://www.springframework.org/schema/context
http://www.springframework.org/schema/context/spring-context.xsd
http://www.springframework.org/schema/aop
http://www.springframework.org/schema/aop/spring-aop.xsd
http://www.springframework.org/schema/tx
http://www.springframework.org/schema/tx/spring-tx.xsd">
<context:property-placeholder location=“classpath:db.properties” />
Spring全套教学资料
Spring是Java程序员的《葵花宝典》,其中提供的各种大招,能简化我们的开发,大大提升开发效率!目前99%的公司使用了Spring,大家可以去各大招聘网站看一下,Spring算是必备技能,所以一定要掌握。
目录:


部分内容:


Spring源码
- 第一部分 Spring 概述
- 第二部分 核心思想
- 第三部分 手写实现 IoC 和 AOP(自定义Spring框架)
- 第四部分 Spring IOC 高级应用
基础特性
高级特性 - 第五部分 Spring IOC源码深度剖析
设计优雅
设计模式
注意:原则、方法和技巧 - 第六部分 Spring AOP 应用
声明事务控制 - 第七部分 Spring AOP源码深度剖析
必要的笔记、必要的图、通俗易懂的语言化解知识难点


脚手框架:SpringBoot技术
它的目标是简化Spring应用和服务的创建、开发与部署,简化了配置文件,使用嵌入式web服务器,含有诸多开箱即用的微服务功能,可以和spring cloud联合部署。
Spring Boot的核心思想是约定大于配置,应用只需要很少的配置即可,简化了应用开发模式。
- SpringBoot入门
- 配置文件
- 日志
- Web开发
- Docker
- SpringBoot与数据访问
- 启动配置原理
- 自定义starter


微服务架构:Spring Cloud Alibaba
同 Spring Cloud 一样,Spring Cloud Alibaba 也是一套微服务解决方案,包含开发分布式应用微服务的必需组件,方便开发者通过 Spring Cloud 编程模型轻松使用这些组件来开发分布式应用服务。
- 微服务架构介绍
- Spring Cloud Alibaba介绍
- 微服务环境搭建
- 服务治理
- 服务容错
- 服务网关
- 链路追踪
- ZipKin集成及数据持久化
- 消息驱动
- 短信服务
- Nacos Confifig—服务配置
- Seata—分布式事务
- Dubbo—rpc通信


Spring MVC
目录:


部分内容:


日志
- Web开发
- Docker
- SpringBoot与数据访问
- 启动配置原理
- 自定义starter
[外链图片转存中…(img-zOfTy0TW-1719201801662)]
[外链图片转存中…(img-GEpo8yj3-1719201801662)]
微服务架构:Spring Cloud Alibaba
同 Spring Cloud 一样,Spring Cloud Alibaba 也是一套微服务解决方案,包含开发分布式应用微服务的必需组件,方便开发者通过 Spring Cloud 编程模型轻松使用这些组件来开发分布式应用服务。
- 微服务架构介绍
- Spring Cloud Alibaba介绍
- 微服务环境搭建
- 服务治理
- 服务容错
- 服务网关
- 链路追踪
- ZipKin集成及数据持久化
- 消息驱动
- 短信服务
- Nacos Confifig—服务配置
- Seata—分布式事务
- Dubbo—rpc通信
[外链图片转存中…(img-dr1yUS5W-1719201801662)]
[外链图片转存中…(img-rhpRMcsc-1719201801663)]
Spring MVC
目录:
[外链图片转存中…(img-QPFX5LNN-1719201801663)]
[外链图片转存中…(img-ZYaLNorO-1719201801663)]
[外链图片转存中…(img-1NlZobKg-1719201801664)]
部分内容:
[外链图片转存中…(img-XGPn2QQ5-1719201801664)]
[外链图片转存中…(img-SFLulzdx-1719201801664)]


 1821
1821

 被折叠的 条评论
为什么被折叠?
被折叠的 条评论
为什么被折叠?
 到【灌水乐园】发言


