


【一线大厂Java面试题解析+后端开发学习笔记+最新架构讲解视频+实战项目源码讲义】
**开源地址:https://docs.qq.com/doc/DSmxTbFJ1cmN1R2dB **
}
throw new MybatisPlusException(“请输入正确的” + tip + “!”);
}
public static void main(String[] args) {
// 代码生成器
AutoGenerator mpg = new AutoGenerator();
// 全局配置
GlobalConfig gc = new GlobalConfig();
String projectPath = System.getProperty(“user.dir”);
gc.setOutputDir(projectPath + “/src/main/java”);
gc.setAuthor(“程序员柳大侠”);
gc.setBaseResultMap(true);
gc.setBaseColumnList(true);
// gc.setSwagger2(true); //true 开启 swagger2 模式
gc.setOpen(false);
gc.setIdType(IdType.NONE);
mpg.setGlobalConfig(gc);
// 数据源配置
DataSourceConfig dsc = new DataSourceConfig();
dsc.setDbType(DbType.MYSQL);
dsc.setUrl(“jdbc:mysql://192.168.67.129:3306/mybatis_plus?useUnicode=true&characterEncoding=UTF-8&zeroDateTimeBehavior=convertToNull&serverTimezone=UTC”);
// dsc.setSchemaName(“public”);
dsc.setDriverName(“com.mysql.cj.jdbc.Driver”);
dsc.setUsername(“root”);
dsc.setPassword(“root”);
mpg.setDataSource(dsc);
// 包配置
PackageConfig pc = new PackageConfig();
pc.setModuleName(“user”);
pc.setParent(“com.huangtl”);
mpg.setPackageInfo(pc);
// 自定义配置
InjectionConfig cfg = new InjectionConfig() {
@Override
public void initMap() {
// to do nothing
}
};
List focList = new ArrayList<>();
focList.add(new FileOutConfig(“/templates/mapper.xml.ftl”) {
@Override
public String outputFile(TableInfo tableInfo) {
// 自定义输入文件名称
return projectPath + “/src/main/resources/mapper/” + tableInfo.getEntityName() + “Mapper” + StringPool.DOT_XML;
}
});
cfg.setFileOutConfigList(focList);
mpg.setCfg(cfg);
mpg.setTemplate(new TemplateConfig().setXml(null));
// 策略配置
StrategyConfig strategy = new StrategyConfig();
strategy.setNaming(NamingStrategy.underline_to_camel);
strategy.setColumnNaming(NamingStrategy.underline_to_camel);
// strategy.setEntityLombokModel(true); //是否为lombok模型
strategy.setRestControllerStyle(true);
strategy.setInclude(scanner(“表名”));
strategy.setControllerMappingHyphenStyle(true);
strategy.setTablePrefix(pc.getModuleName() + “_”);
strategy.setEntityTableFieldAnnotationEnable(true);
mpg.setStrategy(strategy);
mpg.setTemplateEngine(new FreemarkerTemplateEngine());
mpg.execute();
}
}
你可以修改这里的配置,比如类名规则(下划线转驼峰)、id生成策略(自增、UUID等)、生成swagger注释、使用Lombok注释等。
2.数据库建表
我这里建个user表用于后面的示例,总共三个字段:id、nick_name、age

3.运行生成器代码
控制台提示输入表名时输入表名回车即可生成

生成完整目录如下:

在使用Mybatis-Plus之前我们还需要进行一些配置,包括springboot启动类、数据库连接和Mybatis-Plus的配置。
1.springboot启动类:
@SpringBootApplication
public class UserServiceApp {
public static void main(String[] args) {
SpringApplication.run(UserServiceApp.class, args);
}
}
2.application.yml文件:
server:
port: 8092
spring:
datasource:
driver-class-name: com.mysql.cj.jdbc.Driver
url: jdbc:mysql://192.168.67.129:3306/mybatis_plus?useUnicode=true&serverTimezone=Asia/Shanghai&characterEncoding=UTF-8&nullCatalogMeansCurrent=true
username: root
password: root
mybatis-plus:
mapper-locations: classpath*:mapper/**/*.xml
#实体扫描,多个package用逗号或者分号分隔
type-aliases-package: com.huangtl.user.entity
configuration:
log-impl: org.apache.ibatis.logging.stdout.StdOutImpl
主要配置了数据库连接和mybatis-plus的扫描,dao层的Mapper扫描还需要一个配置类。
3.MybatisPlusConfig类:
package com.huangtl.user.config;
import org.mybatis.spring.annotation.MapperScan;
import org.springframework.context.annotation.Configuration;
@Configuration
@MapperScan({“com.huangtl.user.mapper*”})
public class MybatisPlusConfig {
}
@Configuration说明是springboot的配置类。
@MapperScan指定扫描指定位置的Mapper接口。
好了,这样你就可以使用顺利使用Mybatis-Plus的代码操作数据库了,接下去看下Mybatis-Plus的使用示例。
生成的代码结构上面已经解释了,我们这里主要看下service层的类,这里包含了几乎所有的新增改查方法。
先看下service实现类。

这里主要是继承了Mybatis-Plus的一个service实现类,通过泛型的方式将Dao层Mapper类和实体类引入。增删改查方法都在该类。我们可以直接调用该父类方法操作数据库,比如根据id获取一个用户信息方法:
User byId = this.getById(1);
后面的的例子中都在UserServiceImpl中,所以都使用this关键字调用,如果需要其他类调用只需要注入该类即可。
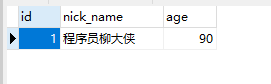
1.新增
public void testInsert(){
User user = new User();
user.setNickName(“程序员柳大侠”);
user.setAge(90);
this.save(user);
}
效果:
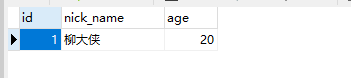
2.修改
public User testUpdate(int id){
User user = new User();
user.setId(id);
user.setNickName(“柳大侠”);
user.setAge(20);
this.updateById(user);
return user;
}
效果:
其他修改方式:
//1.新增或修改
this.saveOrUpdate(user);
//2.lambda表达式修改
this.update(Wrappers.lambdaUpdate(User.class).set(User::getNickName,“柳大侠”).eq(User::getId,id));
//3.数据库原字段修改
this.update(new UpdateWrapper().set(“nick_name”,“柳大侠”).eq(“id”,id));
//4.批量修改
List list = new ArrayList<>();
list.add(user);
this.updateBatchById(list);
3.删除
- 物理删除
默认都是物理删除,会删除数据库中的该条记录。
public void remove(int id){
this.removeById(id);
}
其他方式:
//lambda表达式方式
this.remove(Wrappers.lambdaQuery(User.class).eq(User::getId,id));
//数据库原字段方式
this.remove(new QueryWrapper().eq(“id”,id));
//批量删除
this.removeByIds(ids);
- 逻辑删除
逻辑删除不会删除数据库中的记录,只会修改删除标志字段。
使用方式,在字段上加上@TableLogic注解。
@TableLogic
private Integer deleted;
默认1为已删除,0为未删除。
当你调用删除方法比如removeById时不会删除记录,只会把deleted字段改为1;
你也可以配置已删除/未删除的标志值。
mybatis-plus:
global-config:
db-config:
logic-delete-field: flag # 全局逻辑删除的实体字段名(since 3.3.0,配置后可以忽略不配置注解@TableLogic)
logic-delete-value: 1 # 逻辑已删除值(默认为 1)
logic-not-delete-value: 0 # 逻辑未删除值(默认为 0)
4.查询
查询方式可以查询单条记录信息和多条信息,示例如下:
//单个查询
User user = this.getById(id);
//lambda表达式
User user = this.getOne(Wrappers.lambdaQuery(User.class)
.eq(User::getId,id));
//数据库原字段
User user = this.getOne(new QueryWrapper()
.eq(“id”,id));
//查询多条记录
List ids = new ArrayList();
ids.add(1);
ids.add(2);
List users = this.listByIds(ids);
//查询20岁到30岁之间的用户
List users = this.list(Wrappers.lambdaQuery(User.class)
.ge(User::getAge,20)
.le(User::getAge,30));
//查询20岁或者30岁之间的用户
List users = this.list(Wrappers.lambdaQuery(User.class)
.eq(User::getAge,20)
.or().eq(User::getAge,30));
//查询年龄最小的10条记录
List users = this.list(Wrappers.lambdaQuery(User.class)
.orderByAsc(User::getAge)
.last(“limit 10”));
可以使用func方法根据参数指定对应的sql语句:
String orderColumn = “age”;
List users = this.list(Wrappers.lambdaQuery(User.class)
.func(w->{
//如果排序列是年龄则根据年龄排序
if(“age”.equals(orderColumn)){
w.orderByAsc(User::getAge);
}else if(“nickName”.equals(orderColumn)){
//如果排序列是昵称则根据昵称排序
w.orderByAsc(User::getNickName);
}
}));
在3.4.0版本以前使用的是PaginationInterceptor,只需要在配置类中定义:
@Bean
public PaginationInterceptor paginationInterceptor() {
PaginationInterceptor paginationInterceptor = new PaginationInterceptor();
return paginationInterceptor;
}
3.4.0以后使用的是MybatisPlusInterceptor:
@Bean
public MybatisPlusInterceptor mybatisPlusInterceptor() {
MybatisPlusInterceptor interceptor = new MybatisPlusInterceptor();
interceptor.addInnerInterceptor(new PaginationInnerInterceptor(DbType.MYSQL));
return interceptor;
}
接口写法:
@GetMapping()
public Page queryPage(@RequestBody Page page){
page = userService.page(page, Wrappers.lambdaQuery(User.class).orderByAsc(User::getAge));
return page;
}
这里主要使用到了userService的page方法,也是Mybatis-Plus提供的,返回的也是一个Page对象。
Page类对应的是
com.baomidou.mybatisplus.extension.plugins.pagination.Page;
主要属性如下:
**records:返回记录
total:总页数
size:每页显示条数
current:当前页
pages:总页数**
前端请求体如下:
{
“size”:10,
“current”:1
}
一般前端只需要传size和current即可。
返回内容体如下:
{
“records”: [
{
“id”: 2,
“nickName”: “程序员柳大侠”,
“age”: 90
}
],
“total”: 1,
“size”: 10,
“current”: 1,
“orders”: [],
“optimizeCountSql”: true,
“hitCount”: false,
“countId”: null,
“maxLimit”: null,
“searchCount”: true,
“pages”: 1
}
扩展分页参数
一般来讲我们需要前端传一些自定义参数,而不仅是page中的参数,那么可以这样子写。
比如我们需要多传一个maxAge最大年龄查询参数。
定义一个请求参数体继承Page类。
public class pageDto extends Page {
private int maxAge;
public int getMaxAge() {
return maxAge;
}
public void setMaxAge(int maxAge) {
this.maxAge = maxAge;
}
}
定义接口使用自定义的请求体
@GetMapping(“/page”)
public Page queryPage(@RequestBody pageDto page){
page = userService.page(page, Wrappers.lambdaQuery(User.class)
.le(User::getAge,page.getMaxAge())
.orderByAsc(User::getAge));
return page;
}
前端请求参数
{
“size”:10,
“current”:1,
“maxAge”:100
}
如果不想使用上面的写法,Page也提供了许多构造函数,当前页和显示条数你可以自己定义参数,然后通过Page的构造函数new Page(…)出来,最后再调用userService.page(E page, Wrapper queryWrapper)即可。
new Page(long current, long size);
new Page(long current, long size, long total);
newPage(long current, long size, boolean isSearchCount);
…
这里讲两个常用的扩展功能,分别是自动填充属性和枚举属性。
1.自动填充属性
有时候我们需要在新增或更新数据库时自动给一些字段赋值,比如新增时自动赋值创建时间,更新时自动赋值更新时间。
先写各配置类。
package com.huangtl.user.config;
import com.baomidou.mybatisplus.core.handlers.MetaObjectHandler;
import org.apache.ibatis.reflection.MetaObject;
import org.springframework.context.annotation.Configuration;
import org.springframework.stereotype.Component;
import java.time.LocalDateTime;
/**
-
@Description 参数填充
-
@Author 程序员柳大侠
**/
@Configuration
@Component
public class MybatisMetaObjectHandler implements MetaObjectHandler {
@Override
public void insertFill(MetaObject metaObject) {
this.strictInsertFill(metaObject, “createTime”, LocalDateTime.class, LocalDateTime.now()); // 起始版本 3.3.0(推荐使用)
this.strictUpdateFill(metaObject, “updateTime”, LocalDateTime.class, LocalDateTime.now()); // 起始版本 3.3.0(推荐使用)
}


 1392
1392

 被折叠的 条评论
为什么被折叠?
被折叠的 条评论
为什么被折叠?
 到【灌水乐园】发言


