


【一线大厂Java面试题解析+后端开发学习笔记+最新架构讲解视频+实战项目源码讲义】
**开源地址:https://docs.qq.com/doc/DSmxTbFJ1cmN1R2dB **
2. 疑问
- hashmap_中有个_entrySet,翻遍了源码也只看到了声明了这个属性,没有任何赋值操作 ?
// HashMap的entrySet()方法返回一个特殊的Set,这个Set使用EntryIterator遍历,而这个Iterator则直接操作
// 于HashMap的内部存储结构table上。通过这种方式实现了“视图”的功能。整个过程不需要任何辅助存储空间。
public Set<Map.Entry<K,V>> entrySet() {
Set<Map.Entry<K,V>> es;
return (es = entrySet) == null ? (entrySet = new EntrySet()) : es;
}
final Node<K,V> nextNode() {
Node<K,V>[] t;
Node<K,V> e = next;
if (modCount != expectedModCount)
throw new ConcurrentModificationException();
if (e == null)
throw new NoSuchElementException();
if ((next = (current = e).next) == null && (t = table) != null) {
do {} while (index < t.length && (next = t[index++]) == null);
}
return e;
}
- 为啥size为2的次幂?
3. 面试题
《源码角度一探究竟。源码采用JDK1.7》
Hashmap可以说是Java面试必问的,一般的面试题会问:
- Hashmap有哪些特性?
-
Hashmap底层实现原理(get\put\resize)
-
Hashmap怎么解决hash冲突?
-
Hashmap是线程安全的吗?
=>构造方法 :
首先看构造方法的源码
/**
- The default initial capacity - MUST be a power of two.
*/
static final int DEFAULT_INITIAL_CAPACITY = 16;
/**
- The load factor used when none specified in constructor.
*/
static final float DEFAULT_LOAD_FACTOR = 0.75f;
/**
- The table, resized as necessary. Length MUST Always be a power of two.
*/
transient Entry<K,V>[] table;
/**
-
Constructs an empty HashMap with the default initial capacity
-
(16) and the default load factor (0.75).
*/
public HashMap() {
this(DEFAULT_INITIAL_CAPACITY, DEFAULT_LOAD_FACTOR);
}
由以上源码可知,Hashmap的初始容量默认是16, 底层存储结构是数组(到这里只能看出是数组, 其实还有链表,
下边看源码解释)。基本存储单元是Entry,那Entry是什么呢?我们接着看Entry相关源码
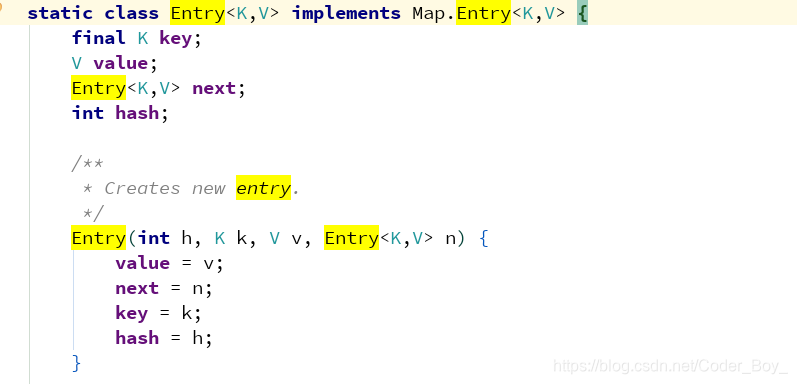
由Entry源码可知,Entry是链表结构。综上所述,可以得出:Hashmap底层是基于数组和链表实现的
=>Hashmap中put()过程
我已经将put过程绘制了流程图帮助大家理解
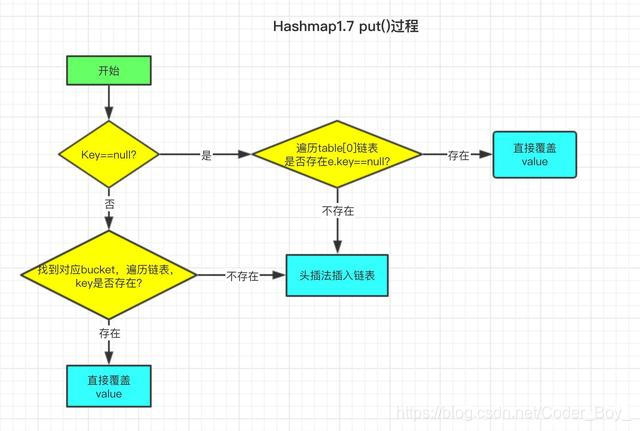
先上put源码
public V put(K key, V value) {
if (key == null)
return putForNullKey(value);
// 根据key计算hash值
int hash = hash(key);
// 计算元素在数组中的位置
int i = indexFor(hash, table.length);
// 遍历链表, 如果相同则覆盖原来value值
for (Entry<K,V> e = table[i]; e != null; e = e.next) {
Object k;
if (e.hash == hash && ((k = e.key) == key || key.equals(k))) {
V oldValue = e.value;
e.value = value;
e.recordAccess(this);
return oldValue;
}
}
// 修改次数加 1
modCount++;
// 采用头插法插入元素
addEntry(hash, key, value, i);
return null;
}
上图中多次提到头插法,啥是 头插法 呢?接下来看 addEntry 方法
void addEntry(int hash, K key, V value, int bucketIndex) {
// 判断是否需要扩容
if ((size >= threshold) && (null != table[bucketIndex])) {
// 扩容后容量为原来的2倍
resize(2 * table.length);
hash = (null != key) ? hash(key) : 0;
// 计算插入元素在扩容后数组中的位置
bucketIndex = indexFor(hash, table.length);
}
// 头插法插入元素的操作
createEntry(hash, key, value, bucketIndex);
}
void createEntry(int hash, K key, V value, int bucketIndex) {
// 取出原来bucket链表
Entry<K,V> e = table[bucketIndex];
// 头插法 (将添加元素放于原来bucket链表之头部)
table[bucketIndex] = new Entry<>(hash, key, value, e);
// 数组大小加 1
size++;
}
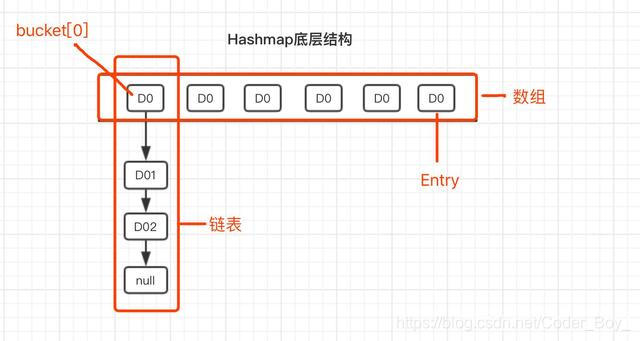
结合Entry类的构造方法,每次插入新元素的时候,将bucket原链表取出,新元素的next指向原链表,这就是 头插法 。为了更加清晰的表示Hashmap存储结构,再绘制一张存储结构图。
==>Hashmap中get()过程
get()逻辑相对比较简单,如图所示
我们来对应下get()源码
public V get(Object key) {
// 获取key为null时的值
if (key == null)
return getForNullKey();
// 不为null时的操作
Entry<K,V> entry = getEntry(key);
return null == entry ? null : entry.getValue();
}
final Entry<K,V> getEntry(Object key) {
// 根据key获取hash值
int hash = (key == null) ? 0 : hash(key);
// 遍历链表,直到找到对应元素
for (Entry<K,V> e = table[indexFor(hash, table.length)];
e != null;
e = e.next) {
Object k;
// 更hash值与key的equals比较,都一致则相同
if (e.hash == hash &&
((k = e.key) == key || (key != null && key.equals(k))))
return e;
}
return null;
}
==> Hashmap中resize()过程
只要是新插入元素,即执行addEntry()方法,在插入完成后,都会判断是否需要扩容。从addEntry()方法可知,扩容后的容量为原来的2倍。
void addEntry(int hash, K key, V value, int bucketIndex) {
if ((size >= threshold) && (null != table[bucketIndex])) {
resize(2 * table.length);
hash = (null != key) ? hash(key) : 0;
bucketIndex = indexFor(hash, table.length);
}
createEntry(hash, key, value, bucketIndex);
}
void resize(int newCapacity) {
Entry[] oldTable = table;
int oldCapacity = oldTable.length;
if (oldCapacity == MAXIMUM_CAPACITY) {
threshold = Integer.MAX_VALUE;
return;
}
// 新建数组
Entry[] newTable = new Entry[newCapacity];
boolean oldAltHashing = useAltHashing;
useAltHashing |= sun.misc.VM.isBooted() &&
(newCapacity >= Holder.ALTERNATIVE_HASHING_THRESHOLD);
// 检查是否hash冲突
boolean rehash = oldAltHashing ^ useAltHashing;
// 原有数组中数组 迁移到 新数组中
transfer(newTable, rehash);
// table引用指向新数组
table = newTable;
// 重新计算扩容阈值-[取当前容量*加载因子之乘积和 MAXIMUM_CAPACITY+1 之中最大值]
threshold = (int)Math.min(newCapacity * loadFactor, MAXIMUM_CAPACITY + 1);
}
这里有个transfer()方法没讲,别着急,扩容时线程安全的问题出现在这个方法中,接下来讲解数组复制过程。
==> Hashmap扩容安全问题
大家都知道结果: 多线程扩容有可能会形成环形链表,这里用图给大家模拟下扩容过程。


 2182
2182


 被折叠的 条评论
为什么被折叠?
被折叠的 条评论
为什么被折叠?
 到【灌水乐园】发言


