


[root@localhost home]# qemu-system-x86\_64 -nodefaults -display none -monitor stdio geheim.qcow2
qemu-system-x86_64: -monitor stdio: Use of AES-CBC encrypted qcow2 images is no longer supported in system emulators
剩下的分析可以查看附录[2],当前QEMU版本推荐的硬盘加密方式是LUKS(Linux Unified Key Setup)。
3. LUKS(Linux Unified Key Setup)加密简介
#用vmware添加一块新磁盘,/dev/sdc,然后进行加密
[root@localhost ~]# cryptsetup -v -y -c aes-cbc-plain luksFormat /dev/sdc

WARNING!
========
This will overwrite data on /dev/sdc irrevocably.

Are you sure? (Type uppercase yes): YES
Enter passphrase:
Verify passphrase:
Command successful.
#映射分区,需要输入密码,之后就不用了
[root@localhost ~]# cryptsetup luksOpen /dev/sdc test\_disk //把sdb1映射为test\_disk
Enter passphrase for /dev/sdc:
[root@localhost ~]# ll -d /dev/mapper/test\_disk
lrwxrwxrwx. 1 root root 7 Oct 19 02:02 /dev/mapper/test_disk -> ../dm-2
#查看映射分区状态
[root@localhost ~]# cryptsetup status /dev/mapper/
cl-root    cl-swap    control    test_disk
[root@localhost ~]# cryptsetup status /dev/mapper/cl-root
[root@localhost ~]# cryptsetup status /dev/mapper/cl-swap
[root@localhost ~]# cryptsetup status /dev/mapper/control
/dev/mapper/control is inactive.
[root@localhost ~]# cryptsetup status /dev/mapper/test\_disk
/dev/mapper/test_disk is active.
  type:    LUKS1
  cipher:  aes-cbc-plain
  keysize: 256 bits
  device:  /dev/sdc
  offset:  4096 sectors
  size:    10481664 sectors
  mode:    read/write
可以看到,未加密的映射分区是没有加密信息的,其中有个/dev/mapper/control不知道是做什么的,以后再研究。可以看到/dev/mapper/test_disk分区的加密信息,使用的aes-cbc-plain加密算法,用qemu-img命令生成的加密镜像,从qemu报错可以看出,现在的qemu版本不支持这种aes-cbc算法,目前无法确定用LUKS生成的加密镜像如果用这种算法,qemu会不会报错,猜测是会报错的,后面再进行验证。
#挂载分区
[root@localhost home]# mkfs.xfs /dev/mapper/test\_disk
meta-data=/dev/mapper/test_disk  isize=512    agcount=4, agsize=327552 blks
         =                       sectsz=512   attr=2, projid32bit=1
         =                       crc=1        finobt=0, sparse=0
data     =                       bsize=4096   blocks=1310208, imaxpct=25
         =                       sunit=0      swidth=0 blks
naming   =version 2              bsize=4096   ascii-ci=0 ftype=1
log      =internal log           bsize=4096   blocks=2560, version=2
         =                       sectsz=512   sunit=0 blks, lazy-count=1
realtime =none                   extsz=4096   blocks=0, rtextents=0
[root@localhost home]# mount /dev/sdc /home/crypto\_test/
mount: unknown filesystem type 'crypto\_LUKS'  //不能直接挂载,要挂载在映射设备上
[root@localhost home]# mount /dev/mapper/test\_disk /home/crypto\_test/
[root@localhost home]# df -h
Filesystem             Size  Used Avail Use% Mounted on
/dev/mapper/test_disk  5.0G   33M  5.0G   1% /home/crypto_test
挂载成功。
#关闭映射,先卸载后关闭
[root@localhost home]# umount /home/crypto\_test/
[root@localhost home]# cryptsetup status /dev/mapper/test\_disk
/dev/mapper/test_disk is active.
  type:    LUKS1
  cipher:  aes-cbc-plain
  keysize: 256 bits
  device:  /dev/sdc
  offset:  4096 sectors
  size:    10481664 sectors
  mode:    read/write
[root@localhost home]# cryptsetup luksClose test\_disk
[root@localhost home]# cryptsetup status /dev/mapper/test\_disk
/dev/mapper/test_disk is inactive.
4.Libvirt对镜像进行LUKS加密
4.1.需要的文件
参考第1节,步骤和需要的文件几乎完全一样,只是加密方式不同。本节只标出不同的地方,其他步骤参考第1节5。
需要的文件为:demo-disk.xml demo-pool.xml demo-secret.xml
#demo-secret.xml
<secret ephemeral='no' private='yes'>
  <uuid>0a81f5b2-8403-7b23-c8d6-21ccc2f80d6f</uuid>
  <usage type='volume'>
    <volume>/home/crypto-test/twofish.luks</volume>
  </usage>
</secret>

#demo-pool.xml
<pool type='dir'>
  <name>test-pool</name>
  <source>
  </source>
  <target>
    <path>/home/crypto-test</path>
  </target>
</pool>

#demo-disk.xml
<volume>
  <name>twofish.luks</name>
  <capacity>3111111111</capacity>
  <target>
    <format type='raw'/>
    <encryption format='luks'>
      <secret type='passphrase' uuid='0a81f5b2-8403-7b23-c8d6-21ccc2f80d6f'/>
      <cipher name='twofish' size='256' mode='cbc' hash='sha256'/>
      <ivgen name='plain64' hash='sha256'/>
    </encryption>
  </target>
</volume>
差异在于
<format type='raw'/>和<encryption format='luks'>
4.2.步骤
#查看镜像文件格式
[root@localhost crypto-test]# file twofish.luks
twofish.luks: LUKS encrypted file, ver 1 [twofish, cbc-plain64:sha256, sha256] UUID: c46eef30-b6c2-473a-959d-84d941b0d893
#虚拟机disk配置
<disk type='file' device='disk'>
      <driver name='qemu' type='raw'/>
      <source file='/home/crypto-test/twofish.luks'/>
      <backingStore/>
      <target dev='hda' bus='ide'/>
      <encryption format='luks'>
        <secret type='passphrase' uuid='0a81f5b2-8403-7b23-c8d6-21ccc2f80d6f'/>
      </encryption>
      <alias name='ide0-0-0'/>
      <address type='drive' controller='0' bus='0' target='0' unit='0'/>
</disk>
<disk type='file' device='cdrom'>
      <driver name='qemu' type='raw'/>
      <source file='/home/ubuntu-14.04.1-server-amd64-20170531.iso'/>
      <backingStore/>
      <target dev='hdc' bus='ide'/>
      <readonly/>
      <alias name='ide0-1-0'/>
      <address type='drive' controller='0' bus='1' target='0' unit='0'/>
</disk>
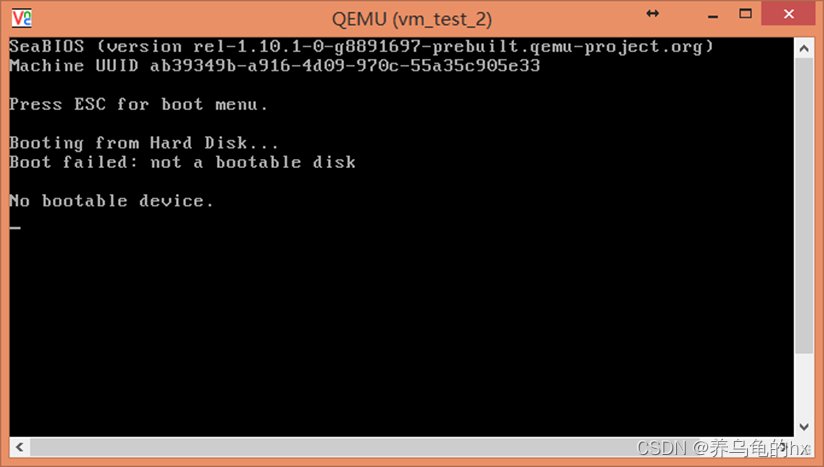
在使用加密镜像的时候,由于实验中建立的是一个空镜像,里面没有操作系统,因此要带上一个cdrom,系统安装好之后,测试把<encryption format='luks'>删除,会找不到硬盘,加密生效。
故意将passphrase的最后一个字母从f改成e,再启动虚拟机
<encryption format='luks'>
        <secret type='passphrase' uuid='0a81f5b2-8403-7b23-c8d6-21ccc2f80d6e'/>
</encryption>
[root@localhost home]# virsh start vm\_test\_2
error: Failed to start domain vm_test_2
error: Secret not found: no secret with matching uuid '0a81f5b2-8403-7b23-c8d6-21ccc2f80d6e'
4.3.结论
使用了LUKS之后,libvirt配置的passphrase不再用来当作生成加密密钥,仅仅用来解锁加密密钥,并且可以随时更改[3]。并且在demo-disk.xml的encryption标签里面,还可以配置成其他的选项来选择加密算法和密钥生成方式。


 1012
1012

 被折叠的 条评论
为什么被折叠?
被折叠的 条评论
为什么被折叠?
 到【灌水乐园】发言


