


-
二、通知监听服务
-
三、打开通知服务监听
-
四、页面显示消息类型
-
五、页面显示消息内容、时间
-
六、源码
===============================================================
今天是七夕,深圳又在下雨,庆幸的是单身狗不用出门,苦涩。NotificationListenerService 通知监听服务,就是监听手机上的广播通知,这个在纯App开发中用的比较少,但是在智能穿戴领域用的很多,比如我有一个智能手表,然后有一个配套的App应用,有时候在上班路上,手机放在口袋里,要接受到手机上的通知消息,例如QQ、微信、来电、短信等。智能手表上显示有新消息,如果手表上有屏幕的话,还能显示消息的内容。这就很Nice了不是吗?
先看看效果图:
===============================================================
下面进入正式的使用,我先说一下使用的思路,NotificationListenerService 是一个服务,服务更多的是在后台运行,其次由于这个需要进行通知监听,会涉及到一个动态权限请求。第三就是手机上是否安装了微信、QQ等应用。
新建项目NotifyListenerDemo。

主要是项目依赖库的添加,打开工程的build.gradle的repositories{}闭包下添加依赖库:
maven {url “https://jitpack.io”}
然后在app模块的build.gradle中添加依赖:
//简单工具类库
implementation ‘com.github.lilongweidev:EasyLibrary:1.0.4’
然后Sync,同步项目添加依赖库。
创建一个服务,然后将服务注册在AndroidManifest.xml中。创建一个NotifyService类,里面的代码如下:
public class NotifyService extends NotificationListenerService {
public static final String TAG = “NotifyService”;
public static final String QQ = “com.tencent.mobileqq”;//qq信息
public static final String WX = “com.tencent.mm”;//微信信息
public static final String MMS = “com.android.mms”;//短信
public static final String HONOR_MMS= “com.hihonor.mms”;//荣耀短信
public static final String MESSAGES = “com.google.android.apps.messaging”;//信息
public static final String IN_CALL = “com.android.incallui”;//来电 -
/**
-
发布通知
-
@param sbn 状态栏通知
*/
@Override
public void onNotificationPosted(StatusBarNotification sbn) {
switch (sbn.getPackageName()){
case MESSAGES:
case MMS:
case HONOR_MMS:
Log.d(TAG,“收到短信”);
break;
case QQ:
Log.d(TAG,“收到QQ消息”);
break;
case WX:
Log.d(TAG,“收到微信消息”);
break;
case IN_CALL:
Log.d(TAG,“收到来电”);
break;
default:break;
}
}
/**
-
通知已删除
-
@param sbn 状态栏通知
*/
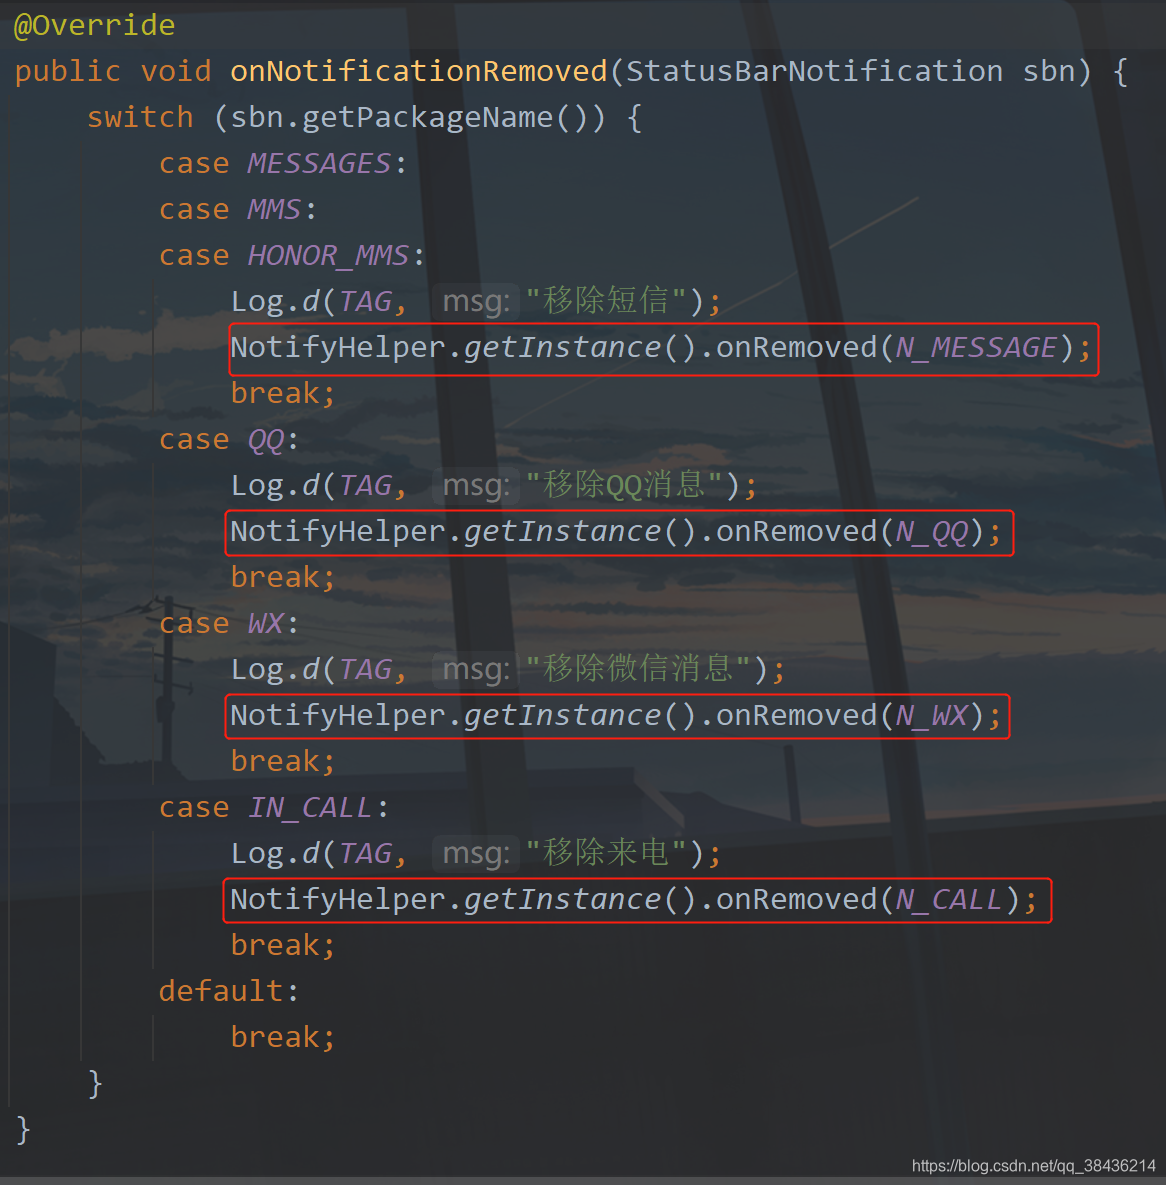
@Override
public void onNotificationRemoved(StatusBarNotification sbn) {
switch (sbn.getPackageName()){
case MESSAGES:
case MMS:
case HONOR_MMS:
Log.d(TAG,“移除短信”);
break;
case QQ:
Log.d(TAG,“移除QQ消息”);
break;
case WX:
Log.d(TAG,“移除微信消息”);
break;
case IN_CALL:
Log.d(TAG,“移除来电”);
break;
default:break;
}
}
/**
- 监听断开
*/
@Override
public void onListenerDisconnected() {
if (Build.VERSION.SDK_INT >= Build.VERSION_CODES.N) {
// 通知侦听器断开连接 - 请求重新绑定
requestRebind(new ComponentName(this, NotificationListenerService.class));
}
}
}
这个类继承了NotificationListenerService,里面里面几个方法,都已经注释过了,这里设置通知栏上应用的包名,由于国产厂商对于Android做了定制化,因此各个厂商的系统App软件的包名就不会是一致的,例如我用的是荣耀,那么我监听到的通知短信是com.hihonor.mms,来电是com.android.incallui。这个地方需要开发者自行去适配。不过QQ和微信这种App的包名是固定的,可以放心使用。
下面将这个服务注册在AndroidManifest.xml中。
<service
android:name=“.NotifyService”
android:enabled=“true”
android:label=“测试通知服务”
android:permission=“android.permission.BIND_NOTIFICATION_LISTENER_SERVICE”>
服务配置完成了,下面进行具体的打开服务操作。
使用这个通知服务其实就是打开一个手机上应用的开关,效果上和打开蓝牙差不多,下面先写一个方法检查当前应用是否开启这个服务。方法代码如下:
/**
-
是否启用通知监听服务
-
@return
*/
public boolean isNLServiceEnabled() {
Set packageNames = NotificationManagerCompat.getEnabledListenerPackages(this);
if (packageNames.contains(getPackageName())) {
return true;
}
return false;
}
这里还对应一个方法就是设置服务是否运行,如下:
/**
-
切换通知监听器服务
-
@param enable
*/
public void toggleNotificationListenerService() {
PackageManager pm = getPackageManager();
pm.setComponentEnabledSetting(new ComponentName(getApplicationContext(), NotifyService.class),
PackageManager.COMPONENT_ENABLED_STATE_DISABLED, PackageManager.DONT_KILL_APP);
pm.setComponentEnabledSetting(new ComponentName(getApplicationContext(), NotifyService.class),
PackageManager.COMPONENT_ENABLED_STATE_ENABLED, PackageManager.DONT_KILL_APP);
}
现在方法有了需要一个地方去触发,通过按钮来进行,在activity_main.xml添加一个按钮。
<?xml version="1.0" encoding="utf-8"?><androidx.constraintlayout.widget.ConstraintLayout xmlns:android=“http://schemas.android.com/apk/res/android”
xmlns:app=“http://schemas.android.com/apk/res-auto”
xmlns:tools=“http://schemas.android.com/tools”
android:layout_width=“match_parent”
android:layout_height=“match_parent”
tools:context=“.MainActivity”>
<TextView
android:id=“@+id/textView”
android:layout_width=“wrap_content”
android:layout_height=“wrap_content”
android:text=“Hello World!”
app:layout_constraintBottom_toBottomOf=“parent”
app:layout_constraintLeft_toLeftOf=“parent”
app:layout_constraintRight_toRightOf=“parent”
app:layout_constraintTop_toTopOf=“parent” />
<Button
android:layout_width=“wrap_content”
android:layout_height=“wrap_content”
android:text=“请求权限”
android:onClick=“requestPermission”
app:layout_constraintBottom_toBottomOf=“parent”
app:layout_constraintEnd_toEndOf=“parent”
app:layout_constraintStart_toStartOf=“parent”
app:layout_constraintTop_toBottomOf=“@+id/textView” />
</androidx.constraintlayout.widget.ConstraintLayout>
在MainActivity中添加一个方法:
private static final int REQUEST_CODE = 9527;
/**
-
请求权限
-
@param view
*/
public void requestPermission(View view) {
if (!isNLServiceEnabled()) {
startActivityForResult(new Intent(“android.settings.ACTION_NOTIFICATION_LISTENER_SETTINGS”), REQUEST_CODE);
} else {
showMsg(“通知服务已开启”);
toggleNotificationListenerService(true);
}
}
这个还有一个showMsg方法:
private void showMsg(String msg) {
Toast.makeText(this, msg, Toast.LENGTH_SHORT).show();
}
然后是页面返回:
@Override
protected void onActivityResult(int requestCode, int resultCode, Intent data) {
super.onActivityResult(requestCode, resultCode, data);
if (requestCode == REQUEST_CODE) {
if (isNLServiceEnabled()) {
showMsg(“通知服务已开启”);
toggleNotificationListenerService(true);
} else {
showMsg(“通知服务未开启”);
toggleNotificationListenerService(false);
}
}
}
下面就可以先运行一下:
现在就可以测试数据,这里建议你找一个朋友给你发消息,保持电脑上没有登录微信和QQ,然后手机上的微信和QQ保持后台运行就可以了,下面让你的朋友给你发QQ消息、微信消息。
这是我这里测试的数据,控制打印出来:

QQ、微信、短信、来电都监听到了。
现在只是在NotifyService中可以打印出来,那么Activity并不知道,但是实际的UI操作又是在Activity里面,因此需要将消息传递到Activity,这种方式很多,我这里使用接口回调的方式来进行。下面新建一个接口,代码如下:
public interface NotifyListener {
/**
-
接收到通知栏消息
-
@param type
*/
void onReceiveMessage(int type);
/**
-
移除掉通知栏消息
-
@param type
*/
void onRemovedMessage(int type);
}
然后再写一个NotifyHelper帮助类,用于实现接口的回调处理。
public class NotifyHelper {
private static NotifyHelper instance;
public static final int N_MESSAGE = 0;
public static final int N_CALL = 1;
public static final int N_QQ = 2;
public static final int N_WX = 3;
private NotifyListener notifyListener;
public static NotifyHelper getInstance() {
if (instance == null) {
instance = new NotifyHelper();
}
return instance;
}
/**
-
收到消息
-
@param type 消息类型
*/
public void onReceive(int type) {
if (notifyListener != null) {
notifyListener.onReceiveMessage(type);
}
}
/**
-
移除消息
-
@param type 消息类型
*/
public void onRemoved(int type) {
if (notifyListener != null)
{
notifyListener.onRemovedMessage(type);
}
}
/**
-
设置回调方法
-
@param notifyListener 通知监听
*/
public void setNotifyListener(NotifyListener notifyListener) {
this.notifyListener = notifyListener;
}
}
最后收到服务中收到通知进行调用。

移除通知进行调用
最后只要在MainActivity中实现接口。
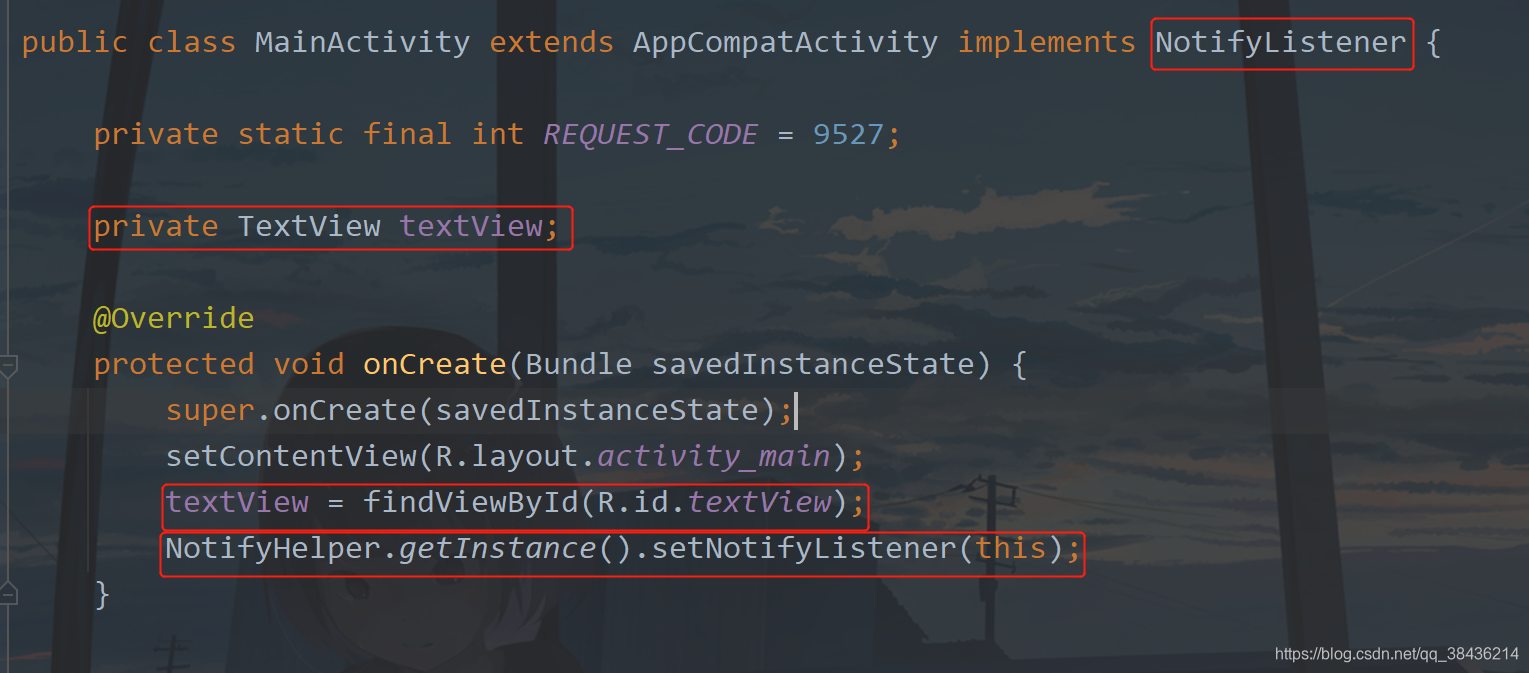
这里实现接口,然后将收到的结果显示在TextView上,实现接口中的两个回调方法。
/**
-
收到通知
-
@param type 通知类型
*/
@Override
public void onReceiveMessage(int type) {
switch (type) {
case N_MESSAGE:
textView.setText(“收到短信消息”);
break;
case N_CALL:
textView.setText(“收到来电消息”);
break;
case N_WX:
textView.setText(“收到微信消息”);
break;
case N_QQ:
textView.setText(“收到QQ消息”);
break;
default:
break;
}
}
/**
-
移除通知
-
@param type 通知类型
*/
@Override
public void onRemovedMessage(int type) {
switch (type) {
case N_MESSAGE:
textView.setText(“移除短信消息”);
break;
case N_CALL:
textView.setText(“移除来电消息”);
break;
case N_WX:
textView.setText(“移除微信消息”);
break;
case N_QQ:
textView.setText(“移除QQ消息”);
break;
default:
break;
}
}
下面再运行一下:
最后
小编这些年深知大多数初中级Android工程师,想要提升自己,往往是自己摸索成长,自己不成体系的自学效果低效漫长且无助。
因此我收集整理了一份《2024年Android移动开发全套学习资料》,初衷也很简单,就是希望能够帮助到想自学提升又不知道该从何学起的朋友。
由于文件比较多,这里只是将部分目录截图出来,全套包含大厂面经、学习笔记、源码讲义、实战项目、大纲路线、电子书籍、讲解视频,并且后续会持续更新
一个人可以走的很快,但一群人才能走的更远!不论你是正从事IT行业的老鸟或是对IT行业感兴趣的新人
都欢迎加入我们的的圈子(技术交流、学习资源、职场吐槽、大厂内推、面试辅导),让我们一起学习成长!
如果你需要这些资料, ⬅ 专栏获取
ype) {
switch (type) {
case N_MESSAGE:
textView.setText(“移除短信消息”);
break;
case N_CALL:
textView.setText(“移除来电消息”);
break;
case N_WX:
textView.setText(“移除微信消息”);
break;
case N_QQ:
textView.setText(“移除QQ消息”);
break;
default:
break;
}
}
下面再运行一下:
最后
小编这些年深知大多数初中级Android工程师,想要提升自己,往往是自己摸索成长,自己不成体系的自学效果低效漫长且无助。
因此我收集整理了一份《2024年Android移动开发全套学习资料》,初衷也很简单,就是希望能够帮助到想自学提升又不知道该从何学起的朋友。
[外链图片转存中…(img-205pQN7C-1719170288617)]
[外链图片转存中…(img-SxNkvwqm-1719170288618)]
[外链图片转存中…(img-UQmjU6W7-1719170288619)]
[外链图片转存中…(img-FetY2l04-1719170288619)]
由于文件比较多,这里只是将部分目录截图出来,全套包含大厂面经、学习笔记、源码讲义、实战项目、大纲路线、电子书籍、讲解视频,并且后续会持续更新
一个人可以走的很快,但一群人才能走的更远!不论你是正从事IT行业的老鸟或是对IT行业感兴趣的新人
都欢迎加入我们的的圈子(技术交流、学习资源、职场吐槽、大厂内推、面试辅导),让我们一起学习成长!
如果你需要这些资料, ⬅ 专栏获取


 1816
1816

 被折叠的 条评论
为什么被折叠?
被折叠的 条评论
为什么被折叠?
 到【灌水乐园】发言


